标注数据扩充
·
使用labelImg标注目标检测数据。由于标注数据工作非常枯燥,标得自己头晕眼花。想了个办法扩充自己的标注数据集。
使用labelImg标注后得到的数据是这样:
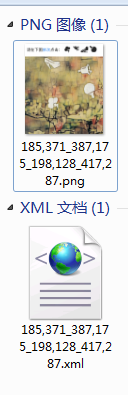
使用代码对图片进行翻转,旋转180度,旋转180度再翻转。同时对xml中的坐标进行运算,得到图片变换后的目标区域。
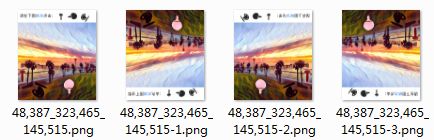
如此,标注1张图可得4张训练数据。代码如下:
import os
import xml.etree.ElementTree as ET
class ManufacturingData():
    '''
    制造数据,对打好标签的数据进行翻转,旋转180,旋转180再翻转
    '''
    def __init__(self):
        '''

        '''
        self.path=''
        self.save_path=''
    def manufacturing(self):
        '''
        :return:
        '''
        imagelist=os.listdir(self.path)
        print(imagelist)
        for s in imagelist:
            if ".xml" in s:
                continue
            else:
                self.newXML(s,0)
                self.newXML(s, 1)
                self.newXML(s, 2)

    def rotate(self,name,model):
        '''
        :param img:
        :return:
        '''
        image=cv2.imread(os.path.join(self.path,name+".png"))
        #
        if model==0:
            image2 = cv2.flip(image, model)
            cv2.imwrite(os.path.join(self.save_path,name + "-1.png"),image2)
        elif model==1:
            image3 = cv2.flip(image, 1)
            cv2.imwrite(os.path.join(self.save_path,name + "-2.png"),image3)
        elif model==2:
            image0 = cv2.flip(image, -1)
            cv2.imwrite(os.path.join(self.save_path, name + "-3.png"), image0)

    def newXML(self,name,model):
        name=name.replace(".png","")
        tree = ET.parse(os.path.join(self.path,name + ".xml"))
        root=tree.getroot()
        objects = root.findall('object')
        size=root.find('size')
        w=int(size.find('width').text)
        h=int(size.find('height').text)
        # print(w,h)
        for obj in objects:
            bbox = obj.find('bndbox')
            x1,y1,x2,y2=int(bbox.find('xmin').text),int(bbox.find('ymin').text),int(bbox.find('xmax').text),int(bbox.find('ymax').text)
            # print(y1,y2)
            if model==0:
                new_y1=h-y2
                new_y2=h-y1
                bbox.find('ymin').text = str(new_y1)
                bbox.find('ymax').text = str(new_y2)
            elif model==1:
                new_x1=w-x2
                new_x2=w-x1
                bbox.find('xmin').text = str(new_x1)
                bbox.find('xmax').text = str(new_x2)
            elif model==2:
                new_y1=h-y2
                new_y2=h-y1
                new_x1 = w - x2
                new_x2 = w - x1
                bbox.find('ymin').text = str(new_y1)
                bbox.find('ymax').text = str(new_y2)
                bbox.find('xmin').text = str(new_x1)
                bbox.find('xmax').text = str(new_x2)

        if model==0:
            tree.write(os.path.join(self.save_path,name + "-1.xml"))
        elif model==1:
            tree.write(os.path.join(self.save_path,name + "-2.xml"))
        elif model==2:
            tree.write(os.path.join(self.save_path,name + "-3.xml"))
        self.rotate(name,model)


if __name__=="__main__":
    # 旋转图片 得到更多数据
    obj=ManufacturingData()
    obj.path=r'' #图片及xml路径
    obj.save_path=r'' #数据扩充后的保存路径
    obj.manufacturing()
labelImg生成的xml和图片放到同一路径下。这里吐槽一下labelImg这个工具,用着用着就只能框正方形,不知道怎么调回去,需要重启工具才能解决。如有大佬知道原因求指点。

有“AI”的1024 = 2048,欢迎大家加入2048 AI社区
更多推荐
 4
4 0
0- 0


 已为社区贡献1条内容

所有评论(0)