「码动四季·开源同行」HarmonyOS应用开发:常见组件2

一、显示类组件
1、Clock时钟组件
组件说明:
是Text的子类,所以可以使用Text的一些属性。
常用属性:
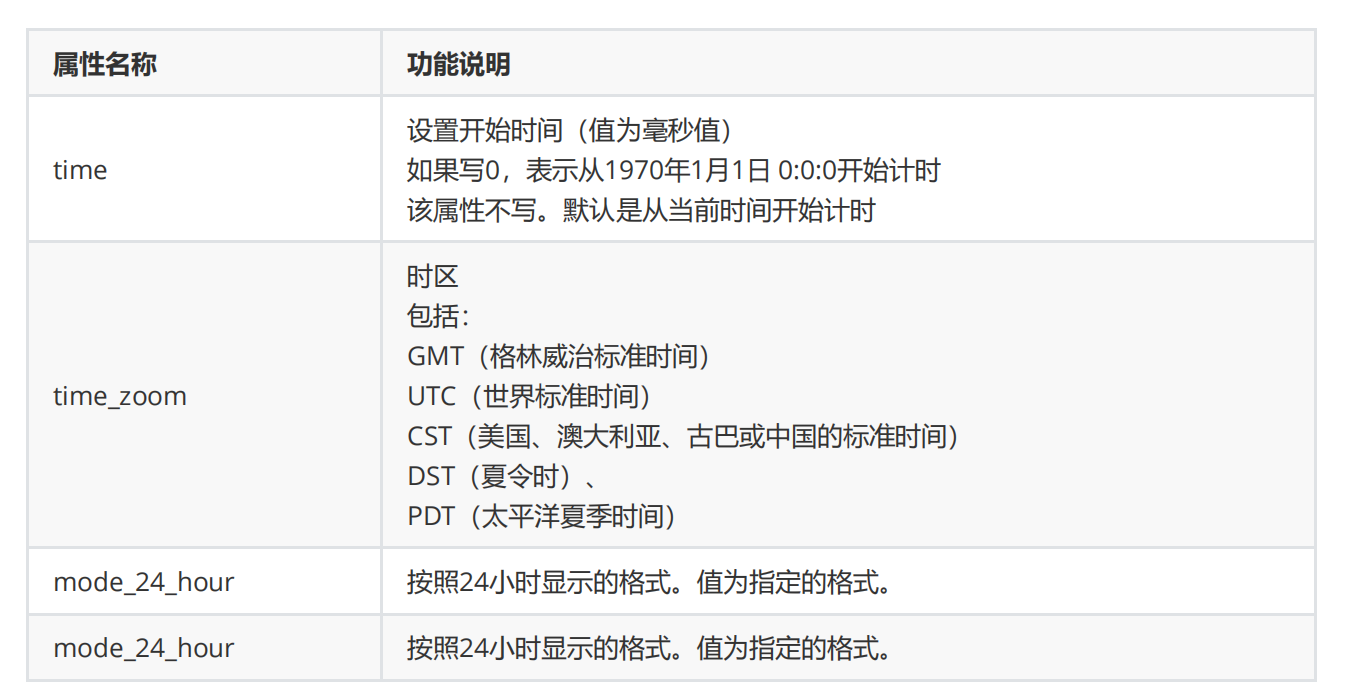
常见方法:
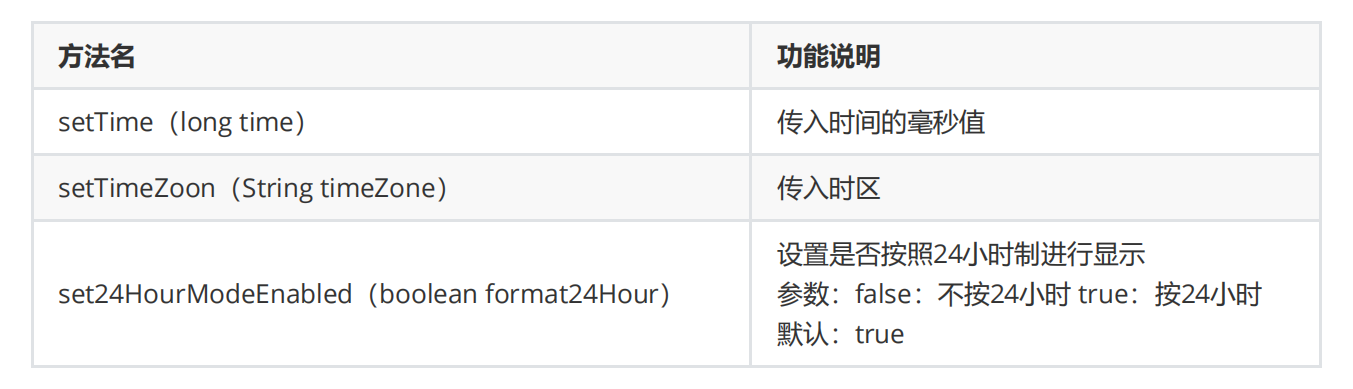
基本用法:
xml文件布局:
<Clock
    ohos:height="match_content"
    ohos:width="match_content"
    ohos:text_size="30fp" />
Java代码:
//将字符串表示的时间(2021-01-01 11:11:11)转成毫秒值
public static String dateToTimeStamp(String s) throws ParseException{
    SimpleDateFormat simpleDateFormat = new SimpleDateFormat("yyyy-MM-dd HH:mm:ss");
    Date date = simpleDateFormat.parse(s);
    long ts = date.getTime();
    String res = String.valueOf(ts);
    return res;
}
//将时间的毫秒值转换为时间
public static String timeStampToDate(String s){
    SimpleDateFormat simpleDateFormat = new SimpleDateFormat("yyyy-MM-dd HH:mm:ss");
    long lt = new Long(s);
    Date date = new Date(lt);
    String res = simpleDateFormat.format(date);
    return res;
}
练习:
需求:
通过点击按钮,将时钟组件中的显示方式在24小时制和12小时制之间切换。
业务分析:
页面上有时钟组件和一个按钮组件。
时钟组件默认是按照24小时制显示时间。
点击按钮可以切换到12小时制显示时间。
再次点击按钮可以切换到24小时制显示时间。
代码示例:
xml文件:
<?xml version="1.0" encoding="utf-8"?>
<DirectionalLayout
    xmlns:ohos="http://schemas.huawei.com/res/ohos"
    ohos:height="match_parent"
    ohos:width="match_parent"
    ohos:orientation="vertical">


<Clock
    ohos:id="$+id:clock"
    ohos:time="1861931471"
    ohos:height="match_content"
    ohos:width="match_content"
    ohos:multiple_lines="true"
    ohos:text_size="35fp"
    ohos:text_alignment="center"
    ohos:mode_24_hour="yyyy年MM月dd日 HH:mm:ss"
    ohos:layout_alignment="center"
    />


<Button
    ohos:id="$+id:but"
    ohos:height="match_content"
    ohos:width="match_content"
    ohos:text="改为12小时制"
    ohos:text_size="20fp"
    ohos:background_element="#92D050"
    ohos:top_margin="30vp"
    ohos:layout_alignment="center"/>

</DirectionalLayout>
public class MainAbilitySlice extends AbilitySlice implements Component.ClickedListener {
    Clock clock;
    Button but;

    @Override
    public void onStart(Intent intent) {
        super.onStart(intent);
        super.setUIContent(ResourceTable.Layout_ability_main);

        //1.找到时钟组件
        clock = (Clock) findComponentById(ResourceTable.Id_clock);
        //找到按钮组件
        but = (Button) findComponentById(ResourceTable.Id_but);
        //2.给按钮添加一个单击事件
        but.setClickedListener(this);
    }

    @Override
    public void onActive() {
        super.onActive();
    }

    @Override
    public void onForeground(Intent intent) {

        super.onForeground(intent);
    }

    //如果为0,表示24小时制
    //如果为1,表示12小时制
    int flag = 0;

    @Override
    public void onClick(Component component) {
        if(flag == 0){
        //表示当前为24小时,改为12小时
        //默认是24小时的。
        //如果我们要按照12小时进行展示,需要把24小时的展示方式给关闭
        clock.set24HourModeEnabled(false);
        //3.指定12小时的展示格式
        clock.setFormatIn12HourMode("yyyy年MM月dd日 hh:mm:ss a");
        //修改按钮上的文字提示
        but.setText("改为24小时制");
        //修改标记
        flag = 1;
    }else if(flag == 1){
        //当前是12小时制,要改为24小时制
        clock.set24HourModeEnabled(true);
        //修改展示格式
        clock.setFormatIn24HourMode("yyyy年MM月dd日 HH:mm:ss");
        //修改按钮上的文字提示
        but.setText("改为12小时制");
        //修改标记
        flag = 0;
    }
  }
}
2、TickTimer定时器组件
组件说明:
是Text的子类,所以可以使用Text的一些属性。
该组件目前有一些bug。这些bug黑马程序员已经反馈至鸿蒙官方,后续版本中会修复这些bug。
bug汇总:
1. 不要用setBaseTime去设置基准时间。
2. 停止之后不用重新开始。
常见属性:
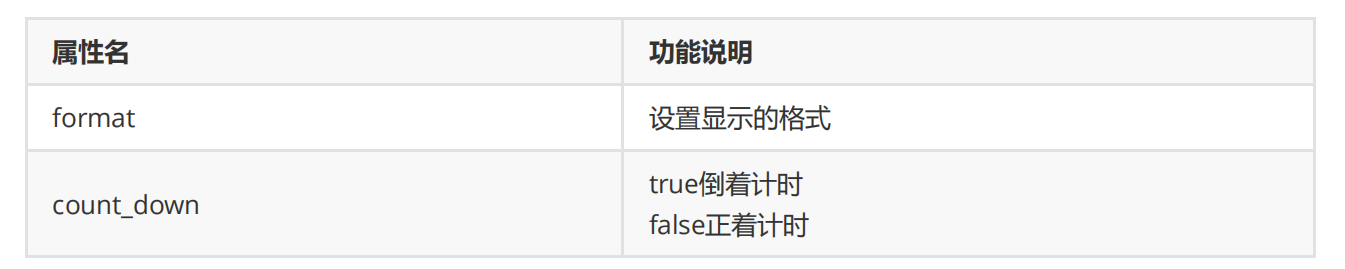
常见方法:
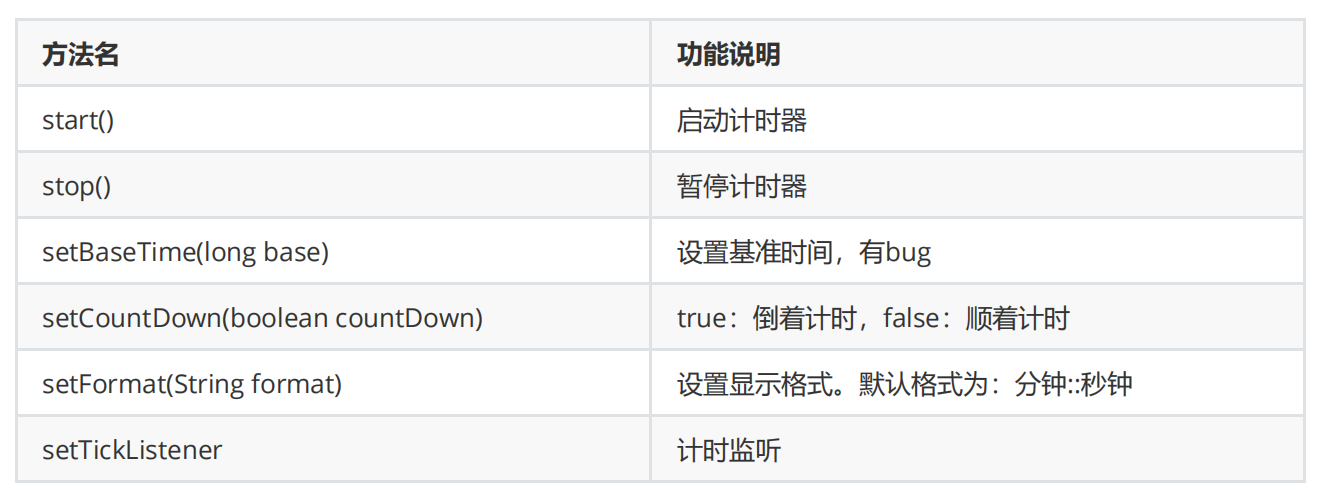
基本用法:
xml文件:
<TickTimer
    ohos:id="$+id:my_tt"
    ohos:height="60vp"
    ohos:width="250vp"
    ohos:padding="10vp"
    ohos:text_size="20fp"
    ohos:text_color="#ffffff"
    ohos:background_element="#0000ff"
    ohos:text_alignment="center"
    ohos:layout_alignment="horizontal_center"
    ohos:top_margin="50vp" />
//没有设置时间,默认是从1970年1月1日开始。
代码示例:
TickTimer tickTimer = (TickTimer)findComponentById(ResourceTable.Id_my_tt);
//可能有bug,里边的事件,时间戳,绝对时间值,测试都不对
//没有设置时间,默认是从1970年1月1日开始。
//设置为0,是从当前时间开始。正数减时间,负数加时间,实际写代码测试一下,是否修改了这个bug
//tickTimer.setBaseTime(时间的毫秒值);

//设置是正着计时还是倒着计时。
//tickTimer.setCountDown(false);
//设置格式
tickTimer.setFormat("mm:ss");
//对时间进行监听
tickTimer.setTickListener(监听回调);
//开始计时
tickTimer.start();
//可能有bug,执行后,后台没停止
tickTimer.stop();

//纯Java实现
//每隔1秒就执行run里面的代码
//只不过没有页面显示而已。
Timer timer = new Timer();
timer.schedule(new TimerTask() {
    @Override
    public void run() {
        //...在这里写定时任务
    });
} },0,1000);
timer.cancel(); //停止计时
练习:
统计10秒之内按了多少次?
xml文件:
<?xml version="1.0" encoding="utf-8"?>
<DirectionalLayout
    xmlns:ohos="http://schemas.huawei.com/res/ohos"
    ohos:height="match_parent"
    ohos:width="match_parent"
    ohos:alignment="center"
    ohos:orientation="vertical">

<TickTimer
    ohos:id="$+id:ticktimer"
    ohos:height="match_content"
    ohos:width="match_content"
    ohos:text_size="30fp"
    ohos:text_color="#FFFFFF"
    ohos:background_element="#0000FF"
    ohos:text_alignment="center"
    ohos:layout_alignment="center"/>

    <Text
        ohos:id="$+id:count"
        ohos:height="match_content"
        ohos:width="match_content"
        ohos:top_margin="10vp"
        ohos:text="0次"
        ohos:text_size="30fp"/>

    <Button
        ohos:id="$+id:but"
        ohos:height="match_content"
        ohos:width="match_content"
        ohos:top_margin="10vp"
        ohos:text_size="30fp"
        ohos:text="开始计时"
        ohos:background_element="#FF0000"/>

</DirectionalLayout>
Java文件:
public class MainAbilitySlice extends AbilitySlice implements Component.ClickedListener,                     TickTimer.TickListener {
    TickTimer tickTimer;
    Text text;
    Button but;

    @Override
    public void onStart(Intent intent) {
        super.onStart(intent);
        super.setUIContent(ResourceTable.Layout_ability_main);


        //1.找到三个组件对象
        tickTimer = (TickTimer) findComponentById(ResourceTable.Id_ticktimer);
        text = (Text) findComponentById(ResourceTable.Id_count);
        but = (Button) findComponentById(ResourceTable.Id_but);

        //2.给按钮绑定一个单击事件
        but.setClickedListener(this);

        //3.给定时器做一些基本设置
        //false 正向计时 1 2 3 ...
        //true 反向计时 10 9 8 7 ....
        tickTimer.setCountDown(false);
        //设置计时格式
        tickTimer.setFormat("mm:ss");

        //4.给定时器去绑定定时事件
        tickTimer.setTickListener(this);


    }

    @Override
    public void onActive() {
        super.onActive();
    }

    @Override
    public void onForeground(Intent intent) {
        super.onForeground(intent);
    }


    //是否第一次被点击。
    //true:表示是第一次点击
    //false:表示不是第一次点击。
    boolean first = true;

    //定义变量用来统计点击的次数
    int count = 0;

    //记录游戏开始时间
    long startTime = 0;

    @Override
    public void onClick(Component component) {
        //当该方法被调用,证明按钮被点击了一次
        count++;


        //判断当前是否第一次点击
        if(first){
            //第一次点击了
            //记录游戏开始的时间
            //要获取定时器中现在的时间
            startTime = String2Long(tickTimer.getText());
            //修改按钮里面的文本
            but.setText("请疯狂点我");
            //修改标记
            first = false;
            //开启定时器
            tickTimer.start();
        }

        //如果不是第一次点击
        //那么就不需要做上面的事情,直接修改文本的内容就可以了
        text.setText(count + "次");


    }

    //当定时器开始计时的时候,就会不断的去调用onTickTimerUpdate这个方法
    //tickTimer表示计时器的对象。
    @Override
    public void onTickTimerUpdate(TickTimer tickTimer) {
        //1.获取当前定时器的时间,并把该时间变成毫秒值
        long nowTime = String2Long(tickTimer.getText());
        //2.判断nowTime跟startTime之间的差有没有超过10秒
        if((nowTime - startTime) >= 10000){
            tickTimer.stop();
            text.setText("最终成绩为:" + count + "次");

            but.setText("游戏结束了");

            //取消按钮的点击事件
            but.setClickable(false);
        }

    }


    //作用:
    //就是把字符串类型的时间,变成毫秒值(long)
    public long String2Long(String time){
        SimpleDateFormat sdf = new SimpleDateFormat("mm:ss");
        Date date = null;
        try {
            date = sdf.parse(time);
        } catch (ParseException e) {
            e.printStackTrace();
        }
        long result = date.getTime();
        return result;
    }
}
3、ProgressBar进度条组件
组件说明:
常见app中,下载进度条,完成任务的进度条等都会用到。
常见属性:
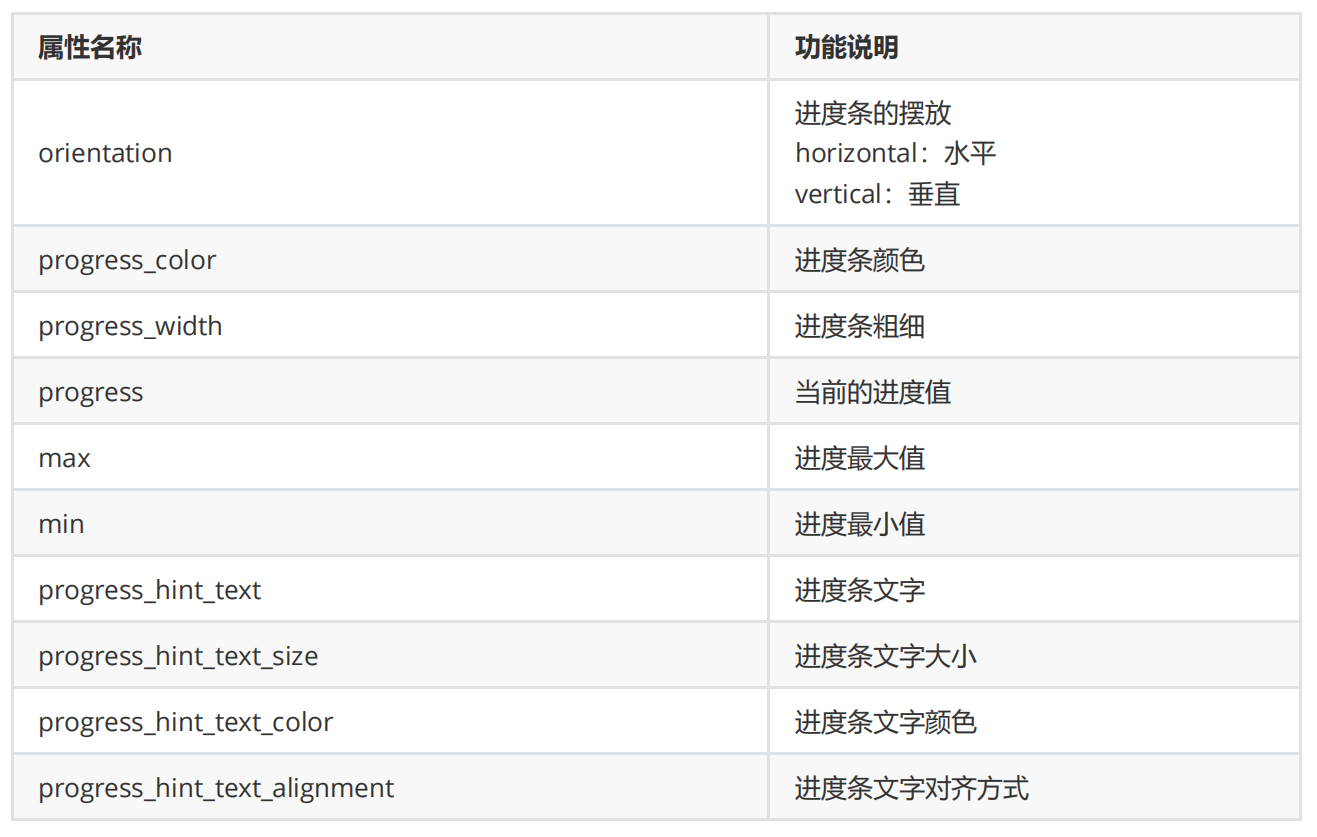
常见方法:
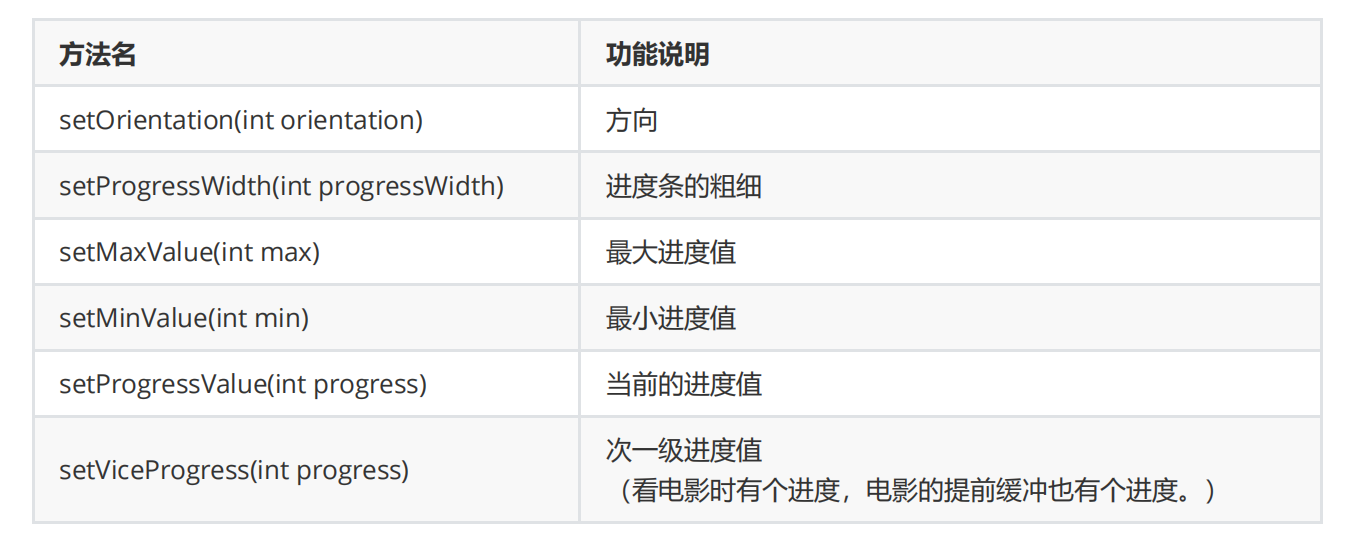
基本用法:
xml文件:
<ProgressBar
        ohos:height="50vp"
        ohos:width="300vp"
        ohos:progress_width="8vp"
        ohos:progress_color="#ff00ff"
        ohos:max="100"
        ohos:min="0"
        ohos:progress="20"
        ohos:top_margin="100vp" />
代码实现:
//用点击模拟如接收文件的进度动态改变进度值
ProgressBar progressBar = (ProgressBar) findComponentById(ResourceTable.Id_my_pgb);
progressBar.setClickedListener(new Component.ClickedListener() {
    @Override
    public void onClick(Component component) {
        ProgressBar pgb = (ProgressBar) component;
        pgb.setProgressValue(pgb.getProgress()+5);
    }
});
练习:
点击一次进度加百分之5。
代码示例:
xml文件:
<?xml version="1.0" encoding="utf-8"?>
<DirectionalLayout
    xmlns:ohos="http://schemas.huawei.com/res/ohos"
    ohos:height="match_parent"
    ohos:width="match_parent"
    ohos:alignment="center"
    ohos:orientation="vertical">

<ProgressBar
    ohos:id="$+id:pb"
    ohos:height="match_content"
    ohos:width="300vp"
    ohos:progress="0"
    ohos:progress_hint_text="0%"
    ohos:progress_hint_text_color="#000000"
    ohos:progress_width="50vp"
    ohos:progress_color="#FF0000"
    ohos:max="100"
    ohos:min="0"/>


</DirectionalLayout>
Java文件
public class MainAbilitySlice extends AbilitySlice implements Component.ClickedListener {
    @Override
    public void onStart(Intent intent) {
        super.onStart(intent);
        super.setUIContent(ResourceTable.Layout_ability_main);

        //1.找到进度条组件
        ProgressBar pb = (ProgressBar) findComponentById(ResourceTable.Id_pb);

        //2.给进度条绑定一个单击事件
        pb.setClickedListener(this);
    }

    @Override
    public void onActive() {
        super.onActive();
    }

    @Override
    public void onForeground(Intent intent) {
        super.onForeground(intent);
    }

    @Override
    public void onClick(Component component) {
        //两种获取进度条组件的方式:
        //1.把onStart方法中的pb移动到成员位置
        //2.onClick方法的形参,也表示被点击的组件对象

        //强转
        ProgressBar pb = (ProgressBar) component;
        //获取进度条里面原本的值
        int progress = pb.getProgress();
        if(progress >= 100){
            //如果进度大于等于100,那么对进度条不会有任何的修改了。
            return;
        }
        //把进度条里面的值 + 5
        progress = progress + 5;
        //再给进度条设置进度
        pb.setProgressValue(progress);
        //再修改一下提示文字
        pb.setProgressHintText(progress + "%");
    }
}
4、RoundProgressBar
组件说明:
是ProgressBar的子类,用法跟ProgressBar一模一样,只是显示的方式不一样。
基本用法:
xml文件:
<?xml version="1.0" encoding="utf-8"?>
<DirectionalLayout
    xmlns:ohos="http://schemas.huawei.com/res/ohos"
    ohos:height="match_parent"
    ohos:width="match_parent"
    ohos:alignment="center"
    ohos:orientation="vertical">

<RoundProgressBar
    ohos:height="300vp"
    ohos:width="300vp"
    ohos:progress_hint_text="80%"
    ohos:progress_hint_text_size="50vp"
    ohos:progress_hint_text_color="#000000"
    ohos:progress="80"
    ohos:progress_width="20vp"
    ohos:progress_color="#FF0000"
    ohos:max="100"
    ohos:min="0"/>

</DirectionalLayout>
二、交互类组件
可以跟用户进行交互的组件:
比如:
- 文本输入框TextField :用户可以输入内容
- 按钮Button :用户可以点击
- 多选框Checkbox :用户可以选择
- 单选框RadioButton :用户可以选择
- 滑块Slider :用户可以滑动
- 可滚动的视图ScrollView:用户可以滚动阅读内容
- 列表容器ListContainer :以列表的形式展示数据
- 搜索框SeachBar :用来搜索的
- 页面切换PageSlider :多页面之间切换的组件
- 等等...
1、TextField文本输入框组件
组件说明:
是Text的子类,用来进行用户输入数据的。
常见属性:
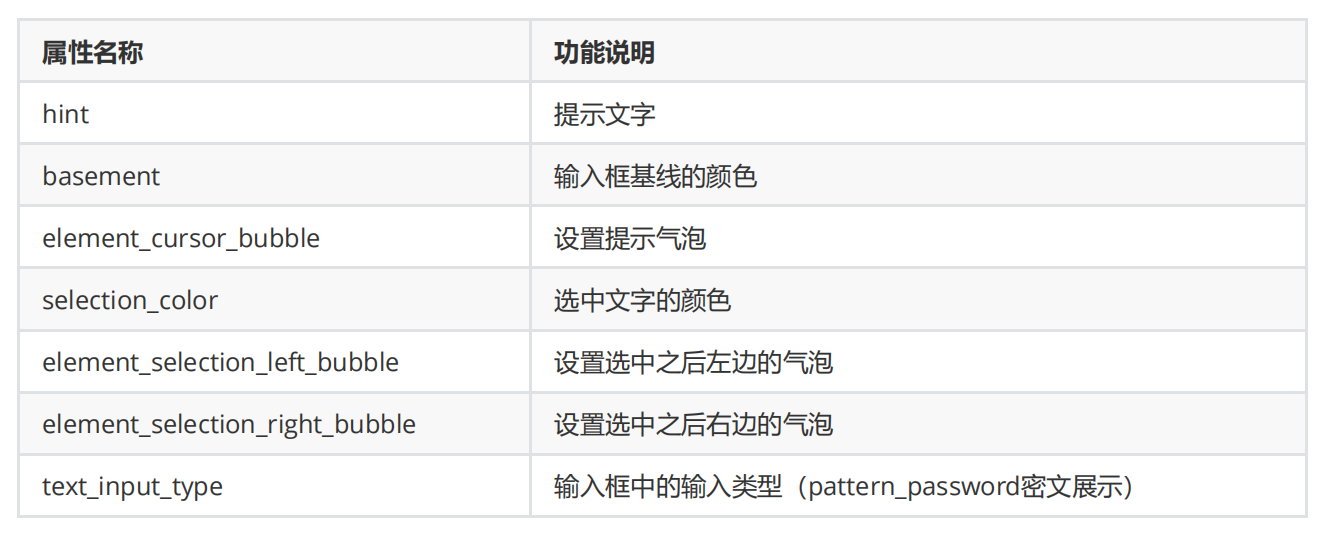
练习1:
获取文本输入框中的内容并进行吐司提示。
xml文件:
<?xml version="1.0" encoding="utf-8"?>
<DirectionalLayout
    xmlns:ohos="http://schemas.huawei.com/res/ohos"
    ohos:height="match_parent"
    ohos:width="match_parent"
    ohos:background_element="#F2F2F2"
    ohos:orientation="vertical"
>

    <TextField
        ohos:id="$+id:text"
        ohos:height="50vp"
        ohos:width="319vp"
        ohos:background_element="#FFFFFF"
        ohos:hint="请输入信息"
        ohos:hint_color="#999999"
        ohos:layout_alignment="horizontal_center"
        ohos:text_alignment="center"
        ohos:text_size="17fp"
        ohos:top_margin="100vp"/>

    <Button
        ohos:id="$+id:but"
        ohos:height="47vp"
        ohos:width="319vp"
        ohos:background_element="#21a8FD"
        ohos:layout_alignment="center"
        ohos:text="获取信息"
        ohos:text_alignment="center"
        ohos:text_color="#FEFEFE"
        ohos:text_size="24vp"
        ohos:top_margin="77vp"/>


</DirectionalLayout>
Java代码:
public class MainAbilitySlice extends AbilitySlice implements Component.ClickedListener {
    TextField tf;
    Button but;

    @Override
    public void onStart(Intent intent) {
        super.onStart(intent);
        super.setUIContent(ResourceTable.Layout_ability_main);

        //1.找到文本输入框组件对象
        tf = (TextField) findComponentById(ResourceTable.Id_text);
        //找到按钮组件对象
        but = (Button) findComponentById(ResourceTable.Id_but);

        //2.给按钮绑定一个点击事件
        //当点击了按钮之后,就要获取文本输入框中的内容
        but.setClickedListener(this);

    }

    @Override
    public void onActive() {
        super.onActive();
    }

    @Override
    public void onForeground(Intent intent) {
        super.onForeground(intent);
    }


    @Override
    public void onClick(Component component) {
        //当点击了按钮之后,获取文本输入框中的内容
        String message = tf.getText();
        //利用一个吐司将信息弹出
        ToastDialog td = new ToastDialog(this);
        //大小不用设置,默认就是包裹内容的
        //自动关闭不用设置,默认到了时间之后就自动关闭
        //持续时间可以不用设置,默认2秒
        //设置吐司的背景。
        td.setTransparent(true);
        //位置(默认居中)
        td.setAlignment(LayoutAlignment.BOTTOM);
        //设置一个偏移
        td.setOffset(0,200);
        //设置吐司的内容
        td.setText(message);
        //让吐司出现
        td.show();
    }
}
练习2:
按住按钮不松,将输入框中的密码变成明文。
松开按钮之后,输入框中的密码变回密文。
代码示例:
xml文件:
<?xml version="1.0" encoding="utf-8"?>
<DirectionalLayout
    xmlns:ohos="http://schemas.huawei.com/res/ohos"
    ohos:height="match_parent"
    ohos:width="match_parent"
    ohos:orientation="vertical"
    ohos:background_element="#F2F2F2"
    >

    <TextField
        ohos:id="$+id:text"
        ohos:height="50vp"
        ohos:width="319vp"
        ohos:hint="请输入密码"

        ohos:text_size="17fp
        ohos:hint_color="#999999"
        ohos:text_alignment="center"
        ohos:top_margin="100vp"
        ohos:layout_alignment="horizontal_center"
        ohos:background_element="#FFFFFF"
        ohos:text_input_type="pattern_password"/>

    <Button
        ohos:id="$+id:but"
        ohos:height="47vp"
        ohos:width="319vp"
        ohos:text="查看密码"
        ohos:text_size="24vp"
        ohos:text_color="#FEFEFE"
        ohos:text_alignment="center"
        ohos:background_element="#21a8FD"
        ohos:top_margin="77vp"
        ohos:layout_alignment="center"/>

</DirectionalLayout>
Java文件:
public class MainAbilitySlice extends AbilitySlice implements Component.TouchEventListener {
    TextField tf;
    @Override
    public void onStart(Intent intent) {
        super.onStart(intent);
        super.setUIContent(ResourceTable.Layout_ability_main);

        //1.找到两个组件对象

        tf = (TextField) findComponentById(ResourceTable.Id_text);
        Button but = (Button) findComponentById(ResourceTable.Id_but);

        //2.要给按钮绑定一个触摸事件
        //因为在触摸事件中,才可以获取到按下不松,松开

        //单击事件 --- 只能捕获到点击了一下。
        but.setTouchEventListener(this);


    }

    @Override
    public void onActive() {
        super.onActive();
    }

    @Override
    public void onForeground(Intent intent) {

        super.onForeground(intent);
    }

    @Override
    //参数一:现在触摸的按钮。
    //参数二:动作对象。
    public boolean onTouchEvent(Component component, TouchEvent touchEvent) {
        int action = touchEvent.getAction();
        if(action == TouchEvent.PRIMARY_POINT_DOWN){
            //当按下不松的时候,将文本框中的密码变成明文。
            tf.setTextInputType(InputAttribute.PATTERN_NULL);
        }else if(action == TouchEvent.PRIMARY_POINT_UP){
            //当松开的时候,将文本框中的密码变回密文。
            tf.setTextInputType(InputAttribute.PATTERN_PASSWORD);
        }
        //true:表示触摸事件的后续动作还会进行触发
        //false:表示触摸事件只触发第一个按下不松的动作。
        return true;
    }
}
练习3:
搭建登录页面。
图片素材请参见今天的资料。
代码示例:
xml文件:
<?xml version="1.0" encoding="utf-8"?>
<DirectionalLayout
    xmlns:ohos="http://schemas.huawei.com/res/ohos"
    ohos:height="match_parent"
    ohos:width="match_parent"
    ohos:orientation="vertical"
    ohos:background_element="#F2F2F2"
    >

    <TextField
        ohos:id="$+id:username"
        ohos:height="50vp"
        ohos:width="319vp"
        ohos:hint="请输入用户名"
        ohos:text_size="17fp"
        ohos:hint_color="#999999"
        ohos:text_alignment="center"
        ohos:top_margin="100vp"
        ohos:layout_alignment="horizontal_center"
        ohos:background_element="#FFFFFF"/>

    <TextField

        ohos:id="$+id:password"
        ohos:height="50vp"
        ohos:width="319vp"
        ohos:hint="请输入密码"
        ohos:text_size="17fp"
        ohos:hint_color="#999999"
        ohos:text_alignment="center"
        ohos:top_margin="10vp"
        ohos:layout_alignment="horizontal_center"
        ohos:background_element="#FFFFFF"
        ohos:text_input_type="pattern_password"
        />

    <Text
        ohos:id="$+id:forgetpassword"
        ohos:height="match_content"
        ohos:width="match_content"
        ohos:text="忘记密码了?"
        ohos:text_size="17fp"
        ohos:text_color="#979797"
        ohos:top_margin="13vp"
        ohos:layout_alignment="right"
        ohos:right_margin="20vp"/>


    <Button
        ohos:id="$+id:login"
        ohos:height="47vp"
        ohos:width="319vp"
        ohos:text="登录"
        ohos:text_size="24fp"
        ohos:text_color="#FEFEFE"
        ohos:text_alignment="center"
        ohos:background_element="#21a8FD"
        ohos:top_margin="77vp"
        ohos:layout_alignment="horizontal_center"/>

    <Button
        ohos:id="$+id:register"
        ohos:height="47vp"
        ohos:width="319vp"
        ohos:text="注册"
        ohos:text_size="24fp"
        ohos:text_color="#FEFEFE"
        ohos:text_alignment="center"
        ohos:background_element="#21a8FD"
        ohos:top_margin="13vp"
        ohos:layout_alignment="horizontal_center"/>


</DirectionalLayout>
2、Button按钮组件
组件说明:
这个组件之前我们经常使用,可以给他设置宽高,设置提示文字,设置背景色,还可以给他添加各种各样的事件。
关于按钮的基本用法其实我们已经掌握了。大家只要完成下面的一些案例即可。
练习1:
文本当我女朋友好吗?
点击按钮之后,按钮的位置随机变化。
代码示例:
xml文件:
<?xml version="1.0" encoding="utf-8"?>
<DirectionalLayout
    xmlns:ohos="http://schemas.huawei.com/res/ohos"
    ohos:height="match_parent"
    ohos:width="match_parent"
    ohos:orientation="vertical"
    ohos:background_element="#D9D9D9"
    >

    <Image
        ohos:height="match_content"
        ohos:width="match_content"
        ohos:image_src="$media:photo"
        ohos:layout_alignment="horizontal_center"
        ohos:top_margin="100vp"/>

    <Text
        ohos:id="$+id:message"
        ohos:height="50vp"
        ohos:width="320vp"
        ohos:top_margin="30vp"
        ohos:text="当我女朋友好吗?"
        ohos:text_alignment="center"
        ohos:text_size="35fp"
        ohos:layout_alignment="horizontal_center"/>

    <Button
        ohos:id="$+id:submit"
        ohos:height="50vp"
        ohos:width="320vp"
        ohos:text="好的"
        ohos:text_color="#FEFEFE"
        ohos:text_alignment="center"
        ohos:text_size="30fp"
        ohos:background_element="#92D050"
        ohos:layout_alignment="horizontal_center"
        ohos:top_margin="20vp"/>

    <Button
        ohos:id="$+id:cacel"
        ohos:height="50vp"
        ohos:width="320vp"
        ohos:text="不好"
        ohos:text_color="#FEFEFE"
        ohos:text_alignment="center"
        ohos:text_size="30fp"
        ohos:background_element="#92D050"
        ohos:layout_alignment="horizontal_center"
        ohos:top_margin="10vp"/>


</DirectionalLayout>
Java文件:
public class MainAbilitySlice extends AbilitySlice implements Component.ClickedListener {
    Text message;
    Button submit;
    Button cacel;

    @Override
    public void onStart(Intent intent) {
        super.onStart(intent);
        super.setUIContent(ResourceTable.Layout_ability_main);

        //1.找到组件
        message = (Text) findComponentById(ResourceTable.Id_message);
        submit = (Button) findComponentById(ResourceTable.Id_submit);
        cacel = (Button) findComponentById(ResourceTable.Id_cacel);

        //2.给两个按钮添加单击事件
        submit.setClickedListener(this);
        cacel.setClickedListener(this);
    }

    @Override
    public void onActive() {
        super.onActive();
    }

    @Override
    public void onForeground(Intent intent) {
        super.onForeground(intent);
    }

    //表示记录了点击不好的次数
    int count = 0;
    Random r = new Random();

    @Override
    public void onClick(Component component) {
        //判断当前点击的是好的,还是不好
        if(component == submit){
            message.setText("恭喜你!");
            //与此同时,app在后台发送一个确认消息。
            //取消两个按钮的点击事件。
            submit.setClickable(false);
            cacel.setClickable(false);
        }else if(component == cacel){
            //不好这个按钮被点击了一次
            count++;
            if(count == 1){
                //表示妹子是第一次点击不好
                message.setText("手滑了吧,再点一次吧");
                //用代码设置大小,单位是像素px
                message.setTextSize(60);
                //还需要把不好按钮的位置进行随机摆放
                int x = r.nextInt(500);
                int y = r.nextInt(1000);
                cacel.setTranslation(x,y);
            }else{
                //表示妹子不是第一次点击不好
                message.setText("我是你永远得不到的男人");
                //取消两个按钮的点击事件。
                submit.setClickable(false);
                cacel.setClickable(false);
            }
        }
    }
}
练习2: 综合案例:用户登录界面
点击登录,验证用户名和密码。
成功,跳转主页面。
失败,提示用户输入错误。
点击注册,跳转注册页面。
代码示例:
xml文件:
<?xml version="1.0" encoding="utf-8"?>
<DirectionalLayout
    xmlns:ohos="http://schemas.huawei.com/res/ohos"
    ohos:height="match_parent"
    ohos:width="match_parent"

    ohos:orientation="vertical"
    ohos:background_element="#F2F2F2"
    >

    <TextField
        ohos:id="$+id:username"
        ohos:height="50vp"
        ohos:width="319vp"
        ohos:hint="请输入用户名"
        ohos:text_size="17fp"
        ohos:hint_color="#999999"
        ohos:text_alignment="center"
        ohos:top_margin="100vp"
        ohos:layout_alignment="horizontal_center"
        ohos:background_element="#FFFFFF"/>

    <TextField
        ohos:id="$+id:password"
        ohos:height="50vp"
        ohos:width="319vp"
        ohos:hint="请输入密码"
        ohos:text_size="17fp"
        ohos:hint_color="#999999"
        ohos:text_alignment="center"
        ohos:top_margin="10vp"
        ohos:layout_alignment="horizontal_center"
        ohos:background_element="#FFFFFF"
        ohos:text_input_type="pattern_password"
        />

    <Text
        ohos:id="$+id:forgetpassword"
        ohos:height="match_content"
        ohos:width="match_content"
        ohos:text="忘记密码了?"
        ohos:text_size="17fp"
        ohos:text_color="#979797"
        ohos:top_margin="13vp"
        ohos:layout_alignment="right"
        ohos:right_margin="20vp"/>

    <Button
        ohos:id="$+id:login"
        ohos:height="47vp"
        ohos:width="319vp"
        ohos:text="登录"
        ohos:text_size="24fp"
        ohos:text_color="#FEFEFE"
        ohos:text_alignment="center"
        ohos:background_element="#21a8FD"
        ohos:top_margin="77vp"
        ohos:layout_alignment="horizontal_center"/>

    <Button
        ohos:id="$+id:register"
        ohos:height="47vp"
        ohos:width="319vp"
        ohos:text="注册"
        ohos:text_size="24fp"
        ohos:text_color="#FEFEFE"
        ohos:text_alignment="center"
        ohos:background_element="#21a8FD"
        ohos:top_margin="13vp"
        ohos:layout_alignment="horizontal_center"/>

</DirectionalLayout>
Java文件:
public class MainAbilitySlice extends AbilitySlice implements Component.ClickedListener {
    TextField username;
    TextField password;
    Text forgetPassword;
    Button login;
    Button register;

    @Override
    public void onStart(Intent intent) {
        super.onStart(intent);
        super.setUIContent(ResourceTable.Layout_ability_main);

        //1.找到5个组件对象
        username = (TextField) findComponentById(ResourceTable.Id_username);
        password = (TextField) findComponentById(ResourceTable.Id_password);

        forgetPassword = (Text) findComponentById(ResourceTable.Id_forgetpassword);

        login = (Button) findComponentById(ResourceTable.Id_login);
        register = (Button) findComponentById(ResourceTable.Id_register);

        //2.给三个组件添加事件
        forgetPassword.setClickedListener(this);
        login.setClickedListener(this);
        register.setClickedListener(this);

    }

    @Override
    public void onActive() {
        super.onActive();
    }

    @Override
    public void onForeground(Intent intent) {

        super.onForeground(intent);
    }

    @Override
    public void onClick(Component component) {
        if(component == forgetPassword){
            //跳转到忘记密码页面
            ToastUtils.showDialog(this,"用户点击了忘记密码");
        }else if(component == login){
            //比较用户输入的用户名和密码是否正确
            String usernameInput = username.getText();
            String passwordInput = password.getText();
            //拿着用户输入的用户名和密码进行比较
            //在实际开发中,我们是把用户名和密码传递给服务器进行比较的。
            //因为我们还没有学习如何跟服务器交互,所以此时我们先暂时写死
            if("".equals(usernameInput) || "".equals(passwordInput)){
                //如果用户名和密码有一个为空,那么都不能登录
                ToastUtils.showDialog(this,"用户名或密码不能为空");
            }else if("zhangsan".equals(usernameInput) && "123456".equals(passwordInput)){
                //如果正确了,则跳转到app的主页面
                ToastUtils.showDialog(this,"登录成功");
            }else{
                //表示只要有一个错误了,都不能登录
                //需要给用户一个提示
                ToastUtils.showDialog(this,"用户名或密码错误了");
            }
        }else if(component == register){
            //跳转到注册页面
            ToastUtils.showDialog(this,"用户点击了注册");
        }
    }
}
3、Checkbox多选框组件
组件说明:
父类是AbsButton,而AbsButton的父类是Button。
当我们需要同时选择多个元素的时候就需要用到多选框组件。
比如:发送图片的时候需要多选,注册的时候选择爱好也需要多选等。
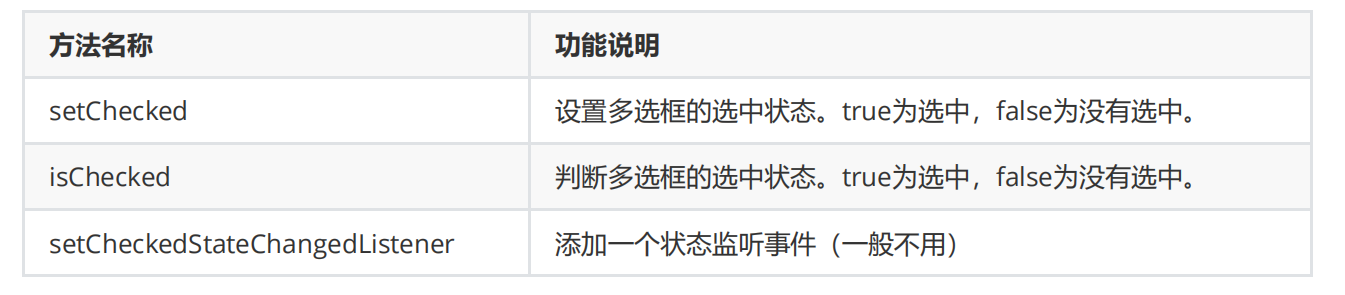
常见属性:

常见方法:
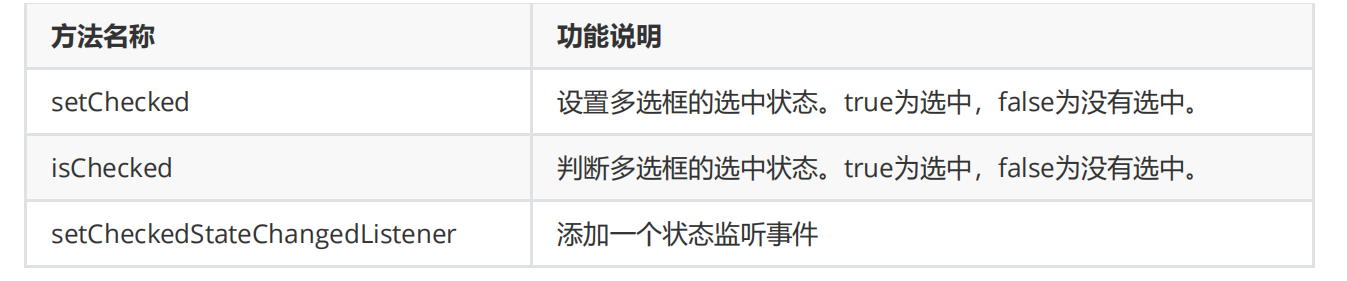
练习1:
当多选框状态改变时,出现对应的吐司提示。
xml文件:
<?xml version="1.0" encoding="utf-8"?>
<DirectionalLayout
    xmlns:ohos="http://schemas.huawei.com/res/ohos"
    ohos:height="match_parent"
    ohos:width="match_parent"
    ohos:alignment="center"
    ohos:orientation="vertical">

    <Checkbox
        ohos:id="$+id:cb"
        ohos:height="match_content"
        ohos:width="match_content"
        ohos:text="玩游戏"
        ohos:text_size="30fp"
        ohos:background_element="#21a8FD"

        />

    </DirectionalLayout>
    吐司布局:
    <?xml version="1.0" encoding="utf-8"?>
    <DirectionalLayout
        xmlns:ohos="http://schemas.huawei.com/res/ohos"
        ohos:height="match_content"
        ohos:width="match_content"
        ohos:orientation="vertical">


        <Text
            ohos:id="$+id:msg"
            ohos:height="match_content"
            ohos:width="match_content"
            ohos:text_size="30fp"
            ohos:text_color="#FFFFFF"
            ohos:text_alignment="center"
            ohos:background_element="#464343"/>

</DirectionalLayout>
Java文件:
public class MainAbilitySlice extends AbilitySlice implements AbsButton.CheckedStateChangedListener/*,
Component.ClickedListener*/ {
    @Override
    public void onStart(Intent intent) {
        super.onStart(intent);
        super.setUIContent(ResourceTable.Layout_ability_main);


        //1.找到多选框组件
        Checkbox cb = (Checkbox) findComponentById(ResourceTable.Id_cb);

        //2.设置多选框的选中状态
        //true表示选中
        //false表示未选中
        cb.setChecked(true);

        //判断当前的多选框是否被选中
        /*boolean checked = cb.isChecked();
        if(checked){
            ToastUtils.showDialog(this,"被选中了");
        }else{
            ToastUtils.showDialog(this,"没有被选中");
        }*/


        //可以给多选框添加一个状态监听事件
        cb.setCheckedStateChangedListener(this);
        // cb.setClickedListener(this);

    }

    @Override
    public void onActive() {
        super.onActive();
    }

    @Override
    public void onForeground(Intent intent) {
        super.onForeground(intent);
    }


    //当多选框的状态被改变之后,就会调用这个方法
    //参数一:absButton就表示状态被改变的那个多选框
    //参数二:表示当前多选框的状态,true选中 false 未选中
    @Override
    public void onCheckedChanged(AbsButton absButton, boolean b) {
        if(b){

            ToastUtils.showDialog(this,"被选中");
        }else{
            ToastUtils.showDialog(this,"未被选中");
        }
    }

    //小结:
    //当多选框绑定单击事件的时候,在onClick方法当中,获取的是点击之前的状态
    //(建议)当多选框绑定状态改变事件的时候,在onCheckedChanged方法中,获取的是点击之后的状态

    /* @Override
    public void onClick(Component component) {
        //参数:表示被点击的那个组件
        Checkbox cb = (Checkbox) component;
        if(cb.isChecked()){
            ToastUtils.showDialog(this,"被选中");
        }else{
            ToastUtils.showDialog(this,"未被选中");
        }
    }*/
}
吐司工具类代码:
public class ToastUtils {
    public static void showDialog(Context context,String message){

        //1.把xml文件加载到内存当中。
        DirectionalLayout dl = (DirectionalLayout)
LayoutScatter.getInstance(context).parse(ResourceTable.Layout_mytoast, null, false);

        //2.获取到当前布局对象中文本组件
        Text msg = (Text) dl.findComponentById(ResourceTable.Id_msg);
        //3.把需要提示的信息设置到文本组件中
        msg.setText(message);

        //4.创建一个吐司对象
        ToastDialog td = new ToastDialog(context);
        //设置吐司的大小。--- 默认是包裹内容

td.setSize(DirectionalLayout.LayoutConfig.MATCH_CONTENT,DirectionalLayout.LayoutConfig.MA        TCH_CONTENT);
        //设置出现的时间
        td.setDuration(2000);
        //设置对齐方式
        td.setAlignment(LayoutAlignment.BOTTOM);
        //把xml中的布局对象交给吐司
        td.setContentCustomComponent(dl);
        //把吐司做一个偏移
        //偏移是以吐司弹框的基准位置进行偏移的
        //如果是正数,就默认往屏幕中央去偏移
        //如果是负数,就往屏幕中央的反方向去偏移
        td.setOffset(0,200);
        //让吐司出现

        td.show();
    }
}
练习2:
自定义时间显示格式。
代码示例:
xml文件:
<?xml version="1.0" encoding="utf-8"?>
<DirectionalLayout
    xmlns:ohos="http://schemas.huawei.com/res/ohos"
    ohos:height="match_parent"
    ohos:width="match_parent"
    ohos:orientation="vertical">

<Clock
    ohos:id="$+id:clock"
    ohos:height="match_content"
    ohos:width="match_content"
    ohos:text_color="#FFFFFF"
    ohos:text_size="30vp"
    ohos:background_element="#778495"
    ohos:mode_24_hour="yyyy年MM月dd日 HH:mm:ss"/>

<Checkbox
    ohos:id="$+id:year"
    ohos:height="match_content"
    ohos:width="match_content"
    ohos:text="年"
    ohos:text_size="30fp"
    ohos:layout_alignment="left"
    ohos:left_margin="30vp"
    ohos:top_margin="30vp"
    ohos:background_element="#5E5CA2"/>

    <Checkbox
        ohos:id="$+id:month"
        ohos:height="match_content"
        ohos:width="match_content"
        ohos:text="月"
        ohos:text_size="30fp"
        ohos:layout_alignment="left"
        ohos:left_margin="30vp"
        ohos:top_margin="10vp"
        ohos:background_element="#5E5CA2"/>

    <Checkbox
        ohos:id="$+id:day"

        ohos:height="match_content"
        ohos:width="match_content"
        ohos:text="日"
        ohos:text_size="30fp"
        ohos:layout_alignment="left"
        ohos:left_margin="30vp"
        ohos:top_margin="10vp"
        ohos:background_element="#5E5CA2"/>

    <Checkbox
        ohos:id="$+id:hour"
        ohos:height="match_content"
        ohos:width="match_content"
        ohos:text="时"
        ohos:text_size="30fp"
        ohos:layout_alignment="left"
        ohos:left_margin="30vp"
        ohos:top_margin="10vp"
        ohos:background_element="#5E5CA2"/>

    <Checkbox
        ohos:id="$+id:minutes"
        ohos:height="match_content"
        ohos:width="match_content"
        ohos:text="分"
        ohos:text_size="30fp"
        ohos:layout_alignment="left"
        ohos:left_margin="30vp"
        ohos:top_margin="10vp"
        ohos:background_element="#5E5CA2"/>

    <Checkbox
        ohos:id="$+id:second"
        ohos:height="match_content"
        ohos:width="match_content"
        ohos:text="秒"
        ohos:text_size="30fp"
        ohos:layout_alignment="left"
        ohos:left_margin="30vp"
        ohos:top_margin="10vp"
        ohos:background_element="#5E5CA2"/>

    <Button
        ohos:id="$+id:submit"
        ohos:height="match_content"
        ohos:width="match_content"
        ohos:text="确定"
        ohos:top_margin="10vp"
        ohos:text_size="30fp"
        ohos:text_color="#000000"
        ohos:background_element="#FF0000"/>


</DirectionalLayout>
Java文件:
public class MainAbilitySlice extends AbilitySlice implements Component.ClickedListener {
    Clock clock;
    Button but;
    @Override
    public void onStart(Intent intent) {
        super.onStart(intent);
        super.setUIContent(ResourceTable.Layout_ability_main);


        //1.找到组件
        clock = (Clock) findComponentById(ResourceTable.Id_clock);
        but = (Button) findComponentById(ResourceTable.Id_submit);

        //2.给按钮去绑定单击事件
        but.setClickedListener(this);
    }

    @Override
    public void onActive() {
        super.onActive();
    }

    @Override
    public void onForeground(Intent intent) {
        super.onForeground(intent);
    }

    @Override
    public void onClick(Component component) {
        //最简单的实现方式
        //判断6个多选框是否被选中,如果被选中,再拼接时间格式就可以了

        String year = check(ResourceTable.Id_year,"yyyy年");
        String month = check(ResourceTable.Id_month,"MM月");
        String day = check(ResourceTable.Id_day,"dd日");
        String hour = check(ResourceTable.Id_hour,"HH:");
        String minutes = check(ResourceTable.Id_minutes,"mm:");
        String second = check(ResourceTable.Id_second,"ss");

        //拼接操作
        String result = year + month + day + " " + hour + minutes + second;
        // " "
        if(result.length() == 1){
            //表示所有的多选框都没有选择
            ToastUtils.showDialog(this,"不能一个都不选");
            //细节:表示当代码弹出吐司之后,方法就执行完毕,下面的代码不会执行了。
            return;
        }

        //把时间展示的格式交给Clock组件
        clock.setFormatIn24HourMode(result);

        }

        //定义一个方法
        //作用:判断多选框有没有被选中
        //如果被选中了,则返回字符串
        //如果没有被选中,则返回一个长度为0的字符串
        public String check(int id,String result){
            //根据传递过来的id找到对应的多选框
            Checkbox cb = (Checkbox) findComponentById(id);
            //判断当前的多选框有没有被选中
            //如果被选中,就返回result
            //如果没有被选中,就返回""
            if(cb.isChecked()){
                return result;
            }else{
                return "";
            }
        }
    }
4、RadioButton单选框组件
组件说明:
父类是AbsButton,而AbsButton的父类是Button。在使用的时候需要用到单选按钮的按钮组。
RadioContainer,在一组内多选按钮只能选择其中一个。
当需要监听单选框的状态时,不要用AbsButton里面的CheckedStateChangedListener。而是给按钮组
RadioContainer添加事件。用RadioContainer里面的CheckedStateChangedListener。
常见属性:

常见方法:
按钮组RadioContainer常见方法:

练习:
xml文件:
<?xml version="1.0" encoding="utf-8"?>
<DirectionalLayout
    xmlns:ohos="http://schemas.huawei.com/res/ohos"
    ohos:height="match_parent"
    ohos:width="match_parent"
    ohos:alignment="center"
    ohos:orientation="vertical">


    <RadioContainer
        ohos:id="$+id:rc"
        ohos:height="match_content"
        ohos:width="match_content">

        <RadioButton
            ohos:id="$+id:boy"
            ohos:height="match_content"
            ohos:width="match_content"
            ohos:text="男"
            ohos:text_size="30fp"
            ohos:text_alignment="center"
            ohos:marked="false"
            ohos:background_element="#21a8fd"
            />

        <RadioButton
            ohos:id="$+id:girl"
            ohos:height="match_content"
            ohos:width="match_content"
            ohos:text="女"
            ohos:text_size="30fp"
            ohos:text_alignment="center"
            ohos:marked="false"
            ohos:background_element="#21a8fd"
            ohos:top_margin="10vp"/>

    </RadioContainer>

    <!-- <RadioContainer
        ohos:height="match_content"
        ohos:width="match_content">

    <RadioButton
        ohos:height="match_content"
        ohos:width="match_content"
        ohos:text="篮球"
        ohos:text_size="30fp"
        ohos:text_alignment="center"
        ohos:marked="false"
        ohos:background_element="#21a8fd"
        />

    <RadioButton
        ohos:height="match_content"
        ohos:width="match_content"
        ohos:text="足球"
        ohos:text_size="30fp"
        ohos:text_alignment="center"
        ohos:marked="false"
        ohos:background_element="#21a8fd"
        ohos:top_margin="10vp"/>

    <RadioButton
        ohos:height="match_content"
        ohos:width="match_content"
        ohos:text="排球"
        ohos:text_size="30fp"
        ohos:text_alignment="center"
        ohos:marked="false"
        ohos:background_element="#21a8fd"
        ohos:top_margin="10vp"/>

    </RadioContainer>-->
</DirectionalLayout>
Java文件:
public class MainAbilitySlice extends AbilitySlice implements RadioContainer.CheckedStateChangedListener {
    @Override
    public void onStart(Intent intent) {
        super.onStart(intent);
        super.setUIContent(ResourceTable.Layout_ability_main);

        //找到单选框按钮对象
        RadioButton rb1 = (RadioButton) findComponentById(ResourceTable.Id_boy);
        RadioButton rb2 = (RadioButton) findComponentById(ResourceTable.Id_girl);
        RadioContainer rc = (RadioContainer) findComponentById(ResourceTable.Id_rc);
        //rb1.setChecked(true);
        //rb1.setCheckedStateChangedListener(this);
        //rb2.setCheckedStateChangedListener(this);

        rc.setMarkChangedListener(this);

    }

    @Override
    public void onActive() {
        super.onActive();
    }

    @Override
    public void onForeground(Intent intent) {
        super.onForeground(intent);
    }

    /* //参数一:状态改变的那个单选按钮
    //参数二:单选按钮的状态
    @Override
    public void onCheckedChanged(AbsButton absButton, boolean b) {
        String text = absButton.getText();
        if(b){
            ToastUtils.showDialog(this,text + "被选中了");
        }else{
            ToastUtils.showDialog(this,text + "被取消选中了");
        }
    }*/

    //当按钮组里面的按钮状态发生改变的时候,就会触发下面的方法
    //参数一:单选框按钮组的对象
    //参数二:索引,表示当前状态改变的是该按钮组中第几个按钮
    @Override
    public void onCheckedChanged(RadioContainer radioContainer, int i) {
        RadioButton rb = (RadioButton) radioContainer.getComponentAt(i);
        String text = rb.getText();
        if(rb.isChecked()){
            ToastUtils.showDialog(this,text + "被选中了");
        }else{
            ToastUtils.showDialog(this,text + "被取消选中了");
        }
    }
}

有“AI”的1024 = 2048,欢迎大家加入2048 AI社区
更多推荐

 12
12 0
0- 0


 已为社区贡献12条内容

所有评论(0)