斯坦福大学 | CS336 | 从零开始构建语言模型 | Spring 2025 | 笔记 | Assignment 1: Training Loop Implement
斯坦福大学 | CS336 | 从零开始构建语言模型 | Spring 2025 | 笔记 | Assignment 1: Training Loop Implement
目录
-
- 前言
- 1. Problem (cross_entropy): Implement Cross entropy (2 points)
- 2. Problem (learning_rate_tuning): Tuning the learning rate (1 point)
- 3. Problem (adamw): Implement AdamW (2 points)
- 4. Problem (adamwAccounting): Resource accounting for training with AdamW (2 points)
- 5. Problem (learning_rate_schedule): Implement cosine learning rate schedule with warmup (1 point)
- 6. Problem (gradient_clipping): Implement gradient clipping (1 point)
- 7. Problem (data_loading): Implement data loading (2 points)
- 8. Problem (checkpointing): Implement model checkpointing (1 point)
- 9. Problem (training_together): Put it together (4 points)
- 10. Problem (decoding): Decoding (3 points)
- 结语
- 源码下载链接
- 参考
前言
在上篇文章 斯坦福大学 | CS336 | 从零开始构建语言模型 | Spring 2025 | 笔记 | Assignment 1: Training Loop 中,我们已经了解了 Training Loop 的作业要求,下面我们就一起来看看这些作业该如何实现,本篇文章记录 CS336 作业 Assignment 1: Basics 中的 Training Loop 实现,仅供自己参考😄
Note:博主并未遵循 from-scratch 的宗旨,所有代码几乎均由 ChatGPT 完成
Assignment 1:https://github.com/stanford-cs336/assignment1-basics
reference:https://chatgpt.com/
reference:https://github.com/donglinkang2021/cs336-assignment1-basics
reference:https://github.com/Louisym/Stanford-CS336-spring25
1. Problem (cross_entropy): Implement Cross entropy (2 points)
Deliverable:编写一个函数,用于计算 交叉熵损失,该函数以模型预测的 logits( o i o_i oi)和目标标签( x i + 1 x_{i+1} xi+1)作为输入,并计算交叉熵损失 ℓ i = − log ( softmax ( o i ) [ x i + 1 ] ) \ell_i = - \log \big( \text{softmax}(o_i)[x_{i+1}] \big) ℓi=−log(softmax(oi)[xi+1]),你的函数需要满足以下要求:
- 为数值稳定性,在计算前减去 logits 中的最大值
- 在可能的情况下,消去不必要的 log \log log 和 exp \exp exp 运算
- 支持任意额外的 batch 维度,并在 batch 维度上返回 平均损失。与 §1.3 中的约定一致,我们假设所有 batch 类维度始终位于最前面,而词表大小维度位于最后
完成后,实现测试适配器 [adapters.run_cross_entropy],然后运行:
uv run pytest -k test_cross_entropy
以测试你的实现是否正确
代码实现如下:
import torch

def cross_entropy_from_logits(logits: torch.Tensor, targets: torch.Tensor) -> torch.Tensor:
    """
    Numerically-stable cross entropy from logits.

    Args:
        logits: Tensor of shape [..., vocab_size], where the last dimension is the class dimension.
        targets: Long tensor of shape [...], containing class indices in [0, vocab_size).

    Returns:
        A scalar tensor: mean negative log-likelihood over all batch elements.
    """
    if logits.ndim < 1:
        raise ValueError("logits must have at least 1 dimension [..., vocab_size].")
    if targets.shape != logits.shape[:-1]:
        raise ValueError(f"targets shape {targets.shape} must match logits batch shape {logits.shape[:-1]}.")
    if targets.dtype not in (torch.int64, torch.int32, torch.int16, torch.int8, torch.uint8):
        raise TypeError("targets must be an integer tensor of class indices.")

    # Subtract max for numerical stability
    m = logits.max(dim=-1, keepdim=True).values
    shifted = logits - m

    # Compute logsumexp over the class dimension
    lse = torch.logsumexp(shifted, dim=-1)  # shape [...]

    # Gather the logit corresponding to the true class
    idx = targets.unsqueeze(-1)  # [..., 1]
    correct = shifted.gather(dim=-1, index=idx).squeeze(-1)  # shape [...]

    # Negative log-likelihood: logsumexp - correct_logit
    nll = lse - correct

    # Return mean over all batch elements
    return nll.mean()
测试适配器 [adapters.run_cross_entropy] 的实现如下:
def run_cross_entropy(
    inputs: Float[Tensor, " batch_size vocab_size"], targets: Int[Tensor, " batch_size"]
) -> Float[Tensor, ""]:
    """Given a tensor of inputs and targets, compute the average cross-entropy
    loss across examples.

    Args:
        inputs (Float[Tensor, "batch_size vocab_size"]): inputs[i][j] is the
            unnormalized logit of jth class for the ith example.
        targets (Int[Tensor, "batch_size"]): Tensor of shape (batch_size,) with the index of the correct class.
            Each value must be between 0 and `num_classes - 1`.

    Returns:
        Float[Tensor, ""]: The average cross-entropy loss across examples.
    """
    from cs336_basics.nn_utils import cross_entropy_from_logits
    return cross_entropy_from_logits(inputs, targets)
执行 uv run pytest -k test_cross_entropy 后输出如下:

下面我们简单分析下代码实现和公式是如何对应上的:
对单个样本(省略 batch 下标),logits 记为 o ∈ R V o \in \mathbb{R}^{V} o∈RV,目标类别为 y y y,作业要求中:
p i = softmax ( o ) i = e o i ∑ j e o j p_i = \text{softmax}(o)_i = \frac{e^{o_i}}{\sum_{j} e^{o_j}} pi=softmax(o)i=∑jeojeoi
交叉熵(对 one-hot 目标)等价于负对数似然:
L = − log p y \mathcal{L} = -\log p_y L=−logpy
把 softmax 代入:
L = − log e o y ∑ j e o j = − ( o y − log ∑ j e o j ) = log ∑ j e o j − o y \mathcal{L} = -\log \frac{e^{o_y}}{\sum_j e^{o_j}} = -\big(o_y - \log \sum_j e^{o_j}\big) = \log \sum_j e^{o_j} - o_y L=−log∑jeojeoy=−(oy−logj∑eoj)=logj∑eoj−oy
这就是我们代码最终实现的核心公式:cross entropy = logsumexp(logits) - logits[target],它避免了先 softmax 在 log 的数值风险和额外计算
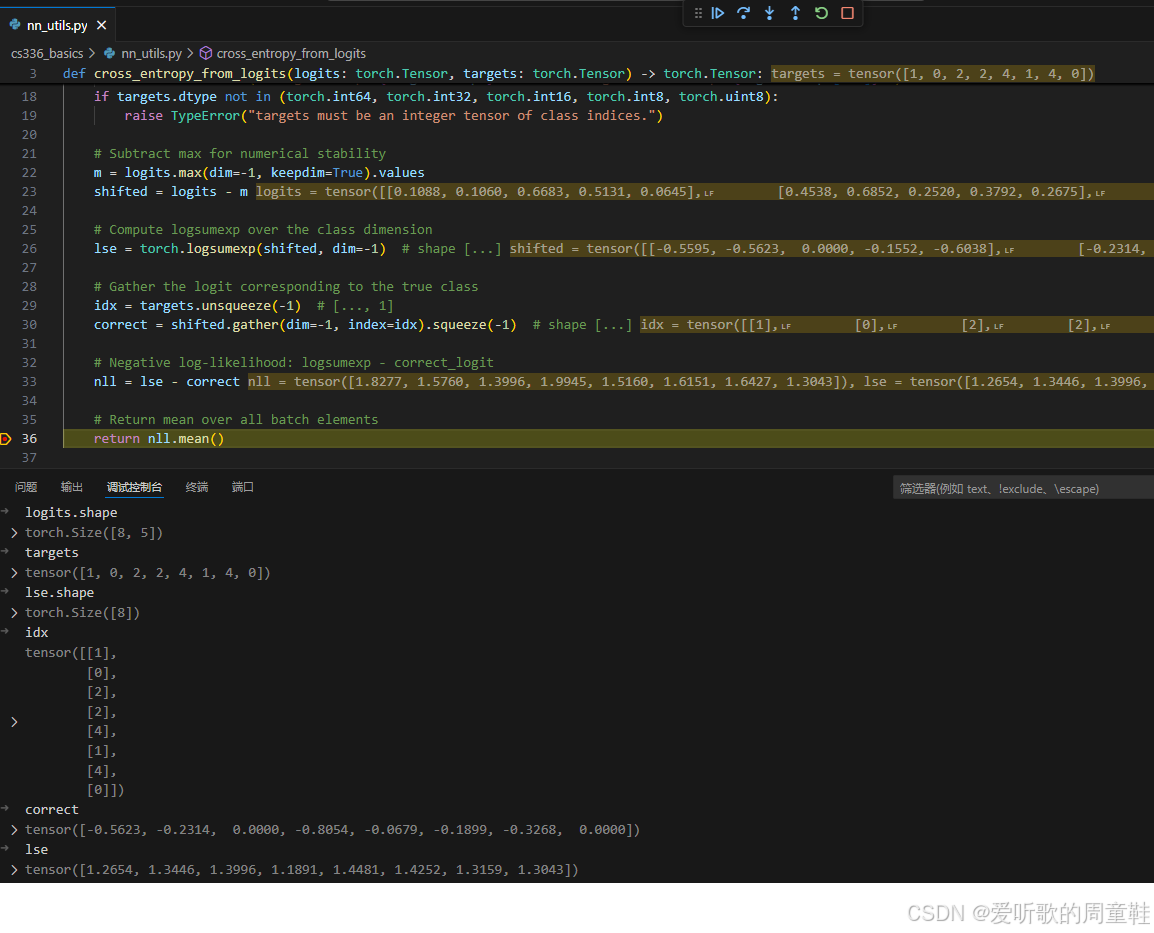
此外直接计算 ∑ j e o j \sum_j e^{o_j} ∑jeoj 可能会导致数值溢出,常见做法是减去其最大值,对应代码中的实现是:
m = logits.max(dim=-1, keepdim=True).values
shifted = logits - m
2. Problem (learning_rate_tuning): Tuning the learning rate (1 point)
正如我们将会看到的那样,在所有超参数中,对训练过程影响最大的就是 学习率。下面我们通过一个简单示例来直观地观察这一点,请将上面的 SGD 示例分别使用另外三个学习率取值来运行:1e1、1e2 和 1e3,并且只训练 10 次迭代
对于每一种学习率,损失函数的变化情况如何?它是下降得更快、更慢,还是会发生发散(也就是说,在训练过程中反而不断增大)?
代码实现如下:
import torch
from torch.optim import SGD

torch.manual_seed(0)

def run_experiment(lr: float, steps: int = 10):
    print(f"\n=== Learning rate = {lr} ===")
    weights = torch.nn.Parameter(5 * torch.randn((10, 10)))
    opt = SGD([weights], lr=lr)

    for t in range(steps):
        opt.zero_grad()
        loss = (weights ** 2).mean()
        print(f"step {t:02d}: loss = {loss.item():.6f}")
        loss.backward()
        opt.step()

if __name__ == "__main__":
    for lr in [1e1, 1e2, 1e3]:
        run_experiment(lr, steps=10)
执行后输出如下:
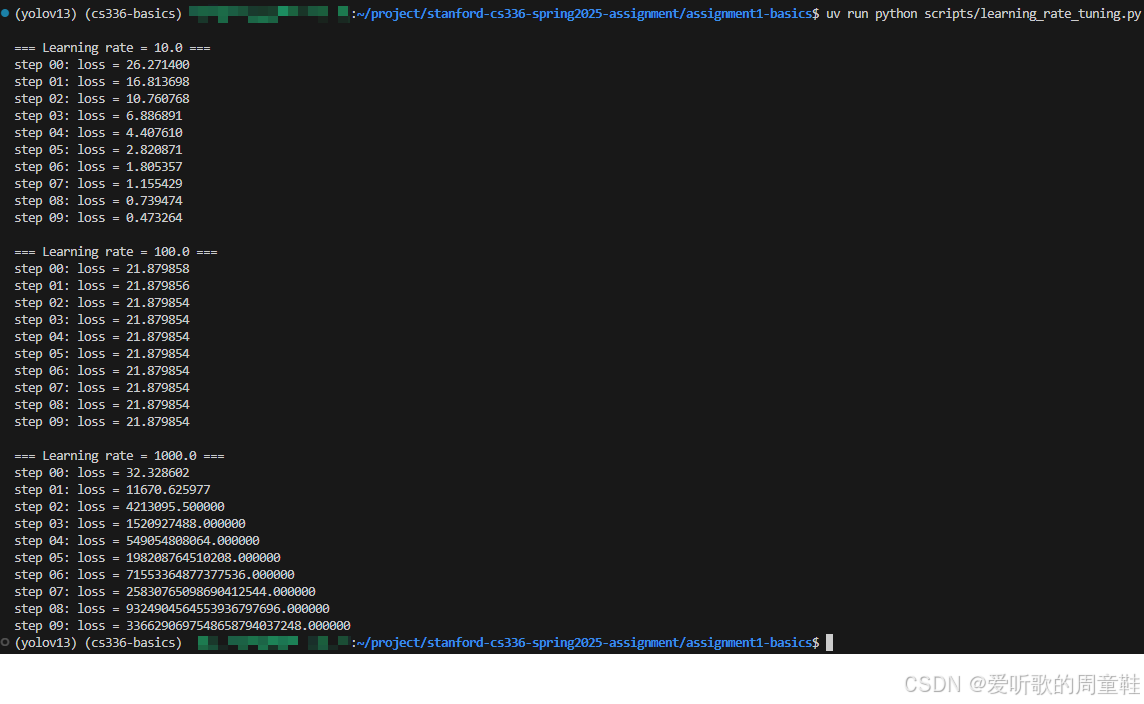
Deliverable:当学习率为 1e1 时,损失在 10 次迭代内稳定且快速下降,表现出良好的收敛性;当学习率增大到 1e2 时,损失几乎不再变化,训练停滞;而在 1e3 的情况下,损失迅速呈指数级增长,训练过程明显发散。这说明过大的学习率会导致参数更新步长过大,从而无法有效下降甚至直至发散。
3. Problem (adamw): Implement AdamW (2 points)
Deliverable:将 AdamW 优化器实现为 torch.optim.Optimizer 的一个子类,你的类应当在 __init__ 中接收学习率 α \alpha α 以及超参数 β \beta β、 ϵ \epsilon ϵ 和 λ \lambda λ。为了帮助你维护状态,基类 Optimizer 为你提供了一个字典 self.state,它将每个 nn.Parameter 对象映射到一个字典,用于存储与该参数相关的任意信息(对于 AdamW 来说,这些信息就是动量估计)
请实现 [adapters.get_adamw_cls],并确保你的实现能够通过下面的测试:
uv run pytest -k test_adamw
代码实现如下:
import math
import torch

class AdamW(torch.optim.Optimizer):
    def __init__(
        self,
        params,
        lr : float = 1e-3,
        betas : tuple[float, float] = (0.9, 0.999),
        eps : float = 1e-8,
        weight_decay: float = 0.0
    ):
        if lr < 0.0:
            raise ValueError(f"Invalid learning rate: {lr}")
        if eps < 0.0:
            raise ValueError(f"Invalid epsilon value: {eps}")
        if weight_decay < 0.0:
            raise ValueError(f"Invalid weight_decay value: {weight_decay}")
        if not (0.0 <= betas[0] < 1.0) or not (0.0 <= betas[1] < 1.0):
            raise ValueError(f"Invalid betas: {betas}")

        defaults = dict(lr=lr, betas=betas, eps=eps, weight_decay=weight_decay)
        super().__init__(params, defaults)

    @torch.no_grad()
    def step(self, closure=None):
        loss = None
        if closure is not None:
            with torch.enable_grad():
                loss = closure()

        for group in self.param_groups:
            lr = group["lr"]
            beta1, beta2 = group["betas"]
            eps = group["eps"]
            wd = group["weight_decay"]

            for p in group["params"]:
                if p.grad is None:
                    continue
                grad = p.grad
                if grad.is_sparse:
                    raise RuntimeError("AdamW does not support sparse gradients.")

                state = self.state[p]
                if len(state) == 0:
                    state["step"] = 0
                    state["exp_avg"] = torch.zeros_like(p, memory_format=torch.preserve_format)
                    state["exp_avg_sq"] = torch.zeros_like(p, memory_format=torch.preserve_format)

                exp_avg = state["exp_avg"]
                exp_avg_sq = state["exp_avg_sq"]

                state["step"] += 1
                step = state["step"]

                # Apply decoupled weight decay
                if wd != 0.0:
                    p.add_(p, alpha=-lr * wd)

                # Update biased first and second moment estimates
                exp_avg.mul_(beta1).add_(grad, alpha=1.0 - beta1)
                exp_avg_sq.mul_(beta2).addcmul_(grad, grad, value=1.0 - beta2)

                # Compute bias-corrected step size
                bias_correction1 = 1.0 - beta1 ** step
                bias_correction2 = 1.0 - beta2 ** step
                step_size = lr * math.sqrt(bias_correction2) / bias_correction1

                # Update parameters
                denom = exp_avg_sq.sqrt().add_(eps)
                p.addcdiv_(exp_avg, denom, value=-step_size)

        return loss
测试适配器 [adapters.get_adamw_cls] 的实现如下:
def get_adamw_cls() -> Any:
    """
    Returns a torch.optim.Optimizer that implements AdamW.
    """
    from cs336_basics.optimizer import AdamW
    return AdamW
执行 uv run pytest -k test_adaw 后输出如下:

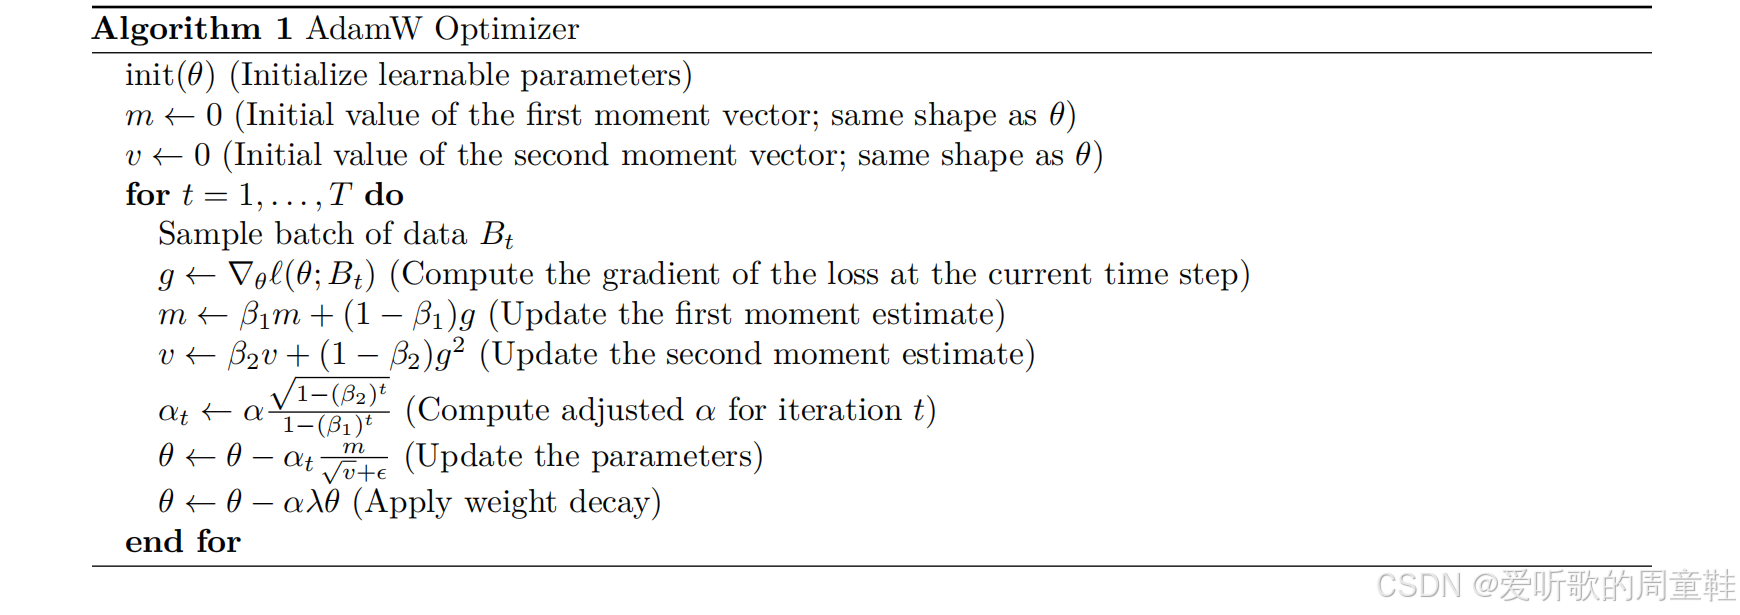
下面我们简单分析下自定义类 AdamW 核心函数 step() 实现的一些关键要点,主要是看看代码是如何对照着下面的 Algorithm 的:
1. closure(可选)
if closure is not None:
    with torch.enable_grad():
        loss = closure()
这是 PyTorch optimizer 的标准接口,允许你在 step 里重新计算 loss,这里我们没有使用到
2. 遍历 param groups / params
for group in self.param_groups:
    for p in group["params"]:
这里兼容 Optimizer 的标准组织方式,保证了同一个优化器里可以对不同参数组设置不同超参
3. 跳过无效梯度参数 + 禁止稀疏梯度
if p.grad is None:
    continue
grad = p.grad
if grad.is_sparse:
    raise RuntimeError("AdamW does not support sparse gradients.")
4. 关键:state 初始化
state = self.state[p]
if len(state) == 0:
    state["step"] = 0
    state["exp_avg"] = zeros_like(p)
    state["exp_avg_sq"] = zeros_like(p)
self.state 是基类提供的:每个 Parameter 一份状态字典,AdamW 要保存的就是:
step:迭代次数 texp_avg:m_t(一阶动量)exp_avg_sq:v_t(二阶动量)
5. 关键:AdamW 的 decoupled weight decay
if wd != 0.0:
    p.add_(p, alpha=-lr * wd)
这一步等价于 θ ← θ − l r ⋅ w d ⋅ θ \theta \leftarrow \theta - lr \cdot wd \cdot \theta θ←θ−lr⋅wd⋅θ,这是 AdamW 的解耦权重衰减,和 L2 正则(把 wd 加到 grad)不一样
6. 更新动量
exp_avg.mul_(beta1).add_(grad, alpha=1 - beta1)
exp_avg_sq.mul_(beta2).addcmul_(grad, grad, value=1 - beta2)
对应公式:
m t = β 1 m t − 1 + ( 1 − β 1 ) g t v t = β 2 v t − 1 + ( 1 − β 2 ) g t 2 \begin{aligned} m_t &= \beta_1 m_{t-1} + (1-\beta_1) g_t \\ v_t &= \beta_2 v_{t-1} + (1-\beta_2) g_t^2 \end{aligned} mtvt=β1mt−1+(1−β1)gt=β2vt−1+(1−β2)gt2
7. bias correction
bias_correction1 = 1 - beta1 ** step
bias_correction2 = 1 - beta2 ** step
step_size = lr * sqrt(bias_correction2) / bias_correction1
这对应公式:
m ^ t = m t 1 − β 1 t , v ^ t = v t 1 − β 2 t \hat{m}_t = \frac{m_t}{1-\beta_1^t},\quad \hat{v}_t = \frac{v_t}{1-\beta_2^t} m^t=1−β1tmt,v^t=1−β2tvt
最后的 update 可以写成:
θ ← θ − l r ⋅ m ^ t v ^ t + ϵ \theta \leftarrow \theta - lr \cdot \frac{\hat{m}_t}{\sqrt{\hat{v}_t}+\epsilon} θ←θ−lr⋅v^t+ϵm^t
代码把这几步折叠进 step_size 里做了一个等价变形,注意 step 必须从 1 开始进入 bias correction
8. 参数更新
denom = exp_avg_sq.sqrt().add_(eps)
p.addcdiv_(exp_avg, denom, value=-step_size)
等价于:
θ ← θ − step_size ⋅ m t v t + ϵ \theta \leftarrow \theta - \text{step\_size} \cdot \frac{m_t}{\sqrt{v_t} + \epsilon} θ←θ−step_size⋅vt+ϵmt
add_、mul_ 以及 addcdiv_ 这些都是 in-place 操作,速度更好
4. Problem (adamwAccounting): Resource accounting for training with AdamW (2 points)
我们来计算在使用 AdamW 进行训练时所需的 内存和计算量,假设所有张量都使用 float32 表示
(a)运行 AdamW 需要多少峰值内存?
请基于以下几部分的内存占用对你的答案进行拆分说明:
- 模型参数(parameters)
- 激活值(activations)
- 梯度(gradients)
- 优化器状态(optimizer state)
请用 batch_size 以及模型的超参数(vocab_size,context_length、num_layers、d_model、num_heads)来表达你的答案,并假设 d f f = 4 × d m o d e l d_{ff}=4\times d_{model} dff=4×dmodel
为简化起见,在计算 激活值内存 时,只考虑以下组件:
- Transformer block
- RMSNorm(s)
- 多头自注意力子层:
- QKV 投影
- Q ⊤ K Q^{\top}K Q⊤K 矩阵乘
- softmax
- 对 value 的加权求和
- 输出投影
- 逐位置前馈网络:
- W 1 W_1 W1 矩阵乘
- SiLU
- W 2 W_2 W2 矩阵乘
- 最终 RMSNorm
- 输出 embedding
- logits 上的交叉熵损失
Deliverable:给出参数、激活值、梯度以及优化器状态各自的代数表达式,并给出总内存表达式。
记符号定义:
- B B B:
batch_size - S S S:
context_length - V V V:
vocab_size - L L L:
num_layers - d d d:
d_model - h h h:
num_heads
所有张量使用 float32,内存分为四部分:
模型参数(parameters)
在 斯坦福大学 | CS336 | 从零开始构建语言模型 | Spring 2025 | 笔记 | Assignment 1: Transformer LM Architecture Implement 文章中,我们有给出模型参数数量的计算公式:
N = L ( 4 d 2 + 3 d d f f + 2 d ) + 2 V d + d = L ( 16 d 2 + 2 d ) + 2 V d + d \begin{aligned} N &= L\left(4d^2+3dd_{ff}+2d\right)+2Vd+d \\ &= L\left(16d^2+2d\right)+2Vd+d \end{aligned} N=L(4d2+3ddff+2d)+2Vd+d=L(16d2+2d)+2Vd+d
参数内存:
M params = 4 N bytes M_{\text{params}} = 4N \text{ bytes} Mparams=4N bytes
梯度(gradients)
每个参数对应一个梯度,同样为 float32:
M grads = 4 N bytes M_{\text{grads}} = 4N \text{ bytes} Mgrads=4N bytes
优化器状态(optimizer state)
AdamW 为每个参数维护两个动量(m 和 v),各占一个 float32:
M opt = 8 N bytes M_{\text{opt}}=8N \text{ bytes} Mopt=8N bytes
激活值(activations)
在前向传播中需要保存的中间张量,用于反向传播,考虑 Transformer 块中各组件及最终输出层:
- Transformer block
- RMSNorm(s): 2 ⋅ ( B S d ) 2\cdot(BSd) 2⋅(BSd)
- 多头自注意力子层:
- QKV 投影: 3 ⋅ ( B S d ) 3\cdot(BSd) 3⋅(BSd)
- Q ⊤ K Q^{\top}K Q⊤K 矩阵乘: B h S 2 BhS^2 BhS2
- softmax: B h S 2 BhS^2 BhS2
- 对 value 的加权求和: B S d BSd BSd
- 输出投影: B S d BSd BSd
- 逐位置前馈网络:
- W 1 W_1 W1 矩阵乘: B S d f f = 4 B S d BSd_{ff}=4BSd BSdff=4BSd
- SiLU: B S d f f = 4 B S d BSd_{ff}=4BSd BSdff=4BSd
- W 2 W_2 W2 矩阵乘: B S d BSd BSd
- 最终 RMSNorm: B S d BSd BSd
- 输出 embedding: B S d BSd BSd
- logits 上的交叉熵损失: B S V BSV BSV(loss 标量本身是 B S BS BS,这里忽略)
总激活元素数:
A = L ( 16 B S d + 2 B h S 2 ) + 2 B S d + B S V A = L(16BSd+2BhS^2)+2BSd+BSV A=L(16BSd+2BhS2)+2BSd+BSV
激活值内存:
M act = 4 A bytes M_{\text{act}} = 4A \text{ bytes} Mact=4A bytes
总峰值内存:
M total = 16 N + 4 [ L ( 16 B S d + 2 B h S 2 ) + 2 B S d + B S V ] M_{\text{total}} = 16N + 4[L(16BSd+2BhS^2)+2BSd+BSV] Mtotal=16N+4[L(16BSd+2BhS2)+2BSd+BSV]
(b)针对 GPT-2 XL 规模的模型实例化你的结果
将你的结果带入 GPT-2 XL 形状的模型,使表达式只依赖于 batch_size,在 80GB 显存限制下,你最大可以使用多大的 batch_size?
Deliverable:一个形如 a ⋅ batch_size + b a\cdot \text{batch\_size}+b a⋅batch_size+b 的表达式(其中 a , b a,b a,b 为数值常数),以及一个表示最大 batch_size 的具体数值。
GPT-2 XL 配置: V = 50257 , S = 1024 , L = 48 , d = 1600 , h = 25 , d f f = 6400 V=50257,\ S=1024, \ L=48, \ d=1600, \ h=25, \ d_{ff}=6400 V=50257, S=1024, L=48, d=1600, h=25, dff=6400
代入得到 N ≈ 201270576 × 10 9 N \approx201270576 \times 10^9 N≈201270576×109,常数项(参数+梯度+AdamW 状态) b = 16 N ≈ 3.40329216 × 10 10 bytes ≈ 34.033 GB b=16N\approx3.40329216 \times 10^{10} \text{ bytes} \approx 34.033 \text{ GB} b=16N≈3.40329216×1010 bytes≈34.033 GB
线性项(激活值) a = 4 [ L ( 16 S d + 2 h S 2 ) + 2 S d + S V ] ≈ 15.318 GB/batch a=4[L(16Sd+2hS^2)+2Sd+SV]\approx15.318 \text{ GB/batch} a=4[L(16Sd+2hS2)+2Sd+SV]≈15.318 GB/batch
总内存近似为:
M total ≈ 15.318 B + 34.033 GB M_{\text{total}} \approx 15.318B+34.033 \text{ GB} Mtotal≈15.318B+34.033 GB
在 80GB 显存限制下:
B max = ⌊ 80 − 34.033 15.318 ⌋ = 3 B_{\max} = \left\lfloor \frac{80 - 34.033}{15.318} \right\rfloor = 3 Bmax=⌊15.31880−34.033⌋=3
(c)AdamW 的单步更新需要多少 FLOPs?
Deliverable:一个代数表达式,并附上简要说明。
AdamW 的更新是逐元素的,主要是若干乘加、平方、开方、除法等标量运算,按每个参数元素估计一个常数开销即可,对每个参数元素(忽略 bias-correction 的标量幂运算开销)大致包含:
- decoupled weight decay:2 FLOPs(乘+加)
- m m m 更新:3 FLOPs
- v v v 更新:4 FLOPs
- denom: v + ϵ \sqrt{v}+\epsilon v+ϵ(可粗略当常数级)
- 参数更新:3 FLOPs(除/乘/加)
因此总共需要的 FLOPs 约为:
F AdamW ≈ c ⋅ N ≈ 15 N F_{\text{AdamW}} \approx c \cdot N \approx 15 N FAdamW≈c⋅N≈15N
这是逐参数元素的常数级开销,远小于 Transformer 的矩阵乘 FLOPs
(d)训练时间估计(基于 MFU)
模型 FLOPs 利用率(MFU)定义为实际观测到的吞吐量(token/s)与硬件理论峰值 FLOPs 吞吐量的比值 [Chowdhery+ 2022]
已知:
- NVIDIA A100 GPU 的 float32 理论峰值为 19.5 TFLOP/s
- 假设你可以达到 50% MFU
- 在单张 A100 上训练 GPT-2 XL
- 训练 400K steps
- batch size = 1024
- 假设 反向传播的 FLOPs 是前向传播的两倍(参考 [Kaplan+ 2020] [Hoffmann+ 2022])
那么完成训练大约需要多少天?
Deliverable:训练所需的天数,并给出简要说明。
在 斯坦福大学 | CS336 | 从零开始构建语言模型 | Spring 2025 | 笔记 | Assignment 1: Transformer LM Architecture Implement 文章中,我们有计算 batch=1 时 GPT-2 XL 前向 FLOPs 为:
F forward ≈ 4.513 × 10 12 FLOPs F_{\text{forward}} \approx 4.513 \times 10^{12} \text{ FLOPs} Fforward≈4.513×10¹² FLOPs
对于 B = 1024 B=1024 B=1024,单步前向 FLOPs:
F forward, step = 1024 × 4.513 × 10 12 ≈ 4.622 × 10 15 FLOPs F_{\text{forward, step}} = 1024 \times 4.513 \times 10^{12} \approx 4.622 \times 10^{15}\ \text{FLOPs} Fforward, step=1024×4.513×1012≈4.622×10¹⁵ FLOPs
单步总 FLOPs(前向 + 反向):
F step = 3 × 4.622 × 10 15 ≈ 1.387 × 10 16 FLOPs F_{\text{step}} = 3 \times 4.622 \times 10^{15} \approx 1.387 \times 10^{16}\ \text{FLOPs} Fstep=3×4.622×1015≈1.387×10¹⁶ FLOPs
总训练 FLOPs:
F total = 400 000 × 1.387 × 10 16 ≈ 5.548 × 10 21 FLOPs F_{\text{total}} = 400\,000 \times 1.387 \times 10^{16} \approx 5.548 \times 10^{21}\ \text{FLOPs} Ftotal=400000×1.387×1016≈5.548×10²¹ FLOPs
实际吞吐量:
1.95 × 10 13 × 0.5 = 9.75 × 10 12 FLOP/s 1.95 \times 10^{13} \times 0.5 = 9.75 \times 10^{12}\ \text{FLOP/s} 1.95×1013×0.5=9.75×10¹² FLOP/s
训练时间:
5.548 × 10 21 9.75 × 10 12 ≈ 5.690 × 10 8 s ≈ 5.690 × 10 8 86400 ≈ 6584 days \frac{5.548 \times 10^{21}}{9.75 \times 10^{12}} \approx 5.690 \times 10^8\ \text{s} \approx \frac{5.690 \times 10^8}{86400} \approx 6584\ \text{days} 9.75×10125.548×1021≈5.690×10⁸ s≈864005.690×108≈6584 days
因此,在单张 A100 上完成训练约需 6584 天
5. Problem (learning_rate_schedule): Implement cosine learning rate schedule with warmup (1 point)
Deliverable:编写一个函数,该函数接收参数 t t t、 α max \alpha_{\max} αmax、 α min \alpha_{\min} αmin、 T w T_w Tw 和 T c T_c Tc,并根据上文定义的调度策略返回在第 t t t 步使用的学习率 α t \alpha_t αt
随后,实现测试适配器 [adapters.get_lr_cosine_schedule],并确保它能够通过以下测试命令:
uv run pytest -k test_get_lr_cosine_schedule
代码实现如下:
import math

def lr_cosine_schedule_with_warmup(
    t: int,
    alpha_max: float,
    alpha_min: float,
    T_w: int,
    T_c: int
) -> float:
    """
    Cosine learning rate schedule with linear warmup.

    Args:
        t: Current iteration (step).
        alpha_max: Maximum learning rate.
        alpha_min: Minimum / final learning rate.
        T_w: Number of warmup iterations.
        T_c: Number of cosine annealing iterations (end of cosine cycle).

    Returns:
        Learning rate at step t.
    """
    # Warmup phase: alpha_t = (t / T_w) * alpha_max
    if T_w > 0 and t < T_w:
        return (t / T_w) * float(alpha_max)

    # After cosine phase: keep alpha_min
    if t > T_c:
        return float(alpha_min)

    # Cosine phase: T_w <= t <= T_c
    denom = T_c - T_w
    if denom <= 0:
        # Degenerate schedule: no valid cosine interval
        return float(alpha_min)

    frac = (t - T_w) / denom  # in [0, 1]
    return float(alpha_min) + 0.5 * (1.0 + math.cos(math.pi * frac)) * (float(alpha_max) - float(alpha_min))
测试适配器 [adapters.get_lr_cosine_schedule] 的实现如下:
def run_get_lr_cosine_schedule(
    it: int,
    max_learning_rate: float,
    min_learning_rate: float,
    warmup_iters: int,
    cosine_cycle_iters: int,
):
    """
    Given the parameters of a cosine learning rate decay schedule (with linear
    warmup) and an iteration number, return the learning rate at the given
    iteration under the specified schedule.

    Args:
        it (int): Iteration number to get learning rate for.
        max_learning_rate (float): alpha_max, the maximum learning rate for
            cosine learning rate schedule (with warmup).
        min_learning_rate (float): alpha_min, the minimum / final learning rate for
            the cosine learning rate schedule (with warmup).
        warmup_iters (int): T_w, the number of iterations to linearly warm-up
            the learning rate.
        cosine_cycle_iters (int): T_c, the number of cosine annealing iterations.

    Returns:
        Learning rate at the given iteration under the specified schedule.
    """
    from cs336_basics.optimizer import lr_cosine_schedule_with_warmup
    return lr_cosine_schedule_with_warmup(
        t=it,
        alpha_max=max_learning_rate,
        alpha_min=min_learning_rate,
        T_w=warmup_iters,
        T_c=cosine_cycle_iters
    )
执行 uv run pytest -k test_get_lr_cosine_schedule 后输出如下:
代码实现较为简单,基本就是将下面三段公式逐段翻译成代码:
(Warm-up 阶段) 如果 t < T w t < T_w t<Tw,则:
α t = t T w α max \alpha_t = \frac{t}{T_w} \alpha_{\max} αt=Twtαmax
对应代码:
if T_w > 0 and t < T_w:
    return (t / T_w) * alpha_max
(余弦退火阶段) 如果 T w ≤ t ≤ T c T_w \le t \le T_c Tw≤t≤Tc,则:
α t = α min + 1 2 ( 1 + cos ( t − T w T c − T w π ) ) ( α max − α min ) \alpha_t = \alpha_{\min} + \frac{1}{2}\left(1 + \cos\left(\frac{t - T_w}{T_c - T_w}\pi\right)\right)(\alpha_{\max} - \alpha_{\min}) αt=αmin+21(1+cos(Tc−Twt−Twπ))(αmax−αmin)
对应代码:
# Cosine phase: T_w <= t <= T_c
denom = T_c - T_w
if denom <= 0:
    # Degenerate schedule: no valid cosine interval
    return float(alpha_min)

frac = (t - T_w) / denom  # in [0, 1]
return float(alpha_min) + 0.5 * (1.0 + math.cos(math.pi * frac)) * (float(alpha_max) - float(alpha_min))
(退火后阶段) 如果 t > T c t > T_c t>Tc,则:
α t = α min \alpha_t = \alpha_{\min} αt=αmin
对应代码:
if t > T_c:
    return alpha_min
6. Problem (gradient_clipping): Implement gradient clipping (1 point)
Deliverable:编写一个函数来实现梯度裁剪,你的函数应当接收一个参数列表以及一个最大的 ℓ 2 \ell_2 ℓ2 范数,并 就地(in place) 修改每一个参数对应的梯度,请使用 ϵ = 10 − 6 \epsilon=10^{-6} ϵ=10−6(即 PyTorch 的默认取值)
随后,实现测试适配器 [adapters.run_gradient_clipping],并确保你的实现能够通过以下测试:
uv run pytest -k test_gradient_clipping
代码实现如下:
import math
import torch
from typing import Iterable

def clip_grad_norm(
    params: Iterable[torch.nn.Parameter],
    max_norm: float,
    eps: float = 1e-6
) -> float:
    """
    Clip gradients in-place so that the global L2 norm does not exceed max_norm.

    Args:
        params: Iterable of parameters whose .grad will be modified in-place.
        max_norm: Maximum allowed global L2 norm.
        eps: Small constant for numerical stability.

    Returns:
        The total (pre-clipping) global L2 norm as a Python float.
    """
    if max_norm < 0:
        raise ValueError(f"max_norm must be non-negative, got {max_norm}")

    # Collect gradients that exist
    grads = []
    for p in params:
        if p is None:
            continue
        g = p.grad
        if g is None:
            continue
        if g.is_sparse:
            raise RuntimeError("clip_grad_norm_ does not support sparse gradients.")
        grads.append(g)

    if len(grads) == 0:
        return 0.0

    # Compute global L2 norm: sqrt(sum_i ||g_i||_2^2)
    # Use float32 accumulation for stability and consistency
    total_sq = 0.0
    for g in grads:
        total_sq += float(g.detach().float().pow(2).sum().item())
    total_norm = math.sqrt(total_sq)

    # Compute clipping coefficient
    clip_coef = float(max_norm) / (total_norm + float(eps))

    # If norm exceeds threshold, scale all grads by the same factor (in-place)
    if clip_coef < 1.0:
        for g in grads:
            g.mul_(clip_coef)

    return float(total_norm)
测试适配器 [adapters.run_gradient_clipping] 的实现如下:
def run_gradient_clipping(parameters: Iterable[torch.nn.Parameter], max_l2_norm: float) -> None:
    """Given a set of parameters, clip their combined gradients to have l2 norm at most max_l2_norm.

    Args:
        parameters (Iterable[torch.nn.Parameter]): collection of trainable parameters.
        max_l2_norm (float): a positive value containing the maximum l2-norm.

    The gradients of the parameters (parameter.grad) should be modified in-place.
    """
    from cs336_basics.nn_utils import clip_grad_norm
    return clip_grad_norm(parameters, max_l2_norm)
执行 uv run pytest -k test_gradient_clipping 后输出如下:

作业要求的是 全局 L2 范数裁剪(global norm clipping):
∥ g ∥ 2 = ∑ i ∣ g i ∣ 2 \lVert g \rVert_2 = \sqrt{\sum_i |g_i|^2} ∥g∥2=i∑∣gi∣2
- 若 ∥ g ∥ 2 ≤ M \lVert g \rVert_2 \le M ∥g∥2≤M:什么都不做
- 若 ∥ g ∥ 2 > M \lVert g \rVert_2 > M ∥g∥2>M:所有梯度统一按比例缩放
g i ← g i ⋅ M ∥ g ∥ 2 + ϵ g_i \leftarrow g_i \cdot \frac{M}{\lVert g \rVert_2 + \epsilon} gi←gi⋅∥g∥2+ϵM
代码中的实现逻辑比较清晰:
1. 收集有效梯度
grads = []
for p in params:
    if p is None:
        continue
    g = p.grad
    if g is None:
        continue
    if g.is_sparse:
        raise RuntimeError(...)
    grads.append(g)
没有梯度的参数不能参与 norm 计算
2. 计算全局 L2 范数
total_sq = 0.0
for g in grads:
    total_sq += float(g.detach().float().pow(2).sum().item())
total_norm = math.sqrt(total_sq)
对应公式 ∥ g ∥ 2 = ∑ i ∣ g i ∣ 2 \lVert g \rVert_2 = \sqrt{\sum_i |g_i|^2} ∥g∥2=∑i∣gi∣2
3. 计算缩放因子
clip_coef = max_norm / (total_norm + eps)
4. 条件裁剪(in-place 修改)
if clip_coef < 1.0:
    for g in grads:
        g.mul_(clip_coef)
所有梯度乘同一个系数,mul_ 操作是 in-place
7. Problem (data_loading): Implement data loading (2 points)
Deliverable:编写一个函数,该函数接收以下输入:
- 一个 numpy 数组 x x x(包含 token ID 的整数数组)
batch_sizecontext_length- 一个 PyTorch 设备字符串(例如
'cpu'或'cuda:0')
并返回一对张量:采样得到的输入序列以及对应的下一个 token 目标序列,这两个张量的形状都应为 ( batch_size , context_length ) (\text{batch\_size},\text{context\_length}) (batch_size,context_length),并且内容均为 token ID,同时二者都应被放置在所指定的设备上
为了使用我们提供的测试来验证你的实现,你需要首先实现测试适配器 [adapters.run_get_batch],并确保你的实现能够通过以下测试
uv run pytest -k test_get_batch
代码实现如下:
import torch
import numpy as np
import numpy.typing as npt

def get_batch(
    dataset: npt.NDArray,
    batch_size: int,
    context_length: int,
    device: str
) -> tuple[torch.Tensor, torch.Tensor]:
    """
    Sample language modeling batches from a 1D numpy array of token IDs.

    Args:
        dataset: 1D numpy array (or memmap) of integer token IDs.
        batch_size: Number of sequences to sample.
        context_length: Length of each input/target sequence.
        device: PyTorch device string, e.g. "cpu", "cuda:0", "mps".

    Returns:
        inputs:  LongTensor of shape (batch_size, context_length)
        targets: LongTensor of shape (batch_size, context_length)
    """

    if dataset.ndim != 1:
        raise ValueError(f"dataset must be 1D, got shape {dataset.shape}")
    if batch_size <= 0:
        raise ValueError(f"batch_size must be positive, got {batch_size}")
    if context_length <= 0:
        raise ValueError(f"context_length must be positive, got {context_length}")

    n = int(dataset.shape[0])
    if n < context_length + 1:
        raise ValueError(f"dataset too small: need at least context_length+1 tokens, got n={n}, context_length={context_length}")

    # Sample start indices on cpu
    max_start = n - context_length - 1
    starts = np.random.randint(low=0, high=max_start+1, size=(batch_size,), dtype=np.int64)

    # Build index matrix of shape (batch_size, context_length + 1)
    offsets = np.arange(context_length + 1, dtype=np.int64)
    indices = starts[:, None] + offsets[None, :]

    # Gather a small contiguous block from the dataset
    block = dataset[indices]  # (B, S+1)

    # Split into inputs and targets
    inputs_np = block[:, :-1]
    targets_np = block[:, 1:]

    # Convert only the small batch to torch tensors and move to target device
    inputs = torch.from_numpy(inputs_np).to(device=device, dtype=torch.long)
    targets = torch.from_numpy(targets_np).to(device=device, dtype=torch.long)

    return inputs, targets
测试适配器 [adapters.run_get_batch] 的实现如下:
def run_get_batch(
    dataset: npt.NDArray, batch_size: int, context_length: int, device: str
) -> tuple[torch.Tensor, torch.Tensor]:
    """
    Given a dataset (a 1D numpy array of integers) and a desired batch size and
    context length, sample language modeling input sequences and their corresponding
    labels from the dataset.

    Args:
        dataset (np.array): 1D numpy array of integer token IDs in the dataset.
        batch_size (int): Desired batch size to sample.
        context_length (int): Desired context length of each sampled example.
        device (str): PyTorch device string (e.g., 'cpu' or 'cuda:0') indicating the device
            to place the sampled input sequences and labels on.

    Returns:
        Tuple of torch.LongTensors of shape (batch_size, context_length). The first tuple item
        is the sampled input sequences, and the second tuple item is the corresponding
        language modeling labels.
    """
    from cs336_basics.data import get_batch
    return get_batch(dataset, batch_size, context_length, device)
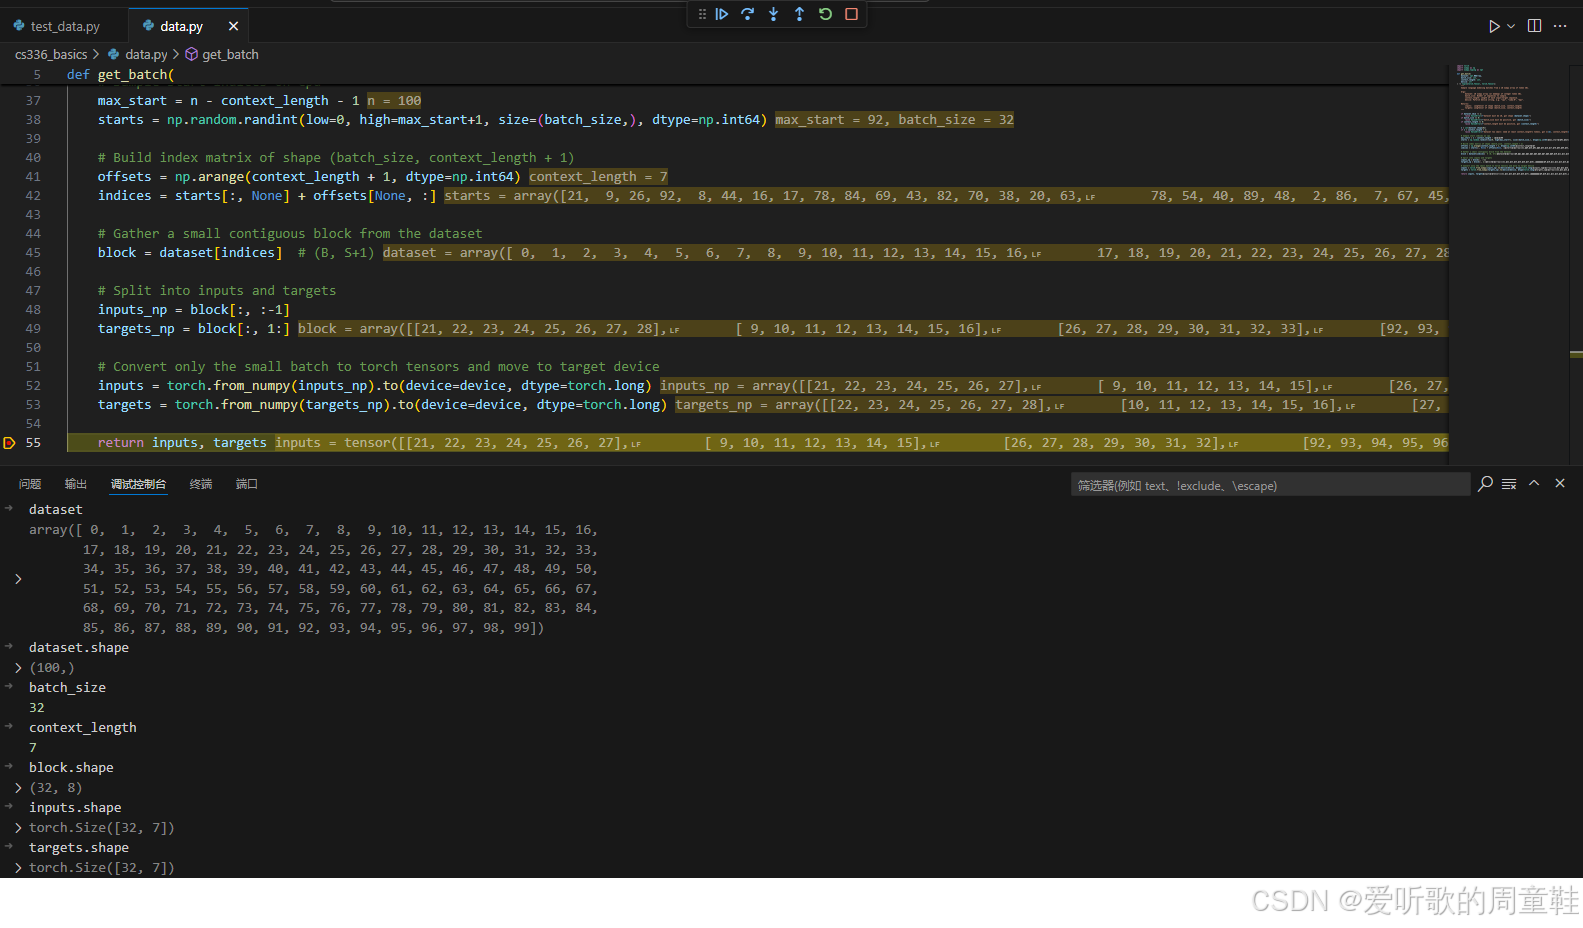
执行 uv run pytest -k test_get_batch 后输出如下:

整个实现较为简单,我们来看下整体流程:
1. 参数检查
if dataset.ndim != 1:
    raise ValueError(f"dataset must be 1D, got shape {dataset.shape}")
if batch_size <= 0:
    raise ValueError(f"batch_size must be positive, got {batch_size}")
if context_length <= 0:
    raise ValueError(f"context_length must be positive, got {context_length}")

n = int(dataset.shape[0])
if n < context_length + 1:
    raise ValueError(f"dataset too small: need at least context_length+1 tokens, got n={n}, context_length={context_length}")
2. 计算可采样起点范围
# Sample start indices on cpu
max_start = n - context_length - 1
starts = np.random.randint(low=0, high=max_start+1, size=(batch_size,), dtype=np.int64)
max_start 确保取 targets 时不会越界,同时用 numpy 在 [0, max_start] 内采样 B 个 starts
3. 构造索引矩阵
# Build index matrix of shape (batch_size, context_length + 1)
offsets = np.arange(context_length + 1, dtype=np.int64)
indices = starts[:, None] + offsets[None, :]
得到形状为 (B, S+1) 的索引,目的是一次性取出 inputs 和 targets 需要的连续块
4. 通过索引矩阵取小块
# Gather a small contiguous block from the dataset
block = dataset[indices]  # (B, S+1)
这样只 materialize 一个 batch,避免把整个 memmap 转成 torch tensor
5. 切分 inputs/targets
# Split into inputs and targets
inputs_np = block[:, :-1]
targets_np = block[:, 1:]
6. 转为 torch 并搬到设备
# Convert only the small batch to torch tensors and move to target device
inputs = torch.from_numpy(inputs_np).to(device=device, dtype=torch.long)
targets = torch.from_numpy(targets_np).to(device=device, dtype=torch.long)

return inputs, targets
整个实现还是比较简单的,调试输出如下图所示:
8. Problem (checkpointing): Implement model checkpointing (1 point)
请实现下面两个函数,用于 保存和加载检查点(checkpoint):
def save_checkpoint(model, optimizer, iteration, out)
该函数应当将前三个参数中的 所有状态 写入到类文件对象 out 中,你可以使用模型和优化器各自的 state_dict 方法来获取它们对应的状态,并使用 torch.save(obj, out) 将对象保存到 out 中(PyTorch 在这里既支持路径,也支持类文件对象)。通常的做法是让 obj 成为一个字典,但只要你之后能够正确加载该检查点,也可以使用任何你喜欢的格式
该函数期望接收以下参数:
model:torch.nn.Moduleoptimizer:torch.optim.Optimizeriteration:intout:str | os.PathLike | typing.BinaryIO | typing.IO[bytes]
def load_checkpoint(src, model, optimizer)
该函数应当从 src(路径或类文件对象)中加载一个检查点,并从中恢复模型和优化器的状态,函数应返回 保存在检查点中的迭代步数。你可以使用 torch.load(src) 来读取在 save_checkpoint 中保存的内容,然后分别调用模型和优化器的 load_state_dict 方法,将它们恢复到之前的状态
该函数期望接收以下参数:
src:str | os.PathLike | typing.BinaryIO | typing.IO[bytes]model:torch.nn.Moduleoptimizer:torch.optim.Optimizer
请实现适配器函数 [adapters.run_save_checkpoint] 和 [adapters.run_load_checkpoint],并确保它们能够通过以下测试:
uv run pytest -k test_checkpointing
代码实现如下:
import os
import torch
from typing import BinaryIO, IO, Union

PathOrFile = Union[str, os.PathLike, BinaryIO, IO[bytes]]

def save_checkpoint(
    model: torch.nn.Module,
    optimizer: torch.optim.Optimizer,
    iteration: int,
    out: PathOrFile
) -> None:
    """
    Save a training checkpoint containing model/optimizer state and iteration.

    Args:
        model: torch.nn.Module
        optimizer: torch.optim.Optimizer
        iteration: Current training iteration (step).
        out: File path or a binary file-like object.
    """
    obj = {
        "iteration": int(iteration),
        "model_state_dict": model.state_dict(),
        "optimizer_state_dict": optimizer.state_dict()
    }
    torch.save(obj, out)

def load_checkpoint(
    src: PathOrFile,
    model: torch.nn.Module,
    optimizer: torch.optim.Optimizer
) -> int:
    """
    Load a training checkpoint and restore model/optimizer state.

    Args:
        src: File path or a binary file-like object.
        model: torch.nn.Module to restore into.
        optimizer: torch.optim.Optimizer to restore into.

    Returns:
        The iteration (step) stored in the checkpoint.
    """
    ckpt = torch.load(src, map_location="cpu")

    if not isinstance(ckpt, dict):
        raise TypeError("Checkpoint must be a dict.")

    if "model_state_dict" not in ckpt or "optimizer_state_dict" not in ckpt or "iteration" not in ckpt:
        raise KeyError("Checkpoint dict missing required keys.")

    model.load_state_dict(ckpt["model_state_dict"])
    optimizer.load_state_dict(ckpt["optimizer_state_dict"])
    return int(ckpt["iteration"])
适配器函数 [adapters.run_save_checkpoint] 和 [adapters.run_load_checkpoint] 的实现如下:
def run_save_checkpoint(
    model: torch.nn.Module,
    optimizer: torch.optim.Optimizer,
    iteration: int,
    out: str | os.PathLike | BinaryIO | IO[bytes],
):
    """
    Given a model, optimizer, and an iteration number, serialize them to disk.

    Args:
        model (torch.nn.Module): Serialize the state of this model.
        optimizer (torch.optim.Optimizer): Serialize the state of this optimizer.
        iteration (int): Serialize this value, which represents the number of training iterations
            we've completed.
        out (str | os.PathLike | BinaryIO | IO[bytes]): Path or file-like object to serialize the model, optimizer, and iteration to.
    """
    from cs336_basics.nn_utils import save_checkpoint
    return save_checkpoint(model, optimizer, iteration, out)


def run_load_checkpoint(
    src: str | os.PathLike | BinaryIO | IO[bytes],
    model: torch.nn.Module,
    optimizer: torch.optim.Optimizer,
) -> int:
    """
    Given a serialized checkpoint (path or file-like object), restore the
    serialized state to the given model and optimizer.
    Return the number of iterations that we previously serialized in
    the checkpoint.

    Args:
        src (str | os.PathLike | BinaryIO | IO[bytes]): Path or file-like object to serialized checkpoint.
        model (torch.nn.Module): Restore the state of this model.
        optimizer (torch.optim.Optimizer): Restore the state of this optimizer.
    Returns:
        int: the previously-serialized number of iterations.
    """
    from cs336_basics.nn_utils import load_checkpoint
    return load_checkpoint(src, model, optimizer)
执行 uv run pytest -k test_checkpointing 后输出如下:

9. Problem (training_together): Put it together (4 points)
Deliverable:编写一个脚本,用于运行训练循环,在 用户提供的输入数据 上训练你的模型,具体来说,我们建议你的训练脚本至少支持以下功能:
- 能够配置和控制 模型以及优化器中的各类超参数
- 使用 np.memmap 以 内存高效 的方式加载训练集和验证集等大型数据集
- 将 checkpoint(检查点)序列化并保存 到用户指定的路径
- 周期性地记录 训练和验证阶段的性能指标(例如输出到控制台或记录到诸如 Weights & Biases [wandb.ai] 这样的外部服务中)
config.py 配置文件代码实现如下:
from typing import Optional
from dataclasses import dataclass, field

@dataclass
class DataConfig:
    # Memmap token files (1D binary files)
    train_data_path: str = "data/train.bin"
    val_data_path: str = "data/val.bin"
    # Numpy dtype used when creating the token files
    np_dtype: str = "uint16"

    context_length: int = 256

    # Device string used by get_batch()
    device: str = "cuda:0"

@dataclass
class ModelConfig:
    vocab_size: int = 10_000
    context_length: int = 256

    d_model: int = 256
    num_layers: int = 4
    num_heads: int = 8

    # If None, will default to 4 * d_model at model construction time
    d_ff: Optional[int] = None

    rope_theta: float = 10_000.0
    # If None, model will use context_length
    max_seq_len: Optional[int] = None

    rmsnorm_eps: float = 1e-5

    # torch dtype string used for model parameters
    torch_dtype: str = "float32"

@dataclass
class OptimizerConfig:
    lr_max: float = 3e-4
    lr_min: float = 3e-5

    warmup_iters: int = 200
    cosine_cycle_iters: int = 10_000

    beta1: float = 0.9
    beta2: float = 0.999
    eps: float = 1e-8
    weight_decay: float = 0.1

    grad_clip: float = 1.0

@dataclass
class TrainingConfig:
    max_steps: int = 10_000
    batch_size: int = 64

    log_interval: int = 50
    eval_interval: int = 500
    eval_batches: int = 20

    ckpt_interval: int = 1000
    ckpt_path: str = "checkpoints/ckpt.pt"
    resume_from: Optional[str] = None

    seed: int = 0

@dataclass
class WandbConfig:
    enable: bool = False
    project: str = "cs336-a1"
    run_name: str = "train"

@dataclass
class TrainConfig:
    data: DataConfig = field(default_factory=DataConfig)
    model: ModelConfig = field(default_factory=ModelConfig)
    optim: OptimizerConfig = field(default_factory=OptimizerConfig)
    train: TrainingConfig = field(default_factory=TrainingConfig)
    wandb: WandbConfig = field(default_factory=WandbConfig)

def get_default_config() -> TrainConfig:
    """
    Return a default training configuration.
    """
    cfg = TrainConfig()

    # Keep model/data context_length consistent by default
    cfg.model.context_length = cfg.data.context_length

    return cfg
train,py 训练代码实现如下:
import os
import time
import math
import torch
import numpy as np
from cs336_basics.data import get_batch
from cs336_basics.nn_utils import cross_entropy_from_logits, load_checkpoint, save_checkpoint, clip_grad_norm
from cs336_basics.config import get_default_config
from cs336_basics.transformer_lm import TransformerLM
from cs336_basics.optimizer import AdamW, lr_cosine_schedule_with_warmup

def open_memmap_1d(path: str, np_dtype: str) -> np.memmap:
    """
    Open a 1D token memmap file. The file is assumed to be a raw binary array.
    """
    dtype = np.dtype(np_dtype)
    itemsize = dtype.itemsize
    nbytes = os.path.getsize(path)
    if nbytes % itemsize != 0:
        raise ValueError(f"File size is not divisible by dtype size: {path} ({nbytes} bytes, itemsize={itemsize})")
    length = nbytes // itemsize
    return np.memmap(path, mode="r", dtype=dtype, shape=(length,))

def torch_dtype_from_string(s: str) -> torch.dtype:
    s = s.lower()
    if s in ("float32", "fp32"):
        return torch.float32
    if s in ("float16", "fp16"):
        return torch.float16
    if s in ("bfloat16", "bf16"):
        return torch.bfloat16
    raise ValueError(f"Unsupported torch dtype string: {s}")

def set_optimizer_lr(optimizer: torch.optim.Optimizer, lr: float) -> None:
    for group in optimizer.param_groups:
        group["lr"] = lr

@torch.no_grad()
def estimate_loss(model: torch.nn.Module, data: np.memmap, cfg) -> float:
    model.eval()
    losses = []
    for _ in range(cfg.train.eval_batches):
        xb, yb = get_batch(
            dataset=data,
            batch_size=cfg.train.batch_size,
            context_length=cfg.data.context_length,
            device=cfg.data.device
        )
        logits = model(xb)  # (B, S, V)
        B, S, V = logits.shape
        loss = cross_entropy_from_logits(logits.reshape(B * S, V), yb.reshape(B * S))
        losses.append(float(loss.item()))
    model.train()
    return float(np.mean(losses))

def main() -> None:
    # 1. Load configuration and set random seed
    cfg = get_default_config()

    torch.manual_seed(cfg.train.seed)
    np.random.seed(cfg.train.seed)

    # 2. Optional experiment tracking (weights & biases)
    wandb = None
    if cfg.wandb.enable:
        import wandb as _wandb
        wandb = _wandb
        wandb.init(project=cfg.wandb.project, name=cfg.wandb.run_name, config={
            "data": cfg.data.__dict__,
            "model": cfg.model.__dict__,
            "optim": cfg.optim.__dict__,
            "train": cfg.train.__dict__,
            "wandb": cfg.wandb.__dict__
        })

    # 3. Prepare filesystem and load datasets (memory-mapped)
    os.makedirs(os.path.dirname(cfg.train.ckpt_path) or ".", exist_ok=True)

    train_mm = open_memmap_1d(cfg.data.train_data_path, cfg.data.np_dtype)
    val_mm = open_memmap_1d(cfg.data.val_data_path, cfg.data.np_dtype)

    # 4. Create model and move it to the target device
    device = torch.device(cfg.data.device)
    model_dtype = torch_dtype_from_string(cfg.model.torch_dtype)

    d_ff = cfg.model.d_ff if cfg.model.d_ff is not None else 4 * cfg.model.d_model

    model = TransformerLM(
        vocab_size=cfg.model.vocab_size,
        context_length=cfg.model.context_length,
        d_model=cfg.model.d_model,
        num_layers=cfg.model.num_layers,
        num_heads=cfg.model.num_heads,
        d_ff=d_ff,
        rope_theta=cfg.model.rope_theta,
        max_seq_len=cfg.model.max_seq_len,
        eps=cfg.model.rmsnorm_eps,
        device=device,
        dtype=model_dtype
    ).to(device)

    # 5. Create optimizer and (optionally) resume from checkpoint
    optimizer = AdamW(
        model.parameters(),
        lr=cfg.optim.lr_max,
        betas=(cfg.optim.beta1, cfg.optim.beta2),
        eps=cfg.optim.eps,
        weight_decay=cfg.optim.weight_decay
    )

    start_it = 0
    if cfg.train.resume_from is not None and os.path.exists(cfg.train.resume_from):
        start_it = load_checkpoint(cfg.train.resume_from, model, optimizer)

    # 6. Training loop initialization
    best_val = float("inf")
    last_log_t = time.time()

    # 7. Main training loop
    for it in range(start_it, cfg.train.max_steps):
        # 7.1 Update learning rate according to schedule
        lr = lr_cosine_schedule_with_warmup(
            t=it,
            alpha_max=cfg.optim.lr_max,
            alpha_min=cfg.optim.lr_min,
            T_w=cfg.optim.warmup_iters,
            T_c=cfg.optim.cosine_cycle_iters
        )
        set_optimizer_lr(optimizer, lr)

        # 7.2 Sample a batch of training data
        xb, yb = get_batch(
            train_mm,
            batch_size=cfg.train.batch_size,
            context_length=cfg.data.context_length,
            device=cfg.data.device
        )

        # 7.3 Forward pass and loss computation
        logits = model(xb)  # (B, S, V)
        B, S, V = logits.shape
        loss = cross_entropy_from_logits(logits.reshape(B * S, V), yb.reshape(B * S))

        # 7.4 Backward pass (gradient computation)
        optimizer.zero_grad(set_to_none=True)
        loss.backward()

        # 7.5 Gradient clipping for training stability
        if cfg.optim.grad_clip > 0:
            clip_grad_norm(model.parameters(), cfg.optim.grad_clip, eps=1e-6)

        # 7.6 Optimizer step (parameter update)
        optimizer.step()

        # 7.7 Periodic training metrics logging
        if (it + 1) % cfg.train.log_interval == 0:
            now = time.time()
            dt = max(now - last_log_t, 1e-9)
            tok_s = (cfg.train.batch_size * cfg.data.context_length * cfg.train.log_interval) / dt
            msg = f"it={it+1} loss={loss.item():.4f} lr={lr:.3e} tok/s={tok_s:.1f}"
            print(msg)
            if wandb is not None:
                wandb.log({"train/loss": float(loss.item()), "train/lr": lr, "train/tok_s": tok_s}, step=it + 1)
            last_log_t = now

        # 7.8 Periodic evaluation on validation set
        if (it + 1) % cfg.train.eval_interval == 0:
            val_loss = estimate_loss(model, val_mm, cfg)
            val_ppl = float(math.exp(val_loss))
            print(f"[eval] it={it+1} val_loss={val_loss:.4f} val_ppl={val_ppl:.2f}")
            if wandb is not None:
                wandb.log({"val/loss": val_loss, "val/ppl": val_ppl}, step=it + 1)

            # Save the best-performing checkpoint
            if val_loss < best_val:
                best_val = val_loss
                best_path = cfg.train.ckpt_path.replace(".pt", ".best.pt")
                save_checkpoint(model, optimizer, it + 1, best_path)

        # 7.9 Periodic checkpointing
        if (it + 1) % cfg.train.ckpt_interval == 0:
            save_checkpoint(model, optimizer, it + 1, cfg.train.ckpt_path)

    # 8. Final checkpoint adn cleanup
    save_checkpoint(model, optimizer, cfg.train.max_steps, cfg.train.ckpt_path)
    if wandb is not None:
        wandb.finish()

if __name__ == "__main__":
    main()
执行 uv run python cs336_basics/train.py 训练指令后输出如下:
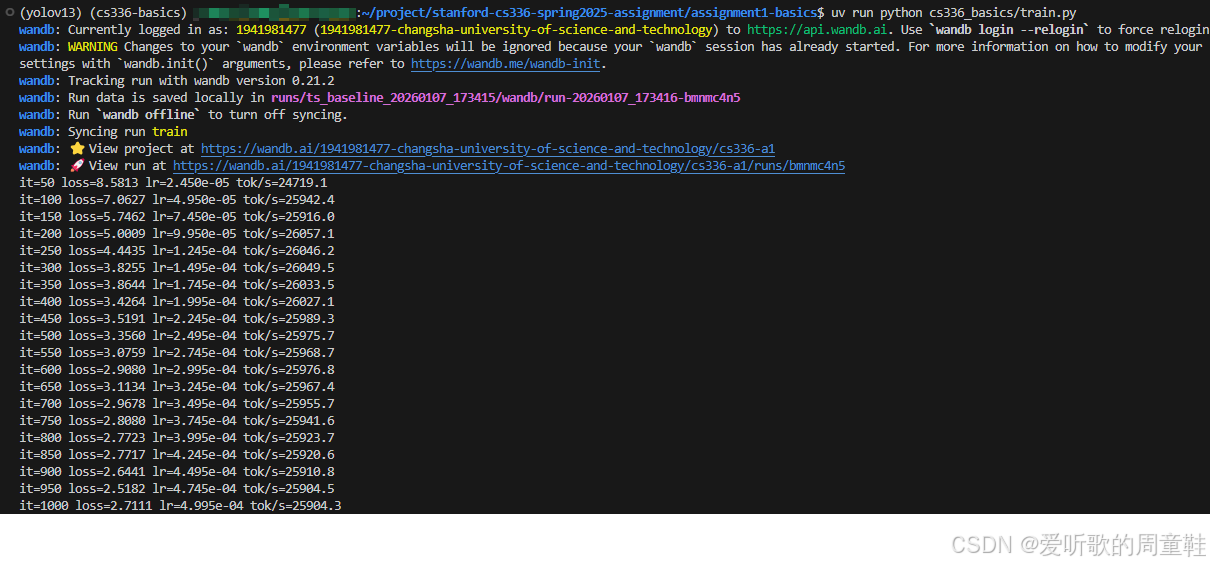
Note:由于在后续实验小节需要经常调整相关参数、配置,因此代码会时刻调整,最新训练代码请参考相关仓库:https://github.com/Melody-Zhou/stanford-cs336-spring2025-assignments
train.py 训练脚本其实就是把我们前面实现的 Data Loader / TransformerLM / AdamW / LR schedule / Gradient clipping / checkpoint 全串起来,形成一个可复现实验的最小训练框架,下面我们按功能块简单分析下相关代码:
1. 训练参数配置
cfg = get_default_config()

torch.manual_seed(cfg.train.seed)
np.random.seed(cfg.train.seed)
通过 config.py 把模型/优化器/数据/训练超参数集中管理,同时设置随机种子,保证 batch 采样、初始化等可复现
2. memmap 数据加载
os.makedirs(os.path.dirname(cfg.train.ckpt_path) or ".", exist_ok=True)

train_mm = open_memmap_1d(cfg.data.train_data_path, cfg.data.np_dtype)
val_mm = open_memmap_1d(cfg.data.val_data_path, cfg.data.np_dtype)
这里利用 np.memmap(mode="r") 直接把前面 tokenzier_experiment 小节中保存的 .bin token 文件映射到 ID 数组,不把全量数据读进 RAM
3. 模型构建
model = TransformerLM(
    vocab_size=cfg.model.vocab_size,
    context_length=cfg.model.context_length,
    d_model=cfg.model.d_model,
    num_layers=cfg.model.num_layers,
    num_heads=cfg.model.num_heads,
    d_ff=d_ff,
    rope_theta=cfg.model.rope_theta,
    max_seq_len=cfg.model.max_seq_len,
    eps=cfg.model.rmsnorm_eps,
    device=device,
    dtype=model_dtype
).to(device)
把模型需要的超参数填入即可
4. 优化器构建
optimizer = AdamW(
    model.parameters(),
    lr=cfg.optim.lr_max,
    betas=(cfg.optim.beta1, cfg.optim.beta2),
    eps=cfg.optim.eps,
    weight_decay=cfg.optim.weight_decay
)
创建 AdamW 优化器,并把需要的参数传递进去
5. 主训练 step
# 7. Main training loop
for it in range(start_it, cfg.train.max_steps):
    # 7.1 Update learning rate according to schedule
    lr = lr_cosine_schedule_with_warmup(
        t=it,
        alpha_max=cfg.optim.lr_max,
        alpha_min=cfg.optim.lr_min,
        T_w=cfg.optim.warmup_iters,
        T_c=cfg.optim.cosine_cycle_iters
    )
    set_optimizer_lr(optimizer, lr)

    # 7.2 Sample a batch of training data
    xb, yb = get_batch(
        train_mm,
        batch_size=cfg.train.batch_size,
        context_length=cfg.data.context_length,
        device=cfg.data.device
    )

    # 7.3 Forward pass and loss computation
    logits = model(xb)  # (B, S, V)
    B, S, V = logits.shape
    loss = cross_entropy_from_logits(logits.reshape(B * S, V), yb.reshape(B * S))

    # 7.4 Backward pass (gradient computation)
    optimizer.zero_grad(set_to_none=True)
    loss.backward()

    # 7.5 Gradient clipping for training stability
    if cfg.optim.grad_clip > 0:
        clip_grad_norm(model.parameters(), cfg.optim.grad_clip, eps=1e-6)

    # 7.6 Optimizer step (parameter update)
    optimizer.step()

    # 7.7 Periodic training metrics logging
    if (it + 1) % cfg.train.log_interval == 0:
        now = time.time()
        dt = max(now - last_log_t, 1e-9)
        tok_s = (cfg.train.batch_size * cfg.data.context_length * cfg.train.log_interval) / dt
        msg = f"it={it+1} loss={loss.item():.4f} lr={lr:.3e} tok/s={tok_s:.1f}"
        print(msg)
        if wandb is not None:
            wandb.log({"train/loss": float(loss.item()), "train/lr": lr, "train/tok_s": tok_s}, step=it + 1)
        last_log_t = now

    # 7.8 Periodic evaluation on validation set
    if (it + 1) % cfg.train.eval_interval == 0:
        val_loss = estimate_loss(model, val_mm, cfg)
        val_ppl = float(math.exp(val_loss))
        print(f"[eval] it={it+1} val_loss={val_loss:.4f} val_ppl={val_ppl:.2f}")
        if wandb is not None:
            wandb.log({"val/loss": val_loss, "val/ppl": val_ppl}, step=it + 1)

        # Save the best-performing checkpoint
        if val_loss < best_val:
            best_val = val_loss
            best_path = cfg.train.ckpt_path.replace(".pt", ".best.pt")
            save_checkpoint(model, optimizer, it + 1, best_path)

    # 7.9 Periodic checkpointing
    if (it + 1) % cfg.train.ckpt_interval == 0:
        save_checkpoint(model, optimizer, it + 1, cfg.train.ckpt_path)
在主训练循环中,程序在每一步首先按照带 warm-up 的余弦退火策略更新优化器的学习率,然后从内存映射的数据集中采样一个训练批次并执行前向传播以计算交叉熵损失;随后进行反向传播,在需要时对梯度进行裁剪以保证训练稳定性,并由优化器完成参数更新。训练过程中会定期输出并记录训练指标,同时按设定间隔在验证集上评估模型性能、保存当前最优模型以及周期性地写入检查点,从而实现稳定、可监控且可恢复的训练流程
整个训练流程还是相对清晰的
10. Problem (decoding): Decoding (3 points)
Deliverable:实现一个函数,用于从你的语言模型中进行解码,我们建议你的实现至少支持以下功能:
- 针对用户给定的提示(prompt)生成补全文本:输入一段序列 x 1 … t x_{1\ldots t} x1…t,并不断采样生成后续内容,直到遇到
<|endoftext|>token 为止 - 允许用户控制生成 token 的最大数量:在未生成结束符之前,限制最多可生成的 token 数
- 支持温度参数(temperature)控制:在采样之前,对预测的下一个词分布应用带温度的 softmax(temperature scaling)
- 支持 top-p 采样 [Holtzman+ 2020]:又称为 nucleus sampling,并允许用户指定阈值参数 p p p
import torch
from typing import Optional

def top_p_sampling(probs: torch.Tensor, top_p: float) -> torch.Tensor:
    """
    Apply nucleus (top-p) sampling to a probability vector.

    Args:
        probs: 1D tensor of probabilities (sum to 1).
        top_p: Cumulative probability threshold in (0, 1].

    Returns:
        Filtered probabilities (renormalized), same shape as probs.
    """
    if not (0.0 < top_p <= 1.0):
        raise ValueError(f"top_p must be in (0, 1], got {top_p}")

    sorted_probs, sorted_idx = torch.sort(probs, descending=True)
    cum = torch.cumsum(sorted_probs, dim=-1)

    # Keep tokens while cumulative prob is <= top_p, but always keep at least one token.
    keep = cum <= top_p
    keep[..., 0] = True

    filtered_sorted_probs = sorted_probs * keep.to(sorted_probs.dtype)
    filtered_sorted_probs = filtered_sorted_probs / filtered_sorted_probs.sum(dim=-1, keepdim=True)

    out = torch.zeros_like(probs)
    out.scatter_(dim=-1, index=sorted_idx, src=filtered_sorted_probs)
    return out

@torch.no_grad()
def generate(
    model: torch.nn.Module,
    prompt_ids: torch.Tensor,
    *,
    end_token_id: int,
    max_new_tokens: int = 128,
    temperature: float = 1.0,
    top_p: float = 1.0
) -> torch.Tensor:

    if prompt_ids.dim() != 1:
        raise ValueError(f"prompt_ids must be 1D (t,), got shape {tuple(prompt_ids.shape)}")
    if prompt_ids.dtype != torch.long:
        prompt_ids = prompt_ids.to(torch.long)

    if max_new_tokens < 0:
        raise ValueError(f"max_new_tokens must be non-negative, got {max_new_tokens}")

    model_was_training = model.training
    model.eval()

    device = next(model.parameters()).device
    out = prompt_ids.to(device)

    # Try to read context_length if the model exposes it
    context_length: Optional[int] = getattr(model, "context_length", None)

    for _ in range(max_new_tokens):
        # Truncate to the model context window if needed
        if context_length is not None and out.numel() > context_length:
            inp = out[-context_length:]
        else:
            inp = out

        logits = model(inp.unsqueeze(0))  # (1, S, V)
        next_logits = logits[0, -1, :]    # (V,)

        # Greedy decoding if temperature == 0
        if temperature == 0.0:
            next_id = int(torch.argmax(next_logits).item())
        else:
            if temperature < 0.0:
                raise ValueError(f"temperature must be >= 0, got {temperature}")

            scaled = next_logits / float(temperature)
            probs = torch.softmax(scaled, dim=-1)

            if top_p < 1.0:
                probs = top_p_sampling(probs, top_p)

            next_id = int(torch.multinomial(probs, num_samples=1).item())

        out = torch.cat([out, torch.tensor([next_id], device=device, dtype=torch.long)], dim=0)

        if next_id == int(end_token_id):
            break

    if model_was_training:
        model.train()

    return out

if __name__ == "__main__":
    from cs336_basics.nn_utils import load_checkpoint
    from cs336_basics.config import get_default_config
    from cs336_basics.transformer_lm import TransformerLM
    from cs336_basics.tokenizer import Tokenizer
    from cs336_basics.optimizer import AdamW

    EOT = "<|endoftext|>"

    cfg = get_default_config()
    device = torch.device(cfg.data.device)

    # ---- 1) Load tokenzier (TinyStories BPE) ----
    tok = Tokenizer.from_files(
        "workspace/tinystories_bpe_vocab.pkl",
        "workspace/tinystories_bpe_merges.pkl",
        special_tokens=[EOT]
    )
    end_token_id = tok.special_id[EOT]

    # ---- 2) Build model (match training config) ----
    model_dtype = cfg.model.torch_dtype.lower()
    dtype_map = {"float32": torch.float32, "fp32": torch.float32,
                 "float16": torch.float16, "fp16": torch.float16,
                 "bfloat16": torch.bfloat16, "bf16": torch.bfloat16}
    dtype = dtype_map[model_dtype]

    d_ff = cfg.model.d_ff if cfg.model.d_ff is not None else 4 * cfg.model.d_model

    model = TransformerLM(
        vocab_size=cfg.model.vocab_size,
        context_length=cfg.model.context_length,
        d_model=cfg.model.d_model,
        num_layers=cfg.model.num_layers,
        num_heads=cfg.model.num_heads,
        d_ff=d_ff,
        rope_theta=cfg.model.rope_theta,
        max_seq_len=cfg.model.max_seq_len,
        eps=cfg.model.rmsnorm_eps,
        device=device,
        dtype=dtype,
    ).to(device)

    # ---- 3) Create a dummy optimizer ----
    optimizer = AdamW(model.parameters())

    # --- 4) Load checkpoint weights ---
    ckpt_path = "workspace/ckpt.best.pt"
    it = load_checkpoint(ckpt_path, model, optimizer)

    # 5) Encode prompt -> generate -> decode
    prompt = "Once upon a time"
    prompt_ids = torch.tensor(tok.encode(prompt), dtype=torch.long)

    out_ids = generate(
        model,
        prompt_ids,
        end_token_id=end_token_id,
        max_new_tokens=128,
        temperature=1.0,
        top_p=0.9,
    )

    print(tok.decode(out_ids.tolist()))
执行 uv run cs336_basics/generate.py 生成指令后输出如下:

下面我们简单看下对应代码是如何实现的
首先我们来看下采样函数 top_p_sampling(),它实现了作业要求的 nucleus sampling:给定 softmax 后的分布 probs,只保留累计概率达到 top_p 所需的 最小集合,其余 token 概率置零,然后对保留部分重新归一化
实现步骤如下:
1. 参数校验
if not (0.0 < top_p <= 1.0):
    raise ValueError(f"top_p must be in (0, 1], got {top_p}")
2. 按概率降序排序
sorted_probs, sorted_idx = torch.sort(probs, descending=True)
cum = torch.cumsum(sorted_probs, dim=-1)
sorted_idx 是排序后位置到原 vocab id 的映射,而 cum 是累计概率
3. 确定保留集合
keep = cum <= top_p
keep[..., 0] = True
4. 过滤并重新归一化
filtered_sorted_probs = sorted_probs * keep.to(sorted_probs.dtype)
filtered_sorted_probs = filtered_sorted_probs / filtered_sorted_probs.sum(dim=-1, keepdim=True)
5. 散射回原 vocab 顺序
out = torch.zeros_like(probs)
out.scatter_(dim=-1, index=sorted_idx, src=filtered_sorted_probs)
return out
最终返回的 out 与原 probs 同形状,但只要被保留的 token 有非零概率
这个实现满足作业要求的支持 top-p 截断,并返回一个新的、可用于采样的概率分布
我们接着来看 generate 函数的整体流程,它是一个标准的自回归解码循环:给定 prompt,不断预测下一个 token,采样出来后 append 到输入序列中,循环直到生成结束符或达到最大长度
核心实现步骤如下:
1. context window 截断
# Truncate to the model context window if needed
if context_length is not None and out.numel() > context_length:
    inp = out[-context_length:]
else:
    inp = out
模型训练时有固定 context_length,生成时序越长就必须滑窗截断,否则位置编码或 attention 可能越界
2. 模型推理取输出 logits
logits = model(inp.unsqueeze(0))  # (1, S, V)
next_logits = logits[0, -1, :]    # (V,)
3. 采样
# Greedy decoding if temperature == 0
if temperature == 0.0:
    next_id = int(torch.argmax(next_logits).item())
else:
    if temperature < 0.0:
        raise ValueError(f"temperature must be >= 0, got {temperature}")

    scaled = next_logits / float(temperature)
    probs = torch.softmax(scaled, dim=-1)

    if top_p < 1.0:
        probs = top_p_sampling(probs, top_p)

    next_id = int(torch.multinomial(probs, num_samples=1).item())
如果温度参数为 0 则进行贪婪采样,直接 argmax 取输出概率最大的 token,如果温度参数大于 0 则进行 top-p 采样,利用温度缩放
4. 追加 token,并检查终止
out = torch.cat([out, torch.tensor([next_id], device=device, dtype=torch.long)], dim=0)

if next_id == int(end_token_id):
    break
__main__ 中就是加载 toknezier、训练好的模型权重,输入一段 prompt 调用上面的 generate 函数生成对应的文本,比较简单
在给定 Once upon a time 提示词时的输出如下:
Once upon a time, there was a noisy lion. He lived in a jungle with his friends. The lion had a long nose. He liked to play and run with his friends.
One day, the lion met a little girl named Lily. Lily said, “Hi, rabbit! I want to play with you.” The owl was surprised. He said, “Hello, I am a nice lion. Can I play too?” Lily said, “Yes, let’s play together!”
So, they played hide and seek. They had lots of fun. After playing, the lion and Lily got tired. They played in the forest for a long time
那值得一提的是这个测试的权重是博主在后续实验小节完成学习率调整作业时随手拿的一个权重,它在 batch=8 的情况下只训练了 3000 个 steps,大约只跑了作业建议 token 总数的 1.9%。不过最终生成的文本还行,起码语句通顺,只是存在一些逻辑错误
OK,以上就是本次 Training Loop 作业的全部实现了
结语
在本篇文章中我们将 CS336 Assignment 1 中涉及的所有 Training Loop 相关模块完整的串联了起来,从损失函数与优化器的底层实现出发,构建了一个可运行、可扩展、可生成文本的最小语言模型训练系统
与前面分词、模型小节的实现相比,本小节的核心价值并不在于某一个具体算法,而在于把训练作为一个系统工程来理解:数据如何被高效加载、梯度如何被稳定更新、学习率如何随训练阶段变化以及在任何时刻如何安全地中断与恢复训练
在顺利完成整个训练流程后,本次作业还剩最后的实验环节,在下一小节中,我们将对模型和参数进行一些有针对性的修改并开展实验,以深入理解 Transformer 各个架构组件的设计初衷,敬请期待🤗
源码下载链接
参考

有“AI”的1024 = 2048,欢迎大家加入2048 AI社区
更多推荐

 20
20 0
0- 0


 已为社区贡献58条内容

所有评论(0)