Spring Boot集成LangChain4j!5 分钟打造企业级智能对话接口
配置方式:@Bean.build();使用方式:@Service@Autowired@Autowired。
视频教程:【SpringBoot集成LangChain4j!5 分钟打造企业级智能对话接口】
前面几节课,咱们用纯 Java 玩转了本地大模型、国产 API、甚至 AI 绘画——是不是觉得“AI 应用开发”也没那么玄乎?
但你心里可能还卡着一个问题:
“我公司项目全是 SpringBoot 啊!难道要重写一套?有没有办法 直接在现有 Spring Boot 项目里加个 AI 功能,比如一个 /ai/chat 接口?”
当然有!而且超简单!
准备好了吗?咱们这就把 AI 能力“注入”你的 Spring Boot 应用!
🎯 引入:为什么企业级 AI 必须用 Spring Boot 整合?
想象一下真实场景:
- 产品经理说:“用户反馈太难处理,能不能让 AI 先自动分类?”
- 运维同事问:“能不能做个智能日志分析助手?”
- 客户希望:“在我们后台加个‘AI 客服’入口!”
这些需求,最终都要变成一个 HTTP 接口,集成到现有系统里。
而 Spring Boot 是什么?是 Java 企业开发的“标准答案”!
所以,让 AI 能力以 Spring Bean 的形式注入 Controller,才是企业级开发的正确姿势!
🧠 理论铺垫:LangChain4j 如何“融入” Spring Boot?
还记得咱们说 LangChain4j 是“AI 乐高积木”吗?
现在,LangChain4j 官方提供了 Spring Boot Starter ——
它就像一包“预装好的积木”,你只要加个依赖,QwenChatModel 自动变成 Spring Bean!
整个流程长这样:

是不是超省心?你只管写业务逻辑,底层连接、重试、序列化全交给 Starter!
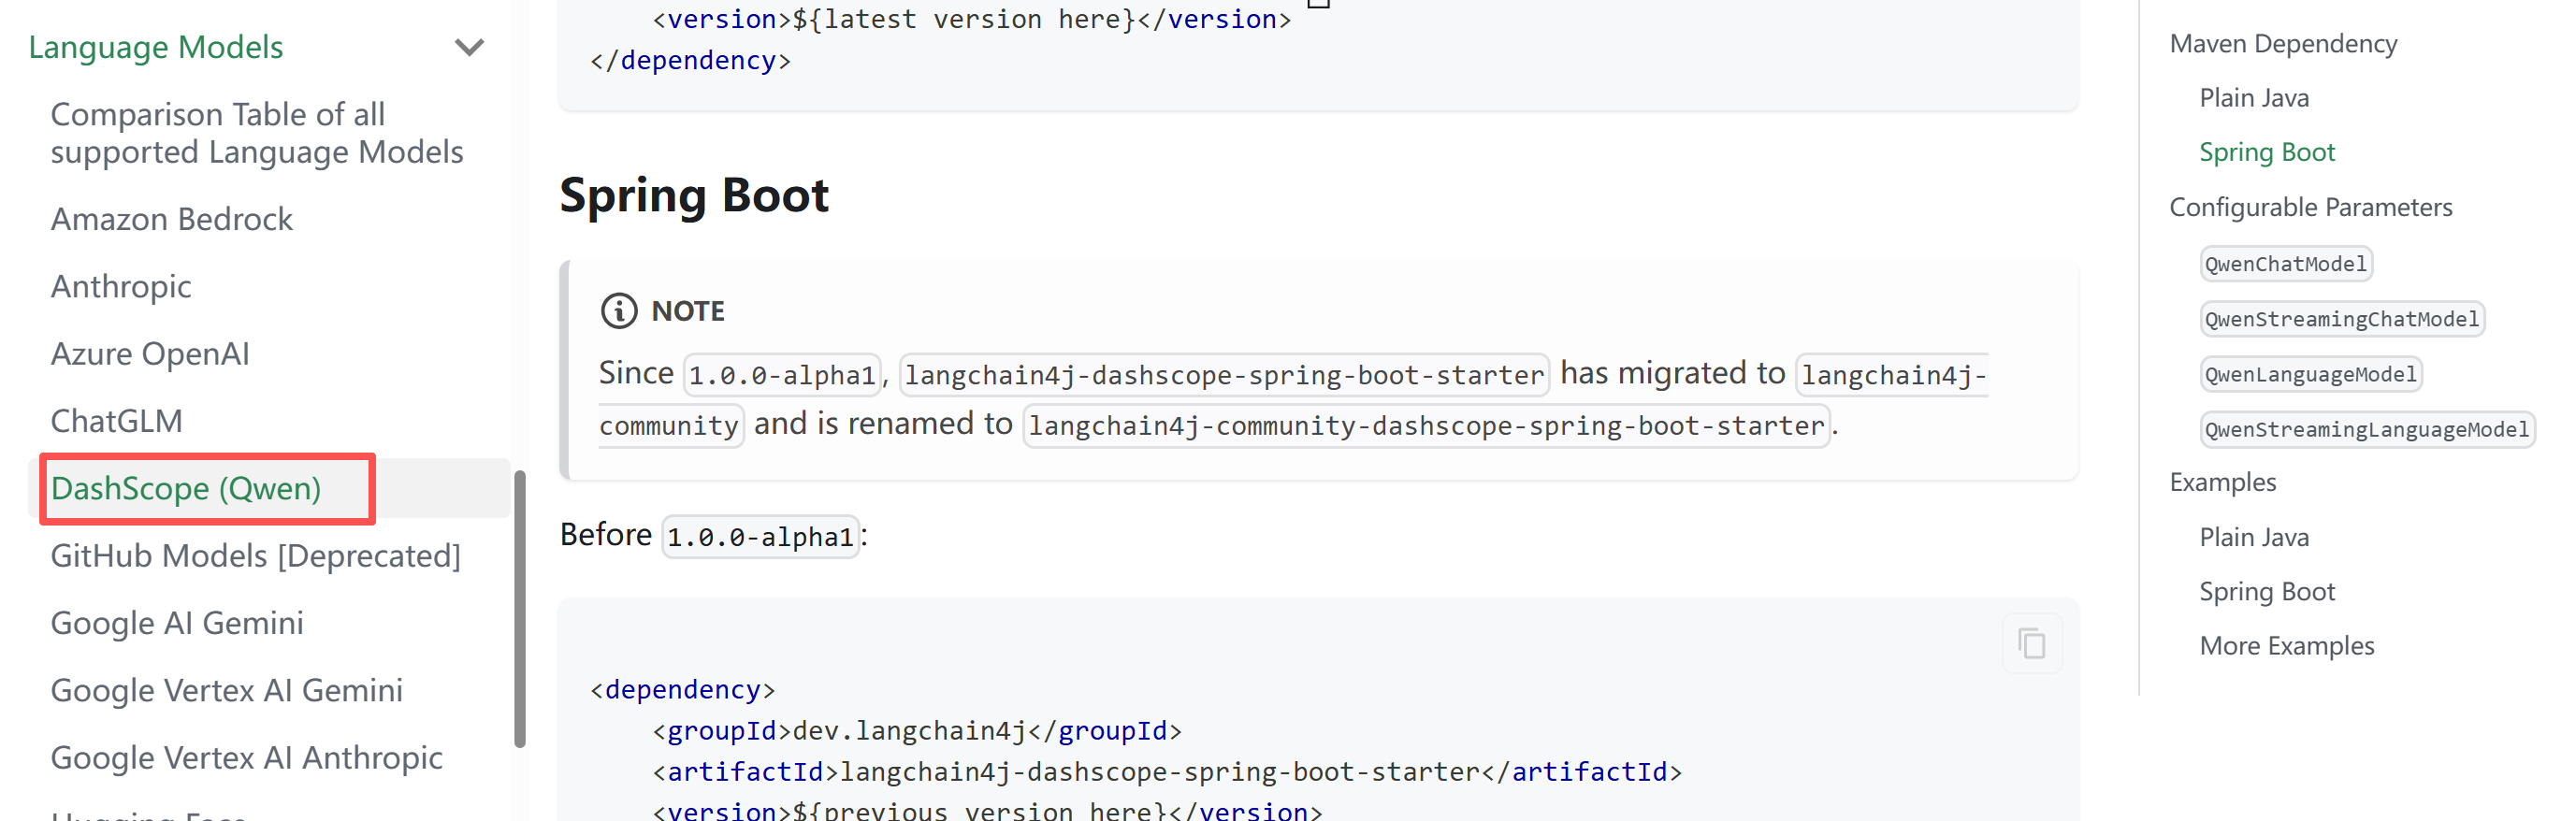
langchain4j-spring-boot-starter。
截至 2026 年初,LangChain4j 官方已提供 Spring Boot 支持,我们优先使用 dev.langchain4j:langchain4j-spring-boot-starter。
官方文档:https://docs.langchain4j.dev/integrations/language-models/dashscope#spring-boot
⚙️ 实战 Part 1:创建 Spring Boot 项目 + 加依赖
第一步:用 Spring Initializr 创建项目
- 访问 start.spring.io
- 选 Java 17+, Maven, Spring Boot 3.x
- 添加依赖:Spring Web
- Group:
com.example, Artifact:ai-spring-demo - 点击 Generate,导入 IDEA
第二步:添加 LangChain4j Spring Boot Starter
在 pom.xml 中加入:
<dependency>
    <groupId>org.springframework.boot</groupId>
    <artifactId>spring-boot-starter</artifactId>
</dependency>
<dependency>
    <groupId>dev.langchain4j</groupId>
    <artifactId>langchain4j-community-dashscope-spring-boot-starter</artifactId>
    <version>1.11.0-beta19</version>
</dependency>
<dependency>
    <groupId>org.springframework.boot</groupId>
    <artifactId>spring-boot-starter-web</artifactId>
</dependency>
<dependency>
    <groupId>org.springframework.boot</groupId>
    <artifactId>spring-boot-starter-test</artifactId>
    <scope>test</scope>
</dependency>
⚙️ 实战 Part 2:配置 API Key + 写 Controller
第一步:配置 application.yml
langchain4j:
  community:
    dashscope:
      chat-model:
        api-key: ${DASHSCOPE_API_KEY}   # 从环境变量读取,安全!
        model-name: qwen-max       # 可选:qwen-plus, qwen-turbo 等
🔐 重要!不要把 API Key 写死在 yml 里!
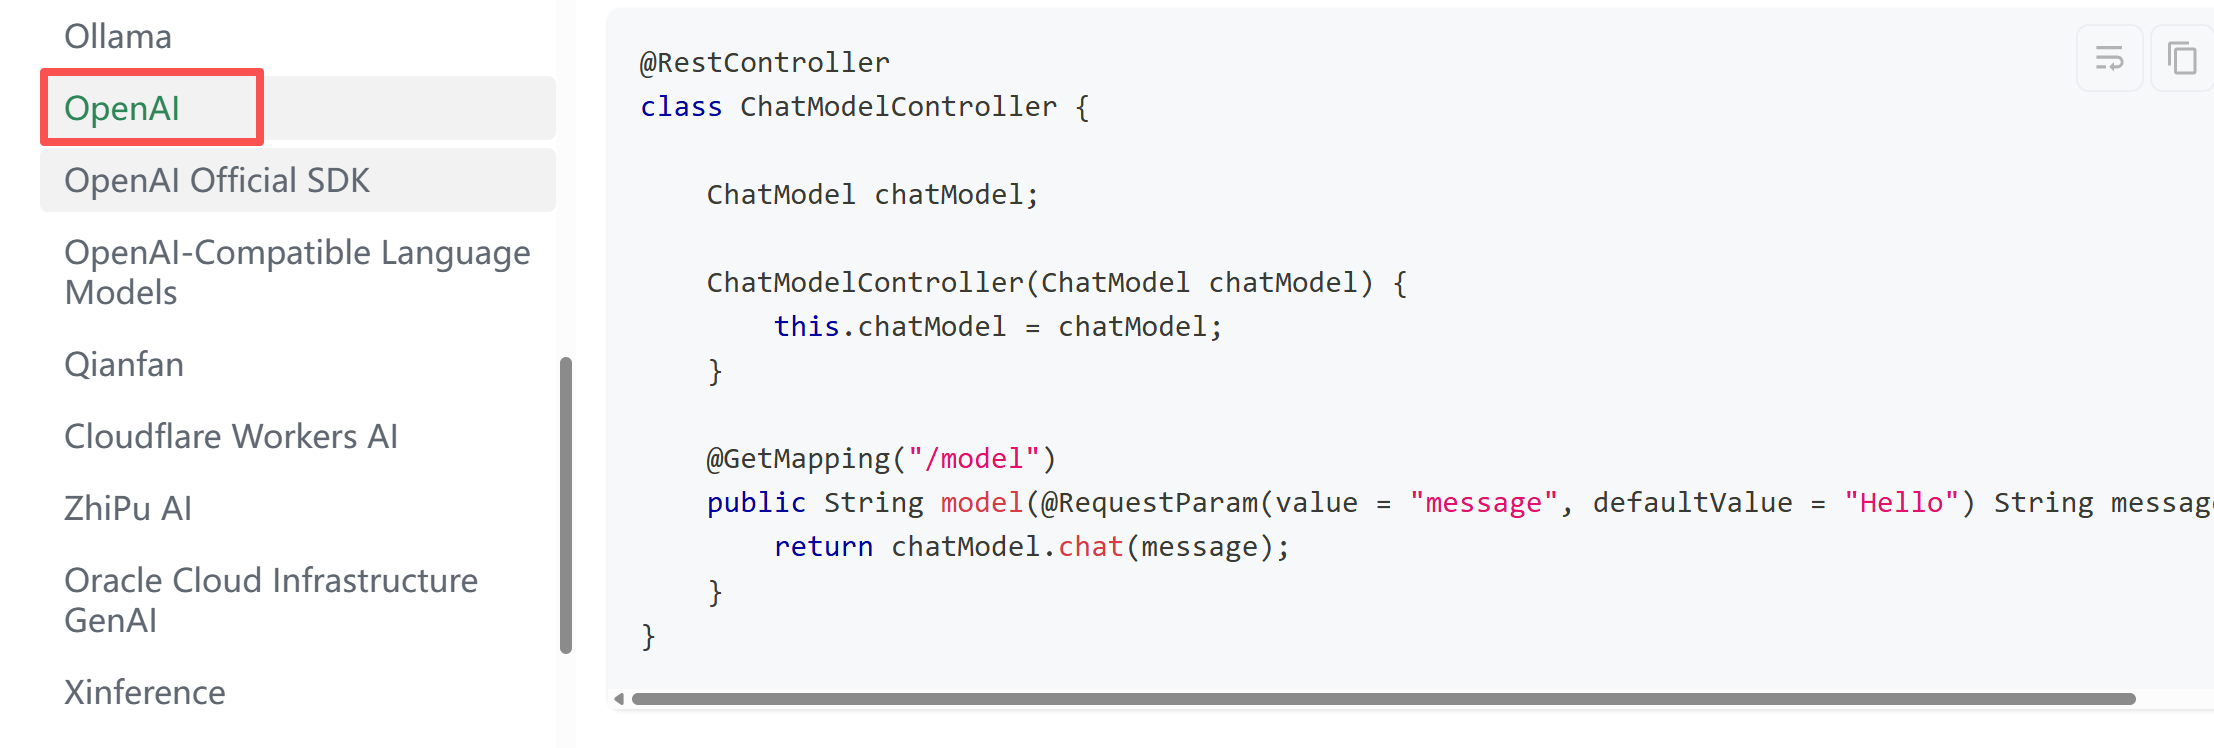
第二步:写一个 AI Controller
/**
 * @author 小编码上说
 * @version 1.0
 * @data 2026/2/11 15:05
 */
@RestController
@RequestMapping("/ai")
public class AiController {

    @Autowired
    ChatModel qwenChatModel;

    @RequestMapping("/chat")
    public String test(@RequestParam(defaultValue="你是谁") String message) {
        String chat = qwenChatModel.chat(message);
        return chat;
    }
}
⚠️ 为什么能直接注入 ChatModel?
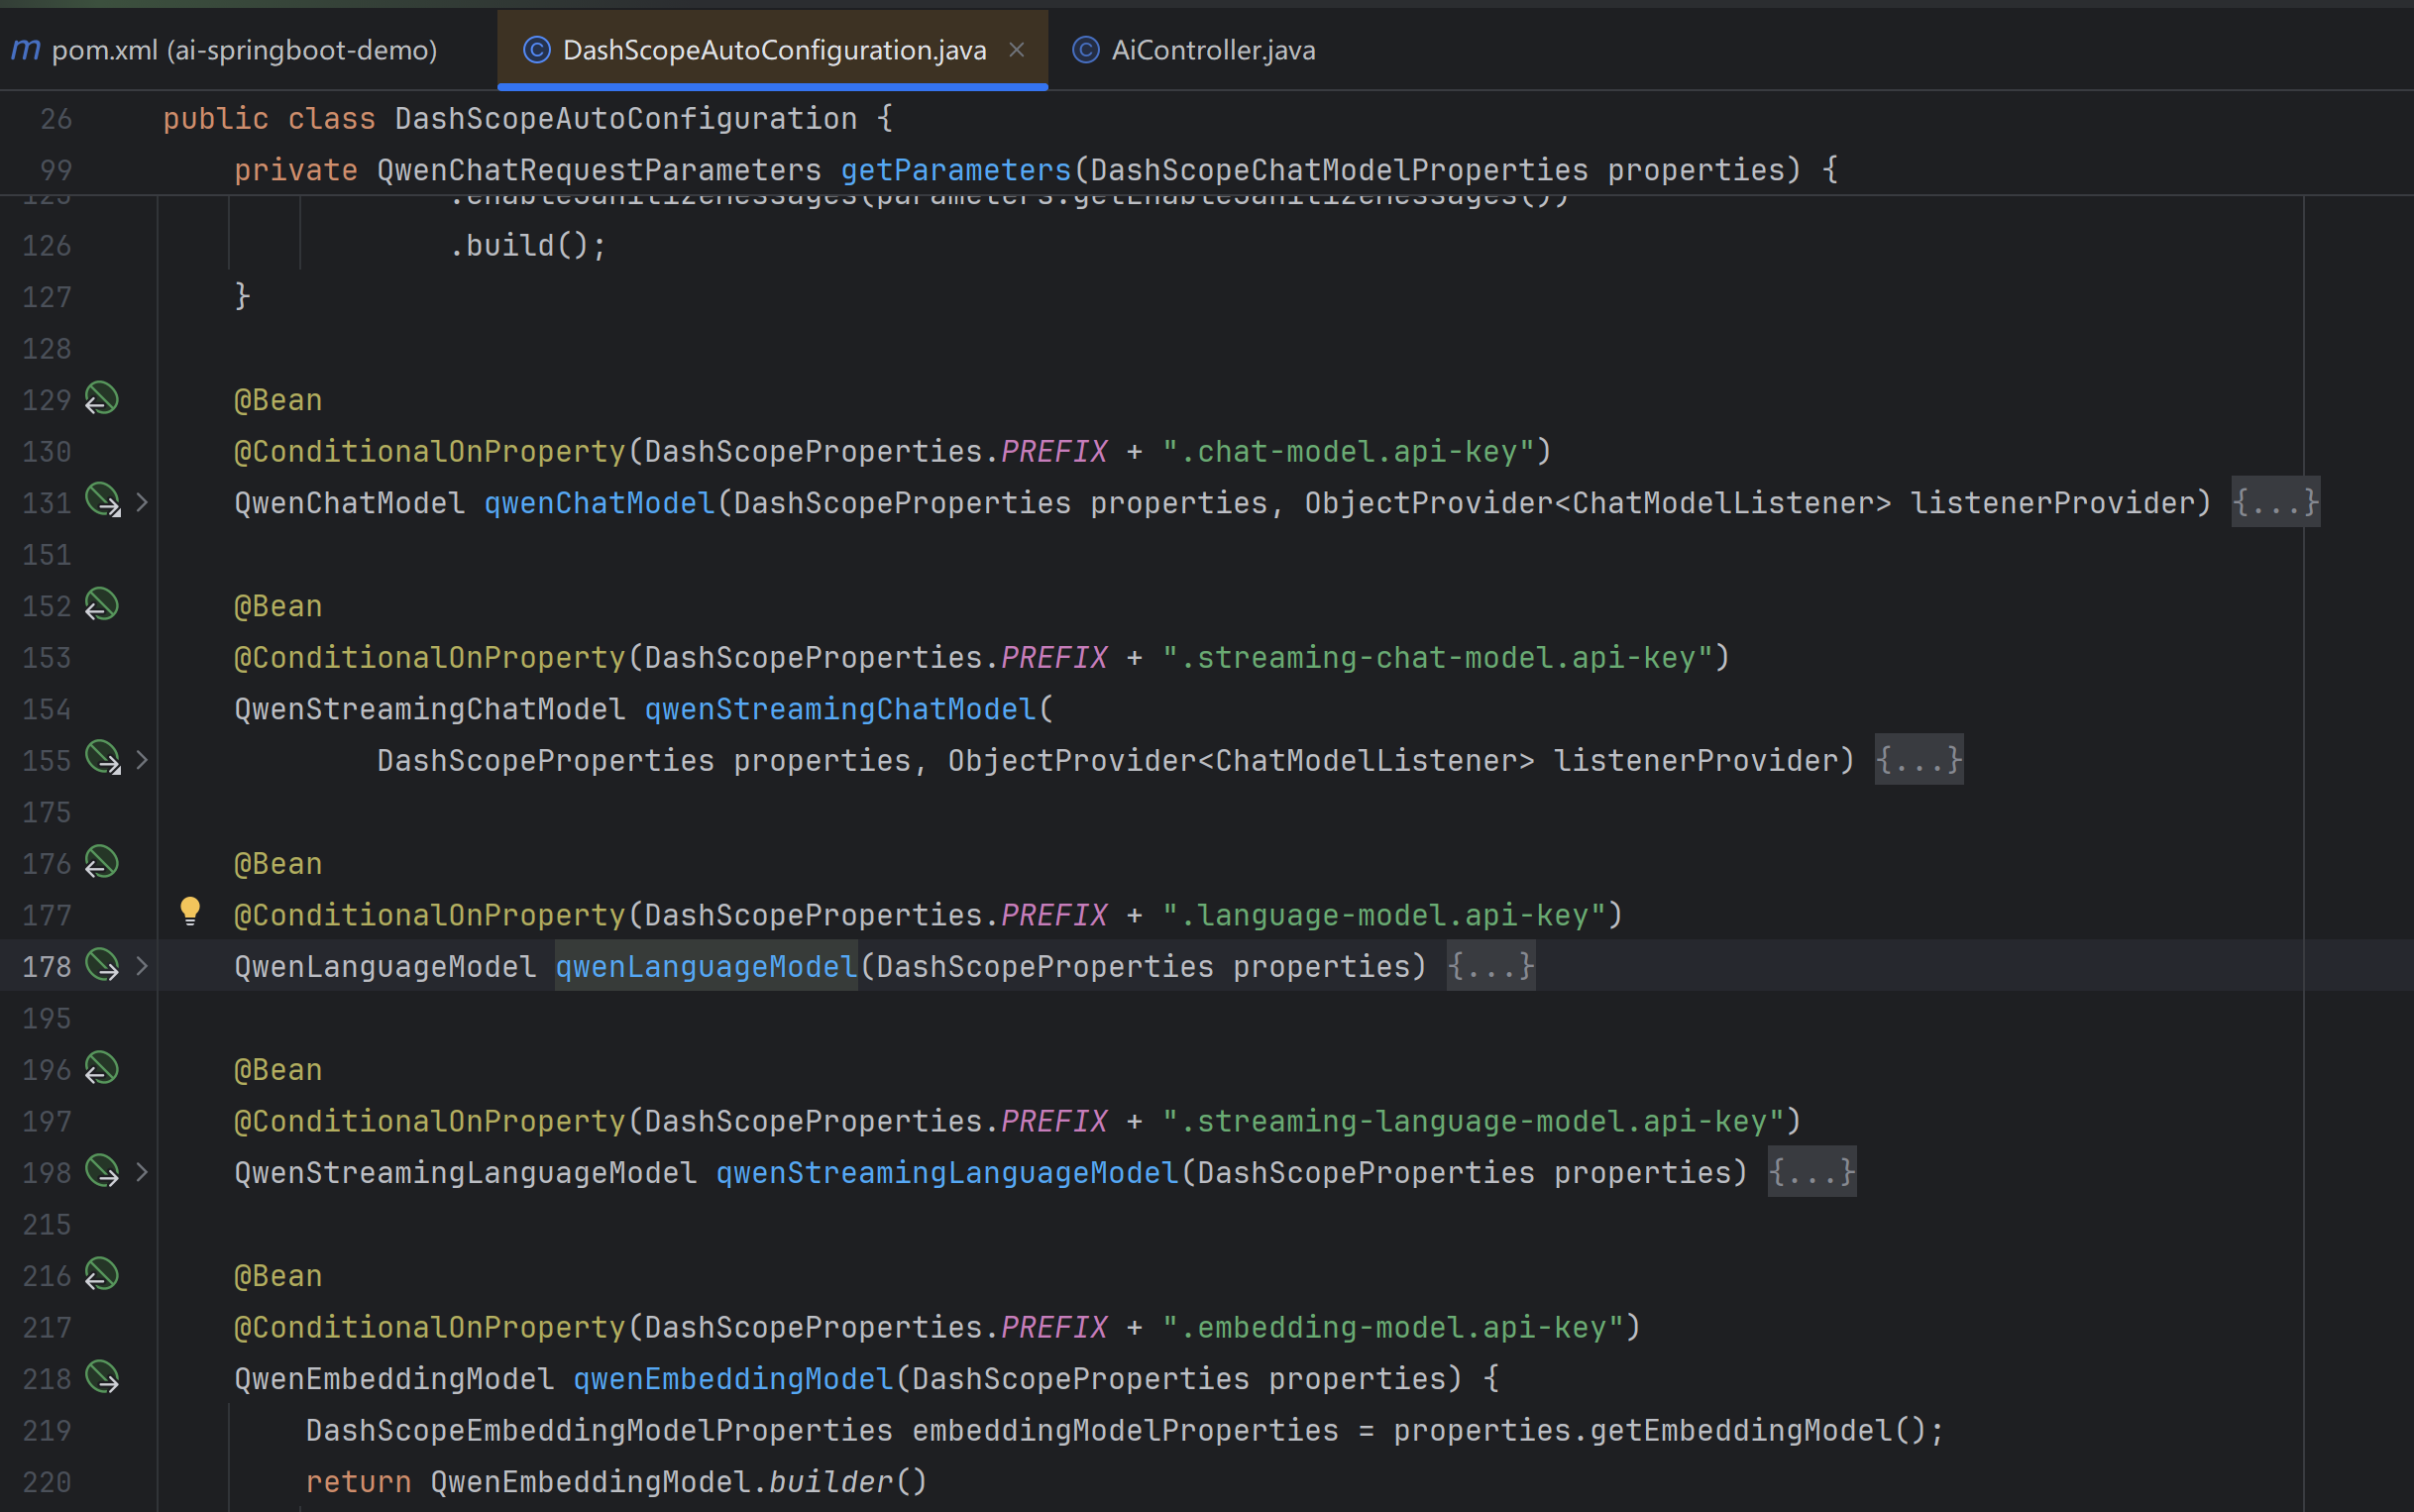
因为 Starter 里的 AutoConfiguration 检测到 langchain4j.qwen.api-key 配置后,自动创建了 QwenChatModel 的 Bean!
In this case, an instance of QwenChatModel (an implementation of a ChatModel) will be automatically created, and you can autowire it where needed:

自动配置类:DashScopeAutoConfiguration
@AutoConfiguration
@EnableConfigurationProperties({DashScopeProperties.class})
public class DashScopeAutoConfiguration {
    public DashScopeAutoConfiguration() {
    }
▶️ 启动 & 测试
- 设置环境变量:
export ALIBABA_API_KEY=你的阿里云API_KEY- 启动应用:run
- 访问:
http://localhost:8080/ai/chat?message=你好啊你会看到浏览器直接返回:
你好!我是通义千问(Qwen),阿里巴巴研发的超大规模语言模型……🎉 成了!一个企业级 AI 接口,就这么诞生了!
❓ 互动思考:如果我想换模型,比如 DeepSeek,怎么办?
好问题!只需三步:
- 在
pom.xml加langchain4j-open-ai-spring-boot-starter依赖; - 在
application.yml改成 OpenAI 配置(baseUrl: https://api.deepseek.com); - 重启!Spring Boot 会自动切换 Bean!
这就是 Starter + 自动配置 的威力——模型可插拔,业务代码零修改!
官方文档:https://docs.langchain4j.dev/integrations/language-models/open-ai
扩展:通过引入自定义配置类,可以同时配置多模型。
- 配置方式:
@Configuration
public class LangChain4jConfig {

    @Value("${dashscope.api-key}")
    private String apiKey;

    @Bean
    public ChatModel qwenMaxChatModel() {
        return DashScopeChatModel.builder()
            .apiKey(apiKey)
            .modelName("qwen-max")
            .temperature(0.7)
            .maxTokens(2048)
            .build();
    }

    @Bean
    public ChatModel qwenPlusChatModel() {
        return DashScopeChatModel.builder()
            .apiKey(apiKey)
            .modelName("qwen-plus")
            .temperature(0.5)
            .maxTokens(1024)
            .build();
    }
}- 使用方式:
@Service
public class AiService {
    @Autowired
    @Qualifier("qwenMaxChatModel")
    private ChatModel qwenMaxChatModel;

    @Autowired
    @Qualifier("qwenPlusChatModel")
    private ChatModel qwenPlusChatModel;
}
🎁 收尾:本节课你掌握了什么?
- ✅ 成功将 LangChain4j 与 Spring Boot 无缝整合;
- ✅ 通过 Starter 实现 Qwen 模型的自动装配,告别手动 new;
- ✅ 用 10 行代码写出生产级 AI 对话接口;
- ✅ 为后续接入记忆对话、知识库、流式响应打下坚实基础!
从今天起,你不再是一个只会 CRUD 的开发者——
你是那个能给公司系统“注入 AI 大脑”的关键人物!
记得先跑通这个接口,有问题评论区见!咱们下期继续“企业级 AI”之旅!
参考文档:
- 核心库查询地址:https://central.sonatype.com/artifact/dev.langchain4j/langchain4j/versions
- Starter 组件(以 OpenAI 为例):https://central.sonatype.com/artifact/dev.langchain4j/langchain4j-open-ai-spring-boot-starter/versions
- 操作:打开链接后,页面会列出该组件的所有发布版本(包括正式版、beta 版),并显示每个版本的发布时间。

有“AI”的1024 = 2048,欢迎大家加入2048 AI社区
更多推荐
 8
8 0
0- 0


 已为社区贡献3条内容

所有评论(0)