前端实现自定义图片裁剪组件及使用指南
本文介绍了一个基于React和TailwindCSS开发的前端图片裁剪组件ImageCropper,无需依赖第三方库即可实现高质量的图片裁剪功能。该组件支持8个控制点精准调整裁剪区域,提供拖拽移动、缩放、旋转和重置等操作,并适配移动端触摸交互。文章详细说明了组件的安装导入方式、属性接口(包括图片源、弹窗控制、回调函数等)以及基本使用方法,并提供了图片列表裁剪和文件上传裁剪两个完整示例代码。该组件可
前端实现自定义图片裁剪组件及使用指南
本文主要实现了一种在前端通过canvas rect等基础元素,实现图片的自由裁剪的功能组件,技术栈是React + tailwindcss,无其他第三方组件的引入。
在线的demo示例使用可以参考:图片在线裁剪拼图工具
💡 ImageCropper组件源码在最后,可以自由获取!!!
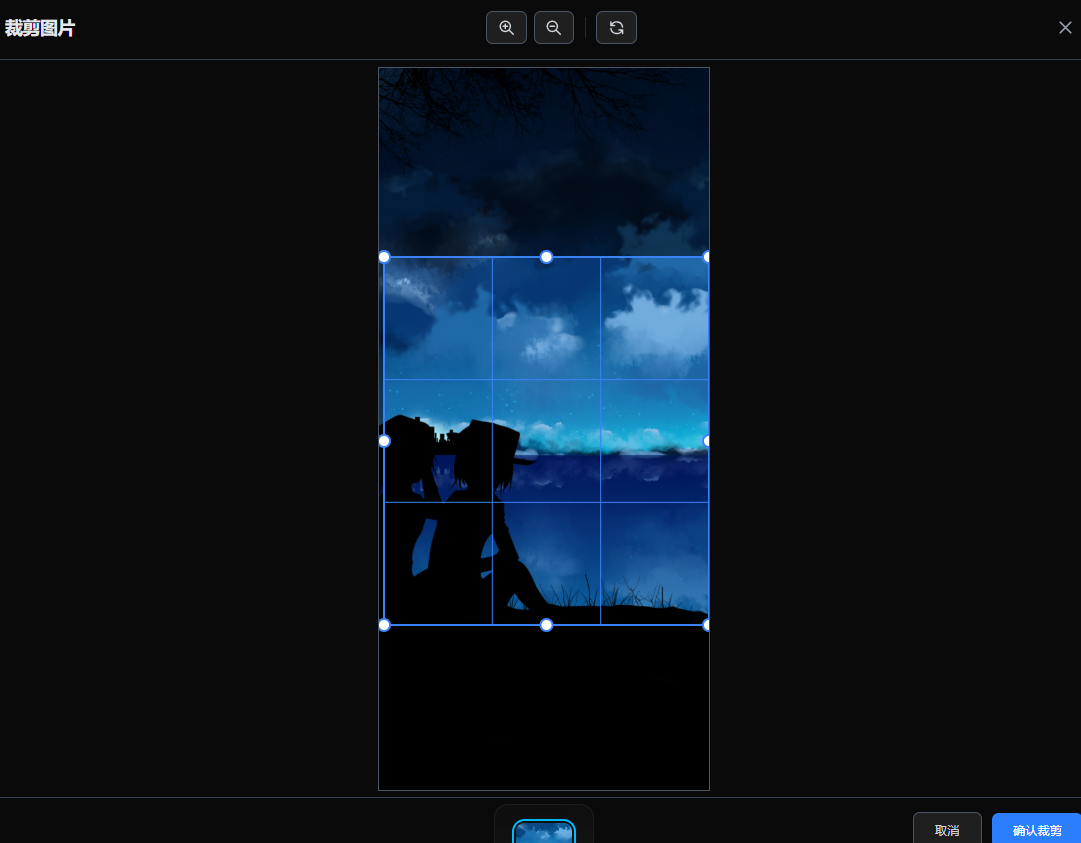
先看实际的效果图:
- 裁剪前:
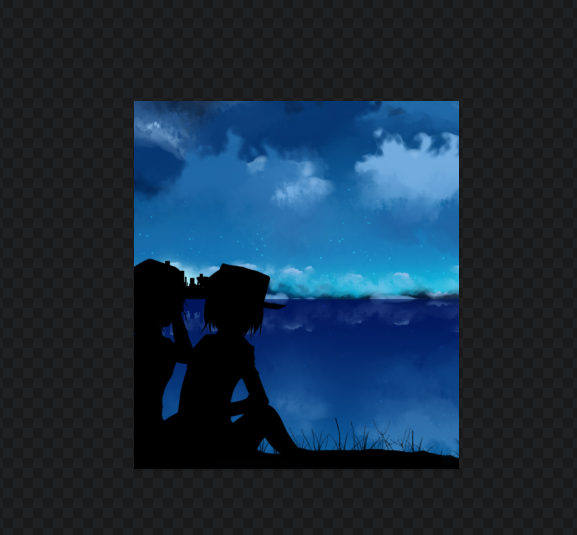
- 裁剪后:
📖 组件介绍
ImageCropper 是一个基于 HTML5 Canvas 的图片裁剪组件,支持 8 个控制点精确调整裁剪区域,提供丰富的交互功能和高质量输出。
主要特性
- ✅ 8 个控制点:四个角和四条边的中点,支持精确调整
- ✅ 多种操作:拖拽移动、缩放、旋转、重置
- ✅ 移动端支持:完美适配触摸操作
- ✅ 高质量输出:支持原始分辨率裁剪,保持图片清晰度
- ✅ 独立组件:仅依赖 React,易于集成
📦 安装与导入
方式一:直接使用组件文件
将 ImageCropper.jsx 文件复制到你的项目中:
import ImageCropper from './components/ImageCropper'
方式二:作为 npm 包(需要发布)
npm install image-cropper
import ImageCropper from 'image-cropper'
🔧 Props 接口
| 属性名 | 类型 | 必填 | 说明 |
|---|---|---|---|
imageSrc |
string |
✅ | 图片源,支持 URL 或 DataURL |
isOpen |
boolean |
✅ | 控制裁剪弹窗的显示/隐藏 |
onClose |
function |
✅ | 关闭裁剪弹窗的回调函数 |
onCropComplete |
function |
✅ | 裁剪完成回调,接收裁剪后的图片 DataURL |
Props 详细说明
imageSrc: string
- 说明:要裁剪的图片源
- 支持格式:
- 网络图片 URL:
"https://example.com/image.jpg" - Base64 DataURL:
"data:image/png;base64,..." - Blob URL:
URL.createObjectURL(file)
- 网络图片 URL:
isOpen: boolean
- 说明:控制裁剪弹窗的显示状态
- 示例:
true显示弹窗,false隐藏弹窗
onClose: () => void
- 说明:关闭裁剪弹窗时触发的回调
- 使用场景:清理状态、取消操作
onCropComplete: (croppedImageUrl: string, cropInfo?: object) => void
- 说明:裁剪完成时触发的回调
- 参数:
croppedImageUrl:裁剪后的图片 DataURL(PNG 格式)cropInfo(可选):裁剪信息对象{ displayWidth: number, // 显示时的宽度 displayHeight: number, // 显示时的高度 originalWidth: number, // 原始像素宽度 originalHeight: number // 原始像素高度 }
🚀 基本使用
最简单的示例
import React, { useState } from 'react'
import ImageCropper from './components/ImageCropper'

function App() {
  const [isOpen, setIsOpen] = useState(false)
  const [imageSrc, setImageSrc] = useState('')

  // 打开裁剪器
  const handleOpen = () => {
    setImageSrc('https://example.com/image.jpg')
    setIsOpen(true)
  }

  // 关闭裁剪器
  const handleClose = () => {
    setIsOpen(false)
  }

  // 处理裁剪完成
  const handleCropComplete = (croppedImageUrl) => {
    console.log('裁剪完成,图片 DataURL:', croppedImageUrl)
    // 可以在这里保存图片或更新状态
    setIsOpen(false)
  }

  return (
    <div>
      <button onClick={handleOpen}>打开裁剪器</button>

      <ImageCropper
        imageSrc={imageSrc}
        isOpen={isOpen}
        onClose={handleClose}
        onCropComplete={handleCropComplete}
      />
    </div>
  )
}
📝 完整示例
示例 1:图片列表裁剪
import React, { useState } from 'react'
import ImageCropper from './components/ImageCropper'

function ImageList() {
  const [images, setImages] = useState([
    'https://picsum.photos/400/300?random=1',
    'https://picsum.photos/500/400?random=2',
  ])

  // 裁剪器状态
  const [cropperState, setCropperState] = useState({
    isOpen: false,
    imageSrc: null,
    imageIndex: null,
  })

  // 双击图片打开裁剪器
  const handleImageDoubleClick = (imageSrc, index) => {
    setCropperState({
      isOpen: true,
      imageSrc: imageSrc,
      imageIndex: index,
    })
  }

  // 处理裁剪完成
  const handleCropComplete = (croppedImageUrl) => {
    if (cropperState.imageIndex !== null) {
      // 替换原图片为裁剪后的图片
      const newImages = [...images]
      newImages[cropperState.imageIndex] = croppedImageUrl
      setImages(newImages)
    }
    // 关闭裁剪器
    setCropperState({
      isOpen: false,
      imageSrc: null,
      imageIndex: null,
    })
  }

  // 关闭裁剪器
  const handleClose = () => {
    setCropperState({
      isOpen: false,
      imageSrc: null,
      imageIndex: null,
    })
  }

  return (
    <div>
      {/* 图片列表 */}
      <div className="grid grid-cols-3 gap-4">
        {images.map((src, index) => (
          <img
            key={index}
            src={src}
            alt={`图片 ${index + 1}`}
            onDoubleClick={() => handleImageDoubleClick(src, index)}
            className="cursor-pointer"
          />
        ))}
      </div>

      {/* 裁剪组件 */}
      <ImageCropper
        imageSrc={cropperState.imageSrc}
        isOpen={cropperState.isOpen}
        onClose={handleClose}
        onCropComplete={handleCropComplete}
      />
    </div>
  )
}
示例 2:文件上传裁剪
import React, { useState } from 'react'
import ImageCropper from './components/ImageCropper'

function ImageUpload() {
  const [uploadedImage, setUploadedImage] = useState(null)
  const [isOpen, setIsOpen] = useState(false)
  const [croppedImage, setCroppedImage] = useState(null)

  // 处理文件选择
  const handleFileSelect = (e) => {
    const file = e.target.files?.[0]
    if (file) {
      const reader = new FileReader()
      reader.onload = (event) => {
        const imageUrl = event.target.result
        setUploadedImage(imageUrl)
        setIsOpen(true) // 自动打开裁剪器
      }
      reader.readAsDataURL(file)
    }
  }

  // 处理裁剪完成
  const handleCropComplete = (croppedImageUrl, cropInfo) => {
    setCroppedImage(croppedImageUrl)
    setIsOpen(false)
    console.log('裁剪信息:', cropInfo)
  }

  // 下载裁剪后的图片
  const handleDownload = () => {
    if (croppedImage) {
      const link = document.createElement('a')
      link.download = 'cropped-image.png'
      link.href = croppedImage
      link.click()
    }
  }

  return (
    <div>
      <input
        type="file"
        accept="image/*"
        onChange={handleFileSelect}
      />

      {croppedImage && (
        <div>
          <h3>裁剪后的图片:</h3>
          <img src={croppedImage} alt="裁剪后" />
          <button onClick={handleDownload}>下载图片</button>
        </div>
      )}

      <ImageCropper
        imageSrc={uploadedImage}
        isOpen={isOpen}
        onClose={() => setIsOpen(false)}
        onCropComplete={handleCropComplete}
      />
    </div>
  )
}
示例 3:获取裁剪信息
const handleCropComplete = (croppedImageUrl, cropInfo) => {
  console.log('裁剪后的图片:', croppedImageUrl)

  if (cropInfo) {
    console.log('显示尺寸:', {
      width: cropInfo.displayWidth,
      height: cropInfo.displayHeight
    })
    console.log('原始像素尺寸:', {
      width: cropInfo.originalWidth,
      height: cropInfo.originalHeight
    })
  }

  // 可以用于上传到服务器
  // uploadToServer(croppedImageUrl, cropInfo)
}
🎨 操作说明
裁剪器操作
-
调整裁剪区域
- 拖动 8 个控制点(四个角和四条边的中点)调整裁剪框大小
- 拖动裁剪框内部可以移动裁剪框位置
-
移动图片
- 拖动裁剪框外的空白区域可以移动图片位置
-
缩放图片
- 点击工具栏的放大/缩小按钮
- 缩放范围:0.1x - 3x
-
重置
- 点击重置按钮恢复初始状态
-
确认裁剪
- 点击"确认裁剪"按钮完成裁剪
- 点击"取消"或点击背景关闭裁剪器
⚠️ 注意事项
1. 图片跨域问题
如果使用网络图片 URL,可能会遇到跨域问题。解决方案:
// 方案 1:使用代理服务器
const imageSrc = 'https://your-proxy.com/image.jpg'

// 方案 2:使用 CORS 配置的图片服务器
// 确保图片服务器设置了正确的 CORS 头

// 方案 3:转换为 DataURL(推荐)
const reader = new FileReader()
reader.onload = (e) => {
  setImageSrc(e.target.result) // 使用 DataURL
}
reader.readAsDataURL(file)
2. 大图片处理
对于超大图片,组件会自动缩放以适应屏幕,但裁剪时会使用原始分辨率,确保输出质量。
3. 内存管理
裁剪后的图片是 DataURL 格式,可能占用较大内存。建议:
// 使用完图片后释放内存
const handleCropComplete = (croppedImageUrl) => {
  // 处理图片...

  // 如果不再需要,可以转换为 Blob 减少内存占用
  const blob = dataURLtoBlob(croppedImageUrl)
  const blobUrl = URL.createObjectURL(blob)

  // 使用完后记得释放
  // URL.revokeObjectURL(blobUrl)
}

function dataURLtoBlob(dataurl) {
  const arr = dataurl.split(',')
  const mime = arr[0].match(/:(.*?);/)[1]
  const bstr = atob(arr[1])
  let n = bstr.length
  const u8arr = new Uint8Array(n)
  while (n--) {
    u8arr[n] = bstr.charCodeAt(n)
  }
  return new Blob([u8arr], { type: mime })
}
4. 样式依赖
组件使用了 Tailwind CSS 的 className。如果项目中没有 Tailwind,需要:
- 安装 Tailwind CSS
- 或者将 className 替换为内联样式
🔍 常见问题
Q1: 裁剪后的图片质量下降?
A: 组件会保持原始分辨率裁剪,不会降低质量。如果遇到质量问题,检查:
- 原始图片分辨率
- 浏览器 Canvas 限制
- 导出格式(PNG 无损)
Q2: 移动端触摸不灵敏?
A: 组件已针对移动端优化,控制点检测距离在移动端会自动增大。如果仍有问题,检查:
- 触摸事件是否被其他元素阻止
- 是否有 CSS
touch-action冲突
Q3: 如何限制裁剪区域的最小/最大尺寸?
A: 当前版本最小尺寸固定为 50x50 像素。如需自定义,可以修改组件源码中的限制逻辑:
// 在 handleMove 函数中
if (newCrop.width >= minWidth && newCrop.height >= minHeight) {
  // 允许调整
}
Q4: 如何自定义裁剪框样式?
A: 需要修改组件源码中的绘制代码:
// 修改裁剪框颜色
ctx.strokeStyle = "#your-color"

// 修改控制点样式
ctx.fillStyle = "#your-color"
ctx.strokeStyle = "#your-color"
🔗 相关资源
源码:
"use client"

import React, { useRef, useEffect, useLayoutEffect, useState, useCallback } from "react"

/**
 * 简单的图片裁剪组件
 * 支持8个控制点:上下左右 + 四个角
 */
export default function ImageCropper({ imageSrc, isOpen, onClose, onCropComplete }) {
  const canvasRef = useRef(null)
  const [image, setImage] = useState(null)
  const [crop, setCrop] = useState({ x: 50, y: 50, width: 200, height: 200 })
  const [dragging, setDragging] = useState(null)
  const [canvasSize, setCanvasSize] = useState({ width: 0, height: 0 })
  const [scale, setScale] = useState(1)
  const [imagePos, setImagePos] = useState({ x: 0, y: 0 })
  const [isDraggingImage, setIsDraggingImage] = useState(false)
  const [dragStart, setDragStart] = useState({ x: 0, y: 0 })

  // 使用 ref 存储最新的处理函数,避免依赖项问题
  const handlersRef = useRef(null)

  // 加载图片
  useEffect(() => {
    if (!isOpen || !imageSrc) return

    const img = new Image()
    img.crossOrigin = "anonymous"
    img.onload = () => {
      setImage(img)

      // 计算适合的尺寸 - 使用更大的空间以保持清晰度
      const maxWidth = window.innerWidth * 0.85
      const maxHeight = window.innerHeight * 0.75

      // 使用原始图片尺寸,但限制在合理范围内
      let width = img.width
      let height = img.height

      // 如果图片太大,按比例缩小,但保持尽可能大以维持清晰度
      if (width > maxWidth || height > maxHeight) {
        const scaleX = maxWidth / width
        const scaleY = maxHeight / height
        const scale = Math.min(scaleX, scaleY)
        width = Math.floor(width * scale)
        height = Math.floor(height * scale)
      }

      setCanvasSize({ width, height })
      setImagePos({ x: 0, y: 0 })
      setScale(1)

      // 设置初始裁剪区域(居中,60%大小)
      const cropSize = Math.min(width, height) * 0.6
      setCrop({
        x: (width - cropSize) / 2,
        y: (height - cropSize) / 2,
        width: cropSize,
        height: cropSize,
      })
    }
    img.src = imageSrc
  }, [isOpen, imageSrc])

  // 绘制画布
  useEffect(() => {
    if (!canvasRef.current || !image) return

    const canvas = canvasRef.current
    const ctx = canvas.getContext("2d")

    // 设置高质量渲染
    ctx.imageSmoothingEnabled = true
    ctx.imageSmoothingQuality = "high"

    // 清空画布
    ctx.clearRect(0, 0, canvas.width, canvas.height)

    // 绘制图片(带缩放和位移)
    const scaledWidth = canvasSize.width * scale
    const scaledHeight = canvasSize.height * scale
    const x = imagePos.x
    const y = imagePos.y

    // 先绘制完整图片
    ctx.drawImage(image, x, y, scaledWidth, scaledHeight)

    // 绘制遮罩(分四个区域,避免覆盖裁剪区域)
    ctx.fillStyle = "rgba(0, 0, 0, 0.5)"

    // 上方遮罩
    if (crop.y > 0) {
      ctx.fillRect(0, 0, canvas.width, crop.y)
    }

    // 下方遮罩
    if (crop.y + crop.height < canvas.height) {
      ctx.fillRect(0, crop.y + crop.height, canvas.width, canvas.height - crop.y - crop.height)
    }

    // 左侧遮罩
    if (crop.x > 0) {
      ctx.fillRect(0, crop.y, crop.x, crop.height)
    }

    // 右侧遮罩
    if (crop.x + crop.width < canvas.width) {
      ctx.fillRect(crop.x + crop.width, crop.y, canvas.width - crop.x - crop.width, crop.height)
    }

    // 绘制裁剪框边框
    ctx.strokeStyle = "#3b82f6"
    ctx.lineWidth = 2
    ctx.strokeRect(crop.x, crop.y, crop.width, crop.height)

    // 绘制网格线
    ctx.strokeStyle = "#3b82f6"
    ctx.lineWidth = 1
    ctx.beginPath()
    ctx.moveTo(crop.x + crop.width / 3, crop.y)
    ctx.lineTo(crop.x + crop.width / 3, crop.y + crop.height)
    ctx.moveTo(crop.x + (crop.width * 2) / 3, crop.y)
    ctx.lineTo(crop.x + (crop.width * 2) / 3, crop.y + crop.height)
    ctx.moveTo(crop.x, crop.y + crop.height / 3)
    ctx.lineTo(crop.x + crop.width, crop.y + crop.height / 3)
    ctx.moveTo(crop.x, crop.y + (crop.height * 2) / 3)
    ctx.lineTo(crop.x + crop.width, crop.y + (crop.height * 2) / 3)
    ctx.stroke()

    // 绘制8个控制点
    const handles = [
      { x: crop.x, y: crop.y, cursor: "nw-resize" }, // 左上
      { x: crop.x + crop.width / 2, y: crop.y, cursor: "n-resize" }, // 上
      { x: crop.x + crop.width, y: crop.y, cursor: "ne-resize" }, // 右上
      { x: crop.x + crop.width, y: crop.y + crop.height / 2, cursor: "e-resize" }, // 右
      { x: crop.x + crop.width, y: crop.y + crop.height, cursor: "se-resize" }, // 右下
      { x: crop.x + crop.width / 2, y: crop.y + crop.height, cursor: "s-resize" }, // 下
      { x: crop.x, y: crop.y + crop.height, cursor: "sw-resize" }, // 左下
      { x: crop.x, y: crop.y + crop.height / 2, cursor: "w-resize" }, // 左
    ]

    // 检测是否为移动设备,增大控制点尺寸
    const isMobile = /Android|webOS|iPhone|iPad|iPod|BlackBerry|IEMobile|Opera Mini/i.test(navigator.userAgent)
    const handleRadius = isMobile ? 10 : 6

    ctx.fillStyle = "#fff"
    ctx.strokeStyle = "#3b82f6"
    ctx.lineWidth = 2
    handles.forEach((handle) => {
      ctx.beginPath()
      ctx.arc(handle.x, handle.y, handleRadius, 0, Math.PI * 2)
      ctx.fill()
      ctx.stroke()
    })
  }, [image, crop, canvasSize, scale, imagePos])

  // 获取坐标(统一处理鼠标和触摸事件)
  const getCoordinates = (e) => {
    const rect = canvasRef.current.getBoundingClientRect()
    if (e.touches && e.touches.length > 0) {
      // 触摸事件
      return {
        x: e.touches[0].clientX - rect.left,
        y: e.touches[0].clientY - rect.top,
        clientX: e.touches[0].clientX,
        clientY: e.touches[0].clientY,
      }
    } else {
      // 鼠标事件
      return {
        x: e.clientX - rect.left,
        y: e.clientY - rect.top,
        clientX: e.clientX,
        clientY: e.clientY,
      }
    }
  }

  // 开始拖动(统一处理鼠标和触摸)
  const handleStart = (e) => {
    e.preventDefault() // 防止移动端默认行为(滚动、缩放等)
    const coords = getCoordinates(e)
    const x = coords.x
    const y = coords.y

    // 检测是否为移动设备,调整触摸检测距离
    const isMobile = /Android|webOS|iPhone|iPad|iPod|BlackBerry|IEMobile|Opera Mini/i.test(navigator.userAgent)
    const touchThreshold = isMobile ? 20 : 10

    // 检查是否点击了控制点
    const handles = [
      { name: "nw", x: crop.x, y: crop.y },
      { name: "n", x: crop.x + crop.width / 2, y: crop.y },
      { name: "ne", x: crop.x + crop.width, y: crop.y },
      { name: "e", x: crop.x + crop.width, y: crop.y + crop.height / 2 },
      { name: "se", x: crop.x + crop.width, y: crop.y + crop.height },
      { name: "s", x: crop.x + crop.width / 2, y: crop.y + crop.height },
      { name: "sw", x: crop.x, y: crop.y + crop.height },
      { name: "w", x: crop.x, y: crop.y + crop.height / 2 },
    ]

    for (const handle of handles) {
      const dist = Math.sqrt((x - handle.x) ** 2 + (y - handle.y) ** 2)
      if (dist < touchThreshold) {
        setDragging({ type: "handle", name: handle.name, startX: x, startY: y, startCrop: { ...crop } })
        return
      }
    }

    // 检查是否在裁剪框内(移动裁剪框)
    if (x >= crop.x && x <= crop.x + crop.width && y >= crop.y && y <= crop.y + crop.height) {
      setDragging({ type: "move", startX: x, startY: y, startCrop: { ...crop } })
      return
    }

    // 否则拖动图片
    setIsDraggingImage(true)
    setDragStart({ x: coords.clientX - imagePos.x, y: coords.clientY - imagePos.y })
  }

  // 拖动中(统一处理鼠标和触摸)
  const handleMove = (e) => {
    e.preventDefault() // 防止移动端默认行为
    const coords = getCoordinates(e)

    // 拖动图片
    if (isDraggingImage) {
      setImagePos({
        x: coords.clientX - dragStart.x,
        y: coords.clientY - dragStart.y,
      })
      return
    }

    if (!dragging) return

    const x = coords.x
    const y = coords.y
    const dx = x - dragging.startX
    const dy = y - dragging.startY

    if (dragging.type === "move") {
      setCrop({
        ...dragging.startCrop,
        x: Math.max(0, Math.min(canvasSize.width - dragging.startCrop.width, dragging.startCrop.x + dx)),
        y: Math.max(0, Math.min(canvasSize.height - dragging.startCrop.height, dragging.startCrop.y + dy)),
      })
    } else if (dragging.type === "handle") {
      const newCrop = { ...dragging.startCrop }

      switch (dragging.name) {
        case "nw":
          newCrop.x += dx
          newCrop.y += dy
          newCrop.width -= dx
          newCrop.height -= dy
          break
        case "n":
          newCrop.y += dy
          newCrop.height -= dy
          break
        case "ne":
          newCrop.y += dy
          newCrop.width += dx
          newCrop.height -= dy
          break
        case "e":
          newCrop.width += dx
          break
        case "se":
          newCrop.width += dx
          newCrop.height += dy
          break
        case "s":
          newCrop.height += dy
          break
        case "sw":
          newCrop.x += dx
          newCrop.width -= dx
          newCrop.height += dy
          break
        case "w":
          newCrop.x += dx
          newCrop.width -= dx
          break
      }

      // 限制最小尺寸
      if (newCrop.width >= 50 && newCrop.height >= 50) {
        // 限制在画布内
        if (newCrop.x >= 0 && newCrop.y >= 0 &&
            newCrop.x + newCrop.width <= canvasSize.width &&
            newCrop.y + newCrop.height <= canvasSize.height) {
          setCrop(newCrop)
        }
      }
    }
  }

  // 结束拖动(统一处理鼠标和触摸)
  const handleEnd = (e) => {
    e.preventDefault()
    setDragging(null)
    setIsDraggingImage(false)
  }

  // 鼠标事件(保持兼容性)
  const handleMouseDown = (e) => handleStart(e)
  const handleMouseMove = (e) => handleMove(e)
  const handleMouseUp = (e) => handleEnd(e)

  // 使用 useLayoutEffect 确保在 DOM 更新后立即更新 ref
  useLayoutEffect(() => {
    handlersRef.current = {
      handleStart,
      handleMove,
      handleEnd,
      dragging,
      isDraggingImage,
      dragStart,
      imagePos,
      crop,
      canvasSize
    }
  })

  // 使用 useEffect 手动注册非被动的触摸事件监听器
  useEffect(() => {
    const canvas = canvasRef.current
    if (!canvas || !handlersRef.current) return

    // 触摸事件处理器(直接从 ref 获取最新的处理函数)
    const touchStartHandler = (e) => {
      e.preventDefault()
      e.stopPropagation()
      const handlers = handlersRef.current
      if (handlers?.handleStart) {
        handlers.handleStart(e)
      }
    }

    const touchMoveHandler = (e) => {
      e.preventDefault()
      e.stopPropagation()
      const handlers = handlersRef.current
      if (handlers?.handleMove) {
        handlers.handleMove(e)
      }
    }

    const touchEndHandler = (e) => {
      e.preventDefault()
      e.stopPropagation()
      const handlers = handlersRef.current
      if (handlers?.handleEnd) {
        handlers.handleEnd(e)
      }
    }

    // 添加非被动事件监听器
    canvas.addEventListener('touchstart', touchStartHandler, { passive: false })
    canvas.addEventListener('touchmove', touchMoveHandler, { passive: false })
    canvas.addEventListener('touchend', touchEndHandler, { passive: false })
    canvas.addEventListener('touchcancel', touchEndHandler, { passive: false })

    return () => {
      canvas.removeEventListener('touchstart', touchStartHandler)
      canvas.removeEventListener('touchmove', touchMoveHandler)
      canvas.removeEventListener('touchend', touchEndHandler)
      canvas.removeEventListener('touchcancel', touchEndHandler)
    }
  }, [image, canvasSize]) // 当图片和画布尺寸变化时重新注册

  // 确认裁剪
  const handleCrop = () => {
    if (!image) return

    const canvas = document.createElement("canvas")
    const ctx = canvas.getContext("2d")

    // 计算原始图片上的裁剪区域
    const scaledWidth = canvasSize.width * scale
    const scaledHeight = canvasSize.height * scale

    // 裁剪区域相对于缩放后图片的位置
    const relativeX = crop.x - imagePos.x
    const relativeY = crop.y - imagePos.y

    // 转换到原始图片的坐标(原始像素)
    const sourceX = (relativeX / scaledWidth) * image.width
    const sourceY = (relativeY / scaledHeight) * image.height
    const sourceWidth = (crop.width / scaledWidth) * image.width
    const sourceHeight = (crop.height / scaledHeight) * image.height

    // 设置输出画布尺寸为原始像素尺寸(保持高清)
    canvas.width = sourceWidth
    canvas.height = sourceHeight

    // 启用高质量图像平滑
    ctx.imageSmoothingEnabled = true
    ctx.imageSmoothingQuality = "high"

    // 从原始图片裁剪,输出高清图片
    ctx.drawImage(
      image,
      sourceX, sourceY, sourceWidth, sourceHeight,
      0, 0, sourceWidth, sourceHeight
    )

    // 使用高质量 PNG 输出
    const croppedImage = canvas.toDataURL("image/png", 1.0)

    // 传递裁剪信息(包括原始显示尺寸)
    onCropComplete(croppedImage, {
      displayWidth: crop.width,
      displayHeight: crop.height,
      originalWidth: sourceWidth,
      originalHeight: sourceHeight,
    })

    handleClose()
  }

  // 关闭
  const handleClose = () => {
    setImage(null)
    onClose()
  }

  // 缩放
  const handleZoom = (delta) => {
    setScale((prev) => Math.max(0.1, Math.min(3, prev + delta)))
  }

  // 重置
  const handleReset = () => {
    setScale(1)
    setImagePos({ x: 0, y: 0 })
    if (canvasSize.width && canvasSize.height) {
      const cropSize = Math.min(canvasSize.width, canvasSize.height) * 0.6
      setCrop({
        x: (canvasSize.width - cropSize) / 2,
        y: (canvasSize.height - cropSize) / 2,
        width: cropSize,
        height: cropSize,
      })
    }
  }

  if (!isOpen) return null

  return (
    <div
      className="fixed inset-0 z-50 flex items-center justify-center bg-black/80"
      onClick={(e) => e.target === e.currentTarget && handleClose()}
      style={{ touchAction: "none" }} // 防止移动端背景滚动
    >
      <div className="relative w-[95vw] h-[95vh] max-w-7xl max-h-[90vh] bg-white dark:bg-[#111111] rounded-lg shadow-2xl flex flex-col overflow-hidden md:rounded-lg">
        {/* 头部工具栏 */}
        <div className="flex items-center justify-between px-3 md:px-6 py-3 md:py-4 border-b border-gray-200 dark:border-gray-700 bg-gray-50 dark:bg-[#0a0a0a]">
          <h2 className="text-lg md:text-xl font-semibold text-gray-800 dark:text-gray-200">裁剪图片</h2>

          <div className="flex items-center gap-1 md:gap-2">
            <button
              onClick={() => handleZoom(0.1)}
              className="px-2 md:px-3 py-2 text-sm font-medium text-gray-700 dark:text-gray-300 bg-white dark:bg-[#1f1f1f] border border-gray-300 dark:border-gray-600 rounded-md hover:bg-gray-50 dark:hover:bg-[#2a2a2a] active:bg-gray-100 dark:active:bg-[#333333]"
              title="放大"
            >
              <svg className="w-4 h-4 md:w-5 md:h-5" fill="none" stroke="currentColor" viewBox="0 0 24 24">
                <path strokeLinecap="round" strokeLinejoin="round" strokeWidth={2} d="M21 21l-6-6m2-5a7 7 0 11-14 0 7 7 0 0114 0zM10 7v6m3-3H7" />
              </svg>
            </button>

            <button
              onClick={() => handleZoom(-0.1)}
              className="px-2 md:px-3 py-2 text-sm font-medium text-gray-700 dark:text-gray-300 bg-white dark:bg-[#1f1f1f] border border-gray-300 dark:border-gray-600 rounded-md hover:bg-gray-50 dark:hover:bg-[#2a2a2a] active:bg-gray-100 dark:active:bg-[#333333]"
              title="缩小"
            >
              <svg className="w-4 h-4 md:w-5 md:h-5" fill="none" stroke="currentColor" viewBox="0 0 24 24">
                <path strokeLinecap="round" strokeLinejoin="round" strokeWidth={2} d="M21 21l-6-6m2-5a7 7 0 11-14 0 7 7 0 0114 0zM13 10H7" />
              </svg>
            </button>

            <div className="w-px h-6 bg-gray-300 dark:bg-[#2a2a2a] mx-1"></div>

            <button
              onClick={handleReset}
              className="px-2 md:px-3 py-2 text-sm font-medium text-gray-700 dark:text-gray-300 bg-white dark:bg-[#1f1f1f] border border-gray-300 dark:border-gray-600 rounded-md hover:bg-gray-50 dark:hover:bg-[#2a2a2a] active:bg-gray-100 dark:active:bg-[#333333]"
              title="重置"
            >
              <svg className="w-4 h-4 md:w-5 md:h-5" fill="none" stroke="currentColor" viewBox="0 0 24 24">
                <path strokeLinecap="round" strokeLinejoin="round" strokeWidth={2} d="M4 4v5h.582m15.356 2A8.001 8.001 0 004.582 9m0 0H9m11 11v-5h-.581m0 0a8.003 8.003 0 01-15.357-2m15.357 2H15" />
              </svg>
            </button>
          </div>

          <button
            onClick={handleClose}
            className="p-2 text-gray-500 dark:text-gray-400 hover:text-gray-700 dark:hover:text-gray-300 hover:bg-gray-200 dark:hover:bg-[#2a2a2a] active:bg-gray-300 dark:active:bg-[#2a2a2a] rounded-full"
          >
            <svg className="w-5 h-5 md:w-6 md:h-6" fill="none" stroke="currentColor" viewBox="0 0 24 24">
              <path strokeLinecap="round" strokeLinejoin="round" strokeWidth={2} d="M6 18L18 6M6 6l12 12" />
            </svg>
          </button>
        </div>

        {/* 裁剪区域 */}
        <div className="flex-1 overflow-hidden p-4 bg-gray-100 dark:bg-[#0a0a0a] flex items-center justify-center">
          <canvas
            ref={canvasRef}
            width={canvasSize.width}
            height={canvasSize.height}
            className="cursor-move border border-gray-300 dark:border-gray-600 touch-none"
            style={{
              imageRendering: "high-quality",
              WebkitFontSmoothing: "antialiased",
              touchAction: "none", // 防止移动端默认触摸行为
            }}
            onMouseDown={handleMouseDown}
            onMouseMove={handleMouseMove}
            onMouseUp={handleMouseUp}
            onMouseLeave={handleMouseUp}
          />
        </div>

        {/* 底部操作栏 */}
        <div className="flex items-center justify-end gap-3 px-3 md:px-6 py-3 md:py-4 border-t border-gray-200 dark:border-gray-700 bg-gray-50 dark:bg-[#0a0a0a]">
          <button
            onClick={handleClose}
            className="px-4 md:px-6 py-2.5 md:py-2.5 text-sm font-medium text-gray-700 dark:text-gray-300 bg-white dark:bg-[#1f1f1f] border border-gray-300 dark:border-gray-600 rounded-md hover:bg-gray-50 dark:hover:bg-[#2a2a2a] active:bg-gray-100 dark:active:bg-[#333333] min-h-[44px] md:min-h-0"
          >
            取消
          </button>
          <button
            onClick={handleCrop}
            className="px-4 md:px-6 py-2.5 md:py-2.5 text-sm font-medium text-white bg-blue-600 dark:bg-blue-500 rounded-md hover:bg-blue-700 dark:hover:bg-blue-600 active:bg-blue-800 dark:active:bg-blue-700 min-h-[44px] md:min-h-0"
          >
            确认裁剪
          </button>
        </div>
      </div>

      {/* 使用提示 */}
      <div className="absolute bottom-4 md:bottom-8 left-1/2 transform -translate-x-1/2 bg-black/75 text-white px-3 md:px-6 py-2 md:py-3 rounded-lg text-xs md:text-sm backdrop-blur-sm max-w-[90vw] text-center">
        💡 提示:拖动8个控制点调整裁剪区域 | 拖动裁剪框移动位置 | 拖动空白处移动图片
      </div>
    </div>
  )
}
作者: IMeL
最后更新: 2025-01-01

有“AI”的1024 = 2048,欢迎大家加入2048 AI社区
更多推荐


 26
26 0
0- 0


 已为社区贡献1条内容

所有评论(0)