智能安规考核系统:AI(YOLO+讯飞语音)赋能千人千面
摘要 "千人千面智能安规考核系统"是一款基于PyQt5框架开发的智能化安全规程考核平台,融合了YOLOPose姿态估计、人脸识别、YOLOv11目标检测和语音识别等多模态AI技术。系统通过ONNX格式实现模型轻量化部署,利用ONNX Runtime和GPU加速提升性能,并打包为独立可执行程序便于工业现场部署。该系统可自动评估安全装备佩戴、操作规范等指标,实现了电力、建筑等行业安
前言
项目介绍
近期,完成了“千人千面智能安规考核系统”的研发与部署工作。该系统旨在通过人工智能技术实现电力、建筑等行业安全规程考核的自动化、智能化与个性化,全面提升考核效率与公正性。
系统基于 PyQt5 框架进行桌面端封装,具备良好的用户交互界面与跨平台兼容性。通过融合多种前沿深度学习模型,构建了一套多模态智能考评体系,涵盖的技术如下:
- 姿态估计(YOLOPose):用于精准识别考生在实操过程中的身体姿态与动作规范性,如登高作业姿势、设备操作流程等,确保动作符合安全规程要求。
- 人脸识别:实现考生身份自动核验,防止替考,保障考核过程的真实性与可追溯性。
- 目标检测(YOLOv11):对考核场景中的关键安全装备进行实时检测,包括安全帽佩戴、工作服着装规范、35kV绝缘手套使用、布控球安装状态等,确保个人防护与设备操作符合标准。
- 语音识别:集成科大讯飞高精度语音识别接口,自动识别并评估考生对安全规程的口述背诵内容,实现“听、看、做”一体化智能评分。
为提升系统的部署灵活性与运行效率,项目进行了深度优化:
- 所有
PyTorch训练模型(.pt)均被转换为ONNX(Open Neural Network Exchange)格式,实现模型的跨框架兼容与轻量化部署。 - 利用
ONNX Runtime结合GPU(CUDA)加速,显著提升推理速度,确保在复杂场景下仍能实现实时、低延迟的多任务并行处理。 - 整个系统通过
PyInstaller打包为独立的.exe可执行文件,无需安装复杂环境,一键式部署,极大降低了现场运维门槛,适用于对安全性要求较高的工业现场。
选择 ONNX 的理由
为何要将pt格式文件转换为ONNX格式呢,原因如下:
| 特性/方面 | PyTorch (PT) | ONNX |
|---|---|---|
| 框架类型 | 深度学习开发框架 | 模型交换格式 |
| 适用阶段 | 研发、训练阶段 | 部署阶段 |
| 推理性能 | 原生支持一般,可通过 TorchScript 或 JIT 提升 | 支持通过 ONNX Runtime 及其他高性能引擎优化推理性能 |
| 跨平台兼容性 | 主要针对特定环境(如 Python),需要额外工作实现跨平台 | 设计用于跨平台兼容,支持多种硬件和操作系统 |
| 互操作性 | 有限,主要在 PyTorch 生态内 | 高,支持与 TensorFlow, MXNet 等多个框架互操作 |
| 部署复杂度 | 相对较高,尤其是跨框架或跨平台时 | 较低,简化了跨框架和跨平台的部署流程 |
| 社区和支持 | 强大的社区支持和活跃的开发者群体 | 良好的社区支持,特别是对于工业级应用和生产部署 |
| 应用场景 | 适用于研究、原型设计以及小规模应用 | 更适合大规模部署、跨平台应用及需要高性能推理的场景 |
- 跨平台兼容性:ONNX 支持多种深度学习框架和硬件平台,使得模型可以在不同的环境中高效运行。
- 简化部署流程:通过使用 ONNX 格式,可以减少因框架差异导致的部署难题。
- 性能优化:利用 ONNX Runtime 或者其他支持 ONNX 的高性能引擎可以获得比原生框架更好的推理速度。
- 团队协作:ONNX 作为一种开放标准,促进了不同背景的开发者之间的协作,提高了模型共享和重用的效率。
千人千面安全规范考核系统
系统流程图如下: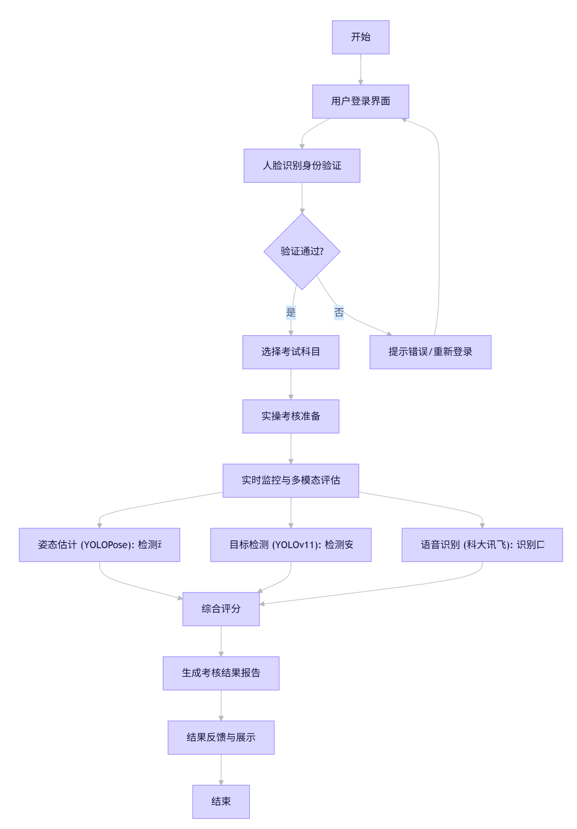
接下来,博主将根据技术栈进行系统介绍:
系统 UI 与功能设计
整个系统使用PyQt5进行开发,各个界面及其功能如下:
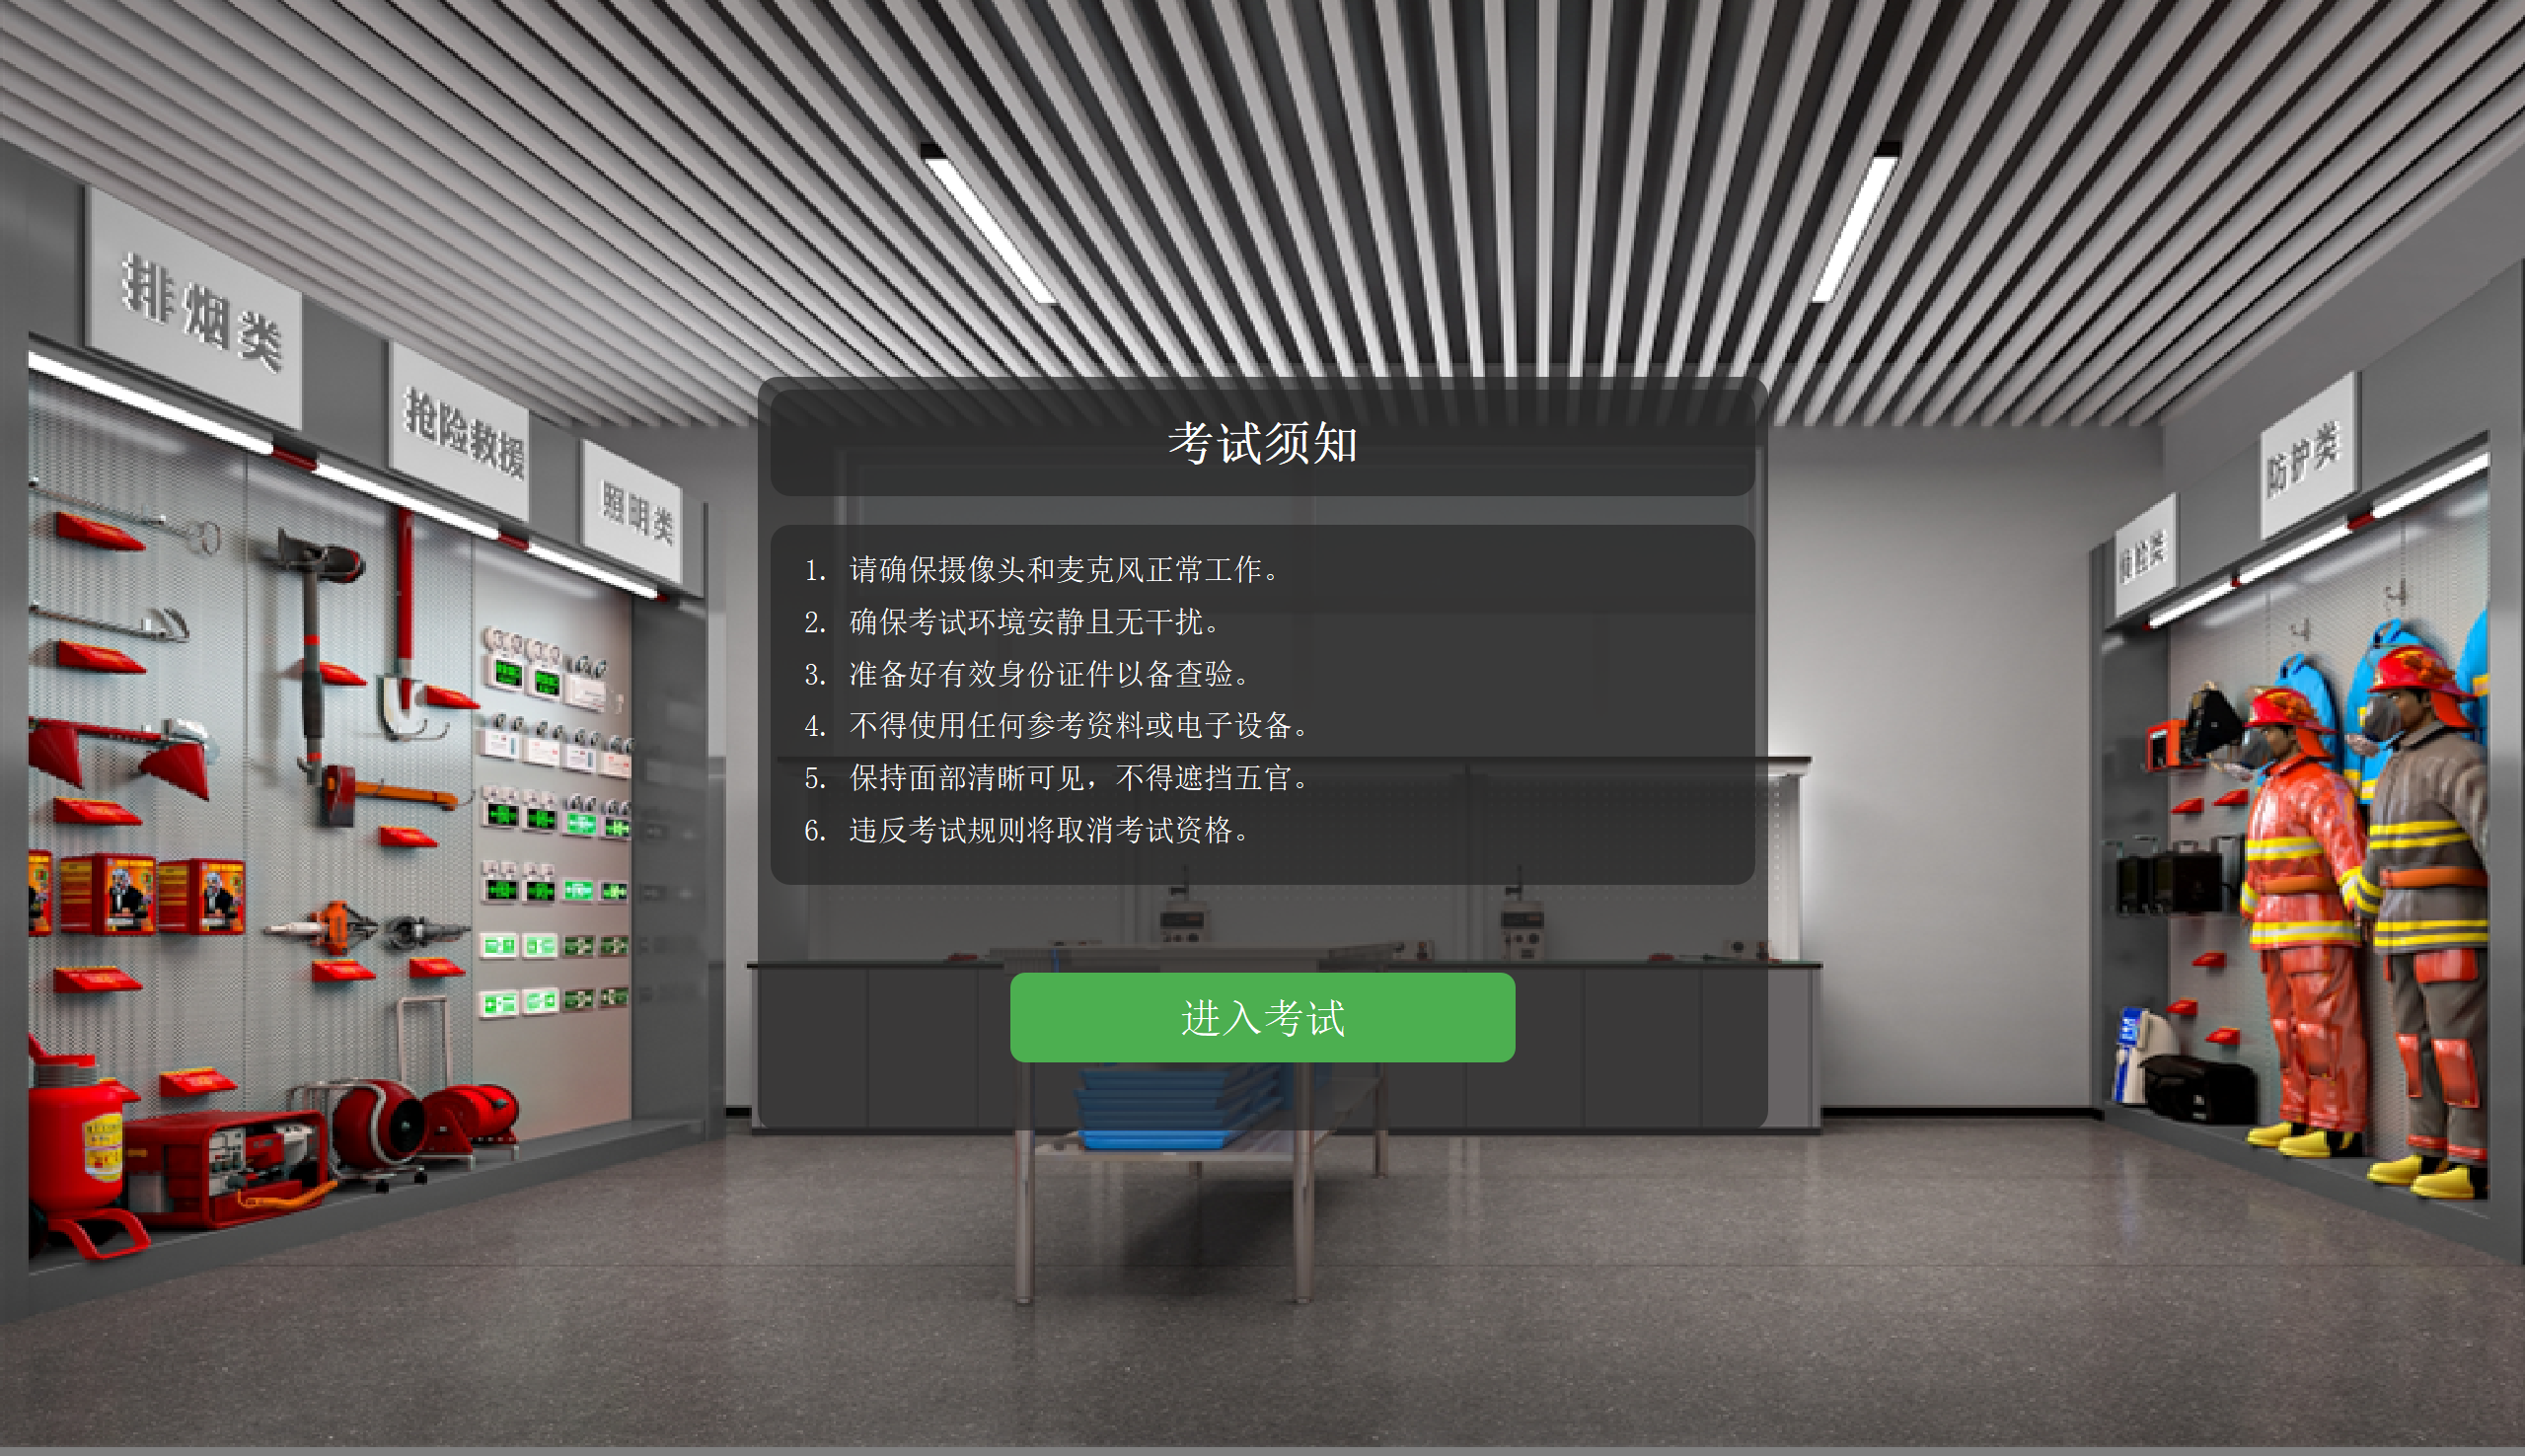
系统首页
该界面是主界面,后续的页面都是一个个widget,不断的切换到这个主界面中。
主界面代码如下:
class ExamHomePage(QMainWindow):
    def __init__(self):
        super().__init__()
        self.setWindowTitle("千人千面考试系统")
        self.setWindowFlags(Qt.FramelessWindowHint)
        self.setWindowIcon(QIcon(resource_path("images/logo.ico")))
        screen = QApplication.primaryScreen()
        screen_geometry = screen.availableGeometry()
        self.width = screen_geometry.width()
        self.height = screen_geometry.height()

        self.setGeometry(0, 0, self.width, self.height)
        self.setFixedSize(self.width, self.height)
        self.user_id=""
        self.id_card=""
        self.name=""
        self.api_data=[]
        self.selected_items=[]
        # 页面容器
        self.stacked_widget = QStackedWidget(self)
        self.setCentralWidget(self.stacked_widget)
        # 创建一个 QLabel 用于背景
        self.bg_label = QLabel(self.stacked_widget)
        self.bg_label.setGeometry(self.stacked_widget.rect())
        bg_pixmap = QPixmap(resource_path("images/bg.jpg"))
        self.bg_label.setPixmap(bg_pixmap)
        self.bg_label.setScaledContents(True)  # 图片随 label 缩放
        self.bg_label.lower()  # 将背景 label 放在最底层
        # 首页
        self.home_page = QWidget()
        self.init_home_page()
        self.stacked_widget.addWidget(self.home_page)
        # 人脸匹配页
        self.face_match_page = FaceMatchPage(parent=self)
        self.stacked_widget.addWidget(self.face_match_page)  # index 1
        #考试项目选择
        self.exam_select_page = ExamSelectionPage(parent=self)
        self.stacked_widget.addWidget(self.exam_select_page)  # index 2
        # 考试页面
        self.exam_page = ExamApp(exam_name="", selected_items="", parent=self)
        self.stacked_widget.addWidget(self.exam_page)  # index 3
在主界面加载完成后,即可初始化首页:
    def init_home_page(self):
        layout = QVBoxLayout()
        layout.setAlignment(Qt.AlignCenter)
        # 背景图
        background = QLabel(self.home_page)
        background.setPixmap(QPixmap(resource_path("images/img.jpg")).scaled(self.width, self.height+150))
        background.setStyleSheet("background-color: rgba(0, 0, 0, 120);")
        background.resize(self.width, self.height)

        container = QWidget(self.home_page)
        container.setStyleSheet("""
            background-color: rgba(40, 40, 40, 180);
            border-radius: 20px;
            padding: 30px;
        """)
        container.setFixedSize(int(self.width * 0.4), int(self.height * 0.5))

        layout_container = QVBoxLayout()
        layout_container.setAlignment(Qt.AlignTop)

        title = QLabel("考试须知", self.home_page)
        title.setAlignment(Qt.AlignCenter)
        title.setStyleSheet("font-size: 48px; font-weight: bold; color: white; margin-bottom: 20px;")
        layout_container.addWidget(title)

        notice_text = QLabel("""
            <style>.notice {color:white;font-size:30px;line-height:1.2;text-align:left;}</style>
            <div class="notice">
                <p>1. 请确保摄像头和麦克风正常工作。</p>
                <p>2. 确保考试环境安静且无干扰。</p>
                <p>3. 准备好有效身份证件以备查验。</p>
                <p>4. 不得使用任何参考资料或电子设备。</p>
                <p>5. 保持面部清晰可见,不得遮挡五官。</p>
                <p>6. 违反考试规则将取消考试资格。</p>
            </div>
        """)
        notice_text.setWordWrap(True)
        layout_container.addWidget(notice_text)
        layout_container.addSpacing(20)

        start_button = QPushButton("进入考试", self.home_page)
        start_button.setFixedSize(int(container.width() * 0.5), int(self.height * 0.06))
        start_button.setStyleSheet("""
            QPushButton {
                background-color: #4CAF50;
                border: none;
                color: white;
                font-size: 42px;
                padding: 10px;
                border-radius: 15px;
            }
            QPushButton:hover {
                background-color: #32CD32;
                color: white;
                border: 2px solid #8FBC8F;
            }
        """)
        start_button.clicked.connect(self.goto_face_match_page)
        layout_container.addWidget(start_button, alignment=Qt.AlignCenter)

        container.setLayout(layout_container)
        x = (self.width - container.width()) // 2
        y = (self.height - container.height()) // 2
        container.move(x, y)
        layout.addWidget(container)
        self.home_page.setLayout(layout)
人脸认证
人脸识别是一种通过分析人脸图像或视频来识别个体身份的技术,其基本原理可以分为以下几个关键步骤:
人脸检测 (Face Detection):
首先,系统需要在图像或视频流中找到人脸的位置。这通常通过检测人脸的轮廓、五官(如眼睛、鼻子、嘴巴)的相对位置和特征来实现,将人脸区域从背景中分割出来,并用一个矩形框标记。关键点定位与对齐 (Landmark Detection & Alignment):
在检测到的人脸区域内,系统会定位关键的面部特征点(如眼角、鼻尖、嘴角等)。这些点用于对人脸进行几何校正(对齐),例如旋转、缩放,以消除姿态、角度变化带来的影响,确保后续分析的准确性。特征提取 (Feature Extraction):
这是核心步骤。系统利用深度学习模型(如卷积神经网络CNN)分析对齐后的人脸图像,将其转换成一个高维度的数字向量(称为“特征向量”或“嵌入向量”
- Embedding)。这个向量是人脸的数学化表示,它高度浓缩了能区分不同个体的独特面部特征(如五官的形状、相对距离、纹理等),同时尽量忽略光照、表情、发型等非本质变化。
- 特征比对与识别 (Feature Comparison & Recognition):
- 识别 (Recognition/Identification):将提取出的特征向量与数据库中存储的已知身份的特征向量进行比对。计算它们之间的相似度(通常用余弦相似度或欧氏距离衡量)。系统会找到最相似的向量,并将对应的身份作为识别结果。
- 验证 (Verification):判断当前人脸特征向量是否与某个特定身份(如
ID)的特征向量匹配(“1:1比对”),回答“是不是某人”的问题。核心思想:人脸识别的本质是将复杂的、直观的人脸视觉信息,转化为计算机易于存储、计算和比较的数字特征。通过深度学习,模型学习到如何生成这种特征向量,使得同一个人在不同照片下的特征向量距离很近,而不同人的特征向量距离很远,从而实现准确的身份识别。
这里,博主直接使用OpenCV中的库实现人脸识别:
人脸库构建
首先是人脸库构建,这里博主使用的是anno构建的方式,因为先前使用faiss方式构建时,在使用pyinstaller打包时会失败。
这里下面的人脸检测模型(face_detection.onnx)与特征提取模型(face_recognition.onnx)是使用的OpenCV中自带的人脸库实现的。
import cv2
import os
import numpy as np
from annoy import AnnoyIndex

# 加载模型
face_detector = cv2.FaceDetectorYN_create(
    "D:/workspace/qianren/onnx_inference/models/face_detection.onnx", "", (320, 320))
face_recognizer = cv2.FaceRecognizerSF_create(
    "D:/workspace/qianren/onnx_inference/models/face_recognition.onnx", "")

# 人脸库目录
dataset_dir = "D:/faces/faces"  # 每个人一个文件夹,如 faces_dataset/person_001/*.jpg
feature_list = []
name_list = []

for person_name in os.listdir(dataset_dir):
    person_path = os.path.join(dataset_dir, person_name)
    if not os.path.isdir(person_path):
        continue

    for img_file in os.listdir(person_path):
        img_path = os.path.join(person_path, img_file)
        img = cv2.imread(img_path)

        h, w = img.shape[:2]
        face_detector.setInputSize((w, h))
        _, faces = face_detector.detect(img)

        if faces is not None and len(faces) > 0:
            aligned_face = face_recognizer.alignCrop(img, faces[0])
            embedding = face_recognizer.feature(aligned_face).flatten().astype('float32')
            # 对特征向量进行 L2 归一化(余弦相似度需要)
            embedding /= np.linalg.norm(embedding)

            feature_list.append(embedding)
            name_list.append(person_name)

# 转换为 numpy 数组
feature_array = np.array(feature_list).astype('float32')
# 获取维度
dimension = feature_array.shape[1]
# 创建 Annoy 索引(使用余弦相似度)
annoy_index = AnnoyIndex(dimension, metric='angular')  # angular 表示余弦距离
# 添加向量到索引
for i, vector in enumerate(feature_array):
    annoy_index.add_item(i, vector)
# 构建索引(n_trees 是搜索速度与准确率之间的权衡)
annoy_index.build(n_trees=10)
# 保存索引和名字列表
annoy_index.save("ann_face_index.ann")
np.save("../datasets/ann_name_list.npy", np.array(name_list))
print("人脸库构建完成!")
人脸识别
人脸识别代码如下:
import cv2

# 加载模型
face_detector = cv2.FaceDetectorYN_create("D:/workspace/qianren/onnx_inference/models/face_detection.onnx", "", (320, 320))
face_recognizer = cv2.FaceRecognizerSF_create("D:/workspace/qianren/onnx_inference/models/face_recognition.onnx", "")

# 加载注册图像
reference_img = cv2.imread("face.jpg")
h, w = reference_img.shape[:2]
face_detector.setInputSize((w, h))
# 检测人脸
_, faces = face_detector.detect(reference_img)
if  faces is  None:
    print("人脸特征不明显,无法开启摄像...")
aligned_face = face_recognizer.alignCrop(reference_img, faces[0])
ref_embedding = face_recognizer.feature(aligned_face)
print("已加载参考图像特征,启动摄像头...")
# 打开摄像头
cap = cv2.VideoCapture(0)

while True:
    ret, frame = cap.read()
    if not ret:
        break
    h, w = frame.shape[:2]
    face_detector.setInputSize((w, h))
    _, faces = face_detector.detect(frame)
    if faces is not None and len(faces) > 0:
        for idx, face in enumerate(faces):
            # 获取当前人脸 bounding box
            box = list(map(int, face[:4]))  # x, y, width, height
            aligned = face_recognizer.alignCrop(frame, face)
            embedding = face_recognizer.feature(aligned)
            # 计算相似度
            cosine_score = cv2.matchTemplate(ref_embedding, embedding, cv2.TM_CCOEFF_NORMED)[0][0]
            match_label = "matched" if cosine_score > 0.7 else "not matched"
            color = (0, 255, 0) if cosine_score > 0.7 else (0, 0, 255)
            # 绘制人脸矩形框
            cv2.rectangle(frame,
                          (box[0], box[1]),
                          (box[0] + box[2], box[1] + box[3]),
                          color, 2)

            # 显示识别结果(放在人脸框上方)
            cv2.putText(frame, f"{match_label} ({cosine_score:.2f})",
                        (box[0], box[1] - 10),
                        cv2.FONT_HERSHEY_SIMPLEX,
                        0.6, color, 2)
    else:
        cv2.putText(frame, "No Face Detected", (10, 30),
                    cv2.FONT_HERSHEY_SIMPLEX, 0.8, (255, 0, 0), 2)

    cv2.imshow("Real-Time Face Recognition", frame)

    if cv2.waitKey(1) & 0xFF == ord('q'):
        break

cap.release()
cv2.destroyAllWindows()
效果图如下:
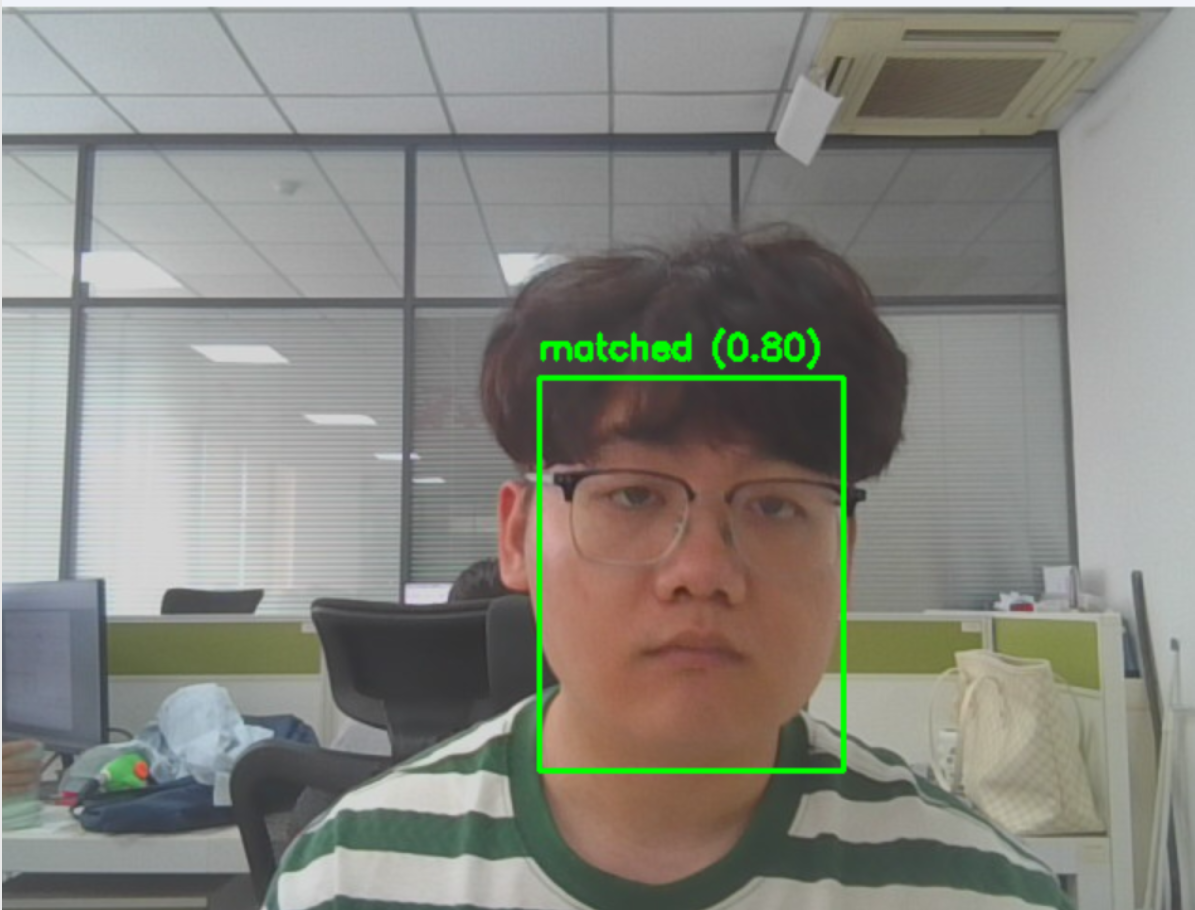
将上述人脸识别的核心算法融入到我们的系统中,效果如下:
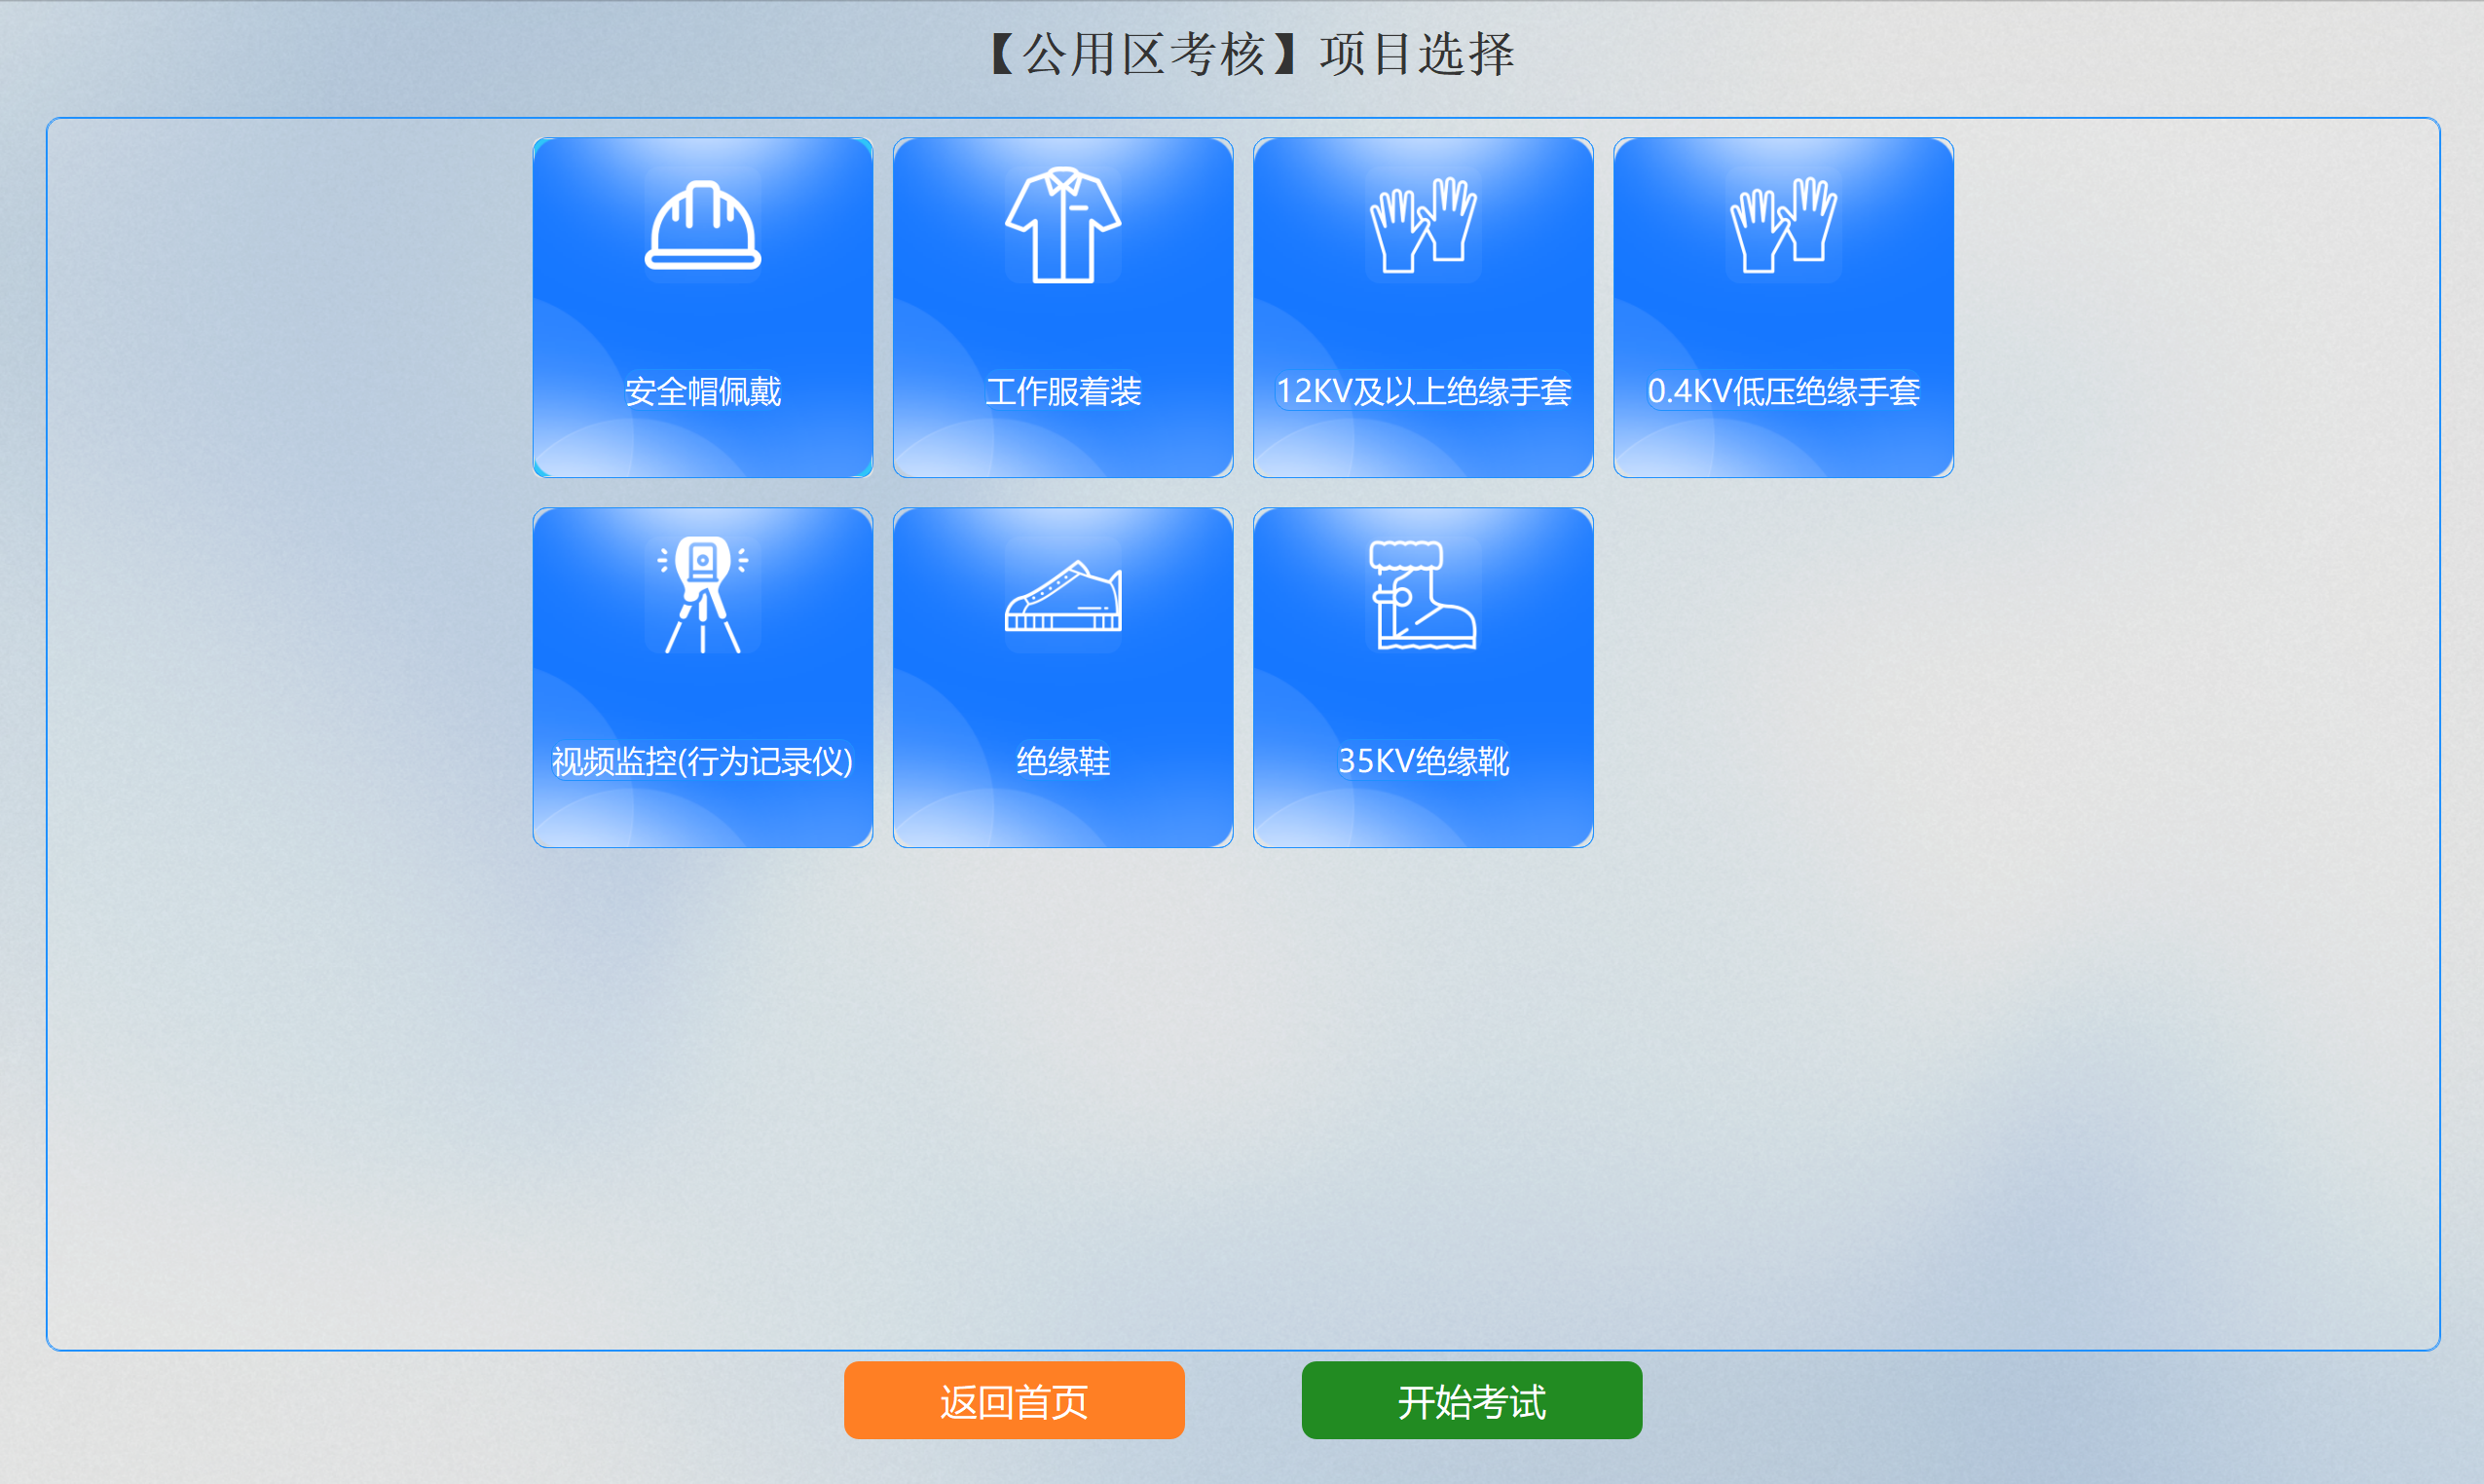
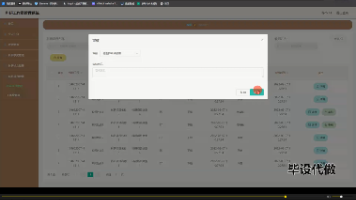
项目选择
用户可选择不同的考核项目进行组合考试。
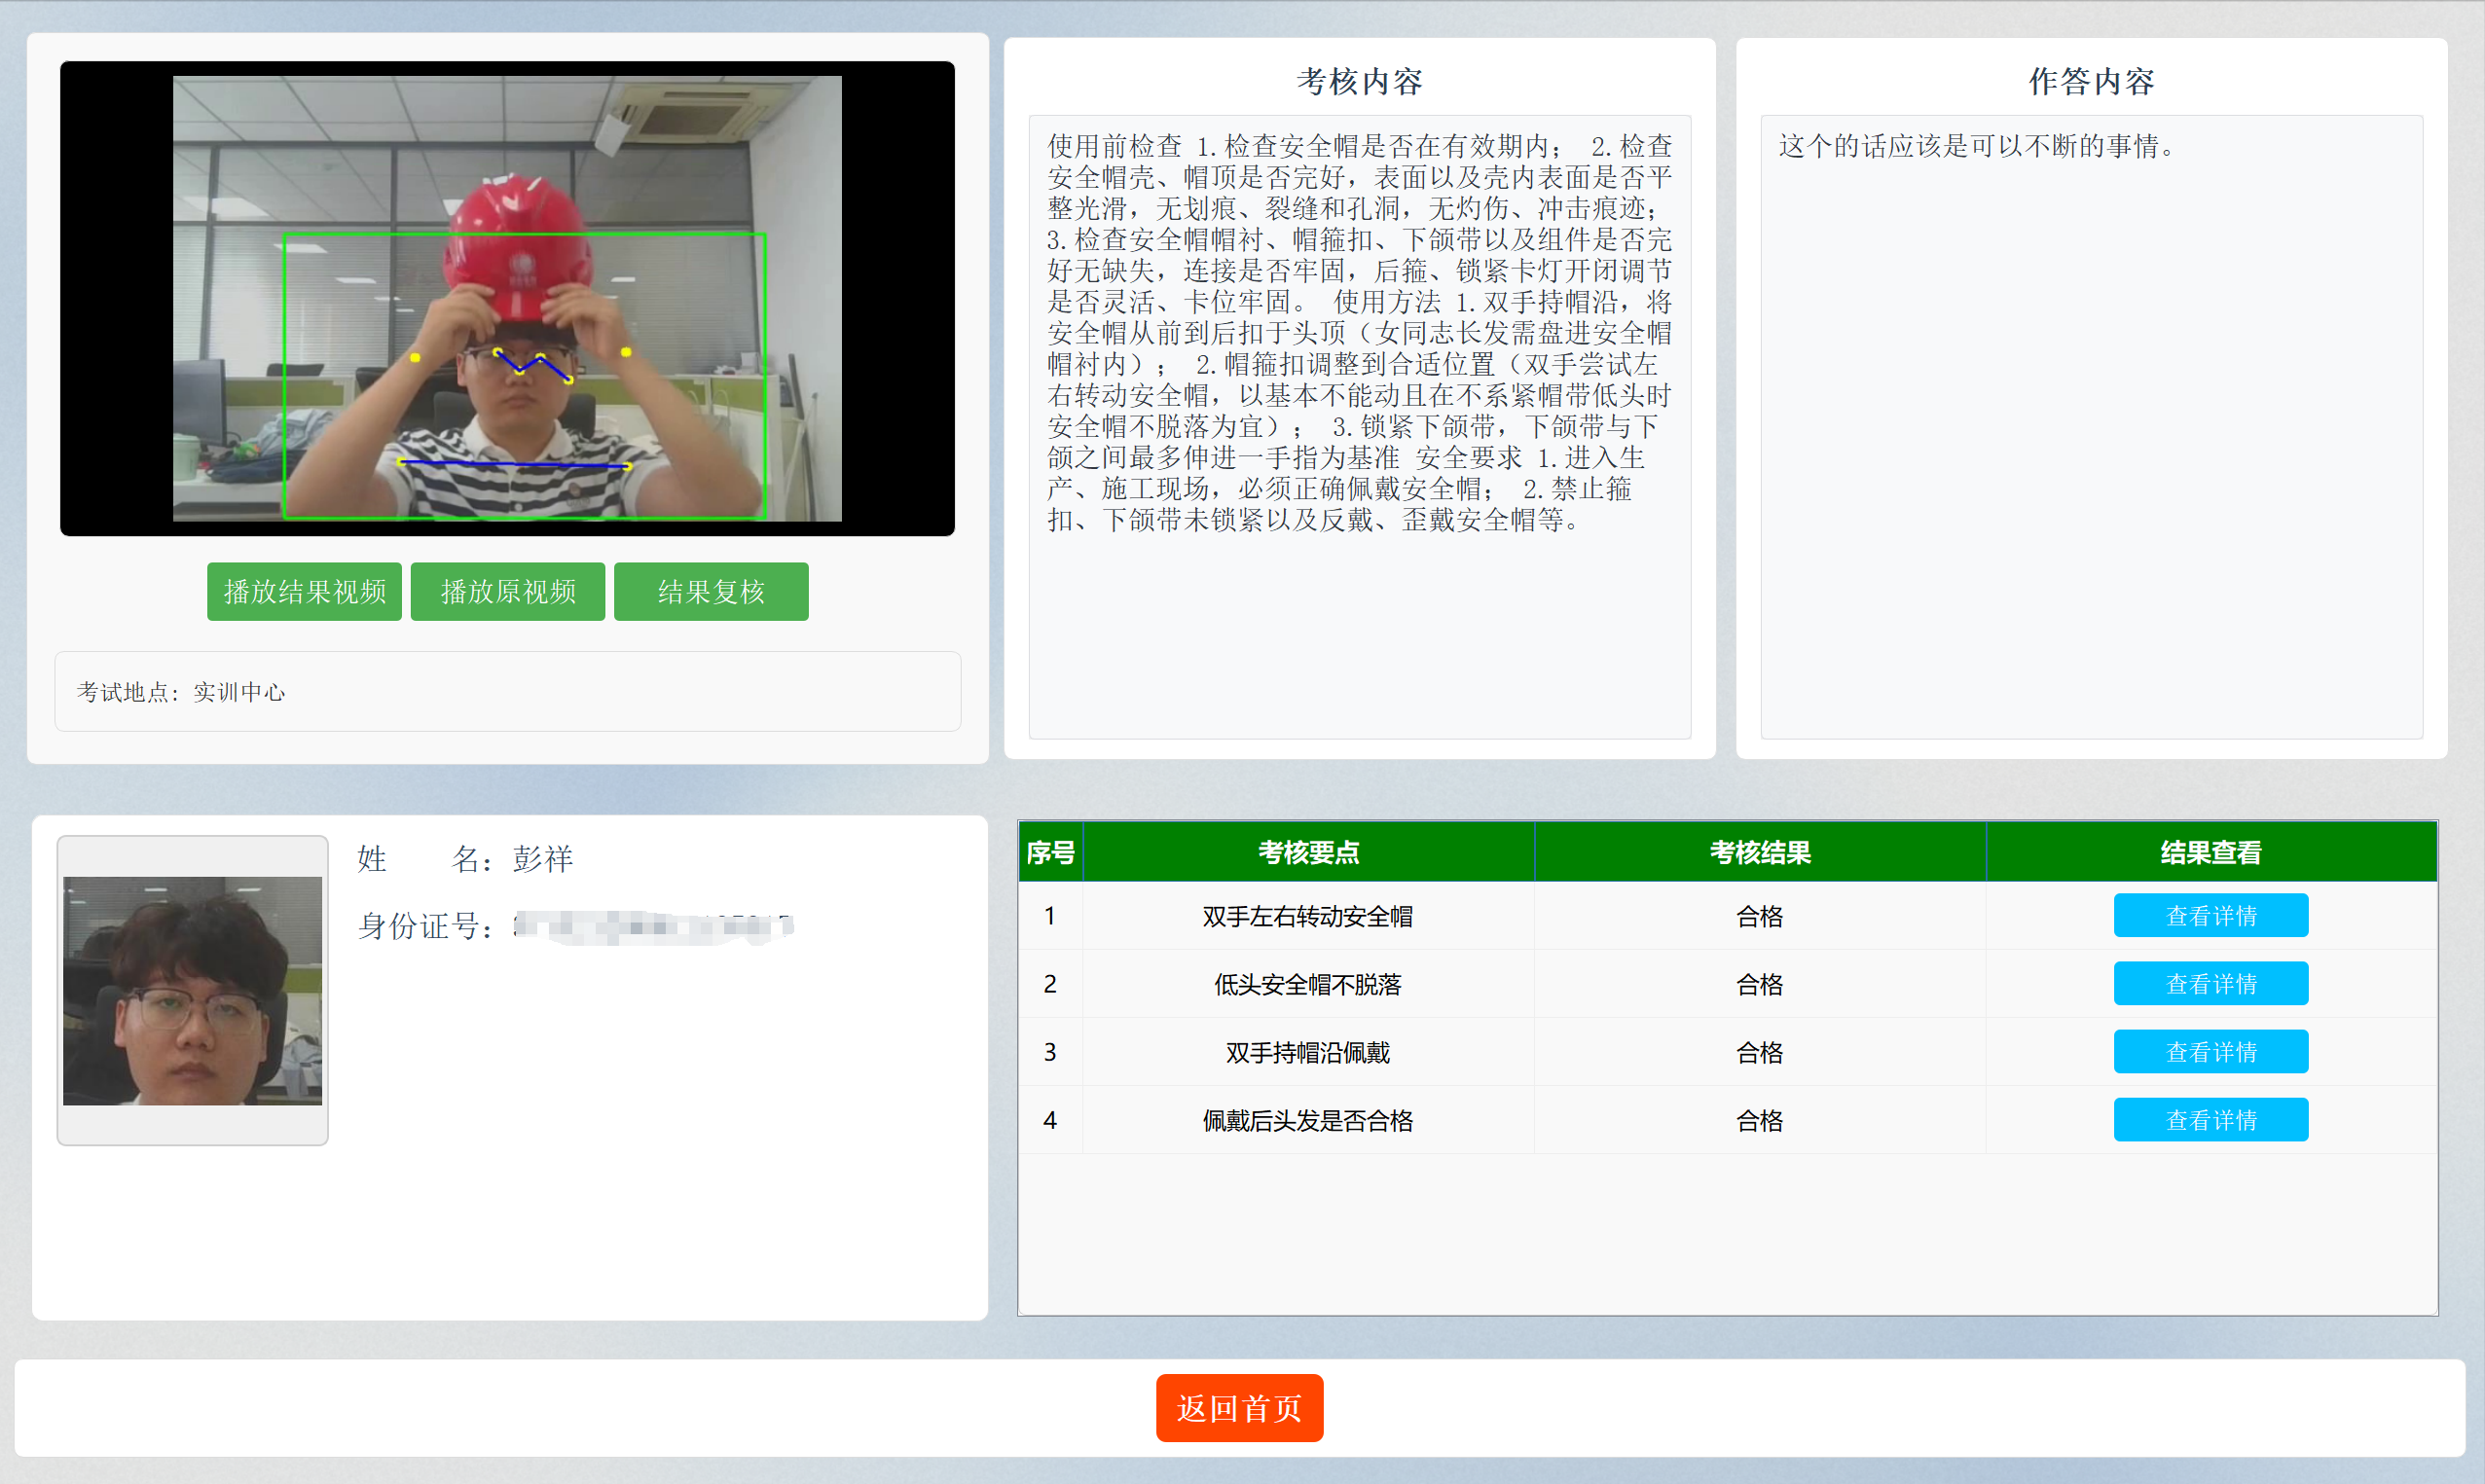
考试详情
该界面中主要分为五个模块,分别是视频模块,考核内容模块,作答内容模块(考生背诵的考试规范),个人信息模块以及考核要点模块。
当点击结果复核按钮后,会将原始视频进行安规动作识别与语音识别,即对考试成绩进行复核。
系统发布
上述过程打包的是onnxruntime-cpu版本,为进行推理加速,我们需要进行打包onnxruntime-gpu,其打包的配置文件如下:
# -*- mode: python ; coding: utf-8 -*-
a = Analysis(
    ['exam_home.py'],
    pathex=[],
    binaries=[],
    datas=[('D:\softwares\Anconda\envs\qianren\Lib\site-packages\onnxruntime\capi\onnxruntime_providers_shared.dll','onnxruntime\\capi'),
    ('models/*.onnx','models'),('uploads','uploads'),('bin','bin'),
    ('images','images'),('configs','configs'),
    ('datasets','datasets'),('results','results')],
    hiddenimports=['onnxruntime', 'faiss'],
    hookspath=[],
    hooksconfig={},
    runtime_hooks=[],
    excludes=[],
    noarchive=False,
    optimize=0,
)
pyz = PYZ(a.pure)

exe = EXE(
    pyz,
    a.scripts,
    [],
    exclude_binaries=True,
    name='main',
    debug=False,
    bootloader_ignore_signals=False,
    strip=False,
    upx=True,
    console=False,
    disable_windowed_traceback=False,
    argv_emulation=False,
    target_arch=None,
    codesign_identity=None,
    entitlements_file=None,
    icon='images/logo.ico',
)
coll = COLLECT(
    exe,
    a.binaries,
    a.datas,
    strip=False,
    upx=True,
    upx_exclude=[],
    name='main',
)
打包命令:
pyinstaller exam_home.spec
这样虽然能够成功打包,但却在运行时出现了一个错误:
ImportError: DLL load failed while importing
onnxruntime_pybind11_state: 动态链接库(DLL)初始化例程失败。
尝试了很多方法,比如将cuda.dll、cudnn.dll放入到软件路径下,但却依旧报错,最后发现只需要将onnxruntime-gpu的版本降一下就行,博主先前的是1.18,降到1.14即可。
Package                   Version
------------------------- ---------
altgraph                  0.17.4
annoy                     1.17.3
blinker                   1.8.2
certifi                   2025.7.14
charset-normalizer        3.4.2
click                     8.1.8
colorama                  0.4.6
coloredlogs               15.0.1
decorator                 4.4.2
Flask                     3.0.3
Flask-Cors                5.0.0
flatbuffers               25.2.10
humanfriendly             10.0
idna                      3.10
imageio                   2.35.1
imageio-ffmpeg            0.5.1
importlib_metadata        8.5.0
itsdangerous              2.2.0
Jinja2                    3.1.6
MarkupSafe                2.1.5
moviepy                   1.0.3
mpmath                    1.3.0
numpy                     1.24.4
nvidia-pyindex            1.0.9
onnxruntime-gpu           1.14.1
opencv-python             4.12.0.88
packaging                 25.0
pefile                    2023.2.7
pillow                    10.4.0
pip                       22.1.2
proglog                   0.1.12
protobuf                  5.29.5
PyAudio                   0.2.14
pydub                     0.25.1
pyinstaller               6.14.2
pyinstaller-hooks-contrib 2025.7
PyQt5                     5.15.11
PyQt5-Qt5                 5.15.2
PyQt5_sip                 12.15.0
pyreadline3               3.5.4
pywin32-ctypes            0.2.3
PyYAML                    6.0.2
requests                  2.32.4
setuptools                70.3.0
simpleaudio               1.0.4
sympy                     1.13.3
tqdm                      4.67.1
urllib3                   2.2.3
websocket-client          1.8.0
websockets                13.1
Werkzeug                  3.0.6
wheel                     0.45.1
zipp                      3.20.2
深度学习模型
姿态估计
整个系统中,主要是对人体动作的识别,因此首先使用的便是姿态估计算法,这里可以参考博主这篇博客:
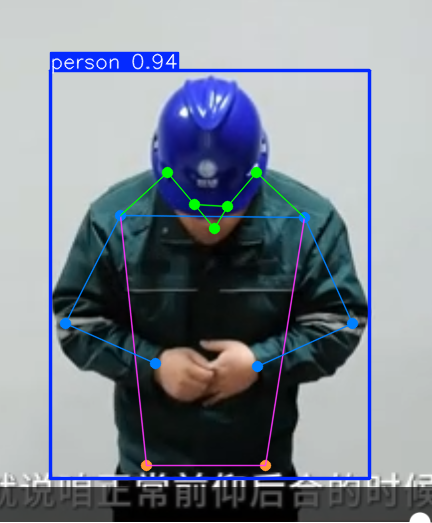
模型在经过训练后,就需要根据识别到的人的各个关节点的位置关系来判断响应的动作。其主要包含以下五个过程:
- 输入预处理:接收输入图像,并对其进行必要的预处理,如尺寸调整、归一化等。
- 特征提取:使用深度卷积神经网络对输入图像进行特征提取。
- 关键点预测:在特征图上应用特定的层或模块来预测人体关键点的位置。这些关键点可能包括关节位置,如肘部、膝盖、肩膀等。
- 后处理:对网络输出进行解析,转换成实际坐标,并可能进行一些后处理操作以改善结果,例如非极大值抑制(
NMS)去除重复预测。 - 根据人体各个关键点的位置关系判断其动作,如举手,低头等。
import cv2
import numpy as np
import onnxruntime as ort
from utils.myutil import nms, xywh2xyxy
INPUT_WIDTH = 640
INPUT_HEIGHT = 640
CONF_THRESHOLD = 0.5
KEYPOINT_VISIBILITY_THRESHOLD = 0.8

# COCO 17 关键点连接关系
SKELETON = [
    (0, 1), (0, 2), (1, 3), (2, 4),     # Head
    (5, 6),                             # Shoulders
    (5, 7), (7, 9), (9, 11),            # Left arm
    (6, 8), (8, 10), (10, 12),          # Right arm
    (11, 13), (12, 14),                 # Hips
    (5, 11), (6, 12),                   # Torso
]

COLORS = [(255, 0, 0), (0, 255, 0), (0, 0, 255),
          (255, 255, 0), (255, 0, 255), (0, 255, 255)]


class YOLOPoseDetector:
    def __init__(self, model_path):
        """
        初始化 ONNX Runtime 推理会话
        """
        providers = ['CUDAExecutionProvider', 'CPUExecutionProvider']
        self.session = ort.InferenceSession(model_path,providers=providers)
        self.input_name = self.session.get_inputs()[0].name
        self.output_name = self.session.get_outputs()[0].name

    def preprocess(self, img):
        """
        图像预处理:等比缩放 + 填充黑边 + 归一化
        """
        h, w, _ = img.shape
        new_w, new_h = INPUT_WIDTH, INPUT_HEIGHT
        ratio = min(new_w / w, new_h / h)
        resized_img = cv2.resize(img, (int(w * ratio), int(h * ratio)), interpolation=cv2.INTER_LINEAR)
        padded_img = np.zeros((new_h, new_w, 3), dtype=np.uint8)
        padded_img[:int(h * ratio), :int(w * ratio)] = resized_img
        blob = padded_img.astype(np.float32) / 255.0
        blob = blob.transpose(2, 0, 1)[None]  # [1, 3, H, W]
        return blob, ratio

    def postprocess(self, outputs, ratio, original_shape):
        """
        后处理:解析输出,提取检测框、NMS、关键点
        """
        h, w, _ = original_shape
        output = outputs[0].squeeze(0)  # shape: (56, 8400)
        outputs = output.transpose(1, 0)  # shape: (8400, 56)

        # 分离 bbox、class_scores、keypoints
        boxes = outputs[:, :4]
        class_scores = outputs[:, 4:5]
        keypoints = outputs[:, 5:]

        # 计算总置信度
        scores = class_scores.flatten()
        valid_indices = np.where(scores >= CONF_THRESHOLD)[0]

        if len(valid_indices) == 0:
            return [], []

        boxes = boxes[valid_indices]
        scores = scores[valid_indices]
        keypoints = keypoints[valid_indices]

        # NMS
        boxes_xyxy = xywh2xyxy(boxes)
        nms_indices = nms(boxes_xyxy, scores)

        final_boxes = boxes[nms_indices]
        final_keypoints = keypoints[nms_indices]

        bboxes = []
        keypoints_list = []
        max_area = 0
        best_bbox = None
        best_kp_list = None

        for i in range(len(final_boxes)):
            cx, cy, cw, ch = final_boxes[i]
            x_center = cx / ratio
            y_center = cy / ratio
            width = cw / ratio
            height = ch / ratio

            x1 = int(x_center - width / 2)
            y1 = int(y_center - height / 2)
            x2 = int(x_center + width / 2)
            y2 = int(y_center + height / 2)
            # 计算面积
            area = (x2 - x1) * (y2 - y1)
            if area > max_area:
                max_area = area
                best_bbox = [x1, y1, x2 - x1, y2 - y1]  # 转为 [x, y, w, h]
                # 处理关键点
                kpts = final_keypoints[i].reshape(-1, 3)
                kp_list = []
                for j in range(kpts.shape[0]):
                    px = int(kpts[j, 0] / ratio)
                    py = int(kpts[j, 1] / ratio)
                    vis = float(kpts[j, 2])
                    kp_list.append((px, py, vis))
                best_kp_list = kp_list

        # 如果有找到最大框,则添加到最终结果中
        if best_bbox is not None and best_kp_list is not None:
            bboxes.append(best_bbox)
            keypoints_list.append(best_kp_list)

        return bboxes, keypoints_list

    def draw_results(self, img, bboxes, keypoints_list):
        """
        在图像上绘制检测框和关键点
        """
        for bbox in bboxes:
            x, y, w, h = bbox
            cv2.rectangle(img, (x, y), (x + w, y + h), (0, 255, 0), 2)
        for keypoints in keypoints_list:
            # 绘制关键点
            for (x, y, vis) in keypoints:
                if vis > KEYPOINT_VISIBILITY_THRESHOLD:
                    cv2.circle(img, (int(x), int(y)), 5, (0, 255, 255), -1)
            # 绘制骨架连线
            for i1, i2 in SKELETON:
                p1 = keypoints[i1]
                p2 = keypoints[i2]
                if p1[2] > KEYPOINT_VISIBILITY_THRESHOLD and p2[2] > KEYPOINT_VISIBILITY_THRESHOLD:
                    cv2.line(img, (int(p1[0]), int(p1[1])), (int(p2[0]), int(p2[1])), (255, 0, 0), 2)
        return img

    def detect(self, img):
        """
        对一张图像进行完整检测
        """
        original_shape = img.shape
        blob, ratio = self.preprocess(img)
        outputs = self.session.run([self.output_name], {self.input_name: blob.astype(np.float32)})
        bboxes, keypoints_list = self.postprocess(outputs, ratio, original_shape)
        result_img = self.draw_results(img.copy(), bboxes, keypoints_list)
        return result_img, bboxes, keypoints_list

# if __name__ == "__main__":
#     detector = YOLOPoseDetector("pose.onnx")
#
#     image_path = "images/test1.jpg"
#     img = cv2.imread(image_path)
#
#     result_img, bboxes, keypoints_list = detector.detect(img)
#
#     cv2.imshow("Pose Detection", result_img)
#     cv2.waitKey(0)
#     cv2.destroyAllWindows()
目标检测
目标检测的作用是识别到我们的一些考试用具,比如安全帽。目标检测的推理代码如下:
import cv2
import numpy as np
import onnxruntime
from utils.myutil import xywh2xyxy, multiclass_nms, detections_dog

class CommonDet:
    #初始化YOLO模型
    def __init__(self, path, conf_thres=0.6, iou_thres=0.6):
        self.conf_threshold = conf_thres
        self.iou_threshold = iou_thres
        self.initialize_model(path)
    #调用推理
    def __call__(self, image):
        return self.detect_objects(image)
    #加载模型并获取模型的输入与输出结构
    def initialize_model(self, path):
        providers = ['CUDAExecutionProvider', 'CPUExecutionProvider']
        self.session = onnxruntime.InferenceSession(path,providers=providers)
        self.get_input_details()
        self.get_output_details()

    #执行模型推理过程
    def detect_objects(self, image):
        input_tensor = self.prepare_input(image)
        # Perform inference on the image
        outputs = self.inference(input_tensor)
        self.boxes, self.scores, self.class_ids = self.process_output(outputs)
        return self.boxes, self.scores, self.class_ids
    #前处理操作
    def prepare_input(self, image):
        self.img_height, self.img_width = image.shape[:2]
        input_img = cv2.cvtColor(image, cv2.COLOR_BGR2RGB)
        # Resize input image
        input_img = cv2.resize(input_img, (self.input_width, self.input_height))
        # Scale input pixel values to 0 to 1
        input_img = input_img / 255.0
        input_img = input_img.transpose(2, 0, 1)
        input_tensor = input_img[np.newaxis, :, :, :].astype(np.float32)
        return input_tensor

    #具体使用onnx推理
    def inference(self, input_tensor):
        outputs = self.session.run(self.output_names, {self.input_names[0]: input_tensor})
        return outputs
    #后处理操作
    def process_output(self, output):
        predictions = np.squeeze(output[0]).T
        # Filter out object confidence scores below threshold
        scores = np.max(predictions[:, 4:], axis=1)
        predictions = predictions[scores > self.conf_threshold, :]
        scores = scores[scores > self.conf_threshold]
        if len(scores) == 0:
            return [], [], []
        # Get the class with the highest confidence
        class_ids = np.argmax(predictions[:, 4:], axis=1)
        # Get bounding boxes for each object
        boxes = self.extract_boxes(predictions)
        indices = multiclass_nms(boxes, scores, class_ids, self.iou_threshold)
        return boxes[indices], scores[indices], class_ids[indices]
    #box转换,包含尺度变换与xywh转换
    def extract_boxes(self, predictions):
        # Extract boxes from predictions
        boxes = predictions[:, :4]
        boxes = self.rescale_boxes(boxes)
        boxes = xywh2xyxy(boxes)
        return boxes
    #尺度变换
    def rescale_boxes(self, boxes):
        # Rescale boxes to original image dimensions
        input_shape = np.array([self.input_width, self.input_height, self.input_width, self.input_height])
        boxes = np.divide(boxes, input_shape, dtype=np.float32)
        boxes *= np.array([self.img_width, self.img_height, self.img_width, self.img_height])
        return boxes

    def get_input_details(self):
        model_inputs = self.session.get_inputs()
        self.input_names = [model_inputs[i].name for i in range(len(model_inputs))]
        self.input_shape = model_inputs[0].shape
        self.input_height = self.input_shape[2]
        self.input_width = self.input_shape[3]
    def get_output_details(self):
        model_outputs = self.session.get_outputs()
        self.output_names = [model_outputs[i].name for i in range(len(model_outputs))]
    def draw_detections(self, image, mask_alpha=0.4):
        return detections_dog(image, self.boxes, self.scores,
                              self.class_ids, mask_alpha)

if __name__ == "__main__":
    model_path = "../models/juan_shoutao.onnx"
    image_path = "../images/1.jpg"
    # 初始化模型
    detector = CommonDet(model_path)
    # 加载图像
    image = cv2.imread(image_path)
    # 检测对象
    boxes, scores, class_ids = detector(image)
    # # 绘制检测结果
    result_image = detector.draw_detections(image)
    # 显示结果
    cv2.imshow("Detections", result_image)
    cv2.waitKey(0)
    cv2.destroyAllWindows()
目标分类
目标分类主要是用于判断动作是否标准,比如,是否手套是否佩戴规范,一般为了加快处理速度,我们会根据目标检测的框选结果提取出ROI区域,进而对区域内的图像进行分类。
import onnxruntime as ort
from PIL import Image
import numpy as np
import cv2

class CommonClass:
    def __init__(self, model_path):
        providers = ['CUDAExecutionProvider', 'CPUExecutionProvider']
        self.session = ort.InferenceSession(model_path,providers=providers)
        self.ndtype = np.float16 if self.session.get_inputs()[0].type == 'tensor(float16)' else np.float32
        self.model_height, self.model_width = [x.shape for x in self.session.get_inputs()][0][-2:]

    def __call__(self, img):
        img = self.preprocess(img)
        preds = self.session.run([self.session.get_outputs()[0].name], {self.session.get_inputs()[0].name: img})
        return preds

    def preprocess(self, img):
        if isinstance(img, np.ndarray):
            if len(img.shape) == 3 and img.shape[2] == 3:
                img = cv2.cvtColor(img, cv2.COLOR_BGR2RGB)  # 转换为 RGB
            img = Image.fromarray(img)  # 转换为 PIL 图像

        img_width, img_height = img.size
        # Resize 保持宽高比
        if img_width < img_height:
            resize_width = self.model_width
            resize_height = round((self.model_width / img_width) * img_height)
        elif img_width > img_height:
            resize_width = round((self.model_height / img_height) * img_width)
            resize_height = self.model_height
        else:
            resize_width, resize_height = self.model_width, self.model_height

        img = img.resize((resize_width, resize_height), Image.Resampling.BILINEAR)
        # Center crop 到目标尺寸
        start_index = abs(resize_height - resize_width) // 2
        if resize_width < resize_height:
            box = [0, start_index, self.model_width, start_index + self.model_height]
        elif resize_width > resize_height:
            box = [start_index, 0, start_index + self.model_width, self.model_height]
        else:
            box = [0, 0, self.model_width, self.model_height]
        img = img.crop(box)
        img = np.array(img).astype(self.ndtype) / 255.0
        img = np.transpose(img, (2, 0, 1))
        img = np.expand_dims(img, axis=0).astype(self.ndtype)
        return img

if __name__ == "__main__":
    yolo11 = CommonClass('models/cloths.onnx')
    image_path = "../images/test1.jpg"
    img = cv2.imread(image_path)
    preds = yolo11(img)
    # 假设输出是一个softmax层的结果,获取最高分数的索引
    pred_class = np.argmax(preds[0])
    print(f'Predicted class index: {pred_class}, Predictions: {preds}')
讯飞语音识别
这里博主将讯飞的语音识别接口进行了封装,方便调用,这里大家只需去讯飞注册一下,开启这项服务即可:
讯飞地址:https://console.xfyun.cn/services/iat_zh_cn_mulacc_slm
import os
import json
import base64
import hashlib
import hmac
import ssl
import threading
import time
from datetime import datetime
from wsgiref.handlers import format_date_time
from urllib.parse import urlencode
from time import mktime

import numpy as np
import websocket
from pydub import AudioSegment

from utils.load_file import resource_path

# 状态标识
STATUS_FIRST_FRAME = 0
STATUS_CONTINUE_FRAME = 1
STATUS_LAST_FRAME = 2


def is_silence(segment_path, threshold=-45.0):
    """
    判断音频文件是否为静音
    :param segment_path: 音频路径
    :param threshold: 静音能量阈值(单位 dBFS)
    :return: True 表示静音,False 表示有声音
    """
    try:
        audio = AudioSegment.from_file(segment_path)
        # 转换为单声道(避免立体声干扰)
        audio = audio.set_channels(1)
        # 获取 RMS 能量(转换为 dBFS)
        rms = audio.rms
        if rms == 0:
            return True
        dbfs = 20 * np.log10(rms / (audio.max_possible_amplitude))
        print(f"[{os.path.basename(segment_path)}] 音频能量: {dbfs:.2f} dBFS")
        return dbfs < threshold
    except Exception as e:
        print(f"无法读取音频文件: {segment_path}, 错误: {str(e)}")
        return True  # 出错时默认认为是静音

class Ws_Param:
    def __init__(self, APPID, APIKey, APISecret):
        self.APPID = APPID
        self.APIKey = APIKey
        self.APISecret = APISecret
        self.iat_params = {
            "domain": "slm",
            "language": "zh_cn",
            "accent": "mulacc",
            "result": {"encoding": "utf8", "compress": "raw", "format": "json"}
        }

    def create_url(self):
        url = 'wss://iat.cn-huabei-1.xf-yun.com/v1'
        now = datetime.now()
        date = format_date_time(mktime(now.timetuple()))
        signature_origin = f"host: iat.cn-huabei-1.xf-yun.com\n" \
                           f"date: {date}\n" \
                           f"GET /v1 HTTP/1.1"
        signature_sha = hmac.new(
            self.APISecret.encode('utf-8'),
            signature_origin.encode('utf-8'),
            digestmod=hashlib.sha256
        ).digest()
        signature_sha = base64.b64encode(signature_sha).decode('utf-8')
        authorization_origin = f'api_key="{self.APIKey}", algorithm="hmac-sha256", headers="host date request-line", signature="{signature_sha}"'
        authorization = base64.b64encode(authorization_origin.encode('utf-8')).decode('utf-8')
        v = {"authorization": authorization, "date": date, "host": "iat.cn-huabei-1.xf-yun.com"}
        return url + '?' + urlencode(v)


def split_audio(file_path, segment_duration_ms=10000, output_dir="segments"):
    """将音频切分为指定长度的小段"""
    if not os.path.exists(output_dir):
        os.makedirs(output_dir)

    audio = AudioSegment.from_wav(file_path)
    segments = []

    for i, start in enumerate(range(0, len(audio), segment_duration_ms)):
        segment = audio[start:start + segment_duration_ms]
        segment_path = os.path.join(output_dir, f"segment_{i}.wav")
        segment.export(segment_path, format="wav")
        segments.append((i, segment_path))

    print(f"音频已分割为 {len(segments)} 段")
    return segments


results = {}
lock = threading.Lock()


import threading

def recognize_segment(wsParam, file_path, index,output_path=resource_path('uploads/audio.txt')):
    done_event = threading.Event()  # 控制是否完成识别

    def on_message(ws, message):
        try:
            msg = json.loads(message)
            code = msg["header"]["code"]
            status = msg["header"]["status"]

            if code != 0:
                print(f"[段 {index}] 请求错误:{code}")
                done_event.set()
                return

            payload = msg.get("payload")
            if payload and "result" in payload:
                result_base64 = payload["result"]["text"]
                result_str = base64.b64decode(result_base64).decode("utf-8")
                result_json = json.loads(result_str)

                text = "".join(cw["w"] for ws_item in result_json.get("ws", []) for cw in ws_item.get("cw", []))
                with open(output_path, "a", encoding="utf-8") as f:
                    f.write(text)
                print(f"[段 {index}] 识别结果: {text}")

            if status == 2:
                print(f"[段 {index}] 识别完成,准备关闭连接")
                #ws.close()
                done_event.set()

        except Exception as e:
            print(f"[段 {index}] 解析失败: {str(e)}")
            done_event.set()

    def on_error(ws, error):
        print(f"[段 {index}] WebSocket 错误: {error}")
        done_event.set()

    def on_close(ws, *args):
        print(f"[段 {index}] 连接已关闭")

    def on_open(ws):
        def run(*args):
            frameSize = 4096
            intervel = 0.01
            status = STATUS_FIRST_FRAME

            with open(file_path, "rb") as fp:
                while True:
                    buf = fp.read(frameSize)
                    if not buf:
                        status = STATUS_LAST_FRAME

                    audio = str(base64.b64encode(buf), 'utf-8')

                    if status == STATUS_FIRST_FRAME:
                        d = {
                            "header": {"status": 0, "app_id": wsParam.APPID},
                            "parameter": {"iat": wsParam.iat_params},
                            "payload": {"audio": {"audio": audio, "sample_rate": 16000, "encoding": "raw"}}
                        }
                        ws.send(json.dumps(d))
                        status = STATUS_CONTINUE_FRAME
                    elif status == STATUS_CONTINUE_FRAME:
                        d = {
                            "header": {"status": 1, "app_id": wsParam.APPID},
                            "payload": {"audio": {"audio": audio, "sample_rate": 16000, "encoding": "raw"}}
                        }
                        ws.send(json.dumps(d))
                    elif status == STATUS_LAST_FRAME:
                        d = {
                            "header": {"status": 2, "app_id": wsParam.APPID},
                            "payload": {"audio": {"audio": audio, "sample_rate": 16000, "encoding": "raw"}}
                        }
                        ws.send(json.dumps(d))
                        break

                    time.sleep(intervel)

        threading.Thread(target=run).start()

    # 创建 WebSocket 并运行
    wsUrl = wsParam.create_url()
    ws = websocket.WebSocketApp(wsUrl,
                                on_message=on_message,
                                on_error=on_error,
                                on_close=on_close)
    ws.on_open = on_open

    wst = threading.Thread(target=ws.run_forever, kwargs={"sslopt": {"cert_reqs": ssl.CERT_NONE}})
    wst.daemon = True  # 设置为守护线程,主程序退出时自动终止
    wst.start()

    # 等待识别完成,最多等 30 秒
    done_event.wait(timeout=45)

    # 关闭连接
    try:
        ws.keep_running = False
        wst.join(timeout=10)
    except Exception as e:
        print(f"[段 {index}] 关闭 WebSocket 出错: {e}")


from concurrent.futures import ThreadPoolExecutor, wait, ALL_COMPLETED

if __name__ == "__main__":
    # 初始化参数
    wsParam = Ws_Param(
        APPID='',
        APIKey='',
        APISecret=''
    )

    # 设置原始音频路径
    original_audio_path = r"D:\workspace\qianren\onnx_inference\uploads\output_audio.wav"

    # 分割音频
    segments = split_audio(original_audio_path, segment_duration_ms=15000)

    non_silent_segments = []
    for idx, path in segments:
        if not is_silence(path):
            non_silent_segments.append((idx, path))
        else:
            print(f"[段 {idx}] 被跳过(静音)")

    print(f"共 {len(segments)} 段音频,其中 {len(non_silent_segments)} 段有声音,将被识别")
    output_path=resource_path('../uploads/audio.txt')
    # 然后只对 non_silent_segments 进行识别
    with ThreadPoolExecutor(max_workers=2) as executor:
        futures = []
        for idx, path in non_silent_segments:
            future = executor.submit(recognize_segment, wsParam, path, idx,output_path)
            futures.append(future)
        wait(futures, return_when=ALL_COMPLETED)

    # 合并结果(注意跳过的段不参与合并)
    final_text = ""
    for i in sorted(results.keys()):
        final_text += results[i]
    print("\n最终识别结果:\n", final_text)
前后端交互
该系统可独立运行,但为了确保数据源的唯一性并便于统一管理,设计了服务器后端。后端主要用于根据人脸特征在后台数据库中查询考生信息,并存储考生的考试结果。
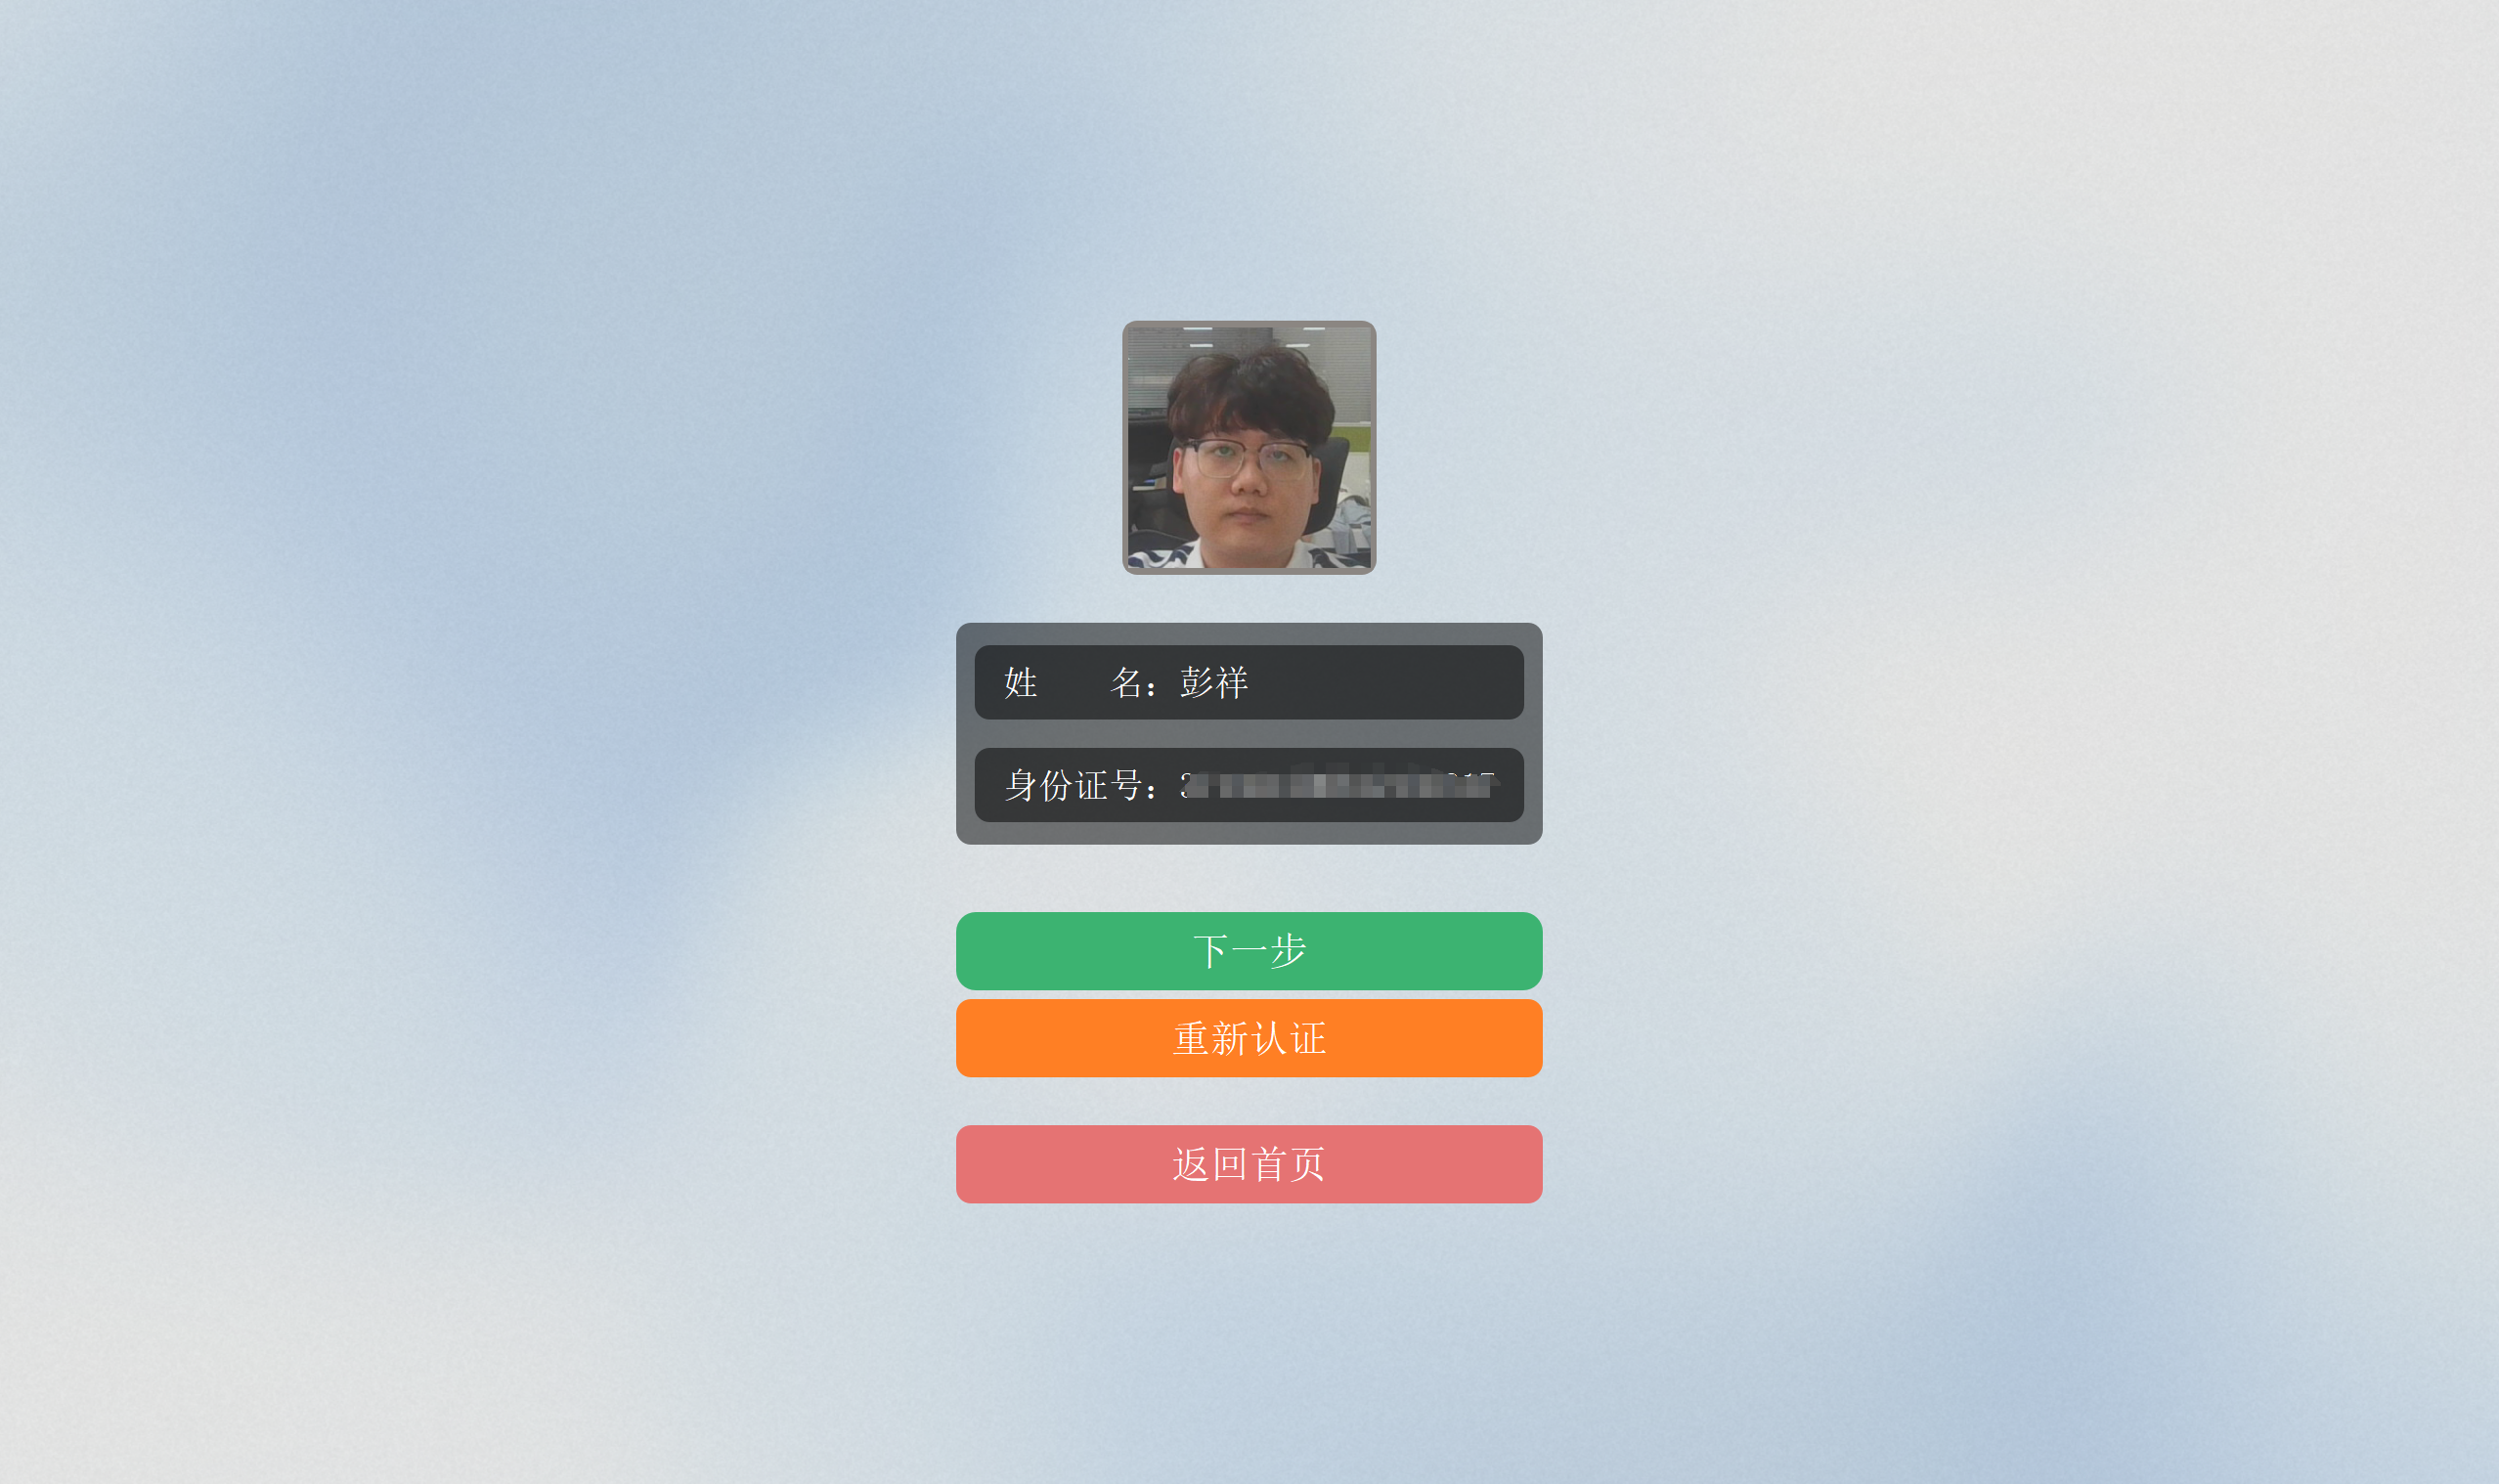
考生信息查询
    def set_user_info(self, id_card):
        # 构造请求URL
        url = f"{self.url}/api/staffManage/queryByIdCard?idCard={id_card}"
        try:
            # 发送GET请求
            response = requests.get(url)
            data = response.json()  # 将响应内容解析为JSON
            if data.get("code") == 200:  # 判断是否请求成功
                user_info = data.get("data", {})
                real_name = user_info.get("realName", "未知姓名")
                user_id = user_info.get("id", "未知ID")
                # 更新UI中的Label
                self.name_label.setText(f"姓    名:{real_name}")
                self.id_label.setText(f"身份证号:{id_card}")
                self.parent_window.user_id= user_id
                self.parent_window.id_card= id_card
                self.parent_window.name= real_name
            else:
                # 如果接口返回非200,显示错误信息
                self.name_label.setText("姓    名:获取失败")
                self.id_label.setText(f"身份证号:{id_card}")
                self.next_btn.hide()
                print("请求失败,返回数据:", data)

        except Exception as e:
            # 网络异常处理
            self.name_label.setText("姓    名:网络错误")
            self.id_label.setText(f"身份证号:{id_card}")
            self.next_btn.hide()
            print("请求出错:", e)
考试成绩上传
这里以上传考试成绩为例,我们将其封装为线程方法,使其能够不阻塞主线程的执行,代码如下:首先开启线程后会执行run方法,具体流程为先将图像、视频数据上传到服务器,返回存储地址,随后将考生的考试结果上传到数据库。
class UploadThread(QThread):
    def __init__(self, source_dir, user_id,selected_items,reg_txt):
        super().__init__()
        self.source_dir = source_dir
        self.user_id = user_id
        self.selected_items=selected_items
        self.reg_txt=reg_txt

    def run(self):
        # 在新线程中执行上传
        self.upload_files_from_directory(self.source_dir, self.user_id)

    def upload_files_from_directory(self, directory_path, personId):
        url = Configs.url
        upload_url = f"{url}/api/exam/fileUpload?personId={personId}"
        data = {'type': 'multi'}
        files_to_send = []
        self.SUPPORTED_IMAGE_EXTS = ['.jpg', '.jpeg', '.png', '.bmp', '.gif']
        self.SUPPORTED_VIDEO_EXTS = ['.mp4', '.avi', '.mov', '.mkv', '.flv']
        if not os.path.isdir(directory_path):
            print(f"错误:路径 {directory_path} 不是一个有效的目录")
            return
        for filename in os.listdir(directory_path):
            file_path = os.path.join(directory_path, filename)
            if os.path.isdir(file_path):
                continue
            _, ext = os.path.splitext(filename.lower())

            if ext in self.SUPPORTED_IMAGE_EXTS:
                mime_type = 'image/jpeg' if ext != '.png' else 'image/png'
            elif ext in self.SUPPORTED_VIDEO_EXTS:
                mime_type = 'video/mp4'
            else:
                print(f"跳过不支持的文件格式:{filename}")
                continue
            try:
                with open(file_path, 'rb') as f:
                    file_data = f.read()  # 一次性读取文件内容
                    files_to_send.append(('files', (filename, io.BytesIO(file_data), mime_type)))
            except Exception as e:
                print(f"打开文件 {filename} 时出错:{e}")
        if not files_to_send:
            print("没有可上传的文件。")
            return

        try:
            response = requests.post(upload_url, files=files_to_send, data=data)
            result = response.json()
            if result.get("code") == 200:
                file_urls = result.get("data")
                print("上传成功,文件地址:", file_urls)
                videoUrl,imgUrl=extract_mp4_and_zero_jpg(file_urls)
                assign_urls_to_actions(file_urls)
                submitter=ExamSubmitter(self.selected_items,self.user_id,imgUrl,self.reg_txt,videoUrl)
                submitter.submit_exam()
            else:
                print("上传失败,返回结果:", result)
        except Exception as e:
            print("上传过程中出错:", str(e))
调用方法如下:
upload_thread = UploadThread(resource_path("uploads/results"),self.user_id,self.selected_items,self.recognition_text)
upload_thread.start()
总结
至此,千人千面安规考核系统的功能基本介绍完毕,码字不易,给个赞呗!

有“AI”的1024 = 2048,欢迎大家加入2048 AI社区
更多推荐

 15
15 0
0- 0


 已为社区贡献14条内容

所有评论(0)