大模型微调助力中医问答
本文介绍了基于LoRA技术和peft框架对Qwen大模型进行中医领域微调的全过程。首先创建Anaconda环境并安装必要依赖,下载Qwen1.5-0.5B-Chat-GGUF模型进行初始测试。然后通过自定义中药数据集,使用LoRA方法配置模型参数(r=8,alpha=16),在10个epoch下进行参数高效微调。训练过程中采用16位浮点数、梯度累积等技术优化性能。最后评估显示微调后的模型能有效回答
一、测试大模型
1.1 新建管理环境
首先,在Anaconda Prompt输入命令,新建MedChinese 环境。
conda create -n MedChinese python=3.10然后,进入该环境。
activate MedChinese 1.2 安装包
在MedChinese 环境中输入以下命令安装必要的包。
pip install transformers==4.55.4
pip install torch==2.8.0
pip install accelerate==1.10.0
1.3 下载大模型
在魔塔社区官网https://modelscope.cn/home,下载模型Qwen1.5-0.5B-Chat-GGUF,存放在Qwen目录中。
1.4 测试大模型
新建程序test.py,用于测试大模型。
# 导入Hugging Face Transformers相关库
from transformers import AutoModelForCausalLM, AutoTokenizer

# 指定模型名称
MODEL = "Qwen/Qwen1.5-0.5B-Chat-GGUF"
# 加载训练好的模型和分词器# tokenizer和model要一一对应
tokenizer = AutoTokenizer.from_pretrained(MODEL, trust_remote_code=True)
model = AutoModelForCausalLM.from_pretrained(MODEL, trust_remote_code=True, device_map='auto')
# 模型设为评估状态
model.eval()
# 定义测试示例
examples = [ {"instruction": "使用中医知识正确回答适合这个病例的中成药。", "input": "我这段时间感觉身体不太对劲,有腹泻的迹象,面黄肌瘦,吃点什么中成药能改善?" },
             {"instruction": "使用中医知识正确回答适合这个病例的中成药。", "input": "我昨天开始咳嗽,感觉喉咙痛,痰又稠又黄,还感觉有点发热。" }]
# 测试模型生成结果
for example in examples:
    context = f"Instruction: {example['instruction']}\nInput: {example['input']}\nAnswer: "

    # 使用tokenizer对context进行处理,并将结果转换为PyTorch张量格式
    inputs = tokenizer(context, return_tensors="pt")
    # 模型生成回复
    outputs = model.generate(inputs.input_ids.to(model.device), max_length=512, num_return_sequences=1, no_repeat_ngram_size=2)
    # 对回复内容进行解码
    answer = tokenizer.decode(outputs[0], skip_special_tokens=True)
    print(f"Output: \n{answer}\n")
二、预训练大模型
新建程序finetune.py,用于预训练大模型。
2.1 本地安装与设置wandb
(1)本地安装
wandb(Weights&Biases, W&B):用于跟踪、可视化和协作机器学习实验的工具,支持在线和离线。它提供了一个简单的 Python API,可以轻松地将实验数据发送到云端,并通过 Web 应用程序进行访问和可视化。利用docker在本地安装wandb。打开系统CMD命令窗口,输入命令:
docker run --rm -d -v wandb:/vol -p 5001:8080 --name wandb-local wandb/local:0.9.41(2)本地设置
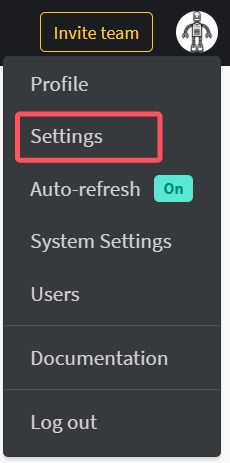
在谷歌浏览器通过网址http://localhost: 5001访问wandb。首先输入邮箱、用户名和密码创建用户。最后,通过setting选项,查询API keys信息。


(3)程序添加必要字段
import os
import wandb
os.environ["WANDB_BASE_URL"] = "http://localhost:5001"
wandb.login(key="local-xxx")   # 此处设置API keys的值。
2.2 自定义中药数据集
from torch.utils.data import Dataset
import json
class MedicineDataset(Dataset):
    def __init__(self, data_path, tokenizer, device):
        self.data = json.load(open(data_path,'r',encoding='utf8'))
        self.tokenizer = tokenizer
        self.device = device

    def __len__(self):
        # 返回data的长度
        return len(self.data)

    def __getitem__(self, idx):
        # 从data中获取指定索引的示例
        example = self.data[idx]
        # 对示例进行格式化
        formatted_example = self.format_example(example)
        # 使用tokenizer处理context部分,并设置最大长度为512,截断超出部分,使用最大长度进行填充,并返回PyTorch张量
        inputs = self.tokenizer(formatted_example["context"], max_length=512, truncation=True, padding="max_length", return_tensors="pt" )
        # 使用tokenizer处理target部分,设置与inputs相同的参数
        labels = self.tokenizer(formatted_example["target"], max_length=512, truncation=True, padding="max_length",  return_tensors="pt" )
        # 将labels的input_ids添加到inputs中,作为预测目标
        inputs["labels"] = labels["input_ids"]
        # 确保所有张量在同一个设备上,并移除不必要的维度
        return {key: val.squeeze().to(self.device) for key, val in inputs.items()}

    def format_example(self, example: dict) -> dict:
        # 构建context字符串,包含指令和输入(如果有)
        context = f"Instruction: {example['instruction']}\n"
        if example.get("input"):
            context += f"Input: {example['input']}\n"
            context += "Answer: "
            target = example["output"]
        # 返回包含context和target的字典
        return {"context": context, "target": target}
2.3 对大模型进行设置
# 导入微调模型所需的库
from transformers import AutoTokenizer, AutoModelForCausalLM
import torch
# 指定模型
MODEL = "Qwen/Qwen1.5-0.5B-Chat-GGUF"
# 判断设备类型
device = torch.device("cuda" if torch.cuda.is_available() else "cpu")
# 加载分词器和模型
tokenizer = AutoTokenizer.from_pretrained(MODEL, trust_remote_code=True)
model = AutoModelForCausalLM.from_pretrained(MODEL, trust_remote_code=True, use_cache=False)
# 把模型移动到设备上
model = model.to(device)
# 节省内存的一些配置
model.supports_gradient_checkpointing = True
# 支持梯度检查点功能,减少显存使用
model.gradient_checkpointing_enable()
# 启用梯度检查点功能,减少训练时的显存占用
model.enable_input_require_grads()
# 允许模型输入的张量需要梯度,支持更灵活的梯度计算
model.is_parallelizable = True
# 指定模型可以并行化处理
model.model_parallel = True
2.4 LoRA配置
(1)安装peft库
PEFT(参数高效微调)是一个库,用于有效地将大型预训练模型适配到各种下游应用,无需微调模型的所有参数,因为这成本过高。PEFT 方法仅微调少量(额外)模型参数,从而显著降低计算和存储成本,同时获得与完全微调模型相当的性能。这使得在消费级硬件上训练和存储大型语言模型 (LLM) 更加容易。在MedChinese 环境中输入以下命令。
pip install peft==0.5.0(2)配置相关参数
# 导入peft库
from peft import get_peft_model, LoraConfig, TaskType
# 配置LoRA相关参数
peft_config = LoraConfig(task_type=TaskType.CAUSAL_LM, # 任务类型: 因果语言模型(Causal LM)
                         inference_mode=False, # 设置推理模式为False,表示当前配置用于训练模式,而非推理模式
                         r=8, # 设置低秩分解的秩: Rank=8。r越小,表示模型的参数量和内存占用越少,压缩程度越高
                         lora_alpha=16, # 设置缩放因子:lora_alpha=16
                         lora_dropout=0.1, # 设置dropout概率:lora_dropout=0.1,表示有10%的神经元会被丢弃,此操作有助于防止模型过拟合,提升模型的泛化能力
                         target_modules=["q_proj", "v_proj"] # 查询投影和值投影模块target_modules
                         )
# 在模型上应用LoRA配置
model = get_peft_model(model, peft_config)
2.5 微调模型
(1)新建文件夹
创建文件夹data、results、logs。
(2)下载数据集。
在魔塔社区官网https://modelscope.cn/home,下载数据集cpmi_dataset.json,存放在data目录。
(3)开始微调
# 创建训练数据集
train_dataset = MedicineDataset("data/cpmi_dataset.json", tokenizer, device)

# 导入训练相关的库
from transformers import TrainingArguments
from transformers.trainer import Trainer

# 定义训练参数
training_args = TrainingArguments(output_dir="./results", # 训练结果保存的目录
                                  num_train_epochs=10, # 训练的总轮数
                                  per_device_train_batch_size=32, # 每个设备上的训练批次大小
                                  gradient_accumulation_steps=8, # 梯度累积步数,在进行反向传播前累积多少步
                                  eval_strategy="no", # 评估策略,这里设置为不评估
                                  save_strategy="epoch", # 保存策略,每个 epoch 保存一次模型
                                  learning_rate=5e-5, # 学习率
                                  fp16=True, # 启用 16 位浮点数训练,提高训练速度并减少显存使用
                                  logging_dir="./logs", # 日志保存目录
                                  dataloader_pin_memory=False # 禁用pin_memory以节省内存
                                  )
# 自定义CustomTrainer
class CustomTrainer(Trainer):
    def compute_loss(self, model, inputs, return_outputs=False, **kwargs):
        labels = inputs.pop("labels")
        # 从输入中取出标签
        outputs = model(**inputs)
        # 获取模型输出
        logits = outputs.logits
        # 获取模型输出的logits
        shift_logits = logits[..., :-1, :].contiguous()
        # 对logits进行偏移,准备计算交叉熵损失
        shift_labels = labels[..., 1:].contiguous()
        # 对标签进行偏移,准备计算交叉熵损失
        loss_fct = torch.nn.CrossEntropyLoss()
        # 定义交叉熵损失函数
        loss = loss_fct(shift_logits.view(-1, shift_logits.size(-1)), shift_labels.view(-1))
        # 计算损失
        return (loss, outputs) if return_outputs else loss
        # 根据参数返回损失和输出

# 定义Trainer
trainer = CustomTrainer(model=model, # 训练的模型
                        args=training_args, # 训练参数
                        train_dataset=train_dataset # 训练数据集
                        )
# 开始微调
print("开始微调")
trainer.train()
print("微调完成")
2.6 保存微调模型
新建文件夹fine-tuning-Qwen1.5-0.5B-Chat,用于保存微调后的模型参数。
# 微调后模型的保存路径
FINE_TUNING_DIR = "./fine-tuning-Qwen1.5-0.5B-Chat"
# 保存训练后的模型和配置文件
model.save_pretrained(FINE_TUNING_DIR)
tokenizer.save_pretrained(FINE_TUNING_DIR)
# 将配置文件下载到模型目录中
config = model.config.to_dict()
config_path = os.path.join(FINE_TUNING_DIR, 'config.json')
with open(config_path, 'w') as f:
    json.dump(config, f, ensure_ascii=False, indent=4)
print(f"微调后的模型已经成功保存到: {FINE_TUNING_DIR}")
三、大模型评估
微调完成之后,最后一步就是大模型评估。
# 导入所需要的库
from transformers import AutoModelForCausalLM, AutoTokenizer
# 加载训练好的模型和分词器
FINE_TUNING_DIR = "./fine-tuning-Qwen1.5-0.5B-Chat"
tokenizer = AutoTokenizer.from_pretrained(FINE_TUNING_DIR, trust_remote_code=True)
model = AutoModelForCausalLM.from_pretrained(FINE_TUNING_DIR, trust_remote_code=True, device_map='auto')
# 模型设为评估状态
model.eval()
# 定义测试示例
questions = [{"instruction": "使用中医知识正确回答适合这个病例的中成药。","input": "我这段时间感觉身体不太对劲,有腹泻的迹象,面黄肌瘦,吃点什么中成药能改善?" },
             {"instruction": "使用中医知识正确回答适合这个病例的中成药。", "input": "我昨天开始咳嗽,感觉喉咙痛,痰又稠又黄,还感觉有点发热。" }]
# 生成回复
for question in questions:
    context = f"Instruction: {question['instruction']}\nInput: {question['input']}\nAnswer: "
    # 对输入文本进行编码
    inputs = tokenizer(context, return_tensors="pt")
    # 模型生成回复
    outputs = model.generate(inputs.input_ids.to(model.device), max_length=512, num_return_sequences=1, no_repeat_ngram_size=2)
    # 对回复内容进行解码
    answer = tokenizer.decode(outputs[0], skip_special_tokens=True)
    print(f"Input: {question['input']}")
    print(f"Output: {answer}\n")
四、小结
本项目基于 LoRA 技术与 peft 框架,对 Qwen 模型进行了微调,使其在中医领域的问答任务上取得了较好的效果。
更多推荐
 已为社区贡献6条内容


所有评论(0)