高性能web服务器Nginx
进程结构与请求处理机制
Nginx采用独特的Master-Worker多进程模型。Master进程负责管理和监控,如接收信号、重启Worker;Worker进程则负责实际处理客户端请求。这种模型结合了多进程的稳定性和异步非阻塞I/O的效率,使得单个Worker可以处理成千上万个并发连接,从而实现高性能。与此相对,传统的Apache多进程/多线程模型在高并发下容易因资源耗尽和上下文切换开销过大而性能下降。
核心配置与命令行管理
Nginx的配置文件由多个配置块组成,包括main(主配置)、events(事件配置)、http(HTTP协议配置)、mail和stream。命令行工具提供了多种参数用于管理Nginx服务,例如:
-
-v:显示版本信息。 -
-t:测试配置文件语法是否正确。 -
-s reload:向主进程发送信号,实现平滑重新加载配置。
常用功能配置
-
网站配置:通过
server块监听端口(listen)和域名(server_name),并指定网站根目录(root)。 -
高并发优化:通过
worker_rlimit_nofile和worker_connections参数来增加单个进程可打开的文件数和最大并发连接数。 -
location模块:根据URL的不同部分(URI)匹配不同的配置,支持精确匹配(=)、前缀匹配(^~)、正则匹配(~/~*)等多种方式,并有特定的匹配优先级。 -
root与alias:root会将请求URI追加到指定的路径后,而alias则会替换URI中的匹配部分,常用于为特定目录提供服务。 -
账户认证:使用
auth_basic和.htpasswd文件实现基本的HTTP账户认证功能。
静态资源与性能优化
-
Gzip压缩:通过
gzip on启用压缩功能,可以显著减小文件传输大小,提升加载速度。相关参数可调整压缩级别、压缩的最小文件大小等。 -
版本隐藏:通过修改源代码并重新编译,可以隐藏Nginx的版本信息,提高安全性。
-
动静分离:利用
location模块,将静态资源(如.jpg,.css)直接由Nginx处理,而将动态请求(如.php)转发给后端服务器,从而降低后端服务器的压力。 -
反向代理缓存:通过
proxy_cache_path和proxy_cache指令,Nginx可以将后端服务器的响应缓存到本地磁盘,当再次收到相同请求时直接返回缓存内容,显著提升响应速度。
负载均衡与代理
-
HTTP负载均衡:通过
upstream配置块定义一组后端服务器,并使用proxy_pass将请求转发到该组服务器。支持多种调度算法,如默认的轮询(rr)、权重轮询(wrr)和IP哈希等。 -
四层(TCP/UDP)负载均衡:使用
stream配置块,Nginx可以代理非HTTP协议的流量。这常用于端口代理或大规模集群架构中,可以为MySQL、DNS等服务进行负载均衡。
FastCGI与二次开发
-
FastCGI: Nginx本身无法处理PHP等动态语言,需要通过FastCGI协议与后端PHP-FPM等解析器通信。Nginx将动态请求转发给FastCGI进程处理,处理完成后再将结果返回给客户端。FastCGI通过保持进程来复用资源,比传统的CGI更高效。
-
二次开发: OpenResty是基于Nginx和Lua语言的高性能Web平台,允许开发者通过编写Lua脚本来扩展Nginx的功能,实现更复杂的逻辑。
Nginx 简介
-
基本信息: Nginx(engine X)于2002年开发,是一个免费、开源、高性能的 HTTP 和反向代理服务器、邮件代理服务器以及 TCP/UDP 代理服务器。它成功解决了 C10K 问题(即单台服务器处理上万并发连接)。
-
版本与生态: Nginx 分为社区版和商业版(Nginx Plus)。2019年,它被F5 Networks公司以6.7亿美元收购。除了官方版本,还有一些知名的二次开发版本,如淘宝的 Tengine和章亦春的 OpenResty,它们在Nginx的基础上增加了更多功能和特性,以满足特定业务需求。
Nginx 安装
官方源码包下载地址:
https://nginx.org/en/download.html

[root@nginx ~]# dnf install gcc pcre-devel zlib-devel openssl-devel -y
[root@nginx ~]# useradd -s /sbin/nologin -M nginx

[root@nginx ~]# tar zxf nginx-1.24.0.tar.gz
[root@nginx ~]# ls
anaconda-ks.cfg  nginx-1.24.0.tar.gz  nginx-1.24.0
Public           Desktop              nginx-1.26.1         Templates
Documents        Music                Videos               Downloads                       Pictures

=================================================================

# 编译安装
--prefix=/usr/local/nginx 指定了 Nginx 将被安装到 /usr/local/nginx 目录下。
执行完这个命令后,通常会生成一些配置文件和 Makefile,然后可以使用 make 命令进行编译,最后使用 make install 命令进行安装

[root@nginx nginx-1.24.0]# ./configure --prefix=/usr/local/nginx \
--user=nginx \                         # 指定nginx运行用户
--group=nginx \                        # 指定nginx运行组
--with-http_ssl_module \               # 支持https://
--with-http_v2_module \                # 支持http版本2
--with-http_realip_module \            # 支持ip透传
--with-http_stub_status_module \       # 支持状态页面
--with-http_gzip_static_module \       # 支持压缩
--with-pcre \                          # 支持正则
--with-stream \                        # 支持tcp反向代理
--with-stream_ssl_module \             # 支持tcp的ssl加密
--with-stream_realip_module            # 支持tcp的透传ip

[root@nginx nginx-1.24.0]# make && make install
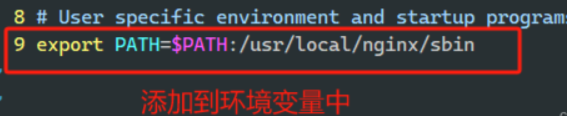
配置环境变量 PATH
[root@Nginx ~]# vim ~/.bash_profile
export PATH=$PATH:/usr/local/nginx/sbin
[root@Nginx ~]# source ~/.bash_profile
配置 systemd
[root@Nginx ~]# vim /lib/systemd/system/nginx.service
[Unit]
Description=The NGINX HTTP and reverse proxy server
After=syslog.target network-online.target remote-fs.target nss-lookup.target
Wants=network-online.target

[Service]
Type=forking
PIDFile=/usr/local/nginx/logs/nginx.pid
ExecStartPre=/usr/local/nginx/sbin/nginx -t
ExecStart=/usr/local/nginx/sbin/nginx
ExecReload=/usr/local/nginx/sbin/nginx -s reload
ExecStop=/bin/kill -s QUIT $MAINPID
PrivateTmp=true

[Install]
WantedBy=multi-user.target


[root@Nginx ~]# systemctl daemon-reload
[root@Nginx ~]# systemctl start nginx
平滑升级和回滚
有时候我们需要对Nginx版本进行升级以满足对其功能的需求,例如添加新模块,需要新功能,而此时 Nginx又在跑着业务无法停掉,这时我们就可能选择平滑升级。
平滑升级
【先停止nginx进程 】
 解压压缩包 编译新版本
[root@nginx ~]# tar zxf nginx-1.26.1.tar.gz
[root@nginx ~]# tar zxf echo-nginx-module-0.63.tar.gz
[root@nginx ~]# cd nginx-1.26.1/

#编译新版本
[root@nginx nginx-1.26.1]# ./configure --prefix=/usr/local/nginx \
--user=nginx \
--group=nginx \
--add-module=/root/echo-nginx-module-0.63 \        #添加echo模块
--with-http_ssl_module \
--with-http_v2_module \
--with-http_realip_module \
--with-http_stub_status_module \
--with-http_gzip_static_module \
--with-pcre --with-stream \
--with-stream_ssl_module \
--with-stream_realip_module

编译
cd nginx-1.24.0/
./configure --prefix=/usr/local/nginx --user=nginx --group=nginx --with-http_ssl_module --with-http_v2_module --with-http_realip_module --with-http_stub_status_module --with-http_gzip_static_module --with-pcre --with-stream --with-stream_ssl_module --with-stream_realip_module
查看两个版本 并把旧版备份
#查看两个版本
[root@nginx nginx-1.26.1]# ll objs/nginx /usr/local//nginx/sbin/nginx
-rwxr-xr-x 1 root root 6170600 Aug 15 16:22 objs/nginx
-rwxr-xr-x 1 root root 6090120 Aug 18 19:07 /usr/local//nginx/sbin/nginx

#把之前的旧版nginx命令备份
[root@nginx nginx-1.26.1]# cd /usr/local/nginx/sbin/
[root@nginx sbin]# cp nginx nginx.24

#把新版本的nginx命令复制过去
[root@nginx sbin]# \cp -f /root/nginx-1.26.1/objs/nginx /usr/local/nginx/sbin

[root@nginx sbin]# ls
nginx  nginx.24            #此刻nginx为新版

#检测是否有问题
[root@nginx sbin]# nginx -t
nginx: the configuration file /usr/local/nginx/conf/nginx.conf syntax is ok
nginx: configuration file /usr/local/nginx/conf/nginx.conf test is successful
启动新的nginx,回收旧的nginx
[root@nginx sbin]# nginx        #启动
nginx: [emerg] bind() to 0.0.0.0:80 failed (98: Address already in use)
nginx: [emerg] bind() to 0.0.0.0:80 failed (98: Address already in use)
nginx: [emerg] bind() to 0.0.0.0:80 failed (98: Address already in use)
nginx: [emerg] bind() to 0.0.0.0:80 failed (98: Address already in use)
nginx: [emerg] bind() to 0.0.0.0:80 failed (98: Address already in use)

#先查看nginx进程
[root@nginx sbin]# ps aux | grep nginx
root        8387  0.0  0.1   9868  2068 ?        Ss   20:53   0:00 nginx: master process /usr/local/nginx/sbin/nginx
nginx       8388  0.0  0.2  14200  4884 ?        S    20:53   0:00 nginx: worker process
root       11924  0.0  0.1 221664  2176 pts/0    S+   21:01   0:00 grep --color=auto nginx


=================================================================================
[root@nginx sbin]# kill -USR2 8387

#8387 为nginx worker ID
#USR2 平滑升级可执行程序,将存储有旧版本主进程PID的文件重命名为nginx.pid.oldbin,并启动新的
nginx
#此时两个master的进程都在运行,只是旧的master不在监听,由新的master监听80
#此时Nginx开启一个新的master进程,这个master进程会生成新的worker进程,这就是升级后的Nginx进
程,此时老的进程不会自动退出,但是当接收到新的请求不作处理而是交给新的进程处理


#此时会出现两个master和两个worker
[root@nginx sbin]# ps aux | grep nginx
root        8387  0.0  0.1   9868  2452 ?        Ss   20:53   0:00 nginx: master process /usr/local/nginx/sbin/nginx
nginx       8388  0.0  0.2  14200  4884 ?        S    20:53   0:00 nginx: worker process
root       11925  0.0  0.3   9776  6400 ?        S    21:02   0:00 nginx: master process /usr/local/nginx/sbin/nginx
nginx      11926  0.0  0.2  14240  4880 ?        S    21:02   0:00 nginx: worker process
root       11928  0.0  0.1 221664  2176 pts/0    S+   21:02   0:00 grep --color=auto nginx
#回收旧版
[root@nginx sbin]# kill -WINCH 8387
[root@nginx sbin]# ps aux | grep nginx
root        8387  0.0  0.1   9868  2452 ?        Ss   20:53   0:00 nginx: master process /usr/local/nginx/sbin/nginx
root       11925  0.0  0.3   9776  6400 ?        S    21:02   0:00 nginx: master process /usr/local/nginx/sbin/nginx
nginx      11926  0.0  0.2  14240  4880 ?        S    21:02   0:00 nginx: worker process
root       11933  0.0  0.1 221664  2176 pts/0    S+   21:04   0:00 grep --color=auto nginx

[root@nginx sbin]# curl -I localhost
HTTP/1.1 200 OK
Server: nginx/1.26.1        #已经升级
Date: Sun, 18 Aug 2024 13:04:38 GMT
Content-Type: text/html
Content-Length: 615
Last-Modified: Sun, 18 Aug 2024 12:48:19 GMT
Connection: keep-alive
ETag: "66c1ed93-267"
Accept-Ranges: bytes
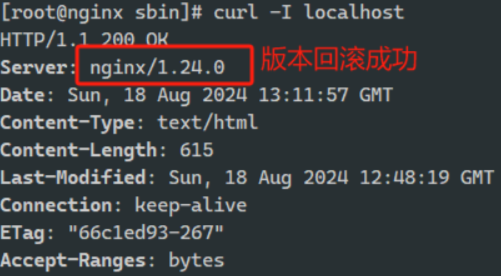
版本回滚
唤起旧版备份
#将旧版的备份重新唤起
[root@nginx sbin]# ls
nginx  nginx.24

[root@nginx sbin]# cp nginx nginx.26
[root@nginx sbin]# ls
nginx  nginx.24  nginx.26

[root@nginx sbin]# mv nginx.24 nginx
mv: overwrite 'nginx'? y
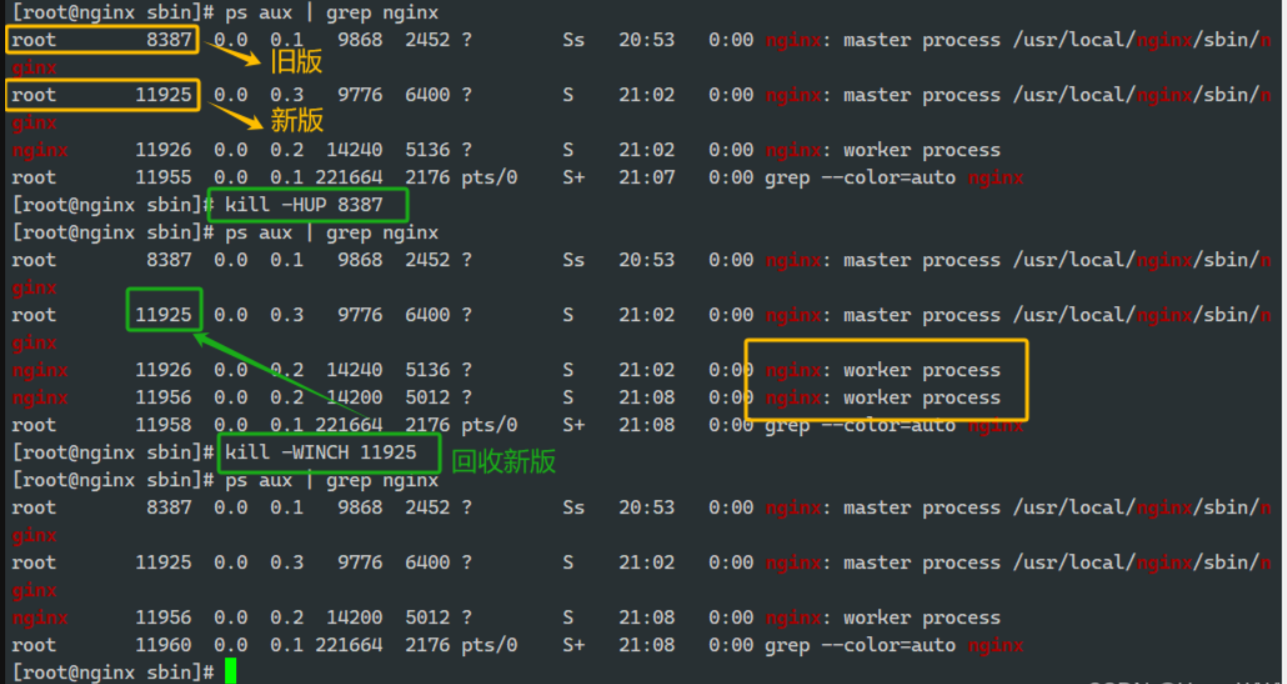
重新拉起旧版本worker
[root@nginx sbin]# ps aux | grep nginx
root        8387  0.0  0.1   9868  2452 ?        Ss   20:53   0:00 nginx: master process /usr/local/nginx/sbin/nginx
root       11925  0.0  0.3   9776  6400 ?        S    21:02   0:00 nginx: master process /usr/local/nginx/sbin/nginx
nginx      11926  0.0  0.2  14240  5136 ?        S    21:02   0:00 nginx: worker process
root       11955  0.0  0.1 221664  2176 pts/0    S+   21:07   0:00 grep --color=auto nginx
[root@nginx sbin]# kill -HUP 8387
[root@nginx sbin]# ps aux | grep nginx
root        8387  0.0  0.1   9868  2452 ?        Ss   20:53   0:00 nginx: master process /usr/local/nginx/sbin/nginx
root       11925  0.0  0.3   9776  6400 ?        S    21:02   0:00 nginx: master process /usr/local/nginx/sbin/nginx
nginx      11926  0.0  0.2  14240  5136 ?        S    21:02   0:00 nginx: worker process
nginx      11956  0.0  0.2  14200  5012 ?        S    21:08   0:00 nginx: worker process
root       11958  0.0  0.1 221664  2176 pts/0    S+   21:08   0:00 grep --color=auto nginx
[root@nginx sbin]# kill -WINCH 11925
[root@nginx sbin]# ps aux | grep nginx
root        8387  0.0  0.1   9868  2452 ?        Ss   20:53   0:00 nginx: master process /usr/local/nginx/sbin/nginx
root       11925  0.0  0.3   9776  6400 ?        S    21:02   0:00 nginx: master process /usr/local/nginx/sbin/nginx
nginx      11956  0.0  0.2  14200  5012 ?        S    21:08   0:00 nginx: worker process
root       11960  0.0  0.1 221664  2176 pts/0    S+   21:08   0:00 grep --color=auto nginx
Nginx 核心配置总结
Nginx 的配置体系结构化且灵活,易于管理和维护。它主要由一个主配置文件和多个子配置文件组成。
1. 配置文件组成
-
主配置文件:
nginx.conf,是Nginx配置的核心。 -
子配置文件:通过
include指令将其他配置文件(如conf.d/*.conf)引入主配置,方便管理不同站点的配置。 -
协议相关文件:如
fastcgi.conf、uwsgi.conf等,用于处理不同的后端通信协议。 -
MIME 类型文件:
mime.types,定义了文件扩展名与对应的 MIME 类型,告诉浏览器如何正确处理不同类型的文件。
2. 配置格式与语法
-
指令与指令块:配置由一个个独立的**指令(directive)和指令块(block)**组成。
-
语法规则:每条指令必须以分号
;结尾,指令和值之间用空格分隔。 -
指令块:使用大括号
{}将多条指令组织在一起,可以嵌套。 -
注释与变量:使用
#符号添加注释。使用$符号引用变量,变量可以是Nginx内置的,也可以通过set指令自定义。
3. 主配置文件结构
nginx.conf 采用层级结构,由四个主要的配置块构成:
-
mainblock:全局配置段,影响整个 Nginx 服务,如 worker 进程数等。 -
eventsblock:配置事件驱动模型,如单个 worker 进程的最大连接数。 -
httpblock:HTTP/HTTPS 协议相关配置段,用于配置Web服务器功能,如虚拟主机、反向代理、缓存等。这是最常用的配置块。 -
mail/streamblock:这两个配置块在默认配置文件中不包含,但可以用来配置邮件代理或 TCP/UDP 四层代理。
主配置文件 nginx/conf/nginx.conf
添加子配置文件
mkdir /usr/local/nginx/conf.d


server{
...
}

include /usr/local/nginx/conf/conf.d/*.conf;
在配置文件的最后面添加此行
注意不要放在最前面,会导致前面的命令无法生效
建立web站点
server {
        listen 80;
        server_name www.wjy.org;
        root /usr/local/nginx/html;
Nginx location
location 指令是 Nginx 配置中用于根据客户端请求的 URI(统一资源标识符)来匹配并处理请求的核心功能。一个 server 块可以包含多个 location 配置段,Nginx 会按照一套严格的优先级规则,为每个请求找到最合适的 location 来进行处理。
location 语法与匹配规则
location 指令的语法为 location [ = | ~ | ~* | ^~ ] uri { ... },其中 URI 前面的修饰符决定了匹配的类型:
| 修饰符 | 含义 | 匹配规则 |
|
|
精确匹配 |
要求请求的 URI 字符串与指定的 URI 完全一致。如果找到精确匹配,Nginx 会立即停止搜索,并使用此 |
|
|
前缀匹配 |
对 URI 的最左边部分进行匹配,但不使用正则表达式。一旦匹配成功,Nginx 将停止继续搜索其他 |
|
|
正则匹配 |
对 URI 进行区分大小写的正则匹配。 |
|
|
正则匹配 |
对 URI 进行不区分大小写的正则匹配。 |
|
无修饰符 |
前缀匹配 |
这是最常见的前缀匹配,匹配以指定 URI 开头的所有请求。如果同时存在更精确的前缀匹配和正则表达式,它会继续向下搜索。 |
|
|
转义符 |
用于在正则表达式中转义特殊字符,使其作为普通字符进行匹配。 |
匹配优先级(从高到低)
Nginx 匹配 location 的规则非常重要,它决定了哪个配置段会被最终执行。整体优先级可以概括为:
-
=精确匹配:优先级最高,一旦匹配成功即停止。 -
^~前缀匹配:优先级次之,匹配成功后停止。 -
~或~*正则匹配:在非正则匹配都检查完之后,Nginx 会按照配置文件中的顺序依次检查所有正则表达式location,并使用第一个匹配成功的。 -
无修饰符的前缀匹配:优先级最低。如果上述所有规则都没有匹配成功,Nginx 会使用匹配度最高的无修饰符
location。
总结优先级:
= > ^~ > ~ / ~* > 无修饰符
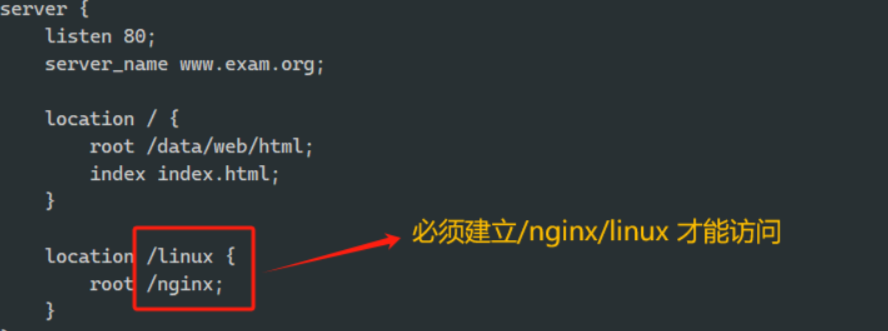
root 与 alias
root:
指定web的家目录,在定义location的时候,文件的绝对路径等于 root+location
server {
   listen 80;
   server_name www.exam.com;
   location / {
       root /data/web/html;    #默认发布目录
   }
   location /dirtest {         #必须建立/mnt/dirtest才能访问
       root /mnt;
   }
}
alias:
定义路径别名,会把访问的路径重新定义到其指定的路径,文档映射的另一种机制;仅能用于 location上下文,此指令使用较少
server {
   listen 80;
   server_name www.exam.com;
   location / {
       root /data/web/html;        #默认发布目录 可以自主创建
   }
   location /dirtest {
       root /mnt;
   }
   location /alias {                #注意about后不要加/
                 #使用alias的时候uri后面如果加了斜杠,则下面的路径配置必须加斜杠,否则403

       alias /mnt/dirtest;         #当访问alias的时候,会显示alias定义的/mnt/dirtest
里面的内容
   }
}
Nginx 账户认证功能
[root@nginx ~]# htpasswd -cm /usr/local/nginx/.htpasswd admin
New password:
Re-type new password:
Adding password for user admin
[root@nginx ~]# cat /usr/local/nginx/.htpasswd
admin:$apr1$FpZQolny$CX5peL/Hxa3iw6GQXDRFh/

[root@nginx ~]# htpasswd -m /usr/local/nginx/.htpasswd howe
New password:
Re-type new password:
Adding password for user howe
[root@nginx ~]# cat /usr/local/nginx/.htpasswd
admin:$apr1$FpZQolny$CX5peL/Hxa3iw6GQXDRFh/
howe:$apr1$.r6F4qwy$h6eqZboHclzrA3nFvMslb/
[root@nginx ~]# mkdir /data/web/howe
[root@nginx ~]# echo howe > /data/web/howe/index.html
[root@nginx ~]# vim /usr/local/nginx/conf.d/vhost.conf
[root@nginx ~]# cat /usr/local/nginx/conf.d/vhost.conf
server {
        listen 80;
        server_name www.exam.org;
        root /data/web/html;
        index index.html;

        location =  /howe {
            root /data/web;
            auth_basic "login password !!"
            auth_basic_user_file "/usr/local/nginx/.htpasswd";
        }
}
添加认证
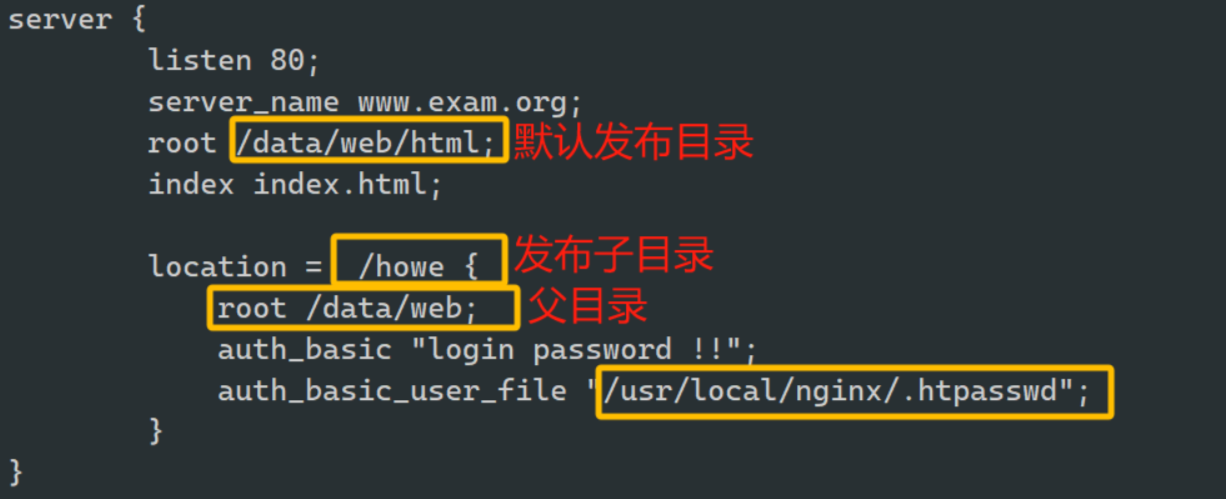
重启Nginx
[root@nginx ~]# curl www.exam.com/login/ -u admin:nginx
自定义错误页面
[root@nginx ~]# mkdir -p /data/web/errorpage
[root@nginx ~]# echo error page > /data/web/errorpage/40x.html
[root@nginx ~]# cat /usr/local/nginx/conf.d/vhost.conf
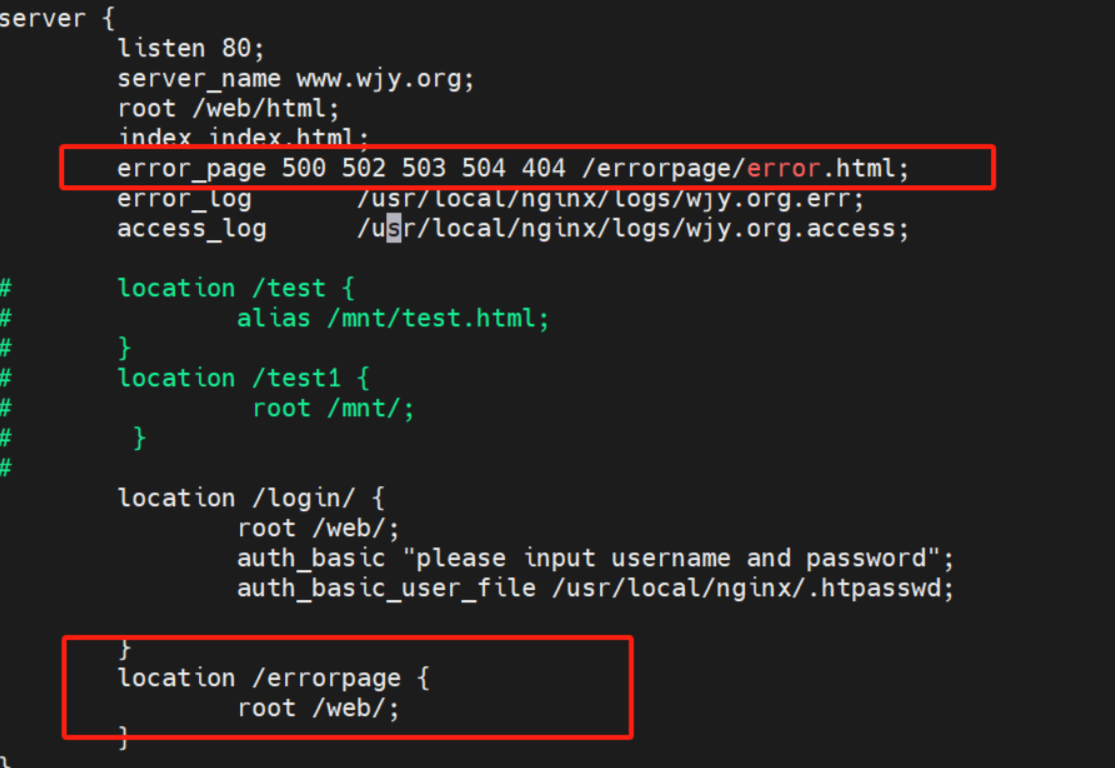
自定义错误日志
[root@nginx ~]# mkdir -p /var/log/superhowe.com/

[root@nginx ~]# curl 172.25.250.100
welcome to nginx
[root@nginx ~]# cat /var/log/superhowe.com/access.log
172.25.250.100 - - [16/Aug/2024:14:32:05 +0800] "GET / HTTP/1.1" 200 17 "-" "curl/7.76.1"
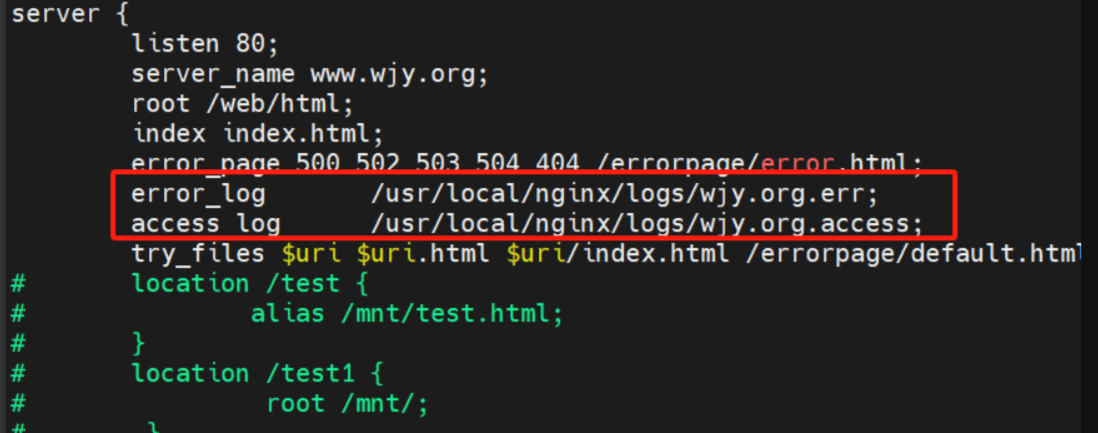
重启nginx并访问不存在的页面进行测试并验证是在指定目录生成新的日志文件
作为下载服务器配置
[root@nginx ~]# mkdir -p /data/web/download

[root@nginx ~]# dd if=/dev/zero of=/data/web/download/howefile bs=1M count=10
10+0 records in
10+0 records out
10485760 bytes (10 MB, 10 MiB) copied, 0.00656212 s, 1.6 GB/s

[root@nginx ~]# vim /usr/local/nginx/conf.d/vhost.conf
  ...
        location /download {
            root /data/web;
            autoindex on;
            autoindex_localtime on;
            autoindex_exact_size off;
            limit_rate 1024k;
        }
  ...


[root@nginx ~]# nginx -s reload
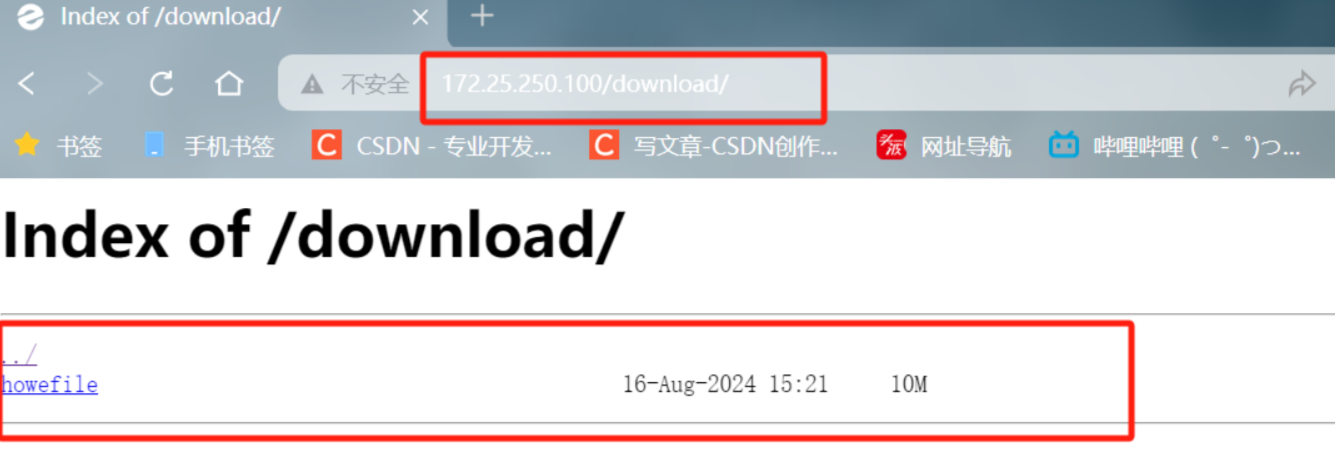
Nginx高级配置
Nginx 状态页
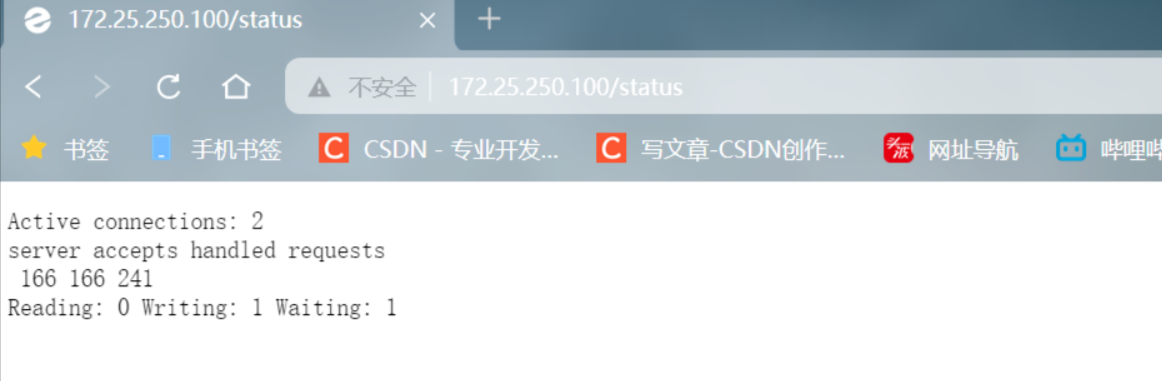
基于nginx 模块 ngx_http_stub_status_module 实现,
在编译安装nginx的时候需要添加编译参数 --with-http_stub_status_module
否则配置完成之后监测会是提示法错误
Note:状态页显示的是整个服务器的状态,而非虚拟主机的状态
[root@nginx ~]# vim /usr/local/nginx/conf.d/status.conf

[root@nginx ~]# cat /usr/local/nginx/conf.d/status.conf
server {
    listen 80;
    server_name status.exam.com;
    root /data/web/html;
    index index.html;		#指定默认的索引文件为 index.html

    location /status {
        stub_status;
        allow 172.25.250.1;   	#允许访问的主机
        deny all;			   #其他所有主机不能访问
    }
}

[root@nginx ~]# nginx -s reload
[root@nginx ~]# nginx -s reload
[root@nginx ~]# curl 172.25.250.100/status
<html>
<head><title>403 Forbidden</title></head>
<body>
<center><h1>403 Forbidden</h1></center>
<hr><center>superhowe/2.0</center>
</body>
</html>

#去windows测试is ok
Nginx 压缩功能
Nginx Gzip 压缩功能总结
Nginx 的 Gzip 压缩功能通过压缩文件内容来减少传输大小,从而节省网络带宽并加快网页加载速度。这项功能依赖于内置的 ngx_http_gzip_module 模块。虽然压缩会消耗一定的 CPU 资源,但在大多数情况下,其带来的性能提升是显而易见的。
核心配置指令
以下是控制 Gzip 压缩功能的关键指令:
| 指令 | 作用 | 默认值 |
|
`gzip on |
off` |
启用或禁用 Gzip 压缩。 |
|
|
设置压缩比。数值越高,压缩率越高,文件越小,但CPU 消耗也越大。 |
|
|
|
设置进行 Gzip 压缩的最小文件大小。小于此值的文件将不被压缩。 |
|
|
|
指定仅对哪些 MIME 类型的资源进行压缩。 |
|
|
|
禁用特定浏览器的 Gzip 压缩。例如,可以禁用不支持压缩的早期版本 IE 浏览器。 |
无 |
|
|
设置启用压缩功能的最小 HTTP 协议版本。 |
|
|
`gzip_vary on |
off` |
当启用压缩时,是否在响应头中添加 |
预压缩功能
Nginx 还提供了更高级的优化方式:预压缩。
-
gzip_static on | off: 这项功能依赖于ngx_http_gzip_static_module模块。启用后,Nginx 会尝试直接从磁盘查找与请求文件同名但以.gz结尾的预压缩文件并返回给客户端。这可以完全避免在请求时进行实时压缩,从而节省服务器的 CPU 资源。
[root@nginx web]# vim /usr/local/nginx/conf/nginx.conf
[root@nginx web]# cat /usr/local/nginx/conf/nginx.conf
...
    #gzip on
    gzip on;
    gzip_comp_level 5;
    gzip_min_length 1k;
    gzip_http_version 1.1;
    gzip_vary on;
    gzip_types text/plain application/javascript application/x-javascript text/css application/x-http-php image/gif image/png;
...

[root@nginx web]# nginx -s reload
[root@nginx web]# echo hello superhowe > /data/web/html/small.html
[root@nginx web]# du -sh /usr/local/nginx/logs/access.log
52K	/usr/local/nginx/logs/access.log
[root@nginx web]# cat /usr/local/nginx/logs/access.log > /data/web/html/big.html


#查看
[root@nginx web]# curl --head --compressed 172.25.250.100/small.html
HTTP/1.1 200 OK
Server: superhowe/2.0
Date: Fri, 16 Aug 2024 08:21:40 GMT
Content-Type: text/html
Content-Length: 16
Last-Modified: Fri, 16 Aug 2024 08:20:15 GMT
Connection: keep-alive
Keep-Alive: timeout=60
ETag: "66bf0bbf-10"
Accept-Ranges: bytes

[root@nginx web]# curl --head --compressed 172.25.250.100/big.html
HTTP/1.1 200 OK
Server: superhowe/2.0
Date: Fri, 16 Aug 2024 08:21:48 GMT
Content-Type: text/html
Last-Modified: Fri, 16 Aug 2024 08:21:18 GMT
Connection: keep-alive
Keep-Alive: timeout=60
Vary: Accept-Encoding
ETag: W/"66bf0bfe-c813"
Content-Encoding: gzip

#不是对文件进行压缩 而是对文件传输过程进行压缩
Nginx的版本隐藏
[root@Nginx nginx-1.26.1]# vim src/core/nginx.h
#define nginx_version 1026001
#define NGINX_VERSION "2.0"
#define NGINX_VER "superme/" NGINX_VERSION
Nginx 变量使用
- nginx的变量可以在配置文件中引用,作为功能判断或者日志等场景使用
- 变量可以分为内置变量和自定义变量
- 内置变量是由nginx模块自带,通过变量可以获取到众多的与客户端访问相关的值
Nginx 内置变量总结
Nginx 提供了丰富的内置变量,这些变量可以在配置文件中直接使用,用于动态地获取和处理客户端请求、服务器信息以及其他上下文数据。这些变量是 Nginx 实现灵活配置和复杂逻辑的基础。
客户端请求相关变量
这些变量主要用于获取客户端的请求信息,如IP地址、端口、URI等。
-
$remote_addr: 客户端的公网IP地址。 -
$remote_port: 客户端连接Nginx时使用的随机端口。 -
$request_uri: 客户端请求的原始URI,包含请求参数(例如:/index.html?id=1)。 -
$document_uri: 请求的URI,但不包含任何参数(例如:/index.html)。 -
$args: URI中的所有请求参数。 -
$is_args: 如果URI中有参数,则为?,否则为空。 -
$request_method: 客户端请求的方法,如GET,POST,PUT等。 -
$http_user_agent: 客户端浏览器的详细信息。 -
$http_cookie: 客户端发送的所有cookie信息。 -
$http_<name>: 获取请求头中任意字段的值。需要将字段名转为小写,并将-替换为_。
服务器信息相关变量
这些变量提供了Nginx服务器自身的配置和状态信息。
-
$server_addr: Nginx服务器的IP地址。 -
$server_name: 虚拟主机的服务器名称(server_name指令的值)。 -
$server_port: 虚拟主机的端口号。 -
$server_protocol: 客户端请求使用的协议版本,如HTTP/1.1。 -
$document_root: 当前请求的系统根目录,由root指令设置。 -
$request_filename: 当前请求文件的完整磁盘路径。
其他常用变量
-
$host: 客户端请求的Host头部,如果不存在则为主机名。 -
$scheme: 请求使用的协议,如http或https。 -
$limit_rate: 如果通过limit_rate指令限制了带宽,则显示其值,否则为0。
server {
    listen 80;
    server_name var.timinglee.org;
    root /data/web/html;
    index index.html;

    location /var {
        default_type text/html;
        echo $remote_addr;
        echo $args;
        echo $is_args;
        echo $document_root;
        echo $document_uri;
        echo $host;
        echo $remote_port;
        echo $remote_user;
        echo $request_method;
        echo $request_filename;
        echo $request_uri;
        echo $scheme;
        echo $server_protocol;
        echo $server_addr;
        echo $server_name;
        echo $server_port;
        echo $http_user_agent;
        echo $http_cookie;
        echo $cookie_key2;
    }
}


[root@nginx conf.d]# curl www.exam.com/var
172.25.250.100


/data/web/html
/var
www.exam.com
52734

GET
/data/web/html/var
/var
http
HTTP/1.1
172.25.250.100
www.exam.com
80
curl/7.76.1
自定义变量
自定义变量名称和值,使用指令set $variable value;
语法格式:
Syntax: set $variable value;
Default: —
Context: server, location, if
Nginx Rewrite
反向代理功能
环境
| node | 作用 | 需要的软件 |
| 172.25.250.100 | 主机 | nginx |
| 172.25.250.10 | 客户端 | http php |
| 172.25.250.20 | 客户端 | http |
systemctl disable --now firewalld.service
关闭防火墙!!
[root@client ~]# vim /var/www/html/index.php
[root@client ~]# cat /var/www/html/index.php
<?php
    phpinfo();
?>
[root@client2 html]# mkdir -p /var/www/html/static
[root@client2 html]# echo static 172.25.250.20 > /var/www/html/static/index.html
[root@client2 html]# systemctl restart httpd
server {
    listen 80;
    server_name www.exam.com;

    location ~ \.php$ {
        proxy_pass http://172.25.250.10:80;
    }

    location /static {
        proxy_pass http://172.25.250.20:8080;
    }
}
缓存功能
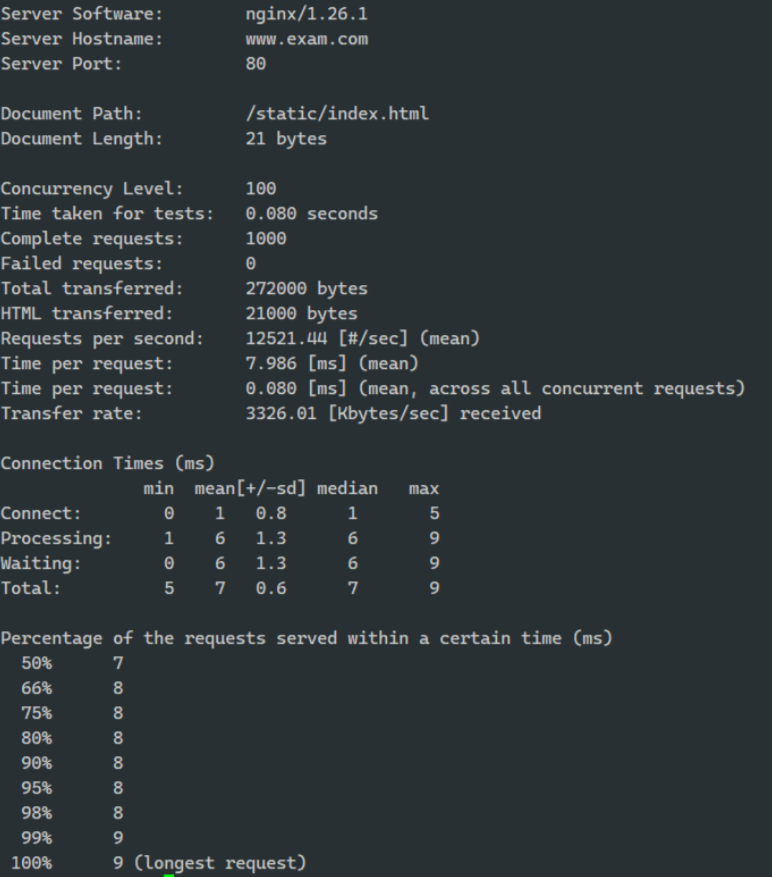
使用 Apache Bench(ab)工具压测
[root@nginx ~]# ab -n1000 -c100 http://www.exam.com/static/index.html
This is ApacheBench, Version 2.3 <$Revision: 1903618 $>
Copyright 1996 Adam Twiss, Zeus Technology Ltd, http://www.zeustech.net/
Licensed to The Apache Software Foundation, http://www.apache.org/

Benchmarking www.exam.com (be patient)
Completed 100 requests
Completed 200 requests
Completed 300 requests
Completed 400 requests
Completed 500 requests
Completed 600 requests
Completed 700 requests
Completed 800 requests
Completed 900 requests
Completed 1000 requests
Finished 1000 requests


Server Software:        nginx/1.26.1
Server Hostname:        www.exam.com
Server Port:            80

Document Path:          /static/index.html
Document Length:        21 bytes

Concurrency Level:      100
Time taken for tests:   0.239 seconds
Complete requests:      1000
Failed requests:        0
Total transferred:      272000 bytes
HTML transferred:       21000 bytes
Requests per second:    4192.68 [#/sec] (mean)
Time per request:       23.851 [ms] (mean)
Time per request:       0.239 [ms] (mean, across all concurrent requests)
Transfer rate:          1113.68 [Kbytes/sec] received

Connection Times (ms)
              min  mean[+/-sd] median   max
Connect:        0    3   2.3      2      11
Processing:     6   20   6.4     20      35
Waiting:        1   19   6.5     19      35
Total:          9   22   5.3     22      38

Percentage of the requests served within a certain time (ms)
  50%     22
  66%     25
  75%     26
  80%     27
  90%     29
  95%     32
  98%     35
  99%     37
 100%     38 (longest request)
配置缓存功能
[root@nginx ~]# vim /usr/local/nginx/conf/nginx.conf

[root@nginx conf.d]# cat proxy.conf
server {
   listen 80;
   server_name www.exam.com;

   location ~ \.php$ {
        proxy_pass http://172.25.250.10:80;
   }

   location /static {
        proxy_pass http://172.25.250.20:8080;
        proxy_cache proxycache;
        proxy_cache_key $request_uri;
        proxy_cache_valid 200 302 301 10m;
        proxy_cache_valid any 1m;
   }
}
反向代理负载均衡
四层负载均衡
客户端
[root@client ~]# dnf install bind -y
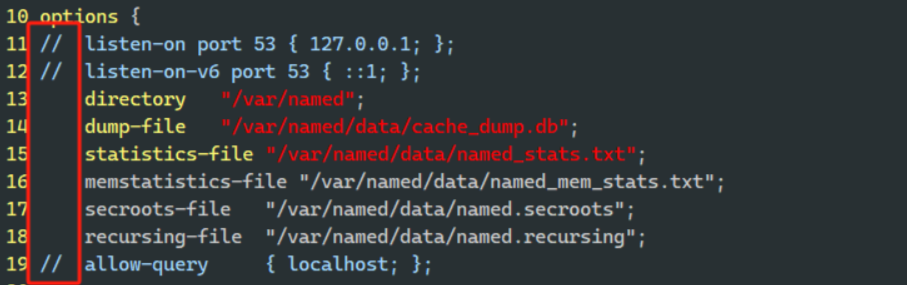
配置dns
vim /etc/named.conf

vim /etc/named.rfc1912.zones
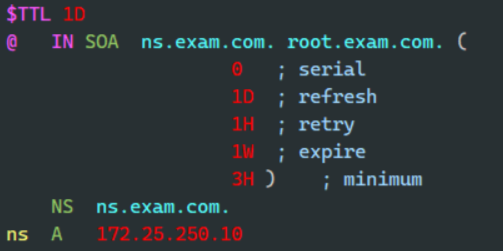
[root@client ~]# cd /var/named/
[root@client named]# cp named.localhost exam.com.zone -p
[root@client named]# vim exam.com.zone
配置主机
stream {
    upstream dns_server {
        server 172.25.250.10:53 max_fails=3 fail_timeout=5;
        server 172.25.250.20:53 max_fails=3 fail_timeout=5;
    }

    server {
        listen 53 udp reuseport;
        proxy_timeout 20s;
        proxy_pass dns_server;
    }
}
#解析客户端1
[root@nginx conf.d]# dig www.exam.com @172.25.250.100

; <<>> DiG 9.16.23-RH <<>> www.exam.com @172.25.250.100
;; global options: +cmd
;; Got answer:
;; ->>HEADER<<- opcode: QUERY, status: NOERROR, id: 41175
;; flags: qr aa rd ra; QUERY: 1, ANSWER: 1, AUTHORITY: 0, ADDITIONAL: 1

;; OPT PSEUDOSECTION:
; EDNS: version: 0, flags:; udp: 1232
; COOKIE: c1b014401eeaeb970100000066c4ad362ad5252fca3c10c2 (good)
;; QUESTION SECTION:
;www.exam.com.			IN	A

;; ANSWER SECTION:
www.exam.com.		86400	IN	A	172.25.250.10

;; Query time: 0 msec
;; SERVER: 172.25.250.100#53(172.25.250.100)
;; WHEN: Tue Aug 20 22:50:30 CST 2024
;; MSG SIZE  rcvd: 85


#解析客户端2
[root@nginx conf.d]# dig www.exam.com @172.25.250.100

; <<>> DiG 9.16.23-RH <<>> www.exam.com @172.25.250.100
;; global options: +cmd
;; Got answer:
;; ->>HEADER<<- opcode: QUERY, status: NOERROR, id: 17948
;; flags: qr aa rd ra; QUERY: 1, ANSWER: 1, AUTHORITY: 0, ADDITIONAL: 1

;; OPT PSEUDOSECTION:
; EDNS: version: 0, flags:; udp: 1232
; COOKIE: 1f3bf28759bb1a800100000066c4ae39784897552ccecbcf (good)
;; QUESTION SECTION:
;www.exam.com.			IN	A

;; ANSWER SECTION:
www.exam.com.		86400	IN	A	172.25.250.20

;; Query time: 0 msec
;; SERVER: 172.25.250.100#53(172.25.250.100)
;; WHEN: Tue Aug 20 22:54:49 CST 2024
;; MSG SIZE  rcvd: 85
实现 FastCGI
Nginx 与动态内容的交互总结
早期的 Web 服务器只能处理静态 HTML 文件。随着动态网站的发展,出现了 PHP、Java 等后端语言,但 Web 服务器本身并不能直接运行这些语言。Nginx 通过一种标准化的协议接口,实现了与外部程序的通信,从而能够处理动态内容。
CGI (通用网关接口)
-
定义: CGI 是 Web 服务器和外部应用程序之间的一套接口标准。
-
工作原理: Web 服务器每收到一个动态请求,就会创建一个新的 CGI 进程来处理。处理完成后,CGI 进程将结果返回给 Web 服务器,然后立即关闭。
-
缺点: 这种“一请求一进程”的模式效率很低。每次请求都需要重新创建进程、解析配置文件和初始化环境,导致资源消耗大,在高并发场景下性能非常差。
FastCGI
-
定义: FastCGI 是为了解决 CGI 效率低下问题而诞生的协议。
-
工作原理: FastCGI 改进了进程管理模式。它在处理完一个请求后并不会关闭进程,而是将进程保留下来,使其能够处理后续的多个请求。
-
优点: 通过进程的复用,FastCGI 大大减少了进程创建和销毁的开销,从而显著提升了处理动态请求的效率。
PHP-FPM
-
定义: PHP-FPM(FastCGI Process Manager)是专为 PHP 语言设计的 FastCGI 进程管理器。
-
工作原理: PHP-FPM 包含一个 Master 进程和一个或多个 Worker 进程。
-
Master 进程:负责监听端口,并管理 Worker 进程。
-
Worker 进程:每个 Worker 进程都内嵌了 PHP 解析器,专门用于处理来自 Nginx 的 PHP 代码请求。
-
-
总结: Nginx 本身不具备处理 PHP 代码的能力,它通过 FastCGI 协议,将 PHP 相关的请求转发给 PHP-FPM 来处理。PHP-FPM 作为 FastCGI 的具体实现,高效地管理 PHP 进程,将处理结果返回给 Nginx,最终由 Nginx 响应给客户端。
FastCGI配置指令
fastcgi_pass address:port;           #转发请求到后端服务器,address为后端的fastcgi
                                      server的地址,可用位置:location, if in location

fastcgi_index name;                 #fastcgi默认的主页资源,示例:fastcgi_index index.php;

fastcgi_param parameter value [if_not_empty];
#设置传递给FastCGI服务器的参数值,可以是文本,变量或组合,可用于将Nginx的内置变量赋值给自定义key

fastcgi_param REMOTE_ADDR $remote_addr;     #客户端源IP
fastcgi_param REMOTE_PORT $remote_port;     #客户端源端口
fastcgi_param SERVER_ADDR $server_addr;     #请求的服务器IP地址
fastcgi_param SERVER_PORT $server_port;     #请求的服务器端口
fastcgi_param SERVER_NAME $server_name;     #请求的server name

Nginx默认配置示例:
location ~ \.php$ {
    root /scripts;
    fastcgi_pass 127.0.0.1:9000;
    fastcgi_index index.php;
    fastcgi_param SCRIPT_FILENAME /scripts$fastcgi_script_name;     #默认脚本路径
    #fastcgi_param SCRIPT_FILENAME $document_root$fastcgi_script_name;
    include fastcgi_params;             #此文件默认系统已提供,存放的相对路径为prefix/conf
}
源码编译php
环境:重新配置nginx
rm -rf /usr/local/nginx
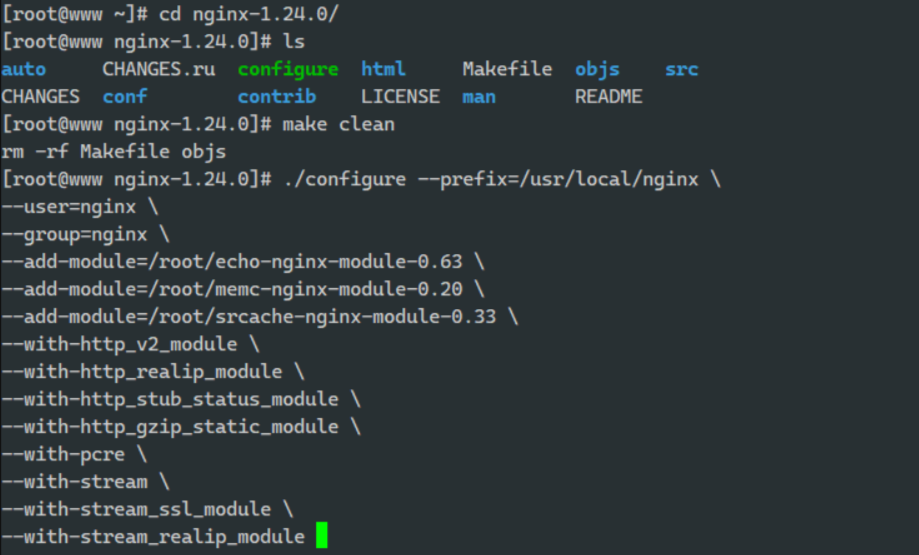
停止nginx 然后编译安装
make && make install
先下载所需软件包
yum install -y bzip2
yum install -y systemd-devel
yum install -y libxml2-devel
yum install -y sqlite-devel
yum install -y libpng-devel
yum install -y libcurl-devel
yum install -y oniguruma-devel

#oniguruma-devel下载方法
wget https://mirrors.aliyun.com/rockylinux/9.4/devel/x86_64/kickstart/Packages/o/oniguruma-devel-6.9.6-1.el9.5.x86_64.rpm

[root@nginx mnt]# wget   https://mirrors.aliyun.com/rockylinux/9.4/devel/x86_64/kickstart/Packages/o/oniguruma-devel-6.9.6-1.el9.5.x86_64.rpm
--2024-08-19 18:23:23--  https://mirrors.aliyun.com/rockylinux/9.4/devel/x86_64/kickstart/Packages/o/oniguruma-devel-6.9.6-1.el9.5.x86_64.rpm
Resolving mirrors.aliyun.com (mirrors.aliyun.com)... 112.46.177.207, 112.46.177.209, 112.46.177.206
Connecting to mirrors.aliyun.com (mirrors.aliyun.com)|112.46.177.207|:443... connected.
HTTP request sent, awaiting response... 200 OK
Length: 66534 (65K) [application/x-rpm]
Saving to: ‘oniguruma-devel-6.9.6-1.el9.5.x86_64.rpm.1’

oniguruma-devel-6.9.6 100%[=======================>]  64.97K  --.-KB/s    in 0.04s

2024-08-19 18:23:23 (1.47 MB/s) - ‘oniguruma-devel-6.9.6-1.el9.5.x86_64.rpm.1’ saved [66534/66534]

#查看
[root@nginx mnt]# ls
hgfs  oniguruma-devel-6.9.6-1.el9.5.x86_64.rpm
#安装
[root@nginx mnt]# dnf install oniguruma-devel-6.9.6-1.el9.5.x86_64.rpm -y
编译
#解压php压缩包
[root@nginx ~]# tar zxf php-8.3.9.tar.gz
[root@nginx ~]# cd php-8.3.9/
[root@nginx php-8.3.9]#


#编译
[root@nginx php-8.3.9]# ./configure \
--prefix=/usr/local/php \
--with-config-file-path=/usr/local/php/etc \
--enable-fpm \
--with-fpm-user=nginx \
--with-fpm-group=nginx \
--with-curl \
--with-iconv \
--with-mhash \
--with-zlib \
--with-openssl \
--enable-mysqlnd \
--with-mysqli \
--with-pdo-mysql \
--disable-debug \
--enable-sockets \
--enable-soap \
--enable-xml \
--enable-ftp \
--enable-gd \
--enable-exif \
--enable-mbstring \
--enable-bcmath \
--with-fpm-systemd

xxxxxxxxxxxxxxxxxxxxxxxxxxxxxxxxxxxxxxxxxxxxxxxxxx

#直接复制
./configure --prefix=/usr/local/php --with-config-file-path=/usr/local/php/etc --enable-fpm --with-fpm-user=nginx --with-fpm-group=nginx --with-curl --with-iconv --with-mhash --with-zlib --with-openssl --enable-mysqlnd --with-mysqli --with-pdo-mysql --disable-debug --enable-sockets --enable-soap --enable-xml --enable-ftp --enable-gd --enable-exif --enable-mbstring --enable-bcmath --with-fpm-systemd

#编译完成后执行
make && make install
完成后会出现license
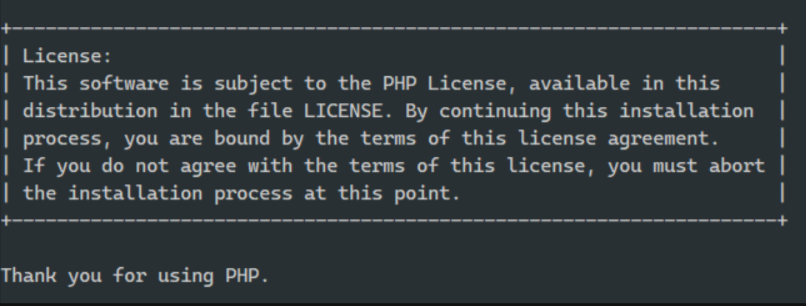
php相关配置优化
更改环境配置
[root@nginx ~]# vim ~/.bash_profile
[root@nginx ~]# cat ~/.bash_profile
# .bash_profile

# Get the aliases and functions
if [ -f ~/.bashrc ]; then
	. ~/.bashrc
fi

# User specific environment and startup programs
export PATH=$PATH:/usr/local/nginx/sbin:/usr/local/php/bin:/usr/local/php/sbin

[root@nginx ~]# source ~/.bash_profile    #立即生效

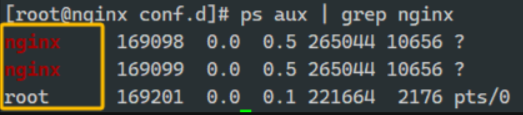
[root@nginx ~]# cd /usr/local/php/etc/
[root@nginx etc]# cp php-fpm.conf.default php-fpm.conf
[root@nginx etc]# vim php-fpm.conf
[root@nginx html]# vim /usr/local/nginx/conf/nginx.conf
        server 127.0.0.1:11211;
        keepalive 512;
}
    server {
        listen       80;
        server_name  www.wjy.org;
        root /usr/local/nginx/html;

        location /memc {
                internal;
                memc_connect_timeout 100ms;
                memc_send_timeout 100ms;
                memc_read_timeout 100ms;
                set $memc_key $query_string; #使用内置变量$query_string来作为key
                set $memc_exptime 300; #缓存失效时间300秒
                memc_pass memcache;
                }


        location ~ \.php$ {
                set $key $uri$args; #设定key的值
                srcache_fetch GET /memc $key; #检测mem中是否有要访问的php
                srcache_store PUT /memc $key; #缓存为加载的php数据
                fastcgi_pass 127.0.0.1:9000;
                fastcgi_index index.php;
                include fastcgi.conf;
                }
        }

[root@Nginx ~]# systemctl start nginx.service
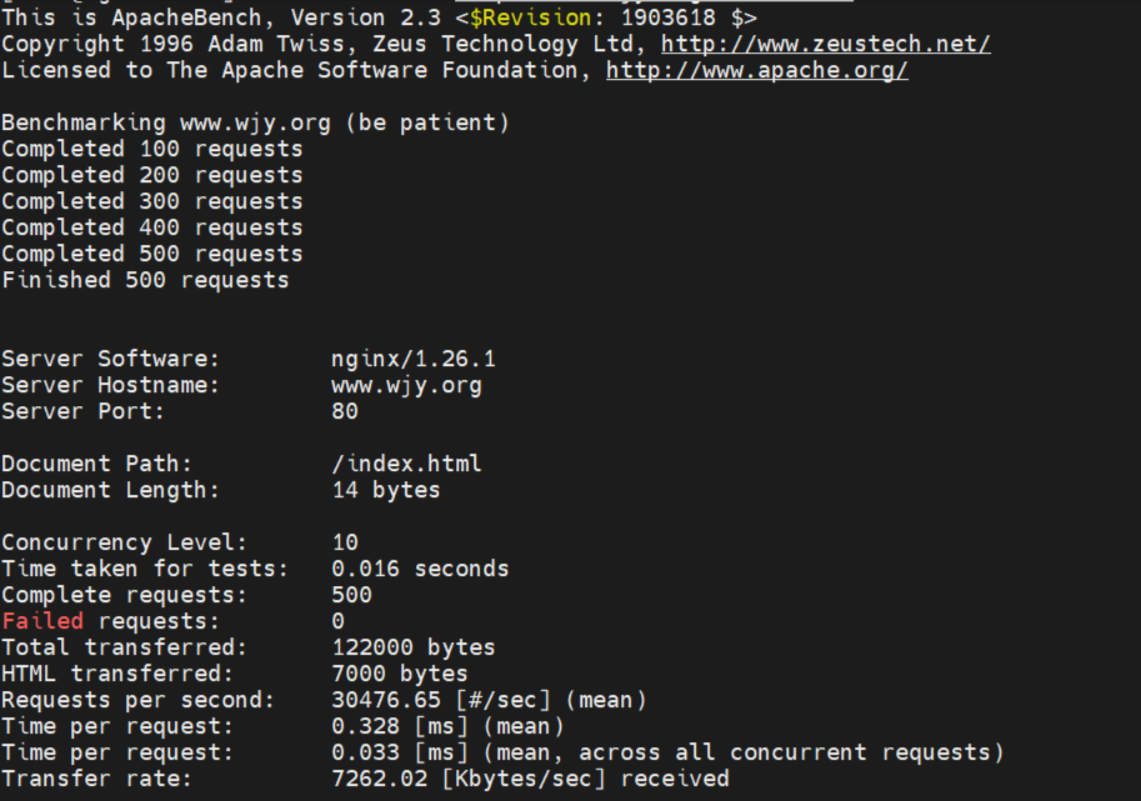
nginx 二次开发版本
编译安装 openresty
[root@nginx ~]# nginx -s stop        #停止nginx 释放80端口

[root@nginx ~]# cd openresty-1.25.3.1/
[root@nginx openresty-1.25.3.1]# ls
bundle  configure  COPYRIGHT  patches  README.markdown  README-windows.txt  util

[root@nginx openresty-1.25.3.1]# dnf install -y gcc pcre-devel openssl-devel perl

[root@nginx openresty-1.25.3.1]# cd /usr/local/src/
[root@nginx src]# wget https://openresty.org/download/openresty-1.17.8.2.tar.gz


[root@nginx openresty-1.25.3.1]# ./configure --prefix=/usr/local/openresty --with-http_ssl_module --with-http_v2_module --with-http_realip_module --with-http_stub_status_module --with-http_gzip_static_module --with-pcre --with-stream --with-stream_ssl_module --with-http_sub_module --without-http_memcached_module --with-stream_realip_module

[root@nginx openresty-1.25.3.1]# make && make install


[root@nginx openresty-1.25.3.1]# ln -s /usr/local/openresty/bin/* /usr/bin/

[root@nginx openresty-1.25.3.1]# openresty -v
nginx version: openresty/1.25.3.1


[root@nginx openresty-1.25.3.1]# vim ~/.bash_profile
export PATH=$PATH:/usr/local/nginx/sbin:/usr/local/php/bin:/usr/local/php/sbin:/usr/local/openresty/bin

[root@nginx openresty-1.25.3.1]# source ~/.bash_profile

[root@nginx openresty-1.25.3.1]# openresty
[root@nginx openresty-1.25.3.1]# ps -ef | grep nginx
nginx     180177  180175  0 19:16 ?        00:00:00 php-fpm: pool www
nginx     180178  180175  0 19:16 ?        00:00:00 php-fpm: pool www
root      199344       1  0 23:11 ?        00:00:00 nginx: master process openresty
nobody    199345  199344  0 23:11 ?        00:00:00 nginx: worker process
root      199347  180514  0 23:11 pts/5    00:00:00 grep --color=auto nginx


有“AI”的1024 = 2048,欢迎大家加入2048 AI社区
更多推荐

 15
15 0
0- 0


 已为社区贡献1条内容

所有评论(0)