Java多线程基础篇
(ps:本次也是写了2w字,争取做到内容全面,用简单的大白话去解释一些原理,所想的代码应该可以运行,感觉粘贴我自己运行结果很不方便,如有疏漏欢迎批评指正)
一、简单了解线程
1.1cpu,进程和线程
目前我们电脑的cpu是多核心的,我们之前所写的代码都只是使用了cpu的一个核心,如果要去实现一些特殊的功能或者大型的业务单靠一个核心是远远不够的,这里就通过特殊的代码把更多的cpu核心调动起来利用,这样的代码成为“并发编程”,多进程编程就是并发编程的一种。
但是多进程编程有一个缺点,就是效率低,体现在每次调度进程都要进行资源分配和销毁,对时间和空间的开销很大,如果频繁调度进程那么开销将会很明显,为了解决开销问题,发明了“线程”,线程相比进程轻量,关键就在于它省去了分配资源和销毁资源的过程。
进程在系统中通过PCB结构来描述,通过链表形式组织,进程是一组PCB,线程就是一个PCB,
一个进程可以包含多个线程,每个线程都能独立的在cpu上调度执行,不能没有线程。每个进程⾄少有⼀个线程存在,即主线程
线程是“系统调度”的基本单位,进程是“资源分配”的基本单位。同一个进程中的线程共用一份资源。
线程不是越多越好,过多的线程可能会造成冲突(线程安全问题)。
多个线程之间会相互影响,一个线程崩溃会连带其他线程,多个进程之间有隔离性,一般不会相互影响。
并行与并发
并行:多个核心,每个核心执行一个线程,所有核心同时执行
并发:一个核心按照“分时复用”之类的调度规则,让多个线程在一个核心上快速地“一个接一个”执行,由于速度足够快,在宏观上像是“同时执行”
1.2多线程程序
线程是操作系统提供的概念,操作系统提供API为程序员调用,不同系统的API是不同的,JVM已经封装好了这些API,Thread标准类库就负责多线程的开发
一段简单代码:
1.Thread类早已在Java.lang包中不需要导入,就比如String
2.继承主要是是为了重写run方法
3.调用start会在进程内部创建新的线程,执行run方法
4.每个进程都有一个主线程,这里的main就是
5.类似run这种手动定义的但没有手动调用,最后却被系统/库/框架调用的方法叫做“回调函数”
//继承于Thread

class MyThread extends Thread{
//run方法中写线程需要执行的内容
    public void run() {

        System.out.println("线程执行");
    }
}
public class Test41 {
    public static void main(String[] args) {
        System.out.println("主线程执行");
        MyThread t1 = new MyThread();
        //通过start来调t1的run方法
        t1.start();


    }
}
试运行此代码,观察不同线程之间的运行
class MyThread extends Thread{
    public void run() {
        while(true){
            System.out.println("线程执行");
        }

    }
}
public class Test41 {
    public static void main(String[] args) {
        System.out.println("主线程执行");
        MyThread t1 = new MyThread();

        t1.start();
        while(true){
            System.out.println("主线程执行");
        }


    }
}
可以用sleep使线程等待,记得要捕获异常
class MyThread extends Thread{
    public void run() {

        while(true) {
            System.out.println("线程执行");
            try {
                sleep(1000);
            } catch (InterruptedException e) {
                throw new RuntimeException(e);
            }


        }

    }

}
public class Test41 {
    public static void main(String[] args) throws InterruptedException {
        System.out.println("主线程执行");
        MyThread t1 = new MyThread();

        t1.start();
        while(true){

            System.out.println("主线程执行");
            Thread.sleep(1000);
        }


    }
}
可以看到多个线程之间,谁先在cpu上执行是“不确定的”,调度顺序取决于操作系统里的调度器实现,调度器也有自己的一套规则,在宏观上近似为“随机”。
如果你想可视化线程可以借助jdk,bin包里面的jconsole程序
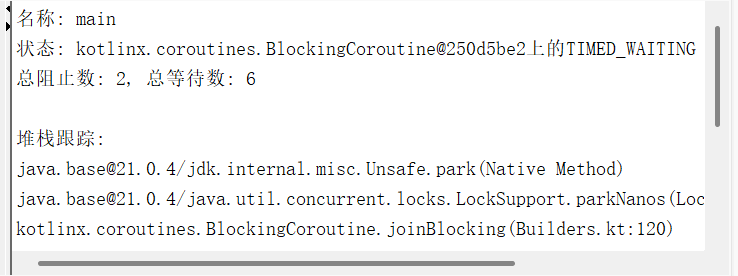
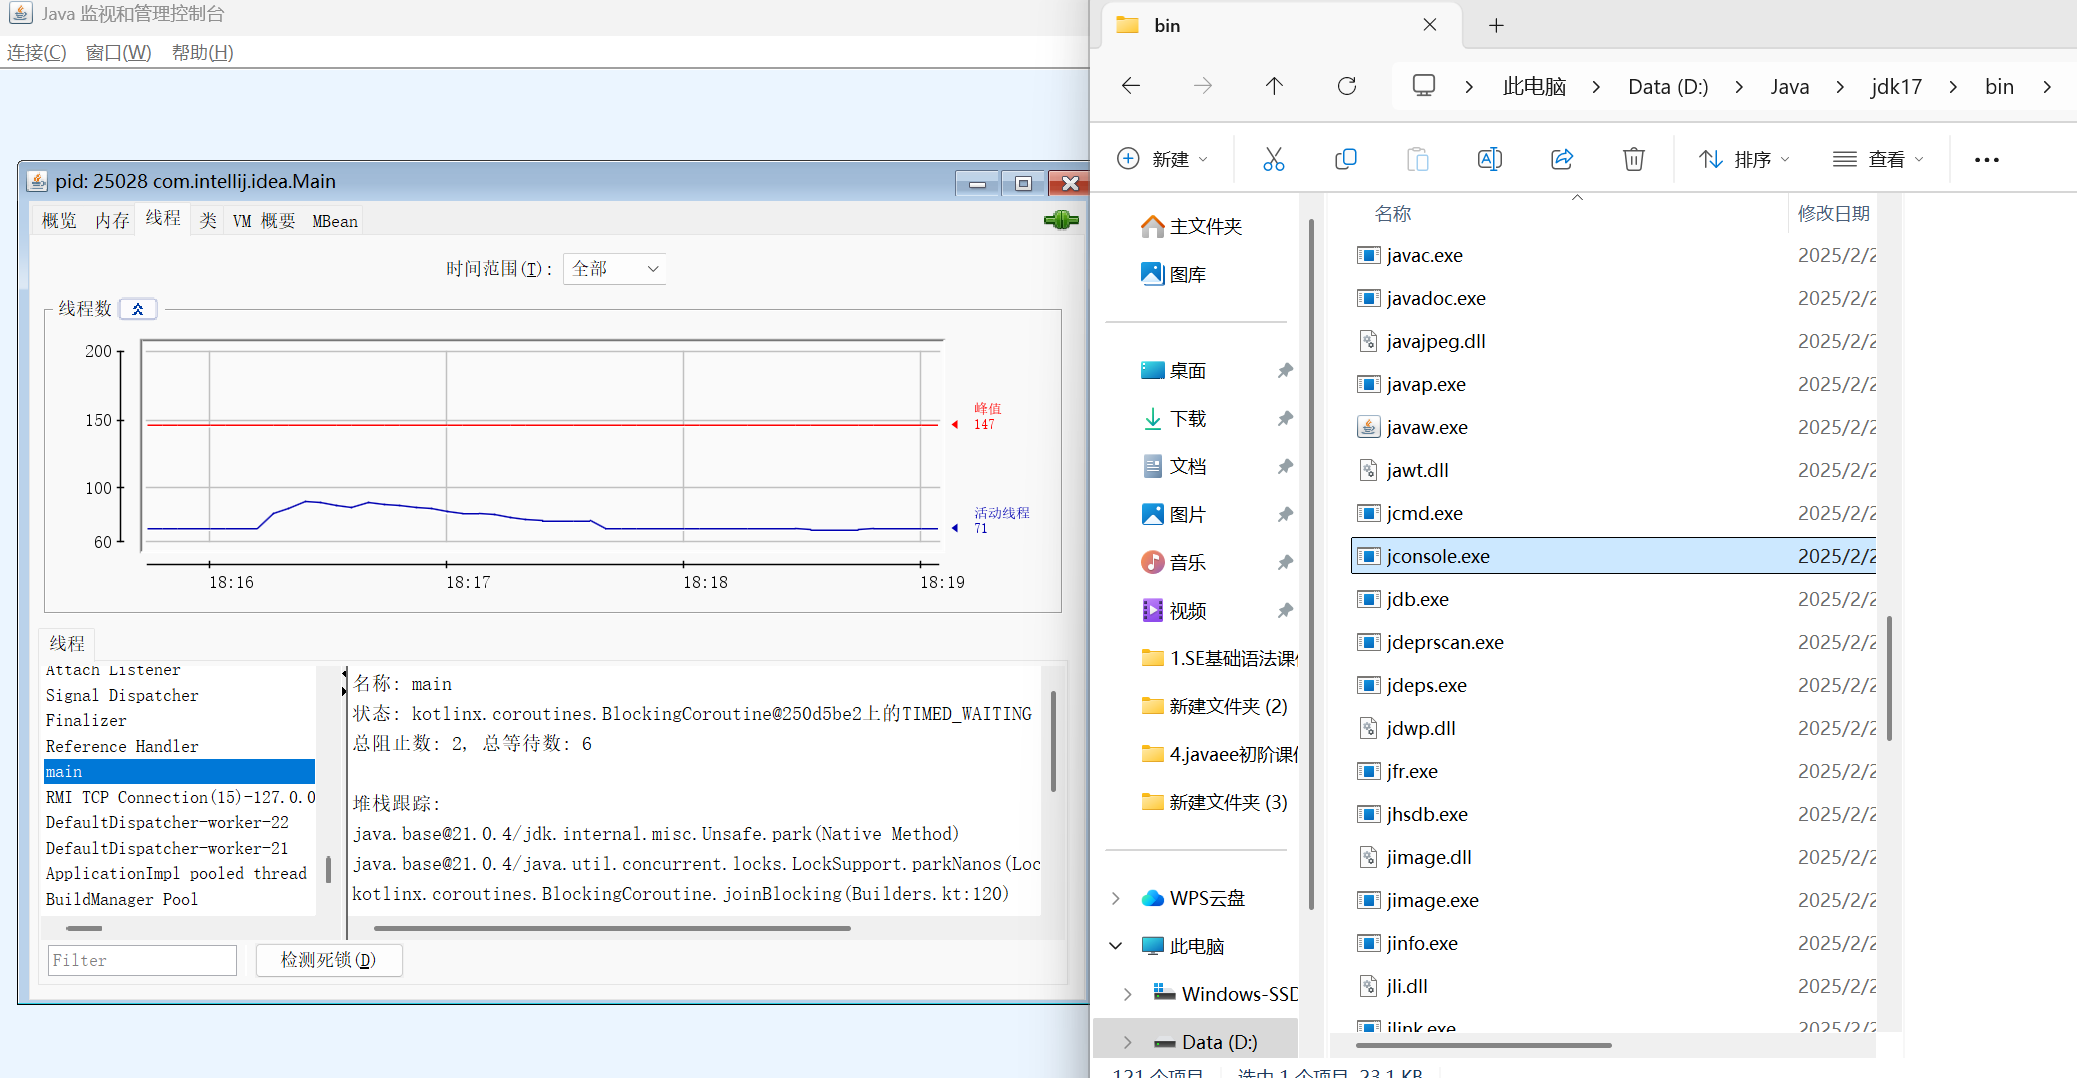 左边就是我自己程序的main线程的具体信息,堆栈跟踪就是调用栈,对检查代码异常很有帮助
1.3线程的创建
线程有五种创建方式
1.继承Thread,重写run
class MyThread extends Thread{
    public void run() {

        while(true) {
            System.out.println("线程执行");
            try {
                sleep(1000);
            } catch (InterruptedException e) {
                throw new RuntimeException(e);
            }


        }

    }

}
public class Test41 {
    public static void main(String[] args) throws InterruptedException {
        System.out.println("主线程执行");
        MyThread t1 = new MyThread();

        t1.start();
        while(true){

            System.out.println("主线程执行");
            Thread.sleep(1000);
        }


    }
}
2.实现Runnable,重写run
这里通过Thread创建线程,线程要执行的的任务是通过Runnable描述的,而不是Thread
class MyRunnable implements Runnable{
    public void run() {
        while(true) {
            System.out.println("线程执行");
            try {Thread.sleep(1000);}
            catch (InterruptedException e){
                throw new RuntimeException(e);
            }
        }
    }
}

public class Test41 {
    public static void main(String[] args) throws InterruptedException {
        System.out.println("主线程执行");

        MyRunnable myRunnable = new MyRunnable();
        Thread thread = new Thread(myRunnable);//通过Thread创建线程
        thread.start();
        while(true){

            System.out.println("主线程执行");
            Thread.sleep(1000);
        }
    }
}
3.匿名内部类创建 Thread ⼦类对象
public class Test41 {
    public static void main(String[] args) throws InterruptedException {
       //匿名内部类
        Thread t =new Thread(){
            public void run(){
                while(true) {
                    System.out.println("线程执行");
                    try {Thread.sleep(1000);}
                    catch (InterruptedException e){
                        throw new RuntimeException(e);
                    }
                }
            }
        };
        t.start();
        while(true){

            System.out.println("主线程执行");
            Thread.sleep(1000);
        }
    }
}
4.匿名内部类创建 Runnable ⼦类对象
public class Test41 {
    public static void main(String[] args) throws InterruptedException {


        Thread t = new Thread(new Runnable() {
            public void run() {
                while(true) {
                    System.out.println("线程执行");
                    try {
                        Thread.sleep(1000);
                    } catch (InterruptedException e) {
                        throw new RuntimeException(e);
                    }
                }
            }
        });
        t.start();
        while(true){

            System.out.println("主线程执行");
            Thread.sleep(1000);
        }
    }
}
5.基于lambda表达式(本质是匿名内部类的简化,lambda重点不是写类而是类的方法)
public class Test41 {
    public static void main(String[] args) throws InterruptedException {

        Thread t = new Thread(()-> System.out.println("666"));
        t.start();
        while(true){

            System.out.println("主线程执行");
            Thread.sleep(1000);
        }
    }
}
二、Thread类和常见方法
2.1Thread类构造方法
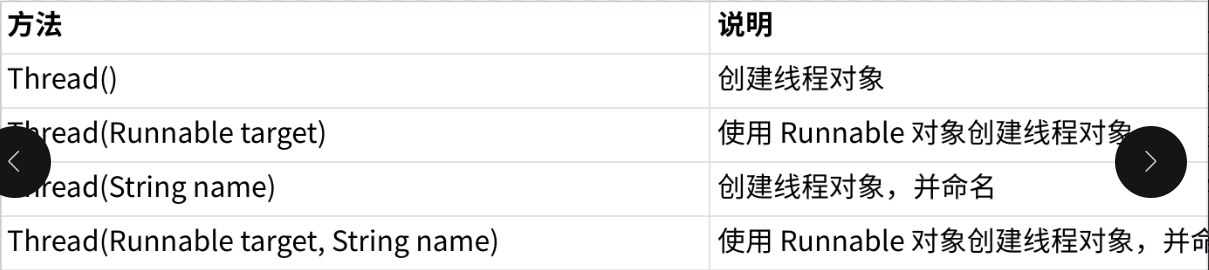
这样就可以给线程起个名字,起名字是为了方便调试
public class Test41 {
    public static void main(String[] args) throws InterruptedException {

        Thread t=new Thread(new Runnable() {
            public void run() {
                System.out.println("666");
            }
        },"qwq");
        t.start();

        while(true){

            System.out.println("主线程执行");
            Thread.sleep(1000);
        }
    }
}
2.2Thread常见属性
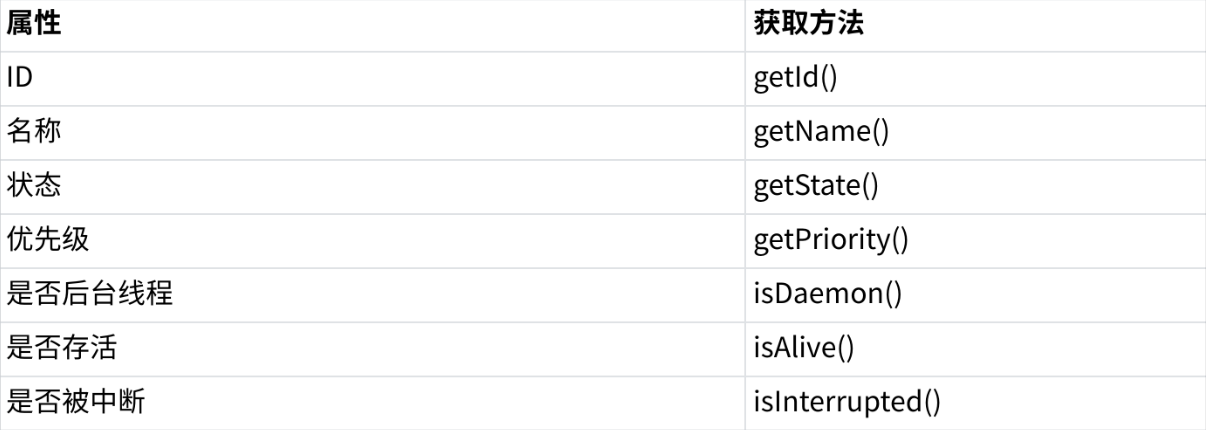
对于getId,得到的是Thread对象的标识,而不是线程的标识,Thread对象的标识是JVM自定的。
public class Test41 {
    public static void main(String[] args) throws InterruptedException {

        Thread thread=new Thread(new Runnable() {
            public void run() {
                System.out.println("666");

            }
        },"qwq");
        System.out.println(thread.getName()+thread.getId());
        System.out.println(thread.getState());
        System.out.println(thread.getPriority());
        thread.start();

    }
}
对于前台线程和后台线程:
前台线程在执行过程中能够阻止进程的结束,后台线程不能阻止且会被前台线程带来的进程结束而结束,多个前台线程必须全部结束后进程才会结束,main线程就是前台线程
试运行如下代码:
public class Test41 {
    public static void main(String[] args) throws InterruptedException {

        Thread thread=new Thread(new Runnable() {
            public void run() {
               while(true){
                   System.out.println("666");
                   try {
                       Thread.sleep(1000);
                   } catch (InterruptedException e) {
                       throw new RuntimeException(e);
                   }
               }

            }
        },"qwq");

        thread.setDaemon(true);//将thread对应线程设为后台线程
        thread.start();//代码运行后根本来不及打印

    }
}
线程存活示例,试运行此代码
public class Test41 {
    public static void main(String[] args) throws InterruptedException {

        Thread thread=new Thread(new Runnable() {
            public void run() {
               for(int i=0;i<3;i++){
                   System.out.println("666");
                   try {
                       Thread.sleep(1000);
                   } catch (InterruptedException e) {
                       throw new RuntimeException(e);
                   }
               }

            }
        },"qwq");

        System.out.println(thread.isAlive());
        thread.start();
        Thread.sleep(1000);
        System.out.println(thread.isAlive());
        Thread.sleep(3000);
        System.out.println(thread.isAlive());
    }
}
2.3线程的启动-start
start和run的区别:
run是对线程所要执行的任务的描述
start则是用来调用系统函数,在系统内核创建PCB加入链表,根据不同系统调用不同API,创建线程后执行run方法。
一个Thread对象只能调用一次start
2.4线程的终止
Java中的线程终止是比较温柔的,是线程A去让线程B运行结束而终止,而不是让B中断
一种简单粗暴的终止,通过主线程修改while条件达到终止目的。
这里用成员变量A,而不另起一个局部变量的原因就是lambda表达式的变量捕获,变量捕获只能捕获同作用域下的final修饰的变量或者实际没有修改的变量,但是A修改了所以捕获不成功,所以就用内部类特性创建成员变量A
public class Test41 {
    private static boolean A = false;//匿名内部类能够访问外部类成员
    public static void main(String[] args) throws InterruptedException {


        Thread thread = new Thread(()->{
                while(!A){
                    System.out.println("线程执行");
                    try {
                        Thread.sleep(1000);
                    } catch (InterruptedException e) {
                        throw new RuntimeException(e);
                    }
                }
            System.out.println("线程结束");
        });

        thread.start();
        Thread.sleep(1000);
        System.out.println("阻止线程");
        A = true;
    }
}
使用interrupt终止,通过interrupt设置标志位
public class Test41 {

    public static void main(String[] args) throws InterruptedException {

        Thread thread = new Thread(()->{
                Thread currentThread = Thread.currentThread();
                while(!currentThread.isInterrupted()){
                    System.out.println("线程执行");
                    try {
                        Thread.sleep(1000);
                    } catch (InterruptedException e) {
                        throw new RuntimeException(e);
                    }
                }
            System.out.println("线程结束");
        });

        thread.start();
        Thread.sleep(2000);
        System.out.println("阻止线程");
        thread.interrupt();

    }
}
运行此代码会进入catch,因为主线程执行快,可能在thread线程sleep到900ms时就进行了中断,这时线程被提前唤醒因而异常
但是修改为如下代码后,程序依然不断执行,这是因为线程sleep被唤醒后会重新设置interruptted标志位,这修改了就跟没改一样,如果想结束循环,就在catch里加上break或者return
public class Test41 {

    public static void main(String[] args) throws InterruptedException {

        Thread thread = new Thread(()->{
                Thread currentThread = Thread.currentThread();
                while(!currentThread.isInterrupted()){
                    System.out.println("线程执行");
                    try {
                        Thread.sleep(1000);
                    } catch (InterruptedException e) {
                        /*throw new RuntimeException(e);*/
                        System.out.println("catch执行");
                    }
                }
            System.out.println("线程结束");
        });

        thread.start();
        Thread.sleep(2000);
        System.out.println("阻止线程");
        thread.interrupt();

    }
}
2.5线程等待-join
在a中调用b.join,就是让a等待b结束后,a在执行。你可以理解为“b在插队”但实际操作系统内核不是这样就是了
简单示例:
public class Test41 {

    public static void main(String[] args) throws InterruptedException {

        Thread thread = new Thread(()->{
                Thread currentThread = Thread.currentThread();
                for (int i=0;i<3;i++){
                    System.out.println("线程执行");
                    try {
                        Thread.sleep(1000);
                    } catch (InterruptedException e) {
                        throw new RuntimeException(e);

                    }
                }
            System.out.println("线程结束");
        });
        System.out.println("main");
        thread.start();
        thread.join();
        System.out.println("main");


    }
}
如果代码修改成这样,重复运行多次发现不同线程被同一线程等待,执行线程的先后没有差别
public class Test41 {

    public static void main(String[] args) throws InterruptedException {

        Thread thread = new Thread(()->{
                Thread currentThread = Thread.currentThread();
                for (int i=0;i<3;i++){
                    System.out.println("线程执行");
                    try {
                        Thread.sleep(1000);
                    } catch (InterruptedException e) {
                        throw new RuntimeException(e);

                    }
                }
            System.out.println("线程结束");
        });
        Thread thread1 = new Thread(()->{

            for (int i=0;i<3;i++){
                System.out.println("线程1执行");
                try {
                    Thread.sleep(1000);
                } catch (InterruptedException e) {
                    throw new RuntimeException(e);

                }
            }
            System.out.println("线程结束");
        });
        System.out.println("main");
        thread.start();
        thread1.start();
        thread1.join();
        thread.join();
        System.out.println("main");


    }
}
如果是这样,就能实现不同线程的先后执行了
public class Test41 {

    public static void main(String[] args) throws InterruptedException {

        Thread thread = new Thread(()->{

                for (int i=0;i<3;i++){
                    System.out.println("线程执行");
                    try {
                        Thread.sleep(1000);
                    } catch (InterruptedException e) {
                        throw new RuntimeException(e);

                    }
                }
            System.out.println("线程结束");
        });
        Thread thread1 = new Thread(()->{
            try {
                thread.join();//加入等待
            } catch (InterruptedException e) {
                throw new RuntimeException(e);
            }
            for (int i=0;i<3;i++){
                System.out.println("线程1执行");
                try {
                    Thread.sleep(1000);
                } catch (InterruptedException e) {
                    throw new RuntimeException(e);

                }
            }
            System.out.println("线程结束");
        });
        System.out.println("main");
        thread.start();
        thread1.start();
        thread1.join();
        thread.join();
        System.out.println("main");


    }
}
上述join是无参版本,就是“死等”,只有等待的线程未结束,就要一直等
加上等待时间就不必死等了

2.6获取当前对象的引用和线程休眠
线程对象获取:

上面已经用过了
public class ThreadDemo {
 public static void main(String[] args) {
        Thread thread = Thread.currentThread();
         System.out.println(thread.getName());
         }
}
线程的休眠:

就是上面用的sleep,线程休眠实质上是让线程先不参与cpu调度,先把资源让给其他线程,如果某个程序cpu占用过高就需要sleep
三、线程的状态
线程状态有六种:
NEW:安排任务,没有行动,对象已经有了,内核线程还没有
RUNNABLE:就绪,正在工作中或即将开始工作
TERMINATED:对象还在,内核线程已经销毁
WAITING:阻塞,没有超时时间的阻塞
TIMED_WAITING:阻塞,有超时时间的阻塞
BLOCKED:阻塞,锁导致的阻塞
后续内容待补充:线程状态的转换。
四、线程安全
4.1线程不安全简单示例
有如下代码
试运行一下结果是不是20000
public class Test41 {
    private static int count=0;
    public static void main(String[] args) throws InterruptedException {

        Thread thread = new Thread(()->{

                for (int i=0;i<10000;i++){
                   count++;
                }
            System.out.println("线程结束");
        });
        Thread thread1 = new Thread(()->{

            for (int i=0;i<10000;i++){
               count++;
            }
            System.out.println("线程结束");
        });

        thread.start();
        thread1.start();
        thread1.join();
        thread.join();
        System.out.println(count);


    }
}
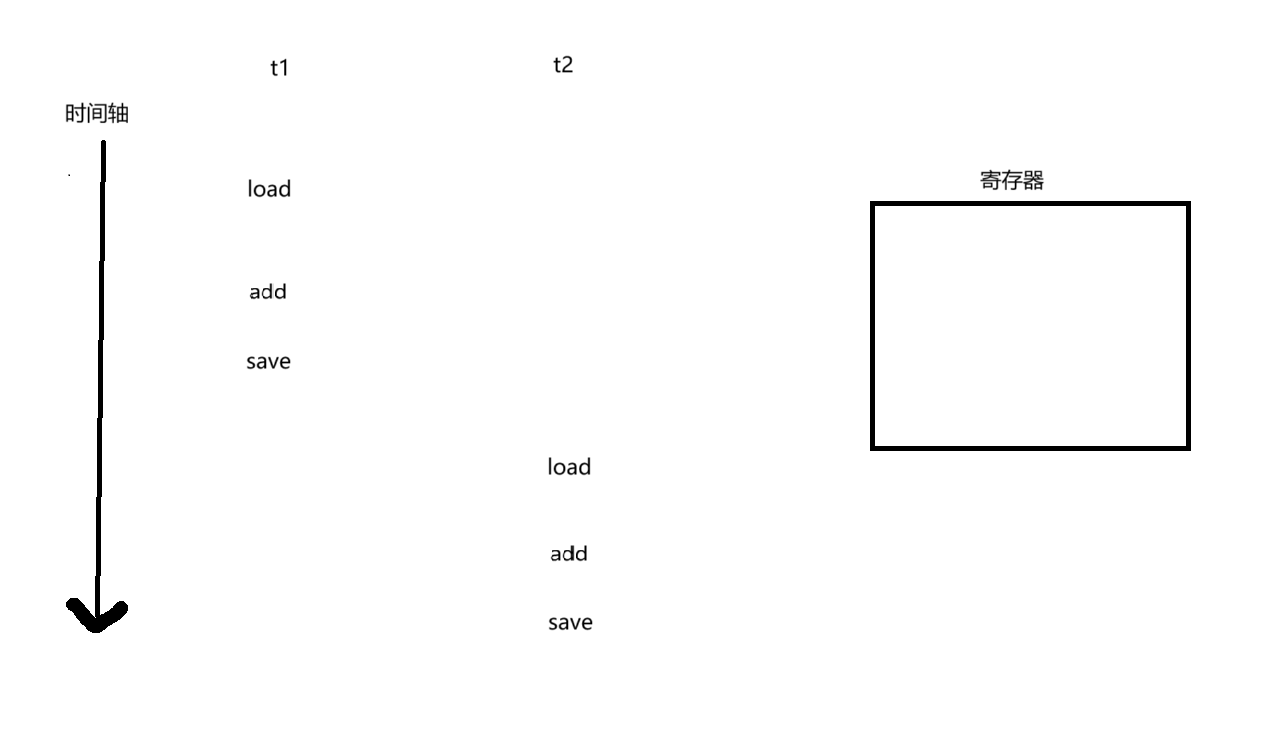
结果并非是20000,原因:在微观上系统内核在处理运算时要进行三步
load——把内存数据读取到cpu寄存器
add——cpu寄存器数据+1
save——把寄存器值写回内存
cpu的执行是抢占式执行(并发)
简写运算处理示例
正常状态:
首先t1,内存初始为0,load到寄存器,寄存器为0,寄存器add,寄存器为1,save回内存,内存为1,t2重复上述操作,内存为2。这样就可以正常+
由于并发执行在cpu的调度上是抢占式执行,也可能会出现其他情况:
首先t1执行load和add寄存器为1,内存为0t2执行load后寄存器重变为0,add后为1
最后save内存为1
明显变成“1+1=1”了
那如果更夸大点
甚至会出现“1+1<1”的情况
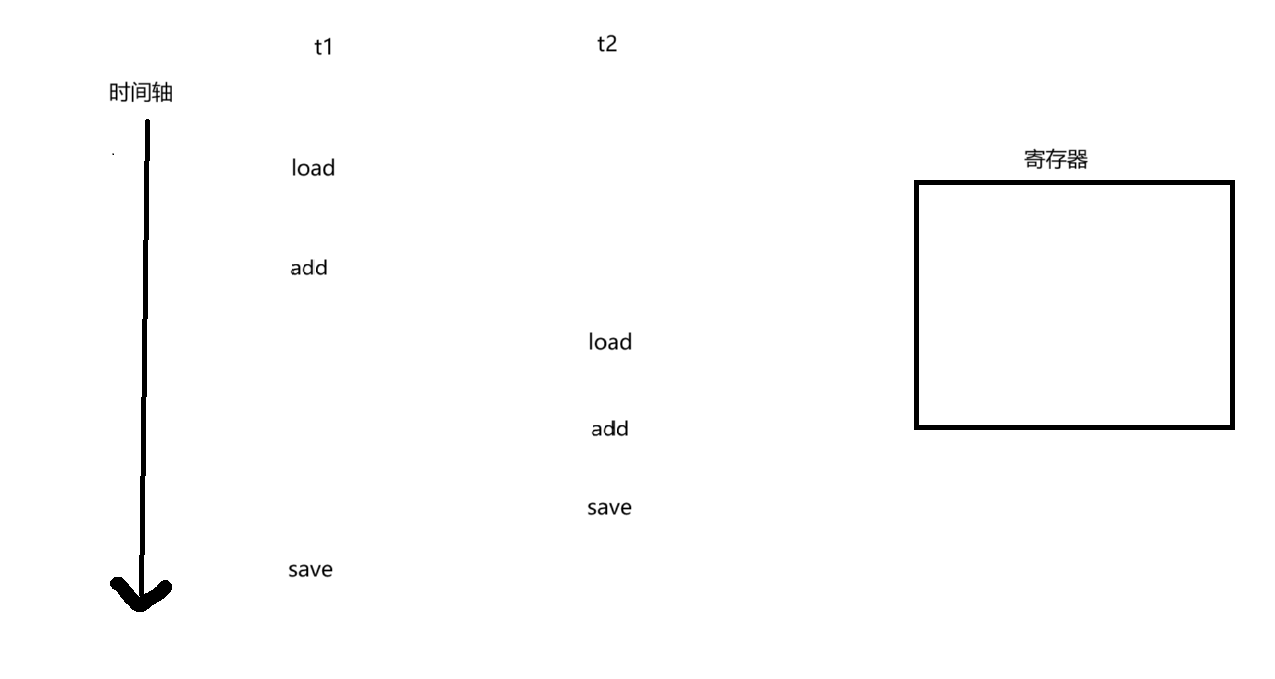
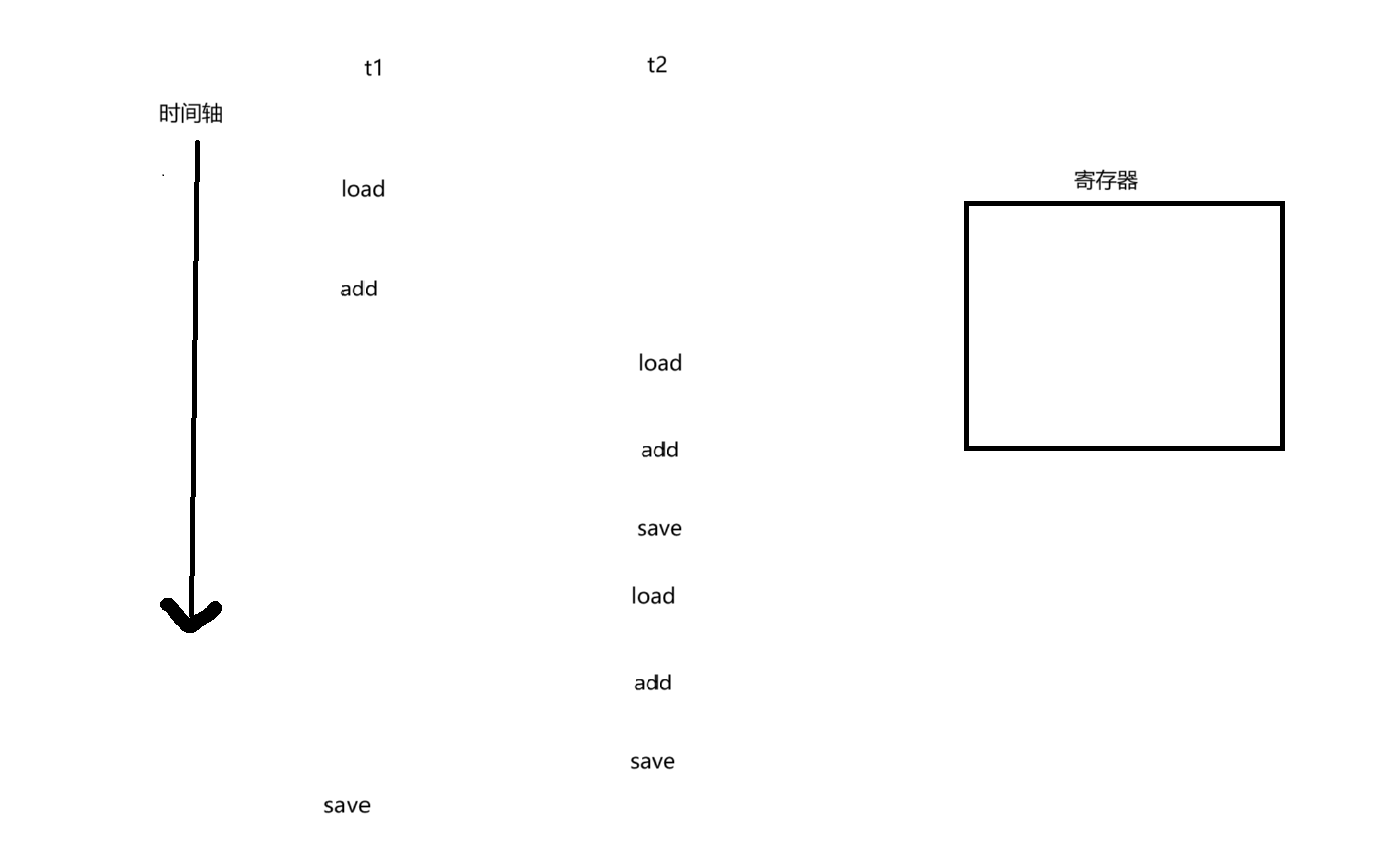
这就是线程不安全
4.2线程不安全的原因及解决(加锁)
线程不安全有如下几个原因,后面也附上相应解决方案。
1.线程在操作系统中,随机调度,抢占式执行(根本)
这个是操作系统的东西,单靠程序员基本无法解决
2.多个线程,同时修改同一个变量
可能实现,通过直接修改代码,但大部分情况不能
3.修改操作不是“原子”的
解决线程安全的主要办法:把“非原子”操作改成“原子”的,主要方法就是加锁
4.内存可见性(可⻅性指, ⼀个线程对共享变量值的修改,能够及时地被其他线程看到)
5.指令重排序(了解即可)
五、synchronized关键字-锁
5.1锁的互斥
先看加锁结果,这样的输出就是2w了
public class Test41 {
    private static int count=0;
    private static Object lock = new Object();
    public static void main(String[] args) throws InterruptedException {

        Thread thread = new Thread(()->{

                for (int i=0;i<10000;i++){
                    synchronized(lock){
                        count++;
                    }

                }
            System.out.println("线程结束");
        });
        Thread thread1 = new Thread(()->{

            for (int i=0;i<10000;i++){
                synchronized(lock){
                    count++;
                }

            }
            System.out.println("线程结束");
        });

        thread.start();
        thread1.start();
        thread1.join();
        thread.join();
        System.out.println(count);


    }
}
锁原理(互斥):
没进行锁之前,两个线程是这样的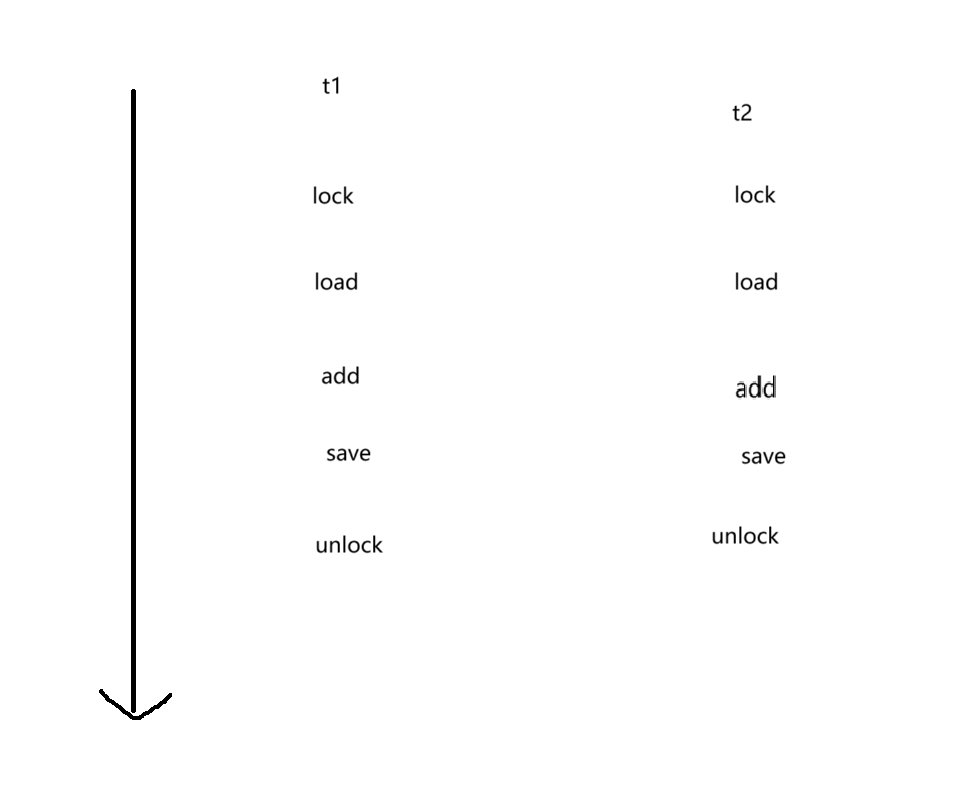
锁之后,由于t2无法拿到资源而进入到了阻塞状态,必须等t1执行结束后才能开始t2
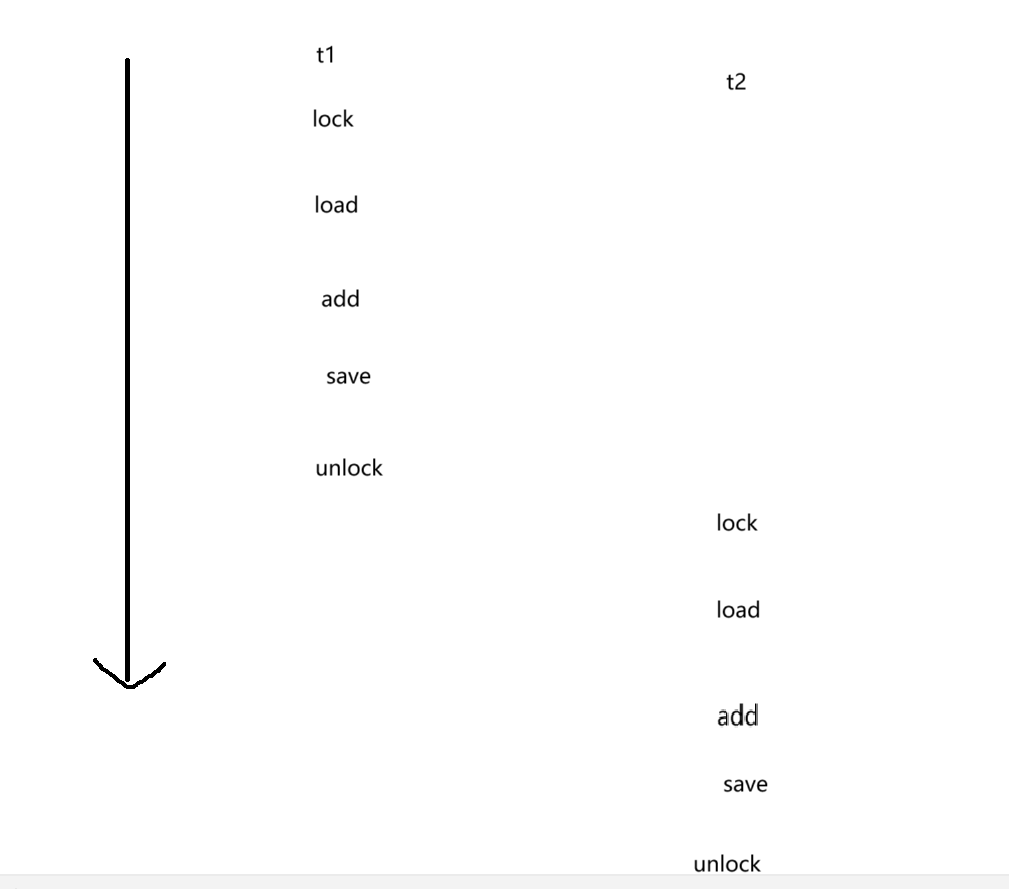
上述是用同一个锁对象的情况,用不同锁对象就好比如,一个房间有两个门,有两把锁,一个门上锁跟另外一个门上锁不相干。
具体用法:
1.synchronized(){}圆括号指定对象
观察如下代码,锁对象的对象必须是Object类及其子类,所以int类型会报错,锁对象的对象并不重要,重要的是是否为同一个对象,是同一个对象就说明是共同用一把锁。
public class Test41 {
    private static int count=0;
    private static int a=0;//int类型
    private static String b="s";//String类型
    private static Object lock = new Object();
    public static void main(String[] args) throws InterruptedException {

        Thread thread = new Thread(()->{

                for (int i=0;i<10000;i++){
                    synchronized(b){
                        count++;
                    }

                }
            System.out.println("线程结束");
        });
        Thread thread1 = new Thread(()->{

            for (int i=0;i<10000;i++){
                //报错
                synchronized(a){
                    count++;
                }

            }
            System.out.println("线程结束");
        });

        thread.start();
        thread1.start();
        thread1.join();
        thread.join();
        System.out.println(count);


    }
}
如果锁对象不同也不能实现线程安全,如下代码运行结果依旧不是20000
public class Test41 {
    private static int count=0;
    private static int a=0;
    private static String b="s";
    private static Object lock = new Object();
    public static void main(String[] args) throws InterruptedException {

        Thread thread = new Thread(()->{

                for (int i=0;i<10000;i++){
                    synchronized(lock){
                        count++;
                    }

                }
            System.out.println("线程结束");
        });
        Thread thread1 = new Thread(()->{

            for (int i=0;i<10000;i++){
                synchronized(b){
                    count++;
                }

            }
            System.out.println("线程结束");
        });

        thread.start();
        thread1.start();
        thread1.join();
        thread.join();
        System.out.println(count);


    }
}
2.synchronized修饰方法
class Count{
    static int count=0;
    //关键在这
    static synchronized public void add(){
        count++;
    }
}


public class Test41 {

    private static int a=0;
    private static String b="s";
    private static Object lock = new Object();
    public static void main(String[] args) throws InterruptedException {


        Thread thread = new Thread(()->{

                for (int i=0;i<10000;i++){
                   Count.add();

                }
            System.out.println("线程结束");
        });
        Thread thread1 = new Thread(()->{

            for (int i=0;i<10000;i++){
               Count.add();

            }
            System.out.println("线程结束");
        });

        thread.start();
        thread1.start();
        thread1.join();
        thread.join();
        System.out.println(Count.count);

    }
}
当然你也可以这样写,效果是等同的,运用反射
class Count{
    static int count=0;
    static  public void add(){
        synchronized (Count.class){
            count++;
        }

    }
}
3.上面是静态方法,那肯定就有普通方法,普通方法大体和静态的运用一样,改为this即可
 synchronized (this){
            count++;
        }
注意:锁不是随便加的,它涉及到性能的问题,加不加锁要看实际
5.2synchronized可重入特性和第一种死锁
有这样一串代码,如果对count加两次锁会发生什么?
谈到锁的互斥特性,如果第一把锁锁住count,那么当第二把锁去锁住count时将会被阻塞等待,那么第二把锁被阻塞时就无法执行count++的操作,这就形成死锁了,程序永远无法执行下去了
可事实应当如此吗?
public class Test42 {
    static int count=0;
    private static Object lock = new Object();


    public static void main(String[] args) throws InterruptedException {

        Thread t1 = new Thread(()->{
            for(int i=0;i<=3;i++){
                synchronized(lock){
                    synchronized(lock){
                        count++;
                    }

                }

            }
            System.out.println("666");
        });
        t1.start();
        t1.join();
        System.out.println(count);

    }

}
最后结果是可以运行的,并没有出现死锁的情况,其实是synchronized对这个情况做了特殊处理,你如果用C++/Python去写就会形成死锁。
可重入锁原理:对被占用锁做额外记录,记录哪个线程对其加锁。如果是同一线程内的,则直接“放行”。就比如上述代码,第一次确实加锁了,但是第二次加锁时发现是同一线程加的锁就直接放行不进行加锁执行count++。
5.3第二种死锁
有这样一种加锁方式:
t1对A加锁,t2对B加锁
t1在不释放A的前提下,对B加锁;t2在不释放B的前提,对A加锁。
t1,t2互不相让,这样下去也将永无止境。
用代码解释:
试运行一下,看看结果如何
public class Test42 {
    static int count1=0;
    static int count2=0;
    private static Object lock1 = new Object();
    private static Object lock2 = new Object();

    public static void main(String[] args) throws InterruptedException {

        Thread t1 = new Thread(()->{
            for(int i=0;i<=3;i++){
                synchronized(lock1){
                        count1++;
                    System.out.println("t1对1加锁成功");
                    synchronized(lock2){
                        System.out.println("t2对1加锁成功");
                        count2++;
                    }

                }

            }
            System.out.println("666");
        });
        Thread t2 = new Thread(()->{
            for(int i=0;i<=3;i++){
                synchronized(lock2){
                    System.out.println("t2对2加锁成功");
                    count2++;
                    synchronized(lock1){
                        System.out.println("t2对1加锁成功");
                        count1++;
                    }
                }
            }
        });
        t1.start();
        t2.start();
        t1.join();
        t2.join();
        System.out.println(count1+" "+count2);

    }

}
结果发现代码陷入僵局,谁也不让谁
5.4死锁的必要条件及解决
形成死锁有如下几个必要条件
系统层:
1.锁是互斥的
2.锁是不可被抢占的
代码层:
3.请求和保持,线程1在不释放A的情况下去锁B
4.循环等待
解决死锁目前只能针对代码层:
对于3,可以尽量去释放已占有资源,再去加锁
用代码解释:
可以的情况将锁2从1中分离出,正常释放锁
  Thread t1 = new Thread(()->{
            for(int i=0;i<=3;i++){
                synchronized(lock1){
                        count1++;
                    System.out.println("t1对1加锁成功");


                    }
                synchronized(lock2){
                        System.out.println("t1对2加锁成功");
                        count2++;
                    }

            }
            System.out.println("666");
        });
对于4,按照特定的规则去加锁,比如加锁必须按照先加编号小的锁,在加编号大的锁
用代码解释:
加锁时,按编号从小到大
public class Test42 {
    static int count1=0;
    static int count2=0;
    private static Object lock1 = new Object();
    private static Object lock2 = new Object();

    public static void main(String[] args) throws InterruptedException {

        Thread t1 = new Thread(()->{
            for(int i=0;i<=3;i++){
                synchronized(lock1){
                        count1++;
                    System.out.println("t1对1加锁成功");
                    synchronized(lock2){
                        System.out.println("t1对2加锁成功");
                        count2++;
                    }

                }

            }
            System.out.println("666");
        });
        Thread t2 = new Thread(()->{
            for(int i=0;i<=3;i++){
                synchronized(lock1){
                    System.out.println("t2对2加锁成功");
                    count2++;
                    synchronized(lock2){
                        System.out.println("t2对1加锁成功");
                        count1++;
                    }
                }
            }
        });
        t1.start();
        t2.start();
        t1.join();
        t2.join();
        System.out.println(count1+" "+count2);

    }

}
针对死锁也可以使用银行家算法,但是那仅限于理论,因为银行家算法比较复杂,写算法的难度比解决死锁大,不适合解决实际问题。
六、volatile关键字
volatile主要用来解决线程安全问题其4——内存可见性问题。
6.1内存可见性
先看代码,我打算通过线程t2修改n的值来使t1结束,用如下代码能不能做到呢
public class Test43 {
    private static int n=0;
    public static void main(String[] args) throws InterruptedException {
        Thread t1 = new Thread( ()->{
           while(n==0){

           }
            System.out.println("t1结束");
        });

        Thread t2 = new Thread( ()->{
            try {
                Thread.sleep(3000);
            } catch (InterruptedException e) {
                throw new RuntimeException(e);
            }
            n++;
            System.out.println("t2执行结束"+n);

        });
        t1.start();
        t2.start();
        t1.join();
        t2.join();

    }
}
试运行一下,发现即使n已经改变了但是t1仍然在执行,这不奇了怪了吗
其实这就是内存可见性问题
原因:
n==0判断操作在操作系统层要执行两步
1.从内存读取数据到寄存器
2.比较寄存器和0的值
1和2相比,1的操作速度很慢
JVM在运行时发现:
每次循环都要执行1操作,每次执行1操作结果不变
JVM为了优化代码就在每次循环中不在读取内存的值,而是直接读取寄存器/cache的结果
当执行t2时,n改变了,但是对于t1来说,t1的每次循环不会去读取内存而感知不到n的改变,内存对n的修改对t1来说是“不可见的”
这就引起内存可见性问题
内存可见性问题的本质就是JVM对代码的优化在多线程中优化到了不该优化的部分
6.2volatile的应用
volatile的作用就是告诉JVM这个变量是“易变”的,将来会发生修改的,让JVM不要优化
private static volatile int n=0;
在变量前加上volatile修饰即可
试运行看看能否成功
public class Test43 {
    private static volatile int n=0;
    public static void main(String[] args) throws InterruptedException {
        Thread t1 = new Thread( ()->{
           while(n==0){

           }
            System.out.println("t1结束");
        });

        Thread t2 = new Thread( ()->{
            try {
                Thread.sleep(3000);
            } catch (InterruptedException e) {
                throw new RuntimeException(e);
            }
            n++;
            System.out.println("t2执行结束"+n);

        });
        t1.start();
        t2.start();
        t1.join();
        t2.join();

    }
}
6.3volatile不保证原子性
这里仅作告知,synchronized保证原子性,volatile保证内存可见性。
七、wait和notify
wait和notify主要解决的是线程饿死的问题。
7.1何为线程饿死
假设有三个线程t1,t2,t3它们仨共同去拿资源A,这时t1先去对A上锁,发现A已经被拿完了,需要等待补充再去拿,t1就放开锁出来了,但是代码的逻辑是如果线程没拿到A就再去拿直到拿到为止,这时t1就又上锁再去拿,反反复复t2,t3就得一直等待,直到“饿死”。
显然,目前的解决办法就是让线程明白A资源还没有,你得等一会。这样有用到了wait,wait的作用就是让t1知道A没东西后就去等着,别去抢了。那什么时候等完呢?就是等到A有资源了然后去notify(通知)t1,这时候t1在参与锁去拿资源。
7.2wait的使用
wait的原理是同步的两个原子操作,先释放锁,在阻塞等待等通知。
任意Object类及其子类对象都可以调用wait
也就是说wait必须要在锁里面使用,记得捕获异常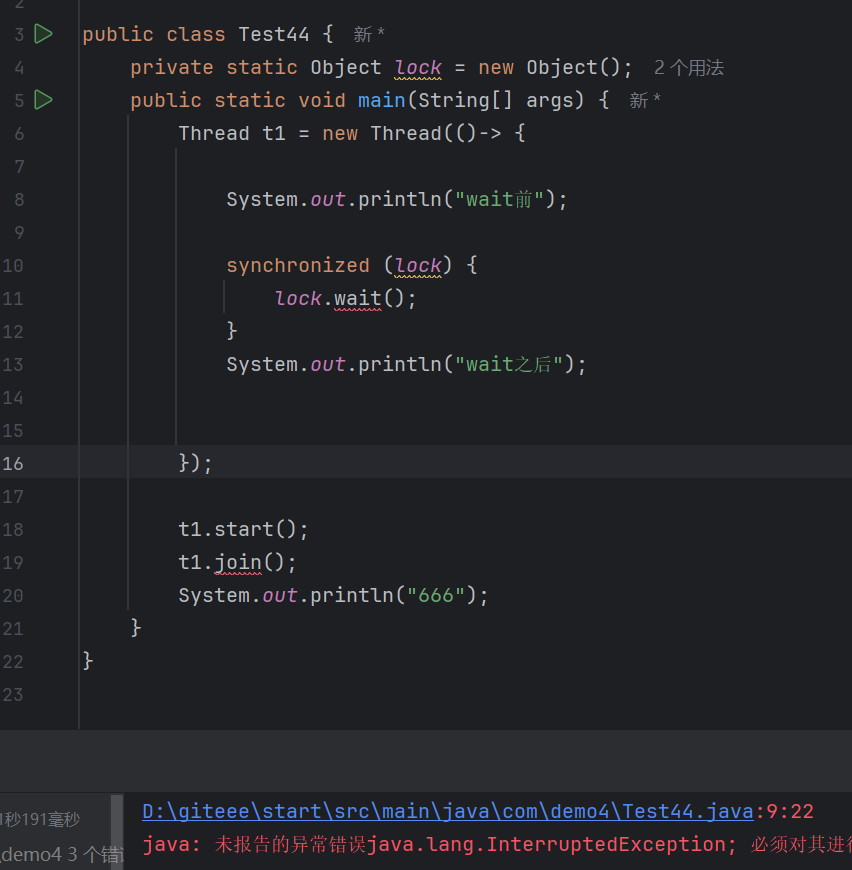
试运行一下,看看是不是被阻塞了
public class Test44 {
    private static Object lock = new Object();
    public static void main(String[] args) throws InterruptedException {
        Thread t1 = new Thread(()-> {

            System.out.println("wait前");

            synchronized (lock) {
                try {
                    lock.wait();
                } catch (InterruptedException e) {
                    throw new RuntimeException(e);
                }
            }
            System.out.println("wait之后");


        });

        t1.start();
        t1.join();
        System.out.println("666");
    }
}
错误代码示例,第一个wait处于没有锁的状态,无法执行wait操作,因而报错
public class Test44 {
    private static Object lock = new Object();
    public static void main(String[] args) throws InterruptedException {
        Thread t1 = new Thread(()-> {

            System.out.println("wait前");
            //错误点在这
            try {
                lock.wait();
            } catch (InterruptedException e) {
                throw new RuntimeException(e);
            }
            //这一区域
            synchronized (lock) {
                try {
                    lock.wait();
                } catch (InterruptedException e) {
                    throw new RuntimeException(e);
                }
            }
            System.out.println("wait之后");


        });

        t1.start();
        t1.join();
        System.out.println("666");
    }
}
wait操作默认“死等”,但你也可以用wait(1000),这样的类似操作只让它等1秒。
7.3notify的使用
想唤醒哪个锁对应的线程,就用对应的锁调用notify,下面代码就是用t2线程去唤醒t1线程,同样notify也必须在锁内调用,不然没意义(t1有锁这时候notify,肯定不能唤醒wait)
public class Test44 {
    private static Object lock = new Object();
    public static void main(String[] args) throws InterruptedException {
        Thread t1 = new Thread(()-> {

            System.out.println("wait前");

            synchronized (lock) {
                System.out.println("3");
                try {
                    lock.wait();
                } catch (InterruptedException e) {
                    throw new RuntimeException(e);
                }
                System.out.println("4");
            }
            System.out.println("wait之后");


        });
        Thread t2 = new Thread(()-> {
            try {
                Thread.sleep(1000);
            } catch (InterruptedException e) {
                throw new RuntimeException(e);
            }

            synchronized (lock) {
                System.out.println("1");

                try {
                    Thread.sleep(1000);
                } catch (InterruptedException e) {
                    throw new RuntimeException(e);
                }
                lock.notify();
                System.out.println("2");
            }
        });

        t1.start();
        t2.start();
        t1.join();
        t2.join();
        System.out.println("666");
    }
}
如果我对此代码稍微修改,整个代码“大概率”就运行不了,我把t2的sleep删了
public class Test44 {
    private static Object lock = new Object();
    public static void main(String[] args) throws InterruptedException {
        Thread t1 = new Thread(()-> {

            System.out.println("wait前");

            synchronized (lock) {
                System.out.println("3");
                try {
                    lock.wait();
                } catch (InterruptedException e) {
                    throw new RuntimeException(e);
                }
                System.out.println("4");
            }
            System.out.println("wait之后");


        });
        Thread t2 = new Thread(()-> {


            synchronized (lock) {
                System.out.println("1");

                try {
                    Thread.sleep(1000);
                } catch (InterruptedException e) {
                    throw new RuntimeException(e);
                }
                lock.notify();
                System.out.println("2");
            }
        });

        t1.start();
        t2.start();
        t1.join();
        t2.join();
        System.out.println("666");
    }
}
原理:wait操作是原子的,它要进行三步
1.释放锁
2.阻塞等待前两个同步进行。
3.等待通知,并重新争取锁,执行wait之后的内容
还有一点,就是线程在cpu调度中抢占式执行。此代码失败原因:t2早了
删去t2的sleep1000,由于t1先要执行打印,那么t2 99%就会先抢到锁并notify,这时t1才去释放锁并等待,但是t2早就notify完了,t1就只能傻等了。
notify的唤醒是随机的
多次运行以下代码你就会发现notify只会唤醒随机一个线程
public class Test44 {
    private static Object lock = new Object();
    public static void main(String[] args) throws InterruptedException {
        Thread t1 = new Thread(()-> {

            System.out.println("t1wait前");

            synchronized (lock) {
                System.out.println("3");
                try {
                    lock.wait();
                } catch (InterruptedException e) {
                    throw new RuntimeException(e);
                }
                System.out.println("4");
            }
            System.out.println("t1wait之后");


        });
        Thread t3 = new Thread(()->{
            System.out.println("t3wait前");

            synchronized (lock) {
                System.out.println("5");
                try {
                    lock.wait();
                } catch (InterruptedException e) {
                    throw new RuntimeException(e);
                }
                System.out.println("6");
            }
            System.out.println("t3wait之后");
        });
        Thread t2 = new Thread(()-> {

            try {
                Thread.sleep(1000);
            } catch (InterruptedException e) {
                throw new RuntimeException(e);
            }
            synchronized (lock) {
                System.out.println("1");

                try {
                    Thread.sleep(1000);
                } catch (InterruptedException e) {
                    throw new RuntimeException(e);
                }
                lock.notify();
                System.out.println("2");
            }
        });

        t1.start();
        t2.start();
        t3.start();
        t1.join();
        t2.join();
        t3.join();
        System.out.println("666");
    }
}
我们可以在t2中写多个notify来解决问题,也可以使用notifyAll来唤醒所有
public class Test44 {
    private static Object lock = new Object();
    public static void main(String[] args) throws InterruptedException {
        Thread t1 = new Thread(()-> {

            System.out.println("t1wait前");

            synchronized (lock) {
                System.out.println("3");
                try {
                    lock.wait();
                } catch (InterruptedException e) {
                    throw new RuntimeException(e);
                }
                System.out.println("4");
            }
            System.out.println("t1wait之后");


        });
        Thread t3 = new Thread(()->{
            System.out.println("t3wait前");

            synchronized (lock) {
                System.out.println("5");
                try {
                    lock.wait();
                } catch (InterruptedException e) {
                    throw new RuntimeException(e);
                }
                System.out.println("6");
            }
            System.out.println("t3wait之后");
        });
        Thread t2 = new Thread(()-> {

            try {
                Thread.sleep(1000);
            } catch (InterruptedException e) {
                throw new RuntimeException(e);
            }
            synchronized (lock) {
                System.out.println("1");

                try {
                    Thread.sleep(1000);
                } catch (InterruptedException e) {
                    throw new RuntimeException(e);
                }
                lock.notifyAll();
                System.out.println("2");
            }
        });

        t1.start();
        t2.start();
        t3.start();
        t1.join();
        t2.join();
        t3.join();
        System.out.println("666");
    }
}

有“AI”的1024 = 2048,欢迎大家加入2048 AI社区
更多推荐


 8
8 0
0- 0


 已为社区贡献2条内容

所有评论(0)