Video llama3 2b 本地部署(windows11 + 8Gnvidia 4060)
该文档简要记录了我在window11系统vscode本地部署video llama3 2B 的过程与踩过的坑,希望能帮助后者更快本地部署video llama3。
我采用的是VideoLLaMA3-2B · 模型库
魔搭社区的这个模型,想着国内模型会下载快一些
写在前面。每次查看版本或者运行一定要重启终端,重启anaconda prompt
首先配置环境,这里我用的是anaconda,方便管理与路径的调用。
打开anaconda prompt 或者anaconda power shell prompt,
conda create -n videollama3 python=3.10 -y
conda activate videollama3
输入如上代码,创建并激活videollama3这个环境,然后配置。
注意:安装核心依赖需要有CUDA toolkit,自己去官网下载一个符合自己系统的(我是12.8版本的)。(我就是没下载,导致走了弯路)。
pip install torch torchvision torchaudio --index-url https://download.pytorch.org/whl/cu121
pip install transformers accelerate sentencepiece protobuf bitsandbytes einops timm pillow decord ffmpeg-python opencv-python imageio packaging ninja modelscope flash_attn --no-build-isolation
在命令行输入上述内容。注意flash_attn很有可能下载不了,可以考虑先不下载这个,而且flash_attn都是linux版本的,即便我找到windows版本的,仍然因为有部分核心模块仅存在于Linux而无法调用(插一句,flash_attn有很好的降低显存,提高推理速度的作用,但是到GitHub下载whl时要对应自己的torch\CUDA\python版本)。
由于我的显存只有8B,在没有量化且没有flashattn情况下,只能采用transformer的标准注意力机制,所以使用魔搭社区的代码还运行不出来,会爆显存。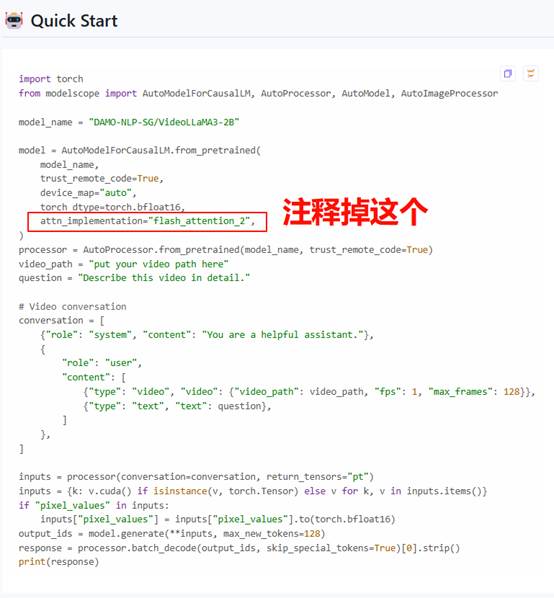
所以需要改变,采用最激进的量化方式,同时视频要尽量采取小的去尝试。在环境中pip install bitsandbytes (这是用于量化的,CUDA最多支持4bit量化,再小就不行了),同时将max_frames视频帧数改为16,同时也要在VS code中将python环境选择上再运行。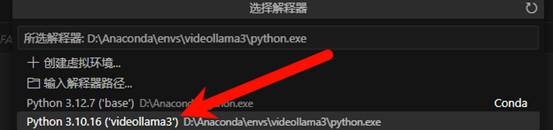
import torch
# Import BitsAndBytesConfig for 4-bit quantization
from transformers import BitsAndBytesConfig
from modelscope import AutoModelForCausalLM, AutoProcessor, AutoModel, AutoImageProcessor

model_name = "DAMO-NLP-SG/VideoLLaMA3-2B"

# Configure 4-bit quantization
quantization_config = BitsAndBytesConfig(
    load_in_4bit=True,
    bnb_4bit_quant_type="nf4", # Use NF4 quantization
    bnb_4bit_use_double_quant=True, # Enable double quantization
    bnb_4bit_compute_dtype=torch.float16 # Use float16 for computation
)

model = AutoModelForCausalLM.from_pretrained(
    model_name,
    trust_remote_code=True,
    device_map="auto",
    torch_dtype=torch.float16, # Explicitly set to float16
    # attn_implementation="flash_attention_2", # Ensure Flash Attention remains disabled
    # load_in_8bit=True # Removed, using quantization_config instead
    quantization_config=quantization_config # Pass the 4-bit config
)
processor = AutoProcessor.from_pretrained(model_name, trust_remote_code=True)
# Use a local path for the video, replace with your actual path!
# video_path = "https://lixin4ever-videollama3.hf.space/.../exercise.mp4" # Using online URL is less reliable
video_path = "path/to/your/local/video.mp4" # <-- IMPORTANT: Replace with your LOCAL video path!

question = "Describe this video in detail."

# Video conversation
conversation = [
    {"role": "system", "content": "You are a helpful assistant."},
    {
        "role": "user",
        "content": [
            # Drastically reduced max_frames
            {"type": "video", "video": {"video_path": video_path, "fps": 1, "max_frames": 16}},
            {"type": "text", "text": question},
        ]
    },
]

print("加载模型并使用4-bit量化...")
print(f"处理视频帧数: 16")
print(f"请确保视频路径 '{video_path}' 正确!")


inputs = processor(conversation=conversation, return_tensors="pt")
# Move inputs to the GPU (device_map should handle model device)
inputs = {k: v.to(model.device) if isinstance(v, torch.Tensor) else v for k, v in inputs.items()}

# Ensure pixel_values are the correct dtype (float16)
if "pixel_values" in inputs and isinstance(inputs["pixel_values"], torch.Tensor):
    inputs["pixel_values"] = inputs["pixel_values"].to(torch.float16)

print("开始生成...")

try:
    with torch.no_grad():
        output_ids = model.generate(**inputs, max_new_tokens=128)
except torch.cuda.OutOfMemoryError as e:
    print("\n错误: 即便使用了4-bit量化和极少的视频帧数,仍然显存不足!")
    print("您的 8GB 显存对于此模型来说可能确实不够用,即使采取了最激进的优化。")
    print("原始错误:", e)
    import sys
    sys.exit(1)
except Exception as e:
    print(f"\n生成过程中发生错误: {e}")
    import sys
    sys.exit(1)


response = processor.batch_decode(output_ids, skip_special_tokens=True)[0].strip()
print("模型回复:")
print(response)
代码如上,视频路径videopath改为一个小视频即可,在终端运行,会出现英文结果(我是一个3s的视频,大概推理了1min,推理效果还不错)。
后续可以将下载的模型放到同一个文件夹,然后让AI帮忙改一下调用方式即可,方便管理,反正有不会的就问AI。
也让AI写了个gradio的前端,只加载视频。当然图片也可以,自己让AI写吧,注意视频一定不要太大!
先 pip install gradio
import gradio as gr
import torch
from transformers import BitsAndBytesConfig
from modelscope import AutoModelForCausalLM, AutoProcessor
import os
import traceback # For detailed error logging

# --- Configuration and Model Loading ---
print("应用启动,开始加载模型...")
load_success = False
model = None
processor = None

try:
    # Get the directory where the script is located
    script_dir = os.path.dirname(os.path.abspath(__file__))
    # Construct the path to the local model directory
    local_model_path = os.path.join(script_dir, "VideoLLaMA3-2B")

    if not os.path.isdir(local_model_path):
        print(f"错误:本地模型目录不存在: {local_model_path}")
        print("请确保 'VideoLLaMA3-2B' 目录与 app.py 在同一文件夹下,并且包含所有模型文件。")
        raise FileNotFoundError(f"Model directory not found: {local_model_path}")

    print(f"尝试从本地路径加载模型: {local_model_path}")

    # Configure 4-bit quantization
    quantization_config = BitsAndBytesConfig(
        load_in_4bit=True,
        bnb_4bit_quant_type="nf4",
        bnb_4bit_use_double_quant=True,
        bnb_4bit_compute_dtype=torch.float16
    )

    model = AutoModelForCausalLM.from_pretrained(
        local_model_path,
        trust_remote_code=True,
        device_map="auto", # Automatically use GPU
        torch_dtype=torch.float16,
        quantization_config=quantization_config
    )
    processor = AutoProcessor.from_pretrained(
        local_model_path,
        trust_remote_code=True
    )
    print("模型和处理器加载成功!")
    load_success = True

except Exception as e:
    print("-"*30)
    print("加载模型或处理器时发生严重错误!应用无法启动。")
    print(f"错误类型: {type(e).__name__}")
    print(f"错误信息: {e}")
    print("详细追溯信息:")
    traceback.print_exc()
    print("请检查错误信息,确认模型文件是否完整,依赖库是否正确安装。")
    print("-"*30)
    # We might want to exit here, or let Gradio show an error state.
    # For now, we let it continue so Gradio can potentially display the error.

# --- Video Processing Function ---
def process_video(video_path, question):
    if not load_success or model is None or processor is None:
        return "错误:模型未能成功加载,无法处理请求。请检查启动日志。"
    if video_path is None:
        return "错误:请先上传一个视频文件。"
    if not question:
        question = "Describe this video in detail." # Default question if empty

    print(f"收到请求: 视频='{video_path}', 问题='{question}'")
    status_update = "开始处理... "

    try:
        # IMPORTANT: Gradio passes the uploaded video as a temporary path.
        # The video_path argument received here IS the path to the video file.

        conversation = [
            {"role": "system", "content": "You are a helpful assistant."},
            {
                "role": "user",
                "content": [
                    # Use the provided video_path directly
                    # Max frames set low due to VRAM limits
                    {"type": "video", "video": {"video_path": video_path, "fps": 1, "max_frames": 16}},
                    {"type": "text", "text": question},
                ]
            },
        ]

        status_update += "准备输入数据... "
        print(status_update)

        inputs = processor(conversation=conversation, return_tensors="pt")
        # Move inputs to the same device as the model
        # Note: With device_map="auto" and quantization, tensors might need explicit .to()
        try:
            inputs = {k: v.to(model.device) if isinstance(v, torch.Tensor) else v for k, v in inputs.items()}
            if "pixel_values" in inputs and isinstance(inputs["pixel_values"], torch.Tensor):
                inputs["pixel_values"] = inputs["pixel_values"].to(model.dtype) # Should be float16
        except Exception as e:
             print(f"移动输入到设备时出错: {e}")
             # Fallback: try moving only tensors that look like model inputs
             inputs = {k: v.to(model.device) if isinstance(v, torch.Tensor) and k in ["input_ids", "attention_mask", "pixel_values"] else v for k, v in inputs.items()}
             if "pixel_values" in inputs and isinstance(inputs["pixel_values"], torch.Tensor):
                 inputs["pixel_values"] = inputs["pixel_values"].to(model.dtype)

        status_update += "生成回复... "
        print(status_update)

        with torch.no_grad():
            output_ids = model.generate(**inputs, max_new_tokens=128)

        response = processor.batch_decode(output_ids, skip_special_tokens=True)[0].strip()

        print("处理完成!")
        print(f"模型回复: {response}")
        return response

    except torch.cuda.OutOfMemoryError:
        print("错误:显存不足 (OOM)!")
        error_message = "处理失败:GPU 显存不足。请尝试更短的视频或关闭其他占用显存的应用。模型当前配置已是最低设置 (4-bit, 16帧)。"
        return error_message
    except Exception as e:
        print(f"处理视频时发生错误: {type(e).__name__} - {e}")
        print("详细追溯信息:")
        traceback.print_exc()
        error_message = f"处理失败:发生内部错误 ({type(e).__name__})。请检查视频文件是否有效或查看控制台日志获取详细信息。"
        return error_message

# --- Gradio Interface Definition ---
print("定义 Gradio 界面...")

with gr.Blocks(theme=gr.themes.Soft(), title="VideoLLaMA3 本地交互") as app:
    gr.Markdown("""
    # 🎬 VideoLLaMA3-2B 本地交互界面
    上传一个视频文件,输入你的问题(或留空使用默认问题),然后点击"开始分析"。
    **注意:** 由于显存限制 (8GB),模型以最低设置运行 (4-bit 量化, 仅处理16帧)。仅适用于非常短的视频片段。
    """)

    with gr.Row():
        with gr.Column(scale=1):
            video_input = gr.Video(label="上传视频", sources=["upload"])
            question_input = gr.Textbox(label="你的问题?", placeholder="例如:详细描述这个视频的内容。 (留空则使用此默认问题)")
            submit_button = gr.Button("🚀 开始分析", variant="primary")
        with gr.Column(scale=1):
            output_textbox = gr.Textbox(label="模型回复", interactive=False, lines=15)

    # Define interactions
    submit_button.click(
        fn=process_video,
        inputs=[video_input, question_input],
        outputs=[output_textbox]
    )

print("界面定义完成。")

# --- Launch the App ---
if __name__ == "__main__":
    if not load_success:
        print("\n启动失败:由于模型加载错误,Gradio 应用无法启动。请解决上述错误后重试。")
    else:
        print("启动 Gradio 应用...")
        app.launch() # Share=True 可生成公开链接,但本地运行时通常不需要
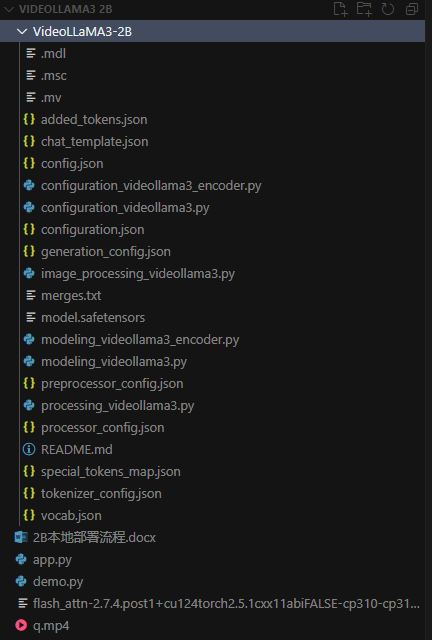
如上是前端代码。此时我已经将模型移动到同一文件夹。最后整体架构如下图
当然,如果在Linux 系统上部署想必会更加顺利高效,同时能在更小的显存下运行出更好的效果,这为videollama3 2B模型的硬件部署与边缘计算方案给出了很好的适应性。未来如果有gguf量化的模型想必会更容易部署,更减少显存的占用。

有“AI”的1024 = 2048,欢迎大家加入2048 AI社区
更多推荐

 18
18 0
0- 0


 已为社区贡献1条内容

所有评论(0)