Git本地项目推送到远程仓库
git操作
目录
1.初始化git
进入项目目录
git init2.添加远程地址并给地址起一个别名
1.git remote -v 查看起的别名
git remote add demo-projects https://gitee.com/huachun_w/demo-project.git这个时候如果拉取还是会有问题
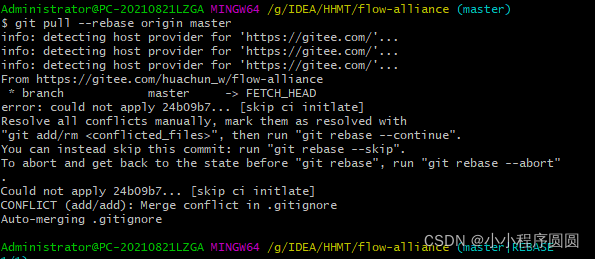
3.合并远程代码
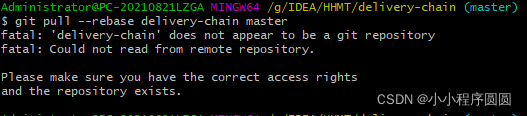
使用 git pull --rebase demo-projects master 进行代码合并,问题解决
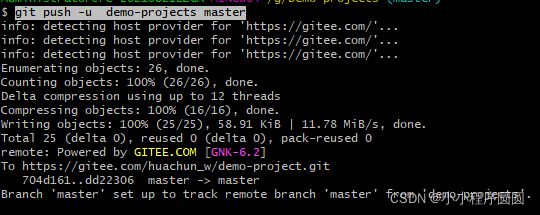
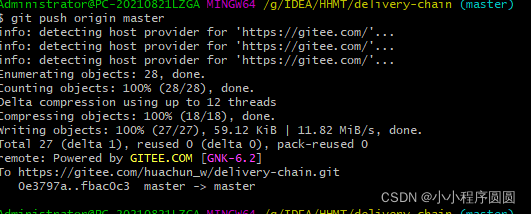
4.推送
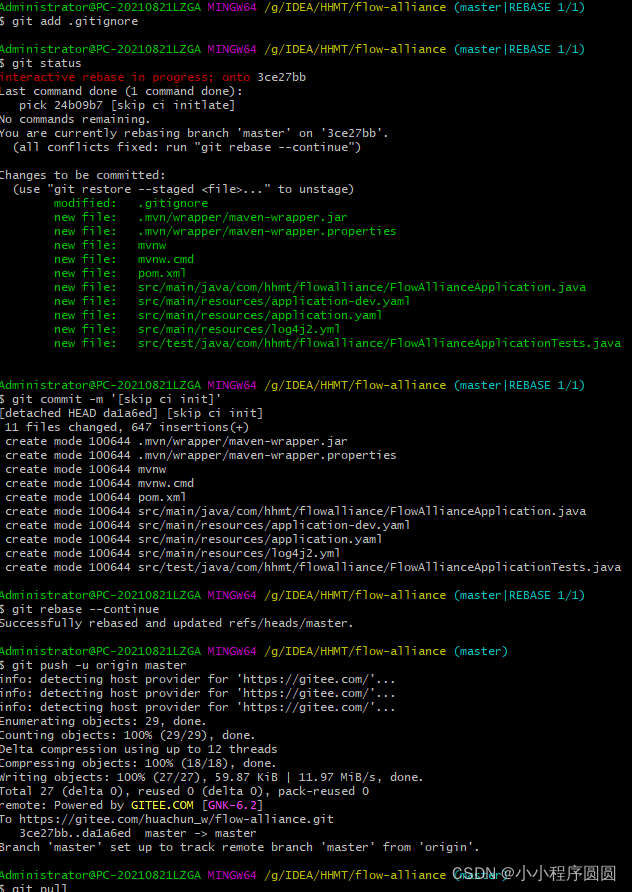
命令 git push -u demo-projects master
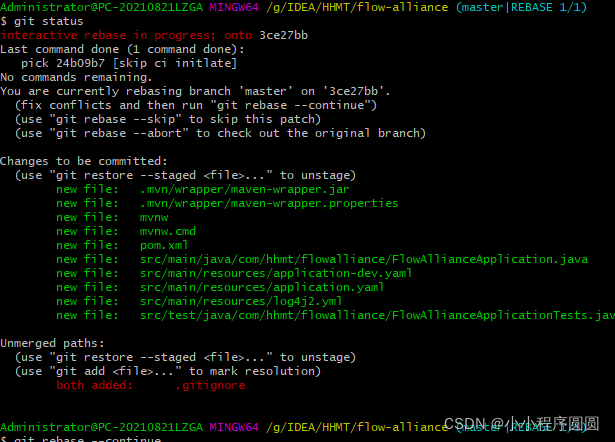
5.常见问题
interactive rebase in progress; onto 3ce27bb
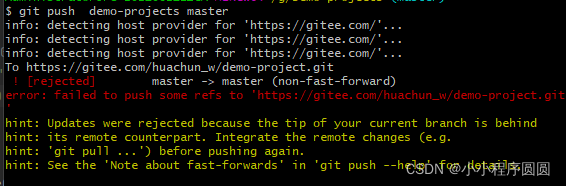
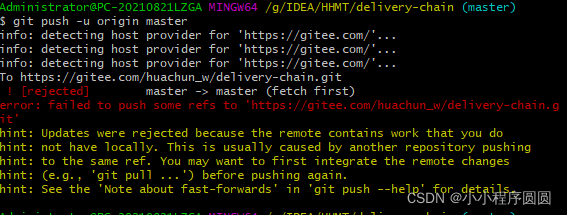
6.无法推送
说明:在gitee创建了一个仓库,然后在本地创建了springboot项目,想要将本地项目推送到远程,首先添加了远程仓库,然后通过pull拉取远程文件,接下来就出现了这个问题
git push -u origin master
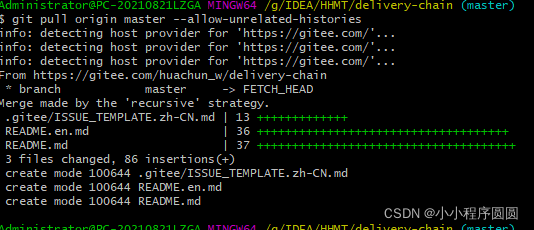
解决方法: 拉取时候添加 --allow-unrelated-histories 参数

这里如果出现一个文件可以直接 :q 退出
推送到远程
参考原文:GitHub_git push出现[rejected] master -> master (non-fast-forward)问题解决_huU丶-CSDN博客
7.查看远程仓库信息
git remote show origin原文参考:git - 查看远程仓库信息_SnowAnna的博客-CSDN博客_git查看远程仓库
8.拉取与本地不相关的git项目
git pull origin master --allow-unrelated-histories

git push <远程主机名> <本地分支名>:<远程分支名>

git push origin master:master原文参考:记Git报错-refusing to merge unrelated histories_夏虫不可语冰-CSDN博客
原文参考:
git status 出错 interactive rebase in progress; onto 796e78f_爱倒腾的博客-CSDN博客_interactive rebaseGit:(git status)interactive rebase in progress_m0_63476377的博客-CSDN博客git status 出错 interactive rebase in progress; onto 796e78f_爱倒腾的博客-CSDN博客_interactive rebase
原文参考:git推送本地项目到远程仓库_微笑的博客-CSDN博客_git推送本地文件到远程仓库
gitee推荐参考:
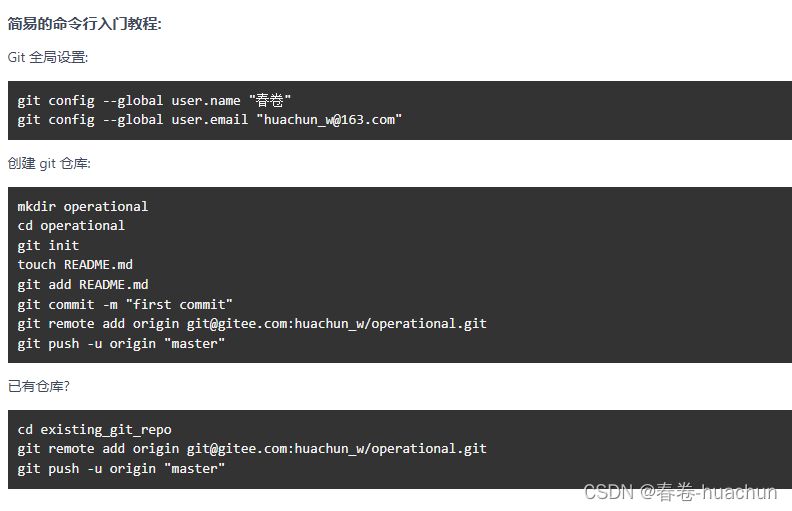
https://gitee.com/huachun_w/operational
9.配置ssh公钥
ssh-keygen -t rsa -C 'your-email' 原文参考:gitee配置SSH公钥_QL-L的博客-CSDN博客_gitee ssh公钥
为第二个账号生成密钥对
同样的方式,为第二个账号生成 SSH 密钥对,使用不同的文件名,例如 id_rsa_account2:
bash
ssh-keygen -t rsa -C "your_email2@example.com" -f ~/.ssh/id_rsa_account2-t rsa:指定密钥类型为 RSA。-C "your_email1@example.com":添加注释,方便识别,通常使用邮箱地址。-f ~/.ssh/id_rsa_account1:指定密钥文件的保存路径和文件名。
10.清除缓存区
说明:在新建项目仓库时候忘了在.gitignore文件中忽略.idea和target目录,本地加上这两个目录后发现还是存在git缓存中,可以使用git rm -r --cached . 删除缓存区域
git rm -r --cached .
git add .
git commit -m "本地提交的comment"
原文参考: git提交时忽略不想提交的文件,以及修改.gitignore不起作用的解决办法_wardenjohn的博客-CSDN博客
11.在本地配置了两个git,怎么使用其中一个提交代码(建议使用方法三)
在本地配置多个 Git 身份(如不同的用户名和邮箱)是比较常见的,比如在工作和个人项目中使用不同的身份。下面为你介绍如何使用其中一个身份来提交代码。
前提条件
假设你已经在本地配置了两个不同的 Git 身份,分别对应不同的用户名和邮箱。例如:
bash
# 配置身份 1
git config --global user.name "user1"
git config --global user.email "user1@example.com"

# 配置身份 2
git config --local user.name "user2"
git config --local user.email "user2@example.com"
这里 --global 表示全局配置,--local 表示针对当前仓库的配置。
方法一:按仓库设置身份
如果你希望针对不同的仓库使用不同的 Git 身份,可以在每个仓库中单独设置用户名和邮箱。
步骤
- 进入目标仓库目录:
bash
cd /path/to/your/repository
- 设置该仓库使用的用户名和邮箱:
bash
git config user.name "your_username"
git config user.email "your_email@example.com"
- 提交代码:
bash
git add .
git commit -m "Your commit message"
git push origin your_branch
方法二:临时覆盖全局配置
如果你只是临时想使用某个身份提交代码,可以在执行 git commit 命令时,通过 -c 参数临时覆盖全局配置。
步骤
- 进入目标仓库目录:
bash
cd /path/to/your/repository
- 临时设置用户名和邮箱并提交代码:
bash
git -c user.name="your_username" -c user.email="your_email@example.com" add .
git -c user.name="your_username" -c user.email="your_email@example.com" commit -m "Your commit message"
git push origin your_branch
方法三:使用条件配置
你可以根据仓库路径来设置不同的 Git 身份,这样在进入相应仓库时会自动使用对应的身份。
步骤
- 编辑全局 Git 配置文件:
bash
git config --global --edit
- 添加条件配置:
ini
[user]
    name = default_user
    email = default_email@example.com

[includeIf "gitdir:/path/to/repo1/"]
    path = ~/.gitconfig-repo1

[includeIf "gitdir:/path/to/repo2/"]
    path = ~/.gitconfig-repo2
这里 ~/.gitconfig-repo1 和 ~/.gitconfig-repo2 是针对不同仓库的配置文件,内容如下:
ini
# ~/.gitconfig-repo1
[user]
    name = user1
    email = user1@example.com

# ~/.gitconfig-repo2
[user]
    name = user2
    email = user2@example.com
- 提交代码:进入相应仓库后,直接使用
git命令提交代码,会自动使用对应的身份。
bash
cd /path/to/repo1
git add .
git commit -m "Your commit message"
git push origin your_branch
通过以上方法,你可以灵活地在本地使用不同的 Git 身份来提交代码。
填写示例
1. 使用正斜杠 /
假设你的仓库位于 D:\Projects\repo1,在 Git 全局配置文件中应这样填写:
ini
[user]
    name = default_user
    email = default_email@example.com

[includeIf "gitdir:D:/Projects/repo1/"]
    path = ~/.gitconfig-repo1
2. 对反斜杠进行转义
同样是 D:\Projects\repo1 这个仓库路径,使用转义后的反斜杠填写如下:
ini
[user]
    name = default_user
    email = default_email@example.com

[includeIf "gitdir:D:\\Projects\\repo1\\"]
    path = ~/.gitconfig-repo1
注意事项
- 路径结尾:路径末尾的斜杠
/或者反斜杠\是可选的,但建议加上,这样能避免一些潜在的匹配问题。 - 大小写问题:Windows 文件系统对路径大小写不敏感,但在 Git 配置里最好保持一致,避免可能出现的混淆。
- 路径准确性:要确保路径是正确的,否则 Git 无法正确匹配仓库,也就不能应用相应的配置。
下面是一个完整的示例,假设你有两个仓库,分别位于 D:\Projects\repo1 和 E:\Work\repo2,对应的配置文件分别是 ~/.gitconfig-repo1 和 ~/.gitconfig-repo2,全局配置文件内容如下:
ini
[user]
    name = default_user
    email = default_email@example.com

[includeIf "gitdir:D:/Projects/repo1/"]
    path = ~/.gitconfig-repo1

[includeIf "gitdir:E:/Work/repo2/"]
    path = ~/.gitconfig-repo2
其中,~/.gitconfig-repo1 和 ~/.gitconfig-repo2 分别包含不同仓库对应的用户信息,示例如下:
ini
# ~/.gitconfig-repo1
[user]
    name = user1
    email = user1@example.com

# ~/.gitconfig-repo2
[user]
    name = user2
    email = user2@example.com
这样,当你在 D:\Projects\repo1 目录下进行 Git 操作时,会使用 user1 的信息;在 E:\Work\repo2 目录下操作时,会使用 user2 的信息。

有“AI”的1024 = 2048,欢迎大家加入2048 AI社区
更多推荐


 0
0 0
0- 0


 已为社区贡献1条内容

所有评论(0)