Java - SpringBoot整合Shiro之二(权限授权和认证跳过)
再看这篇文章之前,可以先过一遍SpringBoot整合Shiro,附带源码。这篇文章为该篇文章的进阶内容。目前为止,我在整合Shirojwt:自定义的JwtFilter过滤器,拦截所有的请求/**。anno:默认实现,。无需认证也可以访问。/login。logout:默认实现,。就是登出的时候的配置。/logout。本文没做相关的实现。不管他。我们在本环节只关注第二个。实际开发中,肯定是有一些接口
Java - SpringBoot整合Shiro之二(权限授权和认证跳过)
前言
再看这篇文章之前,可以先过一遍 SpringBoot整合Shiro,附带源码。这篇文章为该篇文章的进阶内容。
一. Shiro的授权功能
上篇回顾:Realm是Shiro框架中三大重要组成之一,关于授权、校验,以及和元数据打交道的操作都和它有关。而我们在SpringBoot整合Shiro的过程中, 也通过继承了 AuthenticatingRealm 自定义实现了一个JwtRealm。我们主要实现了doGetAuthenticationInfo()函数,目的是为了实现认证功能。那么本篇文章,将着重于授权功能。因此在原本代码的基础上,我们还要实现doGetAuthorizationInfo()函数。
1.1 类关系图
doGetAuthenticationInfo函数是AuthenticatingRealm下的一个抽象方法。而doGetAuthorizationInfo函数则是AuthorizingRealm下的抽象方法。那么继承是单继承,我们如何做到同时重写这两个函数呢?
别急,我们看下AuthorizingRealm的类关系图: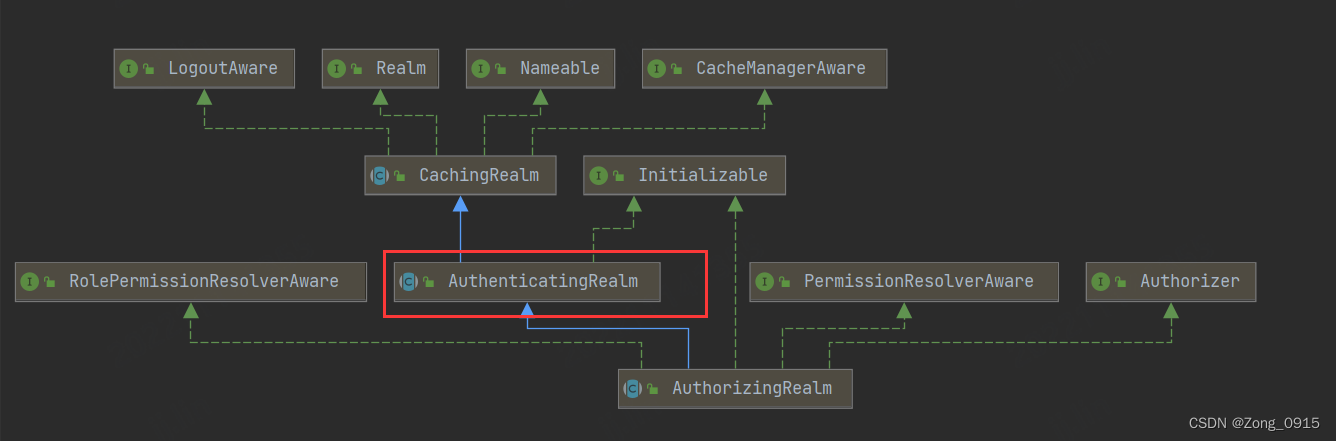
可见,AuthorizingRealm是AuthenticatingRealm的一个子类,因此它即拥有认证的功能也拥有自己独有的的授权功能。那么好了,我们自定义的JwtRealm需要换一个爸爸了:
public class JwtRealm extends AuthorizingRealm {}
1.2 代码编写
那么我们写一个假数据:
private Set<String> getRoleByUserId(Long userId) {
    HashSet<String> roles = new HashSet<>();
    roles.add("user");
    roles.add("roomOwner");
    return roles;
}

private Set<String> getPermissionsByRoleName(String roleName) {
    HashSet<String> roles = new HashSet<>();
    roles.add("user:update");
    return roles;
}
doGetAuthorizationInfo函数重写如下:
// 授权函数
@Override
protected AuthorizationInfo doGetAuthorizationInfo(PrincipalCollection principals) {
    SimpleAuthorizationInfo authorizationInfo = new SimpleAuthorizationInfo();
    // 模拟数据库操作
    String token = (String) principals.getPrimaryPrincipal();
    Long userId = JwtUtil.getUerIdFromClaim(token);
    // 这里就随便写个假的数据
    authorizationInfo.setRoles(getRoleByUserId(userId));
    authorizationInfo.setStringPermissions(getPermissionsByRoleName(""));
    return authorizationInfo;
}
JwtRealm 完整代码如下:
package com.pro.config.jwt;

import com.pro.config.JwtUtil;
import io.jsonwebtoken.SignatureException;
import lombok.extern.slf4j.Slf4j;
import org.apache.shiro.authc.AuthenticationException;
import org.apache.shiro.authc.AuthenticationInfo;
import org.apache.shiro.authc.AuthenticationToken;
import org.apache.shiro.authc.SimpleAuthenticationInfo;
import org.apache.shiro.authz.AuthorizationInfo;
import org.apache.shiro.authz.SimpleAuthorizationInfo;
import org.apache.shiro.realm.AuthorizingRealm;
import org.apache.shiro.subject.PrincipalCollection;

import java.util.HashSet;
import java.util.Set;

/**
 * @author Zong0915
 * 自定义的Shiro Realm
 * @date 2022/11/11 下午8:14
 */
@Slf4j
public class JwtRealm extends AuthorizingRealm {

    /*
     * 多重写一个support
     * 标识这个Realm是专门用来验证JwtToken
     * 不负责验证其他的token(UsernamePasswordToken)
     * 必须重写此方法,不然Shiro会报错
     * */
    @Override
    public boolean supports(AuthenticationToken token) {
        //这个token就是从过滤器中传入的jwtToken
        return token instanceof JwtToken;
    }

    // 认证函数
    @Override
    protected AuthenticationInfo doGetAuthenticationInfo(AuthenticationToken token) throws AuthenticationException {
        String jwt = (String) token.getPrincipal();
        if (jwt == null) {
            throw new SignatureException("Token不能为空!");
        }
        // 校验JWT,如果不通过的话,就会抛出异常,然后被JwtFilter捕捉
        JwtUtil.isVerify(jwt);
        return new SimpleAuthenticationInfo(jwt, jwt, "JwtRealm");
    }

    // 授权函数
    @Override
    protected AuthorizationInfo doGetAuthorizationInfo(PrincipalCollection principals) {
        SimpleAuthorizationInfo authorizationInfo = new SimpleAuthorizationInfo();
        // 模拟数据库操作
        String token = (String) principals.getPrimaryPrincipal();
        Long userId = JwtUtil.getUerIdFromClaim(token);
        // 这里就随便写个假的数据,一般来说,需要你自己去读表查询,然后赋值。只要记住返回类型需要整合为Set<String>
        authorizationInfo.setRoles(getRoleByUserId(userId));
        authorizationInfo.setStringPermissions(getPermissionsByRoleName(""));
        return authorizationInfo;
    }

    private Set<String> getRoleByUserId(Long userId) {
        HashSet<String> roles = new HashSet<>();
        roles.add("user");
        roles.add("roomOwner");
//        roles.add("admin");
        return roles;
    }

    private Set<String> getPermissionsByRoleName(String roleName) {
        HashSet<String> roles = new HashSet<>();
        roles.add("user:update");
        return roles;
    }
}
我们再自定义一个异常捕获函数,在ExceptionController类中添加:
@ExceptionHandler(value = {ShiroException.class})
@ResponseBody
public String authorizationException(ShiroException e) {
    return e.getMessage();
}
最后,在UserController再写几个测试接口:
@RequiresRoles("admin")
@PostMapping("/getAdmin")
public String getAdmin() {
    return "我就是管理员!";
}

@RequiresPermissions("user:update")
@PostMapping("/updateRoom")
public String updateRoom() {
    return "更新数据成功";
}

@RequiresPermissions("user:delete")
@PostMapping("/deleteRoom")
public String deleteRoom() {
    return "删除数据成功";
}
测试如下:
- 访问
/getAdmin(没这个角色):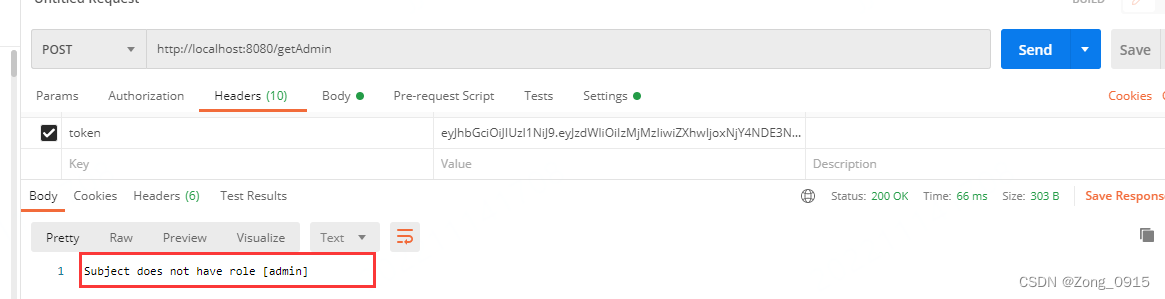
- 访问
/updateRoom(有这个权限):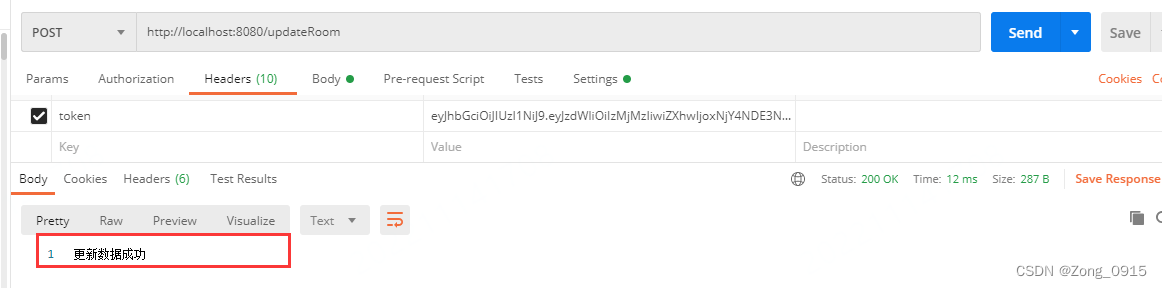
- 访问
/deleteRoom(没有这个权限):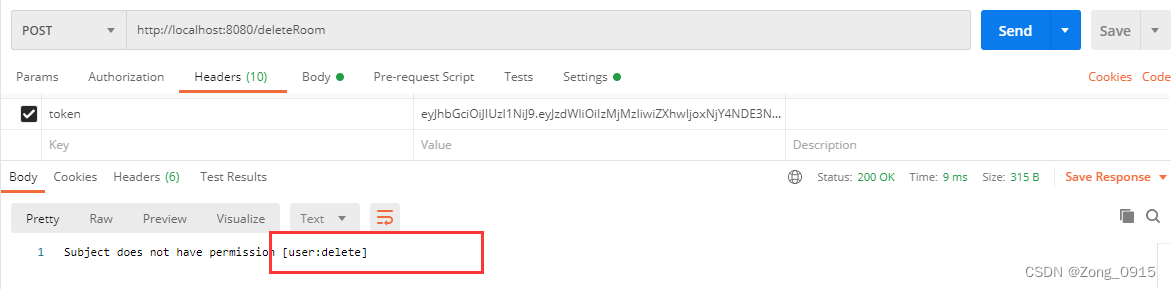
二. 自定义注解跳过认证 / 权限校验
目前为止,我在整合Shiro的配置过程中,只配置了三种过滤器: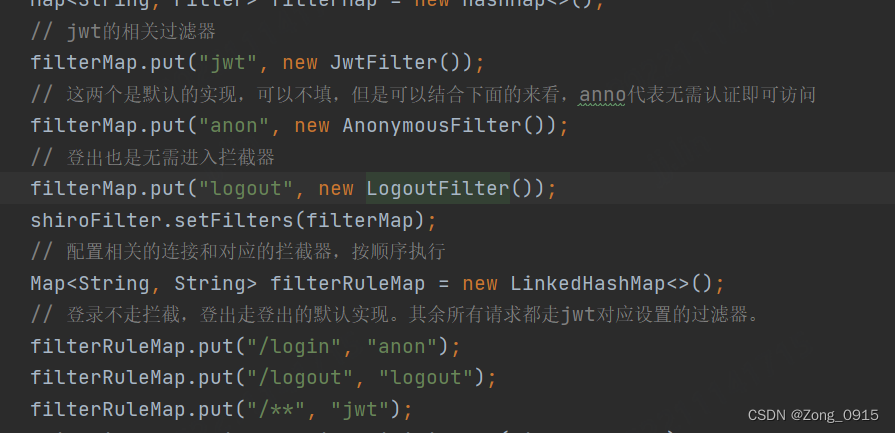
jwt:自定义的JwtFilter过滤器,拦截所有的请求/**。anno:默认实现,AnonymousFilter。无需认证也可以访问。只配置了一个路径:/login。logout:默认实现,LogoutFilter。就是登出的时候的配置。配置了一个路径:/logout。本文没做相关的实现。不管他。
我们在本环节只关注第二个。实际开发中,肯定是有一些接口是不需要经过登录认证的。我举个例子,你在看斗鱼直播的时候,在没登录的情况下,菜单数据也能出来、直播也能看。
那么同理,如果我相关的接口数量越来越多的时候,不太可能在过滤器中做URL配置。因此这里希望采用注解的形式来完成过滤。
我们先自定义一个注解IgnoreCertification:
@Target({ElementType.TYPE, ElementType.METHOD})
@Retention(RetentionPolicy.RUNTIME)
public @interface IgnoreCertification {

}
2.1 重写isAccessAllowed函数
紧接着就是过滤器JwtFilter的实现,我们知道,JwtFilter继承了AccessControlFilter类。需要实现两个函数:
isAccessAllowed:如果返回false,会执行onAccessDenied函数,返回true,则认证通过。onAccessDenied:只有当isAccessAllowed返回false的时候执行。我们项目里用来做JWT认证。
显然,我们可以再isAccessAllowed函数中,增加自己的注解校验逻辑。我们的注解其实没有什么传参的功能,他只是一个标识。做了标记的类或者方法。可以不需要通过认证就可以访问接口。 因此我们只需要判断这个注解是否标注即可。
private IgnoreCertification getConfig(ServletRequest request) {
	// 需要的数据都从它来
    HttpServletRequest httpServletRequest = (HttpServletRequest) request;
    HandlerExecutionChain handlerExecutionChain;
    IgnoreCertification config = null;

    try {
        RequestMappingHandlerMapping mapping = SpringBeanUtil.getBean(RequestMappingHandlerMapping.class);
        handlerExecutionChain = mapping.getHandler(httpServletRequest);
        HandlerMethod handlerMethod = (HandlerMethod) handlerExecutionChain.getHandler();
        // 方法注解
        config = handlerMethod.getMethod().getAnnotation(IgnoreCertification.class);
        // 类注解
        if (null == config) {
            config = handlerMethod.getMethod().getDeclaringClass().getAnnotation(IgnoreCertification.class);
        }
    } catch (Exception e) {
        e.printStackTrace();
    }
    return config;
}

/**
 * 判断是否携带了有效的JwtToken
 */
@Override
protected boolean isAccessAllowed(ServletRequest request, ServletResponse response, Object handler) throws Exception {
    // 若加了注解IgnoreCertification,则跳过校验
    if (null != getConfig(request)) {
        return true;
    }
    return false;
}
新增两个接口:
@PostMapping("/test1")
public String test1(){
    return "携带Token访问成功";
}

@PostMapping("/test2")
@IgnoreCertification
public String test2(){
    return "不携带Token成功访问";
}
携带Token测试接口test1: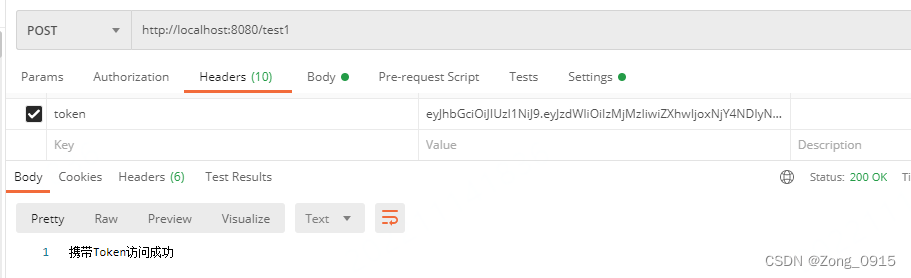
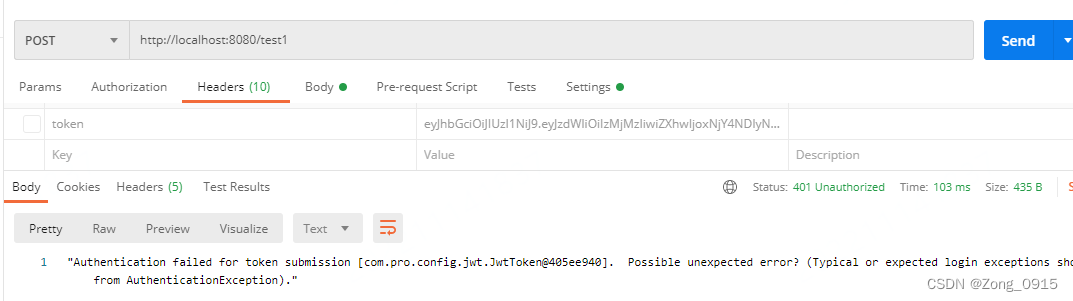
不携带Token测试接口test1:
不携带Token测试接口test2: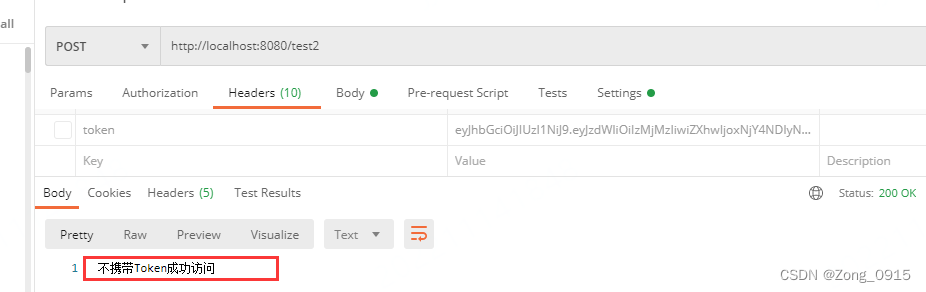

有“AI”的1024 = 2048,欢迎大家加入2048 AI社区
更多推荐


 2
2 0
0- 0


 已为社区贡献4条内容

所有评论(0)