01-springAI
langchain4jvsspringAI
| 维度 | Spring AI | LangChain4j |
|---|---|---|
| 技术栈绑定 | 强依赖 Spring 生态 | 无框架依赖,可独立使用 |
| 适用场景 | SpringBoot应用快速接入单模型 | 多模型(动态模型)平台 |
点击跳转官网
1. 第一个Ai程序
1.1 特征
SpringAI 是一个企业级的 Java AI 应用开发框架,支持如下特性:
- 提供统一的门面接口 ChatClient,支持同步和流式响应,简化 Agent 开发
- 提供统一的模型适配接口,切换模型后,仅需要改动配置项,代码不用动
- 支持所有的主流模型,例如远程的 OpenAI / Anthropic / Google 等模型和本地的 Ollama 模型
- 支持丰富的模型类型,例如 LLM 模型 / 文生图模型 / TTS(文本转语音模型) 等
- 支持所有主流的向量数据库
- 对所有支持的模型和向量数据库提供了 SpringBoot 自动配置 starter,简化模型和向量数据库的配置
- 支持将 AI 输出转化为标准的 Java POJO 模型
- 支持工具 Tool / MCP 调用,可以让模型在运行时动态的调用外界接口
- 支持记忆 Memory
- 支持 `RAG(Retrieval Augmented Generation)``
- 支持 Advisors 模式
1.2 引入依赖
- 引入最新的 spring-ai 统一依赖版本管理配置
<dependencyManagement>
    <dependencies>
        <dependency>
            <groupId>org.springframework.ai</groupId>
            <artifactId>spring-ai-bom</artifactId>
            <version>1.0.2</version>
            <type>pom</type>
            <scope>import</scope>
        </dependency>
    </dependencies>
</dependencyManagement>
- web 服务接口依赖
	<dependencies>
        <dependency>
            <groupId>org.springframework.boot</groupId>
            <artifactId>spring-boot-starter</artifactId>
        </dependency>
        <!-- web -->
        <dependency>
            <groupId>org.springframework.boot</groupId>
            <artifactId>spring-boot-starter-web</artifactId>
        </dependency>
	</dependencies>
1.3 配置模型
模型的使用通常有两种方式:
- 使用本地启动的 Ollama 模型服务:通常用于调试阶段,为了节省调用大模型 API 的费用,需要本地具有 GPU 算力;
- 使用远程的模型服务(通常会使用兼容 OpenAI 接口协议的服务):可以去所调用模型的官网申请 apiKey,需要一定的花销。
1.3.1 本地 ollama 模型服务
- 依赖
<!-- model-本地 -->
<dependency>
    <groupId>org.springframework.ai</groupId>
    <artifactId>spring-ai-starter-model-ollama</artifactId>
</dependency>
- application.properties 配置文件
spring.ai.model.chat=ollama
spring.ai.ollama.base-url=http://127.0.0.1:11434
spring.ai.ollama.chat.options.model=deepseek:r1
1.3.2 远程 Qwen 模型服务(兼容 OpenAi 接口协议)
- 依赖
<!-- openai 兼容服务-远程 -->
<dependency>
    <groupId>org.springframework.ai</groupId>
    <artifactId>spring-ai-starter-model-openai</artifactId>
</dependency>
- application.properties 配置文件
spring.ai.model.chat=openai
spring.ai.openai.base-url=https://dashscope.aliyuncs.com/compatible-mode/
spring.ai.openai.api-key=填写你自己的apiKey
spring.ai.openai.chat.options.model=qwen-max
说明:列出最核心的三个配置,更多配置项见 spring-ai-ollama 文档
1.4 配置ChatClient Bean
@Configuration
public class SpringAIConfig {
    @Bean
    public ChatClient chatClient(ChatModel chatModel) {
        return ChatClient.create(chatModel);
    }
}
1.5 开发Controller
@RestController
public class Controller {
    @Resource
    private ChatClient chatClient;

    @RequestMapping("/")
    public String execute(@RequestParam("userRequest") String userRequest) {
        return chatClient.prompt(userRequest).call().content();
    }
}
2. 接口 ChatClient
ChatClient 通过 Fluent API 模式来统一设置提示语 / 提示语模板 / 模型参数 / 工具与 MCP / 记忆 Memory / Advisor 等,同时提供了同步和流式调用模式,通过类型转换器转换为标准 Java 实体等能力,方便的构建自己的 AI 程序。
2.1 创建 ChatClient 的两种方式
@Configuration
public class SpringAIConfig {
    /**
     * 第一种创建 ChatClient 的方式,使用默认的 builder 参数
     *
     * @param chatModel 该对象会根据配置自动生成
     * @return ChatClient 对象。
     */
    @Bean
    public ChatClient chatClient(ChatModel chatModel) {
        return ChatClient.create(chatModel);
    }

    /**
     * 第二种创建 ChatClient 的方式,使用 builder 来设置自定义参数
     *
     * @return ChatClient 对象。
     */
    @Bean
    public ChatClient customChatClient(ChatModel chatModel) {
        return ChatClient.builder(chatModel)
                .defaultSystem("你是一个知识渊博的ai专家")
                .build();
    }
}
说明:ChatModel 模型会根据配置自动注入。
2.2 启动 ChatClient Fluent API
ChatClient Fluent API 提供了以下三种 prompt 方法来启动 Fluent API:
- 方法定义
ChatClientRequestSpec prompt();
ChatClientRequestSpec prompt(String content);
ChatClientRequestSpec prompt(Prompt prompt);
- 使用
@RestController
public class Controller {
    @Resource
    private ChatClient chatClient;

    @RequestMapping("/1")
    public String execute1(@RequestParam("userRequest") String userRequest) {
        return chatClient.prompt().user(userRequest).call().content();
    }

    @RequestMapping("/2")
    public String execute2(@RequestParam("userRequest") String userRequest) {
        return chatClient.prompt(new Prompt(userRequest)).call().content();
    }

    @RequestMapping("/3")
    public String execute3(@RequestParam("userRequest") String userRequest) {
        return chatClient.prompt(userRequest).call().content();
    }
}
2.3 提示语模板 PromptTemplate
/**
 * 使用默认提示语模板 StTemplateRenderer
 */
@RequestMapping("/100")
public String execute100() {
    return chatClient.prompt()
            .user(u -> u.text("Tell me the names of 5 movies those act  by {actor}").param("actor", "周星驰"))
            .call().content();
}

/**
 * 定制提示语模板
 */
@RequestMapping("/101")
public String execute101() {
    return chatClient.prompt()
            .user(u -> u.text("Tell me the names of 5 movies those act  by <actor>").param("actor", "刘德华"))
            .templateRenderer(StTemplateRenderer.builder().startDelimiterToken('<').endDelimiterToken('>').build())
            .call().content();
}
说明:
- ChatClient 提供了 user 提示语模板和 system 提示语模板, 其中的变量可以在运行时被替换
- 默认使用 StTemplateRenderer 引擎,如果想要使用自定义的模板引擎,可以自己实现接口 TemplateRenderer
- 默认使用 { 作为参数占位符起始标识,使用 } 作为参数占位符结束标识,当发现这两个字符会被提示语或者参数占用时,可以定制提示语模板参数占位符分隔符,如上 execute101() 方法所示
2.4 ChatClient 响应
从返回方式上分为:同步(call())和流式(stream())。
2.4.1 同步响应
call() 响应类型有几种不同的选项:
- String content():返回响应的字符串内容
- ChatResponse chatResponse():ChatResponse 包含响应的元数据的对象,例如,token 的消耗
- ChatClientResponse chatClientResponse():ChatClientResponse 包含 ChatResponse 对象和ChatClient 执行上下文的对象,使您能够访问 advisors 执行期间使用的附加数据(例如,在 RAG 流中检索到的相关文档)
- ResponseEntity<?> responseEntity():ResponseEntity 包含完整 HTTP 响应(包括状态码、标头和正文)的响应
- entity():返回 Java 类型
- entity(ParameterizedTypeReference type):返回 Collection 实体类型
- entity(Class type):返回特定的实体类型
- entity(StructuredOutputConverter structuredOutputConverter):指定 StructuredOutputConverter,将 String 为 T 类型。
说明:调用 call() 方法并不会真正触发 AI 模型的执行。它只是指示 Spring AI 是使用同步调用还是流式调用。实际的 AI 模型调用发生在调用 content()、chatResponse() 和 responseEntity() 等方法时。
/**
* 返回 String
*/
@RequestMapping("/1")
public String execute1(@RequestParam("userRequest") String userRequest) {
    return chatClient.prompt().user(userRequest).call().content();
}

/**
* 返回 ChatResponse
* 包含 token 信息
*/
@RequestMapping("/4")
public ChatResponse execute4(@RequestParam("userRequest") String userRequest) {
    return chatClient.prompt(userRequest).call().chatResponse();
}

/**
* 返回 ResponseEntity
*/
@RequestMapping("/40")
public org.springframework.ai.chat.client.ResponseEntity<ChatResponse, String> execute40() {
    return chatClient.prompt("给我将一个笑话").call().responseEntity(String.class);
}

/**
* 返回 Java 类
*/
@RequestMapping("/5")
public ActorFilms execute5() {
    return chatClient.prompt("生成随机演员的电影列表").call().entity(ActorFilms.class);
}

/**
* 返回 Java 列表
*/
@RequestMapping("/6")
public List<ActorFilms> execute6() {
    return chatClient.prompt("为周星驰和周德华制作5部电影的电影列表。").call().entity(new ParameterizedTypeReference<>() {
});
- java类如下
import lombok.Data;
import lombok.experimental.Accessors;

import java.util.List;

@Data
@Accessors(chain = true)
public class ActorFilms {
    private String actor;
    private List<String> films;
}
2.4.2 流式响应
stream() 响应类型有几种不同的选项:
- Flux content():返回响应的字符串内容
- Flux chatResponse():ChatResponse 包含响应的元数据的对象
- Flux chatClientResponse():ChatClientResponse 包含 ChatResponse 对象和 ChatClient 执行上下文的对象
说明:stream() 调用方式下,无法直接返回 Java 对象,需要借助类型转换器进行转换,见如下的代码操作。
/**
 * 流式返回 String
 * 包含 token 信息
 */
@RequestMapping("/7")
public Flux<String> execute7() {
    return chatClient.prompt("给我讲一个笑话").stream().content();
}

/**
 * 流式返回 ChatResponse
 * 包含 token 信息
 */
@RequestMapping("/8")
public Flux<ChatResponse> execute8() {
    return chatClient.prompt("给我讲一个笑话").stream().chatResponse();
}

/**
 * 流式返回信息,转换为 Java 类
 */
@RequestMapping("/9")
public ActorFilms execute9() {
    /*
     * 创建 Converter
     */
    BeanOutputConverter<ActorFilms> converter = new BeanOutputConverter<>(ActorFilms.class);

    /*
     * 流式调用
     */
    Flux<String> flux = chatClient.prompt().user(
            u -> u.text("""
                   为一个随机的演员生成电影列表。
                    {format}
                  """)
                    .param("format", converter.getFormat())
    ).stream().content();
    String content = flux.collectList().block().stream().collect(Collectors.joining());

    /*
     * 转换
     */
    return converter.convert(content);
}

/**
 * 流式返回信息,转换为 Java 列表
 */
@RequestMapping("/10")
public List<ActorFilms> execute10() {
    /*
     * 创建 Converter
     */
    BeanOutputConverter<List<ActorFilms>> converter = new BeanOutputConverter<>(new ParameterizedTypeReference<>() {
    });

    /*
     * 流式调用
     */
    Flux<String> flux = chatClient.prompt().user(
            u -> u.text("""
                    为一个随机的演员生成电影列表。
                    {format}
                  """)
                    .param("format", converter.getFormat())
    ).stream().content();
    String content = flux.collectList().block().stream().collect(Collectors.joining());

    /*
     * 转换
     */
    return converter.convert(content);
}
- 类型转换器会根据返回的不同的 Java 模型制定不同的 format 提示语。例如对于返回 ActorFilms,format 提示语如下(注意观察 schema 部分):
您的响应应该是JSON格式。
不包括任何解释,只提供遵循此格式的RFC 8259兼容JSON响应,没有偏差。
不要在响应中包含markdown代码块。
从输出中删除`json markdown。
以下是输出必须遵循的JSON Schema实例:
```{
  "$schema" : "https://json-schema.org/draft/2020-12/schema",
  "type" : "object",
  "properties" : {
    "actor" : {
      "type" : "string"
    },
    "films" : {
      "type" : "array",
      "items" : {
        "type" : "string"
      }
    }
  },
  "additionalProperties" : false
}```
- 对于返回 List,format 提示语如下(注意观察 schema 部分):
您的响应应该是JSON格式。
不包括任何解释,只提供遵循此格式的RFC 8259兼容JSON响应,没有偏差。
不要在响应中包含markdown代码块。
从输出中删除`json markdown。
以下是输出必须遵循的JSON Schema实例:
```{
  "$schema" : "https://json-schema.org/draft/2020-12/schema",
  "type" : "array",
  "items" : {
    "type" : "object",
    "properties" : {
      "actor" : {
        "type" : "string"
      },
      "films" : {
        "type" : "array",
        "items" : {
          "type" : "string"
        }
      }
    },
    "additionalProperties" : false
  }
}```
2.5 ChatClient 默认选项设置
使用 ChatClient.Builder 创建 ChatClient 实例时,可以全局指定以下的默认配置项来设置默认配置:
- defaultOptions:核心是模型参数配置,例如温度,在模型介绍的章节会详细介绍
- defaultSystem:system 提示语,可以包含参数
- defaultUser:user 提示语,可以包含参数
- defaultTemplateRenderer:提示语模板
- defaultToolCallbacks/defaultTools/defaultToolContext/defaultToolNames:工具与 mcp
defaultAdvisors:advisors
可以在运行时使用不带前缀的相应方法覆盖这些默认值。
- options
- system
- user
- templateRenderer
- toolCallbacks/tools/toolContext/toolNames
- advisors
在运行时给带参数占位符的默认配置项设置参数值。
@Configuration
public class SpringAIConfig {
    @Bean
    public ChatClient customChatClient(ChatModel chatModel) {
        return ChatClient.builder(chatModel)
                .defaultSystem("You are a helpful assistant.{actor}")
                .build();
    }
}
@RequestMapping("/1000")
public String execute1000() {
    return chatClient.prompt()
            .system(s -> s.param("actor", "周星驰")) // 直接设置参数
            .user("tell me a joke").call().content();
}
2.6 Advisors
Advisors 提供了一种灵活而强大的方法来拦截、修改和增强 Spring AI 应用程序。
例如,使用 user 提示语调用 AI 模型时的一个常见模式是 使用上下文数据扩充提示。 这些上下文数据可以是不同类型的。常见的类型包括:
- 企业私有数据:这是 AI 模型尚未训练过的数据
- 对话历史记录:聊天模型的 API 是无状态的。如果您告诉 AI 模型您的姓名,它不会在后续交互中记住它。每次请求都必须发送对话历史记录,以确保在生成响应时考虑到之前的交互
ChatClient 提供了一个 AdvisorSpec 接口用于配置 Advisor 的接口。该接口提供了添加参数、一次性设置多个参数以及将一个或多个 Advisors 添加到链中的方法。
interface AdvisorSpec {
    AdvisorSpec param(String k, Object v);
    AdvisorSpec params(Map<String, Object> p);
    AdvisorSpec advisors(Advisor... advisors);
    AdvisorSpec advisors(List<Advisor> advisors);
}
关于 Advisors 更多细节,我们在后续的章节继续深入,这里我们以一个简单的日志记录为例,来了解其基础用法。
SimpleLoggerAdvisor 一个用于记录请求模型的 request 和模型返回的 response 数据的 Advisor。可以用于调试和监控 AI 交互。
application.properties 文件种新增如下配置,开启日志:
logging.level.org.springframework.ai.chat.client.advisor=DEBUG
/**
 * 使用默认的日志方式
 */
@RequestMapping("/10000")
public String execute10000() {
    return chatClient.prompt()
            .advisors(new SimpleLoggerAdvisor())
            .user("给我将一个笑话")
            .call().content();
}

/**
 * 定制日志
 */
@RequestMapping("/10001")
public String execute10001() {
    return chatClient.prompt()
            .advisors(new SimpleLoggerAdvisor(
                    request -> "Custom request: " + request.prompt().getUserMessage(),
                    response -> "Custom response: " + response.getResult(),
                    0
            ))
            .user("给我讲一个笑话")
            .call().content();
}
注意:假设有多个 Advisors,每个 Advisor 添加到链中的顺序至关重要,因为它决定了它们的执行顺序。每个 Advisor 都会以某种方式修改提示或上下文,并且一个 Advisor 所做的更改会传递给链中的下一个 Advisor。
2.7 ChatMemory
ChatMemory 接口表示聊天对话内存存储。它提供了向对话添加消息、从对话中检索消息以及清除对话历史记录的方法;对话需要设置 conversationId,用于不同的对话区分。
- 接口定义如下
public interface ChatMemory {
	String DEFAULT_CONVERSATION_ID = "default";

	/**
	 * The key to retrieve the chat memory conversation id from the context.
	 */
	String CONVERSATION_ID = "chat_memory_conversation_id";

	/**
	 * Save the specified message in the chat memory for the specified conversation.
	 */
	default void add(String conversationId, Message message) {
		Assert.hasText(conversationId, "conversationId cannot be null or empty");
		Assert.notNull(message, "message cannot be null");
		this.add(conversationId, List.of(message));
	}

	/**
	 * Save the specified messages in the chat memory for the specified conversation.
	 */
	void add(String conversationId, List<Message> messages);

	/**
	 * Get the messages in the chat memory for the specified conversation.
	 */
	List<Message> get(String conversationId);

	/**
	 * Clear the chat memory for the specified conversation.
	 */
	void clear(String conversationId);
}
ChatMemory 有一个内置实现:MessageWindowChatMemory 维护一个消息窗口,窗口大小不超过指定的最大限制(默认值:20 条消息)。当消息数量超过此限制时,较旧的消息将被移除,但 system 消息将被保留。如果添加了新的 system 消息,所有先前的 system 消息都将从内存中删除。这确保了对话始终可以使用最新的上下文,同时保持内存使用量有限。
MessageWindowChatMemory 内部通过 ChatMemoryRepository 接口提供的内存实现来实现消息存储,ChatMemoryRepository 的实现包括 InMemoryChatMemoryRepository / JdbcChatMemoryRepository / CassandraChatMemoryRepository / Neo4jChatMemoryRepository 等,在 memory 章节我们会详细介绍。
ChatClient 是通过 Advisors 机制来使用 ChatMemory 的。
@Bean
public ChatMemory messageWindowChatMemory() {
    return MessageWindowChatMemory.builder().maxMessages(10).build();
}
@Resource
private ChatMemory messageWindowChatMemory;

@RequestMapping("/20000")
public String execute20000() {
    return chatClient.prompt()
            .advisors(
                    MessageChatMemoryAdvisor.builder(messageWindowChatMemory).build(),
                    new SimpleLoggerAdvisor())
            .user("给我将一个笑话")
            .call().content();
}
3. 提示语 Prompt 与模板 PromptTemplate
在 接口 ChatClient 中介绍了使用提示语的三个方法。
ChatClientRequestSpec prompt();
ChatClientRequestSpec prompt(String content);
ChatClientRequestSpec prompt(Prompt prompt);
3.1 Prompt 类定义
public class Prompt implements ModelRequest<List<Message>> {
    /**
     * The messages to be sent to the model.
     * 请求内容
     */
    private final List<Message> messages;

    /**
     * The options to be used when calling the model.
     * 动态传入模型参数
     */
    @Nullable
    private ChatOptions chatOptions;
}

public interface Content {
    /**
     * 消息内容
     */
    String getText();
    /**
     * 消息元数据
     */
    Map<String, Object> getMetadata();
}

public interface Message extends Content {
	/**
	 * 消息类型
	 */
	MessageType getMessageType();
}

public enum MessageType {
	/**
	 * system 系统消息
	 */
	SYSTEM("system"),
	/**
	 * user 用户消息
	 */
	USER("user"),
	/**
	 * 助手消息
	 */
	ASSISTANT("assistant"),
	/**
	 * 工具响应消息
	 */
	TOOL("tool");
}
四种 MessageType:
- System Role: 通常用于设置人设
- User Role: 用户输入
- Assistant Role: AI 对于用户输入的响应,有时会作为下一轮输入的补充一起发送给大模型,联通整体流程
- Tool Role: 工具返回的信息
3.2 使用 Message 和 PromptTemplate 构建提示语
@RequestMapping("/33")
public String execute33() {
    /*
     * 通过提示语模板创建系统消息
     */
    SystemPromptTemplate systemPromptTemplate = new SystemPromptTemplate("请以{person}的风格回复问题");
    Message systemMessage = systemPromptTemplate.createMessage(Map.of("person", "王家卫"));

    /*
     * 创建用户消息
     */
    UserMessage userMessage = new UserMessage("描述一下今天天很热这个场景");

    /*
     * 创建提示语
     */
    Prompt prompt = Prompt.builder()
            .messages(List.of(systemMessage, userMessage)) // 设置消息
            .chatOptions(new DefaultChatOptionsBuilder().temperature(0.9).build()) // 设置模型参数
            .build();

    /*
     * 调用
     */
    return chatClient.prompt(prompt).call().content();
}
说明:
- 提示语模板是通过
TemplateRenderer来渲染参数的,自定义渲染器和定制渲染器占位符的方式已经在 接口 ChatClient 介绍过,此处不再赘述。chatOptions用来在运行时设置模型参数,覆盖应用启动时的全局默认参数
3.3 使用 Resource 构建提示语模板
在 resource 目录下新建 prompts/system.st 文件,st 文件代表 StringTemplate 格式文件(StringTemplate 是 SpringAI 默认使用的模板引擎),内容如下:
请以{person}的风格回复问题
@Value("classpath:/prompts/system.st")
private org.springframework.core.io.Resource systemResource;

@RequestMapping("/34")
public SystemPromptTemplate execute34() {
    /*
     * 通过 Reource 创建提示语模板
     */
    return new SystemPromptTemplate(systemResource);
}
4. 结构化输出 Structured Output
作用:将大模型返回的非结构化数据转换为应用程序需要的结构化数据。
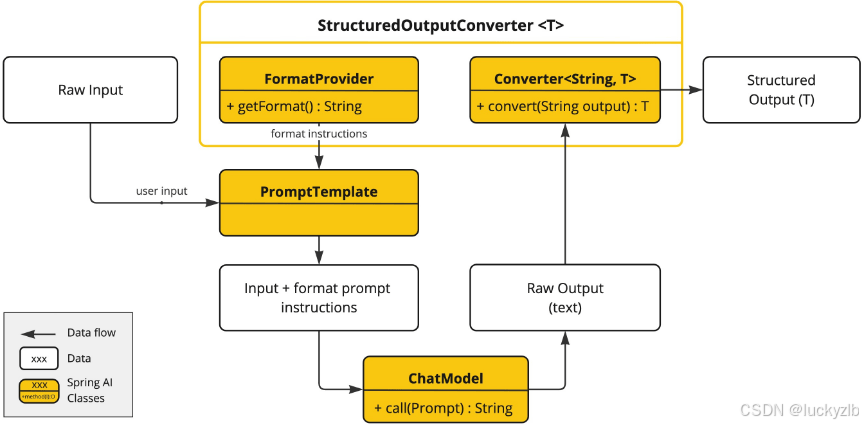
结构化输出转换器核心做两件事:
定义 format:在向大模型发起请求时,将 format 拼接在提示语之后一起发送给大模型,指导大模型按照该 format 进行返回
将字符串转换为目标格式:在大模型返回数据后,将返回的字符串内容转化为指定格式,例如 Java 类
4.1 转为java类型
/**
* 返回 Java 类
*/
@RequestMapping("/5")
public ActorFilms execute5() {
    return chatClient.prompt("Generate the filmography for a random actor.").call().entity(ActorFilms.class);
}
- Java 类如下:
import lombok.Data;
import lombok.experimental.Accessors;

import java.util.List;

@Data
@Accessors(chain = true)
public class ActorFilms {
    private String actor;
    private List<String> films;
}
- 其底层实现是:
@RequestMapping("/55")
public ActorFilms execute55() {
    /*
     * 创建转换器(转换器的 format 提示语会根据 BeanOutputConverter 中的 clazz 属性进行编写)
     */
    BeanOutputConverter<ActorFilms> converter = new BeanOutputConverter<>(ActorFilms.class);
    /*
     * 将转换器的 format 赋值
     */
    PromptTemplate promptTemplate = new PromptTemplate("""
            Generate the filmography for a random actor.
            {format}""");
    Prompt prompt = promptTemplate.create(Map.of("format", converter.getFormat()));
    /*
     * 调用大模型
     */
    String content = chatClient.prompt(prompt).advisors(new SimpleLoggerAdvisor()).call().content();
    /*
     * 转换为指定类型
     */
    return converter.convert(content);
}
类型转换器会根据返回的不同的 Java 模型制定不同的 format 提示语。例如对于返回 ActorFilms,format 提示语如下(注意观察 schema 部分):
Your response should be in JSON format.
Do not include any explanations, only provide a RFC8259 compliant JSON response following this format without deviation.
Do not include markdown code blocks in your response.
Remove the ```json markdown from the output.
Here is the JSON Schema instance your output must adhere to:
```{
  "$schema" : "https://json-schema.org/draft/2020-12/schema",
  "type" : "object",
  "properties" : {
    "actor" : {
      "type" : "string"
    },
    "films" : {
      "type" : "array",
      "items" : {
        "type" : "string"
      }
    }
  },
  "additionalProperties" : false
}```
4.2 转为List类型
@RequestMapping("/6")
public List<ActorFilms> execute6() {
    return chatClient.prompt("Generate the filmography of 5 movies for 周星驰 and 刘德华.").call().entity(new ParameterizedTypeReference<>() {
    });
}
- 底层实现
@RequestMapping("/56")
public List<ActorFilms> execute56() {
    /*
     * 创建转换器(转换器的 format 提示语会根据 BeanOutputConverter 中的 clazz 属性进行编写)
     */
    BeanOutputConverter<List<ActorFilms>> converter = new BeanOutputConverter<>(new ParameterizedTypeReference<>() {
    });
    /*
     * 将转换器的 format 赋值
     */
    PromptTemplate promptTemplate = new PromptTemplate("Tell me the names of 5 movies those act  by {actor}.{format}");
    Prompt prompt = promptTemplate.create(Map.of("actor", "刘德华", "format", converter.getFormat()));
    /*
     * 调用大模型
     */
    String content = chatClient.prompt(prompt).advisors(new SimpleLoggerAdvisor()).call().content();
    /*
     * 转换为指定类型
     */
    return converter.convert(content);
}
在实际使用中,使用以上的转换器也不会 100% 转换成功,与模型选型有非常大的关系。例如,对于深度思考型模型(例如,qwen3:32b 和 deepseek-r1)在 BeanOutputConverter format 提示语的加持下,仍会返回思考块,返回格式类似如下:
<think>
xxx
</think>

json 结果串
对于这种情况我们需要自定义转换器来去除思考块。
如果返回结构体不是 JSON 串,可以使用 JSON-Repair 做 JSON 字符串修复
4.3 自定义类型转换器(思考模式模型)
import java.lang.reflect.Type;
import java.util.Objects;
import java.util.regex.Pattern;

import com.fasterxml.jackson.core.JsonProcessingException;
import com.fasterxml.jackson.core.util.DefaultIndenter;
import com.fasterxml.jackson.core.util.DefaultPrettyPrinter;
import com.fasterxml.jackson.databind.DeserializationFeature;
import com.fasterxml.jackson.databind.JsonNode;
import com.fasterxml.jackson.databind.ObjectMapper;
import com.fasterxml.jackson.databind.ObjectWriter;
import com.fasterxml.jackson.databind.json.JsonMapper;
import com.github.victools.jsonschema.generator.Option;
import com.github.victools.jsonschema.generator.SchemaGenerator;
import com.github.victools.jsonschema.generator.SchemaGeneratorConfig;
import com.github.victools.jsonschema.generator.SchemaGeneratorConfigBuilder;
import com.github.victools.jsonschema.module.jackson.JacksonModule;
import com.github.victools.jsonschema.module.jackson.JacksonOption;
import org.slf4j.Logger;
import org.slf4j.LoggerFactory;

import org.springframework.ai.converter.StructuredOutputConverter;
import org.springframework.ai.model.KotlinModule;
import org.springframework.ai.util.JacksonUtils;
import org.springframework.core.KotlinDetector;
import org.springframework.core.ParameterizedTypeReference;
import org.springframework.lang.NonNull;

import static org.springframework.ai.util.LoggingMarkers.SENSITIVE_DATA_MARKER;

/**
 * 思考模式模型输出转换器
 * 作用:用于去除返回的 <think> 块中的思考块
 */
public class ThinkModelBeanOutputConverter<T> implements StructuredOutputConverter<T> {

	private final Logger logger = LoggerFactory.getLogger(ThinkModelBeanOutputConverter.class);
	private final Pattern pattern = Pattern.compile("<think>.*?</think>", Pattern.DOTALL);

	private final Type type;
	private final ObjectMapper objectMapper;
	private String jsonSchema;

	public ThinkModelBeanOutputConverter(Class<T> clazz) {
		this(ParameterizedTypeReference.forType(clazz));
	}

	public ThinkModelBeanOutputConverter(ParameterizedTypeReference<T> typeRef) {
		this(typeRef.getType(), null);
	}

	public ThinkModelBeanOutputConverter(Class<T> clazz, ObjectMapper objectMapper) {
		this(ParameterizedTypeReference.forType(clazz), objectMapper);
	}

	public ThinkModelBeanOutputConverter(ParameterizedTypeReference<T> typeRef, ObjectMapper objectMapper) {
		this(typeRef.getType(), objectMapper);
	}

	private ThinkModelBeanOutputConverter(Type type, ObjectMapper objectMapper) {
		Objects.requireNonNull(type, "Type cannot be null;");
		this.type = type;
		this.objectMapper = objectMapper != null ? objectMapper : getObjectMapper();
		generateSchema();
	}

	private void generateSchema() {
		JacksonModule jacksonModule = new JacksonModule(JacksonOption.RESPECT_JSONPROPERTY_REQUIRED,
				JacksonOption.RESPECT_JSONPROPERTY_ORDER);
		SchemaGeneratorConfigBuilder configBuilder = new SchemaGeneratorConfigBuilder(
				com.github.victools.jsonschema.generator.SchemaVersion.DRAFT_2020_12,
				com.github.victools.jsonschema.generator.OptionPreset.PLAIN_JSON)
			.with(jacksonModule)
			.with(Option.FORBIDDEN_ADDITIONAL_PROPERTIES_BY_DEFAULT);

		if (KotlinDetector.isKotlinReflectPresent()) {
			configBuilder.with(new KotlinModule());
		}

		SchemaGeneratorConfig config = configBuilder.build();
		SchemaGenerator generator = new SchemaGenerator(config);
		JsonNode jsonNode = generator.generateSchema(this.type);
		ObjectWriter objectWriter = this.objectMapper.writer(new DefaultPrettyPrinter()
			.withObjectIndenter(new DefaultIndenter().withLinefeed(System.lineSeparator())));
		try {
			this.jsonSchema = objectWriter.writeValueAsString(jsonNode);
		}
		catch (JsonProcessingException e) {
			logger.error("Could not pretty print json schema for jsonNode: {}", jsonNode);
			throw new RuntimeException("Could not pretty print json schema for " + this.type, e);
		}
	}

	@SuppressWarnings("unchecked")
	@Override
	public T convert(@NonNull String text) {
		try {
			// remove <think></think> block
			text = cleanThinkTags(text).trim();

			// Check for and remove triple backticks and "json" identifier
			if (text.startsWith("```") && text.endsWith("```")) {
				// Remove the first line if it contains "```json"
				String[] lines = text.split("\n", 2);
				if (lines[0].trim().equalsIgnoreCase("```json")) {
					text = lines.length > 1 ? lines[1] : "";
				}
				else {
					text = text.substring(3); // Remove leading ```
				}

				// Remove trailing ```
				text = text.substring(0, text.length() - 3);

				// Trim again to remove any potential whitespace
				text = text.trim();
			}
			return (T) this.objectMapper.readValue(text, this.objectMapper.constructType(this.type));
		}
		catch (JsonProcessingException e) {
			logger.error(SENSITIVE_DATA_MARKER,
					"Could not parse the given text to the desired target type: \"{}\" into {}", text, this.type);
			throw new RuntimeException(e);
		}
	}

	private String cleanThinkTags(String response) {
		return pattern.matcher(response).replaceAll("");
	}

	protected ObjectMapper getObjectMapper() {
		return JsonMapper.builder()
			.addModules(JacksonUtils.instantiateAvailableModules())
			.configure(DeserializationFeature.FAIL_ON_UNKNOWN_PROPERTIES, false)
			.build();
	}

	@Override
	public String getFormat() {
		String template = """
				Your response should be in JSON format.
				Do not include any explanations, only provide a RFC8259 compliant JSON response following this format without deviation.
				Do not include markdown code blocks in your response.
				Remove the ```json markdown from the output.
				Here is the JSON Schema instance your output must adhere to:
				```%s```
				""";
		return String.format(template, this.jsonSchema);
	}
}
说明:使用正则匹配出 xxx,删除该返回。
5. 模型 Model
5.1 模型特征
- 通过提供统一的模型适配接口,使得切换模型变得方便;
- 提供了各种模型的自动配置 starter,进一步方便模型的创建
- 支持所有的主流模型,例如远程的 OpenAI / Anthropic / Google 等模型和本地的 Ollama 模型
- 支持丰富的模型类型,例如 Chat 模型 / 文生图模型 / TTS(文本转语音模型) 等
本章我们仅介绍最常用的 OpenAI 协议的 Chat 模型和 Ollama 的 Chat 模型。
5.2 模型定义
5.2.1 ChatModel 统一模型
public interface ChatModel extends Model<Prompt, ChatResponse>, StreamingChatModel {
	/**
	 * 同步调用
	 * @param prompt 标准入参
	 * @return ChatResponse 标准返回
	 */
	@Override
	ChatResponse call(Prompt prompt);
}
5.2.2 StreamingChatModel 流式模型
public interface StreamingChatModel extends StreamingModel<Prompt, ChatResponse> {
	/**
	 * 流式调用
	 *
	 * @param prompt 标准输入
	 * @return Flux<ChatResponse> 标准输入
	 */
	@Override
	Flux<ChatResponse> stream(Prompt prompt);
}
5.2.3 ChatOptions 模型参数运行时设置
public interface ChatOptions extends ModelOptions {
	/**
	 * 所用模型
	 */
	String getModel();

    /**
     * temperature:越高,回答越发散,例如可用于写散文;越低,回答越精确,例如回答数学问题
     */
    Double getTemperature();

    /**
     * topK
     */
    Integer getTopK();

    /**
     * topP
     */
    Double getTopP();

	Double getFrequencyPenalty();

    Double getPresencePenalty();
	/**
	 * 最大可用 token 数
	 */
	Integer getMaxTokens();

	List<String> getStopSequences();
}
说明:
temperature/topK/topP:用于控制模型回答的发散性;frequencyPenalty/presencePenalty:用户控制文本出现的重复性,取值范围-2.0~2.0,值越大,重复性越低- 大部分参数的含义均可以在 这里 查看
- 除了通用参数设置之外,不同的模型还具有模型独有的参数设置,这些设置项存储在各个专有 Options 中,例如
OllamaOptions- 模型参数的推荐设置方式:在服务启动的时候,可以为
ChatClient设置统一的默认值,在运行时通过Prompt进行同值覆盖
5.2.4 ChatResponse 统一输出
public class ChatResponse implements ModelResponse<Generation> {
	/**
	 * 元数据
	 */
	private final ChatResponseMetadata chatResponseMetadata;

	/**
	 * 一个 prompt 返回的多个潜在信息
	 */
	private final List<Generation> generations;
}

public class Generation implements ModelResult<AssistantMessage> {
	/**
	 * assistant 消息:ai 返回的消息。包含消息内容和工具列表信息
	 */
	private final AssistantMessage assistantMessage;

	private ChatGenerationMetadata chatGenerationMetadata;
}
5.3 Ollama 本地模型
Ollama 可以方便的在本地运行大语言模型
5.3.1 安装 Ollama
关于 Ollama 的安装和使用见 安装大模型本地运行利器 ollama。
5.3.2 引入依赖
<!-- model-本地 -->
<dependency>
    <groupId>org.springframework.ai</groupId>
    <artifactId>spring-ai-starter-model-ollama</artifactId>
</dependency>
5.3.3 配置 application.properties
spring.ai.model.chat=ollama
spring.ai.ollama.base-url=http://127.0.0.1:11434
spring.ai.ollama.chat.options.model=qwen3:32b
spring.ai.ollama.chat.options.temperature=0.7
说明:
spring.ai.model.chat:必填,ollama - 表示使用 SpringAI 的自动配置能力;none - 表示不使用 SpringAI 的自动配置能力,适用于手动配置场景spring.ai.ollama.base-url:必填,Ollama 提供服务的地址spring.ai.ollama.chat.options.model:必填,模型 IDspring.ai.ollama.chat.options.temperature:默认,0.8。越高,回答越发散,例如可用于写散文;越低,回答越精确,例如回答数学问题
其他完整的配置见 这里
5.3.4 参数设置
启动时可以通过 application.properties 中的选项或者手动通过 OllamaChatModel(api, options) 设置参数。运行时可以通过 Prompt 进行动态设置。
ChatResponse response = chatClient.prompt(
                new Prompt(
                        "Generate the names of 5 famous pirates.",
                        OllamaOptions.builder()
                                .model(OllamaModel.LLAMA3_1)
                                .temperature(0.4)
                                .build()
                )).call().chatResponse();
5.3.5 手动方式
- 引入依赖
<dependency>
    <groupId>org.springframework.ai</groupId>
    <artifactId>spring-ai-ollama</artifactId>
</dependency>
- 使用
@Bean
public ChatModel chatModel() {
    return OllamaChatModel.builder()
            .ollamaApi(OllamaApi.builder().build())
            .defaultOptions(
                    OllamaOptions.builder()
                            .model("qwen3:32b")
                            .temperature(0.9)
                            .build())
            .build();
}
如果需要使用 ChatClient,此时还需要单独引入:
<dependency>
    <groupId>org.springframework.ai</groupId>
    <artifactId>spring-ai-client-chat</artifactId>
</dependency>
@Bean
public ChatModel chatModel() {
    return OllamaChatModel.builder()
            .ollamaApi(OllamaApi.builder().build())
            .defaultOptions(
                    OllamaOptions.builder()
                            .model("gpt-oss:20b")
                            .temperature(0.9)
                            .build())
            .build();
}

@Bean
public ChatClient chatClient(ChatModel chatModel) {
    return ChatClient.create(chatModel);
}
5.4 兼容 OpenAI 协议的远程模型
OpenAI 是行业最领先的 AI 公司,其 API 协议也成为了行业标准,众多的模型都会去兼容 OpenAI 协议,本节就使用兼容 OpenAI 协议的 Qwen 模型来做测试。
5.4.1 引入依赖
<!-- model-openai -->
<dependency>
    <groupId>org.springframework.ai</groupId>
    <artifactId>spring-ai-starter-model-openai</artifactId>
</dependency>
5.4.2 配置 application.properties
spring.ai.model.chat=openai
spring.ai.openai.base-url=https://dashscope.aliyuncs.com/compatible-mode/
spring.ai.openai.api-key=填写你自己的apiKey
spring.ai.openai.chat.options.model=qwen-long
spring.ai.openai.chat.options.temperature=0.7
说明:
spring.ai.model.chat:必填,openai - 表示使用 SpringAI 的自动配置能力;none - 表示不使用 SpringAI 的自动配置能力,适用于手动配置场景spring.ai.openai.base-url:如果使用阿里云的百炼模型,填写如上,在 百炼平台 查看spring.ai.openai.api-key:如果使用阿里云的百炼模型,在 百炼平台 申请和查看spring.ai.openai.chat.options.model:如果使用阿里云的百炼模型,在 百炼平台 查看,选择一个合适的模型即可spring.ai.ollama.chat.options.temperature:默认,0.8。越高,回答越发散,例如可用于写散文;越低,回答越精确,例如回答数学问题- 其他完整的配置见 这里
6. 记忆组件ChatMemory
6.1 作用
大型语言模型 (LLM) 是无状态的,这意味着它们不会保留先前交互的信息。当希望在多个交互之间传递上下文或状态时,需要使用 ChatMemory 组件进行实现。
核心接口如下:
ChatMemoryRepository:处理记忆消息的底层存储和检索ChatMemory:制定策略,实现决定保留哪些消息以及何时删除它们ChatClient:通过Advisors机制来使用ChatMemory
ChatMemory 有一个内置实现:MessageWindowChatMemory,其维护了一个消息窗口,窗口大小不超过指定的最大限制(默认值:20 条消息)。当消息数量超过此限制时,较旧的消息将被移除,但 system 消息将被保留。如果添加了新的 system 消息,所有先前的 system 消息都将从内存中删除。这确保了对话始终可以使用最新的上下文,同时保持内存使用量有限。
MessageWindowChatMemory 内部通过 ChatMemoryRepository 接口提供的实现来实现消息存储,ChatMemoryRepository 的实现包括 InMemoryChatMemoryRepository / JdbcChatMemoryRepository / CassandraChatMemoryRepository / Neo4jChatMemoryRepository 等,可以实现内存存储和持久化存储,用于实现短期记忆和长期记忆。默认使用 InMemoryChatMemoryRepository 进行内存存储。
6.2 接口定义
6.2.1ChatMemory
public interface ChatMemory {
	/**
	 * Save the specified messages in the chat memory for the specified conversation.
	 */
	void add(String conversationId, List<Message> messages);

	/**
	 * Get the messages in the chat memory for the specified conversation.
	 */
	List<Message> get(String conversationId);

	/**
	 * Clear the chat memory for the specified conversation.
	 */
	void clear(String conversationId);
}
说明:
- 每一个对话都需要设置一个
conversationId,用于区分不同的对话 ChatMemory提供了向对话添加消息、从对话中检索消息以及清除对话历史记录的方法
6.2.2 ChatMemoryRepository
public interface ChatMemoryRepository {
	List<Message> findByConversationId(String conversationId);
	/**
	 * Replaces all the existing messages for the given conversation ID with the provided
	 * messages.
	 */
	void saveAll(String conversationId, List<Message> messages);
	void deleteByConversationId(String conversationId);
}
6.2.2.1 InMemoryChatMemoryRepository 内存存储短期记忆
public final class InMemoryChatMemoryRepository implements ChatMemoryRepository {
    // 存储容器
	Map<String, List<Message>> chatMemoryStore = new ConcurrentHashMap<>();

	@Override
	public List<Message> findByConversationId(String conversationId) {
		List<Message> messages = this.chatMemoryStore.get(conversationId);
		return messages != null ? new ArrayList<>(messages) : List.of();
	}

	@Override
	public void saveAll(String conversationId, List<Message> messages) {
		this.chatMemoryStore.put(conversationId, messages);
	}

	@Override
	public void deleteByConversationId(String conversationId) {
		this.chatMemoryStore.remove(conversationId);
	}
}
6.2.2.2 JdbcChatMemoryRepository 数据库存储长期记忆
public final class JdbcChatMemoryRepository implements ChatMemoryRepository {
	private final JdbcTemplate jdbcTemplate;
	private final TransactionTemplate transactionTemplate;
	private final JdbcChatMemoryRepositoryDialect dialect;

	private JdbcChatMemoryRepository(JdbcTemplate jdbcTemplate, JdbcChatMemoryRepositoryDialect dialect,
			PlatformTransactionManager txManager) {
		this.jdbcTemplate = jdbcTemplate;
		this.dialect = dialect;
		this.transactionTemplate = new TransactionTemplate(
				txManager != null ? txManager : new DataSourceTransactionManager(jdbcTemplate.getDataSource()));
	}

	@Override
	public List<Message> findByConversationId(String conversationId) {
		return this.jdbcTemplate.query(this.dialect.getSelectMessagesSql(), new MessageRowMapper(), conversationId);
	}

	@Override
	public void saveAll(String conversationId, List<Message> messages) {
		this.transactionTemplate.execute(status -> {
			deleteByConversationId(conversationId);
			this.jdbcTemplate.batchUpdate(this.dialect.getInsertMessageSql(),
					new AddBatchPreparedStatement(conversationId, messages));
			return null;
		});
	}

	@Override
	public void deleteByConversationId(String conversationId) {
		this.jdbcTemplate.update(this.dialect.getDeleteMessagesSql(), conversationId);
	}
}
可以看到 JdbcChatMemoryRepository 调用的是 JdbcChatMemoryRepositoryDialect 中的 sql 模板来发起数据库访问的。
MysqlChatMemoryRepositoryDialect 内容如下:
public class MysqlChatMemoryRepositoryDialect implements JdbcChatMemoryRepositoryDialect {

	@Override
	public String getSelectMessagesSql() {
		return "SELECT content, type FROM SPRING_AI_CHAT_MEMORY WHERE conversation_id = ? ORDER BY `timestamp`";
	}

	@Override
	public String getInsertMessageSql() {
		return "INSERT INTO SPRING_AI_CHAT_MEMORY (conversation_id, content, type, `timestamp`) VALUES (?, ?, ?, ?)";
	}

	@Override
	public String getSelectConversationIdsSql() {
		return "SELECT DISTINCT conversation_id FROM SPRING_AI_CHAT_MEMORY";
	}

	@Override
	public String getDeleteMessagesSql() {
		return "DELETE FROM SPRING_AI_CHAT_MEMORY WHERE conversation_id = ?";
	}

}
6.3 内存短期记忆模式使用
@Bean
public ChatMemoryRepository inMemoryChatMemoryRepository() {
    return new InMemoryChatMemoryRepository();
}

@Bean
public ChatMemory messageWindowChatMemory() {
    return MessageWindowChatMemory.builder()
            .maxMessages(10)
            .chatMemoryRepository(inMemoryChatMemoryRepository()) // 设定仓储
            .build();
}

@Bean
public ChatClient customChatClient(ChatModel chatModel) {
    return ChatClient.builder(chatModel)
            .defaultAdvisors(MessageChatMemoryAdvisor.builder(messageWindowChatMemory()).build())
            .build();
}
@Resource
private ChatClient customChatClient;

@RequestMapping("/20001")
public String execute20001(@RequestParam("conversationId") String conversationId,
                           @RequestParam("userRequest") String userRequest) {
    return customChatClient.prompt()
            .advisors(advisorSpec -> advisorSpec.param(ChatMemory.CONVERSATION_ID, conversationId))
            .advisors(new SimpleLoggerAdvisor())
            .user(userRequest)
            .call().content();
}
6.4 数据库长期记忆模式使用
- 引入依赖
<!-- memory-jdbc -->
<dependency>
    <groupId>org.springframework.ai</groupId>
    <artifactId>spring-ai-starter-model-chat-memory-repository-jdbc</artifactId>
</dependency>
<!-- 数据源 -->
<dependency>
    <groupId>com.alibaba</groupId>
    <artifactId>druid</artifactId>
    <version>1.2.27</version>
</dependency>
<!-- mysql 驱动 -->
<dependency>
    <groupId>com.mysql</groupId>
    <artifactId>mysql-connector-j</artifactId>
    <version>8.4.0</version>
</dependency>
默认会自动配置一个 JdbcChatMemoryRepository Bean,我们只需直接注入即可。这里我们手动创建一个 Bean,方便了解底层原理。
@Bean
public DataSource dataSource() {
    DruidDataSource dataSource = new DruidDataSource();
    dataSource.setUrl("jdbc:mysql://localhost:3306/ai_demo");
    dataSource.setUsername("root");
    dataSource.setPassword("xxx");
    dataSource.setDriverClassName("com.mysql.jdbc.Driver");
    return dataSource;
}

@Bean
public JdbcTemplate jdbcTemplate() {
    return new JdbcTemplate(dataSource());
}

@Bean
public DataSourceTransactionManager dataSourceTransactionManager() {
    return new DataSourceTransactionManager(jdbcTemplate().getDataSource());
}

@Bean
public JdbcChatMemoryRepository jdbcChatMemoryRepository() {
    return JdbcChatMemoryRepository.builder()
            .jdbcTemplate(jdbcTemplate())
            .dialect(new MysqlChatMemoryRepositoryDialect())
            .transactionManager(dataSourceTransactionManager())
            .build();
}

@Bean
public ChatMemory messageWindowChatMemory() {
    return MessageWindowChatMemory.builder()
            .maxMessages(10)
            .chatMemoryRepository(jdbcChatMemoryRepository())
            .build();
}

@Bean
public ChatClient customChatClient(ChatModel chatModel) {
    return ChatClient.builder(chatModel)
            .defaultAdvisors(MessageChatMemoryAdvisor.builder(messageWindowChatMemory()).build())
            .build();
}
- application.properties
# init database schema
spring.ai.chat.memory.repository.jdbc.initialize-schema=always
说明:
spring.ai.chat.memory.repository.jdbc.initialize-schema:是否自动创建数据库表,always-总是创建;never-不创建;embedded-内嵌型数据库(例如,H2)进行创建。自动创建表的语句在org.springframework.ai.spring-ai-model-chat-memory-repository-jdbc 包下,例如schema-mysql.sql内容如下:
CREATE TABLE IF NOT EXISTS SPRING_AI_CHAT_MEMORY (
    `conversation_id` VARCHAR(36) NOT NULL,
    `content` TEXT NOT NULL,
    `type` ENUM('USER', 'ASSISTANT', 'SYSTEM', 'TOOL') NOT NULL,
    `timestamp` TIMESTAMP NOT NULL,

    INDEX `SPRING_AI_CHAT_MEMORY_CONVERSATION_ID_TIMESTAMP_IDX` (`conversation_id`, `timestamp`)
);
7. 链式组件 Advisors
7.1 作用
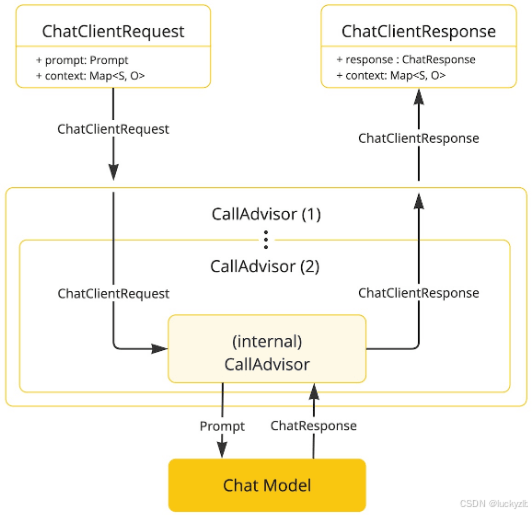
Advisor 是 SpringAI 中极其重要的一个组件,构建了整个 SpringAI 的执行流程。
简单原理如上图所示:多个 Advisor 组成链表结构,在调用大模型前按照优先级从高到低依次执行前置逻辑,之后执行大模型调用,最后在大模型调用之后按照优先级从低到高依次执行后置逻辑。
如果熟悉 Dubbo 的 Filter 链式结构,Advisor 的作用就相当于 Filter 的作用。不过 SpringAI 做的更彻底,将对大模型的调用也包装为一个 advisor,该 advisor 的优先级最低。
7.2 原理分析
@RequestMapping("/10000")
public String execute10000() {
    return chatClient.prompt()
            .advisors(new SimpleLoggerAdvisor())
            .user("tell me a joke")
            .call()
            .content();
}
步骤如下:
- 启动时创建 DefaultChatClient 实例,其间接包含属性
List<Advisor> advisors advisors(new SimpleLoggerAdvisor()):新建一个SimpleLoggerAdvisor实例,添加到 1 中的 advisors 列表里call():仅看同步调用,新建一个ChatModelCallAdvisor,添加到 1 中的 advisors 列表里(ChatModelCallAdvisor就是真正调用模型的地方);新建一个DefaultAroundAdvisorChain实例,将 advisors 列表设置为其的一个属性,并且对该列表中的Advisor实例按照getOrder()进行排序。order 越小,优先级越高,越先执行。content():调用DefaultAroundAdvisorChain的nextCall()方法,依次执行 advisors 列表的链式调用
说明:
Advisor的 order 属性值越小,优先级越高,越先执行;自定义的Advisor需要格外注意该值的定义ChatModelCallAdvisor的优先级最低,order=Integer.MAX_VALUE- 官方建议在启动构建
ChatClientBean时,使用defaultAdvisors()方法注册Advisor
7.3 自定义一个 Advisor
import org.springframework.ai.chat.client.ChatClientRequest;
import org.springframework.ai.chat.client.ChatClientResponse;
import org.springframework.ai.chat.client.advisor.api.CallAdvisor;
import org.springframework.ai.chat.client.advisor.api.CallAdvisorChain;

public class MyCustomAdvisor2 implements CallAdvisor {
    @Override
    public ChatClientResponse adviseCall(ChatClientRequest chatClientRequest, CallAdvisorChain callAdvisorChain) {
        /*
         * 前置逻辑
         */
        System.out.println("MyCustomAdvisor2: start");
        /*
         * 传递上下文参数
         */
        chatClientRequest.context().put("customAdvisor", "MyCustomAdvisor2");
        /*
         * 链式调用,最后到 LLM 调用
         */
        ChatClientResponse chatClientResponse = callAdvisorChain.nextCall(chatClientRequest);
        /*
         * 后置逻辑
         */
        System.out.println("MyCustomAdvisor2: end");
        return chatClientResponse;
    }

    @Override
    public String getName() {
        return this.getClass().getSimpleName();
    }

    @Override
    public int getOrder() {
        return -2;
    }
}
以上仅展示了同步调用的方式,流式调用需要实现 StreamAdvisor,可以参考
org.springframework.ai.chat.client.advisor.SimpleLoggerAdvisor进行实现
8. 工具调用 Tool Calling
8.1 作用
工具调用允许模型与 API 或工具进行交互,从而增强其功能。
工具主要用于两个场景:
获取信息:从外部来源(例如数据库、Web 服务、文件系统或 Web 搜索引擎)获取信息。其目标是增强模型的知识,使其能够回答原本无法回答的问题。因此,它们可用于检索增强生成 (RAG)场景。例如,可以使用工具检索给定位置的当前天气、检索最新新闻文章或查询数据库中的特定记录采取行动:用于在系统中采取行动,例如发送电子邮件、在数据库中创建新记录、提交表单或触发工作流。其目标是自动化原本需要人工干预或明确编程的任务。例如,预订航班、在网页上填写表单,或在代码生成场景中基于自动化测试 (TDD) 实现 Java 类
需要注意的是:不是所有的模型都支持工具调用,请选择能够处理工具调用的模型,例如:qwen3:30b-a3b-instruct-2507-q4_K_M
8.2 核心原理
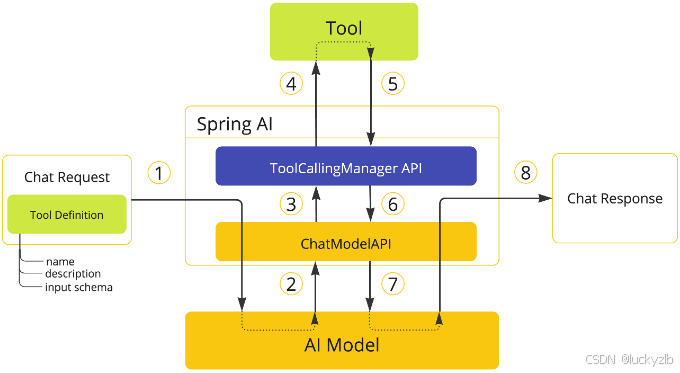
说明:
- 客户端发送请求,包含
prompt和可用工具列表,通过ChatModel发送给模型进行模型调用 - 当模型需要调用某个工具时,它会返回响应(
ChatResponse),其中包含工具名称和根据 inputSchema 定义的请求参数 ChatModel将工具调用请求发送到ToolCallingManager(ToolCallingManager用于处理整个工具的执行周期)ToolCallingManager识别要调用的工具并使用提供的输入参数执行它- 工具调用的结果返回给
ToolCallingManager ToolCallingManager将工具执行结果返回给ChatModel- 如果工具的
returnDirect属性为true,ChatModel直接将工具结果返回给调用者(ChatClient),流程结束;否则,ChatModel将工具执行结果发送回给模型(ToolResponseMessage) 后,继续执行第 8 步 - 模型使用工具调用结果作为附加上下文生成最终响应,并通过
ChatResponse将其发送回调用者(ChatClient)
8.3 核心接口
两个核心接口:工具 ToolCallback 与工具执行管理器 ToolCallingManager。工具负责定义工具(包括工具定义和工具执行逻辑);工具执行管理器负责管理工具的执行,其直接与 ChatModel 沟通,是工具执行的门面接口。
8.3.1 工具
public interface ToolCallback {
	/**
	 * Definition used by the AI model to determine when and how to call the tool.
	 * 工具核心定义:name/description/inputSchema
	 */
	ToolDefinition getToolDefinition();

	/**
	 * Metadata providing additional information on how to handle the tool.
	 * 定义:returnDirect
	 */
	ToolMetadata getToolMetadata();

	/**
	 * Execute tool with the given input and return the result to send back to the AI
	 * model.
	 * 执行逻辑
	 */
	String call(String toolInput);

	/**
	 * Execute tool with the given input and context, and return the result to send back
	 * to the AI model.
	 * 带着上下文执行逻辑
	 */
	String call(String toolInput, @Nullable ToolContext toolContext);
}
public interface ToolDefinition {

	/**
	 * The tool name. Unique within the tool set provided to a model.
	 */
	String name();

	/**
	 * The tool description, used by the AI model to determine what the tool does.
	 */
	String description();

	/**
	 * The schema of the parameters used to call the tool.
	 */
	String inputSchema();
}
SpringAI 默认为 ToolCallback 接口提供了两个实现:MethodToolCallback 和 FunctionToolCallback<I, O>,前者用于实现方法工具,后者用于实现函数工具。
8.3.2 工具管理器
public interface ToolCallingManager {
	/**
	 * Execute the tool calls requested by the model.
	 * 执行工具
	 */
	ToolExecutionResult executeToolCalls(Prompt prompt, ChatResponse chatResponse);
}
- 框架判断是否要执行工具的逻辑如下:
public class DefaultToolExecutionEligibilityPredicate implements ToolExecutionEligibilityPredicate {
	@Override
	public boolean test(ChatOptions promptOptions, ChatResponse chatResponse) {
	    // 开启内部控制标识 && 模型返回了需要执行的工具
		return ToolCallingChatOptions.isInternalToolExecutionEnabled(promptOptions) && chatResponse != null
				&& chatResponse.hasToolCalls();
	}
}
8.4 方法工具定义与调用
8.4.1 定义工具执行管理器
@Bean
public ToolCallingManager toolCallingManager() {
    return ToolCallingManager.builder().build();
}

@Bean
public ChatClient chatClient2(ChatModel chatModel) {
    return ChatClient.builder(chatModel).build();
}
8.4.2 定义工具
import lombok.Data;
import lombok.experimental.Accessors;
import org.springframework.ai.chat.model.ToolContext;
import org.springframework.ai.tool.annotation.Tool;
import org.springframework.ai.tool.annotation.ToolParam;

/**
 * 天气工具类
 */
public class WeatherTools {

    @Tool(name = "getWeather", description = "getWeather", returnDirect = false)
    public Weather getWeather(@ToolParam(description = "The location of the weather") Location location) {
        if (location == null) {
            throw new IllegalArgumentException("Location cannot be null");
        }
        if (location.hangzhou()) {
            return new Weather()
                    .setCurrentLocation(location)
                    .setCurrentWeather(new Weather.WeatherInfo()
                            .setTemperature(40.0)
                            .setWeatherDescription("晴"));
        } else {
            return new Weather()
                    .setCurrentLocation(location)
                    .setCurrentWeather(new Weather.WeatherInfo()
                            .setTemperature(30.3)
                            .setWeatherDescription("阴"));
        }
    }

    @Tool(name = "setAlarm", description = "if the given temperature exceeds 37 degrees, please set a warning", returnDirect = true)
    public void setAlarm(@ToolParam(description = "weather, contains currentLocation and currentWeather") Weather weather, @ToolParam(description = "The tool context", required = false) ToolContext toolContext) {
        System.out.println("Warning: The temperature in " + weather.getCurrentLocation().getCity() + " is " + weather.getCurrentWeather().getTemperature() + "°C. 注意避暑,以下时避暑指南:" + toolContext.getContext().get("summerHeatEscapeGuide"));
    }

    @Data
    @Accessors(chain = true)
    public static class Location {
        @ToolParam(description = "The province of the location")
        private String province;
        @ToolParam(description = "The city of the location")
        private String city;
        @ToolParam(description = "The area of the location", required = false)
        private String area;

        public boolean hangzhou() {
            return "Hangzhou".equals(city);
        }
    }

    @Data
    @Accessors(chain = true)
    public static class Weather {
        private Location currentLocation;
        private WeatherInfo currentWeather;

        @Data
        @Accessors(chain = true)
        public static class WeatherInfo {
            private Double temperature;
            private String weatherDescription;
        }
    }
}
说明:
@Tool将一个方法标识为一个工具name:工具名称,如果不填,默认使用方法名。是工具的唯一标识,建议自行填写,并且全局唯一description:工具用途。务必详尽的介绍该工具的功能,模型会根据该描述进行工具的选择returnDirect:false-表示工具的返回需要返回给模型,模型会根据该返回结果做推理逻辑,将最终的结果返回给客户端;true-表示工具的返回直接返回给客户端,不需要返回给模型resultConverter:用于将工具返回的结果序列化为 String 返回给模型
@ToolParam:标识工具参数的作用,可用于方法参数和属性上。描述务必详细一些,例如setAlarm中的@ToolParam(description = "weather, contains currentLocation and currentWeather") Weather weather,如果仅描述为the weather information,将无法正确的接收来自getWeather()的结果ToolContext:工具上下文参数,可以从ChatClient传入- 支持的方法范围:静态方法和实例方法;public/protected/default/private 可见性;包含该方法的类可以是顶级类或嵌套类,也可以具有任意可见性
- 支持的方法参数范围:方法可以定义任意数量的参数(包括无参数),并且支持大多数类型(primitives, POJOs, enums, lists, arrays, maps)
- 支持的方法返回值范围:方法可以返回大多数类型,包括 void。如果该方法返回值,则返回类型必须是可序列化类型,因为结果将被序列化并发送回模型
- 方法工具不支持的参数类型和返回值类型:
Optional/Asynchronous types (e.g. CompletableFuture, Future)/Reactive types (e.g. Flow, Mono, Flux)/Functional types (e.g. Function, Supplier, Consumer),其中函数类型可以由函数工具支持
8.4.3 执行工具
@RequestMapping("/3")
public String execute3() {
    return chatClient2.prompt("What is the weather like in Hangzhou?")
            .tools(new WeatherTools()) // 添加工具
            .call().content();
}

@RequestMapping("/4")
public String execute4() {
    return chatClient2.prompt("If the temperature in Hangzhou is above 37 degrees, please set a warning.")
            .tools(new WeatherTools()) // 添加工具
            .toolContext(Map.of("summerHeatEscapeGuide", "多喝水"))
            .call().content();
}
- 根据消息流转看下执行步骤:
1.USER:  If the temperature in Hangzhou is above 37 degrees, please set a warning. // 发送用户消息给模型
2.ASSISTANT: ToolCall[function=ToolCallFunction[name=getWeather, arguments={location={city=Hangzhou}}, index=null]] // 模型返回需要调用的工具
3.TOOL: {"currentLocation":{"province":null,"city":"Hangzhou","area":null},"currentWeather":{"temperature":40.0,"weatherDescription":"晴"}}  // 工具返回的响应
4.将前三个消息一起发送给模型
5.ASSISTANT: ToolCall[function=ToolCallFunction[name=setAlarm, arguments={weather={currentLocation={area=null, city=Hangzhou, province=null}, currentWeather={temperature=40, weatherDescription=晴}}}, index=null]] // // 模型返回需要调用的工具
6.TOOL:null // 工具返回给客户端
8.4.4 底层原理
WeatherTools 的两个方法 getWeather 和 setAlarm 在底层运行时会转换为两个 MethodToolCallback,其中 getWeather 的信息如下。核心注意下 inputSchema,通过 jsonSchema 定义清楚了入参,如果后续需要手动定义 inputSchema,这个可以作为参考示例。
MethodToolCallback{toolDefinition=DefaultToolDefinition[name=getWeather, description=getWeather, inputSchema={
  "$schema" : "https://json-schema.org/draft/2020-12/schema",
  "type" : "object",
  "properties" : {
    "location" : {
      "type" : "object",
      "properties" : {
        "area" : {
          "type" : "string",
          "description" : "The area of the location"
        },
        "city" : {
          "type" : "string",
          "description" : "The city of the location"
        },
        "province" : {
          "type" : "string",
          "description" : "The province of the location"
        }
      },
      "required" : [ "city", "province" ],
      "description" : "The location of the weather"
    }
  },
  "required" : [ "location" ],
  "additionalProperties" : false
}], toolMetadata=DefaultToolMetadata[returnDirect=false]}
8.5 函数工具定义域调用
8.5.1 定义工具
public class GetWeatherTool implements Function<GetWeatherTool.Location, GetWeatherTool.Weather> {
    @Override
    public Weather apply(@ToolParam(description = "The location of the weather") Location location) {
        if (location == null) {
            throw new IllegalArgumentException("Location cannot be null");
        }
        if (location.hangzhou()) {
            return new GetWeatherTool.Weather()
                    .setCurrentLocation(location)
                    .setCurrentWeather(new Weather.WeatherInfo()
                            .setTemperature(40.0)
                            .setWeatherDescription("晴"));
        } else {
            return new GetWeatherTool.Weather()
                    .setCurrentLocation(location)
                    .setCurrentWeather(new Weather.WeatherInfo()
                            .setTemperature(30.3)
                            .setWeatherDescription("阴"));
        }
    }

    @Data
    @Accessors(chain = true)
    public static class Location {
        @ToolParam(description = "The province of the location")
        private String province;
        @ToolParam(description = "The city of the location")
        private String city;
        @ToolParam(description = "The area of the location", required = false)
        private String area;

        public boolean hangzhou() {
            return "Hangzhou".equals(city);
        }
    }

    @Data
    @Accessors(chain = true)
    public static class Weather {
        private Location currentLocation;
        private WeatherInfo currentWeather;

        @Data
        @Accessors(chain = true)
        public static class WeatherInfo {
            private Double temperature;
            private String weatherDescription;
        }
    }
}
说明:
@ToolParam:标识工具参数的作用,可用于方法参数和属性上- 支持的函数参数和返回范围:函数入参和返回必须是
public的 - 函数工具不支持的参数返回值范围:
Primitive types/Optional/Collection types (e.g. List, Map, Array, Set)/Asynchronous types (e.g. CompletableFuture, Future)/Reactive types (e.g. Flow, Mono, Flux).
8.5.2 执行工具
@RequestMapping("/5")
public String execute5() {
    FunctionToolCallback<GetWeatherTool.Location, GetWeatherTool.Weather> getWeather = FunctionToolCallback
            .builder("getWeather", new GetWeatherTool()) // name 和实例
            .description("getWeather") // 描述
            .inputType(GetWeatherTool.Location.class) // 输入参数类型,如果未主动指定 inputSchema,则使用这个参数类型生成 inputSchema = JsonSchemaGenerator.generateForType(this.inputType)
            .toolMetadata(ToolMetadata.builder().returnDirect(false).build())
            .build();

    return chatClient2.prompt("What is the weather like in Hangzhou?")
            .toolCallbacks(List.of(getWeather)) // 添加工具
            .call().content();
}
9. 模型上下文协议 MCP
9.1 作用
模型上下文协议(Model Context Protocol,简称 MCP) 为模型和工具/资源等的交互提供了一种标准化协议。通过标准化的协议极大的刺激了工具的丰富性和开放性,随着 MCP 的提出,各种 MCP 协议的工具层出不穷,极大的推动了 AI 行业的发展。
Spring AI MCP 通过 Spring Boot 集成了 MCP 官方提供的 MCP Java SDK,同时提供了 MCP Client 和 MCP Server 的自动配置方式,简化了 MCP 的开发。
9.2 核心原理
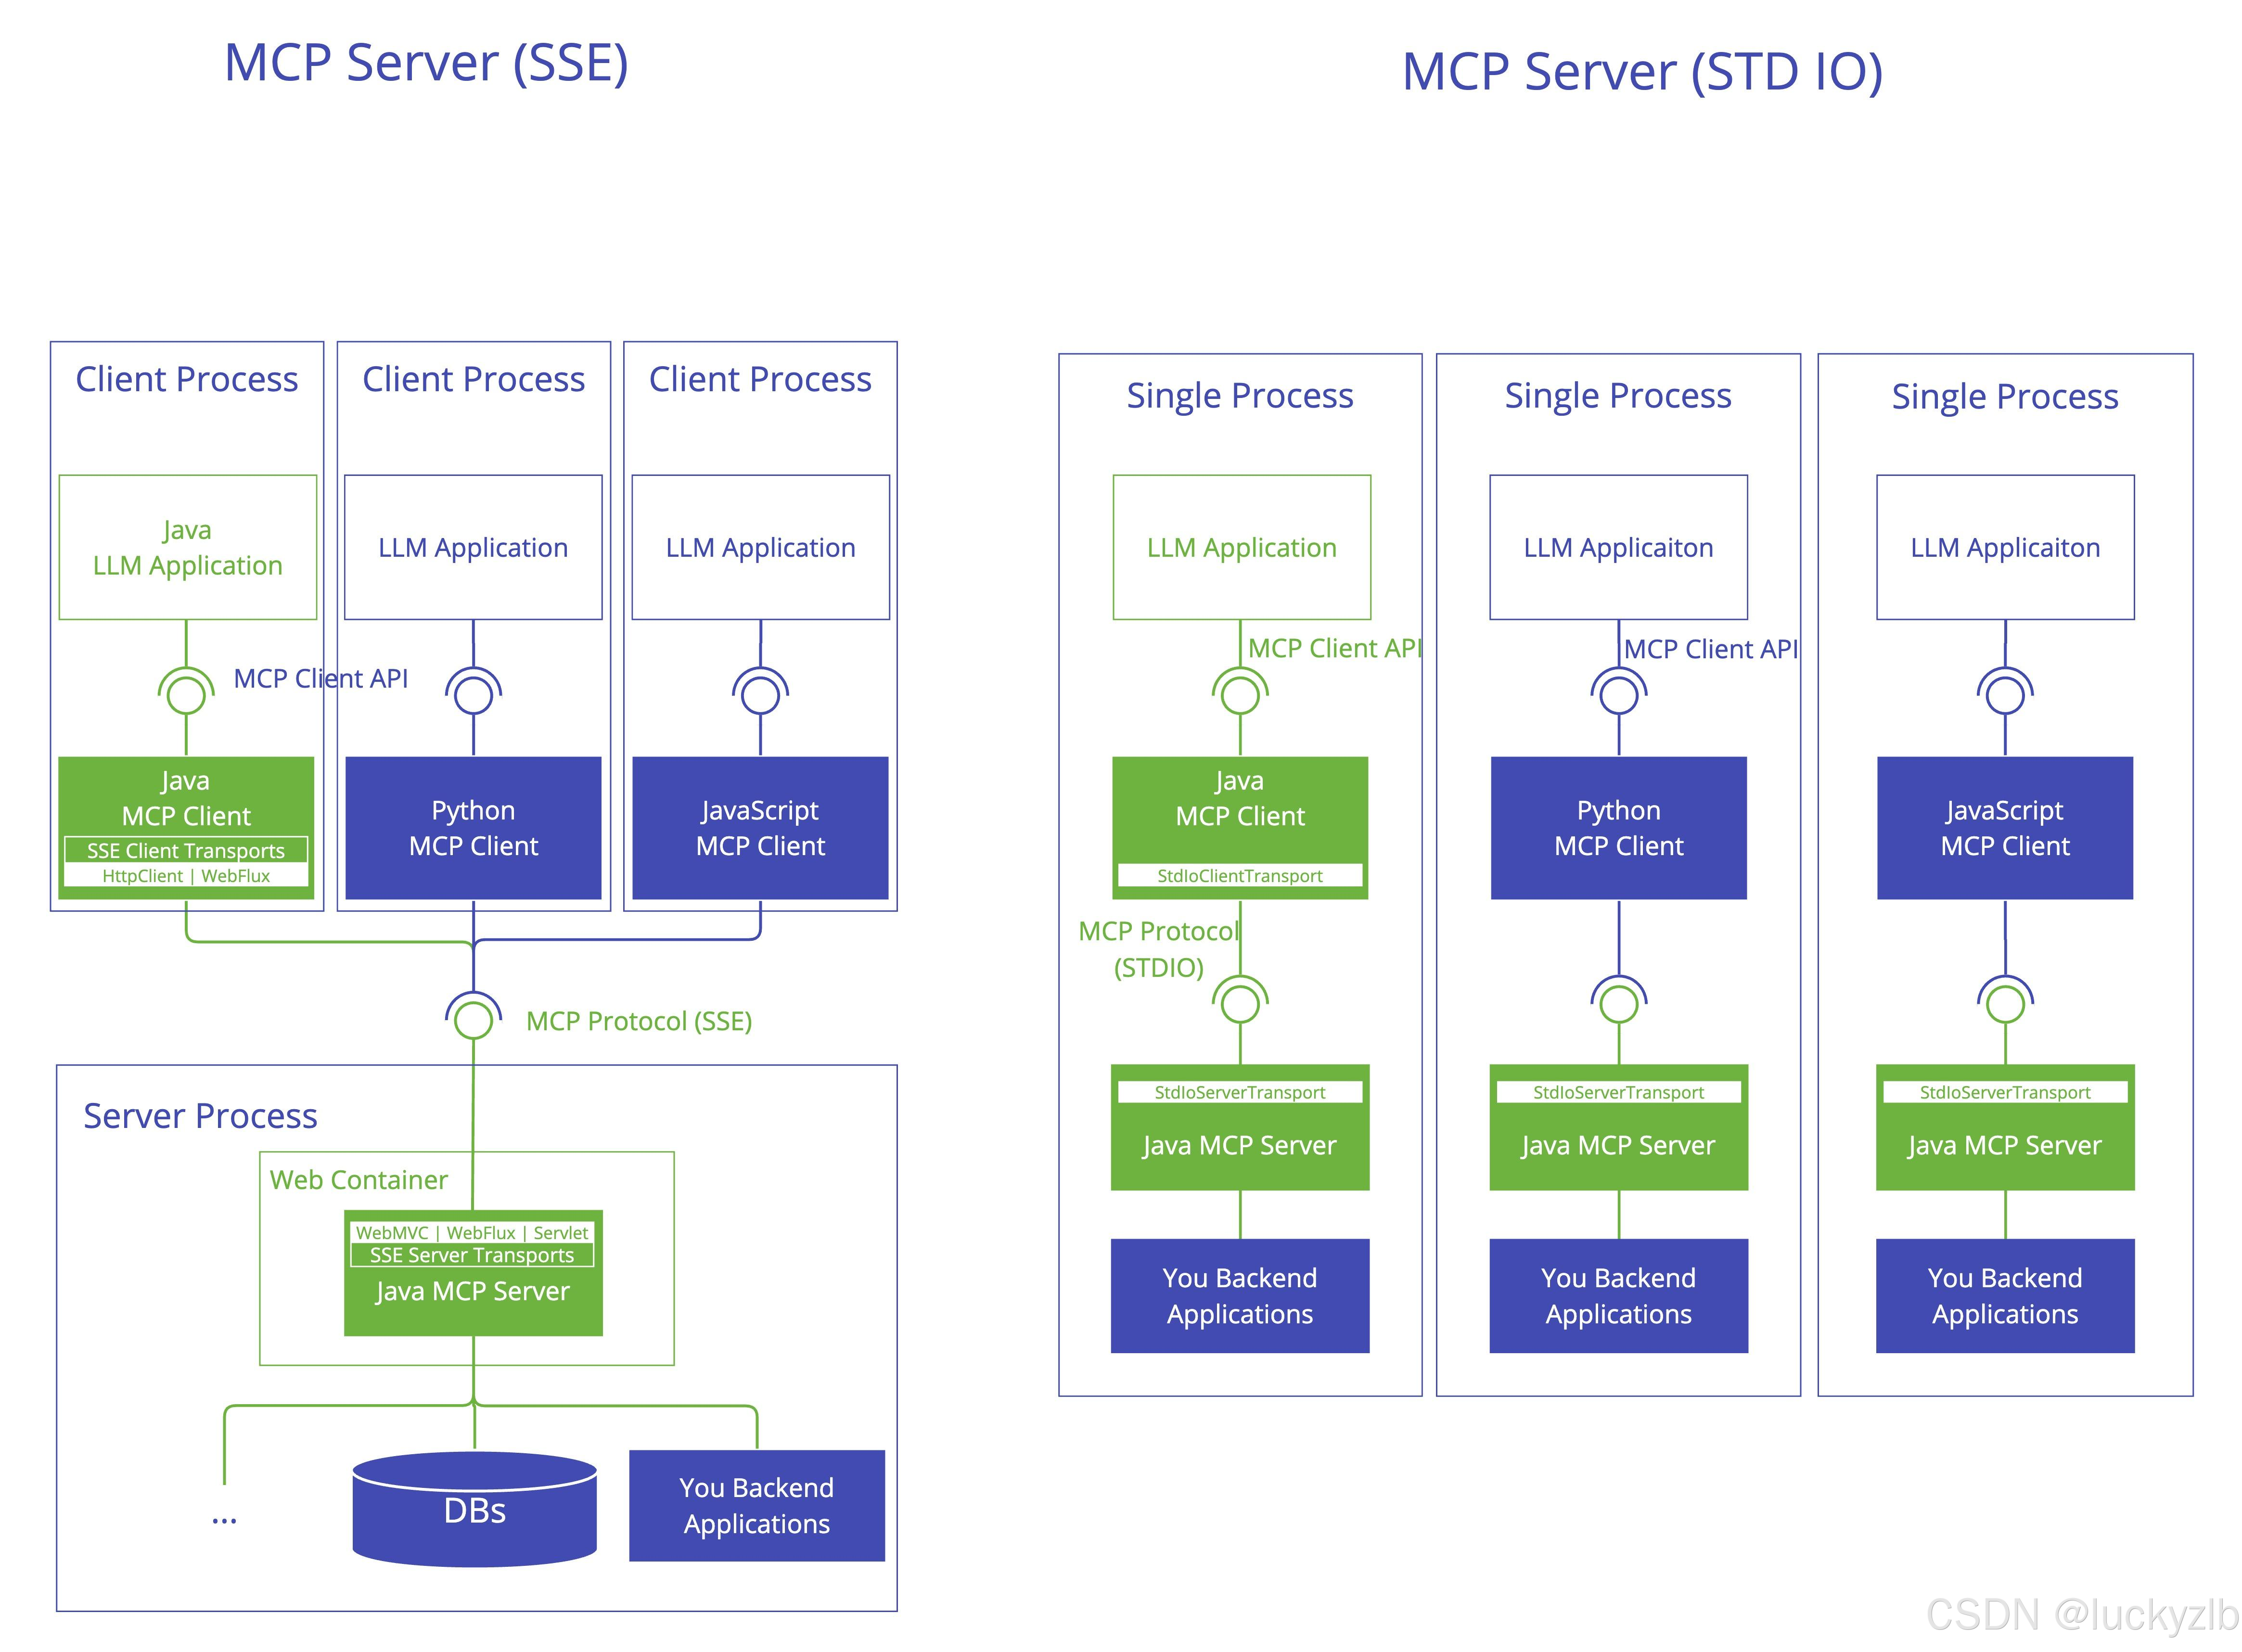
MCP 是典型的 CS(Client-Server)架构,server 提供服务,client 使用服务,其核心提供了两种协议:
- stdio 协议:将 client 与 server 部署在同一个机器上,分别启动各自的进程,通过标准输入和输出进行进程间通信
- sse(
Server-Sent Events)协议:将 client 与 server 部署在不同机器上,server 启动 http 服务,client 通过 http 协议进行访问
9.2 stdio 通信模式
9.2.1 MCPServer
- 依赖
<?xml version="1.0" encoding="UTF-8"?>
<project xmlns="http://maven.apache.org/POM/4.0.0" xmlns:xsi="http://www.w3.org/2001/XMLSchema-instance"
         xsi:schemaLocation="http://maven.apache.org/POM/4.0.0 https://maven.apache.org/xsd/maven-4.0.0.xsd">
    <modelVersion>4.0.0</modelVersion>
    <parent>
        <groupId>org.springframework.boot</groupId>
        <artifactId>spring-boot-starter-parent</artifactId>
        <version>3.5.6</version>
        <relativePath/> <!-- lookup parent from repository -->
    </parent>
    <groupId>cn.aileading</groupId>
    <artifactId>spring-ai-demo2</artifactId>
    <version>0.0.1-SNAPSHOT</version>

    <properties>
        <java.version>21</java.version>
    </properties>

    <dependencyManagement>
        <dependencies>
            <dependency>
                <groupId>org.springframework.ai</groupId>
                <artifactId>spring-ai-bom</artifactId>
                <version>1.0.3</version>
                <type>pom</type>
                <scope>import</scope>
            </dependency>
        </dependencies>
    </dependencyManagement>

    <dependencies>
        <!-- mcp-stdio -->
        <dependency>
            <groupId>org.springframework.ai</groupId>
            <artifactId>spring-ai-starter-mcp-server</artifactId>
        </dependency>
        <!-- lombok -->
        <dependency>
            <groupId>org.projectlombok</groupId>
            <artifactId>lombok</artifactId>
            <version>1.18.42</version>
        </dependency>
    </dependencies>

    <build>
        <plugins>
            <plugin>
                <groupId>org.springframework.boot</groupId>
                <artifactId>spring-boot-maven-plugin</artifactId>
            </plugin>
        </plugins>
    </build>
</project>
说明:如果仅需支持 stdio 协议,使用以上依赖。
- 编写工具
import lombok.Data;
import lombok.experimental.Accessors;
import org.springframework.ai.chat.model.ToolContext;
import org.springframework.ai.tool.annotation.Tool;
import org.springframework.ai.tool.annotation.ToolParam;
import org.springframework.stereotype.Service;

@Service
public class WeatherService {

    @Tool(name = "getWeather", description = "getWeather", returnDirect = false)
    public Weather getWeather(@ToolParam(description = "The location of the weather,contains province,city and area") Location location) {
        if (location == null) {
            throw new IllegalArgumentException("Location cannot be null");
        }
        if (location.hangzhou()) {
            return new Weather()
                    .setCurrentLocation(location)
                    .setCurrentWeather(new Weather.WeatherInfo()
                            .setTemperature(40.0)
                            .setWeatherDescription("晴"));
        } else {
            return new Weather()
                    .setCurrentLocation(location)
                    .setCurrentWeather(new Weather.WeatherInfo()
                            .setTemperature(30.3)
                            .setWeatherDescription("阴"));
        }
    }

    @Tool(name = "setAlarm", description = "if the given temperature exceeds 37 degrees, please set a warning", returnDirect = true)
    public void setAlarm(@ToolParam(description = "weather, contains currentLocation and currentWeather") Weather weather, @ToolParam(description = "The tool context", required = false) ToolContext toolContext) {
        System.out.println("Warning: The temperature in " + weather.getCurrentLocation().getCity() + " is " + weather.getCurrentWeather().getTemperature() + "°C. 注意避暑,以下时避暑指南:" + toolContext.getContext().get("summerHeatEscapeGuide"));
    }

    @Data
    @Accessors(chain = true)
    public static class Location {
        @ToolParam(description = "The province of the location")
        private String province;
        @ToolParam(description = "The city of the location")
        private String city;
        @ToolParam(description = "The area of the location", required = false)
        private String area;

        public boolean hangzhou() {
            return "Hangzhou".equals(city);
        }
    }

    @Data
    @Accessors(chain = true)
    public static class Weather {
        private Location currentLocation;
        private WeatherInfo currentWeather;

        @Data
        @Accessors(chain = true)
        public static class WeatherInfo {
            private Double temperature;
            private String weatherDescription;
        }
    }
}
- 注册工具
@Bean
public ToolCallbackProvider weatherMCP(WeatherService weatherService) {
    return MethodToolCallbackProvider.builder().toolObjects(weatherService).build();
}
- 配置工具
spring.application.name=spring-ai-demo2
spring.main.web-application-type=none
spring.main.banner-mode=off

# mcp-server-info
spring.ai.mcp.server.name=my-weather-server
spring.ai.mcp.server.version=0.0.1
之后执行 mvn clean install,打包,假设包路径如下:D:/code/spring-ai-demo2/target/spring-ai-demo2-0.0.1-SNAPSHOT.jar
9.2.2 MCPClient
如果 client 和 server 是同一进程,方式如下
@Resource
private ToolCallbackProvider weatherMCP;

@RequestMapping("/10")
public String execute10() {
    return chatClient2
            .prompt("What is the weather like in Hangzhou?")
            .toolCallbacks(weatherMCP)
            .call().content();
}
如果 client 和 server 是不同进程,按照如下步骤使用。
- 引入依赖
<!-- mcp-client-stdio/sse -->
<dependency>
    <groupId>org.springframework.ai</groupId>
    <artifactId>spring-ai-starter-mcp-client</artifactId>
</dependency>
- 配置工具
# client 请求超时时间 20s
spring.ai.mcp.client.request-timeout=20000
spring.ai.mcp.client.stdio.servers-configuration=classpath:/mcp/mcp-servers-config.json
- /mcp/mcp-servers-config.json
{
  "mcpServers": {
    "my-weather-server": {
      "command": "java",
      "args": [
        "-Dspring.ai.mcp.server.stdio=true",
        "-Dspring.main.web-application-type=none",
        "-Dlogging.pattern.console=",
        "-jar",
        "D:/code/ai-code-demo2/target/ai-code-demo2-0.0.1-SNAPSHOT.jar"
      ],
      "env": {
      }
    }
  }
}
说明:
- 假设有多个 mcpServer,继续在此处配置即可
-Dlogging.pattern.console=:必须配置,不然会有日志冲突问题
- 进行调用
@Resource
private SyncMcpToolCallbackProvider syncMcpToolCallbackProvider;

@RequestMapping("/11")
public String execute11() {
    return chatClient2
            .prompt("What is the weather like in Hangzhou?")
            .toolCallbacks(syncMcpToolCallbackProvider)
            .call().content();
}
说明:
- 每一个 mcpServer 都会单独起一个进程(此处是 java 进程,如果 mcpServer 是第三方提供的 python 服务,那么会起 python 进程)
- 在 client 端,会为每一个 mcpServer 创建一个 McpSyncClient,所有的 McpSyncClient 会放在 SyncMcpToolCallbackProvider 这个自动配置的 Bean 中(以同步方式说明,MCP 本身也支持异步方式)
9.3 sse通信模式
9.3.1 MCPServer
- 引入依赖
<!-- mcp-sse/stdio -->
<dependency>
    <groupId>org.springframework.ai</groupId>
    <artifactId>spring-ai-starter-mcp-server-webmvc</artifactId>
</dependency>
说明:
spring-ai-starter-mcp-server-webmvc包含spring-boot-starter-web和mcp-spring-webmvc依赖,无需重复引入- 该依赖也支持 stdio 协议,需要设置
spring.ai.mcp.server.stdio=true - 如果项目已经使用了
spring-boot-starter-web,则推荐使用spring-ai-starter-mcp-server-webmvc而不是spring-ai-starter-mcp-server-webflux
- 编写工具
与stdio相同
- 注册工具
与stdio相同
- 配置工具
在这里插入代码片spring.application.name=spring-ai-demo2
server.port=8082

# mcp-server-info
spring.ai.mcp.server.name=my-weather-server
spring.ai.mcp.server.version=0.0.1
之后启动服务。
9.3.2 MCPClient
- 引入依赖
与stdio相同
- 配置工具
# client 请求超时时间 20s
spring.ai.mcp.client.request-timeout=20000
spring.ai.mcp.client.sse.connections.my-weather-server.url=http://127.0.0.1:8082
- 进行调用
与stdio相同
说明:同一个 client 可以同时连接 stdio 协议的 mcpServer 和 sse 协议的 mcpServer,综合上面的配置即可
spring.ai.mcp.client.sse.connections.my-weather-server.url=http://127.0.0.1:8082
spring.ai.mcp.client.stdio.servers-configuration=classpath:/mcp/mcp-servers-config.json
10. 代码实现
- 依赖
pom.xml
<?xml version="1.0" encoding="UTF-8"?>
<project xmlns="http://maven.apache.org/POM/4.0.0" xmlns:xsi="http://www.w3.org/2001/XMLSchema-instance"
         xsi:schemaLocation="http://maven.apache.org/POM/4.0.0 https://maven.apache.org/xsd/maven-4.0.0.xsd">
    <modelVersion>4.0.0</modelVersion>
    <parent>
        <groupId>org.springframework.boot</groupId>
        <artifactId>spring-boot-starter-parent</artifactId>
        <version>3.3.0</version>
        <relativePath/> <!-- lookup parent from repository -->
    </parent>
    <groupId>com.x</groupId>
    <artifactId>demo_01</artifactId>
    <version>0.0.1-SNAPSHOT</version>
    <name>demo_01</name>
    <description>demo_01</description>
    <properties>
        <java.version>17</java.version>
        <spring-ai.version>1.0.3</spring-ai.version>
    </properties>
    <dependencies>
        <dependency>
            <groupId>org.springframework.boot</groupId>
            <artifactId>spring-boot-starter-web</artifactId>
        </dependency>
        <dependency>
            <groupId>org.springframework.ai</groupId>
            <artifactId>spring-ai-starter-model-openai</artifactId>
        </dependency>

        <dependency>
            <groupId>org.springframework.boot</groupId>
            <artifactId>spring-boot-starter-test</artifactId>
            <scope>test</scope>
        </dependency>
    </dependencies>
    <dependencyManagement>
        <dependencies>
            <dependency>
                <groupId>org.springframework.ai</groupId>
                <artifactId>spring-ai-bom</artifactId>
                <version>${spring-ai.version}</version>
                <type>pom</type>
                <scope>import</scope>
            </dependency>
        </dependencies>
    </dependencyManagement>

    <build>
        <plugins>
            <plugin>
                <groupId>org.springframework.boot</groupId>
                <artifactId>spring-boot-maven-plugin</artifactId>
            </plugin>
        </plugins>
    </build>


</project>
- 配置文件
application.yml
spring:
  application:
    name: demo_01
  ai:
    openai:
      api-key: ${API_KEY}
      # 这里使用的是阿里的百炼平台,注意路径没有v1
      base-url: https://dashscope.aliyuncs.com/compatible-mode/
      chat:
        options:
          model: qwen-max
10.1 简单实现
@RestController
@RequestMapping("ai")
public class AiController {
    private final ChatClient chatClient;

    public AiController(ChatClient.Builder chatClientBuilder) {
        this.chatClient = chatClientBuilder.build();
    }

    @GetMapping("/generation")
    String generation(@RequestParam String userInput) {
        // 提示词
        return this.chatClient.prompt()
                // 用户信息
                .user(userInput)
                // 调用大模型
                .call()
                // 获取返回结果
                .content();
    }

}
10.2 System模型角色
- 对ChatClient进行一些配置
AIConfig
@Configuration
public class AIConfig {
    @Bean
    public ChatClient chatClient(ChatClient.Builder builder){
        return builder.defaultSystem("你现在是小明,是一名中日文翻译专家,目前你的年薪百万,妥妥的成功人士。")
                .build();
    }
}
- 进行调用
/**
 * TODO 使用Default System Text给大模型一个角色
 * */
@Autowired
private ChatClient chatClient1;
@GetMapping("/generationSystem")
String generationSystem(@RequestParam String userInput) {
    // 提示词
    return chatClient1.prompt()
            // 用户信息
            .user(userInput)
            // 调用大模型
            .call()
            // 获取返回结果
            .content();
}
10.3 流式传输
- 对ChatClient进行一些配置
AIConfig
@Configuration
public class AIConfig {
    @Bean
    public ChatClient chatClient(ChatClient.Builder builder){
        return builder.defaultSystem("xxx")
                .build();
    }
}
- api接口
    /**
     * TODO 使用流式进行输出
     * */
    @Autowired
    private ChatClient chatClient2;
    @GetMapping(value="/streamChat",produces = "text/html;charset=UTF-8")
    public Flux<String> streamChat(@RequestParam String userInput) {
        Flux<String> output = chatClient2.prompt()
                .system("你是一个专业的幽默笑话师")
                .user(userInput)
                .stream()
                .content();
        return output;
    }
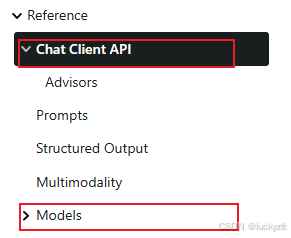
10.5 chat api vs Models
- chat api是总体的调用 ,但是models里边具体的模型可以设置一些具体模型具备的特殊属性
- 下边的例子使用具体的openAI模型
import org.springframework.ai.chat.model.ChatModel;
/**
 * TODO 体验具体模型调用,比如openAI
 * */
@Autowired
private ChatModel chatModel;
@GetMapping(value="/openAiModel")
public String openAiModel(@RequestParam String userInput) {
    ChatResponse response = chatModel.call(
            new Prompt(
                    userInput,
                    OpenAiChatOptions.builder()
                            .model("qwen-max")
                            .maxTokens(150)  // Use maxTokens for non-reasoning models
                            .build()
            ));
    return response.getResult().getOutput().getText();
}
11. function-call
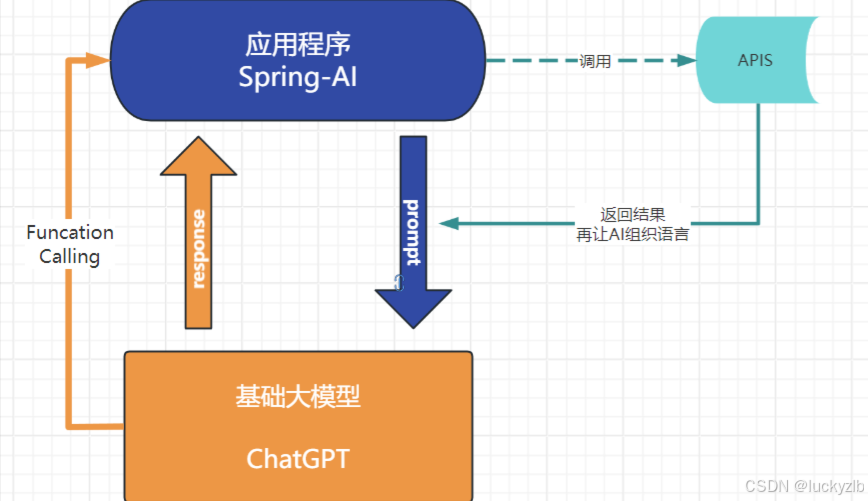
AI本身是不具备实时消息能力的, 比如问“现在北京的天气是什么”, AI是不知道的, 这个时候我们需要通过接口来帮助AI完成,大致流程
11.1 实现代码
- 模拟方法调用
public class LocationNameFunction implements Function<LocationNameFunction.Request, LocationNameFunction.Response> {
    @Override
    public Response apply(Request request) {
        if (request.name == null || request.location == null){
            return new Response("请输入完整信息");
        }
        return new Response(request.location + "1000个人");
    }

    // 密封类 负责告诉大模型提供哪些信息
    public record Request(String name,String location){}
    // 密封类 负责告诉大模型返回哪些信息
    public record Response(String message){}
}
- 进行function声明,注入spring
    /**
     * TODO 将function 放入spring
     * */
    public static final String LOCATION_NAME_FUNCTION = "locationNameFunction";
    @Bean(LOCATION_NAME_FUNCTION)
    @Description("某个地方有多少人?")// 具体描述,方便大模型理解
    public Function<LocationNameFunction.Request, LocationNameFunction.Response> locationNameFunction(){
        return new LocationNameFunction();
    }
- 进行调用模拟
    /**
     * TODO function-call 的测试
     * */
    @Autowired
    private OpenAiChatModel openAiChatModel;
    @GetMapping(value="/functionCall")
    public String functionCall(@RequestParam String userInput) {
        String locationNameFunction = ChatClient.create(openAiChatModel)
                .prompt("北京有多少个小明?")
                .toolNames("locationNameFunction")// 实现function的类名
                .call()
                .content();
        return locationNameFunction;
    }

有“AI”的1024 = 2048,欢迎大家加入2048 AI社区
更多推荐

 4
4 0
0- 0


 已为社区贡献2条内容

所有评论(0)