LangChain4j基础使用
langchain4j为我们提供了一个内存向量数据库的实现:InMemoryEmbeddingStore,文档解析器,用于解析使用文档加载器加载进内存的内容,把非纯文本数据转换为纯文本。向量模型,用于将文档分割后的片段向量化,或者查询时将用户输入的内容向量化。langchain4j为我们提供了一个内存版本的向量模型方案,引入向量模型,并配置给向量数据库操作对象和向量数据库检索对象。文档分割器,用于
LangChain4j基础使用
langchain4j的基础使用
基础要求
java version=17
maven依赖
springboot的starter依赖
<dependency>
    <groupId>dev.langchain4j</groupId>
    <artifactId>langchain4j-open-ai-spring-boot-starter</artifactId>
    <version>1.0.1-beta6</version>
</dependency>

langchain4j的核心包:包括消息注解、流式输出能力、会话记忆等等能力
<dependency>
    <groupId>dev.langchain4j</groupId>
    <artifactId>langchain4j-spring-boot-starter</artifactId>
    <version>1.0.1-beta6</version>
</dependency>
配合流式输出所需要的依赖
<dependency>
    <groupId>dev.langchain4j</groupId>
    <artifactId>langchain4j-reactor</artifactId>
    <version>1.0.1-beta6</version>
</dependency>

RAG(检索增强生成)所需的依赖
<dependency>
    <groupId>dev.langchain4j</groupId>
    <artifactId>langchain4j-easy-rag</artifactId>
    <version>1.0.1-beta6</version>
</dependency>
langchain4j-springboot的项目配置
server:
  port: 8080

spring:
  data:
    redis:
      host: 127.0.0.1
      port: 6379

volc-engine: # 火山引擎
  api_key: ${API-KEY}
  base_url: "https://ark.cn-beijing.volces.com/api/v3"

langchain4j:
  open-ai:
    chat-model: # 普通调用
      base-url: "https://ark.cn-beijing.volces.com/api/v3"
      api-key: ${API-KEY}
      model-name: xxxx
    streaming-chat-model: # 流式调用
      base-url: "https://ark.cn-beijing.volces.com/api/v3"
      api-key: ${API-KEY}
      model-name: xxxx
      log-requests: true
      log-responses: true


logging:
  level:
    dev.langchain4j: debug
一、langchain4j的基础代码实现
1、基础请求
public static void main(String[] args) {
    OpenAiChatModel chatModel = OpenAiChatModel.builder()
            .baseUrl("xxx")
            .apiKey("xxx")
            .modelName("xxx")
            .logRequests(true)
            .logResponses(true)
            .build();

    String chat = chatModel.chat("你是谁?");
    System.out.println(chat);
}
2、使用工具类创建代理服务
创建一个ConsultantService接口,然后通过工具类创建服务代理
/**
 * 使用手动的 bean 加载方式
 * 在配置类中,使用AiServices加载,并指定chatModel
 * @see com.dong.config.CommonConfig
 */
public interface ConsultantService {

    String chat(String message);

}
配置类:
@Configuration
public class CommonConfig {

    @Autowired
    private OpenAiChatModel model;

    @Bean
    public ConsultantService consultantService() {
        return AiServices.builder(ConsultantService.class)
                .chatModel(model)
                .build();
    }
}
3、声明式使用
/**
 * 声明式使用方式:
 * 1. 使用@AiService注解,进行自动配置
 * 默认情况下wiringMode是  AUTOMATIC,自动配置,此时只需要写上 @AiService 即可
 */
@AiService()
public interface ConsultantService2 {

    String chat(String message);

}


/**
 * 声明式使用方式:
 * 1. 使用@AiService注解,进行自动配置
 * 默认情况下wiringMode是  AUTOMATIC,自动配置,此时只需要写上 @AiService() 即可
 * 2. 当对 wiringMode 设置为 EXPLICIT——手动配置时,
 * —— 可以指定这个方法所需要使用的chatModel等(假如有多个模型的情况下,进行模型分配)
 */
@AiService(
        wiringMode = AiServiceWiringMode.EXPLICIT, // 手动装配
        chatModel = "openAiChatModel" // 指定模型 bean
)
public interface ConsultantService3 {

    String chat(String message);

}
4、使用流式输出
/**
 * 声明式使用方式:
 * 1. 使用@AiService注解,进行自动配置
 * 默认情况下wiringMode是  AUTOMATIC,自动配置,此时只需要写上 @AiService() 即可
 * 2. 当对 wiringMode 设置为 EXPLICIT——手动配置时,
 * —— 可以指定这个方法所需要使用的chatModel等(假如有多个模型的情况下,进行模型分配)
 * 3. 使用streamingChatModel来指定支持流式的chatModel,
 * —— 此时需要将 返回结果设置为 Flux<String> 类型
 * —— 同时controller层的接口需要指定 produces = "text/html;charset=utf-8"
 */
@AiService(
        wiringMode = AiServiceWiringMode.EXPLICIT, // 手动装配
        chatModel = "openAiChatModel",  // 指定模型 bean
        streamingChatModel = "openAiStreamingChatModel" //  支持流式的 chatModel
)
public interface ConsultantService4 {

    Flux<String> chat(String message);

}
5、配置会话记忆对象
/**
 * 声明式使用方式:
 * 1. 使用@AiService注解,进行自动配置
 * 默认情况下wiringMode是  AUTOMATIC,自动配置,此时只需要写上 @AiService() 即可
 * 2. 当对 wiringMode 设置为 EXPLICIT——手动配置时,
 * —— 可以指定这个方法所需要使用的chatModel等(假如有多个模型的情况下,进行模型分配)
 * 3. 使用streamingChatModel来指定支持流式的chatModel,
 * —— 此时需要将 返回结果设置为 Flux<String> 类型
 * —— 同时controller层的接口需要指定 produces = "text/html;charset=utf-8"
 * 4. 使用chatMemory 配置会话记忆对象
 * —— 此时需要在配置类中增加一个Bean --> MessageWindowChatMemory (ChatMemory)
 * —— 提供了接口 ChatMemory,可以自定义的实现符合自己项目的ChatMemory,例如文件、redis、db等方式的存储记忆
 */
@AiService(
        wiringMode = AiServiceWiringMode.EXPLICIT, // 手动装配
        chatModel = "openAiChatModel",  // 指定模型 bean
        streamingChatModel = "openAiStreamingChatModel", //  支持流式的 chatModel
        chatMemory = "chatMemory" // 配置会话记忆对象
)
public interface ConsultantService5 {

    Flux<String> chat(String message);

}
配置类:
@Bean
public ChatMemory chatMemory() {
    return MessageWindowChatMemory.builder()
            .maxMessages(20)
            .build();
}
6、进行会话隔离
/**
 * 声明式使用方式:
 * 1. 使用@AiService注解,进行自动配置
 * 默认情况下wiringMode是  AUTOMATIC,自动配置,此时只需要写上 @AiService() 即可
 * 2. 当对 wiringMode 设置为 EXPLICIT——手动配置时,
 * —— 可以指定这个方法所需要使用的chatModel等(假如有多个模型的情况下,进行模型分配)
 * 3. 使用streamingChatModel来指定支持流式的chatModel,
 * —— 此时需要将 返回结果设置为 Flux<String> 类型
 * —— 同时controller层的接口需要指定 produces = "text/html;charset=utf-8"
 * 4. 使用chatMemory 配置会话记忆对象
 * —— 此时需要在配置类中增加一个Bean --> MessageWindowChatMemory (ChatMemory)
 * —— 提供了接口 ChatMemory,可以自定义的实现符合自己项目的ChatMemory,例如文件、redis、db等方式的存储记忆
 * 5. 会话记忆隔离:当是多个用户进行会话时,需要进行会话记忆隔离,
 * —— 不能使用 chatMemory 参数来指定
 * —— 使用 chatMemoryProvider 参数来指定如何获取会话记忆
 * —— 在配置类中增加Bean --> chatMemoryProvider
 * —— 在chat方法中增加 memoryId 参数,并使用 @MemoryId 注解标识
 * —— 将原来的用户消息使用 @UserMessage 注解标识
 * —— 前端接口需要增加一个 memoryId 参数
 *
 */
@AiService(
        wiringMode = AiServiceWiringMode.EXPLICIT, // 手动装配
        chatModel = "openAiChatModel",  // 指定模型 bean
        streamingChatModel = "openAiStreamingChatModel", //  支持流式的 chatModel
        chatMemoryProvider = "chatMemoryProvider" // 配置会话记忆提供者对象
)
public interface ConsultantService6 {

    Flux<String> chat(@MemoryId String memoryId,
                      @UserMessage("你的唯一任务就是根据历史对话记录回答用户的问题,当前用户的问题是:{{msg}}")
                      @V("msg") String message);

}
配置类:
// 默认使用的是内存存储
@Bean
public ChatMemoryProvider chatMemoryProvider() {
    return new ChatMemoryProvider() {
        @Override
        public ChatMemory get(Object memoryId) {
            return MessageWindowChatMemory.builder()
                    .id(memoryId)
                    .maxMessages(20)
                    .build();
        }
    };
}
7、会话记忆持久化
@Repository
public class RedisChatMemoryStore implements ChatMemoryStore {

    @Autowired
    private StringRedisTemplate redisTemplate;

    /**
     * Retrieves messages for a specified chat memory.
     *
     * @param memoryId The ID of the chat memory.
     * @return List of messages for the specified chat memory. Must not be null. Can be deserialized from JSON using {@link ChatMessageDeserializer}.
     */
    @Override
    public List<ChatMessage> getMessages(Object memoryId) {
        String json = redisTemplate.opsForValue().get(memoryId);
        return ChatMessageDeserializer.messagesFromJson(json);
    }

    /**
     * Updates messages for a specified chat memory.
     *
     * @param memoryId The ID of the chat memory.
     * @param messages List of messages for the specified chat memory, that represent the current state of the {@link ChatMemory}.
     *                 Can be serialized to JSON using {@link ChatMessageSerializer}.
     */
    @Override
    public void updateMessages(Object memoryId, List<ChatMessage> messages) {
        // 使用Langchain提供的转换方法,将消息列表转换为json字符串
        String msgsJson = ChatMessageSerializer.messagesToJson(messages);
        // 将数据消息写入到redis中
        redisTemplate.opsForValue().set(memoryId.toString(), msgsJson);
    }

    /**
     * Deletes all messages for a specified chat memory.
     *
     * @param memoryId The ID of the chat memory.
     */
    @Override
    public void deleteMessages(Object memoryId) {
        redisTemplate.delete(memoryId.toString());
    }
}
交给ChatMemoryProvider
@Bean
public ChatMemoryProvider chatMemoryProvider() {
    return new ChatMemoryProvider() {
        @Override
        public ChatMemory get(Object memoryId) {
            return MessageWindowChatMemory.builder()
                    .id(memoryId)
                    .maxMessages(20)
                    .chatMemoryStore(redisChatMemoryStore) // 5.配置chatMemoryStore
                    .build();
        }
    };
}
二、RAG开发
1、内存向量数据库基本使用
// 构建向量数据库操作对象(这里先使用内存向量数据库实现一下)
@Bean
public EmbeddingStore<TextSegment> embeddingStore() {
    // 1. 加载文档到内存中
    List<Document> documents = ClassPathDocumentLoader.loadDocuments("content");

    // 2. 构建一个内存向量数据库
    InMemoryEmbeddingStore<TextSegment> embeddingStore = new InMemoryEmbeddingStore<>();

    // 3.构建一个EmbeddingStoreIngestor,完成文本数据切割、向量化,最后存储到向量数据库中
    EmbeddingStoreIngestor.ingest(documents, embeddingStore);

    // 4. 最后返回这个向量数据库
    return embeddingStore;
}

// 构建向量数据库检索工具
@Bean
public ContentRetriever contentRetriever(EmbeddingStore<TextSegment> embeddingStore) {
    return EmbeddingStoreContentRetriever.builder()
            .embeddingStore(embeddingStore)
            .minScore(0.5) // 最低余弦相似度分数值
            .maxResults(3) // 最大返回结果
            .build();
}
设置contentRetriever
@AiService(
        wiringMode = AiServiceWiringMode.EXPLICIT, // 手动装配
        chatModel = "openAiChatModel",  // 指定模型 bean
        streamingChatModel = "openAiStreamingChatModel", //  支持流式的 chatModel
        chatMemoryProvider = "chatMemoryProvider", // 配置会话记忆提供者对象
        contentRetriever = "contentRetriever" // 检索
)
public interface ConsultantService8 {

    Flux<String> chat(@MemoryId String memoryId,
                      @UserMessage("你的唯一任务就是根据历史对话记录回答用户的问题,当前用户的问题是:{{msg}}")
                      @V("msg") String message);

}
2、RAG的核心API
1、文档加载器
文档加载器,用于把磁盘或者网络中的数据加载进程序
// 根据本地磁盘的绝对路径加载
FileSystemDocumentLoader

// 相对于类路径加载
ClassPathDocumentLoader

// 根据URL路径加载
UrlDocumentLoader
2、文档解析器
文档解析器,用于解析使用文档加载器加载进内存的内容,把非纯文本数据转换为纯文本
// 解析纯文本格式的文件
TextDocumentParser
// 解析PDF文件
ApachePdfBoxDocumentParser
// 解析微软的office文件,如:Word、PPT、Excel
ApachePoiDocumentParser
// 默认解析器,几乎可以解析所有格式的文件,(对PDF的性能稍差,实际使用时建议换一下)
ApacheTikaDocumentParser
使用方式:
- 准备对应类型的文件
- 引入对应的依赖
- 在上一步加载文件进内存的加载器中,指定解析器
<dependency>
    <groupId>dev.langchain4j</groupId>
    <artifactId>langchain4j-document-parser-apache-pdfbox</artifactId>
    <version>1.0.1-beta6</version>
</dependency>
 // 1. 加载文档到内存中
List<Document> documents = ClassPathDocumentLoader.loadDocuments("content", new ApachePdfBoxDocumentParser());
3、文档分割器
文档分割器,用于把一个大文档,切割成一个一个的小片段
// 按照段落分割文本
DocumentByParagraphSplitter
// 按照行分割文本
DocumentByLineSplitter
// 按照句子分割文本
DocumentBySentenceSplitter
// 按照词分割文本
DocumentByWordSplitter
// 按照固定数量的字符分割文本
DocumentByCharacterSplitter
// 按照正则表达式分割文本
DocumentByRegexSplitter
// 默认:递归分割器:优先段落分割、再按照行分割、再按照句子分割、再按照词分割
// 可以设置chunk的长度和重合长度
DocumentSplitters.recursive(...)
使用方法:
- 创建文本分割器
- 设置文本分割器
// 1. 创建文本分割器
DocumentSplitter ds = DocumentSplitters.recursive(500, 100);
EmbeddingStoreIngestor.builder()
        .embeddingStore(embeddingStore)
        // 2. 向 EmbeddingStoreIngestor 对象设置 文本分割器
        .documentSplitter(ds)
        .build();
4、向量模型
向量模型,用于将文档分割后的片段向量化,或者查询时将用户输入的内容向量化
langchain4j为我们提供了一个内存版本的向量模型方案,其他向量模型参考文档
他已经被封装到EmbeddingStoreIngestor中了,但是功能不是那么强大
我们可以通过自己创建一个向量模型,然后设置到EmbeddingStoreIngestor。
配置向量模型信息
langchain4j:
	open-ai:
		embedding-model:
			base-url:
			api-key:
			model-name: text-embedding-v3
			log-requests: true
			log-responses: true
引入向量模型,并配置给向量数据库操作对象和向量数据库检索对象
@Autowired
private OpenAiEmbeddingModel openAiEmbeddingModel;

// 配置给向量数据库操作对象
EmbeddingStoreIngestor ingestor = EmbeddingStoreIngestor.builder()
        .embeddingStore(embeddingStore)
        // 2. 向 EmbeddingStoreIngestor 对象设置 文本分割器
        .documentSplitter(ds)
        .embeddingModel(openAiEmbeddingModel)
        .build();

ingestor.ingest(documents);

// 配置给向量数据库检索对象
return EmbeddingStoreContentRetriever.builder()
        .embeddingStore(embeddingStore)
        .embeddingModel(openAiEmbeddingModel)
        .minScore(0.5) // 最低余弦相似度分数值
        .maxResults(3) // 最大返回结果
        .build();
5、向量数据库
EmbeddingStore,用于操作向量数据库(添加或者检索)
langchain4j为我们提供了一个内存向量数据库的实现:InMemoryEmbeddingStore,其他向量数据库参考文档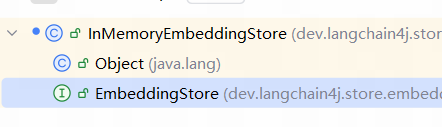
常见的开源免费好用的,可持久化的如:
以RedisVector为例:
- 准备向量数据库(以docker为例)
- 引入依赖
<dependency>
    <groupId>dev.langchain4j</groupId>
    <artifactId>langchain4j-community-redis-spring-boot-starter</artifactId>
    <version>1.0.1-beta6</version>
</dependency>
- 配置向量数据库信息
langchain4j:
	community:
		redis:
			host: locahost
			port: 6379
- 注入RedisEmbeddingSotre
@Configuration
public class EmbeddingConfig {

    @Autowired
    private OpenAiEmbeddingModel openAiEmbeddingModel;

    @Autowired
    private RedisEmbeddingStore redisEmbeddingStore;


    // 构建向量数据库操作对象(这里先使用内存向量数据库实现一下)
    @Bean
    public EmbeddingStore<TextSegment> embeddingStore() {
        // 1. 加载文档到内存中
        List<Document> documents = ClassPathDocumentLoader.loadDocuments("content", new ApachePdfBoxDocumentParser());

        // 2. 使用注入的 RedisEmbeddingStore

        // 3.构建一个EmbeddingStoreIngestor,完成文本数据切割、向量化,最后存储到向量数据库中
        // 1. 创建文本分割器
        DocumentSplitter ds = DocumentSplitters.recursive(500, 100);
        EmbeddingStoreIngestor ingestor = EmbeddingStoreIngestor.builder()
                // 使用 RedisSearch 向量数据库
                .embeddingStore(redisEmbeddingStore)
                // 2. 向 EmbeddingStoreIngestor 对象设置 文本分割器
                .documentSplitter(ds)
                .embeddingModel(openAiEmbeddingModel)
                .build();

        ingestor.ingest(documents);

        // 4. 最后返回这个向量数据库
        return redisEmbeddingStore;
    }


    // 构建向量数据库检索工具
    @Bean
    public ContentRetriever contentRetriever() {
        return EmbeddingStoreContentRetriever.builder()
                .embeddingStore(redisEmbeddingStore)
                .embeddingModel(openAiEmbeddingModel)
                .minScore(0.5) // 最低余弦相似度分数值
                .maxResults(3) // 最大返回结果
                .build();
    }
}
Tools工具
原理
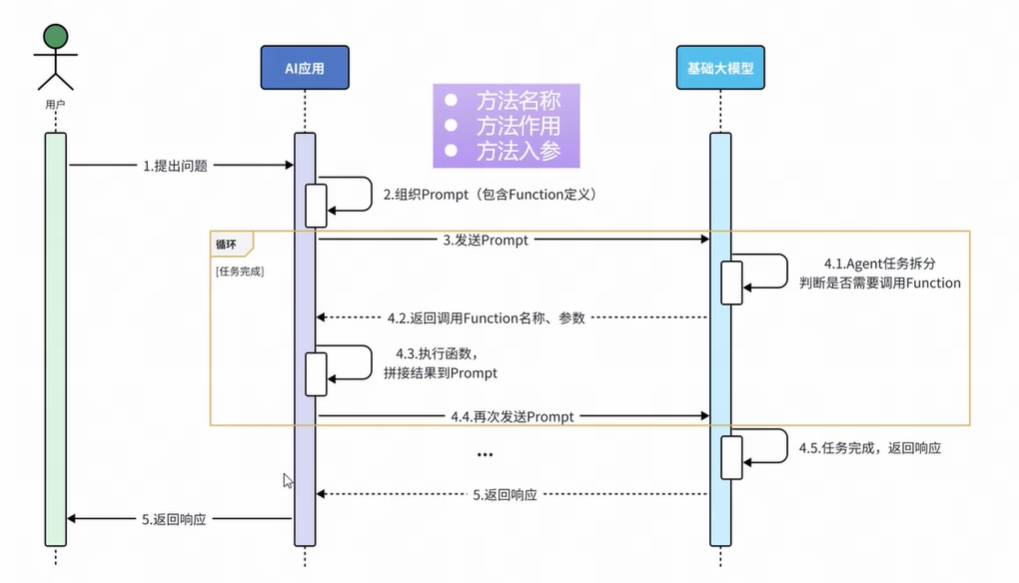
实现
1、准备工具方法
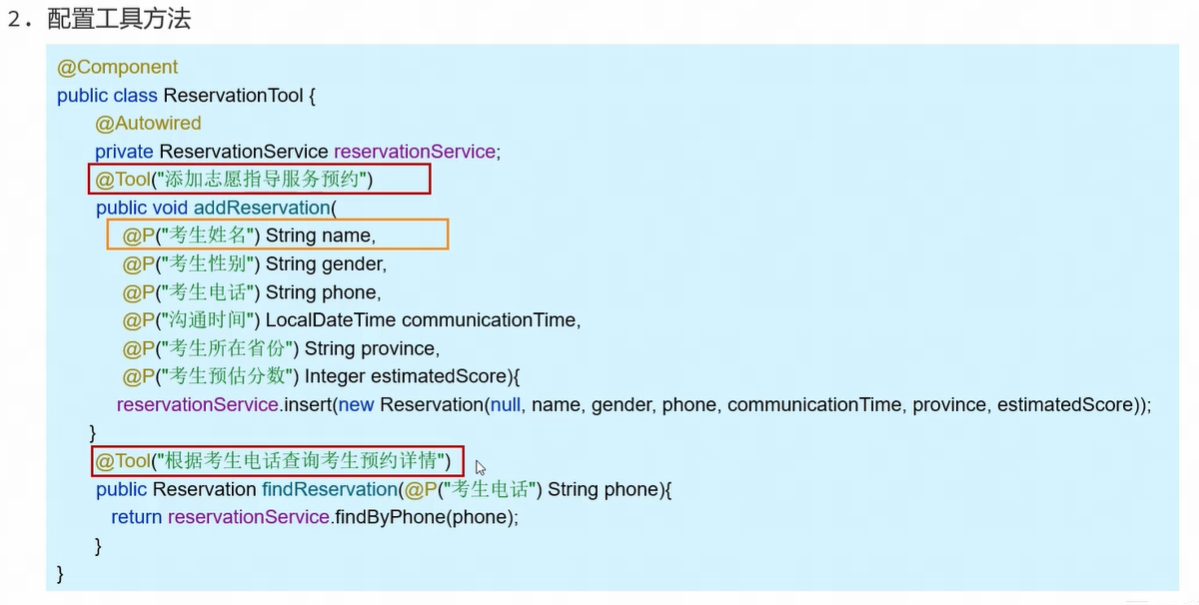
2、配置工具方法
其中需要通过:
- @Tool注解——标识该方法为一个工具
- @P注解——标识参数信息
3、引入工具
在声明式使用中
通过参数tools="xxx"来引入包含了tools的Bean对象
如果要多个工具的时候,只需要tools={xxx, yyy, zzz}

有“AI”的1024 = 2048,欢迎大家加入2048 AI社区
更多推荐
 10
10 0
0- 0


 已为社区贡献1条内容

所有评论(0)