PicoClaw 技术分析
1. 项目概述
PicoClaw 是 Sipeed 公司开发的一款超轻量级个人 AI 助手,采用 Go 语言从零重写。该项目的设计目标是:
- 超低资源占用: <10MB 内存占用
- 极低成本: 可在 $10 硬件上运行
- 快速启动: 1 秒内启动 (0.6GHz 单核)
- 跨平台: 支持 RISC-V、ARM、x86 单一二进制文件
项目灵感来源于 nanobot,并通过 AI 驱动的自举过程完成了架构迁移和代码优化。
2. 技术栈
| 类别 | 技术选型 |
|---|---|
| 编程语言 | Go 1.25+ |
| 主要依赖 | OpenAI SDK、Anthropic SDK、Telegram Bot SDK、Discord SDK 等 |
| 构建工具 | GoReleaser、GoLangCI-Lint |
| 目标平台 | Linux (x86_64, ARM64, RISC-V, Loong64)、macOS、Windows |
3. 系统结构
3.1 目录结构
picoclaw/
├── cmd/picoclaw/          # CLI 入口
│   ├── main.go            # 主程序入口
│   ├── cmd_agent.go       # Agent 交互命令
│   ├── cmd_gateway.go     # 网关服务命令
│   ├── cmd_onboard.go     # 初始化配置
│   ├── cmd_auth.go        # 认证管理
│   ├── cmd_cron.go        # 定时任务
│   └── cmd_skills.go      # 技能管理
├── pkg/                   # 核心包
│   ├── agent/             # AI Agent 核心逻辑
│   ├── providers/         # LLM Provider 抽象层
│   ├── channels/          # 通讯渠道集成
│   ├── tools/             # Agent 工具集
│   ├── config/            # 配置管理
│   ├── auth/              # 认证与 OAuth
│   ├── session/           # 会话管理
│   ├── state/             # 状态管理
│   ├── cron/              # 定时任务服务
│   ├── heartbeat/         # 心跳/周期任务
│   ├── devices/           # 硬件设备支持
│   ├── routing/           # 消息路由
│   ├── bus/               # 事件总线
│   ├── voice/             # 语音处理
│   └── ...
├── config/                # 配置文件示例
└── skills/                # 内置技能
3.2 系统结构图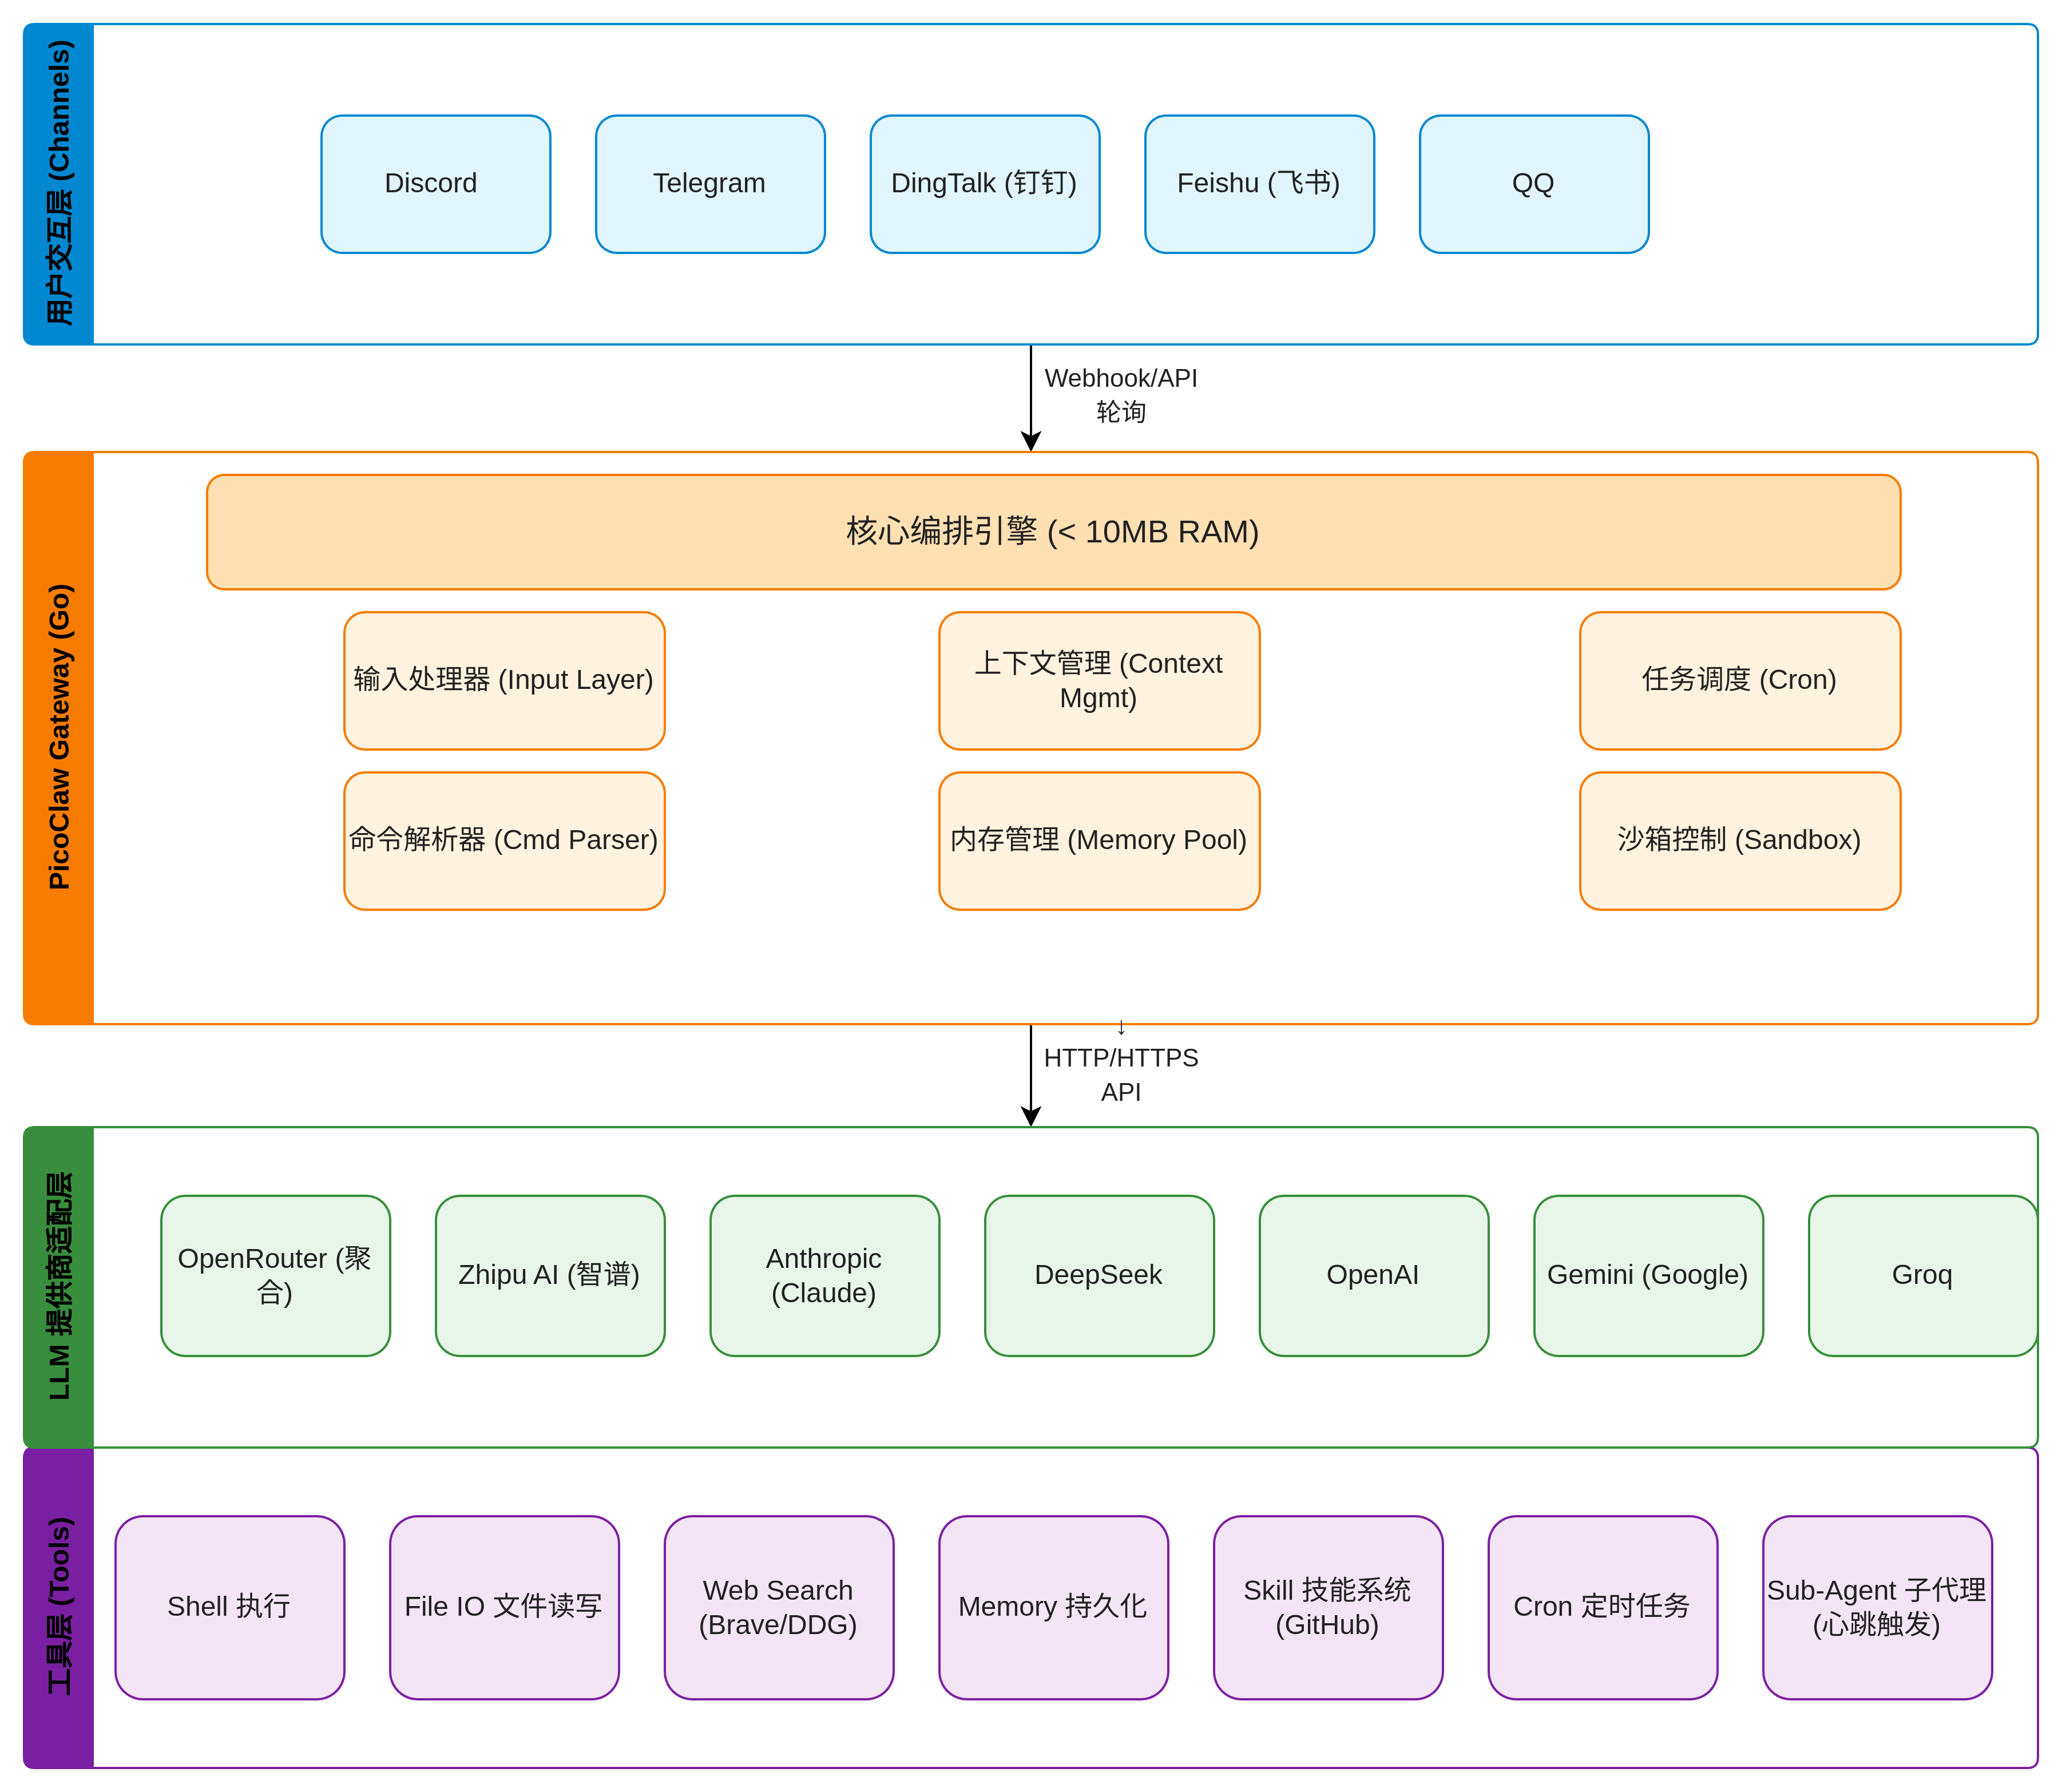
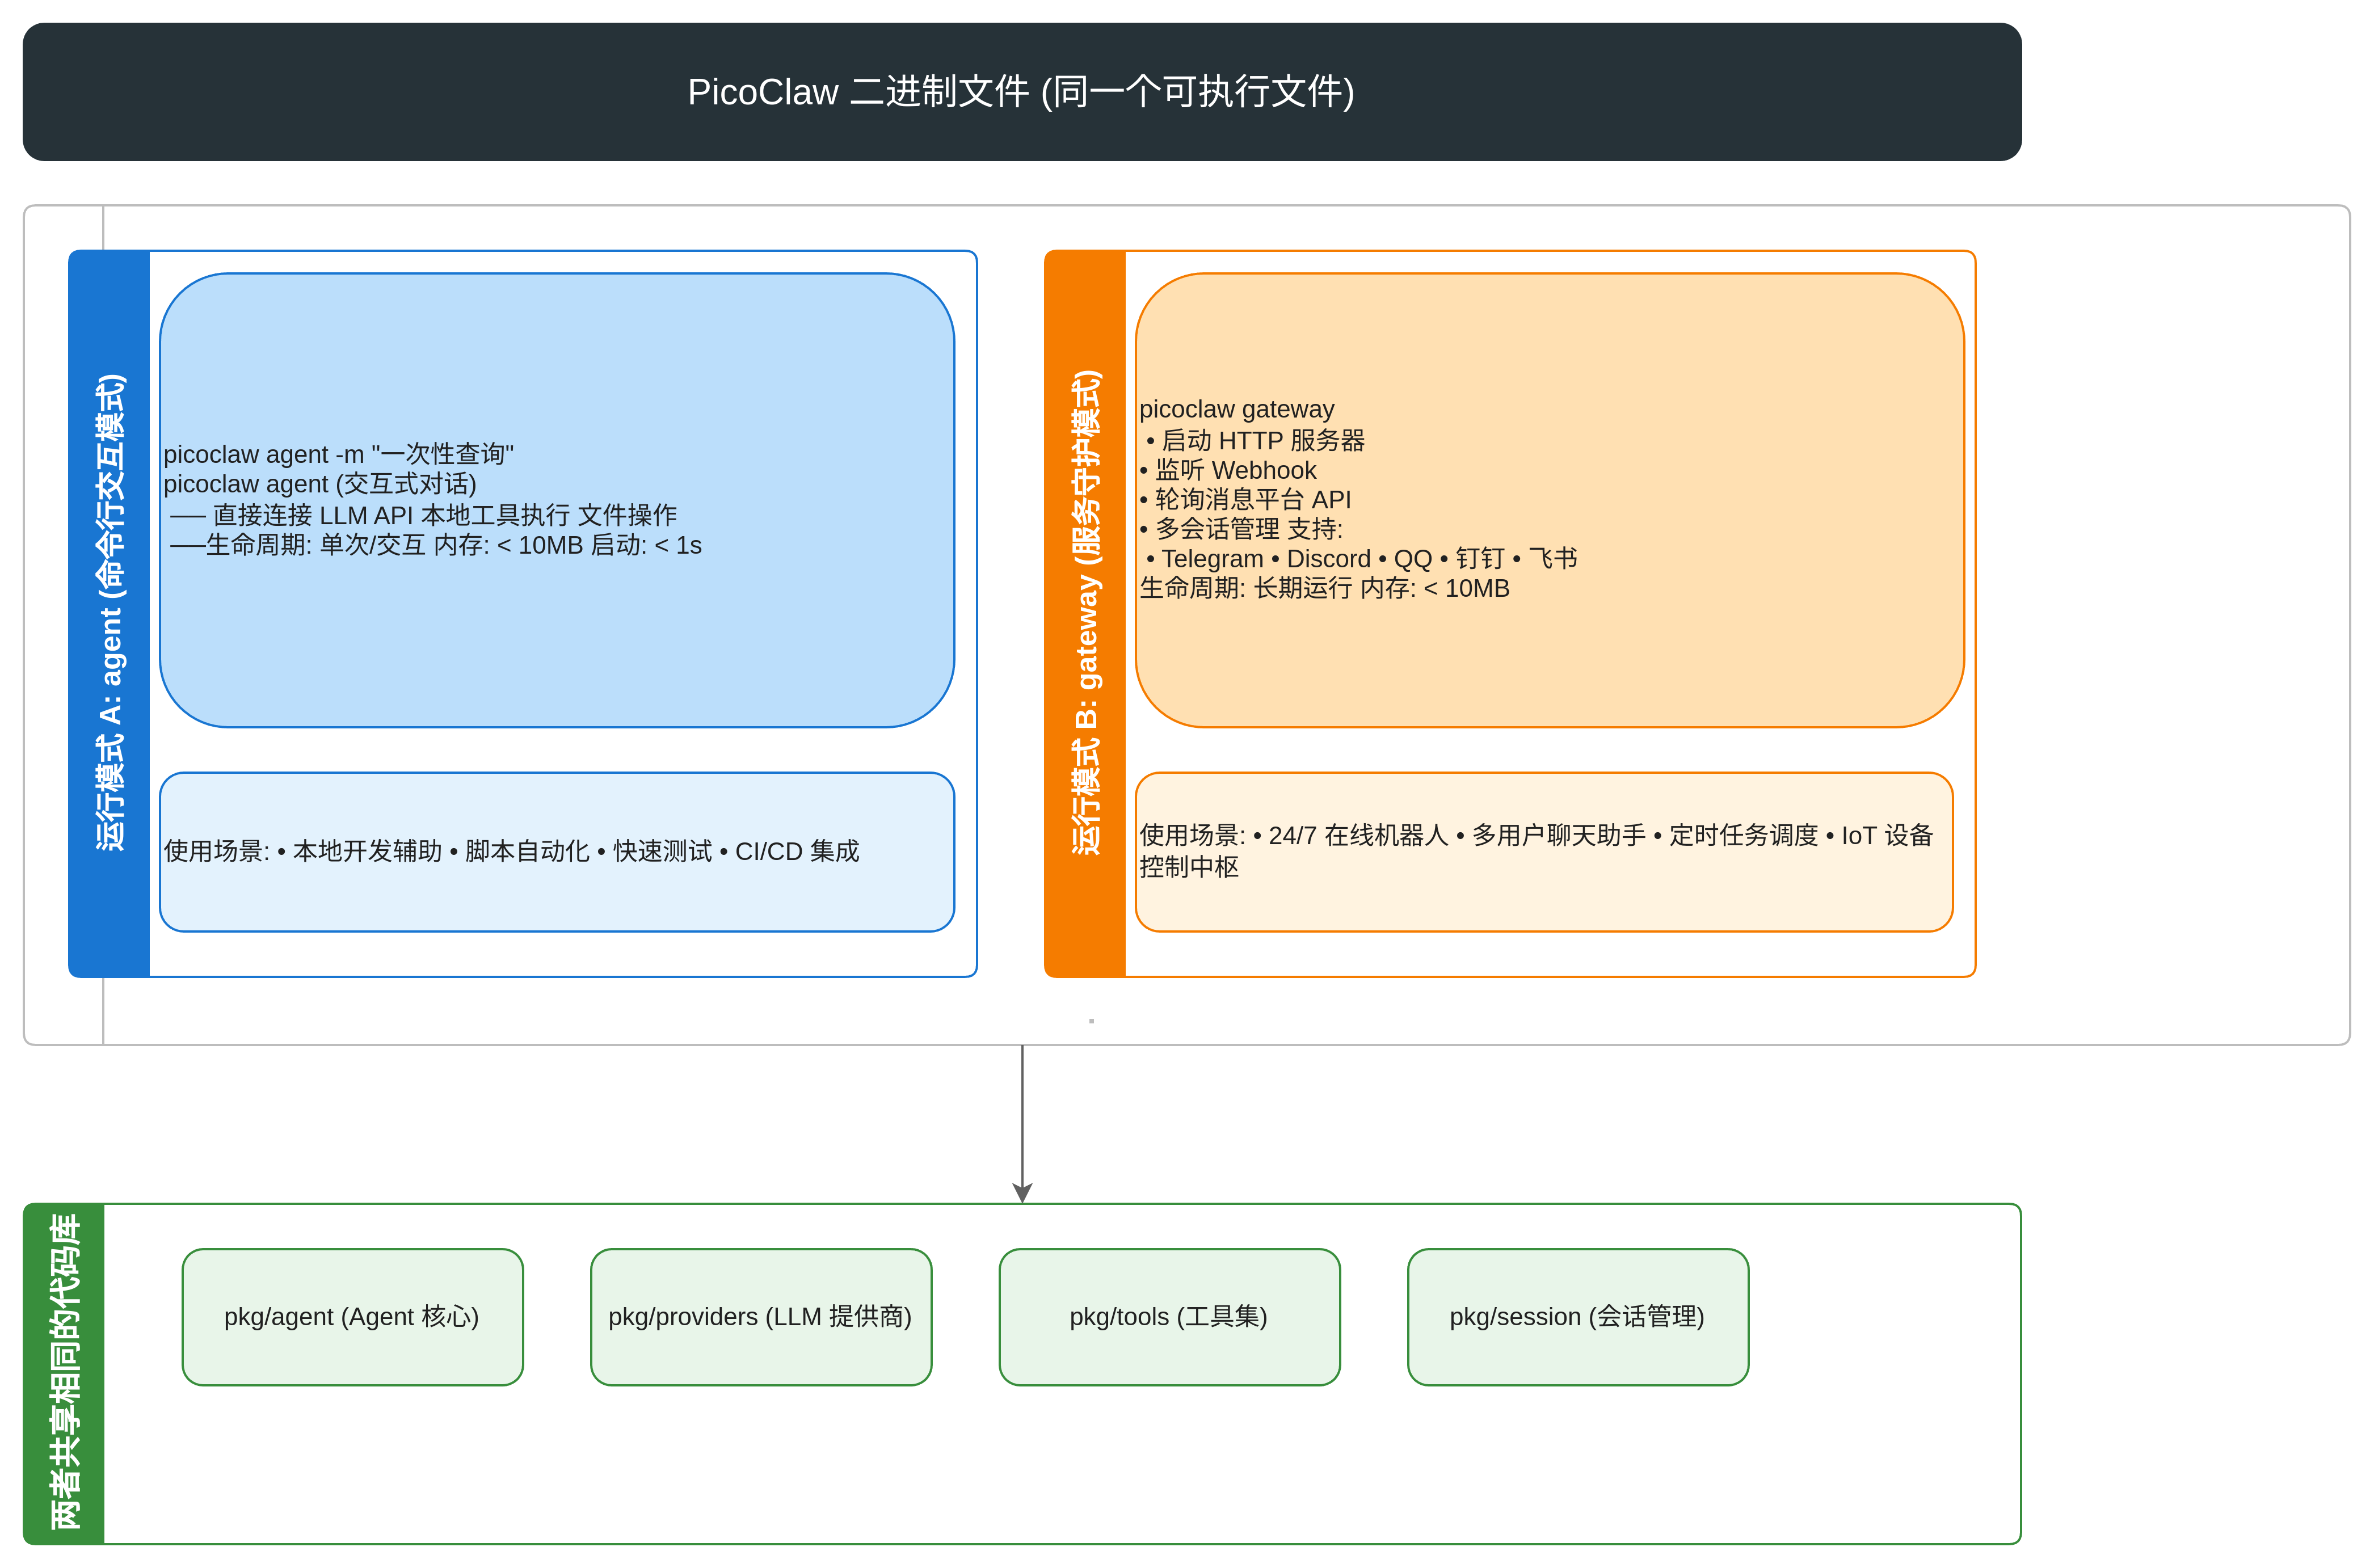
4. 核心模块分析
4.1 Agent 模块 (pkg/agent/)
- instance.go: Agent 实例管理
- loop.go: Agent 循环处理逻辑
- memory.go: 长期记忆管理
- context.go: 上下文构建
- registry.go: Agent 注册表
4.2 Provider 模块 (pkg/providers/)
支持多种 LLM 提供商,通过统一的接口抽象:
| Provider | 说明 |
|---|---|
openai_compat/ | OpenAI 兼容协议 (含 15+ 供应商) |
anthropic/ | Anthropic Claude 原生支持 |
claude_provider.go | Claude CLI 集成 |
codex_provider.go | GitHub Copilot |
antigravity_provider.go | Google Gemini (OAuth) |
factory.go | Provider 工厂模式实现 |
fallback.go | 多 Provider 降级机制 |
cooldown.go | 请求频率控制 |
支持的模型供应商 (通过 OpenAI 兼容协议):
- OpenAI、Anthropic、智谱 AI (GLM)、DeepSeek
- Google Gemini、Groq、Moonshot、通义千问
- NVIDIA、Ollama、OpenRouter、VLLM、Cerebras
- 火山引擎、神算云、GitHub Copilot
4.3 Channels 模块 (pkg/channels/)
支持多种即时通讯平台:
| 渠道 | 文件 | 说明 |
|---|---|---|
| Telegram | telegram.go | Bot API |
| Discord | discord.go | Discord Bot |
qq.go | QQ 开放平台 | |
| 钉钉 | dingtalk.go | 钉钉开放平台 |
| LINE | line.go | LINE Messaging API |
| 企业微信 | wecom.go, wecom_app.go | 微信企业版 |
| 飞书 | feishu_32.go, feishu_64.go | 飞书开放平台 |
| Slack | slack.go | Slack Bot |
whatsapp.go | WhatsApp Bridge | |
| MaixCAM | maixcam.go | Sipeed 硬件相机 |
4.4 Tools 模块 (pkg/tools/)
Agent 可使用的工具集:
| 工具 | 功能 |
|---|---|
filesystem.go | 文件读写、目录列表 |
edit.go | 文件编辑 |
shell.go | 命令执行 |
web.go | Web 搜索 (Brave/DuckDuckGo) |
message.go | 消息发送 |
spawn.go / subagent.go | 子 Agent 派生 |
cron.go | 定时任务 |
skills_install.go | 技能安装 |
i2c.go / spi.go | 硬件 I2C/SPI 通信 |
toolloop.go | 工具循环执行控制 |
4.5 其他核心模块
pkg/cron/: 定时任务调度服务pkg/heartbeat/: 周期性任务 (默认 30 分钟)pkg/migrate/: 配置迁移工具 (从 OpenClaw 迁移)pkg/auth/: OAuth/PKCE 认证pkg/routing/: 消息路由和会话管理pkg/devices/: USB 设备事件监听pkg/health/: 健康检查服务器pkg/logger/: 日志系统
4.6 系统级Prompt
4.6.1. AGENT.MD — 系统指令层(System Instructions)
作用:定义 AI 的核心行为准则和交互规范
| 特性 | 说明 |
| 定位 | 最基础的系统级 Prompt |
| 内容 | 任务执行方式、工具使用规则、记忆管理、用户沟通原则 |
| 影响 | 直接控制 AI 的"行为模式"——如何思考、如何行动、何时询问澄清 |
| 类比 | 相当于员工的岗位操作手册 |
关键指令:
- "Always explain what you're doing before taking actions" → 透明度要求
- "Use tools to help accomplish tasks" → 启用工具调用能力
- "Remember important information in your memory files" → 激活记忆功能
4.6.2. SOUL.md — 人格/角色层(Persona/Character)
作用:塑造 AI 的"性格"和交互风格
| 特性 | 说明 |
| 定位 | 人格化层面的补充 |
| 内容 | 性格特质(友好、简洁、好奇)、价值观(准确优先、隐私保护) |
| 影响 | 决定语气、表达方式、情感色彩**,但不改变核心能力 |
| 类比 | 相当于品牌调性指南或人物小传 |
4.6.3. USER.md — 用户上下文层(User Context)
作用:提供个性化交互所需的背景信息
| 特性 | 说明 |
| 定位 | 动态填充的用户画像模板 |
| 内容 | 用户的沟通偏好、个人信息、学习目标(当前为占位符) |
| 影响 | 让 AI 能因人而异地调整回答风格和内容深度 |
| 类比 | 相当于客户关系管理(CRM)档案 |
4.6.4. IDENTITY.md — 身份/产品层(Product Identity)
作用:定义 AI 产品的元信息和技术规格
| 特性 | 说明 |
| 定位 | 产品说明书 + 项目文档 |
| 内容 | 名称、版本、技术栈、功能列表、设计理念、开源信息 |
| 影响 | 当用户询问"你是谁"或技术细节时提供准确信息;也用于自我认知 |
| 类比 | 相当于产品白皮书或自我介绍名片 |
- 支持多 LLM 提供商(OpenAI、Anthropic、Zhipu 等)
- 强调硬件限制($10 开发板、<10MB RAM)→ 影响回答时的资源意识
- 包含社区链接 → 用于引导用户获取支持
4.6.5层级关系图
| Identity.md │ 我是谁(产品身份)│ (元信息、技术规格、项目背景) |
| SOUL.md │ 我是什么性格(人格)│ (性格、价值观、交互风格) |
| AGENT.md │ 我该怎么做"(行为准则)│ (系统指令、工具使用、任务执行) |
| USER.md │ 我在和谁对话(用户上下文│ (用户偏好、个人信息、学习目标) |
5. CLI 命令
| 命令 | 说明 |
|---|---|
picoclaw onboard | 初始化配置和工作空间 |
picoclaw agent -m "..." | 与 Agent 对话 |
picoclaw gateway | 启动网关服务 |
picoclaw status | 显示状态 |
picoclaw cron list | 列出定时任务 |
picoclaw skills install | 安装技能 |
picoclaw auth login | OAuth 登录 |
6. 安全特性
- 工作空间沙箱:
restrict_to_workspace配置限制 Agent 只能访问指定目录 - 命令执行保护: 阻止危险命令 (
rm -rf,format,dd if=,shutdown等) - 会话隔离: 子 Agent 继承相同的安全限制
7. PicoClaw Gateway 运行流程
7.1 启动流程
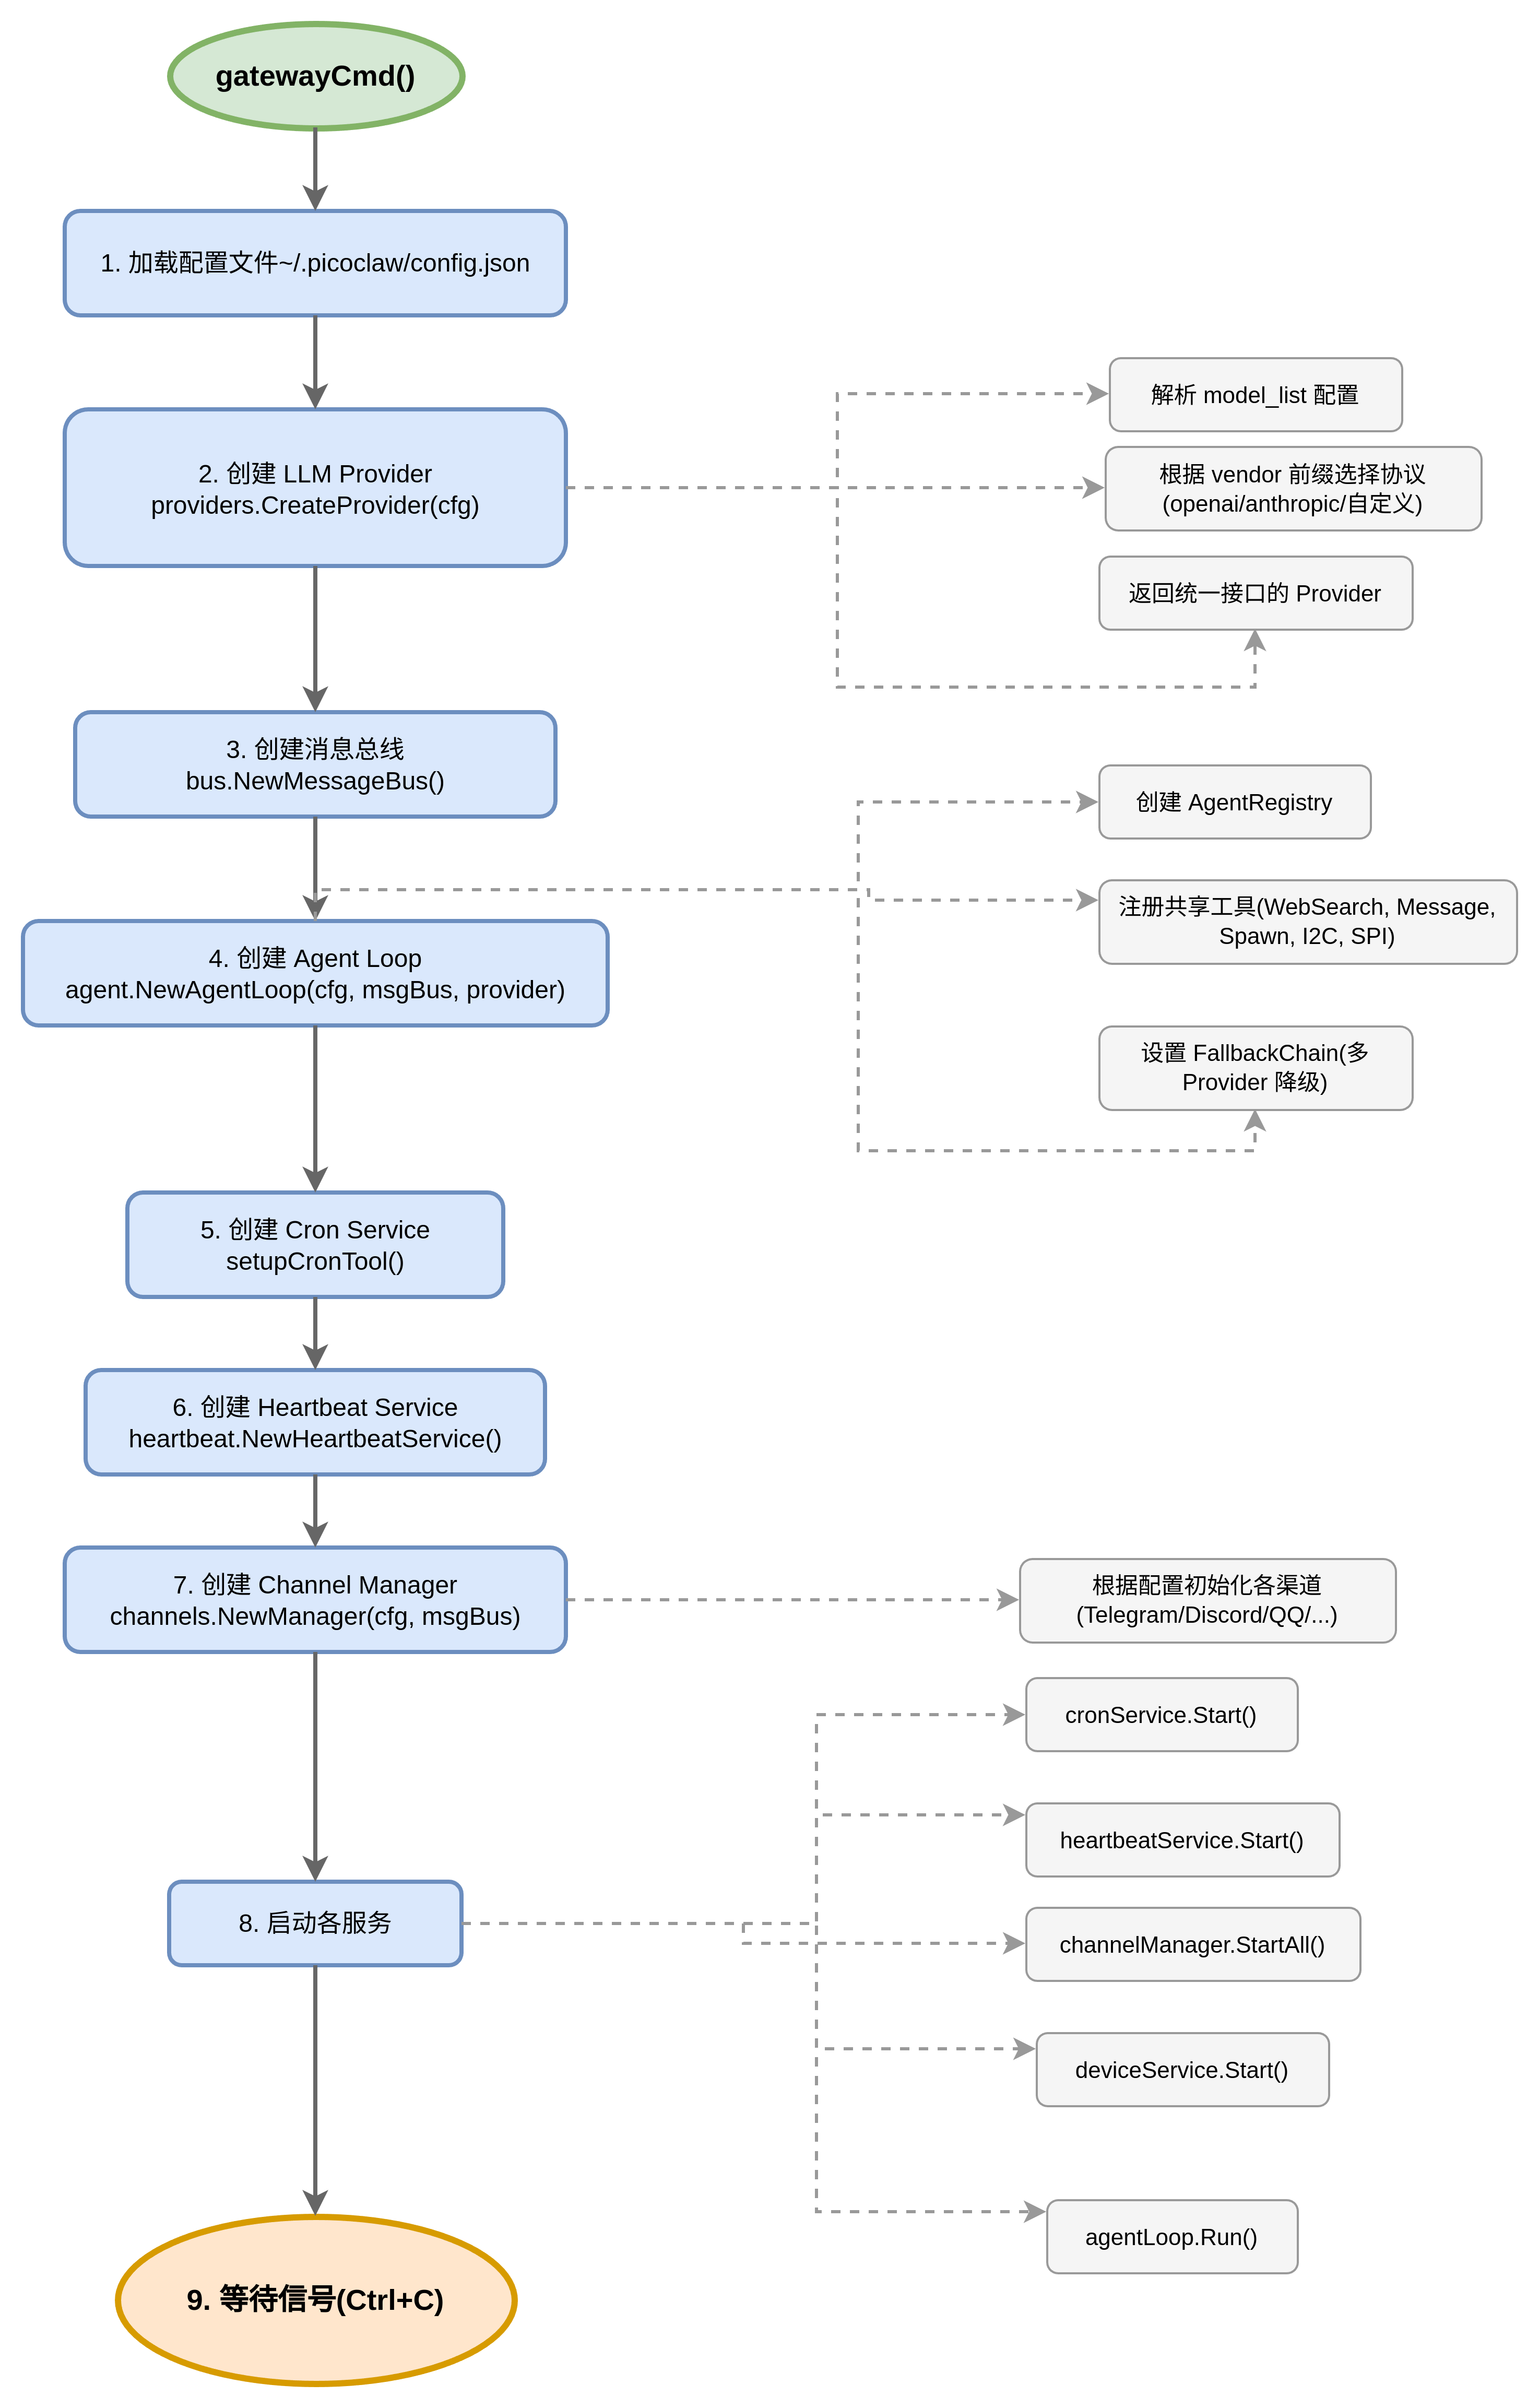
7.2 消息处理流程
用户发送消息
    │
    ▼
Channel (Telegram/Discord/QQ/...)
    │
    ├─► 接收 Webhook/Polling 消息
    ├─► 验证用户权限 (allow_from 白名单)
    ├─► 转换为 InboundMessage
    └─► 发送到消息总线: bus.PublishInbound(msg)
    │
    ▼
MessageBus (消息总线)
    │
    ▼
AgentLoop.Run() 消费消息
    │
    ├─► 1. 路由解析 (routing.ResolveRoute)
    │       根据 Channel/AccountID/Peer 确定 Agent 和 Session
    │
    ├─► 2. 获取 Agent 实例
    │
    └─► 3. runAgentLoop() 处理
            │
            ├─► 构建消息历史
            │       - 从 Session 加载历史消息
            │       - 获取 Summary (摘要)
            │       - ContextBuilder.BuildMessages()
            │
            ├─► runLLMIteration() - LLM 调用循环
            │       │
            │       ├─► 调用 LLM: provider.Chat()
            │       ├─► 检查响应
            │       │       - 无 ToolCalls: 返回内容
            │       │       - 有 ToolCalls: 执行工具
            │       │
            │       └─► 执行工具调用
            │               tools.ExecuteWithContext()
            │
            └─► 保存助手回复到 Session
                │
                ▼
                发送响应到 Outbound
                    │
                    ▼
                    dispatchOutbound() 分发到对应 Channel
8. picoclaw agent 命令运行流程
8.1 命令行入口
picoclaw agent [options]

选项:
  -m, --message "内容"    # 单次对话
  -s, --session "键"      # 指定会话键 (默认: cli:default)
  --model, -model "模型"  # 临时覆盖模型
  -d, --debug             # 调试模式
8.2 两种运行模式
| 模式 | 说明 |
|---|---|
| 单次对话模式 | 有 -m 参数,直接执行并返回,然后退出 |
| 交互式模式 | 无 -m 参数,使用 readline 逐行读取,持续对话 |
8.3 核心处理流程 (ProcessDirect)
ProcessDirect(ctx, content, sessionKey)
    │
    ▼
ProcessDirectWithChannel(ctx, content, sessionKey, "cli", "direct")
    │
    ▼
构建 InboundMessage
    {
        Channel:    "cli",
        SenderID:   "cron",
        ChatID:    "direct",
        Content:   content,
        SessionKey: sessionKey
    }
    │
    ▼
processMessage(ctx, msg)
    │
    ├─► 路由解析: "cli" -> default agent
    ├─► 构建 processOptions
    │
    ▼
runAgentLoop(ctx, agent, opts)
    │
    ├─► Step 1: 更新工具上下文
    ├─► Step 2: 构建消息
    │       - Sessions.GetHistory()
    │       - ContextBuilder.BuildMessages()
    │       - BuildSystemPrompt() ← 包含 Skills 摘要
    │
    ├─► Step 3: 保存用户消息
    │
    ├─► Step 4: LLM 迭代循环
    │       runLLMIteration()
    │       │
    │       ├─► provider.Chat()
    │       ├─► 执行工具 (read_file, exec, web_search, etc.)
    │       └─► 工具结果添加到消息历史
    │
    ├─► Step 5: 保存助手回复
    │
    ├─► Step 6: 摘要优化 (可选)
    │
    ▼
返回 response 字符串
9. Skills 系统技术分析
9.1 Skills 概述
Skills 是 PicoClaw 的扩展机制,允许 Agent 通过读取额外的技能定义文件来增强能力。
9.2 Skills 存储位置
| 位置 | 优先级 | 说明 |
|---|---|---|
| Workspace Skills | 高 | ~/.picoclaw/workspace/skills/{skill-name}/ |
| Global Skills | 中 | ~/.picoclaw/skills/{skill-name}/ |
| Builtin Skills | 低 | {picoclaw-binary}/skills/{skill-name}/ |
9.3 Skills 加载流程
Agent Loop 初始化
    │
    ▼
NewAgentLoop(cfg, msgBus, provider)
    │
    ▼
NewAgentRegistry(cfg, provider)
    │
    ▼
registerSharedTools()
    │
    ▼
创建 FindSkillsTool / InstallSkillTool
    │
    ▼
ContextBuilder.Initialize()
    │
    ▼
SkillsLoader.ListSkills()  ◄─────────────┐
    │                                    │
    │  遍历三个目录:                      │
    │  - workspace/skills/              │
    │  - ~/.picoclaw/skills/            │
    │  - builtin/skills/                 │
    │                                    │
    │  读取每个 skill 的 SKILL.md        │
    │  提取 metadata (name, description) │
    │                                    │
    └────────────────────────────────────┘
    │
    ▼
BuildSystemPrompt() 时
    │
    ▼
skillsLoader.BuildSkillsSummary()
    │
    ▼
生成 XML 格式的技能摘要:
<skills>
  <skill>
    <name>github</name>
    <description>GitHub 集成...</description>
    <location>~/.picoclaw/workspace/skills/github/SKILL.md</location>
    <source>workspace</source>
  </skill>
  ...
</skills>
    │
    ▼
注入到 System Prompt
9.4 SKILL.md 的处理方式
重要发现:SKILL.md 不是直接作为 System Prompt 注入!
实际机制:
-
启动时:只注入 Skills 摘要(XML 格式),包含:
- Skill 名称
- Skill 描述
- SKILL.md 文件位置
-
运行时:LLM 自主决定需要哪个 Skill,然后:
- 调用
read_file工具读取完整 SKILL.md 内容 - 读取结果作为 tool message(角色为 "tool")添加到消息历史
- 再次发送给 LLM,让 LLM 根据 Skill 提示处理请求
- 调用
9.5 Skill 执行完整流程
用户: "帮我创建一个 GitHub Issue"
    │
    ▼
runAgentLoop()
    │
    ▼
BuildSystemPrompt() ──► 包含 Skills 摘要 XML
    │
    ▼
provider.Chat() ──► 发送给 LLM
    │
    ▼
LLM 决策:
  - 用户要求 GitHub 相关操作
  - 查看 Skills 摘要,发现有 "github" skill
  - 需要读取 SKILL.md 获取完整提示词
  - 调用 read_file 工具
    │
    ▼
tools.ExecuteWithContext("read_file", {path: "~/.../skills/github/SKILL.md"})
    │
    ▼
ReadFileTool.Execute()
    ├─► 检查 workspace 权限
    ├─► 读取 SKILL.md 文件内容
    └─► 返回 ToolResult { ForLLM: "完整 SKILL.md 内容..." }
    │
    ▼
toolResultMsg := Message{Role: "tool", Content: "SKILL.md 内容..."}
    │
    ▼
messages = append(messages, toolResultMsg)  ◄── 作为 tool message
    │
    ▼
provider.Chat() ──► 再次发送给 LLM,包含 SKILL.md 内容
    │
    ▼
LLM 现在:
  - 已读取 GitHub Skill 的完整提示词
  - 知道如何使用 GitHub API
  - 可以执行创建 Issue 的操作
    │
    ▼
返回最终响应给用户
9.6 消息类型对比
| 消息类型 | 角色 (Role) | 来源 | 用途 |
|---|---|---|---|
| System Prompt | system | 启动时构建 | 基础指令、身份、Skills 摘要 |
| User Message | user | 用户输入 | 本次请求 |
| Assistant Message | assistant | LLM 回复 | 响应或工具调用 |
| Tool Message | tool | 工具执行结果 | read_file 读取的 SKILL.md 内容 |
9.7 远程 Skills 注册表
支持从远程注册表(如 ClawHub)安装 Skills:
配置 config.json:
{
  "tools": {
    "skills": {
      "registries": {
        "clawhub": {
          "enabled": true,
          "base_url": "https://clawhub.ai"
        }
      }
    }
  }
}
可用工具:
find_skills: 搜索远程 Skillsinstall_skill: 从远程安装 Skill
10. IoT 相关业务流程
10.1 设备服务模块 (pkg/devices/)
PicoClaw 提供了硬件设备监控能力,主要包括:
10.1.1 目录结构
pkg/devices/
├── service.go           # 设备服务主逻辑
├── source.go            # 事件源接口定义
├── events/
│   └── events.go        # 设备事件定义
└── sources/
    ├── usb_linux.go     # USB 热插拔监控 (Linux)
    └── usb_stub.go      # USB 监控存根 (非 Linux)
10.1.2 核心组件
DeviceEvent: 设备事件结构
type DeviceEvent struct {
    Action       Action           // add, remove, change
    Kind         Kind             // usb, bluetooth, pci, generic
    DeviceID     string           // 设备 ID (如 "1-2" 表示 USB 总线 1 设备 2)
    Vendor       string           // 厂商名称
    Product      string           // 产品名称
    Serial       string           // 序列号
    Capabilities string           // 能力描述
    Raw          map[string]string // 原始属性
}
EventSource: 事件源接口
type EventSource interface {
    Kind() Kind                    // 事件类型
    Start(ctx context.Context) (<-chan *DeviceEvent, error)  // 启动监控
    Stop() error                   // 停止监控
}
10.1.3 USB 热插拔监控流程
配置中启用:
{
  "devices": {
    "enabled": true,
    "monitor_usb": true
  }
}
    │
    ▼
NewService(cfg, stateMgr)
    │
    ▼
创建 USBMonitor:
    sources.NewUSBMonitor()
    │
    ▼
service.Start(ctx)
    │
    ├─► 启动 USBMonitor
    │       │
    │       ▼
    │       exec.Command("udevadm", "monitor", "--property", "--subsystem-match=usb")
    │       │
    │       └─► 监听 udevadm 输出的 USB 设备事件
    │
    └─► handleEvents() goroutine
            │
            ▼
            接收 DeviceEvent
            │
            ▼
            sendNotification()
            ├─► 获取最后活跃的 Channel
            ├─► 解析 platform 和 userID
            └─► 发送到消息总线
                │
                ▼
                用户收到通知:
                🔌 Device Connected

                Type: usb
                Device: Logitech USB Receiver
                Capabilities: HID (Keyboard/Mouse/Gamepad)
10.1.4 设备事件通知流程
USB 设备插入/拔出
    │
    ▼
udevadm monitor 检测到事件
    │
    ▼
parseUSBEvent() 解析事件
    │
    ├─► ACTION: add/remove
    ├─► ID_VENDOR: 厂商名
    ├─► ID_MODEL: 产品名
    ├─► ID_SERIAL_SHORT: 序列号
    ├─► ID_USB_CLASS: 设备类别
    └─► DEVPATH: 设备路径
    │
    ▼
DeviceEvent.FormatMessage()
    │
    ▼
🔌 Device Connected

Type: usb
Device: Logitech USB Receiver
Capabilities: HID (Keyboard/Mouse/Gamepad)
Serial: 12345678
    │
    ▼
bus.PublishOutbound() 发送到用户
10.2 I2C 工具 (pkg/tools/i2c.go)
10.2.1 功能概述
I2C 工具允许 Agent 与 I2C 总线设备交互,用于读取传感器和控制外设。
10.2.2 支持的操作
| 操作 | 说明 |
|---|---|
detect | 列出可用的 I2C 总线 |
scan | 扫描总线上的设备 |
read | 从设备读取字节 |
write | 向设备写入字节 |
10.2.3 I2C 工具执行流程
LLM 调用: i2c({action: "detect"})
    │
    ▼
I2CTool.Execute(ctx, args)
    │
    ▼
检测操作系统:
    ├─► Linux: 正常执行
    └─► Other: 返回错误 "I2C is only supported on Linux"
    │
    ▼
根据 action 分发:
    │
    ├─► detect: filepath.Glob("/dev/i2c-*")
    │       │
    │       ▼
    │       返回可用总线列表:
    │       [
    │         {"path": "/dev/i2c-1", "bus": "1"},
    │         {"path": "/dev/i2c-2", "bus": "2"}
    │       ]
    │
    ├─► scan: 扫描总线上的设备
    │       │
    │       ├─► 打开 /dev/i2c-{bus}
    │       ├─► 设置 I2C 地址
    │       ├─► SMBus Quick Write 探测
    │       └─► 返回发现的设备列表
    │
    ├─► read: 从设备读取
    │       │
    │       ├─► 打开设备
    │       ├─► 设置从机地址
    │       ├─► 可选:写入寄存器地址
    │       ├─► 读取数据
    │       └─► 返回十六进制数据
    │
    └─► write: 向设备写入
            │
            ├─► 需要 confirm: true (安全保护)
            ├─► 打开设备
            ├─► 设置从机地址
            ├─► 可选:写入寄存器地址
            ├─► 写入数据
            └─► 返回写入结果
10.2.4 使用示例
// 检测 I2C 总线
{"action": "detect"}

// 扫描总线 1 上的设备
{"action": "scan", "bus": "1"}

// 从地址 0x38 读取 4 字节
{"action": "read", "bus": "1", "address": 0x38, "length": 4}

// 从地址 0x38 的寄存器 0x01 读取 2 字节
{"action": "read", "bus": "1", "address": 0x38, "register": 0x01, "length": 2}

// 向地址 0x38 写入数据
{
  "action": "write",
  "bus": "1",
  "address": 0x38,
  "data": [0xFF, 0x00],
  "confirm": true
}
10.3 SPI 工具 (pkg/tools/spi.go)
10.3.1 功能概述
SPI 工具允许 Agent 与 SPI 总线设备交互,用于高速外设通信。
10.3.2 支持的操作
| 操作 | 说明 |
|---|---|
list | 列出可用的 SPI 设备 |
transfer | 全双工发送/接收 |
read | 接收字节 (发送零字节) |
10.3.3 SPI 工具执行流程
LLM 调用: spi({action: "list"})
    │
    ▼
SPITool.Execute(ctx, args)
    │
    ▼
检测操作系统:
    ├─► Linux: 正常执行
    └─► Other: 返回错误 "SPI is only supported on Linux"
    │
    ▼
根据 action 分发:
    │
    ├─► list: filepath.Glob("/dev/spidev*")
    │       │
    │       ▼
    │       返回可用设备列表:
    │       [
    │         {"path": "/dev/spidev2.0", "device": "2.0"},
    │         {"path": "/dev/spidev2.1", "device": "2.1"}
    │       ]
    │
    ├─► transfer: 全双工传输
    │       │
    │       ├─► 打开 /dev/spidev{device}
    │       ├─► 配置: speed, mode, bits
    │       ├─► 设置 CS 模式和延迟
    │       ├─► 执行 transfer (同时发送和接收)
    │       └─► 返回发送/接收的数据
    │
    └─► read: 读取数据
            │
            ├─► 打开设备
            ├─► 配置参数
            ├─► 发送零字节,接收数据
            └─► 返回接收的数据
10.3.4 使用示例
// 列出 SPI 设备
{"action": "list"}

// 全双工传输
{
  "action": "transfer",
  "device": "2.0",
  "speed": 1000000,
  "mode": 0,
  "bits": 8,
  "data": [0xAA, 0x55, 0x01],
  "confirm": true
}

// 读取 8 字节
{"action": "read", "device": "2.0", "length": 8}
10.4 IoT 业务流程总结
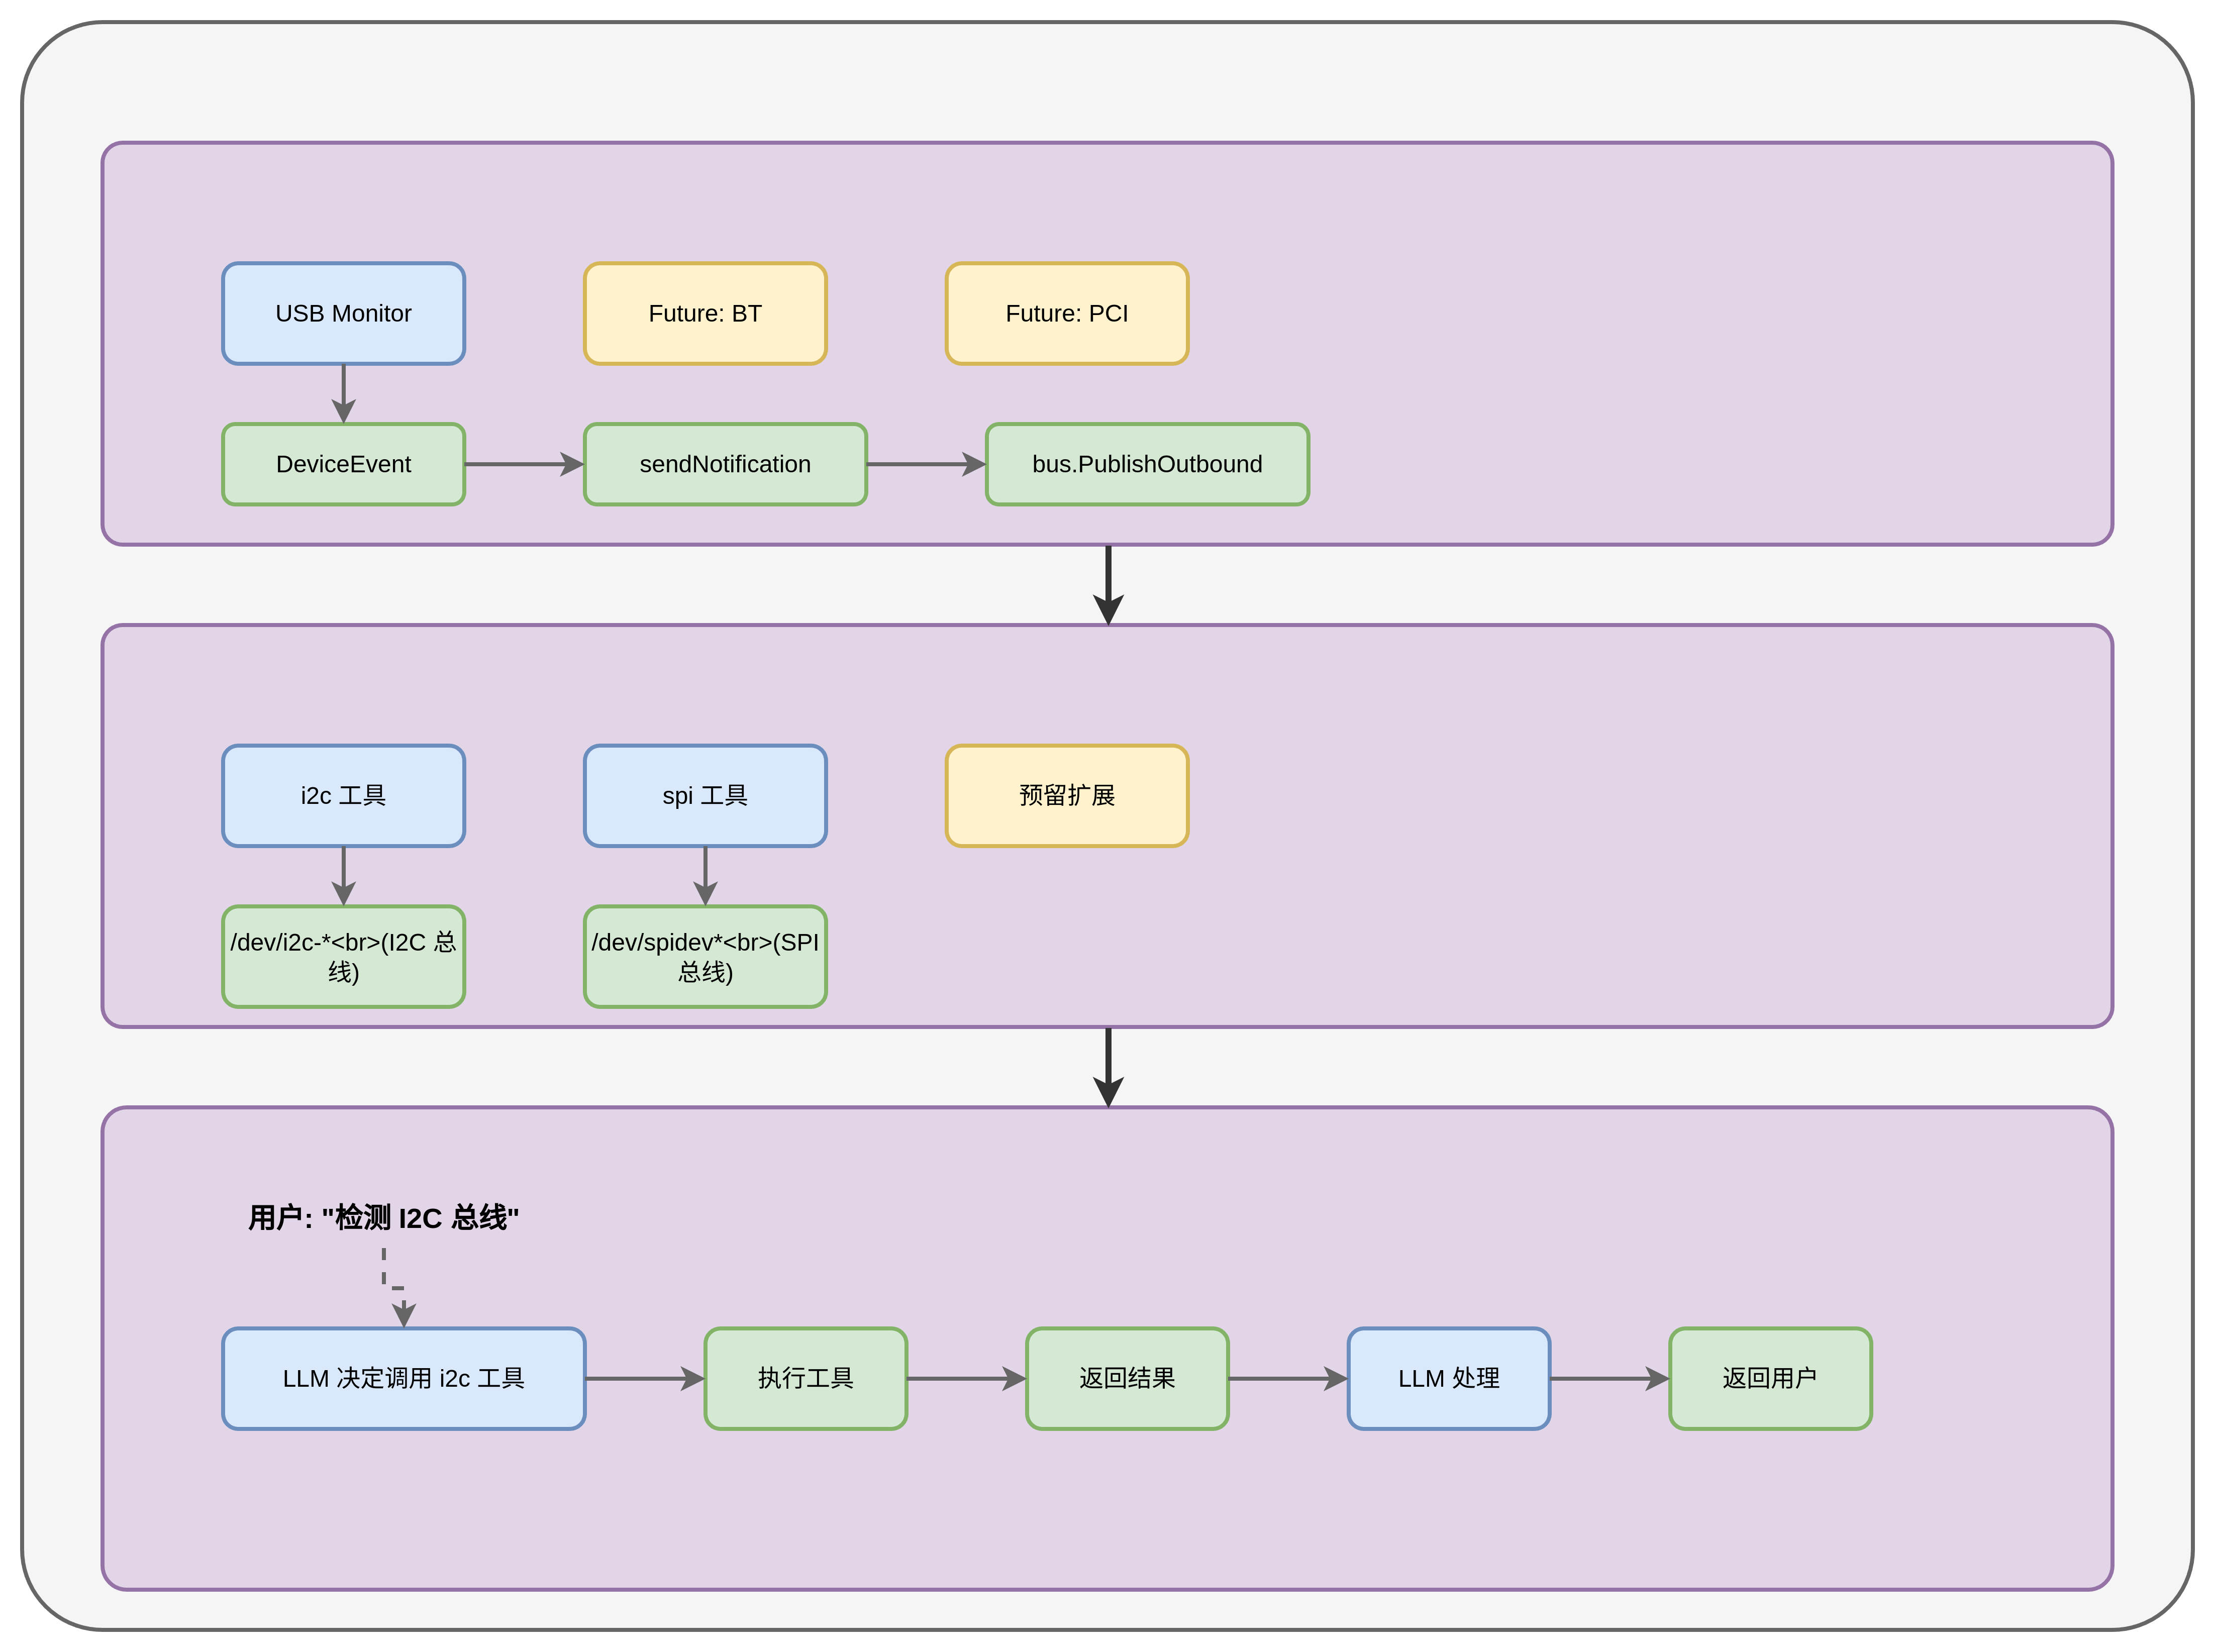
11. 关键代码文件索引
| 功能模块 | 关键文件 |
|---|---|
| CLI 入口 | cmd/picoclaw/main.go |
| Agent 核心 | pkg/agent/loop.go, pkg/agent/context.go |
| Provider 工厂 | pkg/providers/factory.go |
| 消息总线 | pkg/bus/bus.go |
| Channel 管理 | pkg/channels/manager.go |
| 工具注册 | pkg/tools/registry.go |
| Skills 加载 | pkg/skills/loader.go |
| 设备服务 | pkg/devices/service.go |
| I2C 工具 | pkg/tools/i2c.go, pkg/tools/i2c_linux.go |
| SPI 工具 | pkg/tools/spi.go, pkg/tools/spi_linux.go |
| 会话管理 | pkg/session/manager.go |
| 定时任务 | pkg/cron/service.go |
| 心跳任务 | pkg/heartbeat/service.go |
12. 配置示例
完整配置示例
{
  "agents": {
    "defaults": {
      "workspace": "~/.picoclaw/workspace",
      "restrict_to_workspace": true,
      "model": "gpt4",
      "max_tokens": 8192,
      "temperature": 0.7,
      "max_tool_iterations": 20
    }
  },
  "model_list": [
    {
      "model_name": "gpt4",
      "model": "openai/gpt-5.2",
      "api_key": "sk-your-openai-key"
    }
  ],
  "channels": {
    "telegram": {
      "enabled": true,
      "token": "YOUR_TELEGRAM_BOT_TOKEN",
      "allow_from": ["YOUR_USER_ID"]
    },
    "discord": {
      "enabled": false,
      "token": "YOUR_DISCORD_BOT_TOKEN",
      "allow_from": []
    }
  },
  "tools": {
    "web": {
      "brave": {
        "enabled": false,
        "api_key": "YOUR_BRAVE_API_KEY"
      },
      "duckduckgo": {
        "enabled": true
      }
    },
    "skills": {
      "registries": {
        "clawhub": {
          "enabled": true,
          "base_url": "https://clawhub.ai"
        }
      }
    }
  },
  "devices": {
    "enabled": true,
    "monitor_usb": true
  },
  "heartbeat": {
    "enabled": true,
    "interval": 30
  }
}
13. 总结
PicoClaw 是一个设计精良的超轻量级 AI Agent 框架,其核心特点:
- 极简设计: 单二进制文件,无复杂依赖
- 模块化架构: Provider、Channel、Tools 解耦清晰
- 多平台支持: 从嵌入式设备到云服务器
- AI 原生: 95% 代码由 AI Agent 生成,体现现代 AI 工程实践
- 社区活跃: 支持多种通讯平台和 LLM 提供商
- IoT 能力: 内置 I2C/SPI 工具和 USB 设备监控,适配硬件场景
该项目的架构对于构建需要在资源受限环境下运行的 AI 应用具有重要参考价值,特别是嵌入式和 IoT 场景。

有“AI”的1024 = 2048,欢迎大家加入2048 AI社区
更多推荐


 27
27 0
0- 0


 已为社区贡献1条内容

所有评论(0)