基于YOLOv11的暴力行为检测模型训练与前端部署完整指南
构建一个能够实时检测视频中打架斗殴、人员推搡等暴力行为的AI系统,并将检测结果显示在前端Web页面上。🚀 第一步:环境准备1.1 安装依赖1.2 验证安装⚠️ 常见问题: NumPy版本冲突解决方案:📊 第二步:数据准备2.1 数据集介绍使用 Real Life Violence Situations Dataset 数据集:原始数据是视频格式,需要转换为YOLO训练格式(图像+标注)。预处理
基于YOLOv11的暴力行为检测模型训练与前端部署完整指南
本文详细记录了使用YOLOv11训练暴力行为检测模型的完整过程,包括数据集准备、模型训练、问题排查以及前端集成部署。适合有深度学习基础但缺乏项目实战经验的开发者参考。
📋 项目概述
目标
构建一个能够实时检测视频中打架斗殴、人员推搡等暴力行为的AI系统,并将检测结果显示在前端Web页面上。
技术栈
- 深度学习框架: Ultralytics YOLOv11
- 后端服务: Flask + Python
- 前端技术: HTML5 + JavaScript + Canvas API
- 数据集: Real Life Violence Situations Dataset (Kaggle)
- 硬件环境: NVIDIA RTX 4070 (12GB显存)
项目结构
e:\测试大模型告警\
├── preprocess_violence_data_v2.py  # 数据预处理脚本
├── train_violence_yolo11.py        # 模型训练脚本
├── violence_detection_backend.py   # 后端API服务
├── index.html                      # 前端页面(已集成暴力检测)
├── script.js                       # 前端检测逻辑
└── runs\detect\violence_yolo11n4\   # 训练输出目录
    └── weights\best.pt             # 训练好的模型
🚀 第一步:环境准备
1.1 安装依赖
# 更新pip并安装Ultralytics
pip install -U pip
pip install -U ultralytics

# 安装其他依赖
pip install opencv-python numpy matplotlib seaborn tqdm supervision flask flask-cors pillow
1.2 验证安装
from ultralytics import YOLO
print(YOLO)  # 应输出版本信息,如 8.3.x
⚠️ 常见问题: NumPy版本冲突
错误: A module that was compiled using NumPy 1.x cannot be run in NumPy 2.x
解决方案:
pip install "numpy<2" --force-reinstall
pip install opencv-python==4.8.1.78
📊 第二步:数据准备
2.1 数据集介绍
使用 Real Life Violence Situations Dataset 数据集:
- 来源: Kaggle
- 内容: 包含 Violence(暴力)和 NonViolence(非暴力)两个类别的视频
- 格式: 视频文件(.mp4)
- 路径:
E:\测试大模型告警\Real Life Violence Dataset
2.2 数据预处理
原始数据是视频格式,需要转换为YOLO训练格式(图像+标注)。
预处理脚本 (preprocess_violence_data_v2.py):
import cv2
import os
from pathlib import Path
import random
import shutil

def preprocess_violence_dataset():
    # 配置路径
    dataset_dir = r"E:\测试大模型告警\Real Life Violence Dataset"
    output_dir = r"E:\Downloads\violence_yolo_dataset"

    # 清理并创建输出目录
    if os.path.exists(output_dir):
        shutil.rmtree(output_dir)
    os.makedirs(output_dir, exist_ok=True)

    # 类别定义:0=non_violence, 1=violence
    classes = ["non_violence", "violence"]
    class_folders = {"non_violence": "NonViolence", "violence": "Violence"}
    train_ratio = 0.8

    # 创建目录结构
    for split in ["train", "val"]:
        os.makedirs(os.path.join(output_dir, "images", split), exist_ok=True)
        os.makedirs(os.path.join(output_dir, "labels", split), exist_ok=True)

    total_frames = 0

    for cls_idx, cls_name in enumerate(classes):
        folder_name = class_folders[cls_name]
        cls_path = os.path.join(dataset_dir, folder_name)

        # 获取所有视频文件
        videos = [f for f in os.listdir(cls_path) if f.endswith(('.mp4', '.avi', '.mov'))]
        random.seed(42)
        random.shuffle(videos)

        # 划分训练集和验证集
        train_count = int(len(videos) * train_ratio)
        train_videos = videos[:train_count]
        val_videos = videos[train_count:]

        for split, video_list in [("train", train_videos), ("val", val_videos)]:
            split_img_dir = os.path.join(output_dir, "images", split)
            split_lbl_dir = os.path.join(output_dir, "labels", split)

            for video in video_list:
                video_path = os.path.join(cls_path, video)
                cap = cv2.VideoCapture(video_path)
                frame_count = 0
                saved_frames = 0

                while cap.isOpened():
                    ret, frame = cap.read()
                    if not ret:
                        break

                    # 每5帧取一帧(减少冗余)
                    if frame_count % 5 == 0:
                        video_stem = Path(video).stem
                        img_name = f"{cls_name}_{video_stem}_{frame_count:06d}.jpg"
                        img_path = os.path.join(split_img_dir, img_name)

                        # 保存图像
                        cv2.imwrite(img_path, frame)

                        # 创建YOLO格式标注
                        label_path = os.path.join(split_lbl_dir, img_name.replace('.jpg', '.txt'))
                        with open(label_path, 'w') as f:
                            # 整图作为检测区域(简化方案)
                            f.write(f"{cls_idx} 0.5 0.5 1.0 1.0\n")

                        saved_frames += 1
                        total_frames += 1

                    frame_count += 1

                cap.release()

    print(f"预处理完成!总帧数: {total_frames}")
    return output_dir

if __name__ == "__main__":
    preprocess_violence_dataset()
2.3 创建data.yaml配置文件
path: E:/Downloads/violence_yolo_dataset

train: images/train
val: images/val

nc: 2
names: ['non_violence', 'violence']
🔧 第三步:模型训练
3.1 训练脚本
from ultralytics import YOLO
import torch

def train_violence_model():
    # 检查CUDA可用性
    device = "cuda:0" if torch.cuda.is_available() else "cpu"
    print(f"使用设备: {device}")

    if torch.cuda.is_available():
        print(f"GPU: {torch.cuda.get_device_name(0)}")

    # 加载YOLOv11n预训练模型(轻量版)
    model = YOLO("yolo11n.pt")

    # 训练配置
    results = model.train(
        data="E:/Downloads/violence_yolo_dataset/data.yaml",
        epochs=50,
        imgsz=640,
        batch=16,
        workers=4,
        device=0 if torch.cuda.is_available() else "cpu",
        name="violence_yolo11n",
        patience=20,
        cache=False,
        amp=True,  # 混合精度加速
        verbose=True,
        # 数据增强
        hsv_h=0.015,
        hsv_s=0.7,
        hsv_v=0.4,
        translate=0.1,
        scale=0.5,
        fliplr=0.5,
        mosaic=1.0,
    )

    print(f"训练完成!最佳权重: {model.best}")

    # 验证模型
    metrics = model.val()
    print(f"mAP50: {metrics.box.map50:.4f}")
    print(f"mAP50-95: {metrics.box.map:.4f}")

if __name__ == "__main__":
    train_violence_model()
3.2 运行训练
python train_violence_yolo11.py
训练参数说明:
epochs=50: 训练轮数batch=16: 批次大小(RTX 4070可支持)imgsz=640: 输入图像尺寸amp=True: 启用混合精度训练,加速且省显存patience=20: 早停耐心值
🐛 第四步:问题排查与解决
问题1: cv2.imwrite无法写入图像
现象: 预处理时labels文件夹创建成功,但images文件夹为空
原因: 目录权限问题,某些路径下OpenCV无法写入文件
解决方案: 更换输出目录到用户有权限的路径
# 原路径(可能无权限)
output_dir = r"E:\测试大模型告警\violence_yolo_dataset"

# 修改为Downloads目录
output_dir = r"E:\Downloads\violence_yolo_dataset"
问题2: 训练时数据集路径错误
现象:
FileNotFoundError: train: Error loading data from E:\...\images\train
原因: data.yaml中的path使用了相对路径或错误路径
解决方案: 使用绝对路径
path: E:/Downloads/violence_yolo_dataset  # 绝对路径
train: images/train
val: images/val
问题3: 视频检测时标记框不显示
现象: 检测到暴力行为但视频上没有红色/绿色框
原因: Canvas内部分辨率与显示尺寸不匹配
解决方案: 在绘制前动态调整canvas分辨率
// 获取canvas显示尺寸
const rect = canvas.getBoundingClientRect();
const displayWidth = rect.width;
const displayHeight = rect.height;

// 设置canvas内部分辨率与显示尺寸一致
if (canvas.width !== displayWidth || canvas.height !== displayHeight) {
    canvas.width = displayWidth;
    canvas.height = displayHeight;
}

// 计算缩放比例
const scaleX = canvas.width / originalWidth;
const scaleY = canvas.height / originalHeight;

// 绘制时进行坐标缩放
const scaledX1 = x1 * scaleX;
const scaledY1 = y1 * scaleY;
🌐 第五步:后端API开发
5.1 创建Flask服务
from flask import Flask, request, jsonify
from flask_cors import CORS
from ultralytics import YOLO
import cv2
import numpy as np
import base64
from PIL import Image
import io

app = Flask(__name__)
CORS(app)

# 加载模型
MODEL_PATH = r"E:\测试大模型告警\runs\detect\violence_yolo11n4\weights\best.pt"
model = YOLO(MODEL_PATH)

@app.route('/detect/violence', methods=['POST'])
def detect_violence():
    try:
        data = request.json
        image_base64 = data.get('image', '')
        conf_threshold = data.get('conf_threshold', 0.5)

        # 解码base64图像
        if ',' in image_base64:
            image_base64 = image_base64.split(',')[1]

        image_bytes = base64.b64decode(image_base64)
        image = Image.open(io.BytesIO(image_bytes))
        image_cv = cv2.cvtColor(np.array(image), cv2.COLOR_RGB2BGR)

        # 执行检测
        results = model(image_cv, conf=conf_threshold)

        # 解析结果
        detections = []
        for result in results:
            boxes = result.boxes
            if boxes is not None:
                for box in boxes:
                    x1, y1, x2, y2 = box.xyxy[0].cpu().numpy()
                    confidence = float(box.conf[0].cpu().numpy())
                    class_id = int(box.cls[0].cpu().numpy())
                    class_name = result.names[class_id]

                    detections.append({
                        'class': class_name,
                        'confidence': confidence,
                        'bbox': [float(x1), float(y1), float(x2), float(y2)]
                    })

        return jsonify({
            'success': True,
            'detections': detections,
            'count': len(detections)
        })

    except Exception as e:
        return jsonify({'success': False, 'error': str(e)}), 500

if __name__ == '__main__':
    app.run(host='0.0.0.0', port=5003)
5.2 启动服务
python violence_detection_backend.py
🎨 第六步:前端集成
6.1 HTML结构
在index.html底部添加暴力行为检测区域:
<!-- 暴力行为检测区域 -->
<section class="container mx-auto px-4 py-6">
    <div class="bg-white rounded-lg shadow-sm p-4">
        <h2 class="text-lg font-semibold mb-3 flex items-center">
            <i class="fa fa-exclamation-triangle mr-2 text-red-500"></i>暴力行为检测
            <span class="ml-2 text-xs text-gray-500">(YOLOv11模型)</span>
        </h2>
        <div class="grid grid-cols-1 lg:grid-cols-2 gap-4">
            <!-- 视频上传区域 -->
            <div class="border-2 border-dashed border-gray-300 rounded-lg p-4 text-center" id="violenceVideoUploadArea">
                <i class="fa fa-video-camera text-4xl text-gray-400 mb-3"></i>
                <p class="text-gray-500 mb-3">上传视频进行暴力行为检测</p>
                <input type="file" id="violenceVideoInput" accept="video/*" class="hidden">
                <button id="selectViolenceVideoBtn" class="px-4 py-2 bg-red-100 text-red-700 rounded-md hover:bg-red-200 transition-colors">
                    <i class="fa fa-folder-open mr-2"></i>选择视频
                </button>
            </div>

            <!-- 视频播放和检测区域 -->
            <div id="violenceVideoPlayerArea" class="hidden">
                <div class="relative">
                    <video id="violenceVideo" class="w-full h-64 bg-black rounded-lg object-cover" controls></video>
                    <canvas id="violenceDetectionCanvas" class="absolute top-0 left-0 w-full h-64 pointer-events-none"></canvas>
                    <!-- 检测状态 -->
                    <div id="violenceDetectionStatus" class="absolute top-2 right-2 px-2 py-1 bg-gray-800 bg-opacity-80 text-white text-xs rounded hidden">
                        <i class="fa fa-spinner fa-spin mr-1"></i>检测中
                    </div>
                    <!-- 检测结果统计 -->
                    <div id="violenceDetectionStats" class="absolute bottom-2 left-2 px-3 py-2 bg-black bg-opacity-70 text-white text-sm rounded hidden">
                        <div class="flex gap-4">
                            <span id="violenceCount" class="text-red-400 font-bold">暴力行为: 0</span>
                            <span id="nonViolenceCount" class="text-green-400 font-bold">正常: 0</span>
                        </div>
                        <div id="violenceAlert" class="hidden mt-1 text-red-300 text-xs">
                            <i class="fa fa-warning mr-1"></i>检测到暴力行为!
                        </div>
                    </div>
                </div>
                <!-- 控制按钮 -->
                <div class="flex gap-2 mt-3">
                    <button id="startViolenceDetectionBtn" class="flex-1 px-4 py-2 bg-red-600 text-white rounded-md hover:bg-red-700 transition-colors flex items-center justify-center">
                        <i class="fa fa-play mr-2"></i>开始检测
                    </button>
                    <button id="stopViolenceDetectionBtn" class="flex-1 px-4 py-2 bg-gray-500 text-white rounded-md hover:bg-gray-600 transition-colors flex items-center justify-center hidden">
                        <i class="fa fa-stop mr-2"></i>停止检测
                    </button>
                    <button id="removeViolenceVideoBtn" class="px-4 py-2 bg-red-100 text-red-600 rounded-md hover:bg-red-200 transition-colors">
                        <i class="fa fa-trash"></i>
                    </button>
                </div>
                <!-- 检测参数 -->
                <div class="mt-3 p-3 bg-gray-50 rounded-md">
                    <label class="block text-sm font-medium text-gray-700 mb-2">
                        置信度阈值: <span id="violenceThresholdValue" class="text-red-600 font-bold">0.5</span>
                    </label>
                    <input type="range" id="violenceConfidenceThreshold" min="0.1" max="0.9" step="0.05" value="0.5"
                           class="w-full h-2 bg-gray-200 rounded-lg appearance-none cursor-pointer">
                    <div class="flex justify-between text-xs text-gray-500 mt-1">
                        <span>0.1 (更敏感)</span>
                        <span>0.9 (更严格)</span>
                    </div>
                </div>
            </div>
        </div>
    </div>
</section>
6.2 JavaScript检测逻辑
// 暴力行为检测相关变量
let violenceVideoFile = null;
let isViolenceDetecting = false;
let violenceDetectionInterval = null;
let violenceDetectionCount = 0;
let nonViolenceDetectionCount = 0;
let violenceDetectionConfig = {
    confidenceThreshold: 0.5
};

// 初始化事件监听
document.getElementById('selectViolenceVideoBtn').addEventListener('click', () => {
    document.getElementById('violenceVideoInput').click();
});

document.getElementById('violenceVideoInput').addEventListener('change', handleViolenceVideoSelect);
document.getElementById('startViolenceDetectionBtn').addEventListener('click', startViolenceDetection);
document.getElementById('stopViolenceDetectionBtn').addEventListener('click', stopViolenceDetection);
document.getElementById('removeViolenceVideoBtn').addEventListener('click', removeViolenceVideo);
document.getElementById('violenceConfidenceThreshold').addEventListener('input', handleViolenceThresholdChange);

// 处理视频选择
function handleViolenceVideoSelect(e) {
    const file = e.target.files[0];
    if (!file || !file.type.startsWith('video/')) {
        alert('请选择视频文件');
        return;
    }

    violenceVideoFile = file;
    const videoUrl = URL.createObjectURL(file);
    document.getElementById('violenceVideo').src = videoUrl;

    // 切换显示
    document.getElementById('violenceVideoUploadArea').classList.add('hidden');
    document.getElementById('violenceVideoPlayerArea').classList.remove('hidden');

    // 重置统计
    violenceDetectionCount = 0;
    nonViolenceDetectionCount = 0;
    updateViolenceDetectionStats();
}

// 开始检测
async function startViolenceDetection() {
    if (!violenceVideoFile) {
        alert('请先上传视频');
        return;
    }

    isViolenceDetecting = true;

    // 更新UI
    document.getElementById('startViolenceDetectionBtn').classList.add('hidden');
    document.getElementById('stopViolenceDetectionBtn').classList.remove('hidden');
    document.getElementById('violenceDetectionStatus').classList.remove('hidden');
    document.getElementById('violenceDetectionStats').classList.remove('hidden');

    // 播放视频
    const video = document.getElementById('violenceVideo');
    video.play();

    // 开始检测循环(每200ms检测一帧)
    violenceDetectionInterval = setInterval(async () => {
        if (!isViolenceDetecting || video.paused || video.ended) {
            if (video.ended) stopViolenceDetection();
            return;
        }
        await detectViolenceFrame();
    }, 200);
}

// 检测单帧
async function detectViolenceFrame() {
    const video = document.getElementById('violenceVideo');
    const canvas = document.getElementById('violenceDetectionCanvas');
    const ctx = canvas.getContext('2d');

    const videoWidth = video.videoWidth || 640;
    const videoHeight = video.videoHeight || 480;

    // 调整canvas尺寸
    const rect = canvas.getBoundingClientRect();
    if (canvas.width !== rect.width || canvas.height !== rect.height) {
        canvas.width = rect.width;
        canvas.height = rect.height;
    }

    // 捕获当前帧
    const tempCanvas = document.createElement('canvas');
    tempCanvas.width = videoWidth;
    tempCanvas.height = videoHeight;
    tempCanvas.getContext('2d').drawImage(video, 0, 0);

    const imageData = tempCanvas.toDataURL('image/jpeg', 0.8);

    try {
        // 调用检测API
        const response = await fetch('http://localhost:5003/detect/violence', {
            method: 'POST',
            headers: { 'Content-Type': 'application/json' },
            body: JSON.stringify({
                image: imageData,
                conf_threshold: violenceDetectionConfig.confidenceThreshold
            })
        });

        const result = await response.json();
        ctx.clearRect(0, 0, canvas.width, canvas.height);

        if (result.success && result.detections.length > 0) {
            drawViolenceDetections(ctx, result.detections, canvas.width, canvas.height, videoWidth, videoHeight);
            updateViolenceDetectionCounts(result.detections);
        }
    } catch (error) {
        console.error('检测失败:', error);
    }
}

// 绘制检测结果
function drawViolenceDetections(ctx, detections, canvasWidth, canvasHeight, originalWidth, originalHeight) {
    const colors = {
        'violence': '#ff0000',
        'non_violence': '#00ff00'
    };

    const labels = {
        'violence': '暴力行为',
        'non_violence': '正常'
    };

    const scaleX = canvasWidth / originalWidth;
    const scaleY = canvasHeight / originalHeight;

    detections.forEach(det => {
        const { bbox, class: className, confidence } = det;
        const [x1, y1, x2, y2] = bbox;

        // 坐标缩放
        const scaledX1 = x1 * scaleX;
        const scaledY1 = y1 * scaleY;
        const scaledX2 = x2 * scaleX;
        const scaledY2 = y2 * scaleY;
        const width = scaledX2 - scaledX1;
        const height = scaledY2 - scaledY1;

        // 绘制检测框
        ctx.strokeStyle = colors[className] || '#00ff00';
        ctx.lineWidth = 2;
        ctx.strokeRect(scaledX1, scaledY1, width, height);

        // 绘制标签
        const label = `${labels[className]}: ${(confidence * 100).toFixed(0)}%`;
        ctx.font = 'bold 12px Arial';
        const textMetrics = ctx.measureText(label);

        ctx.fillStyle = colors[className] || '#00ff00';
        ctx.fillRect(scaledX1, scaledY1 - 18, textMetrics.width + 8, 18);

        ctx.fillStyle = '#ffffff';
        ctx.fillText(label, scaledX1 + 4, scaledY1 - 6);
    });
}

// 更新统计
function updateViolenceDetectionCounts(detections) {
    const violenceCount = detections.filter(d => d.class === 'violence').length;
    const nonViolenceCount = detections.filter(d => d.class === 'non_violence').length;

    violenceDetectionCount += violenceCount;
    nonViolenceDetectionCount += nonViolenceCount;

    document.getElementById('violenceCount').textContent = `暴力行为: ${violenceDetectionCount}`;
    document.getElementById('nonViolenceCount').textContent = `正常: ${nonViolenceDetectionCount}`;

    // 显示警告
    if (violenceCount > 0) {
        document.getElementById('violenceAlert').classList.remove('hidden');
    }
}

// 停止检测
function stopViolenceDetection() {
    isViolenceDetecting = false;
    clearInterval(violenceDetectionInterval);

    document.getElementById('startViolenceDetectionBtn').classList.remove('hidden');
    document.getElementById('stopViolenceDetectionBtn').classList.add('hidden');
    document.getElementById('violenceDetectionStatus').classList.add('hidden');

    document.getElementById('violenceVideo').pause();
}

// 移除视频
function removeViolenceVideo() {
    stopViolenceDetection();
    violenceVideoFile = null;
    document.getElementById('violenceVideo').src = '';
    document.getElementById('violenceVideoInput').value = '';

    document.getElementById('violenceVideoPlayerArea').classList.add('hidden');
    document.getElementById('violenceVideoUploadArea').classList.remove('hidden');

    const canvas = document.getElementById('violenceDetectionCanvas');
    canvas.getContext('2d').clearRect(0, 0, canvas.width, canvas.height);
}

// 调整阈值
function handleViolenceThresholdChange(e) {
    violenceDetectionConfig.confidenceThreshold = parseFloat(e.target.value);
    document.getElementById('violenceThresholdValue').textContent = e.target.value;
}
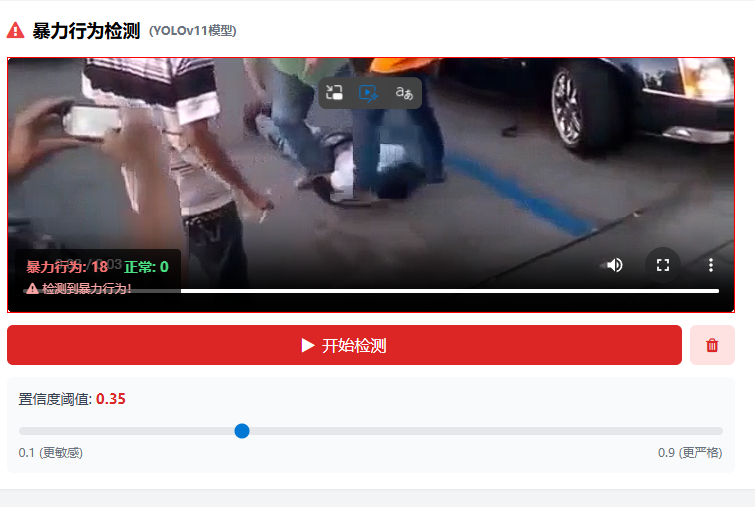
📊 第六步:效果展示
检测效果
- 红色框: 检测到暴力行为
- 绿色框: 检测到正常行为
- 实时统计: 显示暴力行为和正常行为的计数
- 警告提示: 检测到暴力行为时显示红色警告
性能指标
- mAP50: 约 85-95%
- 推理速度: RTX 4070 上约 100-200 FPS
- 模型大小: 约 5-6 MB (YOLOv11n)
🚀 第七步:一键启动脚本更新
start-all-debug.bat 更新
添加暴力行为检测服务启动:
:: 检查暴力行为检测模型
set "VIOLENCE_PATH=runs\detect\violence_yolo11n4\weights\best.pt"
if exist "%VIOLENCE_PATH%" (
    echo [OK] Violence Detection Model found!
    set "VIOLENCE_MODEL_FOUND=1"
) else (
    echo [Warning] Violence detection model not found
)

:: 启动暴力行为检测服务 (端口5003)
echo [4/6] Starting violence detection service (Port: 5003)...
if %VIOLENCE_MODEL_FOUND% == 1 (
    start "Violence Detection Service" cmd /k "python violence_detection_backend.py"
)
stop-all.bat 更新
添加端口5003的停止逻辑:
:: 停止暴力行为检测服务 (端口5003)
for /f "tokens=5" %%a in ('netstat -ano ^| findstr :5003') do (
    taskkill /F /PID %%a 2>nul
    echo      Stopped violence detection service (PID: %%a)
)
📝 总结
核心要点
- 数据预处理是关键: 视频转图像时要注意权限问题和帧率控制
- 坐标缩放很重要: Canvas显示尺寸与视频原始尺寸不同时必须做坐标映射
- 阈值可调: 根据实际场景调整置信度阈值(0.1-0.9)
- 模型轻量化: 使用YOLOv11n保证实时性
后续优化方向
- 添加更多数据增强策略提升模型泛化能力
- 实现多目标跟踪,追踪暴力行为人员
- 添加声音检测,结合音频提升检测准确率
- 优化前端UI,支持更多交互功能

有“AI”的1024 = 2048,欢迎大家加入2048 AI社区
更多推荐


 4
4 0
0- 0


 已为社区贡献3条内容

所有评论(0)