探索Nginx:深入理解Nginx基础组件的使用
Nginx的每个进程内部都有一个自己的ngx_cycle。展开代码语言:C自动换行AI代码解释void *tag;*/ };这里对ngx_string、ngx_array、ngx_list做了简单介绍和提供使用示例,其他的nginx基础组件的使用(比如dequeue、hash、log等等)也是类似的。
1.1、ngx_palloc相关源码
/src/core/ngx_palloc.h。(相关实现在/src/core/ngx_palloc.c文件)
展开
代码语言:C
自动换行
AI代码解释
#ifndef _NGX_PALLOC_H_INCLUDED_ #define _NGX_PALLOC_H_INCLUDED_ #include <ngx_config.h> #include <ngx_core.h> /* * NGX_MAX_ALLOC_FROM_POOL should be (ngx_pagesize - 1), i.e. 4095 on x86. * On Windows NT it decreases a number of locked pages in a kernel. */ #define NGX_MAX_ALLOC_FROM_POOL (ngx_pagesize - 1) #define NGX_DEFAULT_POOL_SIZE (16 * 1024) #define NGX_POOL_ALIGNMENT 16 #define NGX_MIN_POOL_SIZE \ ngx_align((sizeof(ngx_pool_t) + 2 * sizeof(ngx_pool_large_t)), \ NGX_POOL_ALIGNMENT) typedef void (*ngx_pool_cleanup_pt)(void *data); typedef struct ngx_pool_cleanup_s ngx_pool_cleanup_t; struct ngx_pool_cleanup_s { ngx_pool_cleanup_pt handler; void *data; ngx_pool_cleanup_t *next; }; typedef struct ngx_pool_large_s ngx_pool_large_t; struct ngx_pool_large_s { ngx_pool_large_t *next; void *alloc; }; typedef struct { u_char *last; u_char *end; ngx_pool_t *next; ngx_uint_t failed; } ngx_pool_data_t; struct ngx_pool_s { ngx_pool_data_t d; size_t max; ngx_pool_t *current; ngx_chain_t *chain; ngx_pool_large_t *large; ngx_pool_cleanup_t *cleanup; ngx_log_t *log; }; typedef struct { ngx_fd_t fd; u_char *name; ngx_log_t *log; } ngx_pool_cleanup_file_t; ngx_pool_t *ngx_create_pool(size_t size, ngx_log_t *log); void ngx_destroy_pool(ngx_pool_t *pool); void ngx_reset_pool(ngx_pool_t *pool); void *ngx_palloc(ngx_pool_t *pool, size_t size); void *ngx_pnalloc(ngx_pool_t *pool, size_t size); void *ngx_pcalloc(ngx_pool_t *pool, size_t size); void *ngx_pmemalign(ngx_pool_t *pool, size_t size, size_t alignment); ngx_int_t ngx_pfree(ngx_pool_t *pool, void *p); ngx_pool_cleanup_t *ngx_pool_cleanup_add(ngx_pool_t *p, size_t size); void ngx_pool_run_cleanup_file(ngx_pool_t *p, ngx_fd_t fd); void ngx_pool_cleanup_file(void *data); void ngx_pool_delete_file(void *data); #endif /* _NGX_PALLOC_H_INCLUDED_ */
/src/core/ngx_palloc.c
展开
代码语言:C
自动换行
AI代码解释
void * ngx_array_push(ngx_array_t *a) { void *elt, *new; size_t size; ngx_pool_t *p; if (a->nelts == a->nalloc) { /* the array is full */ size = a->size * a->nalloc; p = a->pool; if ((u_char *) a->elts + size == p->d.last && p->d.last + a->size <= p->d.end) { /* * the array allocation is the last in the pool * and there is space for new allocation */ p->d.last += a->size; a->nalloc++; } else { /* allocate a new array */ new = ngx_palloc(p, 2 * size); if (new == NULL) { return NULL; } ngx_memcpy(new, a->elts, size); a->elts = new; a->nalloc *= 2; } } elt = (u_char *) a->elts + a->size * a->nelts; a->nelts++; return elt; }
/src/core/ngx_core.h
代码语言:C
自动换行
AI代码解释
// ... typedef struct ngx_pool_s ngx_pool_t; // ...
1.2、ngx_array组件的相关源码
/src/core/ngx_array.h
展开
代码语言:C
自动换行
AI代码解释
/* * Copyright (C) Igor Sysoev * Copyright (C) Nginx, Inc. */ #ifndef _NGX_ARRAY_H_INCLUDED_ #define _NGX_ARRAY_H_INCLUDED_ #include <ngx_config.h> #include <ngx_core.h> typedef struct { void *elts; ngx_uint_t nelts; size_t size; ngx_uint_t nalloc; ngx_pool_t *pool; } ngx_array_t; ngx_array_t *ngx_array_create(ngx_pool_t *p, ngx_uint_t n, size_t size); void ngx_array_destroy(ngx_array_t *a); void *ngx_array_push(ngx_array_t *a); void *ngx_array_push_n(ngx_array_t *a, ngx_uint_t n); static ngx_inline ngx_int_t ngx_array_init(ngx_array_t *array, ngx_pool_t *pool, ngx_uint_t n, size_t size) { /* * set "array->nelts" before "array->elts", otherwise MSVC thinks * that "array->nelts" may be used without having been initialized */ array->nelts = 0; array->size = size; array->nalloc = n; array->pool = pool; array->elts = ngx_palloc(pool, n * size); if (array->elts == NULL) { return NGX_ERROR; } return NGX_OK; } #endif /* _NGX_ARRAY_H_INCLUDED_ */
1.3、ngx_array的数据结构
展开
代码语言:C
自动换行
AI代码解释
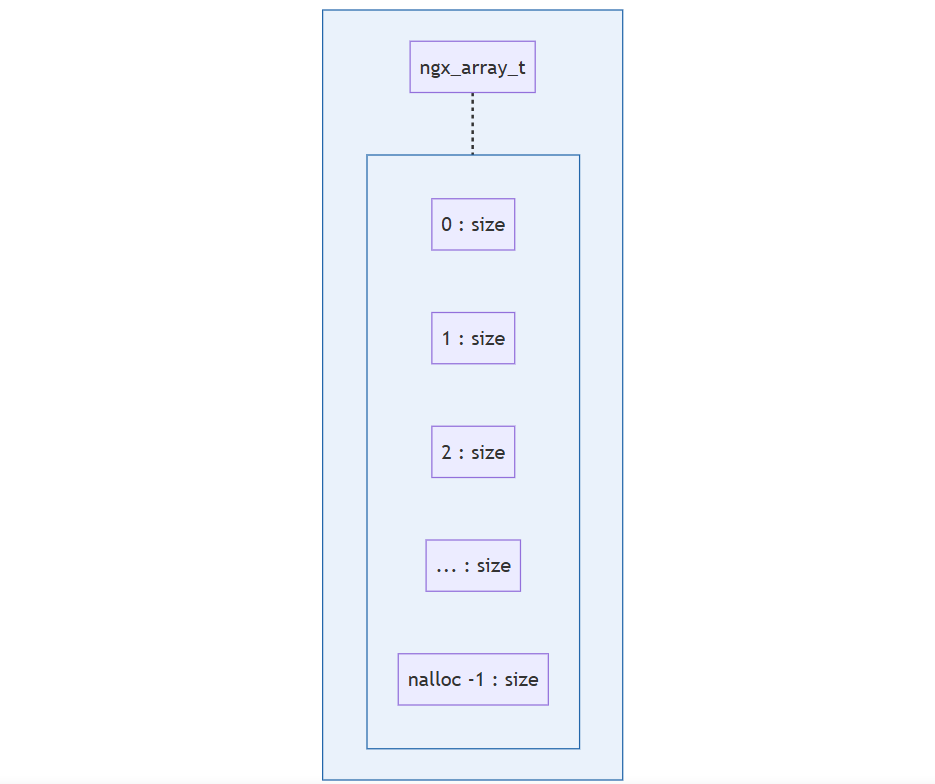
typedef struct { void *elts; ngx_uint_t nelts; size_t size; ngx_uint_t nalloc; ngx_pool_t *pool; } ngx_array_t;
elts:指向内存数据的指针。nelts:指示已使用了多少个元素。size:数组元素的大小。nalloc:分配的元素数量。pool:内存池。
array在内存里的布局:
1.4、ngx_cycle简介和相关源码
Nginx的每个进程内部都有一个自己的ngx_cycle。
/src/core/ngx_cycle.h
展开
代码语言:C
自动换行
AI代码解释
#ifndef _NGX_CYCLE_H_INCLUDED_ #define _NGX_CYCLE_H_INCLUDED_ #include <ngx_config.h> #include <ngx_core.h> #ifndef NGX_CYCLE_POOL_SIZE #define NGX_CYCLE_POOL_SIZE NGX_DEFAULT_POOL_SIZE #endif #define NGX_DEBUG_POINTS_STOP 1 #define NGX_DEBUG_POINTS_ABORT 2 typedef struct ngx_shm_zone_s ngx_shm_zone_t; typedef ngx_int_t (*ngx_shm_zone_init_pt) (ngx_shm_zone_t *zone, void *data); struct ngx_shm_zone_s { void *data; ngx_shm_t shm; ngx_shm_zone_init_pt init; void *tag; ngx_uint_t noreuse; /* unsigned noreuse:1; */ }; struct ngx_cycle_s { // ... }; typedef struct { // ... } ngx_core_conf_t; #define ngx_is_init_cycle(cycle) (cycle->conf_ctx == NULL) ngx_cycle_t *ngx_init_cycle(ngx_cycle_t *old_cycle); ngx_int_t ngx_create_pidfile(ngx_str_t *name, ngx_log_t *log); void ngx_delete_pidfile(ngx_cycle_t *cycle); ngx_int_t ngx_signal_process(ngx_cycle_t *cycle, char *sig); void ngx_reopen_files(ngx_cycle_t *cycle, ngx_uid_t user); char **ngx_set_environment(ngx_cycle_t *cycle, ngx_uint_t *last); ngx_pid_t ngx_exec_new_binary(ngx_cycle_t *cycle, char *const *argv); ngx_cpuset_t *ngx_get_cpu_affinity(ngx_uint_t n); ngx_shm_zone_t *ngx_shared_memory_add(ngx_conf_t *cf, ngx_str_t *name, size_t size, void *tag); void ngx_set_shutdown_timer(ngx_cycle_t *cycle); extern volatile ngx_cycle_t *ngx_cycle; extern ngx_array_t ngx_old_cycles; extern ngx_module_t ngx_core_module; extern ngx_uint_t ngx_test_config; extern ngx_uint_t ngx_dump_config; extern ngx_uint_t ngx_quiet_mode; #endif /* _NGX_CYCLE_H_INCLUDED_ */
1.5、ngx_list相关源码
/src/core/ngx_list.h
展开
代码语言:C
自动换行
AI代码解释
#ifndef _NGX_LIST_H_INCLUDED_ #define _NGX_LIST_H_INCLUDED_ #include <ngx_config.h> #include <ngx_core.h> typedef struct ngx_list_part_s ngx_list_part_t; struct ngx_list_part_s { void *elts; ngx_uint_t nelts; ngx_list_part_t *next; }; typedef struct { ngx_list_part_t *last; ngx_list_part_t part; size_t size; ngx_uint_t nalloc; ngx_pool_t *pool; } ngx_list_t; ngx_list_t *ngx_list_create(ngx_pool_t *pool, ngx_uint_t n, size_t size); static ngx_inline ngx_int_t ngx_list_init(ngx_list_t *list, ngx_pool_t *pool, ngx_uint_t n, size_t size) { list->part.elts = ngx_palloc(pool, n * size); if (list->part.elts == NULL) { return NGX_ERROR; } list->part.nelts = 0; list->part.next = NULL; list->last = &list->part; list->size = size; list->nalloc = n; list->pool = pool; return NGX_OK; } void *ngx_list_push(ngx_list_t *list); #endif /* _NGX_LIST_H_INCLUDED_ */
1.6、ngx_list 的数据结构
展开
代码语言:C
自动换行
AI代码解释
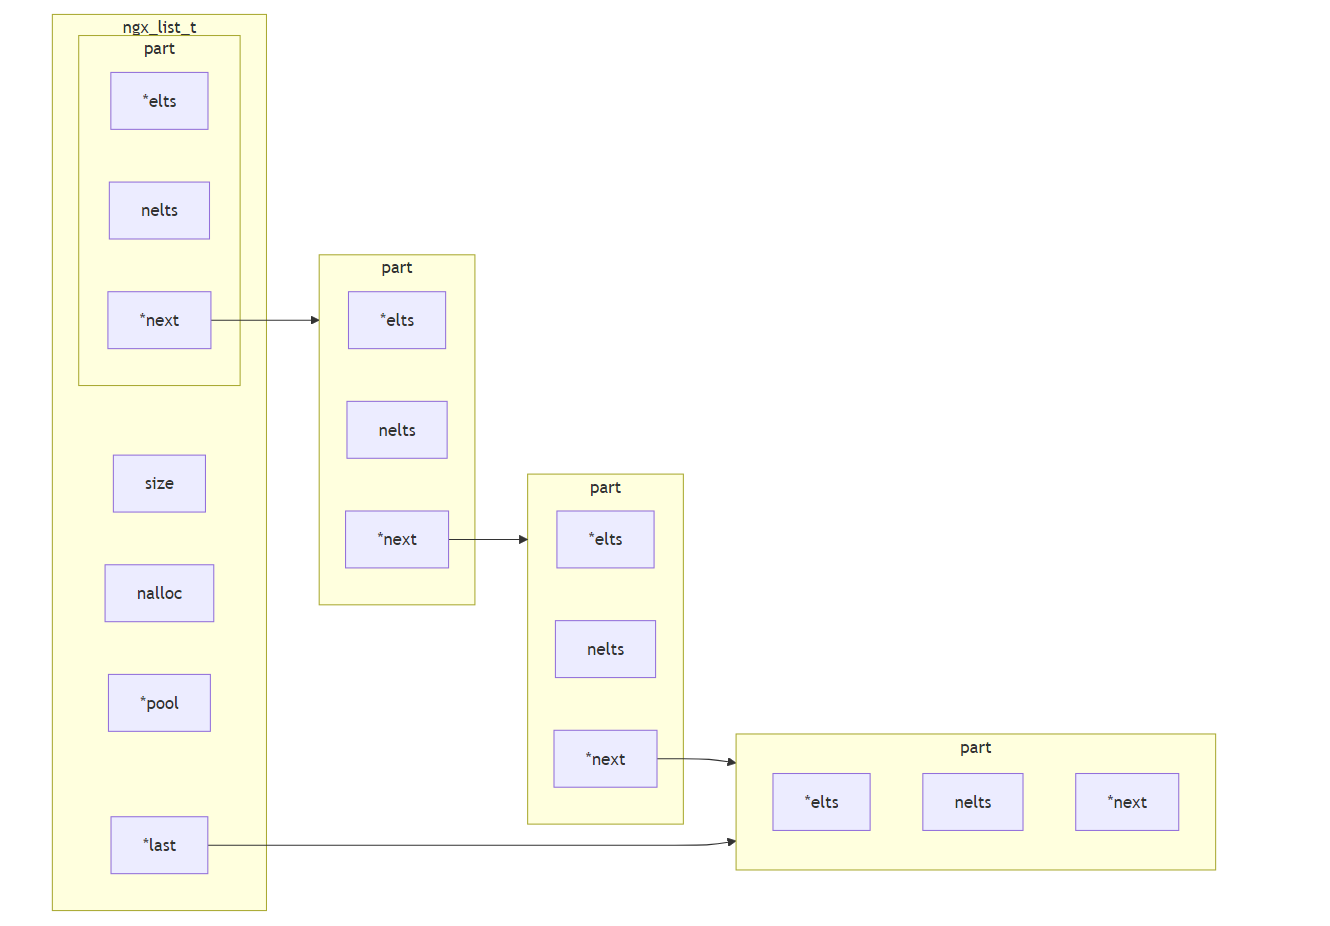
typedef struct ngx_list_part_s ngx_list_part_t; struct ngx_list_part_s { void *elts; ngx_uint_t nelts; ngx_list_part_t *next; }; typedef struct { ngx_list_part_t *last; ngx_list_part_t part; size_t size; ngx_uint_t nalloc; ngx_pool_t *pool; } ngx_list_t;
elts:指向内存数据的指针。nelts:指示已使用了多少个元素。size:数组元素的大小。nalloc:分配的元素数量。pool:内存池。
list 在内存里的布局:
二、Nginx 组件的使用
Nginx的内存池分成大小块,小块是要么不释放要么全部释放。ngx_create_pool(size_t size, ngx_log_t *log)里的size就是用来区分大小块的,大于size的就是大块,否则就是小块。
2.1、makefile的编写
展开
代码语言:Bash
自动换行
AI代码解释
CXX = gcc CXXFLAGS += -g -Wall -Wextra NGX_ROOT = /home/fly/workspace/nginx-1.13.7 TARGETS = ngx_code TARGETS_C_FILE = $(TARGETS).c CLEANUP = rm -f $(TARGETS) *.o all: $(TARGETS) clean: $(CLEANUP) CORE_INCS = -I. \ -I$(NGX_ROOT)/src/core \ -I$(NGX_ROOT)/src/event \ -I$(NGX_ROOT)/src/event/modules \ -I$(NGX_ROOT)/src/os/unix \ -I$(NGX_ROOT)/objs \ -I$(NGX_ROOT)/../pcre-8.41 \ -I$(NGX_ROOT)/../openssl-1.1.0g/include/ \ NGX_PALLOC = $(NGX_ROOT)/objs/src/core/ngx_palloc.o NGX_STRING = $(NGX_ROOT)/objs/src/core/ngx_string.o NGX_ALLOC = $(NGX_ROOT)/objs/src/os/unix/ngx_alloc.o NGX_ARRAY = $(NGX_ROOT)/objs/src/core/ngx_array.o NGX_HASH = $(NGX_ROOT)/objs/src/core/ngx_hash.o NGX_LIST = $(NGX_ROOT)/objs/src/core/ngx_list.o NGX_QUEUE = $(NGX_ROOT)/objs/src/core/ngx_queue.o $(TARGETS): $(TARGETS_C_FILE) $(CXX) $(CXXFLAGS) $(CORE_INCS) $(NGX_PALLOC) $(NGX_STRING) $(NGX_ALLOC) $(NGX_ARRAY) $(NGX_LIST) $(NGX_QUEUE) $(NGX_HASH) $^ -o $@
注意nginx的源码路径以及所需库的路径,要写正确的。
2.2、ngx_palloc+ngx_array的使用
示例代码:
展开
代码语言:C
自动换行
AI代码解释
#include <stdio.h> #include "ngx_config.h" #include "ngx_conf_file.h" #include "nginx.h" #include "ngx_core.h" #include "ngx_string.h" #include "ngx_palloc.h" #include "ngx_array.h" //#include "ngx_hash.h" typedef struct { int id; int level; }ngx_fly_t; // 打印内存池的数据信息 void print_pool(ngx_pool_t *pool) { while (pool) { printf("avail pool memory size: %ld\n\n", pool->d.end - pool->d.last); pool=pool->d.next; } } volatile ngx_cycle_t *ngx_cycle; #define unused(x) (x)=(x) void ngx_log_error_core(ngx_uint_t level, ngx_log_t *log, ngx_err_t err, const char *fmt, ...) { unused(level); unused(log); unused(err); unused(fmt); } int main() { ngx_str_t str = ngx_string("Hello World!"); printf("string length: %ld\n", str.len); printf("string: %s\n", str.data); // 创建内存池 ngx_pool_t *pool; pool = ngx_create_pool(1024, NULL); print_pool(pool); // 创建数组 /* * nalloc = 32 * size = sizeof(ngx_fly_t) * pool = pool */ ngx_array_t *arr = ngx_array_create(pool, 32, sizeof(ngx_fly_t)); print_pool(pool); ngx_fly_t *t1 = ngx_array_push(arr); // 拿出内存 t1->id = 101; //赋值 t1->level = 1; //赋值 print_pool(pool); ngx_fly_t *t2 = ngx_array_push(arr); // 拿出内存 t2->id = 102; //赋值 t2->level = 3; //赋值 print_pool(pool); return 0; }
使用makefile来编译,执行结果:
展开
代码语言:Bash
自动换行
AI代码解释
$ ./ngx_code string length: 12 string: Hello World! avail pool memory size: 944 avail pool memory size: 648 avail pool memory size: 648 avail pool memory size: 648
可以看到:
-
代码中分配的内存池是1024,分配之后只有944可以用,有80字节被使用了。这80字节其实是被内存池的头占用了(ngx_pool_t)。
-
分配完一个32的数组后,内存池还剩余的内存为648,也就是32*8=256被分配给了数据。
-
数组内存分配好之后,使用数组元素已经不会再去申请内存池的内存。
-
如果数组元素用完了,还调用ngx_array_push会怎么样?从ngx_array.c的源码中可以发现,它会动态扩容数组,重新分配2*size。
2.3、ngx_palloc+ngx_list的使用
示例代码:
展开
代码语言:C
自动换行
AI代码解释
#include <stdio.h> #include "ngx_config.h" #include "ngx_conf_file.h" #include "nginx.h" #include "ngx_core.h" #include "ngx_string.h" #include "ngx_palloc.h" #include "ngx_array.h" //#include "ngx_hash.h" typedef struct { int id; int level; }ngx_fly_t; // 打印内存池的数据信息 void print_pool(ngx_pool_t *pool) { while (pool) { printf("avail pool memory size: %ld\n\n", pool->d.end - pool->d.last); pool=pool->d.next; } } volatile ngx_cycle_t *ngx_cycle; #define unused(x) (x)=(x) void ngx_log_error_core(ngx_uint_t level, ngx_log_t *log, ngx_err_t err, const char *fmt, ...) { unused(level); unused(log); unused(err); unused(fmt); } int main() { ngx_str_t str = ngx_string("Hello World!"); printf("string length: %ld\n", str.len); printf("string: %s\n", str.data); // 创建内存池 ngx_pool_t *pool; pool = ngx_create_pool(1024, NULL); print_pool(pool); ngx_list_t *list=ngx_list_create(pool, 32, sizeof(ngx_fly_t)); print_pool(pool); ngx_fly_t *t3 = ngx_list_push(list); // 拿出内存 t3->id = 103; //赋值 t3->level = 3; //赋值 print_pool(pool); ngx_fly_t *t4 = ngx_list_push(list); // 拿出内存 t4->id = 104; //赋值 t4->level = 4; //赋值 print_pool(pool); return 0; }
使用makefile来编译,执行结果:
展开
代码语言:Bash
自动换行
AI代码解释
$ ./ngx_code string length: 12 string: Hello World! avail pool memory size: 944 avail pool memory size: 632 avail pool memory size: 632 avail pool memory size: 632
可以发现,ngx_list相比ngx_array少了648-632 =16字节,从源码的ngx_list_create()函数可以发现,是因为多了一个ngx_list_t的头数据。
三、总结
这里对ngx_string、ngx_array、ngx_list做了简单介绍和提供使用示例,其他的nginx基础组件的使用(比如dequeue、hash、log等等)也是类似的。

有“AI”的1024 = 2048,欢迎大家加入2048 AI社区
更多推荐

 3
3 0
0- 0


 已为社区贡献121条内容

所有评论(0)