OpenClaw + Antigravity 本地 AI 配置完整教程
Antigravity Manager 是一个强大的 AI API 代理工具,可以让你通过本地服务访问多个 AI 模型(Claude、Gemini、GPT 等),统一管理 API 密钥和请求。项目地址完成以上步骤后,你的 OpenClaw(Clawdbot)+ Antigravity Manager 就配置完成了!✅ 下载并安装 Antigravity Manager✅ 获取 API Key✅ 配
OpenClaw + Antigravity 本地 AI 配置完整教程
什么是 OpenClaw?
OpenClaw 是一个开源的 AI 助手框架,包括:
- Clawdbot:核心 AI 助手引擎
- ClawHub:技能市场,提供各种扩展功能
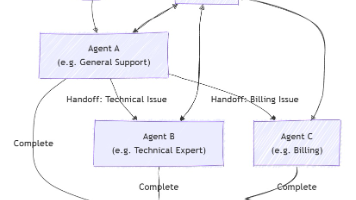
- 多平台支持:支持飞书、Telegram、Discord、WhatsApp 等多个平台
什么是 Antigravity Manager?
Antigravity Manager 是一个强大的 AI API 代理工具,可以让你通过本地服务访问多个 AI 模型(Claude、Gemini、GPT 等),统一管理 API 密钥和请求。
项目地址:https://github.com/lbjlaq/Antigravity-Manager
OpenClaw + Antigravity 的完美组合
将 OpenClaw(Clawdbot)与 Antigravity Manager 结合使用,你可以:
- ✅ 本地部署:所有数据在本地处理,保护隐私
- ✅ 统一管理:一个工具管理所有 AI 模型
- ✅ 成本控制:使用自己的 API 密钥,避免中间商加价
- ✅ 灵活切换:随时切换不同的模型,无需修改代码
- ✅ 技能扩展:通过 ClawHub 安装各种实用技能
前置准备
1. 下载并安装 Antigravity Manager
访问链接 https://github.com/lbjlaq/Antigravity-Manager/releases)
macOS 用户
- 访问 Antigravity Manager Releases
- 下载最新版本的
.dmg文件(例如:Antigravity-Manager-v1.0.0.dmg) - 双击
.dmg文件,将应用拖入Applications文件夹 - 打开应用(首次打开可能需要在「系统偏好设置 → 安全性与隐私」中允许)
Windows 用户
- 访问 Antigravity Manager Releases
- 下载最新版本的
.exe安装包 - 运行安装程序,按照提示完成安装
- 启动 Antigravity Manager
Linux 用户
- 访问 Antigravity Manager Releases
- 下载最新版本的
.AppImage或.deb文件 - 给予执行权限并运行:
chmod +x Antigravity-Manager-*.AppImage
./Antigravity-Manager-*.AppImage
2. 启动 Antigravity Manager
启动后,应用会在本地运行一个 API 服务,默认地址:http://127.0.0.1:8045
你可以在浏览器中访问这个地址,查看管理界面。
3. 配置 AI 模型账号
Antigravity Manager 需要你提供 AI 模型的 API 密钥才能工作。你可以:
选项 1:使用官方 API(推荐)
- Claude:访问 Anthropic Console 获取 API Key
- Gemini:访问 Google AI Studio 获取 API Key
- GPT:访问 OpenAI Platform 获取 API Key
选项 2:购买独享账号(更实惠)
如果你不想自己申请 API,可以购买独享账号:
🎁 推荐:Gemini 3 Pro 独享账号 12 个月(支持反重力) http://maynorai.tqfk.xyz/item/23
- ✅ 独享账号,无需担心限流
- ✅ 支持 Antigravity Manager
- ✅ 12 个月有效期
- ✅ 性价比高
- ✅ 即买即用
在 Antigravity Manager 中配置好 API 密钥后,就可以使用了。
4. 获取 User Token
在 Antigravity Manager 界面中:
- 点击右上角 「User Tokens」
- 点击 「创建新 Token」
- 复制生成的 Token(例如:
sk-82bc103b51f24af888af525a7835e87c) - ⚠️ 重要:妥善保存这个 Token,它只会显示一次!
配置步骤
步骤 1:配置 Claude Sonnet 4.5(默认模型)
这是最常用的模型,适合日常对话和代码生成。
# 添加 local-anthropic provider
cat ~/.clawdbot/clawdbot.json | jq '.models.providers["local-anthropic"] = {
  "baseUrl": "http://127.0.0.1:8045",
  "apiKey": "你的API_KEY",
  "auth": "api-key",
  "api": "anthropic-messages",
  "models": [
    {
      "id": "claude-sonnet-4-5-20250929",
      "name": "Local Claude Sonnet 4.5",
      "reasoning": false,
      "input": ["text"],
      "cost": {
        "input": 0,
        "output": 0,
        "cacheRead": 0,
        "cacheWrite": 0
      },
      "contextWindow": 200000,
      "maxTokens": 8192
    }
  ]
}' > /tmp/clawdbot-temp.json && mv /tmp/clawdbot-temp.json ~/.clawdbot/clawdbot.json

# 设置为默认模型
clawdbot config set agents.defaults.model.primary "local-anthropic/claude-sonnet-4-5-20250929"
步骤 2:配置 Claude Opus 4.5 Thinking(推理模型)
这是 Claude 的推理模型,适合复杂问题和深度思考。
cat ~/.clawdbot/clawdbot.json | jq '.models.providers["local-anthropic-opus"] = {
  "baseUrl": "http://127.0.0.1:8045",
  "apiKey": "你的API_KEY",
  "auth": "api-key",
  "api": "anthropic-messages",
  "models": [
    {
      "id": "claude-opus-4-5-thinking",
      "name": "Local Claude Opus 4.5 Thinking",
      "reasoning": true,
      "input": ["text"],
      "cost": {
        "input": 0,
        "output": 0,
        "cacheRead": 0,
        "cacheWrite": 0
      },
      "contextWindow": 200000,
      "maxTokens": 8192
    }
  ]
}' > /tmp/clawdbot-temp.json && mv /tmp/clawdbot-temp.json ~/.clawdbot/clawdbot.json
步骤 3:配置 Gemini 3 Pro Image(多模态模型)
这是 Google 的多模态模型,支持图片识别和分析。
cat ~/.clawdbot/clawdbot.json | jq '.models.providers["local-google"] = {
  "baseUrl": "http://127.0.0.1:8045/v1beta",
  "apiKey": "你的API_KEY",
  "auth": "api-key",
  "api": "google-generative-ai",
  "models": [
    {
      "id": "gemini-3-pro-image",
      "name": "Local Gemini 3 Pro Image",
      "reasoning": false,
      "input": ["text", "image"],
      "cost": {
        "input": 0,
        "output": 0,
        "cacheRead": 0,
        "cacheWrite": 0
      },
      "contextWindow": 2000000,
      "maxTokens": 8192
    }
  ]
}' > /tmp/clawdbot-temp.json && mv /tmp/clawdbot-temp.json ~/.clawdbot/clawdbot.json
步骤 4:验证配置
clawdbot models list
你应该看到:
Model                                      Input      Ctx      Local Auth  Tags
local-anthropic/claude-sonnet-4-5-20250929 text       195k     yes   yes   default
local-anthropic-opus/claude-opus-4-5-thinking text    195k     yes   yes   configured
local-google/gemini-3-pro-image            text,image 1953k    yes   yes   configured
步骤 5:重启 Gateway
clawdbot gateway restart
使用方法
1. 使用默认模型(Claude Sonnet 4.5)
直接发送消息即可,系统会自动使用默认模型。
clawdbot message send "你好,介绍一下你自己"
2. 切换到 Opus Thinking 模型
适合需要深度思考的复杂问题:
clawdbot config set agents.defaults.model.primary "local-anthropic-opus/claude-opus-4-5-thinking"
clawdbot gateway restart
3. 切换到 Gemini Image 模型
适合需要图片识别的场景:
clawdbot config set agents.defaults.model.primary "local-google/gemini-3-pro-image"
clawdbot gateway restart
4. 临时使用特定模型
不修改默认配置,临时使用某个模型:
# 使用 Opus Thinking
clawdbot agent --model "local-anthropic-opus/claude-opus-4-5-thinking" --message "解释量子计算的原理"

# 使用 Gemini Image
clawdbot agent --model "local-google/gemini-3-pro-image" --message "分析这张图片" --image ./photo.jpg
模型对比
| 模型 | 适用场景 | 特点 | 上下文窗口 |
|---|---|---|---|
| Claude Sonnet 4.5 | 日常对话、代码生成、文档编写 | 速度快、成本低、质量高 | 200k tokens |
| Claude Opus 4.5 Thinking | 复杂推理、数学问题、深度分析 | 推理能力强、思考过程可见 | 200k tokens |
| Gemini 3 Pro Image | 图片识别、多模态任务 | 支持图片输入、超大上下文 | 2000k tokens |
常见问题
Q1: 如何查看当前使用的模型?
clawdbot config get agents.defaults.model.primary
Q2: 如何查看所有可用模型?
clawdbot models list
Q3: 配置后模型不生效怎么办?
确保重启了 Gateway:
clawdbot gateway restart
Q4: 如何删除某个模型配置?
cat ~/.clawdbot/clawdbot.json | jq 'del(.models.providers["local-google"])' > /tmp/clawdbot-temp.json && mv /tmp/clawdbot-temp.json ~/.clawdbot/clawdbot.json
Q5: API Key 和 User Token 有什么区别?
- API Key:是你从 AI 服务商(Claude、Gemini、OpenAI)获取的密钥,用于访问 AI 模型
- User Token:是 Antigravity Manager 生成的本地密钥,用于 Clawdbot 访问 Antigravity Manager
配置流程:
- 先在 Antigravity Manager 中配置 AI 服务商的 API Key
- 然后在 Antigravity Manager 中生成 User Token
- 最后在 Clawdbot 中使用这个 User Token
Q5.1: 在哪里查看 User Token?
在 Antigravity Manager 界面:
- 点击右上角 「User Tokens」
- 查看或创建新的 Token
Q5.2: 如何获取 AI 模型的 API Key?
方式 1:官方申请(免费但需要信用卡)
- Claude:https://console.anthropic.com/
- Gemini:https://makersuite.google.com/app/apikey
- OpenAI:https://platform.openai.com/api-keys
方式 2:购买独享账号(推荐)
- Gemini 3 Pro 独享 12个月 - 支持反重力,独享账号无限流,即买即用
Q6: 本地 API 连接失败怎么办?
检查 Antigravity Manager 是否正在运行:
curl http://127.0.0.1:8045/v1/models
如果返回错误:
- 确认 Antigravity Manager 应用已启动
- 检查端口 8045 是否被占用:
lsof -i :8045(macOS/Linux) - 重启 Antigravity Manager 应用
Q7: 如何备份配置?
cp ~/.clawdbot/clawdbot.json ~/.clawdbot/clawdbot.json.backup
Q8: 如何恢复配置?
cp ~/.clawdbot/clawdbot.json.backup ~/.clawdbot/clawdbot.json
clawdbot gateway restart
高级配置
1. 添加多个 API Key
如果你有多个 Antigravity 账号,可以配置多个 provider:
# 添加第二个 Claude provider
cat ~/.clawdbot/clawdbot.json | jq '.models.providers["local-anthropic-2"] = {
  "baseUrl": "http://127.0.0.1:8045",
  "apiKey": "另一个API_KEY",
  "auth": "api-key",
  "api": "anthropic-messages",
  "models": [...]
}' > /tmp/clawdbot-temp.json && mv /tmp/clawdbot-temp.json ~/.clawdbot/clawdbot.json
2. 配置模型别名
给模型起一个好记的名字:
clawdbot config set agents.defaults.models."local-anthropic/claude-sonnet-4-5-20250929".alias "我的 Claude"
3. 配置成本追踪
虽然本地 API 成本为 0,但你可以设置虚拟成本来追踪使用量:
{
  "cost": {
    "input": 0.003,
    "output": 0.015,
    "cacheRead": 0.0003,
    "cacheWrite": 0.00375
  }
}
快速参考
常用命令
# 查看模型列表
clawdbot models list

# 查看当前默认模型
clawdbot config get agents.defaults.model.primary

# 切换默认模型
clawdbot config set agents.defaults.model.primary "模型ID"

# 重启 Gateway
clawdbot gateway restart

# 查看配置文件
cat ~/.clawdbot/clawdbot.json | jq '.models.providers'
模型 ID 速查
local-anthropic/claude-sonnet-4-5-20250929
local-anthropic-opus/claude-opus-4-5-thinking
local-google/gemini-3-pro-image
相关链接
OpenClaw 生态
- Clawdbot 官方文档:https://docs.clawd.bot
- ClawHub 技能市场:https://hub.openclaw.org
- OpenClaw GitHub:https://github.com/clawdbot/clawdbot
Antigravity Manager
- 项目地址:https://github.com/lbjlaq/Antigravity-Manager
- 下载最新版本:https://github.com/lbjlaq/Antigravity-Manager/releases
API 账号获取
- 官方 Claude API:https://console.anthropic.com/
- 官方 Gemini API:https://makersuite.google.com/app/apikey
- 官方 OpenAI API:https://platform.openai.com/api-keys
- 独享账号推荐:Gemini 3 Pro 独享 12个月(支持反重力) http://maynorai.tqfk.xyz/item/23
总结
完成以上步骤后,你的 OpenClaw(Clawdbot)+ Antigravity Manager 就配置完成了!
关键步骤回顾:
- ✅ 下载并安装 Antigravity Manager
- ✅ 获取 API Key
- ✅ 配置 Claude Sonnet 4.5(默认模型)
- ✅ 配置 Claude Opus 4.5 Thinking(推理模型)
- ✅ 配置 Gemini 3 Pro Image(多模态模型)
- ✅ 验证配置并重启 Gateway
现在你可以:
- 使用本地 API 访问多个 AI 模型
- 随时切换不同的模型
- 享受更快的响应速度和更低的成本
- 通过 ClawHub 安装各种实用技能
- 在多个平台(飞书、Telegram 等)使用你的 AI 助手
下一步推荐:
- 📚 查看 ClawHub 小白必装技能教程
- 🚀 查看 飞书 Bot 配置教程
- 🌐 查看 Clawdbot 远程访问方案
祝你使用愉快!🦞

有“AI”的1024 = 2048,欢迎大家加入2048 AI社区
更多推荐
 0
0 0
0- 0


 已为社区贡献44条内容

所有评论(0)