03.02.04.01 Display a Nested Property Editor in a Detail View 在详细视图中显示嵌套属性编辑器
Display a Nested Property Editor in a Detail View 在详细视图中显示嵌套属性编辑器
This lesson explains how to make the editor of a property visible in a Detail View.
本课程讲解如何使属性的编辑器在详情视图中可见。
The instructions below show how to locate the Department.Office nested property and make it visible in the Employee Detail View.
以下说明展示了如何定位 Department.Office 嵌套属性,并将其显示在 Employee 详情视图中。
Note
Before you proceed, take a moment to review the previous lesson:
在继续之前,请先回顾一下上一课:
- Place an Action in a Different Location 将动作放置在不同的位置
Step-by-Step Instructions 分步说明
1.Open the Model.DesignedDiffs.xafml file in the Model Editor.
在模型编辑器中打开Model.DesignedDiffs.xafml文件。
2.Navigate to the Views | MySolution.Module.BusinessObjects | Employee node. Expand the Employee_DetailView child node and click the Layout node.
导航到 视图 | MySolution.Module.BusinessObjects | 员工 节点。展开 Employee_DetailView 子节点并点击 布局 节点。
3.The Model Editor displays a design surface that imitates the Employee Detail View. Right-click the View’s empty space and choose Customize Layout from the context menu:
模型编辑器显示一个模仿员工详细信息视图的设计界面。右键点击视图的空白区域,从上下文菜单中选择自定义布局:
4.In the invoked Customization window, click the Add button:
在打开的自定义窗口中,点击添加按钮: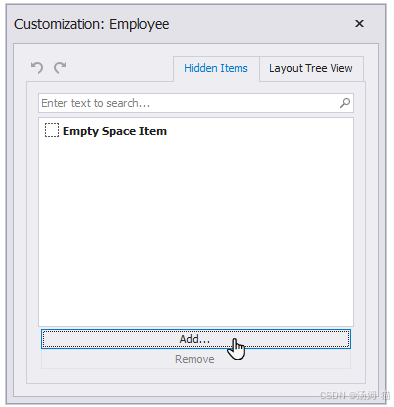
5.In the Object Model dialog, expand the Department node, check the Office checkbox, and click OK.
在对象模型对话框中,展开部门节点,勾选办公室复选框,然后点击确定。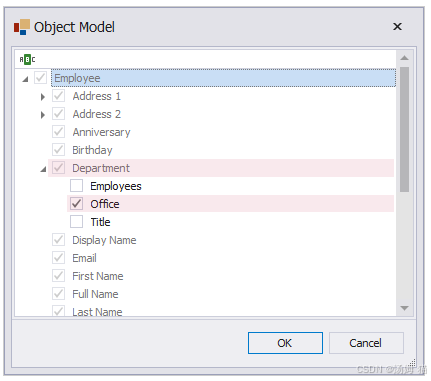
6.The Office: item appears on the Hidden Items tab of the Customization window:
Office(办公室) 项出现在 Customization(自定义) 窗口的 Hidden Items(隐藏项) 选项卡上。
7.Drag the Office: item to the required position of the Employee Detail View.
将 Office: 项目拖拽到 Employee 详情视图中的所需位置。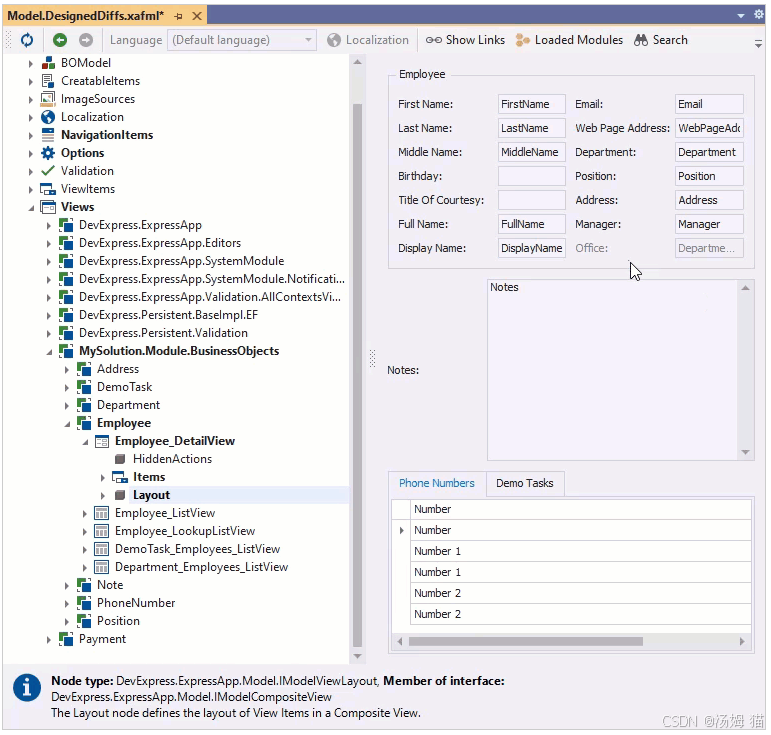
8.Run the application, open the Employee Detail View, and find the Office editor:
运行应用程序,打开员工详细信息视图,找到办公室编辑器:
ASP.NET Core Blazor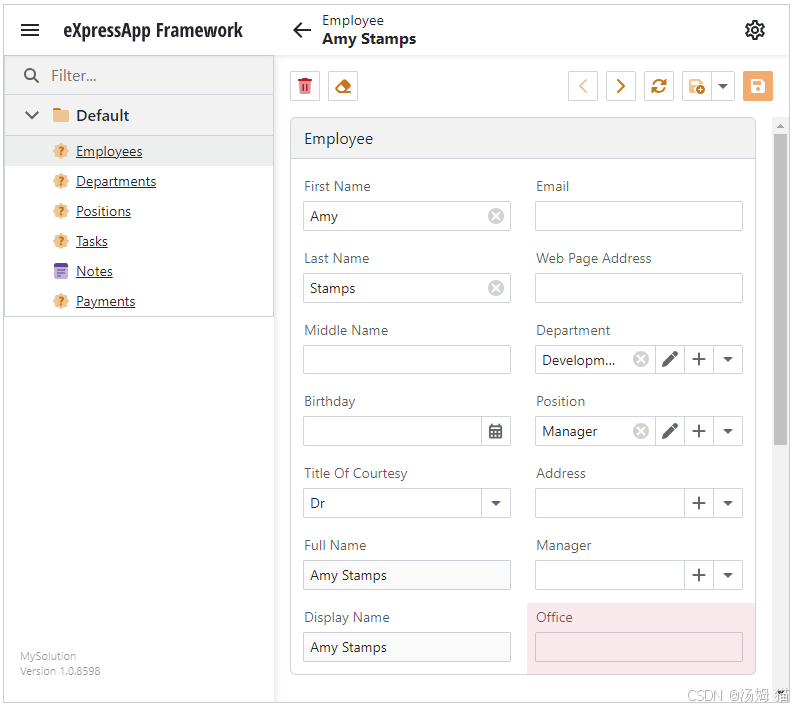
Windows Forms: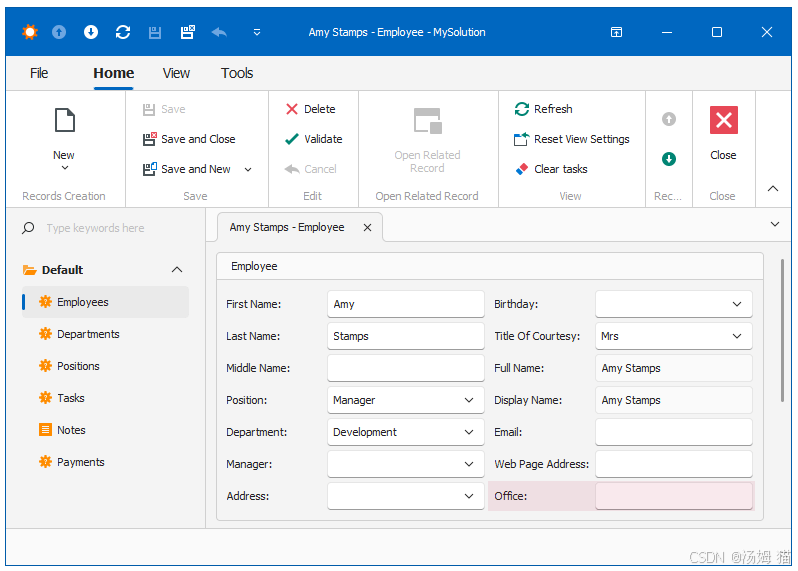
Runtime Customization in ASP.NET Core Blazor / ASP.NET Core Blazor 中的运行时自定义
In an XAF ASP.NET Core Blazor application, you can also customize the Detail View layout at runtime. For more information, refer to the following topic: Runtime Layout Customization in ASP.NET Core Blazor Applications.
在XAF ASP.NET Core Blazor应用程序中,您还可以在运行时自定义详情视图布局。更多信息,请参考以下主题:ASP.NET Core Blazor应用程序中的运行时布局自定义。
1.Navigate to the Employee Detail View. Right-click the layout and select the Customize Layout option in the context menu.
导航到员工详细信息视图。右键单击布局,在上下文菜单中选择自定义布局选项。
2.In the invoked Customization form, click the Customize button under the Hidden Items list.
在调用的自定义表单中,点击隐藏项列表下的自定义按钮。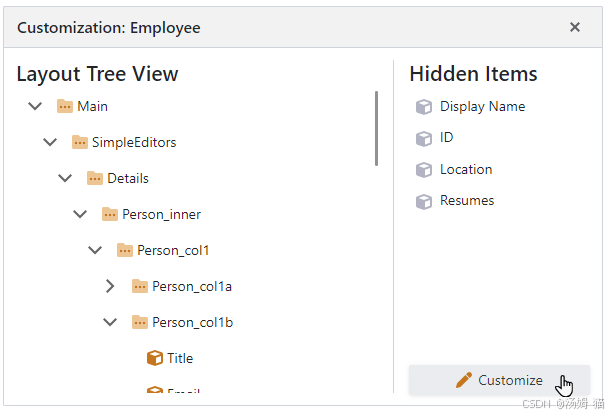
3.In the invoked Object Model dialog window, expand the Department node, check the Office checkbox, and click OK.
在打开的对象模型对话框窗口中,展开部门节点,勾选办公室复选框,然后点击确定。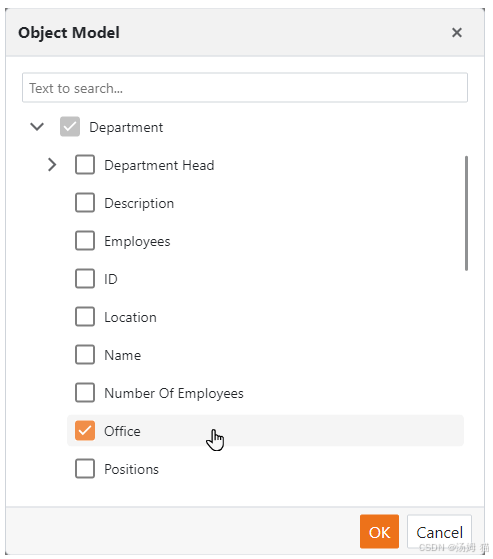
Note
If you have an extensive and complicated data model, the structure in the Object Model dialog window may be confusing. To see the path to a reference property, hover your mouse over the property in the Object Model dialog window. This may help you distinguish between similar properties.
如果您拥有一个庞大且复杂的数据模型,对象模型对话框窗口中的结构可能会令人困惑。要查看引用属性的路径,请将鼠标悬停在对象模型对话框窗口中的属性上。这可能有助于您区分相似的属性。
4.The Office item now appears in the Hidden Items list of the Customization window.
Office 项现在出现在自定义窗口的隐藏项列表中。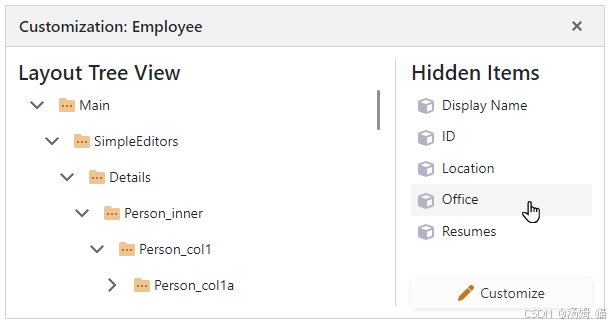
5.Drag the Office item to the required position in the Employee Detail View.
将 Office 项拖拽到 Employee 详情视图中的指定位置。
Note
To remove unnecessary hidden items, uncheck them in the Object Model dialog window.
要移除不必要的隐藏项,请在对象模型对话框窗口中取消勾选它们。

有“AI”的1024 = 2048,欢迎大家加入2048 AI社区
更多推荐


 33
33 0
0- 0


 已为社区贡献11条内容

所有评论(0)