YOLOv5目标跟踪在Jetson设备上的实现:精准实时检测与跟踪教程
往期文章RK3588+docker+YOLOv5部署:https://blog.csdn.net/FJN110/article/details/149673049RK3588测试NPU和RKNN函数包装https://blog.csdn.net/FJN110/article/details/149669753RK3588刷机:https://blog.csdn.net/FJN110/article
往期文章
RK3588+docker+YOLOv5部署:https://blog.csdn.net/FJN110/article/details/149673049
RK3588测试NPU和RKNN函数包装https://blog.csdn.net/FJN110/article/details/149669753
RK3588刷机:https://blog.csdn.net/FJN110/article/details/149669404
以及深度学习部署工程师1~31主要学习tensorRT、cmake、docker、C++基础、语义分割、目标检测、关键点识别、RTSP推流、3D模型部署、车牌检测于识别项目、人脸属性分析(年龄、性别、名称、是否佩戴口罩)等知识
好的进入本节课程: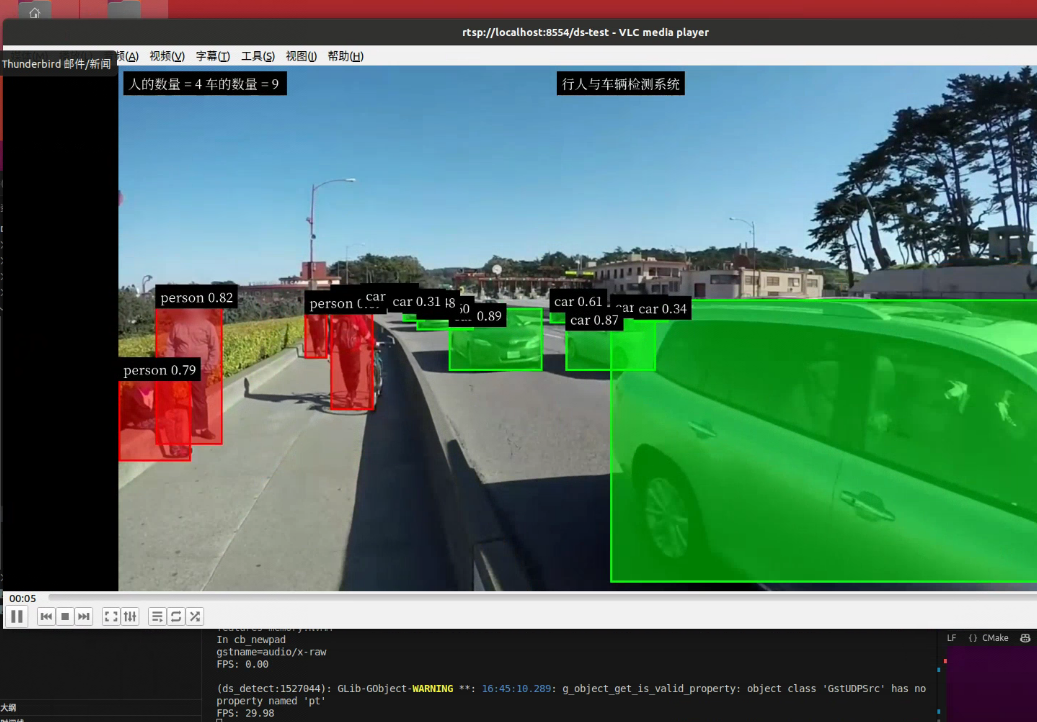
1.1 jetson NX 运行
-
安装
deepstream参考文档:https://docs.nvidia.com/metropolis/deepstream/dev-guide/text/DS_Quickstart.html
# 安装库 sudo apt install \ libssl1.1 \ libgstreamer1.0-0 \ gstreamer1.0-tools \ gstreamer1.0-plugins-good \ gstreamer1.0-plugins-bad \ gstreamer1.0-plugins-ugly \ gstreamer1.0-libav \ libgstreamer-plugins-base1.0-dev \ libgstrtspserver-1.0-0 \ libjansson4 \ libyaml-cpp-dev # 安装librdkafka git clone https://github.com/edenhill/librdkafka.git cd librdkafka git reset --hard 7101c2310341ab3f4675fc565f64f0967e135a6a ./configure make sudo make install # 复制文件 sudo mkdir -p /opt/nvidia/deepstream/deepstream-6.2/lib sudo cp /usr/local/lib/librdkafka* /opt/nvidia/deepstream/deepstream-6.2/lib # 下载SDK,并复制到jetson: 下载地址:https://developer.nvidia.com/downloads/deepstream-sdk-v620-jetson-tbz2 # 附件位置:2.Jetson/deepstream_sdk_v6.2.0_jetson.tbz2 # 解压DeepStream SDK sudo tar -xvf deepstream_sdk_v6.2.0_jetson.tbz2 -C / # 安装 cd /opt/nvidia/deepstream/deepstream-6.2 sudo ./install.sh sudo ldconfig -
生成engine文件:
- 之前课程训练的是只有
person这一类的模型,现在需要加上car车辆类别,我们使用coco预训练模型即可(80类,附件位置:1.预训练模型) - 比如使用
yolov5s.pt,需要按照之前课程流程处理:修改网络结构 --> 导出onnx文件 --> build engine (注意量化需要提供校准集)
- 之前课程训练的是只有
-
编译运行程序,同PC
1.2 Jetson nano
Nano:不支持Deepstream 6.2
# 安装依赖
sudo apt install \
libssl1.0.0 \
libgstreamer1.0-0 \
gstreamer1.0-tools \
gstreamer1.0-plugins-good \
gstreamer1.0-plugins-bad \
gstreamer1.0-plugins-ugly \
gstreamer1.0-libav \
libgstrtspserver-1.0-0 \
libjansson4=2.11-1

#安装librdkafka
git clone https://github.com/edenhill/librdkafka.git
cd librdkafka
git reset --hard 7101c2310341ab3f4675fc565f64f0967e135a6a
./configure
make
sudo make install

# 复制文件
sudo mkdir -p /opt/nvidia/deepstream/deepstream-6.0/lib
sudo cp /usr/local/lib/librdkafka* /opt/nvidia/deepstream/deepstream-6.0/lib


# 下载SDK,并复制到jetson nano上: https://developer.nvidia.com/deepstream_sdk_v6.0.1_jetsontbz2

# 附件位置:2.Jetson/deepstream_sdk_v6.0.1_jetson.tbz2  (Nano:不支持Deepstream 6.2)

# 解压DeepStream SDK
sudo tar -xvf deepstream_sdk_v6.0.1_jetson.tbz2 -C /
# 安装
cd /opt/nvidia/deepstream/deepstream-6.0
sudo ./install.sh
sudo ldconfig
/*
 * SPDX-FileCopyrightText: Copyright (c) 2022 NVIDIA CORPORATION & AFFILIATES. All rights reserved.
 *
 * Created by Marcos Luciano
 * https://www.github.com/marcoslucianops
 */

#include <stdint.h>

__global__ void gpuYoloLayer_nc(
    const float* input, int* num_detections, float* detection_boxes, float* detection_scores, int* detection_classes,
    const float scoreThreshold, const uint netWidth, const uint netHeight, const uint gridSizeX, const uint gridSizeY,
    const uint numOutputClasses, const uint numBBoxes, const float scaleXY, const float* anchors)
{
    uint x_id = blockIdx.x * blockDim.x + threadIdx.x;
    uint y_id = blockIdx.y * blockDim.y + threadIdx.y;
    uint z_id = blockIdx.z * blockDim.z + threadIdx.z;

    if (x_id >= gridSizeX || y_id >= gridSizeY || z_id >= numBBoxes)
        return;

    const int numGridCells = gridSizeX * gridSizeY;
    const int bbindex = y_id * gridSizeX + x_id;

    const float objectness
        = input[bbindex + numGridCells * (z_id * (5 + numOutputClasses) + 4)];

    if (objectness < scoreThreshold)
        return;

    int count = (int)atomicAdd(num_detections, 1);

    const float alpha = scaleXY;
    const float beta = -0.5 * (scaleXY - 1);

    float x
        = (input[bbindex + numGridCells * (z_id * (5 + numOutputClasses) + 0)]
          * alpha + beta + x_id) * netWidth / gridSizeX;

    float y
        = (input[bbindex + numGridCells * (z_id * (5 + numOutputClasses) + 1)]
          * alpha + beta + y_id) * netHeight / gridSizeY;

    float w
        = __powf(input[bbindex + numGridCells * (z_id * (5 + numOutputClasses) + 2)] * 2, 2)
          * anchors[z_id * 2];

    float h
        = __powf(input[bbindex + numGridCells * (z_id * (5 + numOutputClasses) + 3)] * 2, 2)
          * anchors[z_id * 2 + 1];

    float maxProb = 0.0f;
    int maxIndex = -1;

    for (uint i = 0; i < numOutputClasses; ++i)
    {
        float prob
            = input[bbindex + numGridCells * (z_id * (5 + numOutputClasses) + (5 + i))];

        if (prob > maxProb)
        {
            maxProb = prob;
            maxIndex = i;
        }
    }

    detection_boxes[count * 4 + 0] = x - 0.5 * w;
    detection_boxes[count * 4 + 1] = y - 0.5 * h;
    detection_boxes[count * 4 + 2] = x + 0.5 * w;
    detection_boxes[count * 4 + 3] = y + 0.5 * h;
    detection_scores[count] = objectness * maxProb;
    detection_classes[count] = maxIndex;
}

cudaError_t cudaYoloLayer_nc(
    const void* input, void* num_detections, void* detection_boxes, void* detection_scores, void* detection_classes,
    const uint& batchSize, uint64_t& inputSize, uint64_t& outputSize, const float& scoreThreshold, const uint& netWidth,
    const uint& netHeight, const uint& gridSizeX, const uint& gridSizeY, const uint& numOutputClasses, const uint& numBBoxes,
    const float& scaleXY, const void* anchors, cudaStream_t stream);

cudaError_t cudaYoloLayer_nc(
    const void* input, void* num_detections, void* detection_boxes, void* detection_scores, void* detection_classes,
    const uint& batchSize, uint64_t& inputSize, uint64_t& outputSize, const float& scoreThreshold, const uint& netWidth,
    const uint& netHeight, const uint& gridSizeX, const uint& gridSizeY, const uint& numOutputClasses, const uint& numBBoxes,
    const float& scaleXY, const void* anchors, cudaStream_t stream)
{
    dim3 threads_per_block(16, 16, 4);
    dim3 number_of_blocks((gridSizeX / threads_per_block.x) + 1,
                          (gridSizeY / threads_per_block.y) + 1,
                          (numBBoxes / threads_per_block.z) + 1);

    for (unsigned int batch = 0; batch < batchSize; ++batch)
    {
        gpuYoloLayer_nc<<<number_of_blocks, threads_per_block, 0, stream>>>(
            reinterpret_cast<const float*>(input) + (batch * inputSize),
            reinterpret_cast<int*>(num_detections) + (batch),
            reinterpret_cast<float*>(detection_boxes) + (batch * 4 * outputSize),
            reinterpret_cast<float*>(detection_scores) + (batch * outputSize),
            reinterpret_cast<int*>(detection_classes) + (batch * outputSize),
            scoreThreshold, netWidth, netHeight, gridSizeX, gridSizeY, numOutputClasses, numBBoxes, scaleXY,
            reinterpret_cast<const float*>(anchors));
    }
    return cudaGetLastError();
}
结尾
本文详细阐述了在 Jetson NX 和 Jetson Nano 这两款 NVIDIA 嵌入式设备上安装 DeepStream 的完整流程。
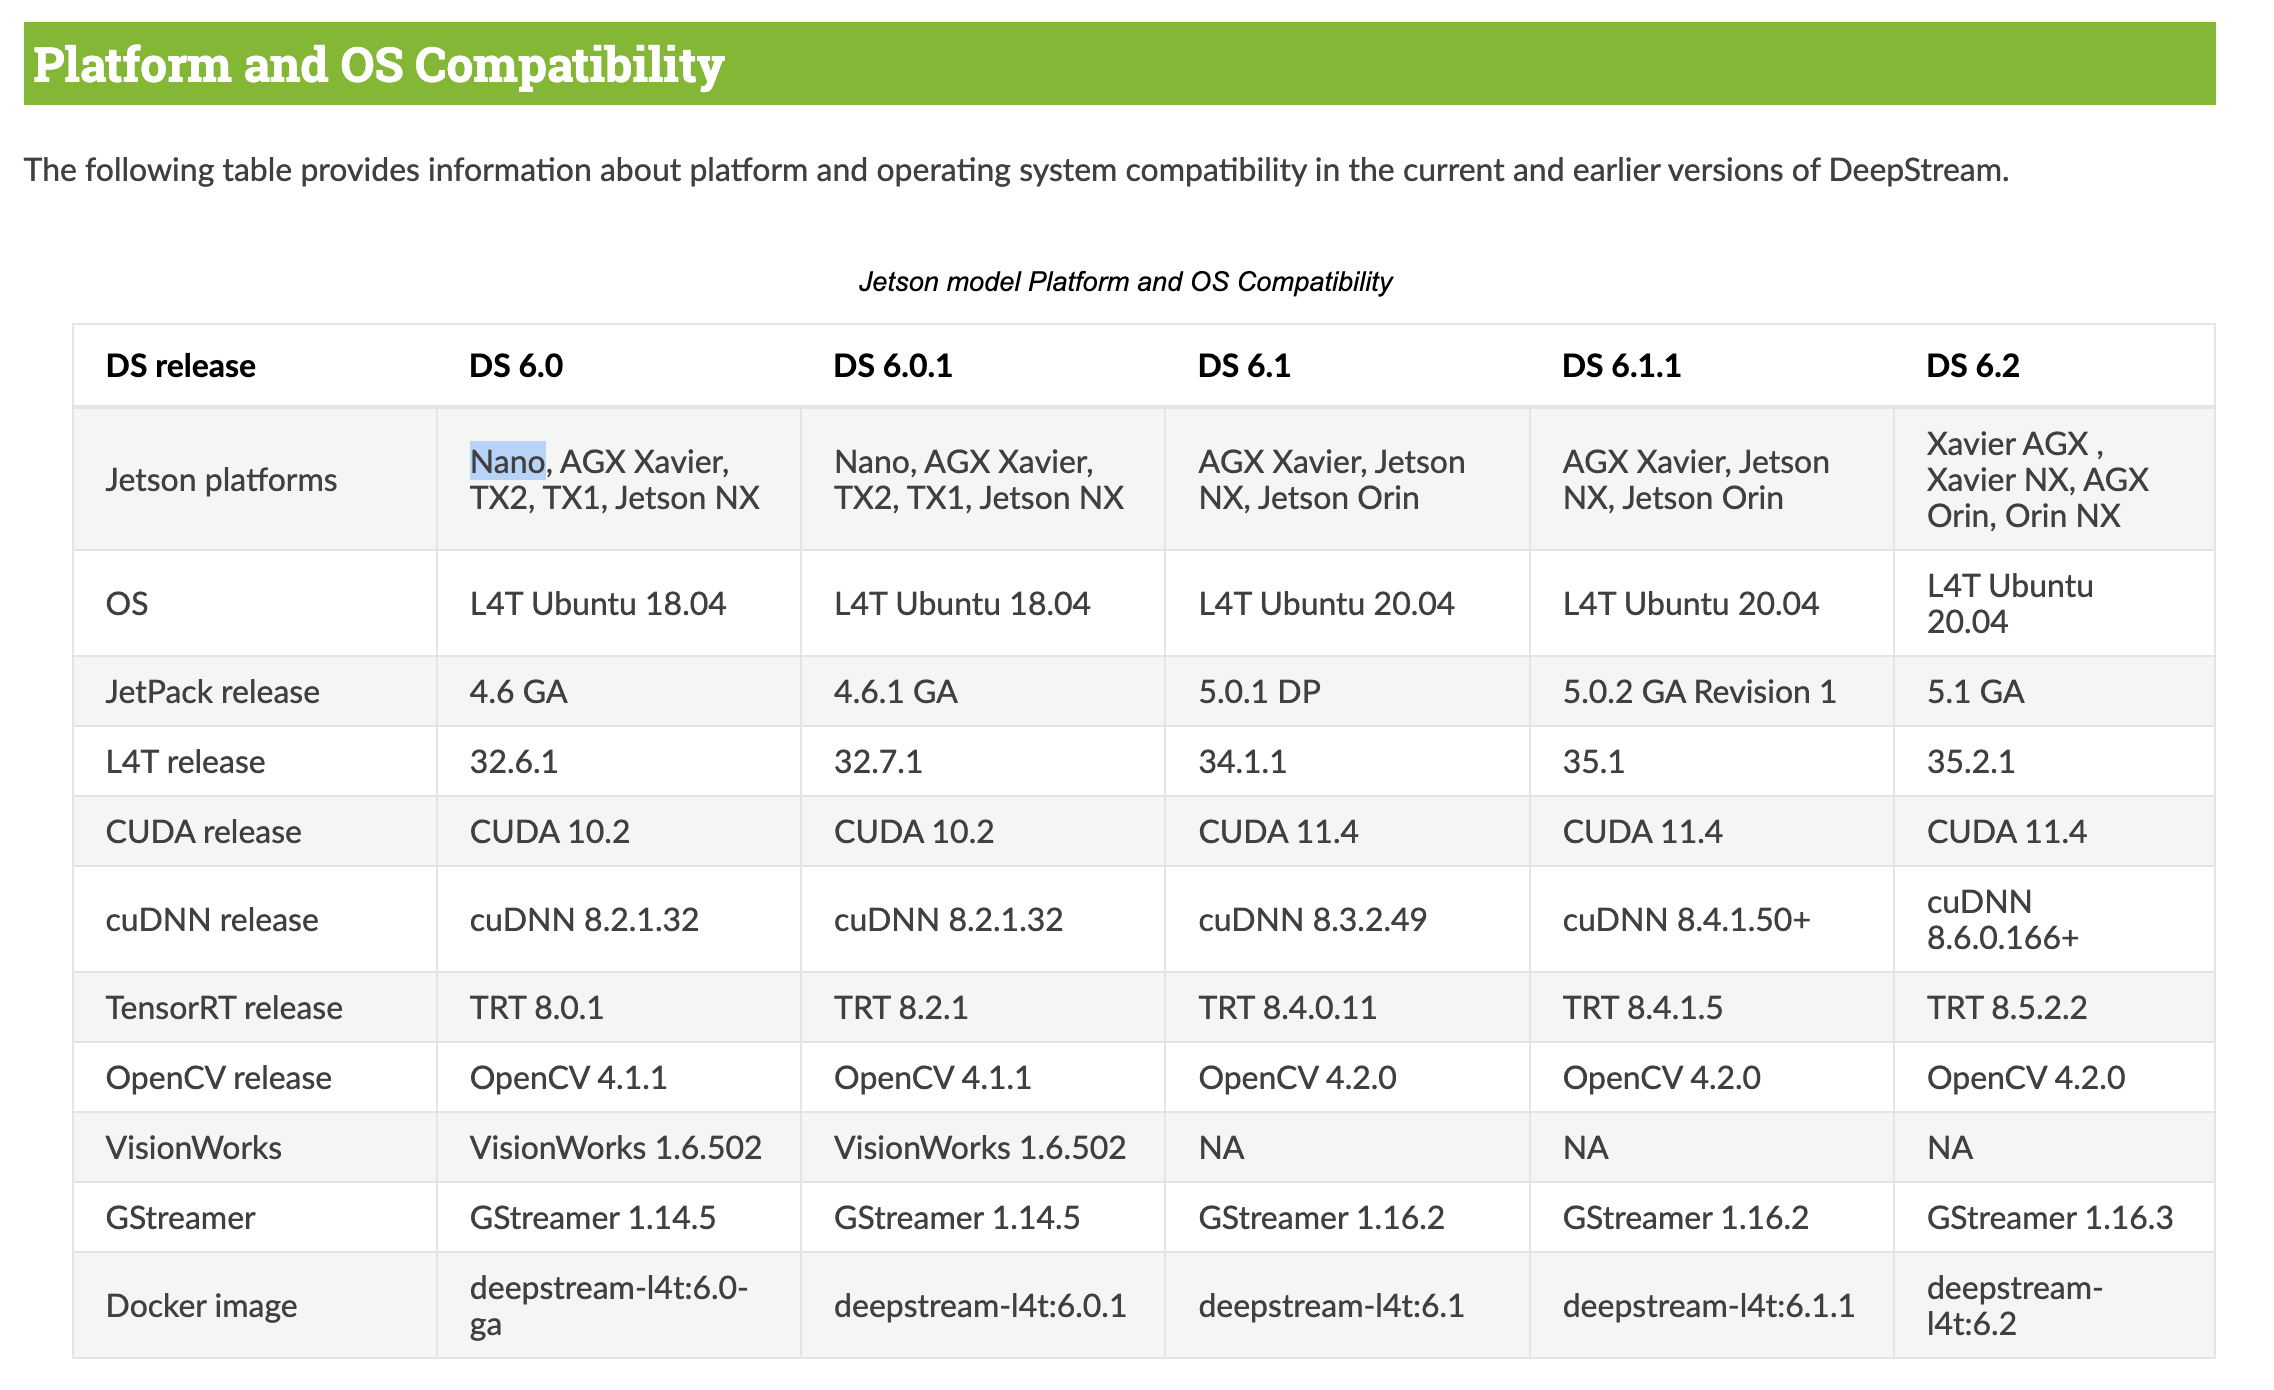
对于 Jetson NX,凭借其强大的性能,能够支持 DeepStream 6.2 版本。安装过程中,需先安装一系列基础依赖库,如 libssl1.1、gstreamer 相关组件等,为后续软件运行搭建基础环境。接着安装 librdkafka,这一步骤涉及代码克隆、版本回退、编译安装以及文件复制,确保 Kafka 相关功能在 DeepStream 中正常运作。随后下载并解压 DeepStream SDK,通过执行安装脚本和更新动态链接库缓存完成安装。在安装完成后,还提及了生成 engine 文件的方法,包括使用 coco 预训练模型,按照特定流程修改网络结构、导出 onnx 文件以及构建 engine,为后续的目标检测任务提供模型支持。
而 Jetson Nano 由于性能限制,仅支持 DeepStream 6.0 版本。其安装流程与 Jetson NX 有相似之处,同样需要安装依赖库和 librdkafka,但在依赖库版本上存在差异,例如 libssl 版本和 libjansson4 版本。在下载和安装 DeepStream SDK 时,需选择适配的 6.0.1 版本。
通过网盘分享的代码等文件,为开发者提供了更全面的实践资源,有助于快速上手和开展相关项目开发。无论是 Jetson NX 还是 Jetson Nano,安装好 DeepStream 后,开发者都可以利用其强大的视频分析和处理能力,结合自定义的模型,实现诸如目标检测、行为分析等多样化的计算机视觉应用,为智能安防、工业检测等领域带来创新解决方案,推动边缘计算技术在更多场景的落地应用。
通过网盘分享的文件:代码等3个文件
链接: https://pan.baidu.com/s/1yFPOgoswxbr32_zoae6-EQ?pwd=bvx3 提取码: bvx3
–来自百度网盘超级会员v3的分享

有“AI”的1024 = 2048,欢迎大家加入2048 AI社区
更多推荐

 13
13 0
0- 0


 已为社区贡献8条内容

所有评论(0)