【华为昇腾DVPP/AIPP学习篇】(3) AIPP+DVPP的使用
本文介绍了在香橙派AI Pro上部署车辆检测模型的优化过程,重点探讨了如何结合DVPP硬件加速和AIPP预处理提升推理性能。作者详细阐述了DVPP的功能模块和使用方法,并以JPEGD解码+VPC缩放为例展示了关键代码实现。项目采用MP4格式转换→DVPP缩放→AIPP转换→结果标注的完整流程,其中通过ffmpeg将MP4转换为符合DVPP要求的H264格式。实验结果表明,该方法有效解决了"
文章目录
1 概要
最近博主准备了一个可以检测车辆的网络模型,准备部署到华为和香橙派联合出版的香橙派 Ai Pro上(Oriange Pi Ai Pro),此推理板使用的是Ascend3130B4的芯片。其中,博主学习CANN的相关知识以满足模型优化的需求。
具体的学习路径如下:
- 项目介绍
- 项目优化(AIPP的使用)
- 项目再次优化(AIPP+DVPP的使用)
硬件环境:
- 香橙派AI Pro (Ubuntu) : 用于部署最终的模型
- 宿主机(Windows):用于编写代码
整体流程:
在宿主机上编写完程序后通过Mobaxterm的SSH将文件上传到香橙派上,随后进行模型转换(.ONNX->.om),最后实现运行
2 DVPP
2.1 什么是DVPP
昇腾AI处理器内置图像处理单元DVPP,提供了强大的媒体处理硬加速能力。同时,异构计算架构CANN提供了使用图像处理硬件算力的入口:AscendCL接口,开发者可通过接口来进行图像处理,以便利用昇腾AI处理器的算力。
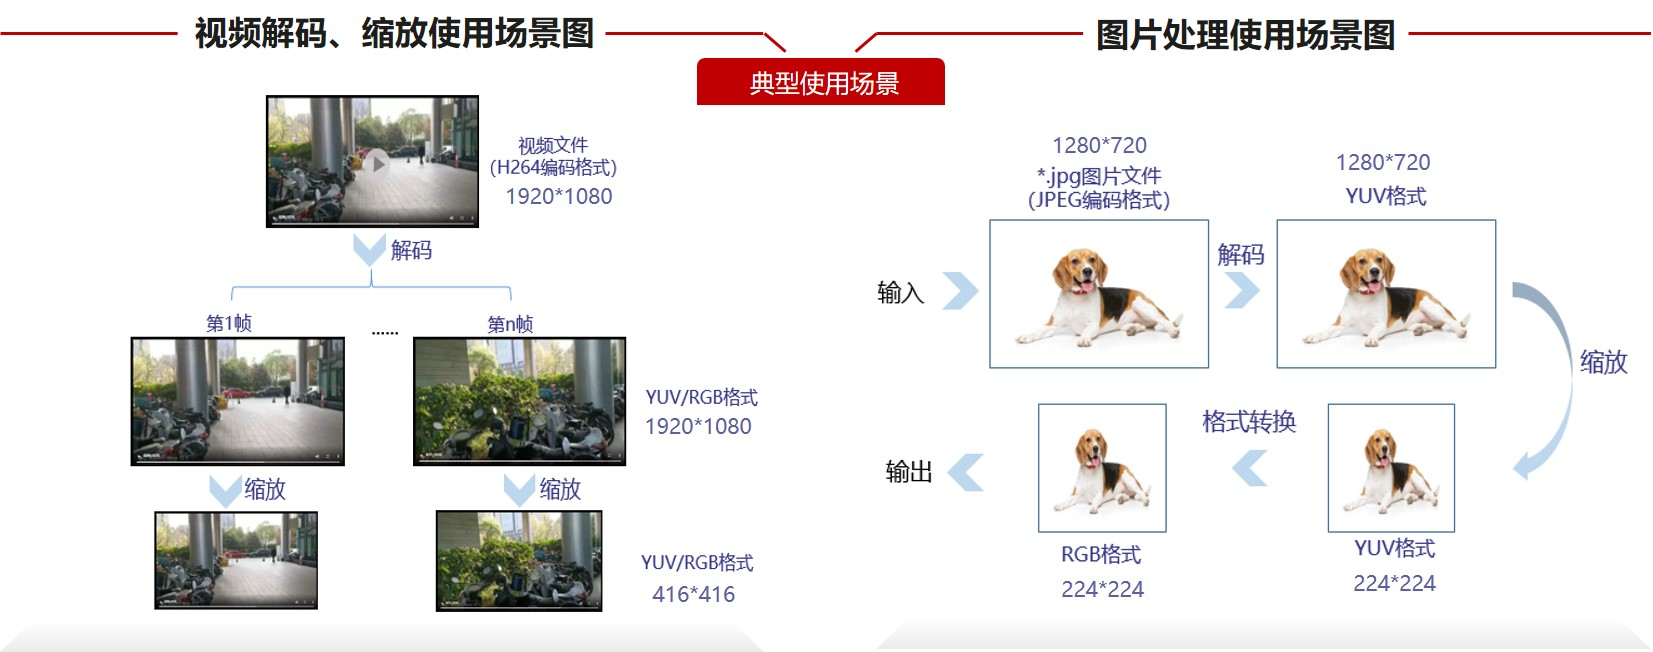
2.2 DVPP能做什么
DVPP内的功能模块如下所示。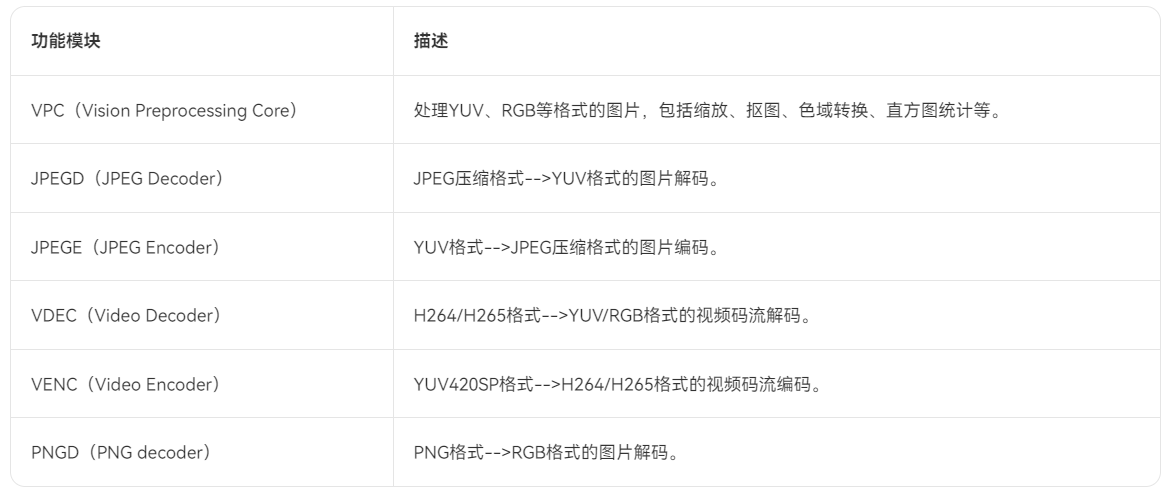
2.3 如何使用DVPP的功能
此处就以JPEGD图片解码+VPC图片缩放为例来说明如何使用DVPP功能。这里先通过一张图总览接口调用流程,包括资源初始化&去初始化、通道创建与销毁、解码、缩放、等待任务完成、释放内存资源等。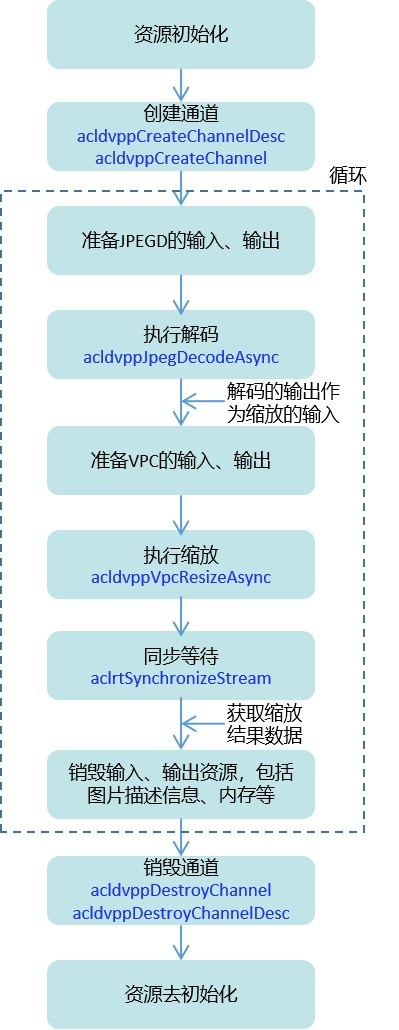
总览接口调用流程后,接下来我们以开发者更熟悉的方式“代码”来展示JPEGD图片解码+VPC图片缩放功能的关键代码逻辑。
// 创建通道
acldvppChannelDesc dvppChannelDesc = acldvppCreateChannelDesc();
acldvppCreateChannel(dvppChannelDesc);

// 在JPEGD图片解码前,准备其输入、输出
// ……
// 创建解码输出图片描述信息,设置输出图片的宽、高、图片格式、内存地址等
acldvppPicDesc decodeOutputDesc = acldvppCreatePicDesc();
acldvppSetPicDescData(decodeOutputDesc, decodeOutputBuffer));
acldvppSetPicDescWidth(decodeOutputDesc, decodeOutputWidth);
acldvppSetPicDescHeight(decodeOutputDesc, decodeOutputHeight);
// 此处省略其它set接口……

// 执行JPEGD图片解码
acldvppJpegDecodeAsync(dvppChannelDesc, decodeInputBuffer, decodeInputBufferSize, decodeOutputDesc, stream);

// 5. 在VPC图片缩放前,准备其输入、输出
// 创建缩放输入图片的描述信息,并设置各属性值,解码的输出作为缩放的输入
acldvppPicDesc resizeInputDesc = acldvppCreatePicDesc();
acldvppSetPicDescData(resizeInputDesc, decodeOutputBuffer);
acldvppSetPicDescWidth(resizeInputDesc, resizeInputWidth);
acldvppSetPicDescHeight(resizeInputDesc, resizeInputHeight);
// 此处省略其它set接口……

// 创建缩放输出图片的描述信息,并设置各属性值
acldvppPicDesc resizeOutputDesc = acldvppCreatePicDesc();
acldvppSetPicDescData(resizeOutputDesc, resizeOutputBuffer);
acldvppSetPicDescWidth(resizeOutputDesc, resizeOutputWidth);
acldvppSetPicDescHeight(resizeOutputDesc, resizeOutputHeight);
// 此处省略其它set接口……

// 6. 执行VPC图片缩放
acldvppVpcResizeAsync(dvppChannelDesc, resizeInputDesc,
                     resizeOutputDesc, resizeConfig, stream);

// 7. JPEGD图片解码、VPC图片缩放都是异步任务,需调用以下接口阻塞程序运行,直到指定Stream中的所有任务都完成
aclrtSynchronizeStream(stream);
3 本工程在AIPP基础上引入DVPP
3.1 整体流程
因为DVPP对输入有较为严格的要求,视频流必须为以下格式之一:
- h264 :main, baselineor high level,且为 annex-b格式
- h265 :main level
而我们是通过mp4文件进行的输入,其格式为AVCC,不是annex-b,因此我们得需要先使用ffmpeg进行格式转换,转换为符合要求的h264 :main, baselineor high level,随后再将其输出。
因此整体流程为:
MP4文件格式转换->DVPP缩放(输出图像为YUV)->AIPP转换(YUV转BGR)->画框(检测结果)
3.1.1 MP4文件格式转换
因为DVPP格式严格要求为
- h264 :main, baselineor high level,且为 annex-b格式
- h265 :main level
我们的mp4的格式为AVCC,因此需要转换。
首先安装ffmpeg,华为设备的ffmpeg安装教程如下:
ffmpeg昇腾设备安装
安装完成之后,对mp4的格式进行转换,进入到mp4所在文件夹,执行如下命令:
LD_LIBRARY_PATH="" /usr/bin/ffmpeg -y -i ../video/car/car_video_1.mp4 \
    -c:v libx264 \
    -profile:v high \
    -level 4.1 \
    -bsf:v h264_mp4toannexb \
    -f h264 \
    ../video/car/car_video_1.h264
转换成功后目标文件夹下出现.h264的视频文件: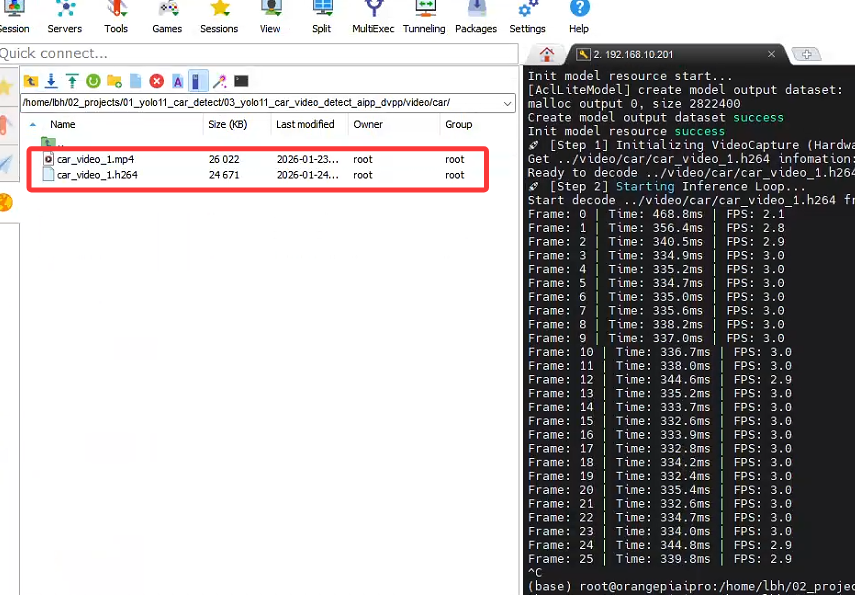
3.1.2 DVPP缩放
官方提供的接口有Camera类和VideoCapture类,因为我们不是摄像头,使用的是视频流,因此使用VideoCapture类。代码如下:
    def run(self):
        print("🚀 [Step 1] Initializing VideoCapture (Hardware Decode)...")
        cap = VideoCapture(self.video_path)

        if not os.path.exists(self.output_dir):
            os.makedirs(self.output_dir)

        out_writer = None
        frame_cnt = 0

        print("🚀 [Step 2] Starting Inference Loop...")
        try:
            while True:
                t_start = time.time()

                # 1. 硬件解码得到 YUV420SP (Device 内存)
                ret, dvpp_image = cap.read()

                if dvpp_image is None:
                    if cap.is_finished():
                        print("\nVideo processing finished.")
                        break
                    time.sleep(0.01)
                    continue

                # 2. 硬件 Resize (Device -> Device)
                # 结果 resized_image 依然是 YUV420SP 格式
                resized_image = self.dvpp.resize(dvpp_image, self.input_width, self.input_height)

                # ---------------------------------------------------------
                # 关键修复步骤
                # ---------------------------------------------------------

                # 3. 准备模型输入
                # 因为 OM 模型开启了 AIPP,它期待的是 YUV420SP 的原始字节流
                # 我们调用 byte_data_to_np_array() 获取原始二进制数据 (转为 numpy 包装)
                # 这一步会把数据从 Device 拷贝到 Host,虽然有一点点开销,但解决了 "Unsupport input" 报错

                model_input_yuv = resized_image.byte_data_to_np_array()

                # 4. 推理
                # 传入 YUV 数据,NPU 内部的 AIPP 会自动完成 YUV->RGB 和 归一化
                result = self.model.execute([model_input_yuv, ])

                # 判空保护
                if result is None:
                    continue

                # 5. 可视化 (为了让人眼能看懂,必须转 BGR)
                # 注意:这里我们用 dvpp_image (原图) 或者 resized_image (小图) 都可以
                # 如果用原图画框,框更清晰;如果用小图,速度更快。这里演示用原图:
                bgr_frame = self.convert_device_yuv_to_host_bgr(dvpp_image)

                if bgr_frame is not None:
                    if out_writer is None:
                        h, w = bgr_frame.shape[:2]
                        save_path = os.path.join(self.output_dir, "result_hardware.mp4")
                        out_writer = cv2.VideoWriter(save_path, cv2.VideoWriter_fourcc(*'mp4v'), 25, (w, h))

                    # 后处理并画图
                    final_frame = self.postprocess(result, bgr_frame)
                    out_writer.write(final_frame)

                # 6. 统计与释放
                t_cost = time.time() - t_start
                fps = 1 / t_cost if t_cost > 0 else 0
                # print(f"\rFrame: {frame_cnt} | Time: {t_cost*1000:.1f}ms | FPS: {fps:.1f}", end="")
                print(f"Frame: {frame_cnt} | Time: {t_cost*1000:.1f}ms | FPS: {fps:.1f}")
                frame_cnt += 1
3.1.3 AIPP转换
AIPP在数据输入模型,即model.execute之后会自动处理传入的数据,在使用之前我们需要配置AIPP,配置方法详情见:
【华为昇腾DVPP/AIPP学习篇】(2) AIPP的使用
在此工程中我们的AIPP配置如下:
aipp_op {
    # =============================================================
    # 1. 基础配置
    # =============================================================
    aipp_mode: static
    related_input_rank: 0

    # 这里的宽高必须和你的 Python 代码中 resize 的目标尺寸一致 (640x640)
    src_image_size_w: 640
    src_image_size_h: 640

    # DVPP 输出的默认格式通常是 NV12 (YUV420SP)
    input_format: YUV420SP_U8

    # =============================================================
    # 2. 色域转换 (CSC: YUV420SP -> RGB)
    # =============================================================
    # 开启色域转换,将 DVPP 的 YUV 数据转回 YOLO 需要的 RGB
    csc_switch: true

    # 下面是标准的 BT.601 YUV 转 RGB 矩阵参数
    # 对应转换公式:RGB = Matrix * (YUV - Bias)
    matrix_r0c0: 298
    matrix_r0c1: 0
    matrix_r0c2: 409
    matrix_r1c0: 298
    matrix_r1c1: -100
    matrix_r1c2: -208
    matrix_r2c0: 298
    matrix_r2c1: 516
    matrix_r2c2: 0

    # Bias 偏置值
    input_bias_0: 16
    input_bias_1: 128
    input_bias_2: 128

    # =============================================================
    # 3. 归一化配置 (Normalization)
    # =============================================================
    # YOLO 模型通常要求输入是 0.0 到 1.0 的浮点数
    # 原始数据是 0-255 (uint8)
    # 计算公式:Pixel_out = (Pixel_in - mean) * var_reci

    # Mean (均值) 设为 0
    mean_chn_0: 0
    mean_chn_1: 0
    mean_chn_2: 0

    # Min 设为 0 (通常和 Mean 配合使用,这里保持 0 即可)
    min_chn_0: 0
    min_chn_1: 0
    min_chn_2: 0

    # Var (方差倒数) = 1 / 255 ≈ 0.003921568627451
    # 这样就把 0-255 缩放到了 0.0-1.0
    var_reci_chn_0: 0.003921568627451
    var_reci_chn_1: 0.003921568627451
    var_reci_chn_2: 0.003921568627451
}
配置完成后模型会自动开启AIPP转化了。
3.1.4 检测结果画框
检测结果画框的代码如下:
    def postprocess(self, infer_output, bgr_frame):
        """解析模型输出并画框"""
        prediction = np.squeeze(infer_output[0])
        # 转置 (84, 8400) -> (8400, 84)
        if prediction.shape[0] < prediction.shape[1]:
            prediction = np.transpose(prediction)

        orig_h, orig_w = bgr_frame.shape[:2]
        scale_x = orig_w / self.input_width
        scale_y = orig_h / self.input_height

        boxes = []
        scores = []
        class_ids = []

        # 筛选框
        for i in range(prediction.shape[0]):
            classes_scores = prediction[i][4:]
            max_score = np.amax(classes_scores)

            if max_score >= self.conf_thres:
                class_id = np.argmax(classes_scores)
                x, y, w, h = prediction[i][0], prediction[i][1], prediction[i][2], prediction[i][3]

                # 还原坐标
                left = int((x - w / 2) * scale_x)
                top = int((y - h / 2) * scale_y)
                width = int(w * scale_x)
                height = int(h * scale_y)

                boxes.append([left, top, width, height])
                scores.append(float(max_score))
                class_ids.append(class_id)

        # NMS
        indices = cv2.dnn.NMSBoxes(boxes, scores, self.conf_thres, self.iou_thres)

        # 画图
        if len(indices) > 0:
            for i in indices:
                idx = i[0] if isinstance(i, (tuple, list, np.ndarray)) else i
                box = boxes[idx]
                self.draw_box(bgr_frame, box, scores[idx], class_ids[idx])

        return bgr_frame
3.1.5 整体代码
import sys

# 1. 设置环境变量和路径
# 请根据实际情况调整相对路径,确保能找到 acllite 文件夹
sys.path.append("acllite")
sys.path.append("../../../../common")
sys.path.append("../../")

import argparse
import cv2
import numpy as np
import acl
import acllite_utils as utils
from PIL import Image, ImageDraw, ImageFont
from acllite_imageproc import AclLiteImageProc
import constants as const
from acllite_model import AclLiteModel
from acllite_image import AclLiteImage
from acllite_resource import AclLiteResource
# 注意:这里导入的是你提供的文件 acllite_video.py 中的 VideoCapture 类
from videocapture import VideoCapture
import cv2
import math
import time # 确保引入了time模块
import os

# 类别定义
labels = ["person", "bicycle", "car", "motorbike", "aeroplane",
          "bus", "train", "truck", "boat", "traffic light",
          "fire hydrant", "stop sign", "parking meter", "bench",
          "bird", "cat", "dog", "horse", "sheep", "cow", "elephant",
          "bear", "zebra", "giraffe", "backpack", "umbrella", "handbag",
          "tie", "suitcase", "frisbee", "skis", "snowboard", "sports ball",
          "kite", "baseball bat", "baseball glove", "skateboard", "surfboard",
          "tennis racket", "bottle", "wine glass", "cup", "fork", "knife", "spoon",
          "bowl", "banana", "apple", "sandwich", "orange", "broccoli", "carrot", "hot dog",
          "pizza", "donut", "cake", "chair", "sofa", "potted plant", "bed", "dining table",
          "toilet", "TV monitor", "laptop", "mouse", "remote", "keyboard", "cell phone",
          "microwave", "oven", "toaster", "sink", "refrigerator", "book", "clock", "vase",
          "scissors", "teddy bear", "hair drier", "toothbrush"]

class YOLO11_App:
    def __init__(self, model_path, video_path, output_dir, conf_thres, iou_thres):
        self.model_path = model_path
        self.video_path = video_path
        self.output_dir = output_dir
        self.conf_thres = conf_thres
        self.iou_thres = iou_thres

        # 初始化资源
        self.resource = AclLiteResource()
        self.resource.init()

        # 初始化模型
        self.model = AclLiteModel(model_path)
        self.input_width = 640
        self.input_height = 640

        # 尝试从模型获取分辨率
        dims, ret = acl.mdl.get_input_dims(self.model._model_desc, 0)
        if len(dims) == 4:
            self.input_height = dims[1]
            self.input_width = dims[2]

        # 初始化 DVPP (用于Resize)
        self.dvpp = AclLiteImageProc(self.resource)

        # 颜色表
        self.colors = np.random.uniform(0, 255, size=(len(labels), 3))

    def convert_device_yuv_to_host_bgr(self, acl_image):
        if acl_image is None:
            return None

        # 1. 获取 numpy 数组 (Device -> Host)
        yuv_bytes = acl_image.byte_data_to_np_array()

        # 2. 恢复 YUV 形状
        h = acl_image.height
        w = acl_image.width

        try:
            # reshape 为 (h*1.5, w)
            yuv_frame = yuv_bytes.reshape((int(h * 1.5), w))

            # 【关键修复】将 int8 (CV_8S) 强制转换为 uint8 (CV_8U)
            # 否则 OpenCV 会报错 Unsupported depth
            yuv_frame = yuv_frame.astype(np.uint8)

            # 3. 颜色空间转换
            bgr_frame = cv2.cvtColor(yuv_frame, cv2.COLOR_YUV2BGR_NV12)
            return bgr_frame
        except Exception as e:
            print(f"[Warning] YUV conversion failed: {e}")
            return None

    def postprocess(self, infer_output, bgr_frame):
        """解析模型输出并画框"""
        prediction = np.squeeze(infer_output[0])
        # 转置 (84, 8400) -> (8400, 84)
        if prediction.shape[0] < prediction.shape[1]:
            prediction = np.transpose(prediction)

        orig_h, orig_w = bgr_frame.shape[:2]
        scale_x = orig_w / self.input_width
        scale_y = orig_h / self.input_height

        boxes = []
        scores = []
        class_ids = []

        # 筛选框
        for i in range(prediction.shape[0]):
            classes_scores = prediction[i][4:]
            max_score = np.amax(classes_scores)

            if max_score >= self.conf_thres:
                class_id = np.argmax(classes_scores)
                x, y, w, h = prediction[i][0], prediction[i][1], prediction[i][2], prediction[i][3]

                # 还原坐标
                left = int((x - w / 2) * scale_x)
                top = int((y - h / 2) * scale_y)
                width = int(w * scale_x)
                height = int(h * scale_y)

                boxes.append([left, top, width, height])
                scores.append(float(max_score))
                class_ids.append(class_id)

        # NMS
        indices = cv2.dnn.NMSBoxes(boxes, scores, self.conf_thres, self.iou_thres)

        # 画图
        if len(indices) > 0:
            for i in indices:
                idx = i[0] if isinstance(i, (tuple, list, np.ndarray)) else i
                box = boxes[idx]
                self.draw_box(bgr_frame, box, scores[idx], class_ids[idx])

        return bgr_frame

    def draw_box(self, img, box, score, class_id):
        x, y, w, h = box
        color = self.colors[class_id]
        cv2.rectangle(img, (x, y), (x + w, y + h), color, 2)
        label = f"{labels[class_id]} {score:.2f}"
        cv2.putText(img, label, (x, y - 5), cv2.FONT_HERSHEY_SIMPLEX, 0.5, color, 2)

    def run(self):
        print("🚀 [Step 1] Initializing VideoCapture (Hardware Decode)...")
        cap = VideoCapture(self.video_path)

        if not os.path.exists(self.output_dir):
            os.makedirs(self.output_dir)

        out_writer = None
        frame_cnt = 0

        print("🚀 [Step 2] Starting Inference Loop...")
        try:
            while True:
                t_start = time.time()

                # 1. 硬件解码得到 YUV420SP (Device 内存)
                ret, dvpp_image = cap.read()

                if dvpp_image is None:
                    if cap.is_finished():
                        print("\nVideo processing finished.")
                        break
                    time.sleep(0.01)
                    continue

                # 2. 硬件 Resize (Device -> Device)
                # 结果 resized_image 依然是 YUV420SP 格式
                resized_image = self.dvpp.resize(dvpp_image, self.input_width, self.input_height)

                # ---------------------------------------------------------
                # 关键修复步骤
                # ---------------------------------------------------------

                # 3. 准备模型输入
                # 因为你的 OM 模型开启了 AIPP,它期待的是 YUV420SP 的原始字节流
                # 我们调用 byte_data_to_np_array() 获取原始二进制数据 (转为 numpy 包装)
                # 这一步会把数据从 Device 拷贝到 Host,虽然有一点点开销,但解决了 "Unsupport input" 报错

                model_input_yuv = resized_image.byte_data_to_np_array()

                # 4. 推理
                # 传入 YUV 数据,NPU 内部的 AIPP 会自动完成 YUV->RGB 和 归一化
                result = self.model.execute([model_input_yuv, ])

                # 判空保护
                if result is None:
                    continue

                # 5. 可视化 (为了让人眼能看懂,必须转 BGR)
                # 注意:这里我们用 dvpp_image (原图) 或者 resized_image (小图) 都可以
                # 如果用原图画框,框更清晰;如果用小图,速度更快。这里演示用原图:
                bgr_frame = self.convert_device_yuv_to_host_bgr(dvpp_image)

                if bgr_frame is not None:
                    if out_writer is None:
                        h, w = bgr_frame.shape[:2]
                        save_path = os.path.join(self.output_dir, "result_hardware.mp4")
                        out_writer = cv2.VideoWriter(save_path, cv2.VideoWriter_fourcc(*'mp4v'), 25, (w, h))

                    # 后处理并画图
                    final_frame = self.postprocess(result, bgr_frame)
                    out_writer.write(final_frame)

                # 6. 统计与释放
                t_cost = time.time() - t_start
                fps = 1 / t_cost if t_cost > 0 else 0
                # print(f"\rFrame: {frame_cnt} | Time: {t_cost*1000:.1f}ms | FPS: {fps:.1f}", end="")
                print(f"Frame: {frame_cnt} | Time: {t_cost*1000:.1f}ms | FPS: {fps:.1f}")
                frame_cnt += 1

        except KeyboardInterrupt:
            print("\nStopped by user.")
        except Exception as e:
            # 打印详细错误堆栈,方便调试
            import traceback
            traceback.print_exc()
        finally:
            print("\nReleasing resources...")
            if out_writer:
                out_writer.release()
            cap.destroy()

if __name__ == '__main__':
    parser = argparse.ArgumentParser()
    parser.add_argument('--model-path', type=str, default='../model/yolo11x.om')
    parser.add_argument('--video-path', type=str, default='../video/car/car_video_1.h264')
    parser.add_argument('--output-dir', type=str, default='../out')
    parser.add_argument('--conf-thres', type=float, default=0.45)
    parser.add_argument('--iou-thres', type=float, default=0.5)
    args = parser.parse_args()

    app = YOLO11_App(args.model_path, args.video_path, args.output_dir, args.conf_thres, args.iou_thres)
    app.run()
3.1.6 性能结果对比
原来: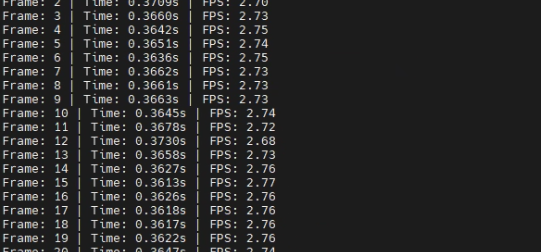
+AIPP: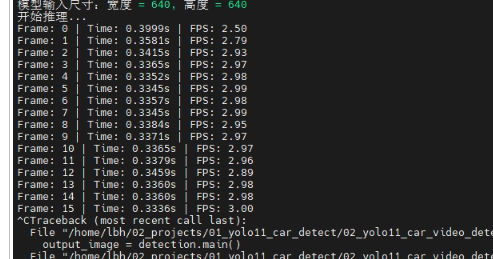
+AIPP+DVPP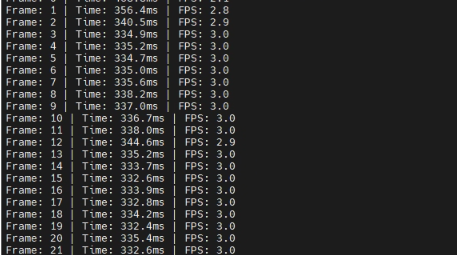
因为DVPP一般是直接处理摄像头获取到的图像的,但是此处是mp4转然后在进行图像处理,因此可能会导致有些额外多余操作使得性能增强不突出,不过总结下来还是有一点提升。
4 总结
本章节讲解了如何在使用AIPP的情况下引入DVPP。
5 其他章节
【华为昇腾DVPP/AIPP学习篇】(1) 工程结构介绍
【华为昇腾DVPP/AIPP学习篇】(2) AIPP的使用
【华为昇腾DVPP/AIPP学习篇】(3) AIPP+DVPP的使用

有“AI”的1024 = 2048,欢迎大家加入2048 AI社区
更多推荐
 17
17 0
0- 0


 已为社区贡献9条内容

所有评论(0)