Flutter for OpenHarmony 开发指南(二):Hello World
一:零基础快速入门Dart Flutter开发
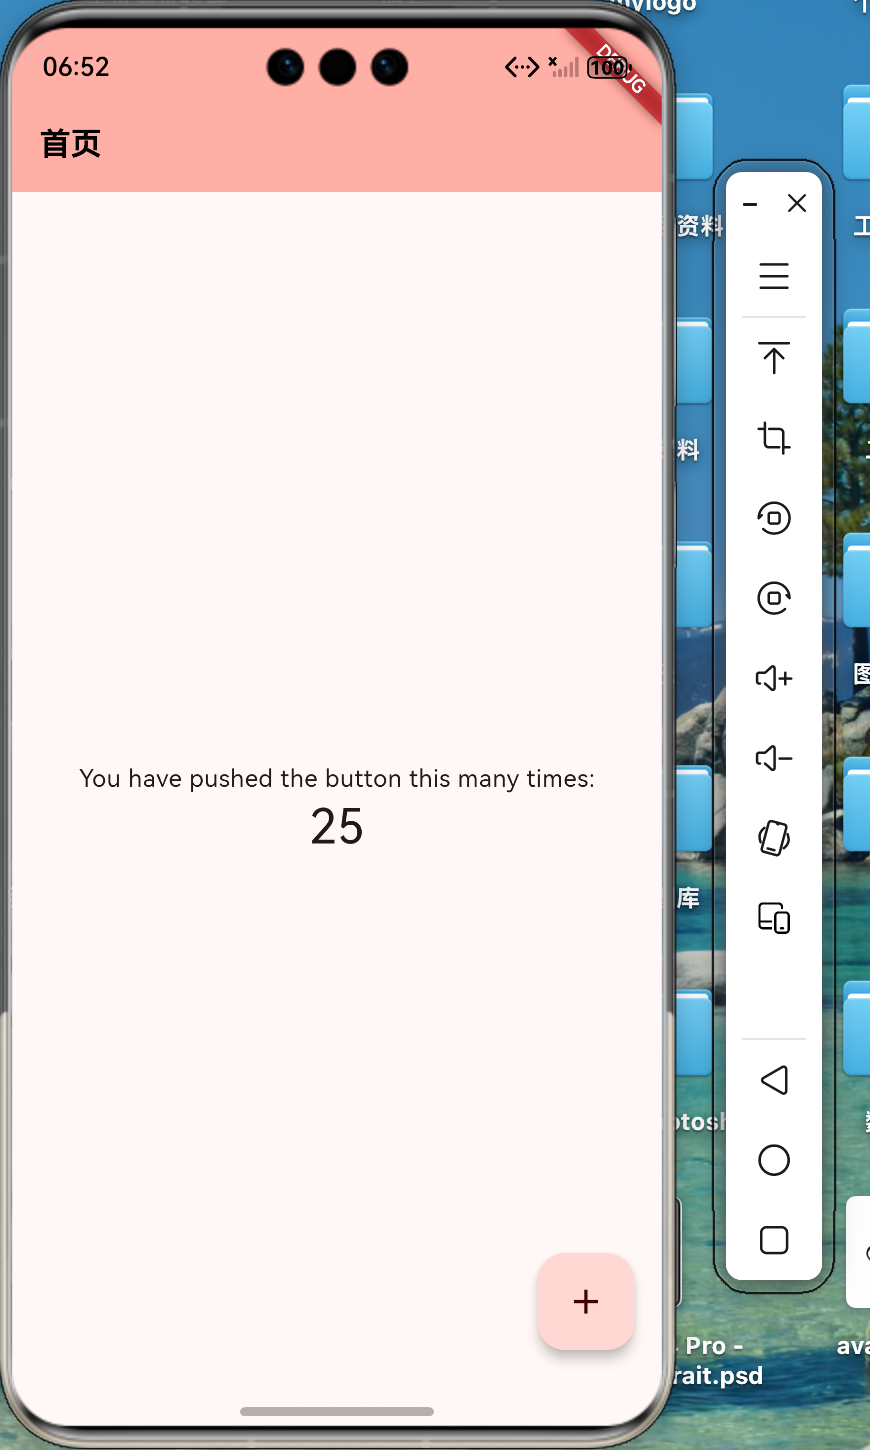
这段代码是 Flutter 官方提供的标准“计数器”示例,也是学习 Flutter 的“Hello World”。现对它进行了一些修改(添加了全局主题配置)。
效果:
二:示例代码
main.dart代码如下:
import 'package:flutter/material.dart';

void main() {
  runApp(const MyApp());
}

class MyApp extends StatelessWidget {
  const MyApp({super.key});
  @override
  Widget build(BuildContext context) {
    return MaterialApp(
      title: 'Flutter Demo',
      theme: ThemeData(
        colorScheme: ColorScheme.fromSeed(seedColor: Colors.red.shade500),
        appBarTheme: const AppBarTheme(
          // 设置背景色(可选)
          // backgroundColor: Colors.white,
          // 设置标题文本的全局样式
          titleTextStyle: TextStyle(
            color: Colors.black, // 全局标题颜色
            fontSize: 18, // 全局字体大小
            fontWeight: FontWeight.bold,
          ),
        ),
      ),

      home: const MyHomePage(title: '首页'),
    );
  }
}

class MyHomePage extends StatefulWidget {
  const MyHomePage({super.key, required this.title});

  final String title;

  @override
  State<MyHomePage> createState() => _MyHomePageState();
}

class _MyHomePageState extends State<MyHomePage> {
  int _counter = 0;

  void _incrementCounter() {
    setState(() {
      _counter++;
    });
  }

  @override
  Widget build(BuildContext context) {
    return Scaffold(
      appBar: AppBar(
        backgroundColor: Theme.of(context).colorScheme.inversePrimary,

        title: Text(widget.title),
      ),
      body: Center(
        child: Column(
          mainAxisAlignment: MainAxisAlignment.center,
          children: <Widget>[
            const Text('You have pushed the button this many times:'),
            Text(
              '$_counter',
              style: Theme.of(context).textTheme.headlineMedium,
            ),
          ],
        ),
      ),
      floatingActionButton: FloatingActionButton(
        onPressed: _incrementCounter,
        tooltip: 'Increment',
        child: const Icon(Icons.add),
      ),
    );
  }
}
三:代码解读
1. 入口函数 (main)
void main() {
  runApp(const MyApp());
}-
main(): 这是 Dart 程序的入口,一切从这里开始。
-
runApp(): 这是 Flutter 的核心函数。它接受一个 Widget(在这里是 MyApp),并将其作为根节点挂载到屏幕上。
2. 根组件 (MyApp)
class MyApp extends StatelessWidget {
  const MyApp({super.key});
  @override
  Widget build(BuildContext context) {
    return MaterialApp(
      title: 'Flutter Demo',
      theme: ThemeData(
        colorScheme: ColorScheme.fromSeed(seedColor: Colors.red.shade500),
        appBarTheme: const AppBarTheme(
          // 设置背景色(可选)
          // backgroundColor: Colors.white,
          // 设置标题文本的全局样式
          titleTextStyle: TextStyle(
            color: Colors.black, // 全局标题颜色
            fontSize: 18, // 全局字体大小
            fontWeight: FontWeight.bold,
          ),
        ),
      ),

      home: const MyHomePage(title: '首页'),
    );
  }
}-
StatelessWidget: 表示这个组件是无状态的。也就是说,MyApp 初始化后,它自己的内部状态不会发生改变(它只是配置整个 App 的壳子)。
-
MaterialApp: 这是 Flutter 提供的一个顶层组件,它封装了 Google Material Design(安卓风格)的设计规范,提供了路由、主题等核心功能。
-
ThemeData: 定义 App 的外观。
-
ColorScheme.fromSeed: 这是 Material 3 的新特性。只需要给一个种子颜色(这里是白色),Flutter 会自动生成一套协调的配色方案(主色、副色、背景色等)。
-
appBarTheme: 这里是设置的全局样式。这意味着,只要在 App 里使用 AppBar 且不单独覆盖样式。
3. 有状态的主页 (MyHomePage)
class MyHomePage extends StatefulWidget { ... }-
StatefulWidget: 这里变成了有状态组件。因为这个页面需要记录点击次数(_counter),数字会变化,所以界面需要随之刷新。
-
title: 这是一个参数,由父组件(MyApp)传递进来,在这里是 "首页"。
4. 状态逻辑与界面 (_MyHomePageState)
这是 MyHomePage 的“伴生”类,所有的逻辑和界面构建都在这里。
变量与逻辑
int _counter = 0; // 状态变量,记录点击次数

void _incrementCounter() {
  setState(() {
    _counter++;
  });
}-
setState(() { ... }): 这句最重要! 在 Flutter 中,单纯改变变量 _counter++ 是不会更新界面的。必须调用 setState 通知 Flutter:“数据变了,请重新运行 build 方法刷新屏幕。”
界面构建 (build)
@override
Widget build(BuildContext context) {
  return Scaffold( ... );
}-
caffold: 意为“脚手架”。它实现了 Material Design 的基本页面布局结构,提供了 appBar(顶部导航栏)、body(中间内容)、floatingActionButton(悬浮按钮)等槽位。
这里的代码有一个“冲突”点:
appBar: AppBar(
  // 这里的设置优先级高于 MyApp 里的全局设置!
  backgroundColor: Theme.of(context).colorScheme.inversePrimary,
  title: Text(widget.title),
),-
注意:你在 MyApp 里设置了全局 backgroundColor: Colors.white,但是在这里(MyHomePage),代码显式地设置了 backgroundColor 为 inversePrimary(一种浅紫色)。
-
结果:背景色会是浅紫色(局部覆盖了全局)。
-
标题文字:因为这里没设置 TextStyle,所以它会使用你在 MyApp 定义的蓝色、18号字(全局样式生效)。
-
页面主体 (body)
body: Center( // 让内容居中
  child: Column( // 垂直排列子组件
    mainAxisAlignment: MainAxisAlignment.center, // 垂直方向居中
    children: <Widget>[
      const Text('You have pushed...'), // 固定文本
      Text(
        '$_counter', // 显示计数变量
        style: Theme.of(context).textTheme.headlineMedium, // 使用默认的大标题样式
      ),
    ],
  ),
),
四:学习建议
-
Widget 是积木:Flutter 也就是在拼积木。Text、Center、Column 都是积木。
-
Stateless vs Stateful:
-
如果页面只是展示静态内容(如“关于我们”),用 StatelessWidget。
-
如果页面有交互、数据会变(如“计数器”、“登录页”),用 StatefulWidget。
-
-
样式优先级:就像 CSS 一样,就近原则。
-
MyApp 里的 theme 是全局样式。
-
具体 Widget(如 AppBar)里的属性是局部样式,会覆盖全局样式。
-
五:真机热更快捷键
R键,可热重载。减少了必须要的操作重复编译,方便快捷,(注意:仅UI更新)
欢迎加入开源鸿蒙跨平台社区 https://openharmonycrossplatform.csdn.net

有“AI”的1024 = 2048,欢迎大家加入2048 AI社区
更多推荐
 34
34 0
0- 0


 已为社区贡献2条内容

所有评论(0)