【Laya】在LayaAir 3.3 中实现图片文字渐变效果(Canvas)
ImageGradientComponent是LayaAir的图片/文本渐变遮罩组件,支持两种模式:遮罩图模式(使用灰度图控制渐变)和代码渐变模式(垂直渐变)。提供丰富的参数配置,包括顶部/底部颜色、强度和平铺选项。支持通过IDE可视化配置或代码动态设置,可实现火焰、海洋等多种渐变效果。组件自动监听文本变化,支持动态更新渐变色,兼容Web/原生平台,适用于UI美化需求。
·
ImageGradientComponent 图片渐变遮罩组件
简介
ImageGradientComponent 是一个 LayaAir 组件,用于为图片和文本添加渐变遮罩效果。支持两种模式:
- 遮罩图模式:使用灰度遮罩图控制渐变的应用范围和强度
- 代码渐变模式:无遮罩图时,使用代码生成垂直渐变
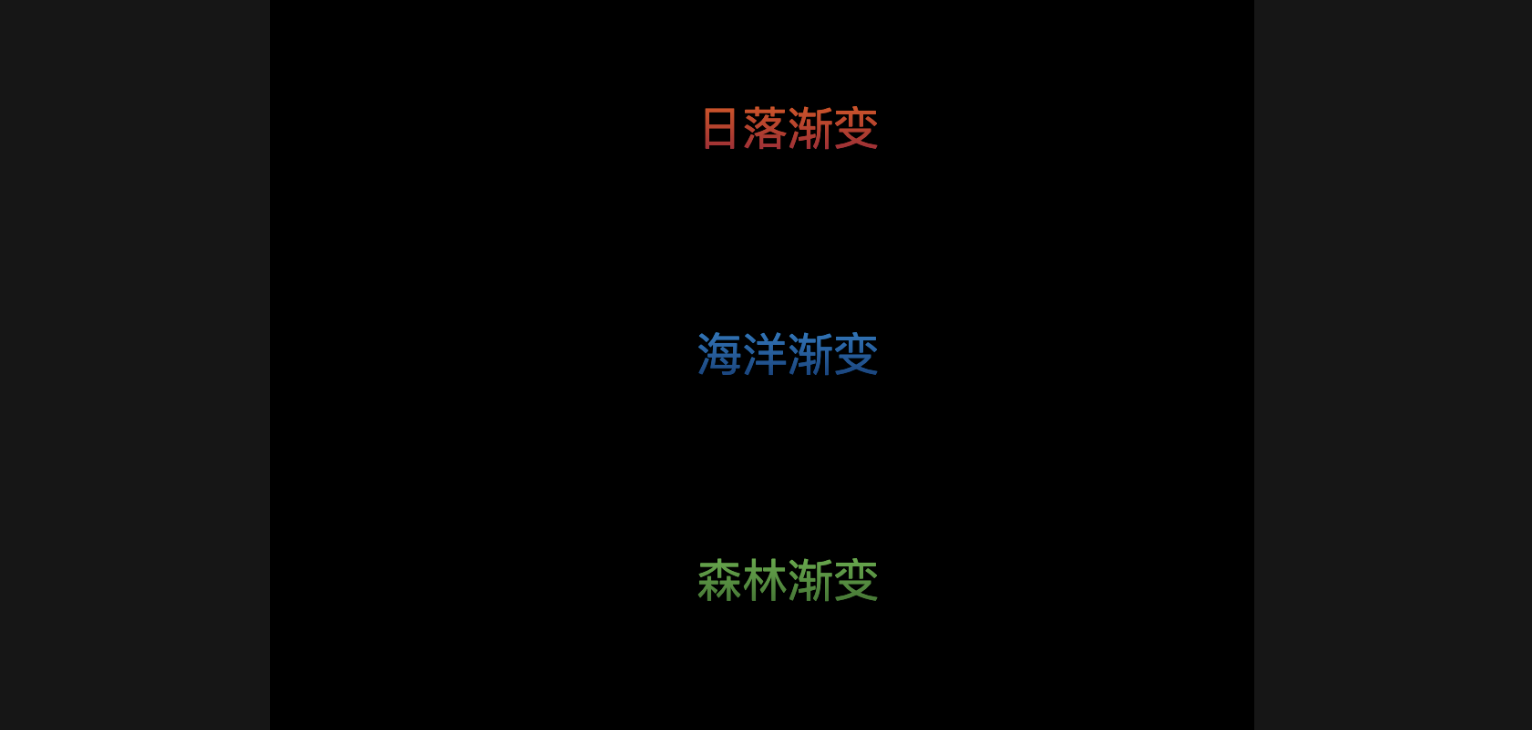
效果演示
参数说明
基础参数
| 参数名 | 类型 | 默认值 | 说明 |
|---|---|---|---|
maskTexture |
Texture | null | 遮罩图(灰度图),可在 IDE 中拖拽资源。为空时使用代码渐变 |
topColor |
Color | [1, 0.42, 0.21, 1] | 顶部渐变色 (RGBA,IDE中为0-1范围) |
bottomColor |
Color | [0, 0.31, 0.54, 1] | 底部渐变色 (RGBA,IDE中为0-1范围) |
strength |
Float | 0.8 | 渐变强度 (0=无效果, 1=完全应用渐变) |
tile |
Boolean | false | 遮罩图是否平铺 (false=拉伸填充, true=平铺重复) |
autoApply |
Boolean | true | 是否自动应用渐变 |
快速开始
方式一:在 IDE 中使用
- 选中 Image、Text 节点
- 添加组件 →
ImageGradientComponent - 在属性面板中配置参数:
- 拖拽遮罩图到
maskTexture(可选) - 设置
topColor和bottomColor - 调整
strength强度
- 拖拽遮罩图到
方式二:代码中使用(有遮罩图)
import { ImageGradientComponent } from "./ImageGradientComponent";

// 为 Image 添加渐变
const img = new Laya.Image();
img.skin = "resources/image.png";
Laya.stage.addChild(img);

// 加载遮罩图
Laya.loader.load("mask.png", Laya.Handler.create(this, (maskTex: Laya.Texture) => {
    const gradient = img.addComponent(ImageGradientComponent);
    gradient.maskTexture = maskTex;
    gradient.topColor = { r: 1, g: 0.42, b: 0.21, a: 1 };  // 橙色
    gradient.bottomColor = { r: 0, g: 0.31, b: 0.54, a: 1 }; // 深蓝色
    gradient.strength = 0.8;
    gradient.tile = false;  // 拉伸填充
}));
方式三:代码渐变(无遮罩图)
import { ImageGradientComponent } from "./ImageGradientComponent";

const img = new Laya.Image();
img.skin = "resources/image.png";
Laya.stage.addChild(img);

const gradient = img.addComponent(ImageGradientComponent);
// 不设置 maskTexture,自动使用代码渐变
gradient.topColor = { r: 1, g: 0.42, b: 0.21, a: 1 };
gradient.bottomColor = { r: 0, g: 0.31, b: 0.54, a: 1 };
gradient.strength = 0.8;
方式四:应用到文本
import { ImageGradientComponent } from "./ImageGradientComponent";

const text = new Laya.Text();
text.text = "渐变文字效果";
text.fontSize = 48;
text.width = 300;
text.height = 100;
text.align = "center";   // 水平居中
text.valign = "middle"; // 垂直居中
Laya.stage.addChild(text);

const gradient = text.addComponent(ImageGradientComponent);
gradient.topColor = { r: 1, g: 0.2, b: 0.5, a: 1 };   // 粉色
gradient.bottomColor = { r: 0.2, g: 0, b: 0.8, a: 1 }; // 紫色
gradient.strength = 1.0;
效果预设
火焰渐变
const gradient = img.addComponent(ImageGradientComponent);
gradient.topColor = { r: 1, g: 0.9, b: 0.2, a: 1 };   // 黄色
gradient.bottomColor = { r: 1, g: 0.2, b: 0, a: 1 };   // 红色
gradient.strength = 0.9;
海洋渐变
const gradient = img.addComponent(ImageGradientComponent);
gradient.topColor = { r: 0.2, g: 0.8, b: 1, a: 1 };    // 浅蓝
gradient.bottomColor = { r: 0, g: 0.1, b: 0.4, a: 1 };  // 深蓝
gradient.strength = 0.7;
森林渐变
const gradient = img.addComponent(ImageGradientComponent);
gradient.topColor = { r: 0.6, g: 0.9, b: 0.4, a: 1 };  // 嫩绿
gradient.bottomColor = { r: 0.1, g: 0.4, b: 0.1, a: 1 }; // 深绿
gradient.strength = 0.8;
夕阳渐变
const gradient = img.addComponent(ImageGradientComponent);
gradient.topColor = { r: 1, g: 0.5, b: 0.2, a: 1 };    // 橙色
gradient.bottomColor = { r: 0.6, g: 0.1, b: 0.4, a: 1 }; // 紫红
gradient.strength = 0.85;
黑白滤镜
const gradient = img.addComponent(ImageGradientComponent);
gradient.topColor = { r: 1, g: 1, b: 1, a: 1 };        // 白色
gradient.bottomColor = { r: 0, g: 0, b: 0, a: 1 };     // 黑色
gradient.strength = 0.5;  // 降低强度获得柔和效果
工作原理
遮罩图模式
当设置了 maskTexture 时,使用灰度遮罩图控制渐变效果:
原图像素     遮罩图亮度    渐变色      最终结果
─────────   ─────────   ─────────   ──────────
  [R,G,B]  ×    亮度     ×  渐变色   =   混合色
                 ↑
        0 = 无渐变效果
        1 = 完全应用渐变
像素混合公式:
result = original + (gradient - original) × maskBrightness × strength
遮罩亮度计算(亮度公式):
brightness = (R × 0.299 + G × 0.587 + B × 0.114) / 255
代码渐变模式
当未设置 maskTexture 时,使用代码生成垂直渐变:
渐变计算:
对于每个像素 (x, y):
    t = y / height                    // 归一化位置 (0~1)
    gradient = topColor + (bottomColor - topColor) × t
    result = original + (gradient - 128) × strength
图示:
顶部颜色 (topColor)
    │
    │ ← 渐变过渡
    │
    │
底部颜色 (bottomColor)
文本处理流程
1. 在 Canvas 上绘制文本
   ↓
2. 获取文本像素数据(getImageData)
   ↓
3. 根据渐变色/遮罩图混合像素
   ↓
4. 将处理后的图像绘制到 Text.graphics
动态更新
修改文本后刷新
const text = new Laya.Text();
const gradient = text.addComponent(ImageGradientComponent);

// 修改文本
text.text = "新的内容";

// 方式一:自动刷新(组件已监听 CHANGE 事件)
// 无需手动调用

// 方式二:手动刷新
gradient.refresh();
动态更改渐变色
const gradient = img.getComponent(ImageGradientComponent) as ImageGradientComponent;

// 更改颜色
gradient.topColor = { r: 1, g: 0, b: 0, a: 1 };
gradient.bottomColor = { r: 0, g: 0, b: 1, a: 1 };

// 重新应用
gradient.refresh();
跨平台兼容性
| 平台 | 兼容性 | 说明 |
|---|---|---|
| Web 浏览器 | ✅ 完全支持 | 使用 Canvas 2D API |
| 移动端 WebView | ✅ 支持 | 现代浏览器均支持 |
| 微信小游戏 | ⚠️ 部分支持 | toDataURL 可能有安全限制 |
| 其他小游戏平台 | ⚠️ 需要适配 | 取决于平台 Canvas 支持 |
注意事项
-
遮罩图要求:
- 推荐使用灰度图(亮度更直观)
- PNG 格式,支持透明通道
- 亮度越高,渐变效果越明显
-
性能考虑:
- 像素操作在大尺寸图片上可能影响性能
- 建议图片尺寸不超过 2048×2048
- 文本内容变化时会自动防抖(100ms 延迟)
-
资源加载:
- 图片资源需配置 CORS 以支持跨域
- 遮罩图需要在组件应用前加载完成
-
文本限制:
- Text 组件修改文本后渐变会自动刷新
- 仅支持单行文本的渐变效果
-
颜色格式:
- IDE 中颜色值为 0-1 范围
- 代码中可直接使用对象格式
{r, g, b, a} - 也支持十六进制字符串
"#FF6B35"
常见问题
Q: 为什么图片没有变化?
A: 检查以下几点:
autoApply是否为truestrength值是否为 0- 遮罩图是否正确加载
- 原图是否有透明区域
Q: 遮罩图效果不明显?
A: 尝试:
- 增加
strength值(接近 1.0) - 检查遮罩图的亮度分布
- 使用对比度更大的渐变色
Q: 文本渐变后不显示?
A: 确保:
- Text 组件已设置
width和height - 文本内容不为空
- 颜色值在有效范围内(0-1)
Q: 如何制作遮罩图?
A: 遮罩图制作建议:
┌─────────────┐
│  ████       │  ← 顶部:高亮度(白色)
│  ██████     │
│  ████████   │  ← 中部:中亮度(灰色)
│  ██████████ │
│  ███████████│  ← 底部:低亮度(黑色)
└─────────────┘
Q: 代码渐变和遮罩图模式有什么区别?
A:
| 特性 | 代码渐变 | 遮罩图渐变 |
|---|---|---|
| 渐变形状 | 线性垂直 | 由遮罩图决定 |
| 灵活度 | 低 | 高 |
| 性能 | 较快 | 较慢 |
| 适用场景 | 简单渐变 | 复杂/不规则渐变 |
源码详解
组件结构
@regClass()
export class ImageGradientComponent extends Laya.Component {
    // 属性定义
    @property({type: Laya.Texture}) maskTexture: Laya.Texture | null = null;
    @property({type: "Color"}) topColor: any = {r: 255, g: 107, b: 53, a: 1};
    @property({type: "Color"}) bottomColor: any = {r: 0, g: 78, b: 137, a: 1};
    @property({type: Number}) strength: number = 0.8;
    @property({type: Boolean}) tile: boolean = false;
    @property({type: Boolean}) autoApply: boolean = true;
}
装饰器说明:
@regClass()- LayaAir 3.x 组件注册装饰器,使组件在 IDE 中可见@property()- 属性装饰器,定义可在 IDE 属性面板中编辑的属性
生命周期方法
onAwake()
onAwake() {
    if (this.autoApply) {
        this.apply();  // 自动应用渐变
    }
    // 监听文本变化(Text/Label 专用)
    if (this.owner instanceof Laya.Text || this.owner instanceof Laya.Label) {
        this.owner.on(Laya.Event.CHANGE, this, this.onTextChanged);
    }
}
执行时机:组件加载时自动调用
功能:
- 根据
autoApply决定是否自动应用渐变 - 为文本组件添加
CHANGE事件监听
核心方法:apply()
apply() {
    Laya.timer.callLater(this, () => {
        // 1. 判断组件类型
        if (this.owner instanceof Laya.Text || this.owner instanceof Laya.Label) {
            // 文本处理流程
            return;
        }

        // 2. 判断是否有遮罩图
        if (!this.maskTexture) {
            this.applyCodeGradient();  // 代码渐变
            return;
        }

        // 3. 获取纹理
        let texture = ownerAny.texture;
        if (!texture && ownerAny._graphics) {
            texture = ownerAny._graphics.texture;  // 从 AutoBitmap 获取
        }

        // 4. 应用渐变
        this.applyWithTexture(texture);
    });
}
流程图:
apply()
    │
    ├─ Text/Label? ──Yes→ applyToText() / applyToTextWithoutMask()
    │                │
    │                └─No
    │
    ├─ 无遮罩图? ────Yes→ applyCodeGradient()
    │                  │
    │                  └─No
    │
    └─ applyWithTexture() → processWithMask() → doProcessWithMask()
像素处理核心算法
代码渐变模式 (doCodeGradient)
private doCodeGradient(sprite: Laya.Sprite, img: HTMLImageElement, width: number, height: number) {
    const canvas = document.createElement('canvas');
    const ctx = canvas.getContext('2d', {willReadFrequently: true})!;

    // 1. 绘制原图到 Canvas
    ctx.drawImage(img, 0, 0, actualWidth, actualHeight);
    const imageData = ctx.getImageData(0, 0, actualWidth, actualHeight);
    const data = imageData.data;

    // 2. 解析渐变色
    const c1 = this.parseColor(this.topColor);    // {r, g, b}
    const c2 = this.parseColor(this.bottomColor); // {r, g, b}

    // 3. 逐像素处理
    for (let y = 0; y < actualHeight; y++) {
        const t = y / actualHeight;  // 归一化位置 0~1
        const gradR = c1.r + (c2.r - c1.r) * t;  // 线性插值
        const gradG = c1.g + (c2.g - c1.g) * t;
        const gradB = c1.b + (c2.b - c1.b) * t;

        for (let x = 0; x < actualWidth; x++) {
            const i = (y * actualWidth + x) * 4;  // 像素索引
            const alpha = data[i + 3];

            if (alpha > 0) {  // 只处理非透明像素
                const r = data[i];
                const g = data[i + 1];
                const b = data[i + 2];

                // 核心混合公式
                data[i]     = r + (gradR - 128) * strength;
                data[i + 1] = g + (gradG - 128) * strength;
                data[i + 2] = b + (gradB - 128) * strength;
            }
        }
    }

    // 4. 写回 Canvas
    ctx.putImageData(imageData, 0, 0);
}
算法图解:
渐变色计算(线性插值):
    gradR = c1.r + (c2.r - c1.r) × t
           ↑          ↑
        顶部色     底部色与顶部色的差

    当 t = 0 (顶部): gradR = c1.r
    当 t = 1 (底部): gradR = c2.r
    当 t = 0.5      : gradR = c1.r + (c2.r - c1.r) × 0.5 (中间值)

混合公式:
    result = original + (gradient - 128) × strength

    gradient - 128 的含义:
    - gradient < 128 → 负值 → 使原图变暗
    - gradient > 128 → 正值 → 使原图变亮
    - gradient = 128 → 零   → 保持原图
遮罩图模式 (doProcessWithMask)
private doProcessWithMask(...) {
    // 1. 绘制原图
    ctx.drawImage(sourceImg, 0, 0, actualWidth, actualHeight, 0, 0, actualWidth, actualHeight);
    const originalData = ctx.getImageData(0, 0, actualWidth, actualHeight);

    // 2. 绘制遮罩图(根据 tile 参数决定拉伸或平铺)
    if (this.tile) {
        maskCanvas.width = maskImg.width;
        maskCanvas.height = maskImg.height;
        maskCtx.drawImage(maskImg, 0, 0);  // 平铺:保持原尺寸
    } else {
        maskCanvas.width = actualWidth;
        maskCanvas.height = actualHeight;
        maskCtx.drawImage(maskImg, 0, 0, actualWidth, actualHeight);  // 拉伸
    }
    const maskData = maskCtx.getImageData(...);

    // 3. 逐像素处理
    for (let y = 0; y < actualHeight; y++) {
        const t = y / actualHeight;
        const gradR = c1.r + (c2.r - c1.r) * t;
        // ...

        for (let x = 0; x < actualWidth; x++) {
            const i = (y * actualWidth + x) * 4;

            if (alpha > 0) {
                // 获取遮罩值(平铺模式下使用取模运算)
                const maskX = x % maskCanvas.width;
                const maskY = y % maskCanvas.height;
                const maskI = (maskY * maskCanvas.width + maskX) * 4;

                // 计算遮罩亮度
                const maskBrightness = (
                    maskData.data[maskI] * 0.299 +
                    maskData.data[maskI + 1] * 0.587 +
                    maskData.data[maskI + 2] * 0.114
                ) / 255;

                // 混合原图和渐变色
                result[i] = origR + (gradR - origR) * maskBrightness * strength;
            }
        }
    }
}
遮罩平铺示意:
原图:遮罩图
┌─────────┐    ┌───┐
│         │    │███│
│ 512×313 │    │░░░│
│         │    │▓▓▓│
└─────────┘    └───┘
              64×64

平铺模式 (tile=true):
┌─────────┐
│███░░░▓▓▓│  遮罩图重复
│███░░░▓▓▓│
│███░░░▓▓▓│
└─────────┘

拉伸模式 (tile=false):
┌─────────┐
│█████████│  遮罩图拉伸
│░░░░░░░░░│  填充整个
│▓▓▓▓▓▓▓▓▓│  图像
└─────────┘
颜色解析 (parseColor)
private parseColor(color: any): { r: number, g: number, b: number } {
    if (color && typeof color === "object" && color.r !== undefined) {
        // IDE 颜色对象:{r: 1, g: 0.42, b: 0.21, a: 1}
        // 范围是 0-1,需要转换为 0-255
        const r = Math.floor(color.r * 255);
        const g = Math.floor(color.g * 255);
        const b = Math.floor(color.b * 255);
        return {r, g, b};
    }
    if (typeof color === "string") {
        // 十六进制字符串:"#FF6B35"
        const r = parseInt(color.slice(1, 3), 16);
        const g = parseInt(color.slice(3, 5), 16);
        const b = parseInt(color.slice(5, 7), 16);
        return {r, g, b};
    }
    return {r: 0, g: 0, b: 0};
}
颜色格式转换:
IDE 输入 (0-1)          Canvas 输出 (0-255)
─────────────────      ─────────────────
{r: 1,   g: 1,   b: 1}  →  {r: 255, g: 255, b: 255} (白色)
{r: 0,   g: 0,   b: 0}  →  {r: 0,   g: 0,   b: 0}   (黑色)
{r: 1,   g: 0.5, b: 0}  →  {r: 255, g: 128, b: 0}   (橙色)
文本处理流程
private applyToTextWithoutMask() {
    // 1. 获取文本属性
    const text = textComp.text;
    const font = textComp.font;
    const fontSize = textComp.fontSize;
    const align = textComp.align;    // left, center, right
    const valign = textComp.valign;  // top, middle, bottom

    // 2. 创建 Canvas 并绘制白色文本
    const canvas = document.createElement('canvas');
    const ctx = canvas.getContext('2d', {willReadFrequently: true})!;
    ctx.font = `${fontSize}px ${font}`;
    ctx.fillStyle = '#FFFFFF';  // 白色文本

    // 3. 计算对齐位置
    let x = 0, y = 0;
    if (align === 'center') x = (compWidth - textWidth) / 2;
    if (align === 'right') x = compWidth - textWidth;
    if (valign === 'middle') y = (compHeight - textHeight) / 2;
    if (valign === 'bottom') y = compHeight - textHeight;

    ctx.fillText(text, x, y);

    // 4. 获取像素并应用渐变
    const imageData = ctx.getImageData(0, 0, compWidth, compHeight);
    // ... 像素处理 ...

    // 5. 将结果绘制到 Text.graphics
    const dataUrl = canvas.toDataURL();
    Laya.loader.load(dataUrl, Laya.Handler.create(this, (tex: Laya.Texture) => {
        textComp.graphics.clear();
        textComp.graphics.drawTexture(tex, 0, 0);
    }));
}
文本对齐计算图示:
水平对齐 (align):
┌─────────────────┐
│left    center   │right
│●                │        ●
│         ●       │                ●
└─────────────────┴────────────────

垂直对齐 (valign):
┌───────┐
│   top │  ●
│middle │     ●
│bottom │        ●
└───────┘
关键技术点
1. willReadFrequently 优化
const ctx = canvas.getContext('2d', {willReadFrequently: true})!;
作用:告诉浏览器将频繁调用 getImageData(),浏览器会优化存储格式以提升读取性能。
2. 防抖处理
onTextChanged() {
    if (this._refreshTimer) {
        Laya.timer.clear(this, this._refreshTimer);
    }
    this._refreshTimer = Laya.timer.once(100, this, this.apply);
}
作用:文本快速变化时,避免频繁执行像素操作,100ms 内只执行最后一次。
3. 纹理获取兼容性
let texture = ownerAny.texture;
if (!texture && ownerAny._graphics) {
    texture = ownerAny._graphics.texture;  // Image 组件的 AutoBitmap
}
if (!texture && ownerAny.skin) {
    texture = Laya.Loader.getRes(ownerAny.skin);  // 从缓存获取
}
支持场景:
- Sprite 直接赋值 texture
- Image 组件使用 skin 属性
- Label 组件(使用 Text 子节点)
4. 原图尺寸处理
// 使用原图的实际尺寸,而不是 texture 报告的尺寸
const actualWidth = sourceImg.width;
const actualHeight = sourceImg.height;
原因:LayaAir 的 texture 可能来自图集(Atlas),texture.width 是裁剪后的尺寸,而 sourceImg 是完整原图。
API 参考
属性
| 属性 | 类型 | 说明 |
|---|---|---|
maskTexture |
Texture | null | 遮罩纹理 |
topColor |
any | 顶部颜色 {r,g,b,a} |
bottomColor |
any | 底部颜色 {r,g,b,a} |
strength |
number | 渐变强度 0-1 |
tile |
boolean | 遮罩图平铺模式 |
autoApply |
boolean | 自动应用 |
方法
| 方法 | 参数 | 说明 |
|---|---|---|
refresh() |
- | 手动刷新渐变效果 |
apply() |
- | 应用渐变到目标对象 |

有“AI”的1024 = 2048,欢迎大家加入2048 AI社区
更多推荐

 23
23 0
0- 0


 已为社区贡献35条内容

所有评论(0)