LNMP【web架构】
nginx—LNMP架构
LNMP Web 架构 是一种广泛使用的开源 Web 服务技术栈,其名称由四个核心组件的首字母组成:
- L:Linux(操作系统)
- N:Nginx(Web 服务器 / 反向代理)
- M:MySQL 或 MariaDB(关系型数据库)
- P:PHP(服务器端脚本语言)
LNMP 架构工作流程
用户浏览器
     ↓ (HTTP/HTTPS 请求)
   Nginx(接收请求,静态资源直接返回)
     ↓(动态请求如 .php)
   PHP-FPM(处理 PHP 脚本)
     ↓(如需读写数据)
   MySQL / MariaDB(存储和查询数据)
     ↑
   PHP 将结果返回给 Nginx
     ↓
   Nginx 返回 HTML/JSON 给用户
源代码编译安装php+nginx+mariadb
| 组件 | 版本 |
|---|---|
| Nginx | 1.16.1 |
| PHP | 7.4 |
更新yum源
编译安装nginx
-
修改linux的软硬件限制文件
-
在centos7上边安装源码包所需要的依赖包
[root@hcss-ecs-3f4b yum.repos.d]# yum -y install wget openssl* gcc gcc-c++ autoconf libjpeg libjpeg-devel libpng libpng-devel freetype freetype-devel libxml2 libxml2-devel zlib zlib-devel glibc glibc-devel glib2 glib2-devel bzip2 bzip2-devel ncurses ncurses-devel curl curl-devel e2fsprogs e2fsprogs-devel krb5-server.x86_64 krb5-devel.x86_64 libidn libidn-devel openssl openssl-devel openldap openldap-devel nss_ldap openldap-clients openldap-servers make gd.x86_64 gd-devel.x86_64 libaio
Loaded plugins: fastestmirror
Loading mirror speeds from cached hostfile
base                                                                                         | 3.6 kB  00:00:00
- 下载nginx源码包
[root@hcss-ecs-3f4b yum.repos.d]# wget http://nginx.org/download/nginx-1.16.1.tar.gz
--2026-01-12 22:56:08--  http://nginx.org/download/nginx-1.16.1.tar.gz
Resolving nginx.org (nginx.org)... 52.58.199.22, 2a05:d014:5c0:2601::6, 2a05:d014:5c0:2600::6
Connecting to nginx.org (nginx.org)|52.58.199.22|:80... connected.
HTTP request sent, awaiting response... 200 OK
Length: 1032630 (1008K) [application/octet-stream]
Saving to: ‘nginx-1.16.1.tar.gz’

100%[==========================================================================>] 1,032,630   19.3KB/s   in 53s

2026-01-12 22:57:02 (18.9 KB/s) - ‘nginx-1.16.1.tar.gz’ saved [1032630/1032630]
- 下载第三方模块
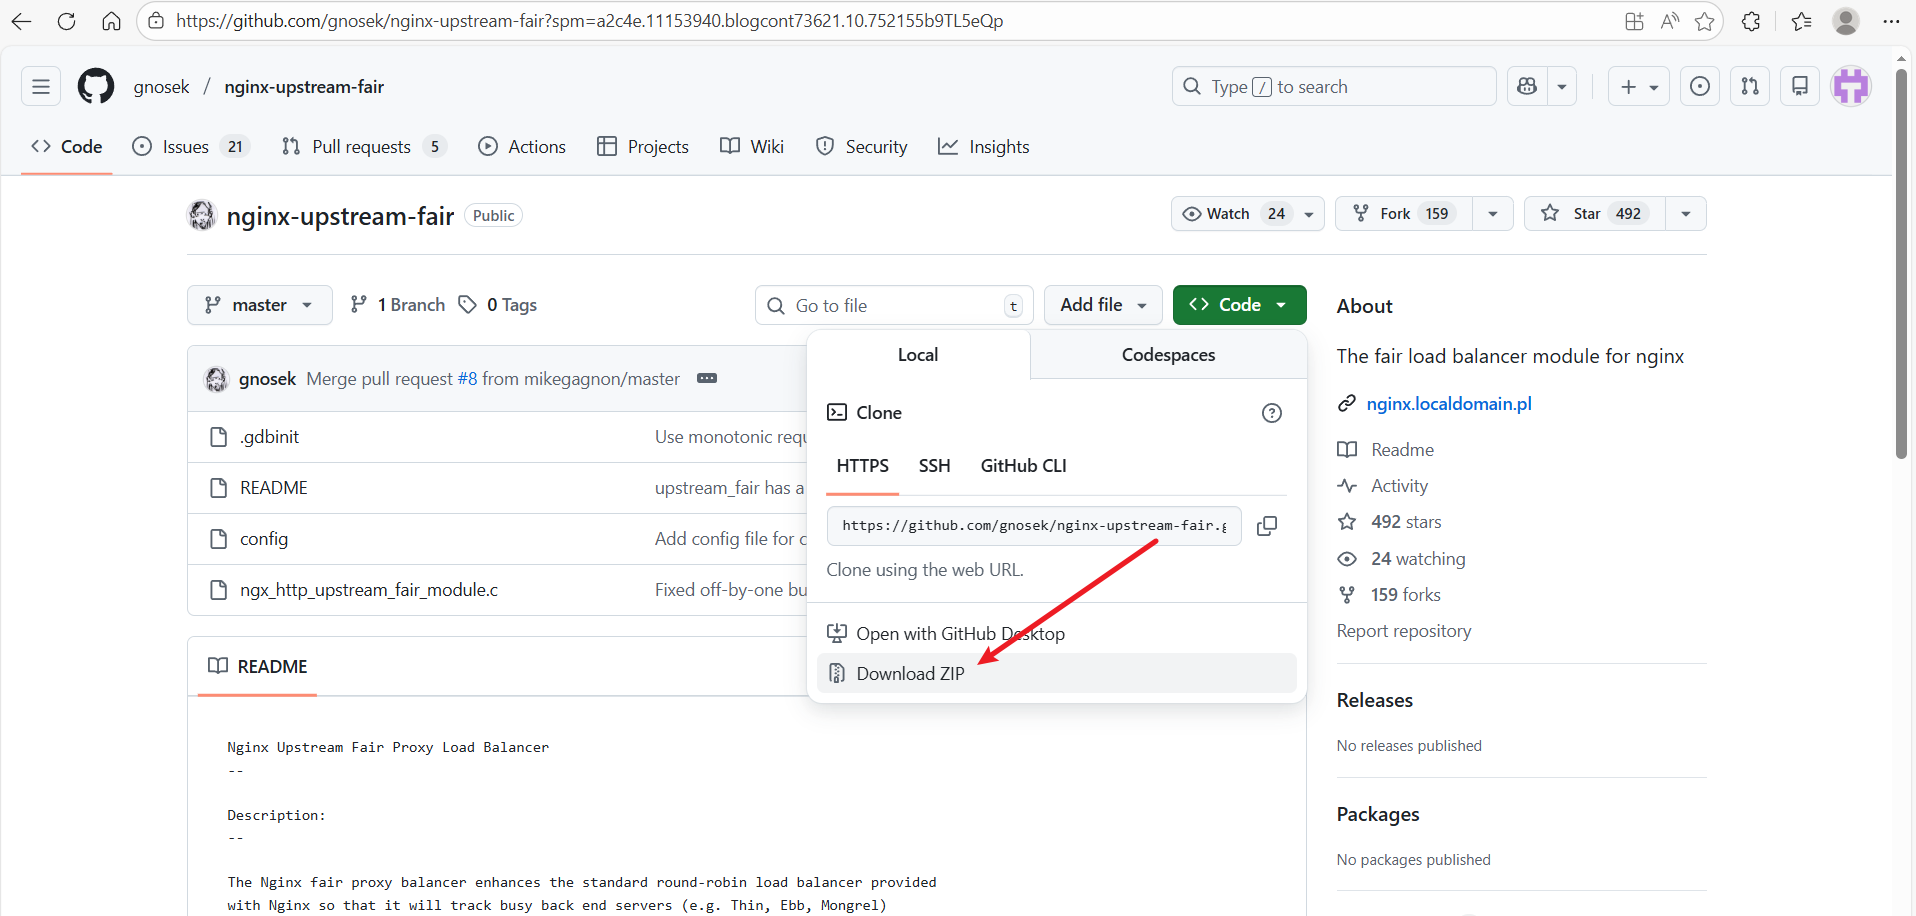
下载链接:https://github.com/gnosek/nginx-upstream-fair?spm=a2c4e.11153940.blogcont73621.10.752155b9TL5eQp
nginx-upstream-fair 是一个 第三方 Nginx 模块,用于实现 “公平”(Fair)的负载均衡策略,即根据后端服务器的响应时间动态分配请求,而不是简单地轮询,因为本次需要使用到他,所以就一起下载到本地,并一起编译了。
- 创建一个运行nginx和php的用户
在生产环境中,因为root用户权限过大,往往不会使用root用户直接运行三方程序,所以这里需要单独建立一个用户用来运行nginx和php。
/usr/sbin/groupadd www && /usr/sbin/useradd -s /sbin/nologin -g www www - 上传nginx-upstream-fair模块包到服务器并解压
我这里将nginx-upstream-fair 模块包上传到了/usr/local并进行解压缩的操作
[root@hcss-ecs-3f4b local]# ls
bin  games      include  lib64    nginx-1.16.1.tar.gz             sbin   src       uniagentd
etc  hostguard  lib      libexec  nginx-upstream-fair-master.zip  share  uniagent
[root@hcss-ecs-3f4b local]# unzip nginx-upstream-fair-master.zip
Archive:  nginx-upstream-fair-master.zip
a18b4099fbd458111983200e098b6f0c8efed4bc
   creating: nginx-upstream-fair-master/
  inflating: nginx-upstream-fair-master/.gdbinit
  inflating: nginx-upstream-fair-master/README
  inflating: nginx-upstream-fair-master/config
  inflating: nginx-upstream-fair-master/ngx_http_upstream_fair_module.c
[root@hcss-ecs-3f4b local]# ls
bin  games      include  lib64    nginx-1.16.1.tar.gz         nginx-upstream-fair-master.zip  share  uniagent
etc  hostguard  lib      libexec  nginx-upstream-fair-master  sbin                            src    uniagentd
[root@hcss-ecs-3f4b local]# pwd
/usr/local
[root@hcss-ecs-3f4b local]#
- 解压nginx
我这里将nginx也下载到了/usr/local下面,也是正常进行解压缩
[root@hcss-ecs-3f4b local]# tar -zxvf nginx-1.16.1.tar.gz
nginx-1.16.1/
nginx-1.16.1/auto/
- 编译nginx
命令:
./configure \
  --user=www \
  --group=www \
  --prefix=/usr/local/nginx \
  --with-http_stub_status_module \
  --with-http_ssl_module \
  --with-http_v2_module \
  --with-http_realip_module \
  --with-http_image_filter_module \
  --add-module=/usr/local/nginx-upstream-fair-master \
  --with-stream \
  --with-http_flv_module \
  --with-http_gzip_static_module \
  --with-pcre
| 参数 | 说明 |
|---|---|
--user=www | 指定 Nginx 工作进程(worker processes)运行的用户为 www。提升安全性,避免以 root 运行。 |
--group=www | 指定 Nginx 工作进程运行的用户组为 www。需确保该用户和组已存在(通常通过 useradd -r -s /sbin/nologin -M www 创建)。 |
--prefix=/usr/local/nginx | 指定 Nginx 的安装目录。安装后,配置文件、日志、可执行文件等都会放在该目录下(如 /usr/local/nginx/conf/nginx.conf)。 |
--with-http_stub_status_module | 启用 Nginx 状态监控模块。可通过访问 http://your-domain/status 查看连接数、请求处理状态等(需在配置中开启 location /status { stub_status; })。 |
--with-http_ssl_module | 启用 HTTPS/SSL/TLS 支持。必须开启才能使用 listen 443 ssl; 和证书配置。 |
--with-http_v2_module | 启用 HTTP/2 协议支持(Nginx 1.9.5+ 内置)。提升现代浏览器加载性能。 |
--with-http_realip_module | 启用获取真实客户端 IP 模块。当 Nginx 前面有反向代理(如 CDN、LB)时,可通过 X-Forwarded-For 获取真实 IP。 |
--with-http_image_filter_module | 启用图片处理模块(如动态裁剪、缩放 JPEG/PNG/GIF)。依赖 GD 库,需系统安装 gd-devel。 |
--add-module=/usr/local/nginx-upstream-fair-master | 添加第三方模块:nginx-upstream-fair,实现基于响应时间的“公平”负载均衡(非官方模块,需提前下载源码)。 |
--with-stream | 启用 TCP/UDP 四层代理模块(stream{} 块),可用于代理 MySQL、Redis、DNS 等非 HTTP 服务。 |
--with-http_flv_module | 启用 FLV 视频流伪 streaming 支持(通过 ?start=xxx 跳转)。适用于老式 Flash 视频播放(现代已较少使用)。 |
--with-http_gzip_static_module | 启用预压缩 .gz 文件支持。如果存在 style.css.gz,且客户端支持 gzip,Nginx 会直接返回该文件,节省 CPU 压缩开销。 |
--with-pcre | 启用 PCRE(Perl Compatible Regular Expressions)库支持。用于 location、rewrite 等正则匹配。需系统已安装 pcre-devel。 |
[root@hcss-ecs-3f4b local]# cd nginx-1.16.1
[root@hcss-ecs-3f4b nginx-1.16.1]# ls
auto  CHANGES  CHANGES.ru  conf  configure  contrib  html  LICENSE  man  README  src
[root@hcss-ecs-3f4b nginx-1.16.1]#
[root@hcss-ecs-3f4b nginx-1.16.1]#
[root@hcss-ecs-3f4b nginx-1.16.1]# ./configure --user=www --group=www --prefix=/usr/local/nginx --with-http_stub_status_module --with-http_ssl_module  --with-http_v2_module --with-http_realip_module --with-http_image_filter_module --add-module=/usr/local/nginx-upstream-fair-master --with-stream --with-http_flv_module --with-http_gzip_static_module --with-pcre
checking for OS
 + Linux 3.10.0-1160.119.1.el7.x86_64 x86_64
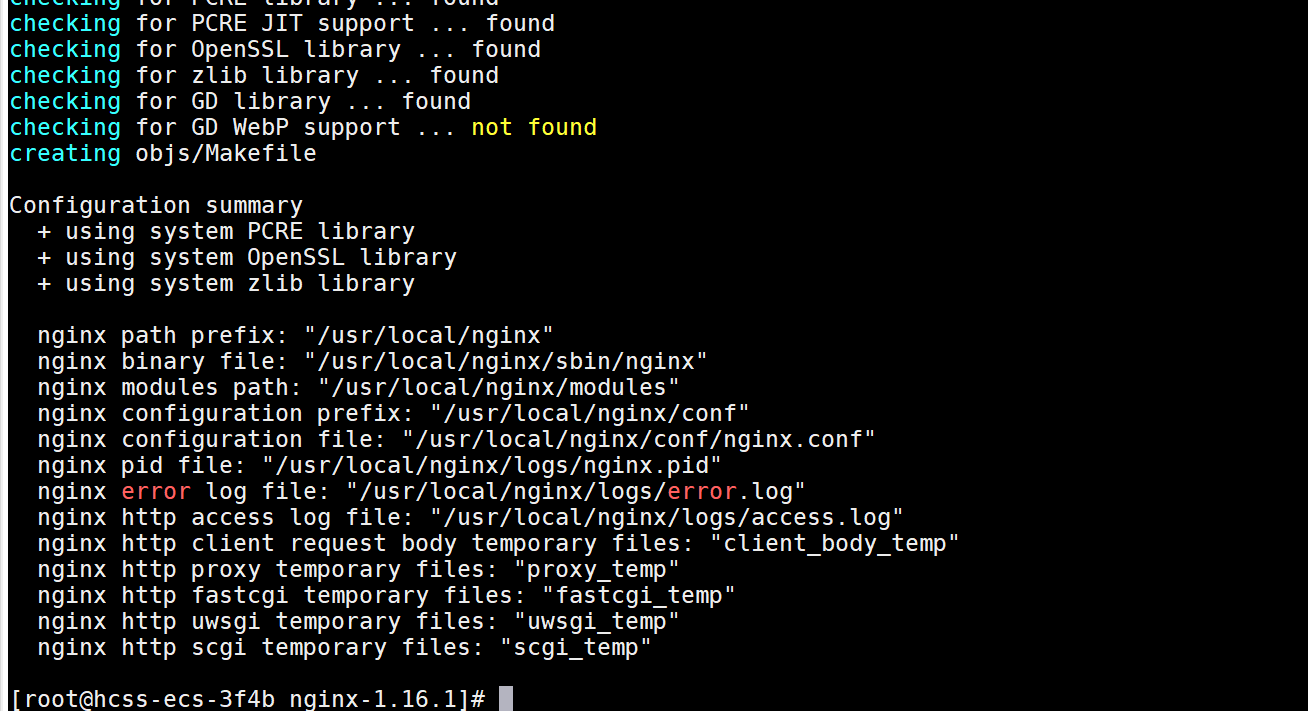
如下图,编译完成之后,如果没有报错的话,继续进行下一步即可。
接着进行编译make && make install
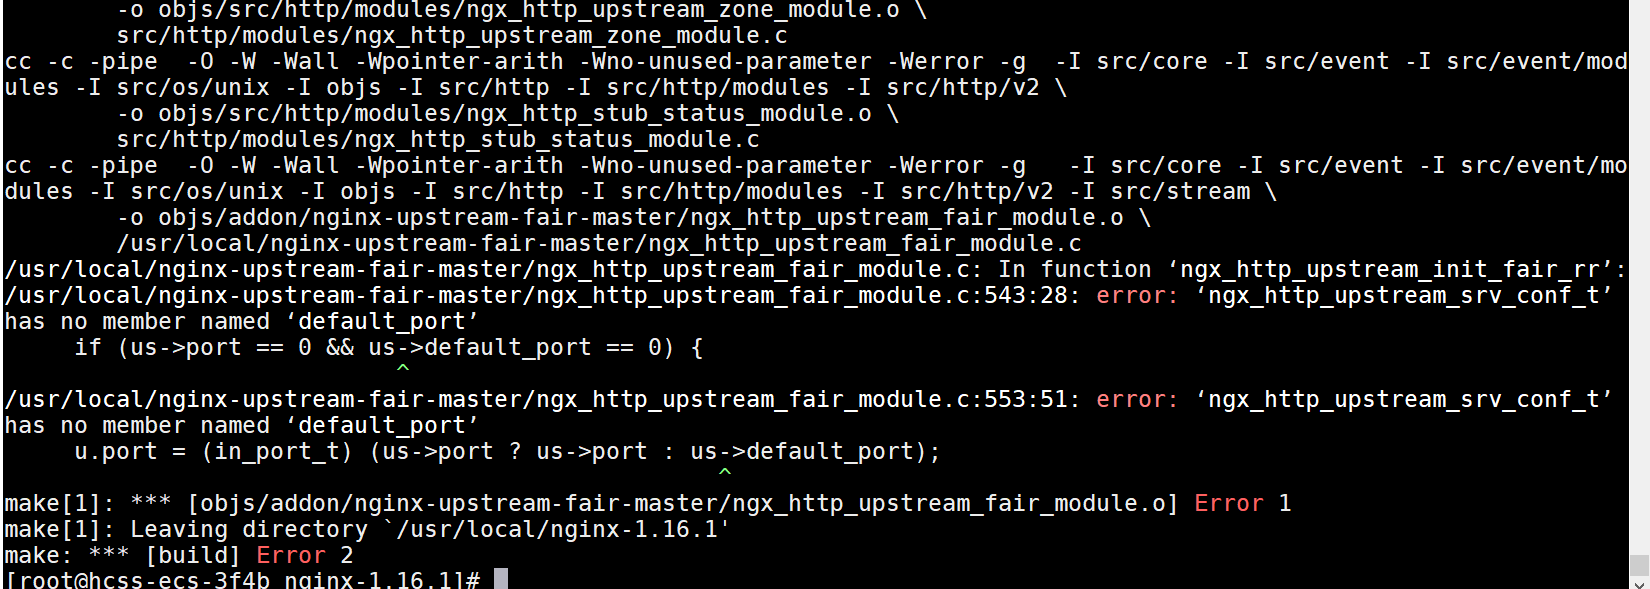
在进行make的时候,我这里报了一个错误,如下图,这是nginx的版本较高,所有的参数被取消,需要修改一下nginx中的配置文件。
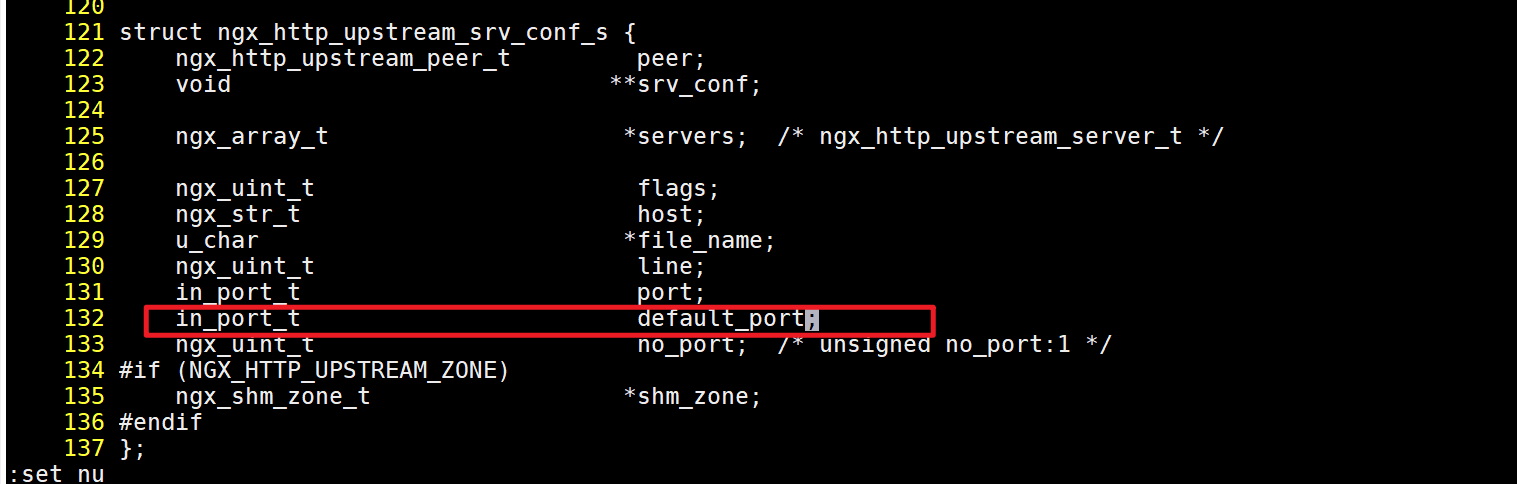
修改nginx目录中的src/http/ngx_http_upstream.h
添加:in_port_t default_port;
修改完之后,在进行make && make install编译就正常了。
- 编写nginx的启动单元
[root@hcss-ecs-3f4b nginx-1.16.1]# vim /usr/lib/systemd/system/nginx.service
[Unit]
Description=nginx - high performance web server
Documentation=https://nginx.org/en/docs/
After=network.target remote-fs.target nss-lookup.target

[Service]
Type=forking
PIDFile=/usr/local/nginx/logs/nginx.pid
ExecStartPre=/usr/local/nginx/sbin/nginx -t -c /usr/local/nginx/conf/nginx.conf
ExecStart=/usr/local/nginx/sbin/nginx -c /usr/local/nginx/conf/nginx.conf
ExecReload=/bin/kill -s HUP $MAINPID
ExecStop=/bin/kill -s QUIT $MAINPID
PrivateTmp=true

[Install]
WantedBy=multi-user.target
- 启动测试
使用systemctl daemon-reload和systemctl start nginx.service启动测试
[root@hcss-ecs-3f4b nginx-1.16.1]# systemctl daemon-reload
[root@hcss-ecs-3f4b nginx-1.16.1]# systemctl start nginx.service
[root@hcss-ecs-3f4b nginx-1.16.1]#
[root@hcss-ecs-3f4b nginx-1.16.1]#
[root@hcss-ecs-3f4b nginx-1.16.1]# systemctl  status nginx
● nginx.service - nginx - high performance web server
   Loaded: loaded (/usr/lib/systemd/system/nginx.service; disabled; vendor preset: disabled)
   Active: active (running) since Wed 2026-01-14 21:47:54 CST; 5s ago
     Docs: https://nginx.org/en/docs/
  Process: 2671 ExecStart=/usr/local/nginx/sbin/nginx -c /usr/local/nginx/conf/nginx.conf (code=exited, status=0/SUCCESS)
  Process: 2669 ExecStartPre=/usr/local/nginx/sbin/nginx -t -c /usr/local/nginx/conf/nginx.conf (code=exited, status=0/SUCCESS)
 Main PID: 2674 (nginx)
   CGroup: /system.slice/nginx.service
           ├─2674 nginx: master process /usr/local/nginx/sbin/nginx -c /usr/local/nginx/conf/nginx.conf
           └─2675 nginx: worker process

Jan 14 21:47:54 hcss-ecs-3f4b systemd[1]: Starting nginx - high performance web server...
Jan 14 21:47:54 hcss-ecs-3f4b nginx[2669]: nginx: the configuration file /usr/local/nginx/conf/nginx.conf sy...is ok
Jan 14 21:47:54 hcss-ecs-3f4b nginx[2669]: nginx: configuration file /usr/local/nginx/conf/nginx.conf test i...ssful
Jan 14 21:47:54 hcss-ecs-3f4b systemd[1]: Started nginx - high performance web server.
Hint: Some lines were ellipsized, use -l to show in full.
[root@hcss-ecs-3f4b nginx-1.16.1]# ss -luntp | grep  80
tcp    LISTEN     0      511       *:80                    *:*                   users:(("nginx",pid=2675,fd=6),("nginx",pid=2674,fd=6))
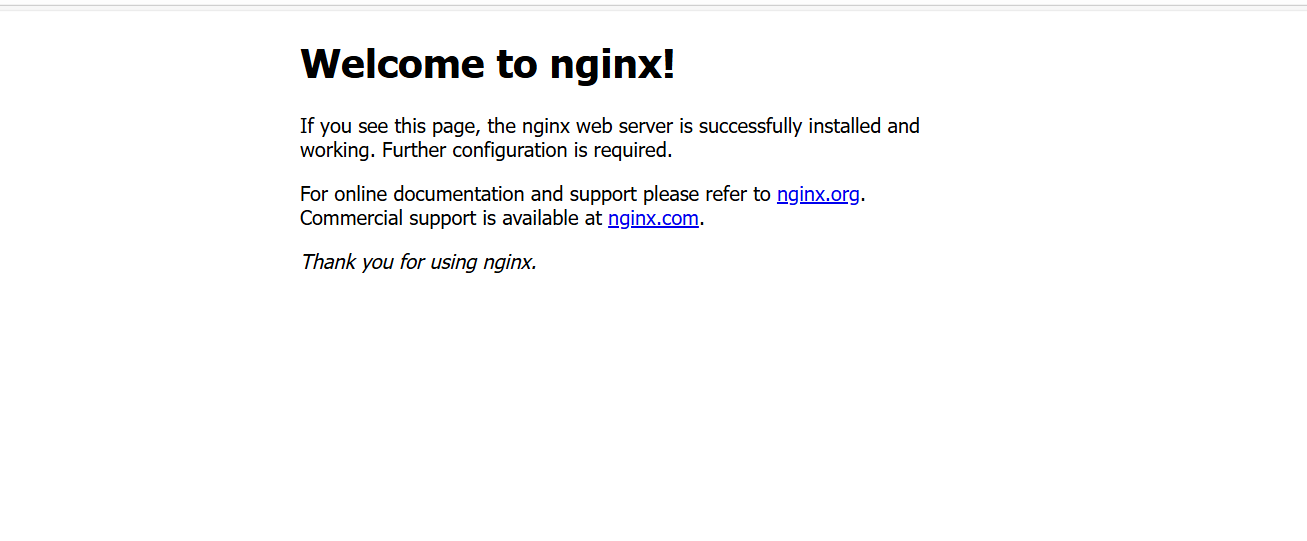
通过浏览器访问系统IP地址的80端口,如果能够出现nginx的欢迎页面,说明nginx安装成功。
编译安装PHP
php下载地址:https://www.php.net/distributions/php-7.4.3.tar.bz2
- 下载并解压php的安装包
我这里还是下载到了/usr/local/下面
[root@hcss-ecs-3f4b local]# wget https://www.php.net/distributions/php-7.4.3.tar.bz2
--2026-01-14 21:52:30--  https://www.php.net/distributions/php-7.4.3.tar.bz2
Resolving www.php.net (www.php.net)... 185.85.0.29
Connecting to www.php.net (www.php.net)|185.85.0.29|:443... connected.
HTTP request sent, awaiting response... 200 OK
Length: unspecified [application/x-bzip2]
Saving to: ‘php-7.4.3.tar.bz2’

[root@hcss-ecs-3f4b local]# tar -jxvf  php-7.4.3.tar.bz2
php-7.4.3/
php-7.4.3/buildconf.bat
php-7.4.3/azure-pipelines.yml
php-7.4.3/README.md
php-7.4.3/configure.ac
php-7.4.3/win32/
php-7.4.3/win32/sockets.c
php-7.4.3/win32/codepage.c
php-7.4.3/win32/php_stdint.h
php-7.4.3/win32/fnmatch.c
php-7.4.3/win32/sendmail.c
php-7.4.3/win32/grp.h
- 编译PHP
[root@hcss-ecs-3f4b local]# cd php-7.4.3
[root@hcss-ecs-3f4b php-7.4.3]# ./configure --prefix=/usr/local/php/php74 --enable-gd --with-curl --enable-fpm --enable-cgi --with-openssl --enable-mbstring --with-pdo-mysql --with-zlib --with-zip --with-mysqli --enable-opcache --enable-mysqlnd --with-libxml --with-jpeg --with-freetype --with-pdo-sqlite --with-sqlite3 --enable-cli --enable-shared --enable-exif
在编译的时候,遇到了以下几个报错
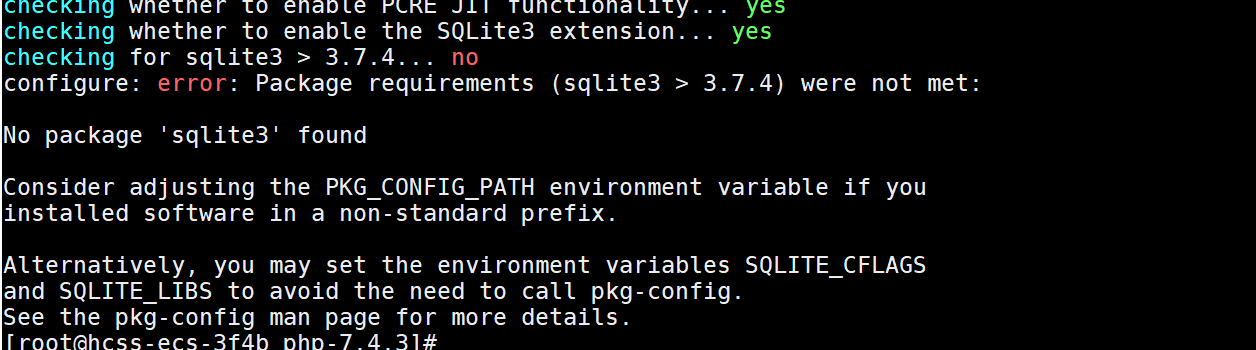
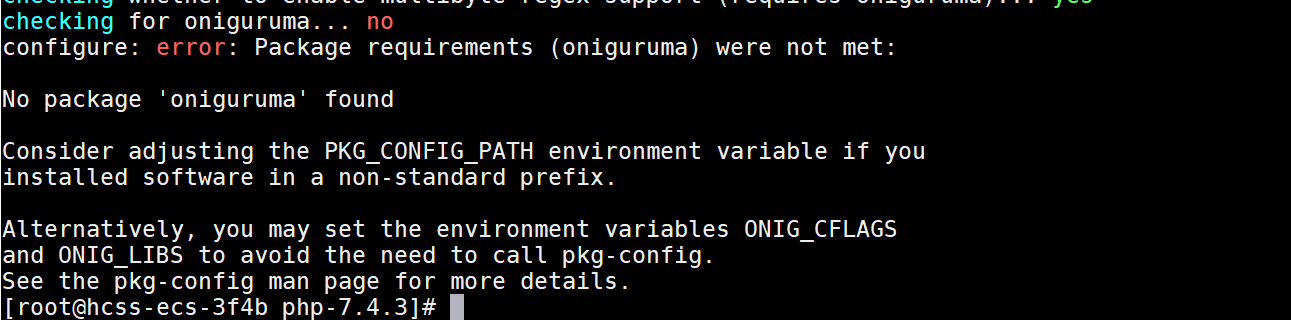
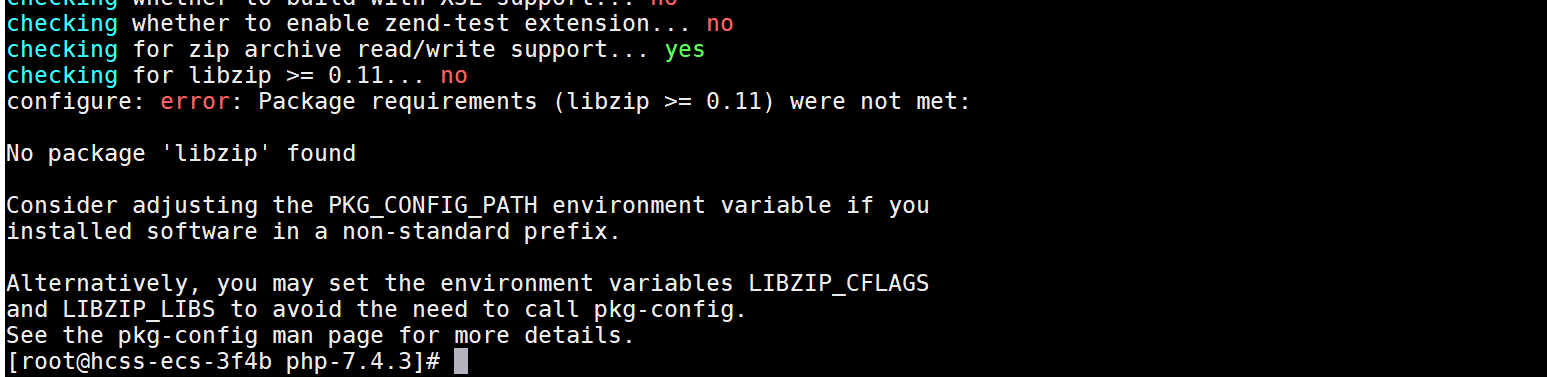
这里是因为缺少了软件包,使用yum安装即可
yum -y install libsqlite3-dev sqlite-devel
yum install oniguruma-devel
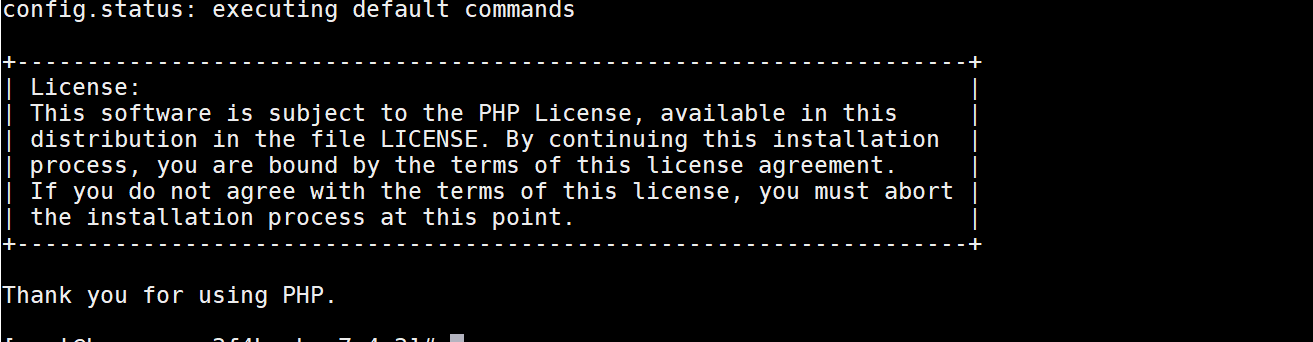
看见下面的信息就是安装成功了
- 安装php
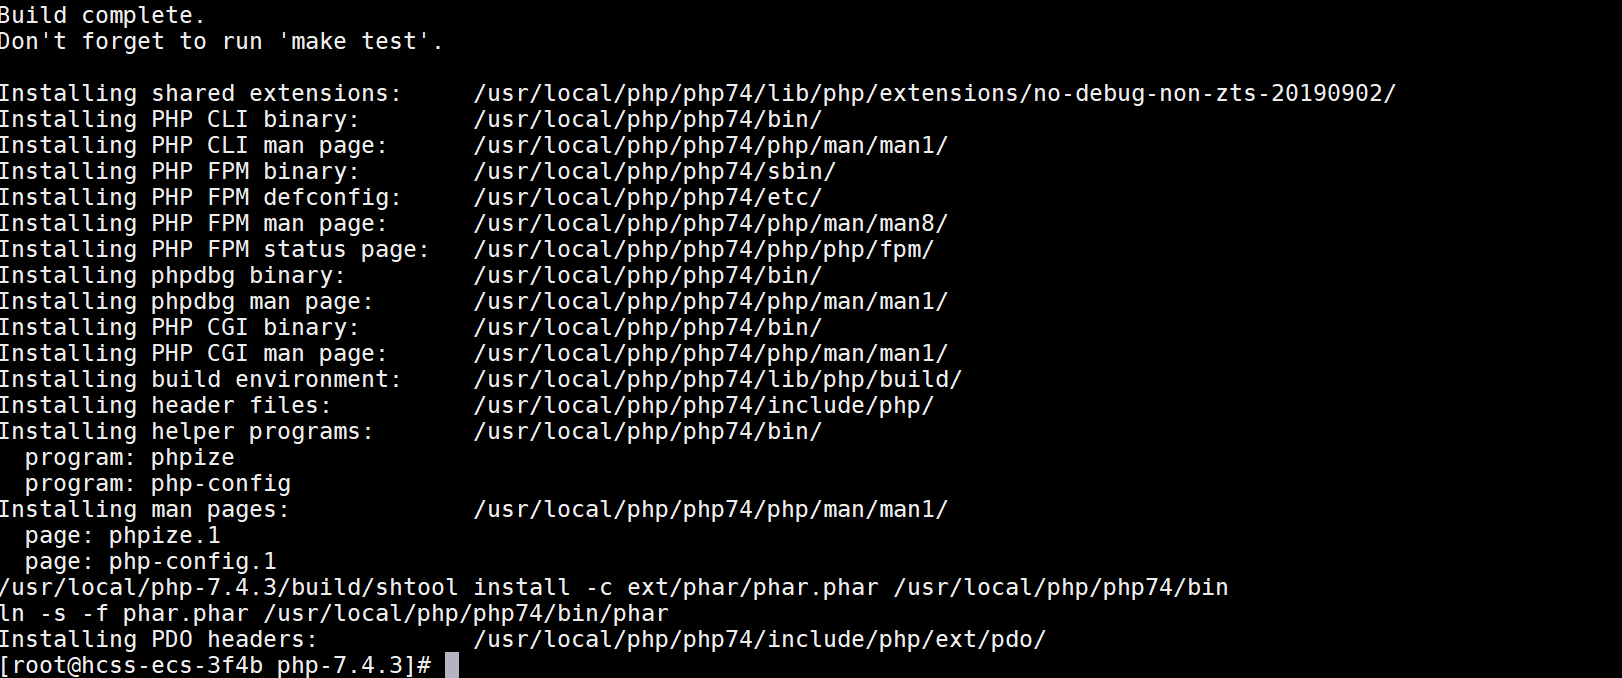
[root@hcss-ecs-3f4b php-7.4.3]# make && make install
- 复制php的配置文件到php的安装目录中
安装完成之后就在php的解压目录中进行复制
[root@hcss-ecs-3f4b php-7.4.3]# cp php.ini-development /usr/local/php/php74/lib/php.ini
[root@hcss-ecs-3f4b php-7.4.3]#
[root@hcss-ecs-3f4b php-7.4.3]# cd sapi/fpm
[root@hcss-ecs-3f4b fpm]# cp php-fpm.service /lib/systemd/system/php74-fpm.service
[root@hcss-ecs-3f4b fpm]# cp init.d.php-fpm /etc/init.d/php74-fpm
[root@hcss-ecs-3f4b fpm]# chmod 755 /etc/init.d/php74-fpm
[root@hcss-ecs-3f4b fpm]#
- 配置php-fpm
[root@hcss-ecs-3f4b fpm]# cd /usr/local/php/php74/etc/
[root@hcss-ecs-3f4b etc]# cp php-fpm.conf.default  ./php-fpm.conf
[root@hcss-ecs-3f4b etc]# cd  /usr/local/php/php74/etc/php-fpm.d
[root@hcss-ecs-3f4b php-fpm.d]# cp www.conf.default www.conf
- 设置php匿名用户与端口9000
[root@hcss-ecs-3f4b php-fpm.d]# vi /usr/local/php/php74/etc/php-fpm.d/www.conf
user = www
group = www
listen = 127.0.0.1:9000
php.ini的配置,把时区改为东八区,编辑php.ini:
[root@hcss-ecs-3f4b php-fpm.d]# vi /usr/local/php/php74/lib/php.ini
date.timezone = "Asia/Shanghai"
mysqli.default_socket = /var/lib/mysql/mysql.sock
pdo_mysql.default_socket= /var/lib/mysql/mysql.sock
- 扩展安装
wordpress需要用到imagick扩展
[root@hcss-ecs-3f4b local]# wget https://pecl.php.net/get/imagick-3.4.4.tgz
--2026-01-14 22:34:21--  https://pecl.php.net/get/imagick-3.4.4.tgz
Resolving pecl.php.net (pecl.php.net)... 185.85.0.29, 2a02:cb40:200::1ad
Connecting to pecl.php.net (pecl.php.net)|185.85.0.29|:443... connected.
HTTP request sent, awaiting response... 200 OK
Length: 253434 (247K) [application/octet-stream]
Saving to: ‘imagick-3.4.4.tgz’

100%[==========================================================================>] 253,434      241KB/s   in 1.0s

2026-01-14 22:34:25 (241 KB/s) - ‘imagick-3.4.4.tgz’ saved [253434/253434]

[root@hcss-ecs-3f4b local]# tar -xf imagick-3.4.4.tgz
[root@hcss-ecs-3f4b local]# cd imagick-3.4.4
[root@hcss-ecs-3f4b imagick-3.4.4]# yum -y install autoconf ImageMagick-devel
- 编译安装,以下命令在 imagick-3.4.4目录下执行
[root@hcss-ecs-3f4b imagick-3.4.4]# /usr/local/php/php74/bin/phpize
Configuring for:
PHP Api Version:         20190902
Zend Module Api No:      20190902
Zend Extension Api No:   320190902
[root@hcss-ecs-3f4b imagick-3.4.4]# ./configure --with-php-config=/usr/local/php/php74/bin/php-config --with-imagick=/usr/local/imagemagick
[root@hcss-ecs-3f4b imagick-3.4.4]# make && make install

- 启用扩展
在php.ini中配置启用扩展 vi /usr/local/php/php74/lib/php.ini ,可以在配置文件的最后两行添加
[root@hcss-ecs-3f4b imagick-3.4.4]# vi /usr/local/php/php74/lib/php.ini
extension_dir = "/usr/local/php/php74/lib/php/extensions/no-debug-non-zts-20190902/"
extension=imagick.so
- 编辑php-fpm的启动单元
[root@hcss-ecs-3f4b imagick-3.4.4]# vim /usr/lib/systemd/system/php-fpm.service
[Unit]
Description=The PHP FastCGI Process Manager
After=syslog.target network.target

[Service]
Type=simple
PIDFile=/usr/local/php/php74/var/run/php-fpm.pid
ExecStart=/usr/local/php/php74/sbin/php-fpm --nodaemonize --fpm-config /usr/local/php/php74/etc/php-fpm.conf
[Install]
WantedBy=multi-user.target
- 启动php-fpm
[root@hcss-ecs-3f4b imagick-3.4.4]# systemctl  daemon-reload
[root@hcss-ecs-3f4b imagick-3.4.4]# systemctl  start php-fpm
[root@hcss-ecs-3f4b imagick-3.4.4]# systemctl  enable php-fpm
Created symlink from /etc/systemd/system/multi-user.target.wants/php-fpm.service to /usr/lib/systemd/system/php-fpm.service.
[root@hcss-ecs-3f4b imagick-3.4.4]# netstat  -anop | grep 9000
tcp        0      0 127.0.0.1:9000          0.0.0.0:*               LISTEN      26445/php-fpm: mast  off (0.00/0/0)
[root@hcss-ecs-3f4b imagick-3.4.4]#
编译安装mariadb10.6.24
- 安装稳定版mariadb10.6.24添加安装源:
[root@hcss-ecs-3f4b imagick-3.4.4]# vim /etc/yum.repos.d/mariadb.repo
[mariadb]
name = MariaDB
baseurl = https://mirrors.tuna.tsinghua.edu.cn/mariadb/mariadb-10.6.24/yum/centos7-amd64/
gpgkey=http://yum.mariadb.org/RPM-GPG-KEY-MariaDB
gpgcheck=0
enabled=1
- 安装mariadb
[root@hcss-ecs-3f4b imagick-3.4.4]# yum install MariaDB-server.x86_64 MariaDB-client.x86_64 MariaDB-devel.x86_64
root@hcss-ecs-3f4b imagick-3.4.4]# systemctl start mariadb.service
[root@hcss-ecs-3f4b imagick-3.4.4]# systemctl enable mariadb.service
Created symlink from /etc/systemd/system/multi-user.target.wants/mariadb.service to /usr/lib/systemd/system/mariadb.service.
[root@hcss-ecs-3f4b imagick-3.4.4]#
- 重置数据库root用户密码:
#跳过权限表启动:
[root@hcss-ecs-3f4b log]# mysqld_safe --skip-grant-tables --skip-networking &
[root@hcss-ecs-3f4b log]# mysql  -u root
Welcome to the MariaDB monitor.  Commands end with ; or \g.
Your MariaDB connection id is 3
Server version: 10.6.19-MariaDB MariaDB Server

Copyright (c) 2000, 2018, Oracle, MariaDB Corporation Ab and others.

Type 'help;' or '\h' for help. Type '\c' to clear the current input statement.
MariaDB [(none)]> FLUSH PRIVILEGES;
Query OK, 0 rows affected (0.001 sec)

MariaDB [(none)]> ALTER USER 'root'@'localhost' IDENTIFIED BY 'root';
Query OK, 0 rows affected (0.000 sec)

MariaDB [(none)]> exit
Bye
使用ps -ef 的命令找出mariadb的进程pid号,将他们kill之后再启动mariadb数据库
[root@hcss-ecs-3f4b log]# ps -ef | grep mariadb
mysql    29924     1  0 23:04 pts/0    00:00:00 /usr/sbin/mariadbd --basedir=/usr --datadir=/var/lib/mysql --plugin-dir=/usr/lib64/mysql/plugin --user=mysql --skip-grant-tables --skip-networking --log-error=/var/lib/mysql/hcss-ecs-3f4b.err --pid-file=hcss-ecs-3f4b.pid
root     30726 32704  0 23:09 pts/0    00:00:00 grep --color=auto mariadb
[root@hcss-ecs-3f4b log]#
[root@hcss-ecs-3f4b log]#
[root@hcss-ecs-3f4b log]#
[root@hcss-ecs-3f4b log]# kill  -9  29924
[root@hcss-ecs-3f4b log]# systemctl  start mariadb
# 使用刚刚设置的root密码登录数据库
[root@hcss-ecs-3f4b log]# mysql  -uroot  -p
Enter password:
Welcome to the MariaDB monitor.  Commands end with ; or \g.
Your MariaDB connection id is 3
Server version: 10.6.19-MariaDB MariaDB Server

Copyright (c) 2000, 2018, Oracle, MariaDB Corporation Ab and others.

Type 'help;' or '\h' for help. Type '\c' to clear the current input statement.

MariaDB [(none)]>
到以上为止,我们的mariadb就搭建好了,接下来就是修改配置,让nginx和php和mariadb的数据库进行互联,并搭建一个博客网站,本次案例就使用wordpress进行搭建
搭建wordpress博客站点
- 修改nginx配置文件
nginx主配置文件如下
#建议在修改前做个备份
[root@hcss-ecs-3f4b log]# vi /usr/local/nginx/conf/nginx.conf
user  www;
worker_processes auto;
worker_cpu_affinity 00000001 00000010;

#error_log  logs/error.log;
#error_log  logs/error.log  notice;
#error_log  logs/error.log  info;

#pid        logs/nginx.pid;


events {
   use epoll;
   worker_connections  65535;
}


http {
   include       mime.types;
   default_type  application/octet-stream;

   log_format  main  '$remote_addr - $remote_user [$time_local] "$request" '
                     '$status $body_bytes_sent "$http_referer" '
                     '"$http_user_agent" "$http_x_forwarded_for"';

   access_log  logs/access.log  main;

   #默认编码
   charset utf-8;
   #服务器名字的hash表大小
   server_names_hash_bucket_size 128;
   #上传文件大小限制
   client_header_buffer_size 32k;
   #设定请求缓
   large_client_header_buffers 4 64k;
   client_max_body_size 8m;
   #开启目录列表访问,合适下载服务器,默认关闭
   #autoindex on;
   #长连接超时时间,单位是秒
   keepalive_timeout 120;
   sendfile            on;  #开启高效文件传输模式
   tcp_nopush          on;  #防止网络阻塞
   tcp_nodelay         on;
   types_hash_max_size 2048;
   gzip  on;
   include /usr/local/nginx/conf/conf.d/*.conf;

   server {
       listen       80;
       server_name  localhost;

       #charset koi8-r;

       #access_log  logs/host.access.log  main;

       location / {
           root   html;
           index  index.html index.htm;
       }

       #error_page  404              /404.html;

       # redirect server error pages to the static page /50x.html
       #
       error_page   500 502 503 504  /50x.html;
       location = /50x.html {
           root   html;
       }

       # proxy the PHP scripts to Apache listening on 127.0.0.1:80
       #
       #location ~ \.php$ {
       #    proxy_pass   http://127.0.0.1;
       #}

       # pass the PHP scripts to FastCGI server listening on 127.0.0.1:9000
       #
       #location ~ \.php$ {
       #    root           html;
       #    fastcgi_pass   127.0.0.1:9000;
       #    fastcgi_index  index.php;
       #    fastcgi_param  SCRIPT_FILENAME  /scripts$fastcgi_script_name;
       #    include        fastcgi_params;
       #}

       # deny access to .htaccess files, if Apache's document root
       # concurs with nginx's one
       #
       #location ~ /\.ht {
       #    deny  all;
       #}
   }


   # another virtual host using mix of IP-, name-, and port-based configuration
   #
   #server {
   #    listen       8000;
   #    listen       somename:8080;
   #    server_name  somename  alias  another.alias;

   #    location / {
   #        root   html;
   #        index  index.html index.htm;
   #    }
   #}


   # HTTPS server
   #
   #server {
   #    listen       443 ssl;
   #    server_name  localhost;

   #    ssl_certificate      cert.pem;
   #    ssl_certificate_key  cert.key;

   #    ssl_session_cache    shared:SSL:1m;
   #    ssl_session_timeout  5m;

   #    ssl_ciphers  HIGH:!aNULL:!MD5;
   #    ssl_prefer_server_ciphers  on;

   #    location / {
   #        root   html;
   #        index  index.html index.htm;
   #    }
   #}

}
include /usr/local/nginx/conf/conf.d/*.conf;
这里使用了include引入了外部的配置文件,所以需要再nginx的conf目录下再创建一个conf.d来保存项目配置
[root@hcss-ecs-3f4b conf]# mkdir -p  /usr/local/nginx/conf/conf.d/
[root@hcss-ecs-3f4b conf]# vi /usr/local/nginx/conf/conf.d/wordpress.conf
server {
   listen       80;
   server_name  localhost;
   location / {
       root   /web/wordpress;
       index  index.php index.html index.htm;
   }
   error_page   500 502 503 504  /50x.html;
   location = /50x.html {
       root   /usr/share/nginx/html;
   }
   location ~ \.php$ {
       root           /web/wordpress;
       fastcgi_pass   127.0.0.1:9000;
       fastcgi_index  index.php;
       #fastcgi_param  SCRIPT_FILENAME  $document_root$fastcgi_script_name;
       #include        fastcgi_params;
       include        fastcgi.conf;
   }
}
- 下载并配置wordpress
下载链接:https://cn.wordpress.org/latest-zh_CN.zip
这里下载完了wordpress之后需要将文件解压到/web/目录下,并编辑配置wp-config.php配置文件,这个配置文件,默认是没有需要的,需要复制目录里面的模板文件
[root@hcss-ecs-3f4b wordpress]# cp wp-config-sample.php   ./wp-config.php
[root@hcss-ecs-3f4b wordpress]# vi wp-config.php
修改一下四个位置即可,分别是数据库名字,数据库用户名、数据库密码、数据库地址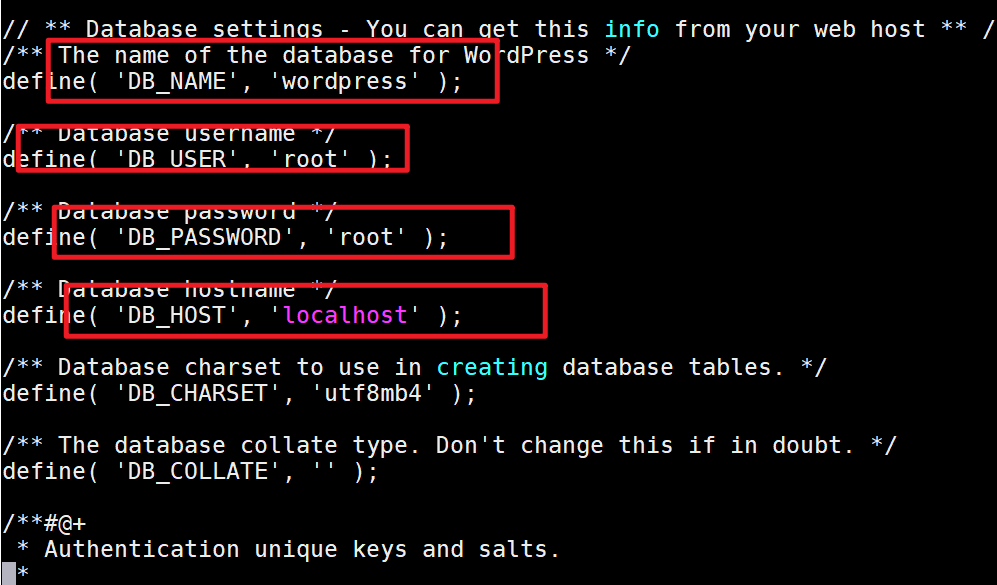
提前:需要你的数据库中有wordpress的数据库才行。
- 以上配置完毕之后,重启nginx、PHP、以及maridb的服务
systemctl restart nginx.service
systemctl enable php-fpm.service
systemctl enable mariadb.service
- 访问测试
直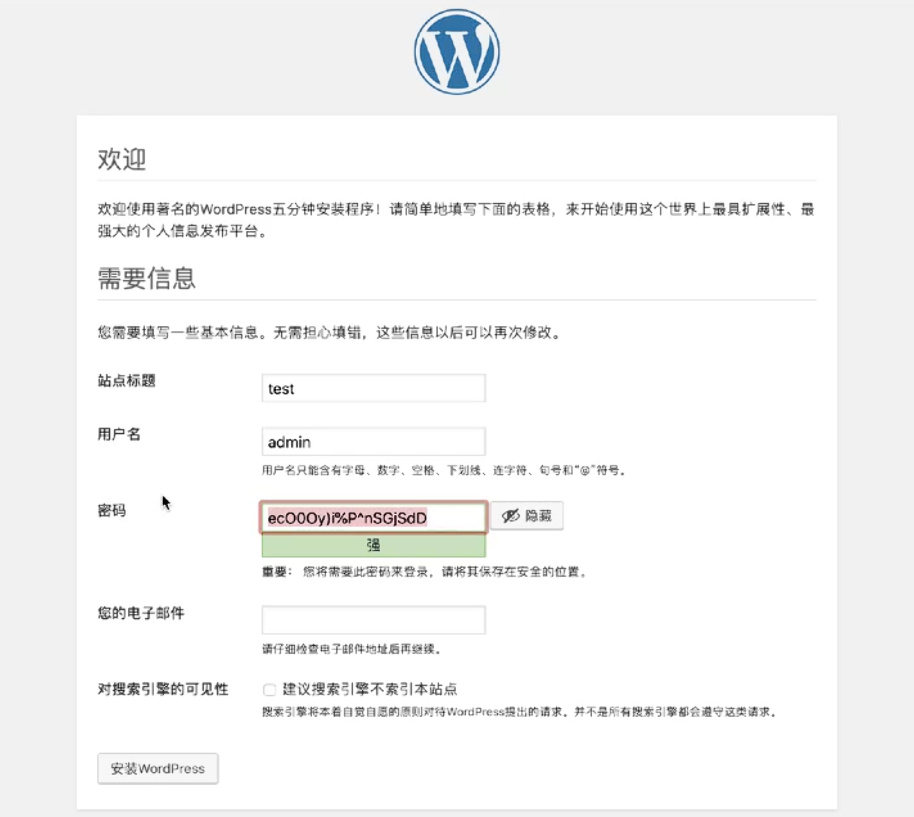
直接在浏览器中输入IP地址访问即可。

有“AI”的1024 = 2048,欢迎大家加入2048 AI社区
更多推荐

 15
15 0
0- 0


 已为社区贡献1条内容

所有评论(0)