Nginx模块开发:自定义HTTP过滤器filter
展开代码语言:C自动换行AI代码解释char *name;void *ctx;
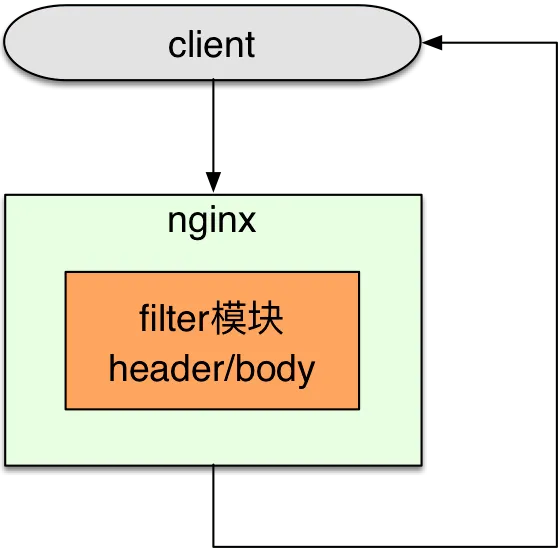
Nginx工作概括图如下:
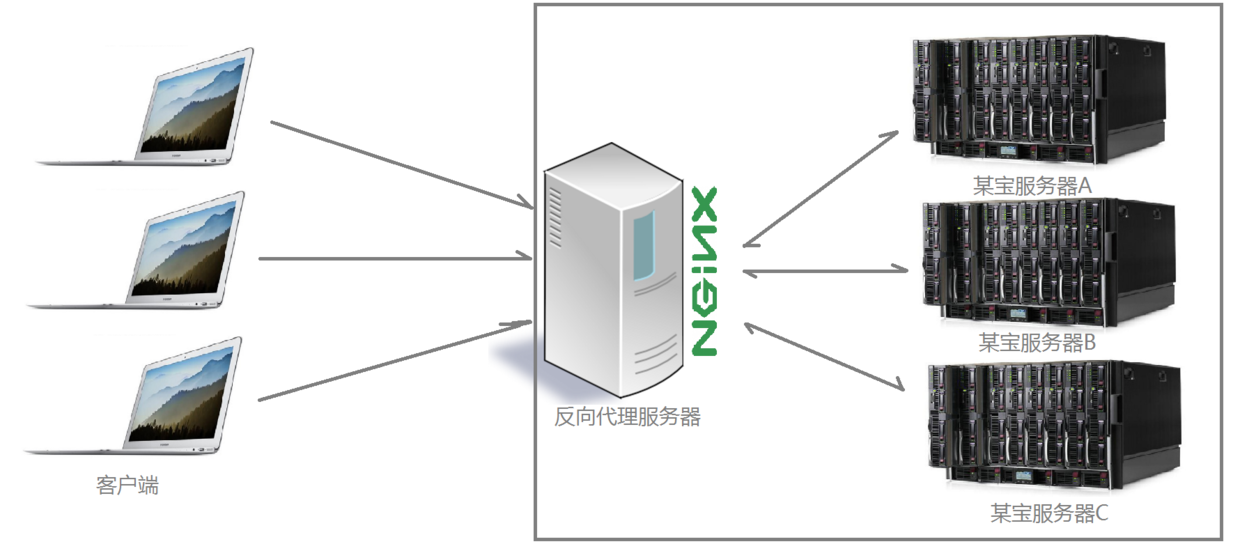
过滤器作用在服务器回发数据给客户端的中间过程。过滤器基于HTTP协议的基础上。
二、Nginx相关数据结构介绍
2.1、ngx_module的数据结构
展开
代码语言:C
自动换行
AI代码解释
#define NGX_MODULE_V1 \ NGX_MODULE_UNSET_INDEX, NGX_MODULE_UNSET_INDEX, \ NULL, 0, 0, nginx_version, NGX_MODULE_SIGNATURE #define NGX_MODULE_V1_PADDING 0, 0, 0, 0, 0, 0, 0, 0 struct ngx_module_s { ngx_uint_t ctx_index; ngx_uint_t index; char *name; ngx_uint_t spare0; ngx_uint_t spare1; ngx_uint_t version; const char *signature; void *ctx; ngx_command_t *commands; ngx_uint_t type; ngx_int_t (*init_master)(ngx_log_t *log); ngx_int_t (*init_module)(ngx_cycle_t *cycle); ngx_int_t (*init_process)(ngx_cycle_t *cycle); ngx_int_t (*init_thread)(ngx_cycle_t *cycle); void (*exit_thread)(ngx_cycle_t *cycle); void (*exit_process)(ngx_cycle_t *cycle); void (*exit_master)(ngx_cycle_t *cycle); uintptr_t spare_hook0; uintptr_t spare_hook1; uintptr_t spare_hook2; uintptr_t spare_hook3; uintptr_t spare_hook4; uintptr_t spare_hook5; uintptr_t spare_hook6; uintptr_t spare_hook7; }; typedef struct { ngx_str_t name; void *(*create_conf)(ngx_cycle_t *cycle); char *(*init_conf)(ngx_cycle_t *cycle, void *conf); } ngx_core_module_t;
2.2、ngx_http_module数据结构
展开
代码语言:C
自动换行
AI代码解释
typedef struct { void **main_conf; void **srv_conf; void **loc_conf; } ngx_http_conf_ctx_t; typedef struct { ngx_int_t (*preconfiguration)(ngx_conf_t *cf); // 解析配置文件之前 ngx_int_t (*postconfiguration)(ngx_conf_t *cf); // 解析配置文件完成之后 // **_main_ **解析配置文件中http关键字的内部 void *(*create_main_conf)(ngx_conf_t *cf); char *(*init_main_conf)(ngx_conf_t *cf, void *conf); // **_srv_ **解析配置文件中server关键字的内部 void *(*create_srv_conf)(ngx_conf_t *cf); char *(*merge_srv_conf)(ngx_conf_t *cf, void *prev, void *conf); // **_loc_ **解析配置文件中location关键字的内部 void *(*create_loc_conf)(ngx_conf_t *cf); char *(*merge_loc_conf)(ngx_conf_t *cf, void *prev, void *conf); } ngx_http_module_t;
2.3、ngx_command数据结构
展开
代码语言:C
自动换行
AI代码解释
struct ngx_command_s { ngx_str_t name; ngx_uint_t type; char *(*set)(ngx_conf_t *cf, ngx_command_t *cmd, void *conf); ngx_uint_t conf; ngx_uint_t offset; void *post; };
/src/http/ngx_http_config.h中定义的相关宏(type会用到):
展开
代码语言:C
自动换行
AI代码解释
#ifndef _NGX_HTTP_CONFIG_H_INCLUDED_ #define _NGX_HTTP_CONFIG_H_INCLUDED_ #include <ngx_config.h> #include <ngx_core.h> #include <ngx_http.h> typedef struct { void **main_conf; void **srv_conf; void **loc_conf; } ngx_http_conf_ctx_t; typedef struct { ngx_int_t (*preconfiguration)(ngx_conf_t *cf); ngx_int_t (*postconfiguration)(ngx_conf_t *cf); void *(*create_main_conf)(ngx_conf_t *cf); char *(*init_main_conf)(ngx_conf_t *cf, void *conf); void *(*create_srv_conf)(ngx_conf_t *cf); char *(*merge_srv_conf)(ngx_conf_t *cf, void *prev, void *conf); void *(*create_loc_conf)(ngx_conf_t *cf); char *(*merge_loc_conf)(ngx_conf_t *cf, void *prev, void *conf); } ngx_http_module_t; #define NGX_HTTP_MODULE 0x50545448 /* "HTTP" */ #define NGX_HTTP_MAIN_CONF 0x02000000 #define NGX_HTTP_SRV_CONF 0x04000000 #define NGX_HTTP_LOC_CONF 0x08000000 #define NGX_HTTP_UPS_CONF 0x10000000 #define NGX_HTTP_SIF_CONF 0x20000000 #define NGX_HTTP_LIF_CONF 0x40000000 #define NGX_HTTP_LMT_CONF 0x80000000 #define NGX_HTTP_MAIN_CONF_OFFSET offsetof(ngx_http_conf_ctx_t, main_conf) #define NGX_HTTP_SRV_CONF_OFFSET offsetof(ngx_http_conf_ctx_t, srv_conf) #define NGX_HTTP_LOC_CONF_OFFSET offsetof(ngx_http_conf_ctx_t, loc_conf) #define ngx_http_get_module_main_conf(r, module) \ (r)->main_conf[module.ctx_index] #define ngx_http_get_module_srv_conf(r, module) (r)->srv_conf[module.ctx_index] #define ngx_http_get_module_loc_conf(r, module) (r)->loc_conf[module.ctx_index] #define ngx_http_conf_get_module_main_conf(cf, module) \ ((ngx_http_conf_ctx_t *) cf->ctx)->main_conf[module.ctx_index] #define ngx_http_conf_get_module_srv_conf(cf, module) \ ((ngx_http_conf_ctx_t *) cf->ctx)->srv_conf[module.ctx_index] #define ngx_http_conf_get_module_loc_conf(cf, module) \ ((ngx_http_conf_ctx_t *) cf->ctx)->loc_conf[module.ctx_index] #define ngx_http_cycle_get_module_main_conf(cycle, module) \ (cycle->conf_ctx[ngx_http_module.index] ? \ ((ngx_http_conf_ctx_t *) cycle->conf_ctx[ngx_http_module.index]) \ ->main_conf[module.ctx_index]: \ NULL) #endif /* _NGX_HTTP_CONFIG_H_INCLUDED_ */
三、Nginx过滤器模块开发
3.1、Nginx模块开发流程
(1)定义一个模块名,ngx_module_t,选择好http模块NGX_HTTP_MODULE。(2)定义cmd命令,有多少条cmd写多少条cmd,ngx_command_t。(3)定义用来解析http block,ngx_http_module_t。(4)执行过程实现添加模块。
3.2、Nginx 模块执行
(1)初始化。当进程启动的时候进行的模块初始化。(2)解析conf文件。解析conf文件中模块的相关命令和设置。(3)Nginx启动之后,有命令或请求到来时,处理请求的流程。
开发模块时,需要实现的主要是这三个流程的功能。
3.3、示例代码
这里主要实现了在返回的网页中添加一个内容。里面在重点地方附上了详细注释。ngx_http_filter_module.c:
展开
代码语言:C
自动换行
AI代码解释
#include <ngx_config.h> #include <ngx_http.h> #include <ngx_core.h> typedef struct { ngx_flag_t enable; }ngx_http_filter_conf_t; static ngx_str_t prefix = ngx_string("<h2>FLY. </h2>"); static ngx_http_output_header_filter_pt ngx_http_next_header_filter; static ngx_http_output_body_filter_pt ngx_http_next_body_filter; // ngx_int_t (*ngx_http_output_header_filter_pt)(ngx_http_request_t *r) // 添加头,header ngx_int_t ngx_http_fly_header_filter(ngx_http_request_t *r) { if (r->headers_out.status != NGX_HTTP_OK) { // 不正常返回,则进行next return ngx_http_next_header_filter(r); } //r->headers_out.content_type.len == sizeof("text/html") r->headers_out.content_length_n += prefix.len; return ngx_http_next_header_filter(r); } // ngx_int_t (*ngx_http_output_body_filter_pt)(ngx_http_request_t *r, ngx_chain_t *chain) // 添加内容,body ngx_int_t ngx_http_fly_body_filter(ngx_http_request_t *r, ngx_chain_t *chain) { /* * 关于ngx_chain_t: * 在nginx中,有一个数据链,存放要发送的数据。 * O->O->O->O * 每次send的是ngx_chain_t中的一个ngx_buf_t */ // 添加一个chain buffer ngx_buf_t *b = ngx_create_temp_buf(r->pool, prefix.len); b->start = b->pos = prefix.data; b->last = b->pos + prefix.len; ngx_chain_t *c1 = ngx_alloc_chain_link(r->pool); c1->buf = b; c1->next = chain; return ngx_http_next_body_filter(r, c1); } // ngx_int_t (*postconfiguration)(ngx_conf_t *cf); // 解析完配置文件之后的动作,也就是解析完http关键字模块之后 ngx_int_t ngx_http_fly_filter_init(ngx_conf_t *cf) { // 模块的初始化 // http { } // O->O->O->O // 多个模块的头插法,取出最前面的模块 ngx_http_next_header_filter = ngx_http_top_header_filter; ngx_http_top_header_filter = ngx_http_fly_header_filter; ngx_http_next_body_filter = ngx_http_top_body_filter; ngx_http_top_body_filter = ngx_http_fly_body_filter; return NGX_OK; } // void *(*create_loc_conf)(ngx_conf_t *cf); // 解析conf文件location关键字之前的动作 void *ngx_http_fly_filter_create_loc_conf(ngx_conf_t *cf) { ngx_http_filter_conf_t *conf = ngx_palloc(cf->pool, sizeof(ngx_http_filter_conf_t)); if (conf == NULL) return NULL; conf->enable = NGX_CONF_UNSET; return conf; } // char *(*merge_loc_conf)(ngx_conf_t *cf, void *prev, void *conf); // 解析完配置文件location关键字之后的动作 // 模块可能在多个地方定义,这个函数合并所有的值一起使用 char *ngx_http_fly_filter_merge_loc_conf(ngx_conf_t *cf, void *parent, void *child) { ngx_http_filter_conf_t *prev = (ngx_http_filter_conf_t*)parent; ngx_http_filter_conf_t *next = (ngx_http_filter_conf_t*)child; // 合并enable的值 ngx_conf_merge_value(next->enable, prev->enable, 0); return NGX_CONF_OK; } /* struct ngx_command_s { ngx_str_t name; ngx_uint_t type; char *(*set)(ngx_conf_t *cf, ngx_command_t *cmd, void *conf); ngx_uint_t conf; ngx_uint_t offset; void *post; }; */ /* // conf文件命令解析 char *ngx_http_fly_filter_set_slot(ngx_conf_t *cf, ngx_command_t *cmd, void *conf) { char *p = conf; // 对应 ngx_http_fly_filter_create_loc_conf函数的conf->enable = NGX_CONF_UNSET; ngx_flag_t *flag = (p + cmd->offset); return NGX_CONF_OK; } */ // conf文件中的每一行都是一个指令指令 ngx_command_t ngx_http_fly_filter_module_cmd[] = { { //命令名称,比如listen,定义了就可以在conf文件中使用,注意不能和其他的起冲突 ngx_string("predix"), // 指示name命令放的位置在哪里以及可以带多少个参数,NGX_CONF_FLAGE表示开关标志 // predix on/off NGX_HTTP_MAIN_CONF | NGX_HTTP_SRV_CONF | NGX_HTTP_LOC_CONF | NGX_CONF_FLAG, // 命令解析,可以使用nginx内部的也可以自己实现 ngx_conf_set_flag_slot,//ngx_http_fly_filter_set_slot, NGX_HTTP_LOC_CONF_OFFSET, // offsetof获取enable在结构体中的偏移位置 offsetof(ngx_http_filter_conf_t,enable), NULL, }, ngx_null_command }; // 用来解析对应的conf文件 static ngx_http_module_t ngx_http_fly_filter_module_ctx = { NULL, ngx_http_fly_filter_init, NULL, NULL, NULL, NULL, ngx_http_fly_filter_create_loc_conf, ngx_http_fly_filter_merge_loc_conf }; // 模块定义 ngx_module_t ngx_http_fly_filter_module = { NGX_MODULE_V1, &ngx_http_fly_filter_module_ctx, ngx_http_fly_filter_module_cmd, // http的ascii值,指示是什么模块 NGX_HTTP_MODULE, NULL, NULL, NULL, NULL, NULL, NULL, NULL, NGX_MODULE_V1_PADDING // 填充 };
3.4、编写config文件
创建:
代码语言:Bash
自动换行
AI代码解释
touch config
内容:
代码语言:Bash
自动换行
AI代码解释
ngx_addon_name=ngx_http_fly_filter_module HTTP_FILTER_MODULES="$HTTP_FILTER_MODULES ngx_http_fly_filter_module" NGX_ADDON_SRCS="$NGX_ADDON_SRCS $ngx_addon_dir/ngx_http_filter_module.c"
注意,config文件要和模块的代码在相同目录。
3.5、编译模块到Nginx源码中
(1)配置中添加模块:
代码语言:Bash
自动换行
AI代码解释
./configure --prefix=/usr/local/nginx --with-http_realip_module --with-http_addition_module --with-http_gzip_static_module --with-http_secure_link_module --with-http_stub_status_module --with-stream --with-pcre=/home/fly/workspace/pcre-8.41 --with-zlib=/home/fly/workspace/zlib-1.2.11 --with-openssl=/home/fly/workspace/openssl-1.1.0g --add-module=/mnt/hgfs/sourcecode_learning/ngx_http_filter_module
注意模块路径要正确。出现如下表示成功:
代码语言:Bash
自动换行
AI代码解释
configuring additional modules adding module in /mnt/hgfs/sourcecode_learning/ngx_http_filter_module + ngx_http_fly_filter_module was configured creating objs/Makefile
(2)查看是否添加模块到动态代码中:
代码语言:Bash
自动换行
AI代码解释
vim objs/ngx_modules.c
(3)编译:
代码语言:Bash
自动换行
AI代码解释
make sudo make install
3.6、执行效果
编译安装完成后,在conf文件中添加模块的开关(predix on)

有“AI”的1024 = 2048,欢迎大家加入2048 AI社区
更多推荐

 9
9 0
0- 0


 已为社区贡献196条内容

所有评论(0)