第2篇《SpringBoot项目结构深度解析》
摘要:本文深入解析SpringBoot项目的标准结构,详细讲解每个目录和文件的作用。通过本文,你将彻底理解Maven项目组织方式、SpringBoot启动原理、配置文件优先级、资源文件管理等核心概念,为后续开发打下坚实基础。
一、前言
当你成功创建第一个SpringBoot项目后,面对项目中的各种目录和文件,是否感到困惑?为什么要有这么多文件夹?每个文件都是干什么的?本文将为你一一揭晓。
📚 学习目标
- 理解标准SpringBoot项目结构
- 掌握pom.xml的核心配置
- 了解SpringBoot启动原理
- 掌握多环境配置方法
- 理解静态资源和模板文件的存放规则
⚙️ 前置条件
- 已完成第1篇的环境搭建
- 已创建第一个SpringBoot项目
- 了解基础的Java和Maven知识
二、SpringBoot项目结构总览
2.1 标准项目结构图
springboot-demo/
├── src/                    # 源代码目录
│   ├── main/              # 主代码
│   │   ├── java/          # Java源代码
│   │   │   └── com/       # 包路径
│   │   │       └── example/
│   │   │           └── demo/
│   │   │               ├── DemoApplication.java    # 启动类
│   │   │               ├── config/                 # 配置类
│   │   │               ├── controller/             # 控制器
│   │   │               ├── service/                # 业务层
│   │   │               ├── dao/                    # 数据访问层
│   │   │               ├── entity/                 # 实体类
│   │   │               ├── dto/                    # 数据传输对象
│   │   │               └── util/                   # 工具类
│   │   └── resources/     # 资源文件
│   │       ├── application.yml              # 主配置文件
│   │       ├── application-dev.yml     # 开发环境配置
│   │       ├── application-prod.yml    # 生产环境配置
│   │       ├── application-test.yml    # 测试环境配置
│   │       ├── static/    # 静态资源
│   │       ├── templates/ # 模板文件
│   │       └── mapper/    # MyBatis映射文件
│   └── test/              # 测试代码
│       └── java/
│           └── com/
│               └── example/
│                   └── demo/
├── target/                # 编译输出目录
├── pom.xml               # Maven配置文件
├── mvnw                  # Maven包装器(Linux/macOS)
├── mvnw.cmd              # Maven包装器(Windows)
└── README.md             # 项目说明文档
2.2 为什么是这样的结构?
SpringBoot遵循约定优于配置的原则,采用标准的Maven/Gradle项目结构:
| 目录/文件 | 作用 | 必要性 |
|---|---|---|
src/main/java |
存放Java源代码 | 必需 |
src/main/resources |
存放配置文件、静态资源 | 必需 |
src/test/java |
存放单元测试代码 | 推荐 |
target/ |
编译输出,包含class文件、jar包 | 自动生成 |
pom.xml |
项目对象模型,定义依赖和构建配置 | 必需 |
三、核心文件深度解析
3.1 pom.xml:项目的"心脏"
3.1.1 基本结构解析
<?xml version="1.0" encoding="UTF-8"?>
<project xmlns="http://maven.apache.org/POM/4.0.0"
xmlns:xsi="http://www.w3.org/2001/XMLSchema-instance"
xsi:schemaLocation="http://maven.apache.org/POM/4.0.0
https://maven.apache.org/xsd/maven-4.0.0.xsd">

<!-- 1. 项目坐标:全球唯一标识 -->
<modelVersion>4.0.0</modelVersion>
<groupId>com.example</groupId>      <!-- 组织或公司域名的倒写 -->
<artifactId>demo</artifactId>       <!-- 项目名称 -->
<version>0.0.1-SNAPSHOT</version>   <!-- 版本号 -->
<name>demo</name>
<description>SpringBoot项目演示</description>

<!-- 2. 父项目:继承SpringBoot的默认配置 -->
<parent>
<groupId>org.springframework.boot</groupId>
<artifactId>spring-boot-starter-parent</artifactId>
<version>3.1.5</version>
<relativePath/> <!-- 不从父项目查找 -->
</parent>

<!-- 3. 项目属性 -->
<properties>
<java.version>17</java.version>            <!-- Java版本 -->
<project.build.sourceEncoding>UTF-8</project.build.sourceEncoding>
<project.reporting.outputEncoding>UTF-8</project.reporting.outputEncoding>
<!-- 自定义属性 -->
<mybatis.version>3.0.2</mybatis.version>
</properties>

<!-- 4. 依赖管理:项目的"食材清单" -->
<dependencies>
<!-- SpringBoot Web Starter:Web开发核心 -->
<dependency>
<groupId>org.springframework.boot</groupId>
<artifactId>spring-boot-starter-web</artifactId>
</dependency>

<!-- SpringBoot Test Starter:单元测试 -->
<dependency>
<groupId>org.springframework.boot</groupId>
<artifactId>spring-boot-starter-test</artifactId>
<scope>test</scope>  <!-- 只在测试时有效 -->
</dependency>

<!-- 开发工具:热部署 -->
<dependency>
<groupId>org.springframework.boot</groupId>
<artifactId>spring-boot-devtools</artifactId>
<scope>runtime</scope>  <!-- 运行时依赖 -->
<optional>true</optional> <!-- 可选依赖 -->
</dependency>
</dependencies>

<!-- 5. 构建配置:如何"烹饪"项目 -->
<build>
<plugins>
<!-- SpringBoot Maven插件:打包和运行 -->
<plugin>
<groupId>org.springframework.boot</groupId>
<artifactId>spring-boot-maven-plugin</artifactId>
</plugin>
</plugins>
</build>
</project>
3.1.2 Starter依赖详解
SpringBoot的Starter机制是核心特性之一:
<!-- 常用Starter依赖 -->
<dependencies>
<!-- Web开发 -->
<dependency>
<groupId>org.springframework.boot</groupId>
<artifactId>spring-boot-starter-web</artifactId>
</dependency>

<!-- 数据库:JPA版本 -->
<dependency>
<groupId>org.springframework.boot</groupId>
<artifactId>spring-boot-starter-data-jpa</artifactId>
</dependency>

<!-- 数据库:MyBatis版本 -->
<dependency>
<groupId>org.mybatis.spring.boot</groupId>
<artifactId>mybatis-spring-boot-starter</artifactId>
<version>${mybatis.version}</version>
</dependency>

<!-- 安全认证 -->
<dependency>
<groupId>org.springframework.boot</groupId>
<artifactId>spring-boot-starter-security</artifactId>
</dependency>

<!-- 模板引擎:Thymeleaf -->
<dependency>
<groupId>org.springframework.boot</groupId>
<artifactId>spring-boot-starter-thymeleaf</artifactId>
</dependency>

<!-- Redis缓存 -->
<dependency>
<groupId>org.springframework.boot</groupId>
<artifactId>spring-boot-starter-data-redis</artifactId>
</dependency>

<!-- 消息队列 -->
<dependency>
<groupId>org.springframework.boot</groupId>
<artifactId>spring-boot-starter-amqp</artifactId>
</dependency>
</dependencies>
Starter的作用:自动引入相关依赖,无需手动管理版本兼容性。
3.2 启动类:项目的"大脑"
3.2.1 启动类详解
package com.example.demo;
import org.springframework.boot.SpringApplication;
import org.springframework.boot.autoconfigure.SpringBootApplication;

/**
* SpringBoot启动类
*
* @SpringBootApplication 是一个复合注解,包含:
* 1. @SpringBootConfiguration:标记为配置类
* 2. @EnableAutoConfiguration:启用自动配置
* 3. @ComponentScan:自动扫描组件
*
* 启动类必须放在最外层包,才能扫描到所有子包
*/
@SpringBootApplication
public class DemoApplication {

/**
* 主方法:程序入口
* SpringApplication.run() 方法会:
* 1. 创建Spring容器
* 2. 启动内嵌的Web服务器(如Tomcat)
* 3. 自动配置Spring和第三方库
*/
public static void main(String[] args) {
// 启动SpringBoot应用
SpringApplication.run(DemoApplication.class, args);

// 自定义启动配置(可选)
/*
SpringApplication app = new SpringApplication(DemoApplication.class);
app.setBannerMode(Banner.Mode.OFF); // 关闭启动Banner
app.run(args);
*/
}
}
3.2.2 启动流程解析
1. 加载启动类 → 2. 扫描@ComponentScan指定的包 → 3. 加载@Configuration配置类
↓
4. 执行自动配置(@EnableAutoConfiguration) → 5. 创建ApplicationContext
↓
6. 启动内嵌Web服务器 → 7. 监听端口 → 8. 应用就绪
3.3 配置文件:项目的"神经"
3.3.1 配置文件类型
SpringBoot支持两种配置文件格式:
# application.yml(推荐格式)
server:
port: 8080
# servlet:
#   context-path: /api  # 已注释,不再使用全局API前缀

spring:
application:
name: demo
datasource:
url: jdbc:mysql://localhost:3306/dev_db
username: root
password: 123456
driver-class-name: com.mysql.cj.jdbc.Driver
配置文件说明:
- 本项目采用YAML格式配置文件,结构更清晰
- 主配置文件:
application.yml - 环境配置文件:
application-dev.yml:开发环境application-test.yml:测试环境application-prod.yml:生产环境```
3.3.2 配置文件优先级(从高到低)
1. 命令行参数:--server.port=9090
2. java:comp/env 里的JNDI属性
3. JVM系统属性:-Dserver.port=9090
4. 操作系统环境变量
5. random.* 属性(随机值)
6. 应用外部:application-{profile}.properties/yml
7. 应用内部:application-{profile}.properties/yml
8. @Configuration注解的@PropertySource
9. SpringApplication.setDefaultProperties
3.3.3 多环境配置示例
# application.yml(主配置)
spring:
profiles:
active: dev  # 默认使用dev环境

---
# 开发环境配置
spring:
profiles: dev
datasource:
url: jdbc:mysql://localhost:3306/dev_db
username: dev_user
password: dev_pass
server:
port: 8080
error:
include-stacktrace: always  # 开发环境显示详细错误

---
# 测试环境配置
spring:
profiles: test
datasource:
url: jdbc:mysql://test-server:3306/test_db
username: test_user
password: test_pass
server:
port: 8081

---
# 生产环境配置
spring:
profiles: prod
datasource:
url: jdbc:mysql://prod-server:3306/prod_db
username: ${DB_USERNAME}  # 使用环境变量
password: ${DB_PASSWORD}
server:
port: 8080
error:
include-stacktrace: never  # 生产环境不显示详细错误
3.3.4 自定义配置与使用
# 自定义配置
app:
config:
upload-path: /data/uploads
max-file-size: 10MB
allowed-types: jpg,png,gif
security:
jwt:
secret: my-secret-key
expiration: 86400000  # 24小时
// 方式1:@Value注解
@Component
public class AppConfig {
@Value("${app.config.upload-path}")
private String uploadPath;

@Value("${app.config.max-file-size}")
private String maxFileSize;
}

// 方式2:@ConfigurationProperties(推荐)
@Component
@ConfigurationProperties(prefix = "app.config")
@Data  // Lombok注解,自动生成getter/setter
public class AppProperties {
private String uploadPath;
private String maxFileSize;
private List<String> allowedTypes;
}

// 方式3:Environment接口
@Component
public class ConfigReader {
@Autowired
private Environment env;

public String getConfig() {
return env.getProperty("app.config.upload-path");
}
}
四、目录结构详解
4.1 src/main/java:业务代码层
4.1.1 标准包结构
com.example.demo/
├── DemoApplication.java           # 启动类
├── config/                        # 配置类
│   ├── AppProperties.java        # 应用配置属性
│   ├── ConfigReader.java         # 配置读取器
│   ├── CorsConfig.java          # 跨域配置
│   ├── MyBatisConfig.java       # MyBatis配置
│   └── WebConfig.java            # Web配置
├── controller/                    # 控制器层:处理HTTP请求
│   ├── HelloController.java      # 测试控制器
│   ├── PageController.java       # 页面控制器
│   └── UserController.java       # 用户控制器
├── dao/                          # 数据访问层
│   └── UserDao.java             # 用户数据访问接口
├── dto/                          # 数据传输对象
│   ├── Result.java              # 统一响应结果
│   └── UserDTO.java              # 用户数据传输对象
├── entity/                       # 实体类:与数据库表对应
│   ├── User.java                # 用户实体
│   └── UserStatus.java          # 用户状态枚举
├── exception/                    # 异常处理
│   ├── BusinessException.java   # 业务异常
│   └── GlobalExceptionHandler.java # 全局异常处理器
├── service/                      # 业务逻辑层:核心业务处理
│   ├── UserService.java         # 用户服务接口
│   └── impl/
│       └── UserServiceImpl.java # 用户服务实现
└── util/                         # 工具类
    └── DateUtil.java            # 日期工具类
4.1.2 各层代码示例
Controller层:
package com.example.demo.controller;
import org.springframework.web.bind.annotation.*;
import com.example.demo.service.UserService;
import com.example.demo.entity.User;

@RestController          // @Controller + @ResponseBody
@RequestMapping("/api/users")  // 统一前缀
public class UserController {

private final UserService userService;

// 构造器注入(Spring推荐的方式)
public UserController(UserService userService) {
this.userService = userService;
}

@GetMapping("/{id}")
public User getUser(@PathVariable Long id) {
return userService.getUserById(id);
}

@PostMapping
public User createUser(@RequestBody User user) {
return userService.createUser(user);
}
}
Service层:
package com.example.demo.service;
import com.example.demo.entity.User;

public interface UserService {
User getUserById(Long id);
User createUser(User user);
}

package com.example.demo.service.impl;
import org.springframework.stereotype.Service;
import com.example.demo.service.UserService;
import com.example.demo.entity.User;
import com.example.demo.dao.UserDao;

@Service  // 标记为Spring Bean
public class UserServiceImpl implements UserService {

private final UserDao userDao;

public UserServiceImpl(UserDao userDao) {
this.userDao = userDao;
}

@Override
public User getUserById(Long id) {
return userDao.findById(id)
.orElseThrow(() -> new RuntimeException("用户不存在"));
}

@Override
public User createUser(User user) {
return userDao.save(user);
}
}
DAO层:
package com.example.demo.dao;
import org.springframework.data.jpa.repository.JpaRepository;
import com.example.demo.entity.User;

public interface UserDao extends JpaRepository<User, Long> {
// JPA会自动实现基本CRUD方法
// 自定义查询方法
User findByUsername(String username);
List<User> findByAgeGreaterThan(int age);
}
Entity实体类:
package com.example.demo.entity;
import jakarta.persistence.*;
import java.time.LocalDateTime;

@Entity
@Table(name = "user")  // 对应数据库表
@Data  // Lombok:自动生成getter/setter/toString等
@NoArgsConstructor
@AllArgsConstructor
public class User {

@Id
@GeneratedValue(strategy = GenerationType.IDENTITY)
private Long id;

@Column(nullable = false, unique = true, length = 50)
private String username;

@Column(nullable = false)
private String password;

@Column(name = "email")  // 指定列名
private String email;

private Integer age;

@Enumerated(EnumType.STRING)
private UserStatus status;

@Column(updatable = false)  // 创建后不可修改
private LocalDateTime createTime;

private LocalDateTime updateTime;

// 生命周期回调
@PrePersist
protected void onCreate() {
createTime = LocalDateTime.now();
updateTime = LocalDateTime.now();
}

@PreUpdate
protected void onUpdate() {
updateTime = LocalDateTime.now();
}
}
4.2 src/main/resources:资源文件层
4.2.1 目录结构详解
resources/
├── application.yml           # 主配置文件
├── application-dev.yml       # 开发环境配置
├── application-prod.yml      # 生产环境配置
├── banner.txt               # 启动Banner
├── static/                  # 静态资源
│   ├── css/
│   │   └── style.css
│   ├── js/
│   │   └── app.js
│   ├── images/
│   │   └── logo.png
│   └── favicon.ico         # 网站图标
├── templates/               # 模板文件
│   ├── index.html
│   ├── error/
│   │   └── 404.html
│   └── layout.html
├── mapper/                  # MyBatis映射文件
│   └── UserMapper.xml
├── db/                      # 数据库脚本
│   └── dev_db.sql            # 建表语句和初始化数据(dev_db)
└── i18n/                    # 国际化文件
├── messages.properties
├── messages_zh_CN.properties
└── messages_en_US.properties
4.2.2 静态资源配置
SpringBoot默认静态资源路径(按优先级):
1. classpath:/META-INF/resources/
2. classpath:/resources/
3. classpath:/static/
4. classpath:/public/
5. ServletContext根路径:/
访问规则:
文件位置:src/main/resources/static/images/logo.png
访问URL:http://localhost:8080/images/logo.png
无需Controller,直接访问
自定义静态资源路径:
spring:
web:
resources:
static-locations:
- classpath:/static/
- classpath:/public/
- file:${app.config.upload-path}  # 外部目录
4.2.3 模板引擎支持
SpringBoot支持多种模板引擎:
# Thymeleaf配置
spring:
thymeleaf:
prefix: classpath:/templates/
suffix: .html
mode: HTML
encoding: UTF-8
cache: false  # 开发时关闭缓存
// Controller中使用模板
@Controller
public class PageController {

@GetMapping("/")
public String index(Model model) {
model.addAttribute("title", "首页");
model.addAttribute("users", userService.getAllUsers());
return "index";  // 对应templates/index.html
}
}
4.3 src/test:测试代码层
4.3.1 测试目录结构
src/test/
├── java/
│   └── com/
│       └── example/
│           └── demo/
│               ├── DemoApplicationTests.java      # 启动测试
│               ├── controller/
│               │   └── UserControllerTest.java   # Controller测试
│               ├── service/
│               │   └── UserServiceTest.java      # Service测试
│               └── repository/
│                   └── UserRepositoryTest.java   # Repository测试
└── resources/
├── application-test.yml     # 测试环境配置
└── test-data.sql           # 测试数据
4.3.2 测试代码示例
package com.example.demo;
import org.junit.jupiter.api.Test;
import org.springframework.boot.test.context.SpringBootTest;

// @SpringBootTest会加载完整的Spring上下文
@SpringBootTest
class DemoApplicationTests {

@Test
void contextLoads() {
// 测试Spring上下文是否能正常加载
}
}

package com.example.demo.controller;
import org.junit.jupiter.api.Test;
import org.springframework.beans.factory.annotation.Autowired;
import org.springframework.boot.test.autoconfigure.web.servlet.AutoConfigureMockMvc;
import org.springframework.boot.test.context.SpringBootTest;
import org.springframework.test.web.servlet.MockMvc;
import static org.springframework.test.web.servlet.request.MockMvcRequestBuilders.*;
import static org.springframework.test.web.servlet.result.MockMvcResultMatchers.*;

@SpringBootTest
@AutoConfigureMockMvc  // 自动配置MockMvc
class UserControllerTest {

@Autowired
private MockMvc mockMvc;

@Test
void testGetUser() throws Exception {
mockMvc.perform(get("/api/users/1"))
.andExpect(status().isOk())
.andExpect(jsonPath("$.username").value("testuser"));
}
}
4.4 target目录:构建输出
4.4.1 target目录结构
target/
├── classes/              # 编译后的class文件
│   ├── com/
│   │   └── example/
│   │       └── demo/
│   └── application.yml
├── generated-sources/    # 生成的源代码
├── generated-test-sources/ # 生成的测试代码
├── maven-status/         # Maven构建状态
├── surefire-reports/     # 测试报告
├── test-classes/         # 测试class文件
└── demo-0.0.1-SNAPSHOT.jar  # 打包后的可执行JAR
4.4.2 JAR包内部结构
demo-0.0.1-SNAPSHOT.jar
├── BOOT-INF/
│   ├── classes/          # 项目class文件
│   └── lib/              # 所有依赖的JAR
├── META-INF/
│   └── MANIFEST.MF       # 清单文件
└── org/
└── springframework/
└── boot/
└── loader/   # SpringBoot类加载器
JAR包的特点:
- 可执行:
java -jar demo-0.0.1-SNAPSHOT.jar - 包含所有依赖:无需单独安装Tomcat
- 内嵌Web服务器:默认Tomcat,可切换为Jetty或Undertow
- 方便部署:一个JAR文件即可运行
五、高级结构与最佳实践
5.1 模块化项目结构(微服务架构)
对于大型项目,推荐模块化设计:
parent-project/
├── pom.xml                          # 父POM
├── common/                          # 公共模块
│   ├── pom.xml
│   └── src/
├── user-service/                    # 用户服务模块
│   ├── pom.xml
│   └── src/
├── order-service/                   # 订单服务模块
│   ├── pom.xml
│   └── src/
├── gateway/                         # API网关
│   ├── pom.xml
│   └── src/
└── config/                          # 配置中心
├── pom.xml
└── src/
5.2 配置分离策略
生产环境推荐配置:
项目目录/
├── config/                # 外部配置文件(优先级最高)
│   ├── application.yml
│   ├── application-prod.yml
│   └── logback-spring.xml
├── logs/                  # 日志目录
├── uploads/               # 上传文件
└── app.jar                # 应用程序JAR

启动命令:
java -jar app.jar \
--spring.config.location=file:./config/ \
--logging.config=file:./config/logback-spring.xml
5.3 日志配置
<!-- pom.xml 添加日志依赖 -->
<dependency>
<groupId>org.springframework.boot</groupId>
<artifactId>spring-boot-starter-logging</artifactId>
</dependency>
<!-- src/main/resources/logback-spring.xml -->
<?xml version="1.0" encoding="UTF-8"?>
<configuration>
<!-- 控制台输出 -->
<appender name="CONSOLE" class="ch.qos.logback.core.ConsoleAppender">
<encoder>
<pattern>%d{yyyy-MM-dd HH:mm:ss} [%thread] %-5level %logger{36} - %msg%n</pattern>
</encoder>
</appender>

<!-- 文件输出 -->
<appender name="FILE" class="ch.qos.logback.core.rolling.RollingFileAppender">
<file>logs/app.log</file>
<rollingPolicy class="ch.qos.logback.core.rolling.TimeBasedRollingPolicy">
<fileNamePattern>logs/app.%d{yyyy-MM-dd}.log</fileNamePattern>
<maxHistory>30</maxHistory>
</rollingPolicy>
<encoder>
<pattern>%d{yyyy-MM-dd HH:mm:ss} [%thread] %-5level %logger{36} - %msg%n</pattern>
</encoder>
</appender>

<!-- 日志级别 -->
<root level="INFO">
<appender-ref ref="CONSOLE"/>
<appender-ref ref="FILE"/>
</root>

<!-- 特定包日志级别 -->
<logger name="com.example.demo" level="DEBUG"/>
<logger name="org.springframework" level="WARN"/>
</configuration>
六、常见问题(Q&A)
Q1:启动类应该放在哪里?
A:启动类必须放在最外层包(根包),确保@ComponentScan能扫描到所有子包。
正确结构:
com.example.demo/
├── DemoApplication.java    # 启动类(最外层)
├── controller/
├── service/
└── entity/
错误结构:
com.example/
├── demo/
│   └── DemoApplication.java  # ❌ 启动类在子包
├── controller/
└── service/
Q2:为什么我的静态资源无法访问?
A:检查以下几点:
- 文件是否在正确目录:
src/main/resources/static/ - 是否有自定义拦截器拦截了静态资源
- 是否配置了
spring.mvc.static-path-pattern
// 如果配置了拦截器,需要排除静态资源
@Configuration
public class WebConfig implements WebMvcConfigurer {

@Override
public void addInterceptors(InterceptorRegistry registry) {
registry.addInterceptor(new AuthInterceptor())
.addPathPatterns("/**")
.excludePathPatterns("/static/**", "/css/**", "/js/**", "/images/**");
}
}
Q3:如何自定义Banner?
A:在src/main/resources下创建banner.txt:
                   _ooOoo_
                  o8888888o
                  88" . "88
                  (| -_- |)
                  O\  =  /O
               ____/`---'\____
             .'  \\|     |//  `.
            /  \\|||  :  |||//  \
           /  _||||| -:- |||||-  \
           |   | \\\  -  /// |   |
           | \_|  ''\---/''  |   |
           \  .-\__  `-`  ___/-. /
         ___`. .'  /--.--\  `. . __
      ."" '<  `.___\_<|>_/___.'  >'"".
     | | :  `- \`.;`\ _ /`;.`/ - ` : | |
     \  \ `-.   \_ __\ /__ _/   .-` /  /
======`-.____`-.___\_____/___.-`____.-'======
                   `=---='
^^^^^^^^^^^^^^^^^^^^^^^^^^^^^^^^^^^^^^^^^^^^^
         佛祖保佑       永无BUG
Spring Boot Version: ${spring-boot.version}
Application Name: ${spring.application.name}
Q4:如何排除自动配置?
A:某些情况下需要排除自动配置:
// 方法1:在启动类上排除
@SpringBootApplication(exclude = {
DataSourceAutoConfiguration.class,
SecurityAutoConfiguration.class
})
# 方法2:在配置文件中排除
spring:
autoconfigure:
exclude:
- org.springframework.boot.autoconfigure.security.servlet.SecurityAutoConfiguration
Q5:项目打包后配置文件在哪里修改?
A:SpringBoot支持外部化配置:
# 1. 同级目录的config文件夹
java -jar app.jar  # 自动读取./config/application.yml

# 2. 指定配置文件路径
java -jar app.jar --spring.config.location=file:/path/to/config/

# 3. 使用环境变量
export SPRING_CONFIG_LOCATION=file:/path/to/config/
java -jar app.jar

# 4. 命令行参数(优先级最高)
java -jar app.jar --server.port=9090 --spring.datasource.url=jdbc:mysql://...
Q6:如何查看所有自动配置?
A:启用debug模式查看:
# application.yml
debug: true
启动时会输出:
=========================
AUTO-CONFIGURATION REPORT
=========================

Positive matches:    # 已启用的自动配置
----------------
WebMvcAutoConfiguration matched

Negative matches:    # 未启用的自动配置
----------------
DataSourceAutoConfiguration:
Did not match:
- @ConditionalOnClass did not find required class 'javax.sql.DataSource'
Q7:如何优雅关闭SpringBoot应用?
A:SpringBoot支持优雅关闭:
# application.yml
server:
shutdown: graceful  # 启用优雅关闭

spring:
lifecycle:
timeout-per-shutdown-phase: 30s  # 关闭超时时间
向应用发送关闭信号:
# 发送POST请求到/actuator/shutdown(需开启端点)
curl -X POST http://localhost:8080/actuator/shutdown

# 或者使用kill命令(不能使用kill -9)
kill -2 <pid>  # SIGINT信号
七、总结
通过本文的学习,你应该已经掌握了:
✅ 核心知识点
- 项目结构:理解了Maven标准目录结构
- 启动原理:掌握了SpringBoot的启动流程
- 配置文件:学会了多环境配置和优先级
- 代码分层:理解了Controller-Service-DAO的分层架构
- 资源管理:知道了静态资源和模板文件的存放规则
🎯 最佳实践建议
- 启动类位置:始终放在根包下
- 配置文件:使用YAML格式,分离多环境配置
- 代码分层:严格遵循分层架构,保持单一职责
- 包命名:使用有意义的包名,按功能划分
- 外部配置:生产环境使用外部配置文件
🔧 实用技巧
- 快速查看配置:使用
debug: true查看自动配置报告 - 热部署:开发时使用
spring-boot-devtools - 配置提示:添加
spring-boot-configuration-processor依赖获得配置提示 - 健康检查:添加
spring-boot-starter-actuator监控应用状态
八、系列导航
SpringBoot从0到项目实战系列:
- 第1篇:零基础搭建SpringBoot开发环境
- 第2篇:【本文】SpringBoot项目结构深度解析
- 第3篇:SpringBoot配置文件详解与多环境配置
- 第4篇:SpringBoot Web开发:RESTful API设计与实现
- 第5篇:SpringBoot数据持久化:MyBatis与JPA实战
- 第6篇:SpringBoot统一异常处理与日志配置
- …(共20篇完整教程)
下一篇预告:《SpringBoot配置文件详解与多环境配置》——我们将深入学习SpringBoot的配置系统,包括YAML语法、配置加密、配置刷新等高级特性。
九、项目实战:从0到1运行项目
9.1 数据库准备
9.1.1 创建数据库
首先在MySQL中创建项目所需的数据库:
-- 创建数据库
CREATE DATABASE IF NOT EXISTS dev_db
DEFAULT CHARACTER SET utf8mb4
DEFAULT COLLATE utf8mb4_unicode_ci;

-- 使用数据库
USE dev_db;

-- 创建用户表
CREATE TABLE IF NOT EXISTS `user` (
  `id` BIGINT NOT NULL AUTO_INCREMENT COMMENT '用户ID',
  `username` VARCHAR(50) NOT NULL COMMENT '用户名',
  `password` VARCHAR(100) NOT NULL COMMENT '密码',
  `email` VARCHAR(100) COMMENT '邮箱',
  `age` INT COMMENT '年龄',
  `status` VARCHAR(20) DEFAULT 'ACTIVE' COMMENT '用户状态',
  `create_time` DATETIME DEFAULT CURRENT_TIMESTAMP COMMENT '创建时间',
  `update_time` DATETIME DEFAULT CURRENT_TIMESTAMP ON UPDATE CURRENT_TIMESTAMP COMMENT '更新时间',
  PRIMARY KEY (`id`),
  UNIQUE KEY `uk_username` (`username`),
  KEY `idx_email` (`email`)
) ENGINE=InnoDB DEFAULT CHARSET=utf8mb4 COMMENT='用户表';

-- 插入测试数据
INSERT INTO `user` (`username`, `password`, `email`, `age`, `status`) VALUES
('admin', '$2a$10$N.zmdr9k7uOCQb376NoUnuTJ8iAt6Z5EHsM8lE9lBOsl7iKTVKIUi', 'admin@example.com', 28, 'ACTIVE'),
('testuser', '$2a$10$N.zmdr9k7uOCQb376NoUnuTJ8iAt6Z5EHsM8lE9lBOsl7iKTVKIUi', 'test@example.com', 25, 'ACTIVE');
9.1.2 导入数据库脚本
将上述SQL保存为src/main/resources/db/schema.sql,SpringBoot会自动执行:
# 或者使用MySQL命令行导入
mysql -u root -p < src/main/resources/db/schema.sql
9.1.3 数据初始化配置
项目已配置自动数据初始化功能,在application-dev.yml中添加了以下配置:
spring:
  jpa:
    defer-datasource-initialization: true
  sql:
    init:
      mode: always
      encoding: UTF-8
这样配置后,Spring Boot会在启动时自动执行src/main/resources/data.sql文件中的SQL语句,插入测试数据。
data.sql文件内容:
-- 初始化用户数据
-- 在应用启动时自动执行

INSERT INTO `user` (`username`, `password`, `email`, `age`, `status`, `create_time`, `update_time`) VALUES
('admin', '$2a$10$N.zmdr9k7uOCQb376NoUnuTJ8iAt6Z5EHsM8lE9lBOsl7iKTVKIUi', 'admin@example.com', 28, 'ACTIVE', NOW(), NOW()),
('testuser', '$2a$10$N.zmdr9k7uOCQb376NoUnuTJ8iAt6Z5EHsM8lE9lBOsl7iKTVKIUi', 'test@example.com', 25, 'ACTIVE', NOW(), NOW())
ON DUPLICATE KEY UPDATE `update_time` = NOW();
注意事项:
defer-datasource-initialization: true确保在Hibernate创建表结构之后再执行data.sqlmode: always表示每次启动都执行数据初始化(开发环境推荐)- 生产环境建议使用
mode: never或mode: embedded,避免重复插入数据 - 使用
ON DUPLICATE KEY UPDATE避免重复插入导致错误
9.2 配置开发环境
9.2.1 主配置文件(application.yml)
spring:
  profiles:
    active: dev  # 默认使用dev环境
  application:
    name: blog-demo
9.2.2 开发环境配置(application-dev.yml)
# 开发环境配置
server:
  port: 8080
#  servlet:
#    context-path: /api  # 已注释,不再使用全局API前缀
  error:
    include-stacktrace: always  # 开发环境显示详细错误
    include-message: always
    include-binding-errors: always

spring:
  datasource:
    url: jdbc:mysql://localhost:3306/dev_db?useUnicode=true&characterEncoding=utf8&useSSL=false&serverTimezone=GMT%2B8&allowPublicKeyRetrieval=true
    username: root
    password: 123456  # 请修改为你的MySQL密码
    driver-class-name: com.mysql.cj.jdbc.Driver
    hikari:
      maximum-pool-size: 10
      minimum-idle: 5
      connection-timeout: 30000
      idle-timeout: 600000
      max-lifetime: 1800000
      pool-name: DevHikariCP

  jpa:
    show-sql: true
    hibernate:
      ddl-auto: update  # 开发环境自动更新表结构
    properties:
      hibernate:
        format_sql: true
        dialect: org.hibernate.dialect.MySQL8Dialect

  thymeleaf:
    cache: false  # 开发环境禁用缓存

  web:
    resources:
      cache:
        period: 0  # 禁用静态资源缓存

# MyBatis配置
mybatis:
  mapper-locations: classpath:mapper/*.xml
  type-aliases-package: com.example.demo.entity
  configuration:
    log-impl: org.apache.ibatis.logging.stdout.StdOutImpl
    map-underscore-to-camel-case: true

# 日志配置
logging:
  level:
    root: INFO
    com.example.demo: DEBUG
    org.springframework.web: DEBUG
    org.hibernate.SQL: DEBUG
    org.hibernate.type.descriptor.sql.BasicBinder: TRACE

# 自定义配置
app:
  config:
    upload-path: ./uploads
    max-file-size: 10MB
    allowed-types: jpg,png,gif,pdf,doc,docx
  security:
    jwt:
      secret: dev-secret-key-change-in-production
      expiration: 86400000  # 24小时
9.3 运行项目
9.3.1 使用IDE运行
-
IntelliJ IDEA:
- 打开项目后,找到
DemoApplication.java - 右键点击类名或main方法
- 选择"Run ‘DemoApplication’"
- 打开项目后,找到
-
Eclipse/STS:
- 右键点击项目
- 选择"Run As" → “Spring Boot App”
9.3.2 使用Maven命令运行
# Windows
mvnw.cmd spring-boot:run

# Linux/macOS
./mvnw spring-boot:run

# 指定环境运行
mvnw.cmd spring-boot:run -Dspring-boot.run.profiles=dev
9.3.3 使用打包后的JAR运行
# 1. 打包项目
mvnw.cmd clean package

# 2. 运行JAR
java -jar target/demo-0.0.1-SNAPSHOT.jar

# 3. 指定环境运行
java -jar target/demo-0.0.1-SNAPSHOT.jar --spring.profiles.active=dev
9.4 验证项目运行
9.4.1 检查启动日志
启动成功后,控制台会显示:
                   _ooOoo_
                  o8888888o
                  88" . "88
                  (| -_- |)
                  O\  =  /O
               ____/`---'\____
             .'  \|     |//  `.
            /  \|||  :  |||//             /  _||||| -:- |||||-             |   | \\  -  /// |   |
           | \_|  ''\---/''  |   |
           \  .-\__  `-`  ___/-. /
         ___`. .'  /--.--\  `. . __
      ."" '<  `.___\_<|>_/___.'  >'"".
     | | :  `- \`.;`\ _ /`;.`/ - ` : | |
     \  \ `-.   \_ __\ /__ _/   .-` /  /
======`-.____`-.___\_____/___.-`____.-'======
                   `=---='
^^^^^^^^^^^^^^^^^^^^^^^^^^^^^^^^^^^^^^^^^^^^^
         佛祖保佑       永无BUG

Spring Boot Version: 3.1.5
Application Name: blog-demo
Profile: dev
Started DemoApplication in 3.456 seconds
9.4.2 访问测试接口
# 测试健康检查
curl http://localhost:8080/api/actuator/health

# 测试获取用户列表
curl http://localhost:8080/api/users

# 测试获取单个用户
curl http://localhost:8080/api/users/1

# 测试创建用户
curl -X POST http://localhost:8080/api/users   -H "Content-Type: application/json"   -d '{"username":"newuser","password":"123456","email":"new@example.com","age":26}'
9.5 开发环境配置说明
本项目采用dev环境作为主要开发环境,配置特点:
| 配置项 | 开发环境设置 | 说明 |
|---|---|---|
| 数据库 | MySQL本地数据库 | 使用localhost:3306 |
| JPA DDL | update | 自动更新表结构 |
| SQL日志 | 开启 | 控制台显示SQL语句 |
| Thymeleaf缓存 | 关闭 | 修改模板立即生效 |
| 静态资源缓存 | 禁用 | 修改资源立即生效 |
| 错误信息 | 详细显示 | 便于调试 |
| 日志级别 | DEBUG | 显示详细日志 |
注意事项:
- 请修改
application-dev.yml中的数据库密码为你的MySQL密码 - 开发环境配置不适用于生产环境,生产环境需使用
application-prod.yml - 敏感信息(如密码)建议使用环境变量或配置中心管理
9.6 项目运行结果展示
9.6.1 启动成功界面

启动成功后,控制台会显示佛祖保佑的Banner图,并显示应用启动信息。
9.6.2 API测试结果
获取用户列表:
curl http://localhost:8080/api/users
响应示例:
[
  {
    "id": 1,
    "username": "admin",
    "email": "admin@example.com",
    "age": 28,
    "status": "ACTIVE",
    "createTime": "2024-01-01T10:00:00",
    "updateTime": "2024-01-01T10:00:00"
  }
]
获取单个用户:
curl http://localhost:8080/api/users/1
响应示例:
{
  "id": 1,
  "username": "admin",
  "email": "admin@example.com",
  "age": 28,
  "status": "ACTIVE",
  "createTime": "2024-01-01T10:00:00",
  "updateTime": "2024-01-01T10:00:00"
}
创建用户:
curl -X POST http://localhost:8080/api/users \
  -H "Content-Type: application/json" \
  -d '{"username":"newuser","password":"123456","email":"new@example.com","age":26}'
响应示例:
{
  "id": 3,
  "username": "newuser",
  "email": "new@example.com",
  "age": 26,
  "status": null,
  "createTime": "2024-01-03T13:00:00",
  "updateTime": "2024-01-03T13:00:00"
}
更新用户:
curl -X PUT http://localhost:8080/api/users/1 \
  -H "Content-Type: application/json" \
  -d '{"username":"admin","email":"updated@example.com","age":29}'
删除用户:
curl -X DELETE http://localhost:8080/api/users/3
9.6.3 页面访问结果
访问首页:
http://localhost:8080/
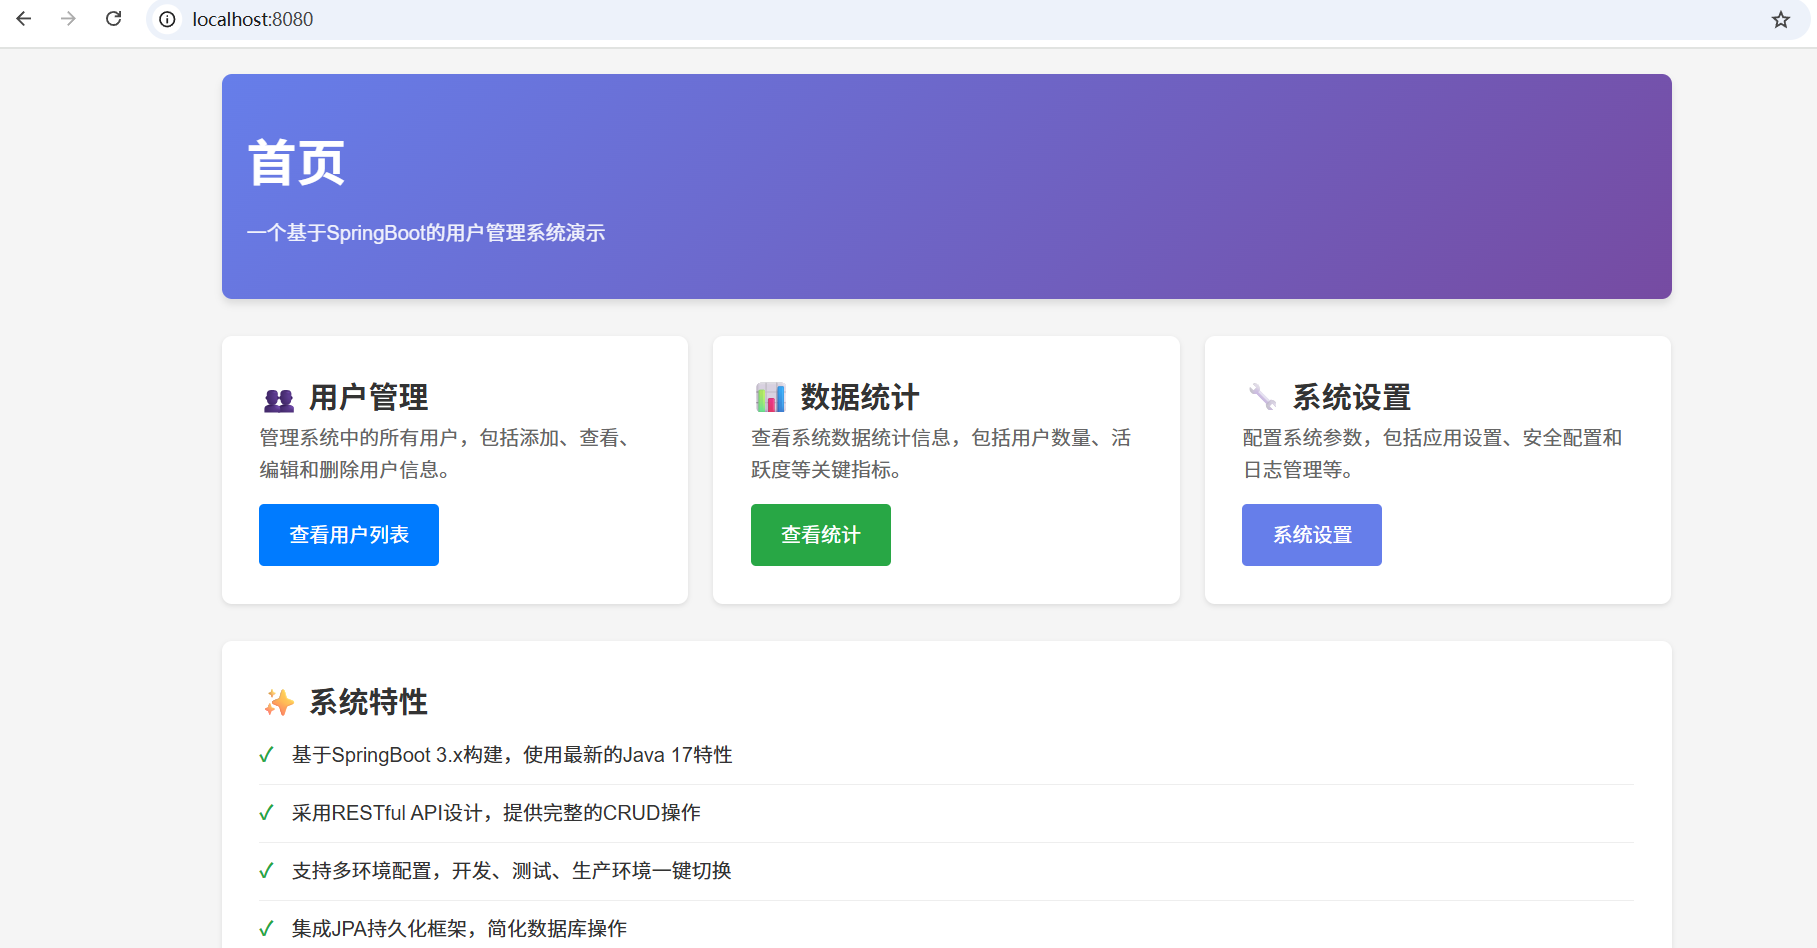
首页展示系统概览,包含三个主要功能卡片:
- 👥 用户管理:点击可跳转到用户列表页
- 📊 数据统计:查看系统数据统计(未实现功能)
- 🔧 系统设置:配置系统参数(未实现功能)
页面特性:
- 采用现代化卡片式设计
- 渐变色头部背景
- 响应式布局,支持移动设备
- 悬停动画效果
访问用户列表页:
http://localhost:8080/ui/users/list
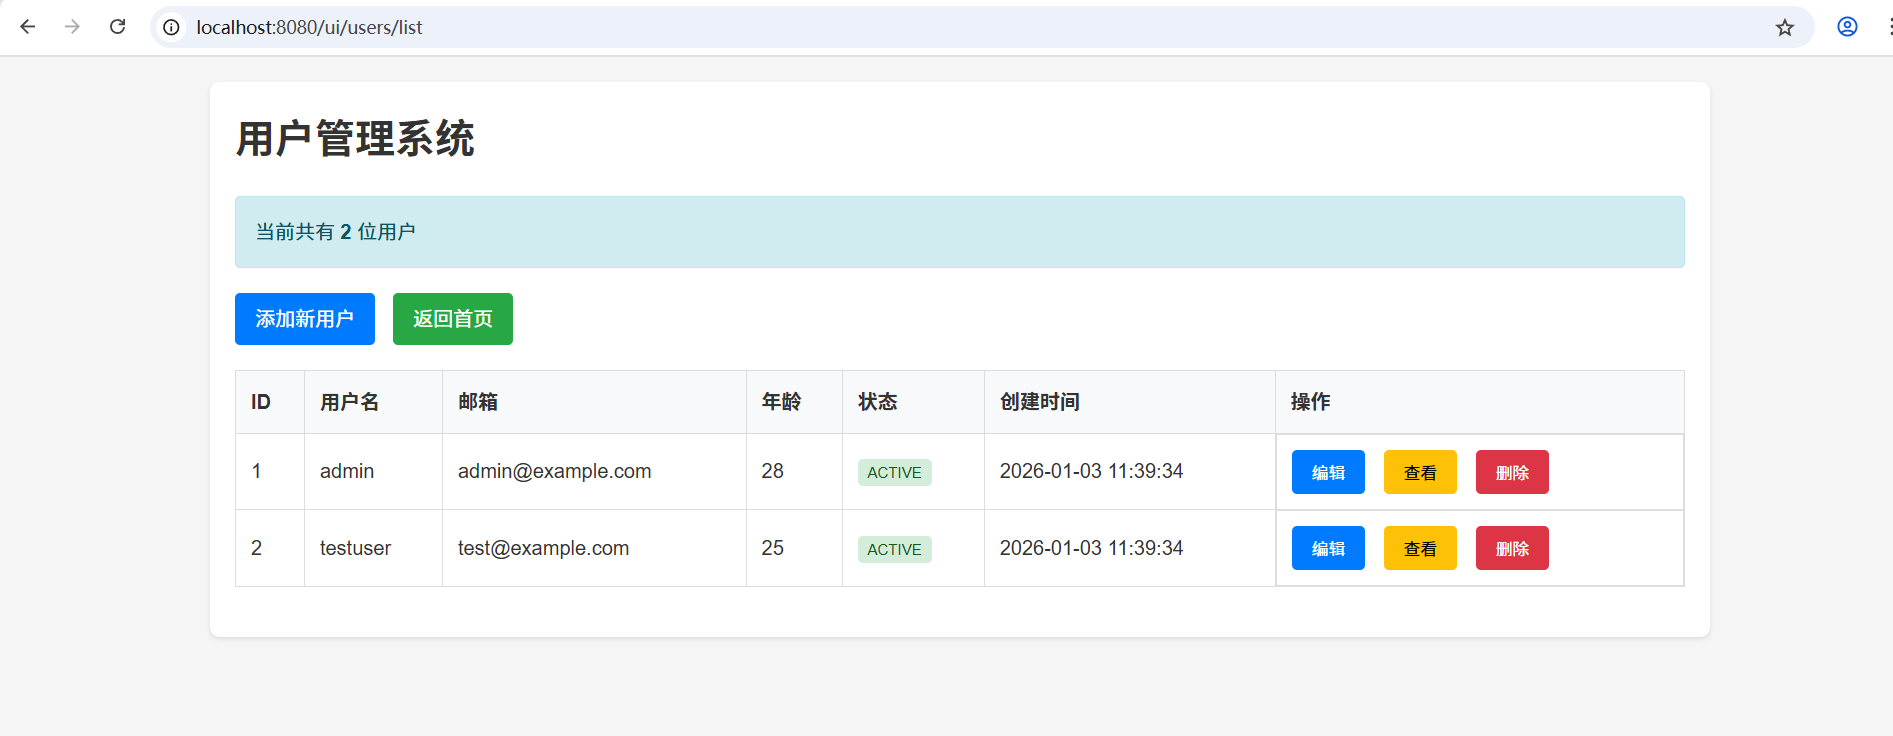
用户列表页功能:
- 展示所有用户的详细信息(ID、用户名、邮箱、年龄、状态、创建时间)
- 显示用户总数统计
- "添加新用户"按钮跳转到创建表单
- 每个用户行提供"查看"和"删除"操作按钮
- 空数据时显示友好提示
访问创建用户表单页:
http://localhost:8080/ui/users/new
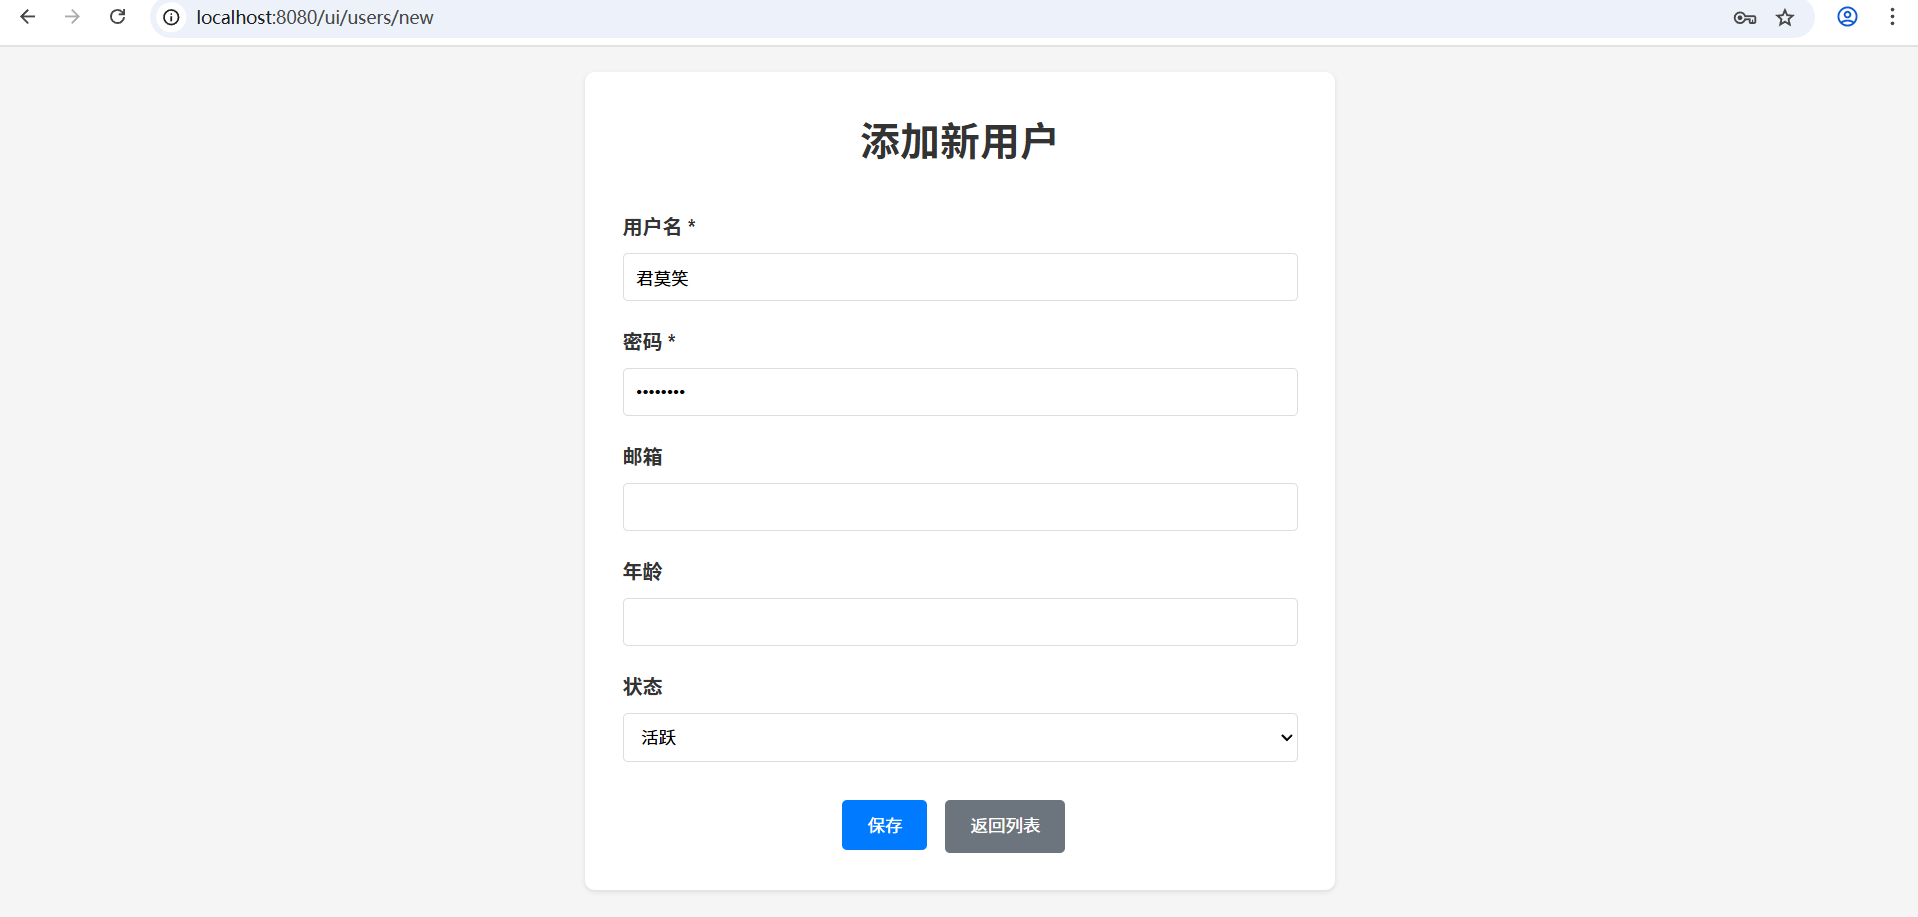
表单页功能:
- 用户名(必填)
- 密码(必填)
- 邮箱(可选)
- 年龄(可选,1-150)
- 状态(下拉选择:活跃/非活跃)
- 表单验证和错误提示
- 提交成功后自动跳转回列表页
API路径说明:
- RESTful API使用
/api/users作为基础路径 - Web页面使用
/ui/users/list、/ui/users/new等路径 - ID参数使用正则表达式限制为数字:
{id:\d+} - 防止路径冲突,如
/users/new不会被误识别为获取ID为"new"的用户
路径配置策略:
本项目采用分层路径设计,将API接口和页面路由分开管理:
-
API接口路径(
/api/*):- 所有RESTful API接口都使用
/api前缀 - 例如:
/api/users、/api/users/list、/api/users/{id} - 便于统一管理和权限控制
- 适合前后端分离架构
- 所有RESTful API接口都使用
-
页面路由路径(
/ui/*):- 所有页面路由都使用
/ui前缀 - 例如:
/ui/users/list、/ui/users/new - 与API接口明确区分
- 便于维护和理解
- 所有页面路由都使用
-
优势:
- 职责清晰:API和页面路由分离
- 易于扩展:可以独立配置拦截器、过滤器
- 安全可控:可以对API和页面分别设置权限
- 符合RESTful最佳实践
错误处理示例:
当访问无效ID时:
curl http://localhost:8080/api/users/abc
响应示例(404 Not Found):
{
  "success": false,
  "message": "参数类型错误:'abc' 无法转换为 Long",
  "parameter": "id",
  "timestamp": 1704289687000
}
十、实战练习
练习1:重构项目结构
将你的项目按照本文的标准结构进行重构:
- 创建标准的包结构:controller、service、dao、entity
- 分离配置文件:创建application-dev.yml和application-prod.yml
- 添加静态资源和模板文件
练习2:多环境配置
创建一个支持三环境的配置:
- 开发环境(dev):使用MySQL本地数据库
- 测试环境(test):使用MySQL测试数据库
- 生产环境(prod):使用MySQL生产数据库,关闭详细错误信息
练习3:自定义Banner
设计一个个性化的启动Banner,包含:
- 项目名称
- SpringBoot版本
- 启动时间
- 自定义ASCII艺术字
练习4:模块化设计
尝试将一个简单的项目拆分为两个模块:
- common模块:包含工具类和公共配置
- web模块:包含业务代码和Web配置
练习5:数据库操作
- 创建一个新的实体类(如Article)
- 创建对应的Repository、Service和Controller
- 测试增删改查操作
练习6:用户管理模块实现
本项目实现了一个完整的用户管理模块,包括用户列表展示、添加新用户、编辑用户和删除用户功能。以下是实现细节:
6.1 用户实体类(User)
用户实体类位于com.example.demo.entity包下,包含以下字段:
id:用户唯一标识,自增主键username:用户名,必填,唯一,长度限制50字符password:密码,必填email:邮箱地址age:年龄status:用户状态,枚举类型(ACTIVE/INACTIVE)createTime:创建时间,自动生成updateTime:更新时间,自动更新
6.2 用户控制器(UserController)
用户控制器位于com.example.demo.controller包下,提供以下REST API:
GET /api/users:获取所有用户列表GET /api/users/{id}:根据ID获取单个用户POST /api/users:创建新用户PUT /api/users/{id}:更新用户信息DELETE /api/users/{id}:删除用户
6.3 用户服务层(UserService和UserServiceImpl)
用户服务接口位于com.example.demo.service包下,实现类位于com.example.demo.service.impl包下,提供以下业务方法:
getUserById(Long id):根据ID获取用户createUser(User user):创建新用户getAllUsers():获取所有用户updateUser(Long id, User user):更新用户信息deleteUser(Long id):删除用户
6.4 用户表单页面(user-form.html)
用户表单页面位于src/main/resources/templates目录下,支持两种模式:
-
新增模式:
- 表单默认为空,无默认用户名和密码
- 提交按钮显示"保存"
- 提交时发送POST请求到
/api/users
-
编辑模式:
- 通过URL参数
?id={userId}进入编辑模式 - 页面加载时自动获取用户数据并填充表单
- 提交按钮显示"更新"
- 提交时发送PUT请求到
/api/users/{userId}
- 通过URL参数
6.5 用户列表页面(user-list.html)
用户列表页面位于src/main/resources/templates目录下,展示所有用户信息,并提供操作按钮:
- 编辑按钮:跳转到编辑页面,携带用户ID参数
- 查看按钮:弹出用户详情信息
- 删除按钮:删除指定用户,需要确认
6.6 页面控制器(PageController)
页面控制器位于com.example.demo.controller包下,提供以下页面路由:
GET /:首页GET /about:关于页面GET /ui/users/list:用户列表页面GET /ui/users/new:新增/编辑用户表单页面
6.7 实现细节
-
表单验证:
- 用户名长度必须在3-50个字符之间
- 密码长度不能少于6个字符
- 年龄必须在1-150之间
-
用户体验优化:
- 表单提交时禁用按钮,防止重复提交
- 操作成功后显示成功消息,1.5秒后自动跳转
- 操作失败时显示错误消息,恢复按钮状态
-
前后端交互:
- 使用Fetch API进行异步请求
- 请求和响应使用JSON格式
- 错误处理机制完善
十一、资源下载
📦 本文示例代码
gitee仓库:https://gitee.com/jun-mo-xiao11/springboot-blog-tutorial/tree/chapter-02
获取本文完整示例:
git clone https://gitee.com/jun-mo-xiao11/springboot-blog-tutorial.git
cd springboot-blog-tutorial/chapter-02
📚 扩展学习
- Spring官方文档:https://docs.spring.io/spring-boot/docs/current/reference/html/
- Maven官方指南:https://maven.apache.org/guides/
- 项目结构规范:https://spring.io/guides/gs/spring-boot/
- 最佳实践:https://github.com/spring-projects/spring-boot/tree/main/spring-boot-project/spring-boot-samples
十二、互动区
实践任务:
- 按照本文结构重构你的项目
- 尝试配置多环境并切换
- 创建一个自定义的Banner
问题反馈:
在实现过程中遇到问题?在评论区留言,我会24小时内回复!
建议征集:
你想在后续教程中看到什么内容?告诉我你的需求!
作者:[小毛]
技术栈:SpringBoot 3.1.5 | Java 17 | Maven 3.9+
版权声明:本文采用 CC BY-NC-SA 4.0 协议进行许可,转载请注明出处。

有“AI”的1024 = 2048,欢迎大家加入2048 AI社区
更多推荐


 20
20 0
0- 0


 已为社区贡献1条内容

所有评论(0)