PCIe Switch深度解析:数据中心的高速互联核心
·
📖 文章摘要
CPU的PCIe通道不够用怎么办?多GPU卡如何高效通信?NVMe硬盘池怎么实现高速连接?这一切的秘密都藏在PCIe Switch这个神奇芯片中!本文将带你深入探索PCIe Switch的世界,从基础原理到架构设计,从应用场景到未来趋势,让你彻底理解这个数据中心高速互联的核心组件!
目录
6.2 CXL(Compute Express Link)集成
🎯 一、PCIe Switch:为什么需要它?
1.1 传统PCIe连接的局限性
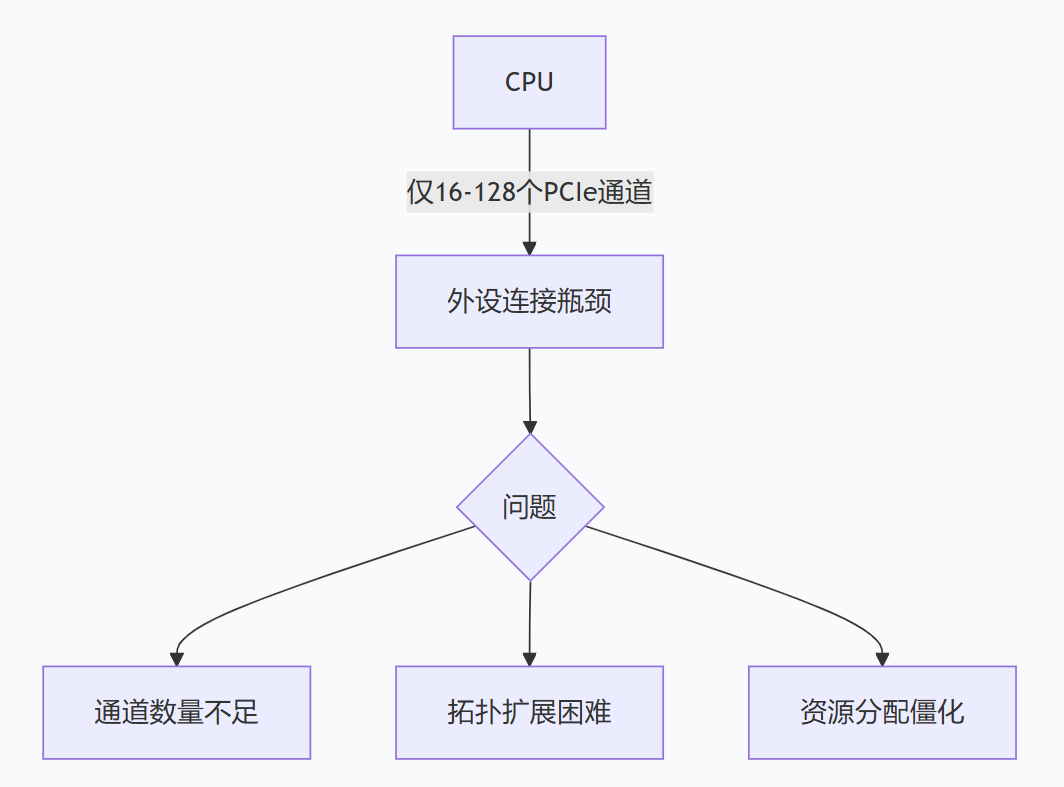
现实困境:
-
现代CPU通常只提供16-128个PCIe通道
-
但数据中心可能需要连接:
-
8-16个GPU卡(每个x16)
-
24-48个NVMe SSD(每个x4)
-
多个网卡、加速卡、存储控制器
-
1.2 PCIe Switch的价值主张
| 特性 | 无Switch | 有Switch | 改进倍数 |
|---|---|---|---|
| 可连接设备数 | ≤ CPU通道数/设备宽度 | 理论上无限 | 10-100倍 |
| 拓扑灵活性 | 树状固定 | 任意拓扑 | 极大提升 |
| 带宽利用率 | 低(通道闲置) | 高(动态分配) | 2-5倍 |
| 系统复杂度 | 简单但受限 | 复杂但灵活 | - |
🔧 二、PCIe Switch核心技术解析
2.1 基础架构概览
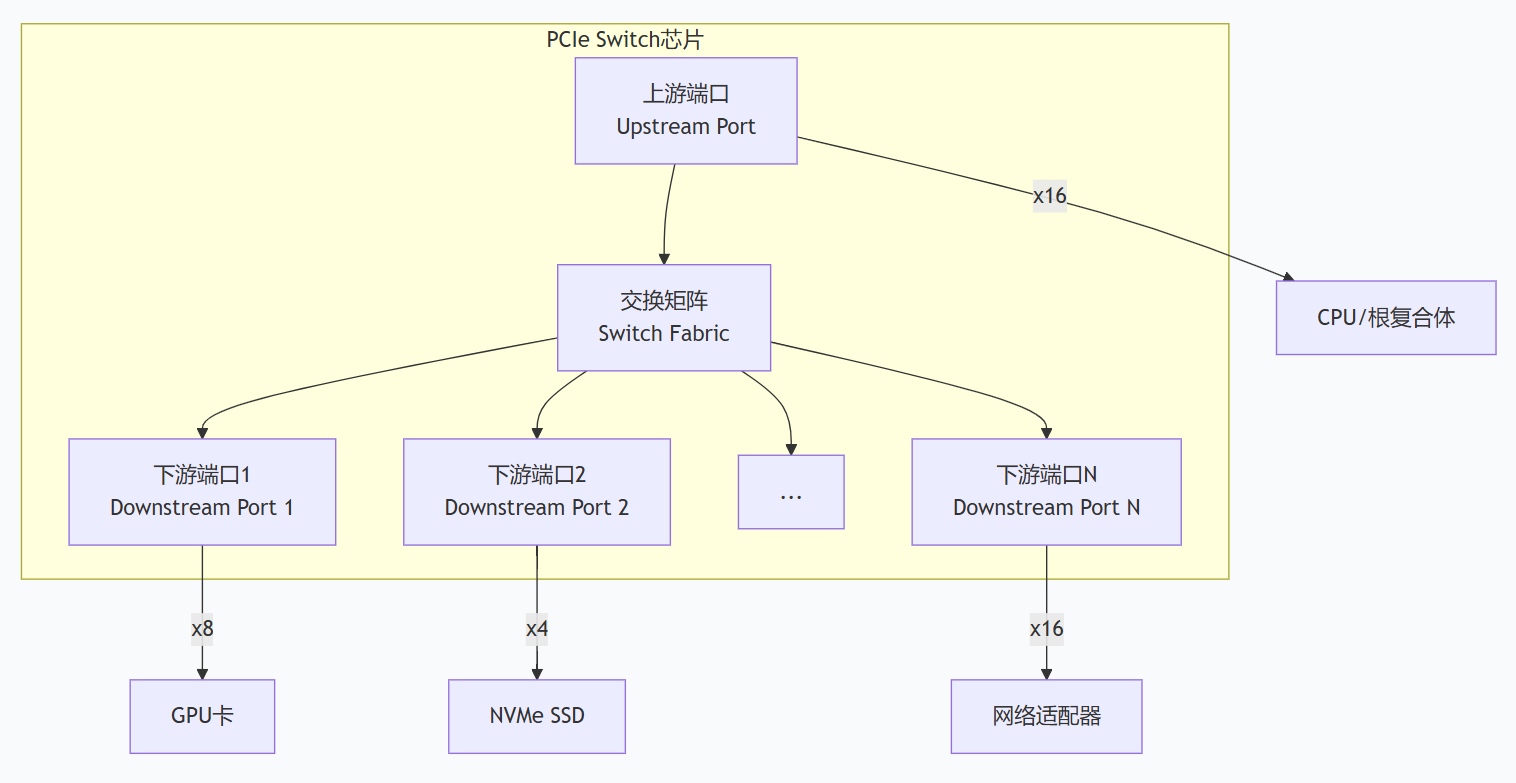
2.2 核心组件详解
2.2.1 端口类型
// PCIe Switch端口配置示例(概念性)
struct pcie_switch_port {
    enum port_type {
        UPSTREAM_PORT,      // 连接CPU/根复合体
        DOWNSTREAM_PORT,    // 连接端点设备
        CROSSLINK_PORT,     // 连接其他Switch(级联)
        MANAGEMENT_PORT     // 管理接口
    } type;

    int pcie_gen;           // PCIe代次:3.0, 4.0, 5.0, 6.0
    int lanes;              // 通道数:x1, x2, x4, x8, x16
    int max_payload_size;   // 最大载荷大小:128B-4096B
    bool sr_iov_support;    // 是否支持SR-IOV
    bool multicast_support; // 是否支持多播
};
2.2.2 交换矩阵(Switch Fabric)
# 简化的交换矩阵工作流程
class PCIeSwitchFabric:
    def __init__(self, num_ports, buffer_size):
        self.ports = num_ports
        self.buffer = [None] * buffer_size
        self.routing_table = {}  # 路由表:设备地址->端口映射
        self.arbitration_policy = "round_robin"  # 仲裁策略

    def route_packet(self, packet):
        """路由数据包"""
        dest_address = packet.destination

        # 1. 查找目标端口
        target_port = self.routing_table.get(dest_address)

        if not target_port:
            # 广播或丢弃
            return self.handle_unknown_address(packet)

        # 2. 检查目标端口状态
        if self.port_busy[target_port]:
            # 使用缓存缓冲
            return self.buffer_packet(packet, target_port)

        # 3. 转发数据包
        return self.forward_packet(packet, target_port)

    def learn_route(self, packet, ingress_port):
        """学习路由(自学习交换机)"""
        source_addr = packet.source
        self.routing_table[source_addr] = ingress_port
2.3 关键技术特性
2.3.1 虚拟化支持
# SR-IOV(单根I/O虚拟化)配置示例
# 一个物理设备虚拟为多个虚拟功能

# 查看设备SR-IOV能力
lspci -s 0000:01:00.0 -vv | grep -A5 SR-IOV

# 启用VF(虚拟功能)
echo 8 > /sys/bus/pci/devices/0000:01:00.0/sriov_numvfs

# 查看创建的VF
lspci | grep "Virtual Function"虚拟化类型对比:
| 技术 | 描述 | 优点 | 缺点 |
|---|---|---|---|
| SR-IOV | 硬件级虚拟化 | 性能接近物理设备 | 需要硬件支持 |
| MR-IOV | 多根虚拟化 | 跨主机共享 | 实现复杂 |
| 软件虚拟化 | 软件模拟 | 兼容性好 | 性能损失大 |
2.3.2 多播与广播
// 多播组管理示例
struct multicast_group {
    uint32_t group_id;
    uint32_t member_ports;  // 位图表示成员端口
    uint32_t source_port;   // 源端口
};

// 处理多播数据包
void handle_multicast_packet(struct pcie_packet *packet) {
    uint32_t mgid = packet->multicast_group_id;
    struct multicast_group *group = find_group(mgid);

    if (group) {
        // 复制到所有成员端口
        for (int port = 0; port < MAX_PORTS; port++) {
            if (group->member_ports & (1 << port)) {
                if (port != packet->ingress_port) {
                    forward_to_port(packet, port);
                }
            }
        }
    }
}
📊 三、主流PCIe Switch芯片对比
3.1 市场格局概览
| 厂商 | 主力产品 | 最大端口数 | PCIe版本 | 特色功能 |
|---|---|---|---|---|
| Broadcom | PEX88000系列 | 100端口 | 5.0/6.0 | 智能加速,低延迟 |
| Microchip | Switchtec系列 | 96端口 | 4.0/5.0 | 高可靠性,汽车级 |
| PLDA | XpressRICH系列 | 48端口 | 4.0/5.0 | 灵活配置,低功耗 |
| 德州仪器 | XIO系列 | 24端口 | 3.0/4.0 | 工业级,低成本 |
| 瑞萨 | IDT系列 | 48端口 | 3.0/4.0 | 服务器优化 |
3.2 技术规格对比表
| 产品型号 | PCIe版本 | 上行带宽 | 下行端口 | 延迟 | 功耗 | 应用场景 |
|---|---|---|---|---|---|---|
| PEX88048 | 5.0 | x16 | 48x x4 | 100ns | 18W | 高性能计算 |
| Switchtec PFX | 4.0 | x16 | 96x x1/x2/x4 | 150ns | 15W | 存储扩展 |
| XpressRICH4 | 4.0 | x16 | 48x x4 | 120ns | 12W | 通信设备 |
3.3 选型指南
# PCIe Switch选型决策树
def select_pcie_switch(requirements):
    """根据需求选择PCIe Switch"""

    if requirements['application'] == 'ai_training':
        # AI训练需要高带宽、低延迟
        candidates = [
            {'model': 'PEX88096', 'gen': 5.0, 'bandwidth': '64GT/s'},
            {'model': 'Switchtec PSX', 'gen': 5.0, 'bandwidth': '32GT/s'}
        ]

    elif requirements['application'] == 'cloud_storage':
        # 云存储需要多端口、高可靠性
        candidates = [
            {'model': 'Switchtec PFX', 'gen': 4.0, 'ports': 96},
            {'model': 'PEX88048', 'gen': 5.0, 'ports': 48}
        ]

    elif requirements['application'] == 'edge_computing':
        # 边缘计算需要低功耗、小尺寸
        candidates = [
            {'model': 'XIO2001', 'gen': 3.0, 'power': '3W'},
            {'model': 'XpressRICH3', 'gen': 4.0, 'power': '5W'}
        ]

    return evaluate_candidates(candidates, requirements['budget'])
🚀 四、实际应用场景分析
4.1 场景一:多GPU AI训练服务器
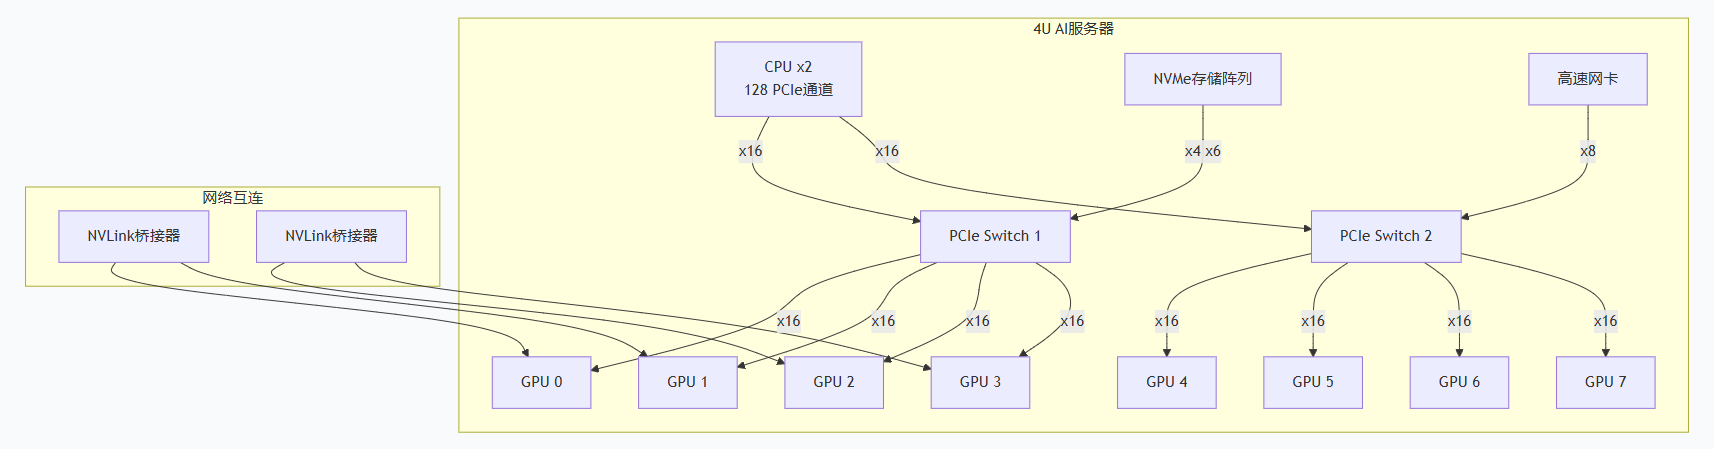
配置示例:
# 使用Broadcom PEX88096构建8-GPU系统
# 拓扑配置脚本(概念性)

# 配置上行端口(连接CPU)
configure_upstream_port --port 0 --width x16 --gen 5.0

# 配置GPU端口
for i in {1..8}; do
    configure_downstream_port \
        --port $i \
        --width x16 \
        --gen 5.0 \
        --max_payload 256 \
        --relaxed_ordering enabled
done

# 配置NVMe存储端口
for i in {9..14}; do
    configure_downstream_port \
        --port $i \
        --width x4 \
        --gen 4.0 \
        --nvme_optimized true
done

# 启用多播优化(用于GPU通信)
enable_multicast --group gpu_cluster --ports 1-8
4.2 场景二:全闪存存储阵列
# 存储阵列PCIe拓扑配置
storage_array:
  controller: 2    # 双控制器高可用
  pcie_switches:
    - model: "Switchtec PFX 96端口"
      upstream_ports:
        - controller_1: x16
        - controller_2: x16
      downstream_ports:
        nvme_ssds:
          count: 48
          configuration: x4 each
          total_bandwidth: "192GB/s"
        cache_ssds:
          count: 4
          configuration: x4 each
        expansion_ports:
          count: 2
          for: "JBOD连接"

  nvme_of_config:
    enabled: true
    max_namespaces: 1024
max_connections: 128性能分析:
# 计算存储阵列理论带宽
def calculate_storage_bandwidth(config):
    # PCIe 4.0 x4 每通道带宽 ≈ 8GB/s
    per_lane_bandwidth = 8  # GB/s

    # 总下行带宽
    total_downstream_lanes = config['nvme_ssds'] * 4
    max_downstream_bw = total_downstream_lanes * per_lane_bandwidth

    # 上行带宽限制
    upstream_lanes = config['upstream_ports'] * 16
    max_upstream_bw = upstream_lanes * per_lane_bandwidth

    # 有效带宽受限于最小值
    effective_bandwidth = min(max_downstream_bw, max_upstream_bw)

    return {
        '理论下行带宽': f"{max_downstream_bw} GB/s",
        '理论上行带宽': f"{max_upstream_bw} GB/s",
        '有效带宽': f"{effective_bandwidth} GB/s",
        '瓶颈': '上行' if max_upstream_bw < max_downstream_bw else '下行'
    }

# 示例:48盘NVMe阵列
config = {
    'nvme_ssds': 48,
    'upstream_ports': 2,  # 双上行
    'upstream_width': 16  # x16每端口
}
print(calculate_storage_bandwidth(config))
4.3 场景三:电信网络设备
// 5G基带单元中的PCIe Switch应用
struct bbu_pcie_config {
    // 上行连接
    struct pcie_link cpu_link;      // 连接基带处理器

    // 下行连接
    struct pcie_link fpga_accelerator[4];  // 4个加速FPGA
    struct pcie_link rf_interface[8];      // 8个射频接口
    struct pcie_link network_card[2];      // 2个高速网卡
    struct pcie_link timing_card;          // 定时同步卡

    // QoS配置
    struct qos_config {
        uint8_t rf_priority;        // 射频数据最高优先级
        uint8_t timing_priority;    // 定时数据次高
        uint8_t accelerator_priority;
        uint8_t network_priority;
    } qos;
};

// 关键配置:低延迟、确定性延迟
void configure_low_latency(struct pcie_switch *sw) {
    set_max_payload_size(sw, 128);      // 小包优化
    enable_cut_through_mode(sw);        // 直通模式
    set_arbitration(sw, "strict_priority");  // 严格优先级仲裁
    disable_ecrc_check(sw);             // 关闭CRC检查减少延迟
}
🔬 五、性能调优与最佳实践
5.1 延迟优化技巧
# 测量PCIe延迟的工具和方法
# 使用专用测试工具
pcie_bandwidth_test --mode latency --iterations 10000

# 系统级延迟检查
sudo lspci -vvv | grep -i latency
sudo cat /sys/bus/pci/devices/*/current_link_speed
sudo cat /sys/bus/pci/devices/*/current_link_width

# 启用PCIe ASPM(活动状态电源管理)
# 注意:可能增加延迟但节省功耗
echo "performance" > /sys/module/pcie_aspm/parameters/policy
5.2 带宽优化配置
# PCIe带宽优化算法
class PCIeBandwidthOptimizer:
    def __init__(self, switch_config):
        self.switch = switch_config
        self.port_utilization = {}
        self.hot_paths = []

    def analyze_traffic_pattern(self):
        """分析流量模式,识别热点路径"""
        # 监控各端口流量
        for port in self.switch.ports:
            traffic = self.monitor_port(port)
            self.port_utilization[port] = traffic

            # 识别高带宽需求路径
            if traffic['avg_bandwidth'] > self.switch.port_capacity * 0.7:
                self.hot_paths.append({
                    'port': port,
                    'src': traffic['main_source'],
                    'dst': traffic['main_destination'],
                    'bandwidth': traffic['avg_bandwidth']
                })

    def optimize_configuration(self):
        """优化Switch配置"""
        recommendations = []

        # 1. 动态调整通道宽度
        for hot_path in self.hot_paths:
            current_width = self.get_port_width(hot_path['port'])
            if current_width < 16:  # 可以升级
                recommendations.append({
                    'action': 'increase_width',
                    'port': hot_path['port'],
                    'from': current_width,
                    'to': min(16, current_width * 2),
                    'reason': f"高带宽需求: {hot_path['bandwidth']} GB/s"
                })

        # 2. 调整缓冲区大小
        total_buffer = self.switch.total_buffer_size
        used_buffer = sum(p['buffer_usage'] for p in self.port_utilization.values())

        if used_buffer > total_buffer * 0.8:
            recommendations.append({
                'action': 'increase_buffer',
                'reason': f"缓冲区使用率 {used_buffer/total_buffer*100:.1f}%"
            })

        # 3. 优化仲裁策略
        if len(self.hot_paths) > self.switch.ports / 2:
            recommendations.append({
                'action': 'change_arbitration',
                'from': 'round_robin',
                'to': 'weighted_round_robin',
                'weights': self.calculate_weights()
            })

        return recommendations
5.3 故障诊断与排查
#!/bin/bash
# pcie_diag.sh - PCIe Switch诊断脚本

echo "=== PCIe Switch诊断工具 ==="
echo "运行时间: $(date)"
echo ""

# 1. 检查Switch设备
echo "1. 检测PCIe Switch设备:"
lspci -d : -vv | grep -i "switch\|bridge" | head -20

# 2. 检查链接状态
echo -e "\n2. PCIe链接状态:"
for device in /sys/bus/pci/devices/*; do
    if [ -f "$device/current_link_speed" ]; then
        speed=$(cat "$device/current_link_speed")
        width=$(cat "$device/current_link_width")
        device_name=$(basename "$device")
        echo "设备 $device_name: $speed x$width"
    fi
done

# 3. 检查错误计数
echo -e "\n3. PCIe错误统计:"
find /sys/devices -name "aer_dev_correctable" -o -name "aer_dev_fatal" | while read file; do
    dir=$(dirname "$file")
    device=$(basename "$dir")
    correctable=$(cat "$dir/aer_dev_correctable" 2>/dev/null || echo "N/A")
    fatal=$(cat "$dir/aer_dev_fatal" 2>/dev/null || echo "N/A")

    if [ "$correctable" != "0" ] || [ "$fatal" != "0" ]; then
        echo "设备 $device: 可纠正错误=$correctable, 致命错误=$fatal"
    fi
done

# 4. 检查DMA性能
echo -e "\n4. DMA性能测试:"
if command -v dd &> /dev/null; then
    dd if=/dev/zero of=/dev/null bs=1M count=1000 2>&1 | grep "bytes transferred"
fi

# 5. 建议修复措施
echo -e "\n5. 潜在问题和建议:"
if dmesg | grep -i "pcie.*error" | tail -5; then
    echo "检测到PCIe错误,建议:"
    echo "  - 检查硬件连接"
    echo "  - 更新固件和驱动"
    echo "  - 降低PCIe速率测试"
fi
🌟 六、未来发展趋势
6.1 PCIe 6.0/7.0技术演进
PCIe版本对比
| 特性 | PCIe 4.0 | PCIe 5.0 | PCIe 6.0 | PCIe 7.0(预计) |
|---|---|---|---|---|
| 发布时间 | 2017 | 2019 | 2022 | 2025 |
| 单通道速率 | 16 GT/s | 32 GT/s | 64 GT/s | 128 GT/s |
| x16带宽 | 32 GB/s | 64 GB/s | 128 GB/s | 256 GB/s |
| 编码方式 | 128b/130b | 128b/130b | PAM4 + FEC | PAM4 + 增强FEC |
| 延迟 | ~100ns | ~90ns | ~80ns | ~70ns |
| 主要改进 | 带宽翻倍 | 信号完整性优化 | PAM4信号,FEC | 能效提升 |
6.2 CXL(Compute Express Link)集成
# CXL over PCIe 配置示例
cxl_over_pcie:
  enabled: true
  protocols:
    - cxl.io:    # I/O语义(兼容PCIe)
        uses: "设备发现、配置"
    - cxl.cache: # 缓存语义
        uses: "CPU缓存一致性"
    - cxl.mem:   # 内存语义
        uses: "内存池化、共享"

  use_cases:
    - memory_pooling:      # 内存池化
        description: "多个服务器共享大容量内存池"
        benefit: "提高内存利用率,降低成本"

    - cache_coherent_accelerators:  # 缓存一致性加速器
        description: "GPU/FPGA与CPU缓存一致性"
        benefit: "减少数据复制,提升性能"

    - composable_disaggregated_infrastructure:  # 可组合分解架构
        description: "按需组合计算、内存、存储资源"
        benefit: "资源利用率最大化"
6.3 光电混合互连
# 未来光电混合PCIe Switch概念设计
class OpticalPCIESwitch:
    def __init__(self):
        # 传统电接口
        self.electrical_ports = 48  # 短距连接
        self.electrical_range = 0.5  # 米

        # 光接口
        self.optical_ports = 12     # 长距连接
        self.optical_range = 100    # 米
        self.wavelengths = 4        # 波分复用

        # 光电转换引擎
        self.oe_converters = 12     # 光电转换模块
        self.conversion_latency = 10  # 纳秒

    def route_optical_packet(self, packet):
        """路由光信号数据包"""
        if packet.distance < 1.0:  # 短距离,用电信号
            return self.electrical_switch.route(packet)
        else:  # 长距离,用光信号
            # 分配波长
            wavelength = self.assign_wavelength(packet.priority)

            # 光电转换
            optical_signal = self.convert_to_optical(packet, wavelength)

            # 光交换
            return self.optical_switch.route(optical_signal)
6.4 智能管理与AI优化
# AI驱动的PCIe Switch优化
class AIPCIeManager:
    def __init__(self):
        self.ml_model = self.load_pretrained_model()
        self.traffic_history = []
        self.prediction_horizon = 60  # 预测未来60秒

    def predict_traffic_pattern(self):
        """预测流量模式"""
        # 收集历史数据
        features = self.extract_features(self.traffic_history)

        # 使用ML模型预测
        predictions = self.ml_model.predict(features)

        # 解析预测结果
        expected_bursts = predictions['burst_times']
        expected_hot_paths = predictions['hot_paths']
        expected_bandwidth = predictions['bandwidth_requirements']

        return {
            'suggested_config': self.generate_config(predictions),
            'expected_peak_time': expected_bursts,
            'preallocation_plan': self.create_preallocation_plan(predictions)
        }

    def proactive_optimize(self):
        """主动优化"""
        predictions = self.predict_traffic_pattern()

        # 在流量高峰前预配置资源
        if self.time_until_peak() < 30:  # 30秒内将出现高峰
            self.preallocate_bandwidth(predictions['hot_paths'])
            self.adjust_qos_priorities(predictions['priority_traffic'])
            self.enable_low_latency_mode(predictions['latency_sensitive'])
🧪 七、动手实验:搭建测试环境
7.1 硬件需求清单
# 最小化PCIe Switch测试平台
test_platform:
  motherboard: "支持PCIe bifurcation"
  cpu: "Intel Xeon 或 AMD EPYC (至少48通道)"
  memory: "64GB DDR4 以上"

  pcie_switch_card:
    model: "Microchip Switchtec PAX 或类似评估板"
    ports: "12个下游端口"
    management: "USB/UART接口"

  test_devices:
    - type: "NVMe SSD"
      count: 4
      interface: "PCIe 4.0 x4"

    - type: "10GbE网卡"
      count: 2
      interface: "PCIe 3.0 x8"

    - type: "USB 3.2控制器"
      count: 1
      interface: "PCIe 3.0 x4"

  monitoring:
    - "PCIe分析仪 (可选)"
    - "高速示波器 (可选)"
    - "温度监控器"
7.2 软件配置步骤
#!/bin/bash
# setup_pcie_switch_test.sh

echo "=== PCIe Switch测试环境配置 ==="

# 1. 安装必要工具
echo "安装诊断工具..."
sudo apt update
sudo apt install -y \
    pciutils \
    lsscsi \
    nvme-cli \
    stress-ng \
    fio \
    iperf3 \
    ethtool

# 2. 加载内核模块
echo "加载内核模块..."
sudo modprobe pcieport
sudo modprobe nvme
sudo modprobe uio
sudo modprobe vfio-pci

# 3. 配置PCIe Switch(如果支持软件配置)
if [ -f "/sys/bus/pci/drivers/switchtec/" ]; then
    echo "配置Switchtec设备..."
    SWITCH_DEVICE=$(lspci -d 1e5d: -n | awk '{print $1}')

    if [ ! -z "$SWITCH_DEVICE" ]; then
        # 绑定到vfio-pci用于直接访问
        sudo ./switchtec_bind.sh $SWITCH_DEVICE

        # 运行配置工具
        sudo switchtec fw-info /dev/switchtec0
        sudo switchtec status /dev/switchtec0
    fi
fi

# 4. 运行基础测试
echo "运行基础性能测试..."

# 测试PCIe带宽
echo "测试PCIe带宽..."
sudo fio --name=pcie_test \
         --filename=/dev/nvme0n1 \
         --rw=randread \
         --bs=128k \
         --iodepth=32 \
         --size=1G \
         --runtime=30 \
         --group_reporting

# 测试延迟
echo "测试延迟..."
sudo nvme lat-stats /dev/nvme0n1

# 5. 监控设置
echo "设置监控..."
# 创建监控脚本
cat > monitor_pcie.sh << 'EOF'
#!/bin/bash
while true; do
    clear
    echo "PCIe状态监控 - $(date)"
    echo "========================="

    # 显示链接状态
    echo "链接状态:"
    for dev in /sys/bus/pci/devices/*; do
        if [ -f "$dev/current_link_speed" ]; then
            speed=$(cat "$dev/current_link_speed")
            width=$(cat "$dev/current_link_width")
            echo "  $(basename $dev): $speed x$width"
        fi
    done

    # 显示温度(如果支持)
    if [ -f "/sys/bus/pci/devices/0000:01:00.0/temp1_input" ]; then
        temp=$(cat "/sys/bus/pci/devices/0000:01:00.0/temp1_input")
        echo "Switch温度: $((temp/1000))°C"
    fi

    sleep 2
done
EOF

chmod +x monitor_pcie.sh

echo "配置完成!"
echo "运行 './monitor_pcie.sh' 开始监控"
7.3 性能基准测试套件
# pcie_benchmark.py
import subprocess
import json
import time
from datetime import datetime

class PCIeBenchmark:
    def __init__(self):
        self.results = {}

    def run_bandwidth_test(self, device, block_size="128k", iodepth=32):
        """运行带宽测试"""
        cmd = [
            "fio",
            "--name=bench",
            f"--filename={device}",
            "--rw=randrw",
            "--rwmixread=70",
            f"--bs={block_size}",
            f"--iodepth={iodepth}",
            "--size=1G",
            "--runtime=30",
            "--output-format=json"
        ]

        result = subprocess.run(cmd, capture_output=True, text=True)
        data = json.loads(result.stdout)

        read_bw = data['jobs'][0]['read']['bw'] / 1024  # MB/s
        write_bw = data['jobs'][0]['write']['bw'] / 1024

        return {
            "read_bandwidth_mbps": read_bw,
            "write_bandwidth_mbps": write_bw,
            "total_bandwidth_mbps": read_bw + write_bw
        }

    def run_latency_test(self, device):
        """运行延迟测试"""
        cmd = ["nvme", "lat-stats", device]
        result = subprocess.run(cmd, capture_output=True, text=True)

        # 解析延迟数据
        lines = result.stdout.split('\n')
        latency_data = {}

        for line in lines:
            if "avg" in line.lower():
                parts = line.split()
                if len(parts) >= 2:
                    latency_data[parts[0]] = parts[1]

        return latency_data

    def run_iops_test(self, device, block_size="4k"):
        """运行IOPS测试"""
        cmd = [
            "fio",
            "--name=iops_test",
            f"--filename={device}",
            "--rw=randrw",
            "--rwmixread=70",
            f"--bs={block_size}",
            "--iodepth=1",
            "--numjobs=4",
            "--size=1G",
            "--runtime=30",
            "--output-format=json"
        ]

        result = subprocess.run(cmd, capture_output=True, text=True)
        data = json.loads(result.stdout)

        read_iops = data['jobs'][0]['read']['iops']
        write_iops = data['jobs'][0]['write']['iops']

        return {
            "read_iops": read_iops,
            "write_iops": write_iops,
            "total_iops": read_iops + write_iops
        }

    def run_comprehensive_test(self, device):
        """运行全面测试"""
        print(f"开始PCIe设备 {device} 的全面测试")
        print("=" * 50)

        self.results['timestamp'] = datetime.now().isoformat()
        self.results['device'] = device

        # 1. 带宽测试
        print("1. 运行带宽测试...")
        self.results['bandwidth'] = self.run_bandwidth_test(device)

        # 2. 延迟测试
        print("2. 运行延迟测试...")
        self.results['latency'] = self.run_latency_test(device)

        # 3. IOPS测试
        print("3. 运行IOPS测试...")
        self.results['iops'] = self.run_iops_test(device)

        # 4. 不同块大小测试
        print("4. 块大小敏感性测试...")
        block_sizes = ["4k", "8k", "16k", "32k", "64k", "128k", "1M"]
        self.results['block_size_sensitivity'] = {}

        for bs in block_sizes:
            print(f"  测试块大小: {bs}")
            self.results['block_size_sensitivity'][bs] = self.run_bandwidth_test(device, bs)
            time.sleep(1)

        # 保存结果
        with open(f"pcie_benchmark_{datetime.now().strftime('%Y%m%d_%H%M%S')}.json", 'w') as f:
            json.dump(self.results, f, indent=2)

        print("\n测试完成!")
        print(f"结果已保存到: pcie_benchmark_*.json")

        return self.results

# 使用示例
if __name__ == "__main__":
    benchmark = PCIeBenchmark()

    # 测试第一个NVMe设备
    results = benchmark.run_comprehensive_test("/dev/nvme0n1")

    # 打印摘要
    print("\n" + "="*50)
    print("测试摘要:")
    print(f"总带宽: {results['bandwidth']['total_bandwidth_mbps']:.2f} MB/s")
    print(f"总IOPS: {results['iops']['total_iops']:.0f}")

    if 'avg_latency' in results['latency']:
        print(f"平均延迟: {results['latency']['avg_latency']}")
📝 八、总结与展望
8.1 关键技术总结
| 技术领域 | 现状 | 挑战 | 发展方向 |
|---|---|---|---|
| 带宽 | PCIe 5.0 64GB/s | 信号完整性 | PCIe 6.0/7.0,光学互连 |
| 延迟 | 50-100ns | 协议开销 | 更简洁协议,直通模式 |
| 可扩展性 | 数百个设备 | 拓扑复杂性 | 自动发现,动态配置 |
| 虚拟化 | SR-IOV成熟 | 安全性隔离 | 硬件强制隔离,信任域 |
| 管理 | 基础带外管理 | 复杂度高 | AI驱动,预测性维护 |
8.2 应用前景
-
AI/ML加速:
-
多GPU/TPU高速互连
-
近内存计算架构
-
模型参数服务器
-
-
可组合基础设施:
-
按需分配计算资源
-
内存池化和共享
-
存储资源解耦
-
-
边缘计算:
-
紧凑型高带宽互连
-
异构计算集成
-
低功耗优化
-
-
量子计算接口:
-
经典-量子混合架构
-
超低延迟控制接口
-
大规模量子比特互连
-
8.3 给工程师的建议
## 学习和实践路线图

### 初级(1-2年经验)
1. **理解基础**:PCIe协议基础,拓扑结构
2. **工具掌握**:lspci, setpci, FIO, NVMe-cli
3. **实践项目**:搭建多NVMe存储系统

### 中级(3-5年经验)
1. **深入协议**:PCIe事务层,数据链路层
2. **性能调优**:延迟分析,带宽优化
3. **项目实战**:设计GPU服务器互连方案

### 高级(5年以上经验)
1. **架构设计**:大规模互连架构
2. **前瞻技术**:CXL,光学互连
3. **标准化贡献**:参与行业标准制定
8.4 资源推荐
官方资源:
开源项目:
学习资料:
-
《PCI Express系统架构》
-
《NVMe SSD设计与实现》
✅ 知识检查清单
完成本文学习后,你应该掌握:
-
PCIe Switch的基本工作原理
-
主流PCIe Switch芯片特性对比
-
多GPU系统互连设计方法
-
PCIe性能测试和调优技巧
-
CXL与PCIe的关系和演进
-
未来PCIe技术发展趋势
-
实际环境中的故障诊断方法
有任何PCIe相关问题或项目经验?欢迎在评论区分享交流!

有“AI”的1024 = 2048,欢迎大家加入2048 AI社区
更多推荐


 14
14 0
0- 0


 已为社区贡献1条内容

所有评论(0)