从Spatial-MLLM看到Multi-SpatialMLLM的多模态大语言模型
Meta AI与
0. 简介
Multi-SpatialMLLM是由Meta AI团队与香港中文大学联合开发的创新性多模态大语言模型,专门针对多帧空间理解任务进行了优化。该项目通过集成深度感知、视觉对应和动态感知三大核心能力,为MLLM注入了强大的多帧空间理解能力。项目的核心贡献包括MultiSPA大规模数据集(包含超过2700万个训练样本,涵盖多样化的3D和4D场景)、统一评估基准(提供全面的空间任务测试框架,使用统一的评估指标)、多任务协同优化(展现出显著的多任务学习效益和新兴能力)以及机器人应用(可作为多帧奖励标注器应用于机器人领域)。
1. Multi-SpatialMLLM vs Spatial-MLLM 核心算法对比
在深入探讨Multi-SpatialMLLM之前,我们首先对比分析两个项目的核心算法差异。这也是最近才开源的一项工作,但是个人觉得Multi更具有泛化能力。根据论文Spatial-MLLM: Boosting MLLM Capabilities in Visual-based Spatial Intelligence的分析,两个项目在技术路线上存在根本性差异。
1.1 技术路径根本差异
Multi-SpatialMLLM采用数据驱动方法,通过大规模数据集和数据引擎来提升空间理解能力。其核心思想是通过2700万样本的海量训练数据,让模型在多任务学习过程中自然地获得空间推理能力。相比之下,Spatial-MLLM采用架构创新方法,使用双编码器架构结合空间感知帧采样,通过较少的120K样本但更精巧的架构设计来实现空间理解。
1.2 算法架构对比
Spatial-MLLM的核心算法基于双编码器架构。该方法设计了一个预训练的2D视觉编码器来提取语义特征,以及一个空间编码器(从视觉几何模型的骨干网络初始化)来提取3D结构特征。两个编码器的特征通过轻量级连接器融合成统一的视觉token,为LLM提供增强的空间理解能力。此外,Spatial-MLLM还提出了空间感知帧采样策略,在推理时选择空间信息量最丰富的帧,确保即使在有限的token长度下,模型也能关注对空间推理至关重要的帧。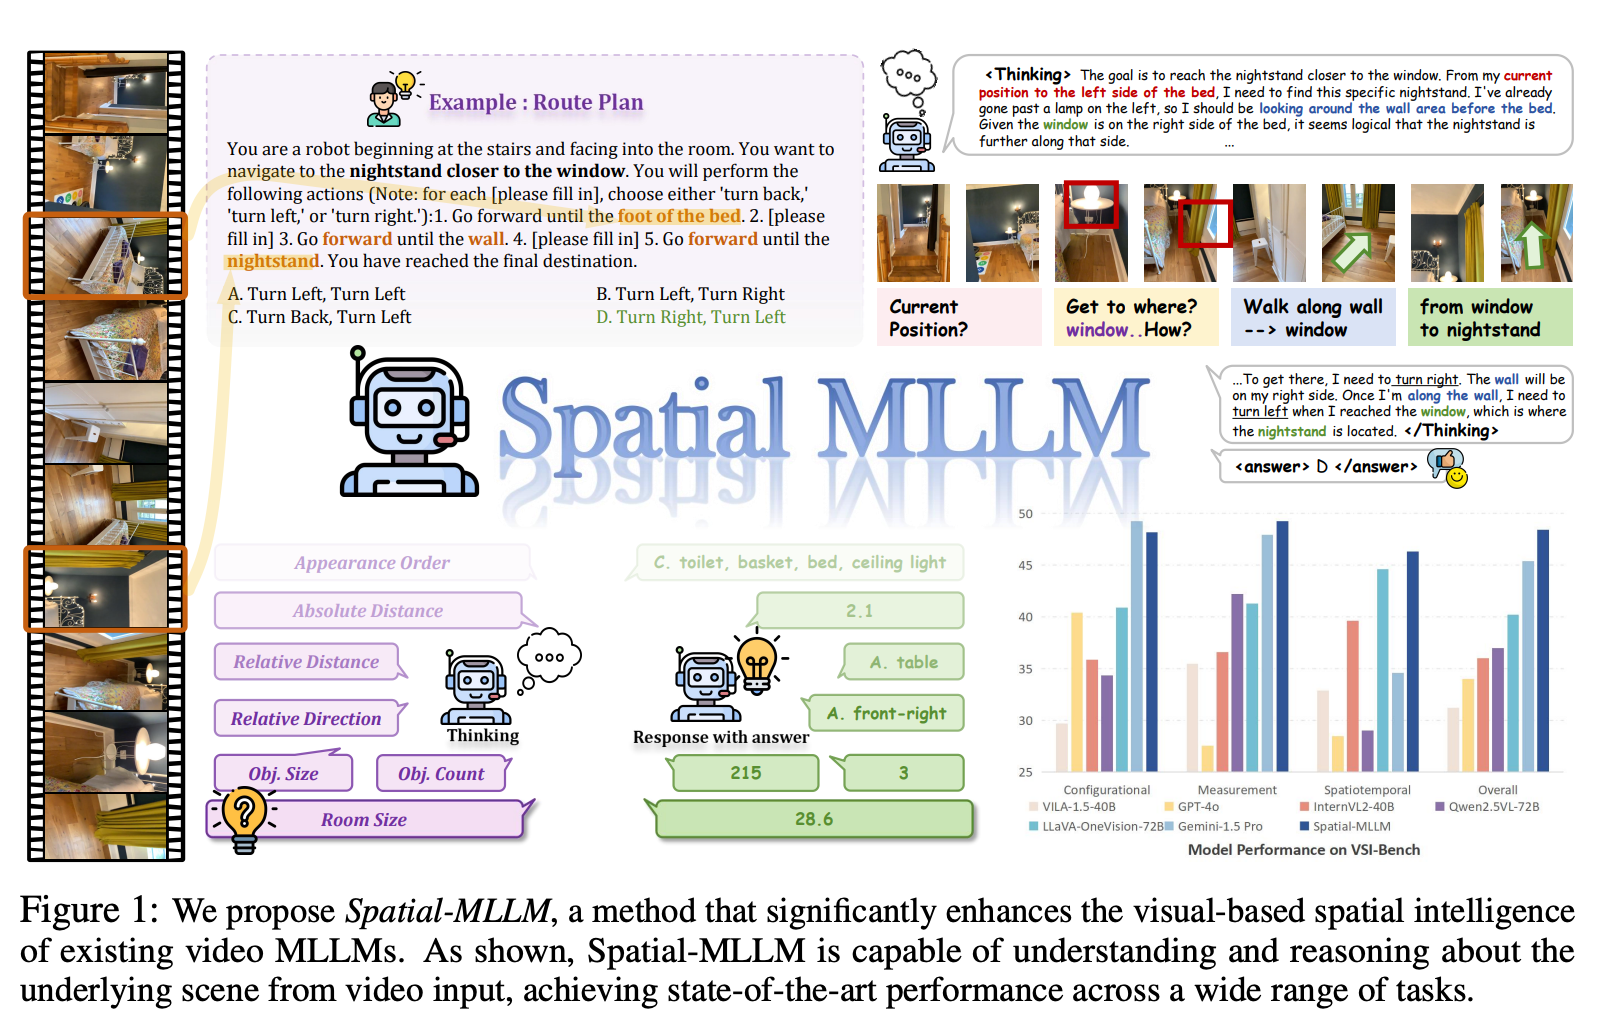
图1:我们提出了Spatial-MLLM,一种显著增强现有视频多模态大语言模型(MLLM)视觉基础空间智能的方法。如图所示,Spatial-MLLM能够理解和推理视频输入中的潜在场景,在广泛的任务中实现了最先进的性能。
Multi-SpatialMLLM则采用基于InternVL-2的微调方法,通过数据引擎生成大规模训练数据来获得空间理解能力。该方法的核心在于构建了五大功能模块的数据生成引擎,每个模块都有专门的算法来生成高质量的训练样本。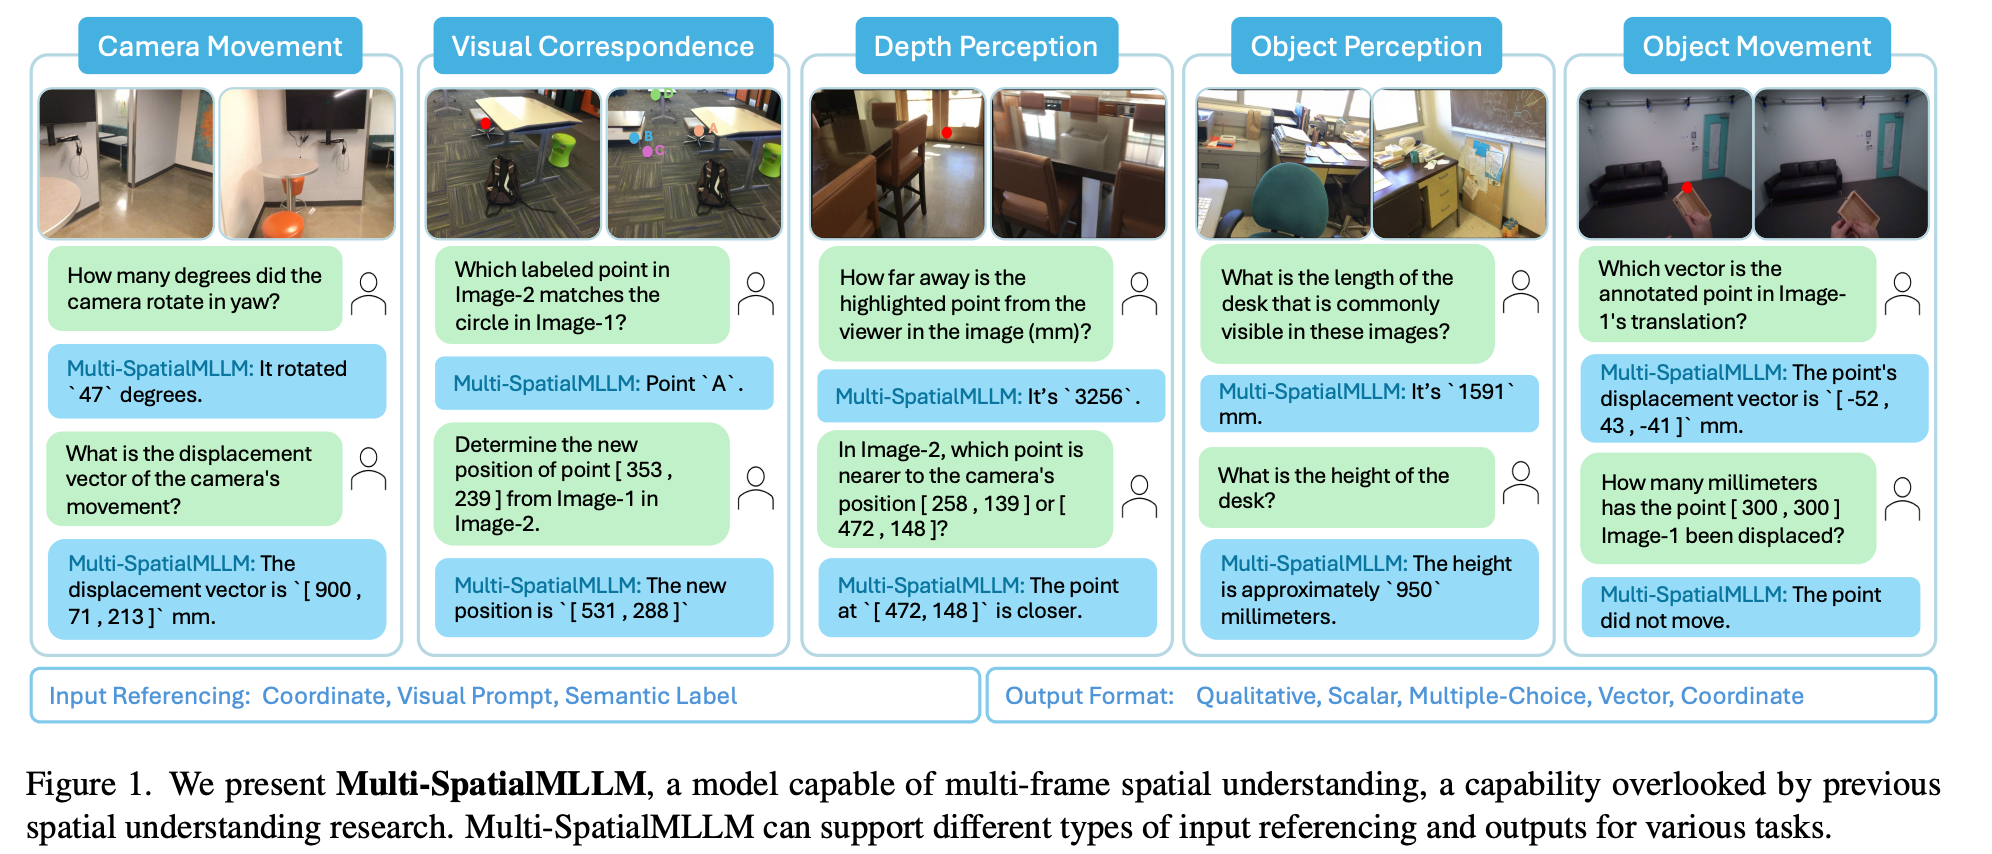
图1:我们提出了Multi-SpatialMLLM,这是一种能够进行多帧空间理解的模型,这一能力在以往的空间理解研究中被忽视。Multi-SpatialMLLM可以支持不同类型的输入引用和输出,以适应各种任务。
Multi-SpatialMLLM的架构基于数据引擎驱动的方法,其核心思想是通过大规模、多样化的训练数据让模型自然地学习空间推理能力。项目包含以下五个核心数据生成引擎:
# Multi-SpatialMLLM的实际项目结构
spatial_engine/
├── camera_movement/              # 相机运动分析引擎
│   ├── calculate_frames_relations.py
│   └── camera_movement_engine_train_val.py
├── depth_perception/             # 深度感知引擎
│   ├── depth_estimation_dot_engine.py
│   ├── depth_estimation_coor_engine.py
│   ├── depth_comparison_dot_engine.py
│   └── depth_comparison_coor_engine.py
├── visual_correspondence/        # 视觉对应引擎
│   ├── visual_correspondence_qa_engine_dot_2_multichoice.py
│   └── visual_correspondence_qa_engine_coor_2_coor.py
├── object_perception/           # 物体感知引擎
│   ├── compute_object_visibility.py
│   ├── single_object_coverage_finder.py
│   ├── merge_object_coverage.py
│   └── single_object_perception_engine.py
├── object_movement/             # 物体运动引擎
│   ├── single_object_movement_engine_coord.py
│   └── single_object_movement_engine_dot.py
└── utils/                       # 工具模块
    └── scannet_utils/
        └── handler/
            └── info_handler.py
每个数据引擎都专门负责生成特定类型的空间理解任务数据,最终汇总成包含2700万样本的MultiSPA数据集。这种模块化的设计确保了数据质量和任务覆盖的全面性。
1.3 空间理解机制对比
Spatial-MLLM通过几何先验知识来实现空间理解。该方法利用视觉几何基础模型(如VGGT)的结构先验,这些模型通常在像素-点对上训练,能够补充主要在图像-文本数据上训练的通用视频MLLM视觉编码器。双编码器设计使得模型能够同时捕获语义信息和几何结构信息,从而在没有显式3D数据输入的情况下进行有效的空间推理。
Multi-SpatialMLLM则通过多任务学习机制实现空间理解。该方法认为通过在大规模、多样化的空间任务上进行联合训练,模型能够自然地学习到空间推理的通用模式。五大核心模块(深度感知、视觉对应、动态感知、相机运动、物体感知)的协同训练产生了显著的多任务学习效益,使得模型在各种空间理解任务上都能表现出色。
2. Multi-SpatialMLLM核心算法详解
Multi-SpatialMLLM的核心算法围绕五大功能模块展开,每个模块都有精心设计的数据生成引擎和算法实现。
2.1 相机运动分析算法
相机运动模块的核心算法calculate_frames_relations.py负责计算多帧图像间的空间关系。该算法通过分析相机位姿变化、视野重叠率、以及几何变换来建立帧间关联。
def calculate_camera_overlap(in_bounds_dict, image_id1, image_id2, use_cuda=False):
    """
    计算两个相机视野重叠百分比的核心算法

    算法原理:
    1. 获取两个相机的可见点集合
    2. 计算并集(至少在一个相机中可见的点)
    3. 计算交集(在两个相机中都可见的点)
    4. 重叠率 = 交集 / 并集 * 100
    """
    in_bounds1 = in_bounds_dict[image_id1]
    in_bounds2 = in_bounds_dict[image_id2]

    if torch.cuda.is_available() and use_cuda:
        # GPU加速计算
        in_bounds1 = torch.from_numpy(in_bounds1).to('cuda')
        in_bounds2 = torch.from_numpy(in_bounds2).to('cuda')

        # 计算可见点的并集和交集
        visible_points_union = torch.logical_or(in_bounds1, in_bounds2)
        overlap_points = torch.logical_and(in_bounds1, in_bounds2)

        # 重叠百分比计算
        overlap_percentage = torch.sum(overlap_points).float() / torch.sum(visible_points_union).float() * 100
        return overlap_percentage.item()
    else:
        # CPU计算版本
        visible_points_union = np.logical_or(in_bounds1, in_bounds2)
        overlap_points = np.logical_and(in_bounds1, in_bounds2)
        overlap_percentage = np.sum(overlap_points) / np.sum(visible_points_union) * 100
        return overlap_percentage

def extract_yaw_pitch(R):
    """
    从旋转矩阵中提取偏航角和俯仰角

    算法步骤:
    1. 提取旋转后的Z轴向量
    2. 偏航角 = arctan2(y, x)
    3. 俯仰角 = arcsin(z / |z_vector|)
    """
    R3 = R[:3, :3] if R.shape == (4, 4) else R
    rotated_z_axis = R3[:, 2]

    # 计算偏航角和俯仰角
    yaw = np.degrees(np.arctan2(rotated_z_axis[1], rotated_z_axis[0]))
    pitch = np.degrees(np.arcsin(rotated_z_axis[2] / np.linalg.norm(rotated_z_axis)))
    return yaw, pitch

def process_scene(scene_id, scene_infos: SceneInfoHandler, warning_file):
    """
    处理单个场景的完整算法流程
    """
    print(f"开始处理场景 {scene_id}")
    image_ids = scene_infos.get_all_extrinsic_valid_image_ids(scene_id)

    # 获取场景中的所有3D点
    scene_points = scene_infos.get_scene_points_align(scene_id)
    scene_points = scene_points[:, :3]

    # 预计算每张图像的可见点
    in_bounds_dict = {}
    yaw_dict = {}
    pitch_dict = {}
    positions_dict = {}

    for image_id in image_ids:
        E = scene_infos.get_extrinsic_matrix_align(scene_id, image_id)

        # 将3D点投影到图像平面
        scene_points_2d, scene_points_depth = scene_infos.project_3d_point_to_image(
            scene_id, image_id, scene_points
        )

        # 检查点的可见性
        in_bounds_points = scene_infos.check_point_visibility(
            scene_id, image_id, scene_points_2d, scene_points_depth
        )

        if np.sum(in_bounds_points) == 0:
            with open(warning_file, 'a') as f:
                f.write(f"{scene_id}: {image_id} 没有可见点\n")

        in_bounds_dict[image_id] = in_bounds_points

        # 提取相机姿态信息
        yaw, pitch = extract_yaw_pitch(E)
        yaw_dict[image_id] = yaw
        pitch_dict[image_id] = pitch
        positions_dict[image_id] = E[:3, 3]

    # 计算所有图像对之间的关系
    scene_overlap_info = {}
    for i, image_id1 in enumerate(image_ids):
        for j in range(i + 1, len(image_ids)):
            image_id2 = image_ids[j]

            # 计算重叠率
            overlap_percentage = calculate_camera_overlap(in_bounds_dict, image_id1, image_id2)

            # 计算姿态差异
            yaw_diff = yaw_dict[image_id2] - yaw_dict[image_id1]
            pitch_diff = pitch_dict[image_id2] - pitch_dict[image_id1]

            # 计算位置距离
            distance = np.linalg.norm(positions_dict[image_id2] - positions_dict[image_id1])

            scene_overlap_info[(image_id1, image_id2)] = {
                'overlap': overlap_percentage,
                'distance': distance,
                'yaw': yaw_diff,
                'pitch': pitch_diff
            }

    print(f"完成场景 {scene_id} 处理")
    return scene_id, scene_overlap_info
2.2 3D点投影与可见性检测算法
场景信息处理器SceneInfoHandler实现了复杂的3D到2D投影算法和可见性检测机制,这是整个系统的基础。
def project_points(points, K, E):
    """
    3D点投影到图像平面的核心算法

    参数:
        points: Nx4齐次坐标矩阵,每行代表一个3D点
        K: 4x4相机内参矩阵
        E: 4x4相机外参矩阵(相机到世界坐标变换)

    算法步骤:
    1. 计算外参矩阵的逆,将世界坐标转换为相机坐标
    2. 使用内参矩阵将相机坐标投影到图像平面
    3. 进行齐次坐标归一化

    返回:
        image_coords: Nx2图像坐标
        points_depth: 点的深度信息
    """
    # 步骤1:世界坐标到相机坐标变换
    E_inv = np.linalg.inv(E)
    camera_coords = E_inv @ points.T  # 4xN矩阵

    # 提取深度信息
    points_depth = camera_coords[2, :]

    # 步骤2:相机坐标到图像坐标投影
    image_coords = K @ camera_coords  # 4xN矩阵

    # 步骤3:齐次坐标归一化
    image_coords /= image_coords[2, :]  # 确保z坐标为1

    return image_coords.T[:, :2], points_depth

class SceneInfoHandler:
    def project_3d_point_to_image(self, scene_id, image_id, points_3d, align=True):
        """
        完整的3D点投影流程
        """
        # 获取相机参数
        K = self.get_intrinsic_matrix(scene_id)
        if align:
            E = self.get_extrinsic_matrix_align(scene_id, image_id)
        else:
            E = self.get_extrinsic_matrix(scene_id, image_id)

        # 确保points_3d是齐次坐标
        if points_3d.shape[1] == 3:
            points_3d_homogeneous = np.hstack([points_3d, np.ones((points_3d.shape[0], 1))])
        else:
            points_3d_homogeneous = points_3d

        # 执行投影
        points_2d, points_depth = project_points(points_3d_homogeneous, K, E)

        return points_2d, points_depth

    def check_point_visibility(self, scene_id, image_id, points_2d, points_depth):
        """
        点可见性检测的多重约束算法

        可见性判断标准:
        1. 点必须在图像边界内
        2. 点的深度必须为正(在相机前方)
        3. 深度信息必须与实际深度图匹配(遮挡检测)
        """
        # 约束1:边界检测
        in_boundary = self.check_point_in_image_boundary(scene_id, points_2d)

        # 约束2和3:深度检测
        depth_valid = self.check_point_visibility_by_depth(scene_id, image_id, points_2d, points_depth)

        # 综合可见性判断
        visibility = np.logical_and(in_boundary, depth_valid)

        return visibility

    def check_point_in_image_boundary(self, scene_id, points_2d):
        """
        图像边界检测算法
        """
        height, width = self.get_image_shape(scene_id)

        # 检查x和y坐标是否在有效范围内
        x_valid = np.logical_and(points_2d[:, 0] >= 0, points_2d[:, 0] < width)
        y_valid = np.logical_and(points_2d[:, 1] >= 0, points_2d[:, 1] < height)

        return np.logical_and(x_valid, y_valid)

    def check_point_visibility_by_depth(self, scene_id, image_id, points_2d, points_depth):
        """
        基于深度图的遮挡检测算法

        算法原理:
        1. 加载对应的深度图
        2. 对于每个投影点,获取深度图中对应位置的深度值
        3. 比较计算得到的深度与深度图中的深度
        4. 如果差异在阈值内,则认为点可见
        """
        # 获取深度图
        depth_image = self.get_depth_image(scene_id, image_id)
        height, width = depth_image.shape[:2]

        # 初始化可见性掩码
        visibility = np.zeros(len(points_2d), dtype=bool)

        for i, (point_2d, point_depth) in enumerate(zip(points_2d, points_depth)):
            x, y = int(round(point_2d[0])), int(round(point_2d[1]))

            # 边界检查
            if 0 <= x < width and 0 <= y < height and point_depth > 0:
                # 获取深度图中的深度值
                depth_from_image = depth_image[y, x] * self.depth_value_scale

                # 深度比较(允许一定误差)
                if depth_from_image > 0:
                    depth_diff = abs(point_depth - depth_from_image)
                    # 如果深度差异小于阈值,认为点可见
                    if depth_diff < max(point_depth * 0.1, 0.05):  # 10%相对误差或5cm绝对误差
                        visibility[i] = True

        return visibility
2.3 物体运动跟踪算法
物体运动模块实现了基于刚体分割的运动分析算法,能够将点云分组为不同的运动物体并跟踪其运动轨迹。
def rigid_body_segmentation(points, threshold=0.1, smoothing_factor=0.01):
    """
    基于刚体假设的点云分割算法

    算法原理:
    1. 计算每个时间步点之间的距离矩阵
    2. 分析距离变化来识别刚体组
    3. 使用层次聚类将点分组

    参数:
        points: 形状为(T, N, 3)的时间序列点云数据
        threshold: 层次聚类的距离阈值
        smoothing_factor: 距离变化平滑阈值
    """
    T, N, _ = points.shape

    # 初始化累积损失矩阵,用于累积点对之间的距离变化
    cumulative_loss = np.zeros((N, N))

    # 遍历时间步计算累积距离变化
    for t in range(1, T):
        # 计算当前时刻和前一时刻的距离矩阵
        distances_t = squareform(pdist(points[t]))
        distances_prev_t = squareform(pdist(points[t - 1]))

        # 平滑距离变化以过滤噪声
        smoothed_change = smooth_distance_changes(
            distances_t, distances_prev_t, smoothing_factor
        )

        # 累积平滑后的距离变化
        cumulative_loss += smoothed_change

    # 使用层次聚类进行分组
    links = linkage(squareform(cumulative_loss), method='average')
    labels = fcluster(links, threshold, criterion='distance')

    # 按聚类标签分组点
    groups = []
    for i in range(1, max(labels) + 1):
        group = np.where(labels == i)[0].tolist()
        groups.append(group)

    return groups

def smooth_distance_changes(distances_t, distances_prev_t, smoothing_factor=0.01):
    """
    距离变化平滑算法

    通过过滤小的距离变化来减少噪声影响
    """
    distance_change = np.abs(distances_t - distances_prev_t)
    return np.where(distance_change > smoothing_factor, distance_change, 0)

class TwoFrameVideoQAEngine:
    def format_training_samples(self, sample_pairs, intrinsics, scene_id,
                               points_pos_world, points_pos_cam,
                               image_height, image_width, extrinsics_w2c):
        """
        格式化训练样本的完整算法流程

        该方法将3D运动数据转换为问答格式的训练样本
        """
        training_samples = []

        for pair_idx, (frame_1_idx, frame_2_idx) in enumerate(sample_pairs):
            # 获取两帧的3D位置
            pos_world_1 = points_pos_world[frame_1_idx]
            pos_world_2 = points_pos_world[frame_2_idx]

            pos_cam_1 = points_pos_cam[frame_1_idx]
            pos_cam_2 = points_pos_cam[frame_2_idx]

            # 计算运动向量和距离
            displacement_world = pos_world_2 - pos_world_1
            displacement_cam = pos_cam_2 - pos_cam_1
            total_distance = np.linalg.norm(displacement_world)

            # 投影到图像坐标
            point_2d_1 = self.project_point(pos_world_1, intrinsics,
                                           image_height, image_width)
            point_2d_2 = self.project_point(pos_world_2, intrinsics,
                                           image_height, image_width)

            if point_2d_1 is None or point_2d_2 is None:
                continue

            # 生成问答对
            if self.question_type == "tapvid3d_total_distance":
                question = random.choice(QUESTION_TEMPLATES[self.question_type]).format(
                    x1=int(point_2d_1[0]), y1=int(point_2d_1[1])
                )
                answer = f"The point traveled a total distance of {total_distance:.1f} mm."

            elif self.question_type == "tapvid3d_displacement_vector":
                question = random.choice(QUESTION_TEMPLATES[self.question_type]).format(
                    x1=int(point_2d_1[0]), y1=int(point_2d_1[1])
                )
                answer = f"The displacement vector is [ {displacement_cam[0]:.1f} , {displacement_cam[1]:.1f} , {displacement_cam[2]:.1f} ] mm."

            # 构建训练样本
            sample = {
                "id": f"{scene_id}_{pair_idx}",
                "image_1": f"frame_{frame_1_idx:05d}.jpg",
                "image_2": f"frame_{frame_2_idx:05d}.jpg",
                "conversations": [
                    {
                        "from": "human",
                        "value": random.choice(TASK_DESCRIPTION) + "\n\n" + question
                    },
                    {
                        "from": "gpt",
                        "value": answer
                    }
                ]
            }

            training_samples.append(sample)

        return training_samples
2.4 视觉对应匹配算法
…详情请参照古月居

有“AI”的1024 = 2048,欢迎大家加入2048 AI社区
更多推荐

 6
6 0
0- 0


 已为社区贡献156条内容

所有评论(0)