SpringBoot集成本地Ollama部署大模型,调用MCP服务demo示例
Ollama是一个本地运行大型语言模型的工具,支持Llama、Mistral等开源模型。安装方法包括Windows下载安装包或Linux使用命令行安装,安装后可通过命令验证。用户可从模型广场选择并下载模型,运行后即可本地使用。此外,文章介绍了MCP服务(Model Context Protocol),这是一种让AI模型调用外部工具的协议,通过SpringBoot开发示例展示了天气查询服务的实现,包
Ollama本地安装大模型
Ollama是什么
Ollama 是一个让用户能够在本地计算机上轻松运行、管理和部署大型语言模型的工具。它支持多种开源模型,包括 Llama、Mistral、CodeLlama 等。官网地址https://ollama.com/
本地部署
首先,需要先安装Ollama程序,这里以windows为例,去官网https://ollama.com/download下载安装包
linux系统通过命令curl -fsSL https://ollama.com/install.sh | sh一键安装,安装完成后,通过命令ollama --version验证
然后,我们去模型广场看一下都可以安装哪些模型,官网https://ollama.com/search,然后点击想要部署的模型,进到详情页,复制命令即可下载部署ollama run gpt-oss:20b
安装完成后,默认启动,这时,可以问一些问题,至此,本地通过Ollama部署大模型完成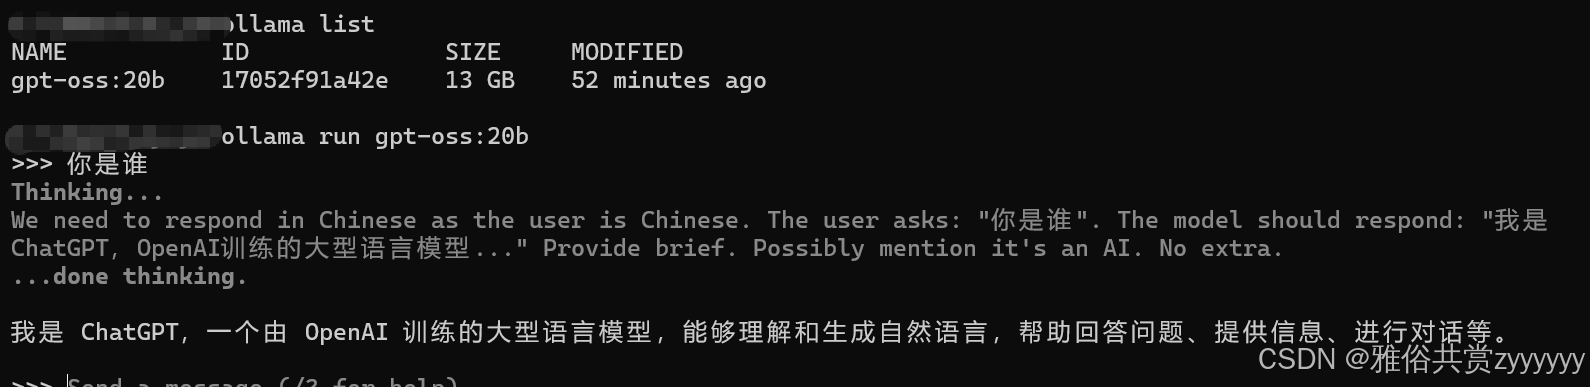
MCP服务
MCP是什么
MCP(Model Context Protocol)服务是一种协议,用于在AI应用和外部工具/服务之间建立标准化的通信方式。它允许AI模型动态调用外部工具,扩展模型的能力。我们知道大模型是基于训练数据的,无法获取最新的天气、新闻等事实信息,无法访问企业内部数据或私有信息,通过MCP服务,我们可以将外部API调用、内部系统调用包装,提供给大模型使用。
SpringBoot开发MCP服务
需要准备SpringBoot3.x版本以及jdk17+版本,首先,引入相关依赖
<properties>
        <maven.compiler.source>17</maven.compiler.source>
        <maven.compiler.target>17</maven.compiler.target>
        <project.build.sourceEncoding>UTF-8</project.build.sourceEncoding>
        <spring-ai.version>1.0.0</spring-ai.version>
    </properties>

    <dependencyManagement>
        <dependencies>
            <dependency>
                <groupId>org.springframework.ai</groupId>
                <artifactId>spring-ai-bom</artifactId>
                <version>${spring-ai.version}</version>
                <type>pom</type>
                <scope>import</scope>
            </dependency>
        </dependencies>
    </dependencyManagement>


    <dependencies>
        <dependency>
            <groupId>org.springframework.boot</groupId>
            <artifactId>spring-boot-starter-web</artifactId>
        </dependency>

        <!-- Spring AI MCP Server -->
        <dependency>
            <groupId>org.springframework.ai</groupId>
            <artifactId>spring-ai-starter-mcp-server-webmvc</artifactId>
        </dependency>

        <!-- 工具类 -->
        <dependency>
            <groupId>org.springframework.boot</groupId>
            <artifactId>spring-boot-starter-validation</artifactId>
        </dependency>

        <!-- 测试 -->
        <dependency>
            <groupId>org.springframework.boot</groupId>
            <artifactId>spring-boot-starter-test</artifactId>
            <scope>test</scope>
        </dependency>
        <!-- 工具类 -->
        <dependency>
            <groupId>org.projectlombok</groupId>
            <artifactId>lombok</artifactId>
            <optional>true</optional>
        </dependency>
        <dependency>
            <groupId>org.openjdk.nashorn</groupId>
            <artifactId>nashorn-core</artifactId>
            <version>15.4</version>
        </dependency>
    </dependencies>
开发MCP服务能力,例如天气查询,这里通过MOCK方式
@Service
@Slf4j
public class WeatherService {
    private final Map<String, String> cityWeatherData;
    private final Random random = new Random();

    public WeatherService() {
        // 模拟天气数据
        cityWeatherData = new HashMap<>();
        cityWeatherData.put("北京", "晴, 25°C, 湿度 60%");
        cityWeatherData.put("上海", "多云, 28°C, 湿度 70%");
        cityWeatherData.put("广州", "雨, 30°C, 湿度 85%");
        cityWeatherData.put("深圳", "晴, 32°C, 湿度 75%");
        cityWeatherData.put("杭州", "阴, 26°C, 湿度 65%");
    }

    @Tool(description = "根据城市名称获取实时天气信息")
    public String getWeatherByCity(
            @ToolParam(description = "城市名称,例如:北京、上海、广州") String city) {
        log.info("getWeatherByCity city: {}", city);

        if (city == null || city.trim().isEmpty()) {
            return "错误:城市名称不能为空";
        }

        String weather = cityWeatherData.get(city);
        if (weather != null) {
            return String.format("城市【%s】的天气:%s", city, weather);
        } else {
            // 如果城市不在预设列表中,生成随机天气
            String[] conditions = {"晴", "多云", "阴", "小雨"};
            String condition = conditions[random.nextInt(conditions.length)];
            int temperature = 20 + random.nextInt(15); // 20-35°C
            int humidity = 50 + random.nextInt(40); // 50-90%

            return String.format("城市【%s】的天气:%s, %d°C, 湿度 %d%%",
                    city, condition, temperature, humidity);
        }
    }

    @Tool(description = "获取未来几天的天气预报")
    public String getWeatherForecast(
            @ToolParam(description = "城市名称") String city,
            @ToolParam(description = "预报天数,1-7天") int days) {
        log.info("getWeatherForecast city: {}, days: {}", city, days);

        if (days < 1 || days > 7) {
            return "错误:预报天数应在1-7天范围内";
        }

        StringBuilder forecast = new StringBuilder();
        forecast.append(String.format("【%s】未来%d天天气预报:\n", city, days));

        String[] conditions = {"晴", "多云", "阴", "小雨", "中雨", "雷阵雨"};

        for (int i = 1; i <= days; i++) {
            String condition = conditions[random.nextInt(conditions.length)];
            int minTemp = 18 + random.nextInt(10);
            int maxTemp = minTemp + 5 + random.nextInt(5);

            forecast.append(String.format("第%d天:%s,温度 %d-%d°C\n",
                    i, condition, minTemp, maxTemp));
        }

        return forecast.toString();
    }

    @Tool(description = "获取空气质量指数(AQI)")
    public String getAirQuality(
            @ToolParam(description = "城市名称") String city) {
        log.info("getAirQuality city: {}", city);

        String[] levels = {"优", "良", "轻度污染", "中度污染", "重度污染"};
        String level = levels[random.nextInt(levels.length)];
        int aqi = 20 + random.nextInt(200); // 20-220

        return String.format("城市【%s】的空气质量:AQI指数 %d,等级 %s", city, aqi, level);
    }
}
然后,配置一个管理嘞对外暴露这些工具,也就是MCP服务
@Configuration
public class McpConfig {
    @Bean
    public ToolCallbackProvider weatherTools(WeatherService weatherService){
        return MethodToolCallbackProvider.builder()
                .toolObjects(weatherService)
                .build();
    }
}
最后,添加相应的配置
server.port=9090
spring.ai.mcp.server.name=mcp-sdk-server-demo
spring.ai.mcp.server.version=1.0.0
# sync表示同步通信模式,在这种模式下,客户端发送请求后,服务器会立即处理并返回结果
spring.ai.mcp.server.type=sync
# sse-endpoint配置 SSE 服务器的端点路径,当使用异步或流式模式时,客户端会通过这个端点连接到 SSE 服务器
spring.ai.mcp.server.sse-endpoint=/sse
启动MCP服务即可,然后访问http://localhost:9090/sse可以看到响应信息
智能体服务
什么是智能体
在Spring AI的上下文中,智能体通常由一个大语言模型(LLM)作为核心,并配备了一系列工具(例如MCP服务提供的工具)来扩展其能力。智能体可以根据用户输入决定是否调用工具、调用哪个工具,并将工具的结果整合到对用户的响应中。简单来说,智能体 = 大语言模型 + 工具调用能力 + 决策逻辑。在我们的例子中,我们有一个MCP服务(工具服务器)和一个智能体(AI应用)。智能体通过MCP客户端调用MCP服务器上的工具,从而获取实时天气、进行计算等。
SpringBoot开发智能体Demo
引入必要的依赖
<dependencies>
        <!-- Spring Boot Web -->
        <dependency>
            <groupId>org.springframework.boot</groupId>
            <artifactId>spring-boot-starter-web</artifactId>
        </dependency>

        <!-- Spring AI Ollama 适配器(调用本地 Ollama 模型) -->
        <dependency>
            <groupId>org.springframework.ai</groupId>
<!--            <artifactId>spring-ai-ollama-spring-boot-starter</artifactId>-->
            <artifactId>spring-ai-starter-model-ollama</artifactId>
            <version>1.0.0-M7</version>
        </dependency>

<!--         Spring AI MCP 客户端(调用 MCP 服务工具)-->
        <dependency>
            <groupId>org.springframework.ai</groupId>
            <artifactId>spring-ai-starter-mcp-client</artifactId>
            <version>1.0.0-M7</version>
        </dependency>

        <!-- 工具类 -->
        <dependency>
            <groupId>org.projectlombok</groupId>
            <artifactId>lombok</artifactId>
            <optional>true</optional>
        </dependency>
    </dependencies>
定义MCP客户端,用来调用MCP服务端
@Service
@Slf4j
public class McpClientService {
    private McpSyncClient syncClient;

    @Value("${mcp.server.url:http://localhost:9090}")
    private String mcpServerUrl;

    @PostConstruct
    public void init() {
        connectToMcpServer();
    }

    /**
     * 连接到MCP服务器
     */
    private void connectToMcpServer() {
        try {
            String fullUrl = mcpServerUrl;
            log.info("🔄 正在连接 MCP 服务器: {}", fullUrl);

            HttpClientSseClientTransport transport = new HttpClientSseClientTransport(fullUrl);
            this.syncClient = McpClient.sync(transport).build();
            this.syncClient.initialize();

            // 测试连接
            testConnection();
            log.info("✅ MCP 客户端连接成功");
        } catch (Exception e) {
            log.error("❌ MCP 客户端连接失败: {}", e.getMessage());
            this.syncClient = null;
            // 可以添加重试逻辑
            scheduleReconnect();
        }
    }

    /**
     * 重连机制
     */
    private void scheduleReconnect() {
        try {
            Thread.sleep(5000); // 5秒后重试
            connectToMcpServer();
        } catch (InterruptedException e) {
            Thread.currentThread().interrupt();
        }
    }

    /**
     * 测试连接并列出可用工具
     */
    public void testConnection() {
        log.info("🧪 测试 MCP 客户端连接...");
        List<String> tools = listAvailableTools();

        if (tools.isEmpty()) {
            log.warn("⚠️ 未找到可用工具,请检查 MCP 服务配置");
        } else {
            log.info("✅ 发现 {} 个可用工具: {}", tools.size(), tools);
        }
    }

    /**
     * 列出所有可用工具
     */
    public List<String> listAvailableTools() {
        if (!isConnected()) {
            log.warn("⚠️ MCP 客户端未连接");
            return Collections.emptyList();
        }

        try {
            McpSchema.ListToolsResult result = syncClient.listTools();

            List<String> toolNames = result.tools().stream()
                    .map(McpSchema.Tool::name)
                    .collect(Collectors.toList());
            return toolNames;
        } catch (Exception e) {
            log.error("❌ 列出工具失败: {}", e.getMessage());
            return Collections.emptyList();
        }
    }

    /**
     * 检查连接状态
     */
    public boolean isConnected() {
        return syncClient != null;
    }

    /**
     * 调用 MCP 工具
     */
    public String callTool(String toolName, Map<String, Object> params) {
        if (!isConnected()) {
            log.warn("⚠️ MCP 客户端未连接,尝试重新连接...");
            connectToMcpServer();
            if (!isConnected()) {
                return "错误:MCP 服务不可用,请检查服务是否启动";
            }
        }

        try {
            log.info("🛠️ 调用工具: {},参数: {}", toolName, params);
            McpSchema.CallToolRequest request = new McpSchema.CallToolRequest(toolName, params);
            McpSchema.CallToolResult result = syncClient.callTool(request);

            String content = result.content().toString();
            log.info("✅ 工具调用成功: {}", content);
            return content;
        } catch (Exception e) {
            log.error("❌ 工具调用失败: {}", e.getMessage());
            return "工具调用错误: " + e.getMessage();
        }
    }

    @PreDestroy
    public void close() {
        if (syncClient != null) {
            try {
                syncClient.closeGracefully();
                log.info("🔌 MCP 客户端连接已关闭");
            } catch (Exception e) {
                log.warn("⚠️ 关闭连接时出错: {}", e.getMessage());
            }
        }
    }

    public List<McpSchema.Tool> listTools() {
        if (!isConnected()) {
            log.warn("⚠️ MCP 客户端未连接");
            return Collections.emptyList();
        }

        try {
            McpSchema.ListToolsResult result = syncClient.listTools();
            List<McpSchema.Tool> tools = result.tools();

            return tools;
        } catch (Exception e) {
            log.error("❌ 列出工具失败: {}", e.getMessage());
            return Collections.emptyList();
        }
    }
}
定义一个工具注册类,Spring AI框架通过@Tool注解来识别和注册工具。当Agent需要调用工具时,它可以通过这些注册的工具来执行具体操作
@Service
public class McpServiceRegister {

    @Autowired
    private McpClientService mcpClientService;

    @Tool(name = "getWeatherByCity", description = "根据城市名称查询实时天气信息")
    public String getWeatherByCity(
            @ToolParam(description = "城市名称,例如:北京、上海、广州") String city) {
        Map<String, Object> params = Map.of("city", city);
        return mcpClientService.callTool("getWeatherByCity", params);
    }

    @Tool(name = "getWeatherForecast", description = "获取未来几天的天气预报")
    public String getWeatherForecast(
            @ToolParam(description = "城市名称") String city,
            @ToolParam(description = "预报天数,1-7天") int days) {
        Map<String, Object> params = Map.of("city", city, "days", days);
        return mcpClientService.callTool("getWeatherForecast", params);
    }

    @Tool(name = "getAirQuality", description = "获取空气质量指数(AQI)")
    public String getAirQuality(
            @ToolParam(description = "城市名称") String city) {
        Map<String, Object> params = Map.of("city", city);
        return mcpClientService.callTool("getAirQuality", params);
    }
}
然后,还需要一个工具回调类,这个 Bean 负责将 McpServiceRegister中所有使用 @Tool注解的方法注册为 AI 模型可以调用的工具。这样,当 AI 模型在处理用户请求时,它能够知道有哪些工具可用,以及如何调用这些工具。
@Configuration
public class McpConfig {
    @Bean
    @Primary
    public ToolCallbackProvider toolCallbackProvider(McpServiceRegister mcpServiceRegister) {
        return MethodToolCallbackProvider.builder()
                .toolObjects(mcpServiceRegister)
                .build();
    }
}
这样,我们就可以理解为什么MCP服务端已经定义了工具,为什么还要在客户端重新写一次工具注册,因为我们的工具回调需要传入工具,而我们没有实现工具自动发现注册,因此通过这种方式将工具注册进来。
最后,实现一个聊天接口,通过对prompt(提示词)的定义,给模型一个任务描述或问题,模型基于这个Prompt来生成相应的回答或内容。
@RestController
public class McpController {

    private final ChatClient chatClient;
    private static final String SYSTEM_PROMPT = """
        你是一个智能助手,请根据问题类型选择合适的回答方式:

        ## 可用工具(仅用于特定问题):
        1. 天气相关工具:
           - getWeatherByCity: 查询城市实时天气
           - getWeatherForecast: 获取天气预报
           - getAirQuality: 获取空气质量

        2. 计算相关工具:
           - calculate: 执行数学计算
           - convertUnit: 单位换算

        ## 回答规则:
        ### 必须调用工具的情况(工具类问题):
        - 询问具体城市天气、天气预报、空气质量
        - 询问数学计算、算术表达式
        - 询问单位换算(温度、长度等)

        ### 使用自身知识回答的情况(非工具类问题):
        - 一般性知识问答、常识问题
        - 聊天、问候、自我介绍
        - 编程、技术问题
        - 历史、文化、科学等知识性问题
        - 建议、意见、创意类问题

        ### 禁止行为:
        - 对于非工具类问题,不要尝试调用工具
        - 不要编造天气或计算数据
        - 不确定时如实告知,不要猜测
        ### 注意:
        - 当你调用工具获取信息后,必须基于工具返回的结果来回答用户
        - 不要拒绝使用工具返回的数据,这些数据是专门为用户问题准备的
        - 如果工具返回了计算结果,直接使用该结果回答用户


        ## 示例:
        用户:北京天气怎么样? → 调用getWeatherByCity工具
        用户:计算2+3 * 4 → 调用calculate工具
        用户:你好! → 用自身知识友好回应
        用户:Java是什么? → 用自身知识解释
        用户:给我讲个笑话 → 用自身知识创作笑话

        请根据问题类型智能选择回答方式。
    """;

    @Autowired
    public McpController(OllamaChatModel ollamaChatModel,
                         ToolCallbackProvider toolCallbackProvider) {
        this.chatClient = buildChatClient(ollamaChatModel, toolCallbackProvider);
    }

    private ChatClient buildChatClient(OllamaChatModel chatModel,
                                       ToolCallbackProvider toolCallbackProvider) {
        return ChatClient.builder(chatModel)
                .defaultTools(toolCallbackProvider.getToolCallbacks())
                .build();
    }

    @RequestMapping("/mcp")
    public String mcp(@RequestParam String message) {
        return chatClient.prompt(SYSTEM_PROMPT)
                .user(message)
                .call()
                .content();
    }
}
然后配置智能体相关配置
server.port=9091
server.servlet.context-path=/agent

spring.application.name=ollama-agent-demo

#本地模型API地址
spring.ai.ollama.base-url=http://127.0.0.1:11434/
#模型名称
spring.ai.ollama.chat.model=gpt-oss:20b
#控制生成文本的随机性:温度值越高,生成的文本越随机、越有创造性;温度值越低,生成的文本越确定、越保守
spring.ai.ollama.chat.options.temperature=0.1
#控制候选词的范围:从概率最高的词开始累加,直到累计概率达到 top-p 值,然后只从这个集合中采样
spring.ai.ollama.chat.options.top-p=0.5
#限制候选词的数量:只从概率最高的 k 个词中选择
spring.ai.ollama.chat.options.top-k=10

#开启MCP服务调用
spring.ai.mcp.client.enabled=true
spring.ai.mcp.client.sse.connections.mcp-sdk-server-demo.url=http://localhost:9090
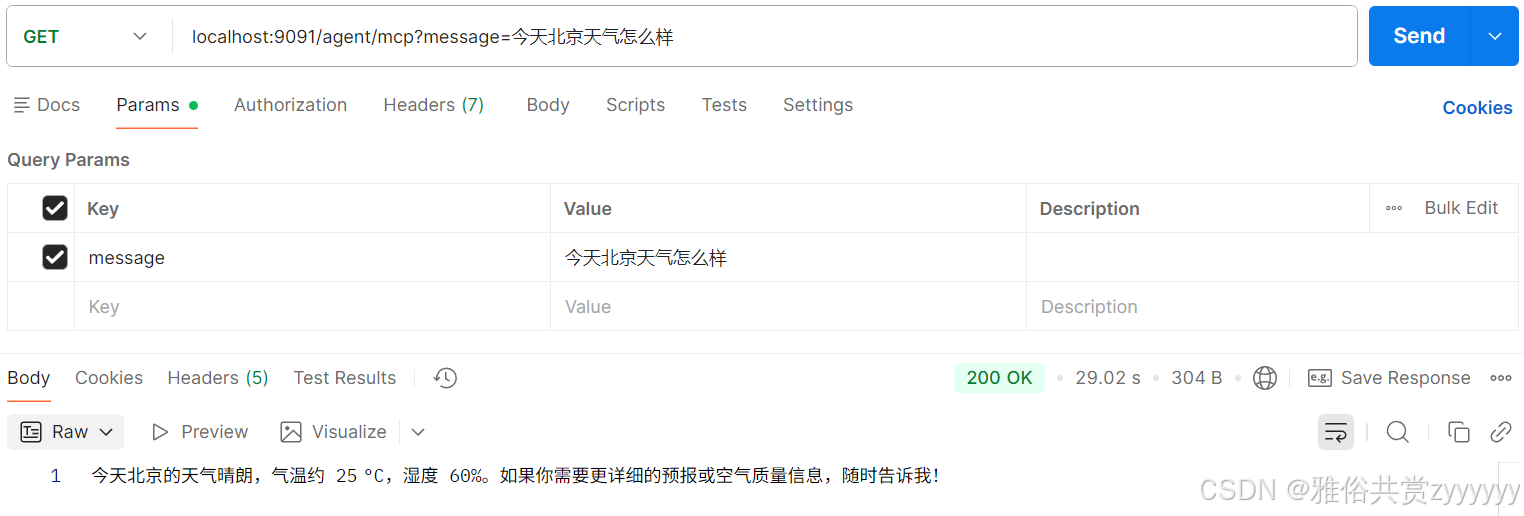
然后我们启动这个智能体Demo,通过接口方式调用测试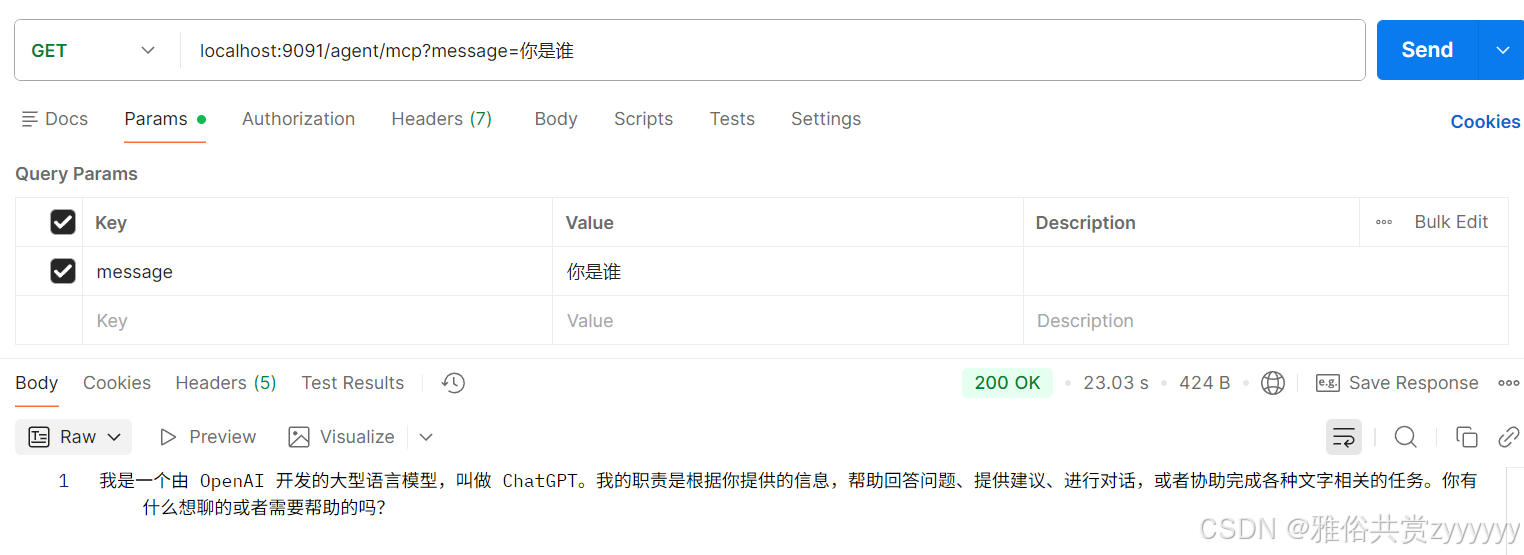

有“AI”的1024 = 2048,欢迎大家加入2048 AI社区
更多推荐
 17
17 0
0- 0


 已为社区贡献4条内容

所有评论(0)