如何自己建造一个AI智能助手(修改)
如何自己建造一个AI智能助手
本文介绍了如何基于现有AI技术构建自己的智能助手。首先概述了主流AI助手的特点。然后详细讲解了搭建AI助手的技术方案:使用Python的FastAPI框架构建后端,调用阿里云通义千问API,配合简单HTML前端实现对话界面。文章提供了完整的代码示例和运行步骤。
一、AI 智能助手概述
目前,AI 智能助手比较火。主流有:
|
产品 |
开发方 |
核心优势 |
特色功能 |
|
ChatGPT |
OpenAI |
对话自然度高,推理能力强 |
插件生态,代码解释 |
|
文心一言 |
百度 |
中文理解顶尖,搜索整合深 |
全网搜索,知识图谱 |
|
通义千问 |
阿里 |
多语种支持,语音识别优 |
电商场景深度整合 |
|
讯飞星火 |
科大讯飞 |
语音交互领先,教育场景强 |
实时翻译,口语评测 |
|
Claude |
Anthropic |
长文本处理佳,安全性高 |
文档分析,隐私保护 |
| 深度求索 |
DeepSeek |
逻辑推理强,知识图谱全 |
推动开源,专业领域问答 |
|
Kimi |
月之暗面 |
超长文本处理 (200 万字) |
学术文献分析,研究趋势 |
AI 智能助手是基于人工智能技术,能够通过自然语言处理 (NLP)、机器学习 (ML)、语音识别等技术与用户交互,提供个性化服务的软件或硬件系统。
一个功能比较完善的AI智能助手的核心特征:
- 自然语言交互:理解人类语言含义与意图
- 多模态感知:支持语音、文字、图像等多种输入方式
- 个性化服务:基于用户习惯提供定制化体验
- 任务执行:从简单查询到复杂操作的全流程处理
基础使用方式
- 文本输入:在 APP 或网页对话框中直接提问
- 多模态结合:上传图片 + 文字描述,如 "这张照片帮我美化一下,调亮天空部分"
一个典型的 AI 助手通常包含以下模块:
|
模块 |
功能 |
|
用户界面(UI) |
网页、App、微信小程序等,用于用户输入和显示回答 |
|
后端服务(Backend) |
接收请求、调用模型、处理逻辑 |
|
大语言模型(LLM) |
核心“大脑”,负责理解与生成文本 |
|
知识库(可选) |
提供特定领域知识(RAG) |
|
记忆/上下文管理 |
支持多轮对话 |
|
部署与运维 |
服务器、API、安全、监控 |
实用技巧
高效使用 AI 助手,本质上是一场高质量的对话。你需要成为一个优秀的“提问者”、“引导者”和“审核者”。
1.清晰表达意图:
明确范围 + 具体需求,避免模糊提问。比如 “用高中物理必修一的知识点,通俗解释牛顿第二定律,配 2 个生活案例”,而非 “讲解牛顿第二定律”。
验证权威来源,可指令 “基于人教版数学教材,解释函数单调性的定义,引用教材原文段落”。
2.提供上下文:
重要信息前置,帮助 AI 理解背景。提供足够上下文(教材版本、学习进度、薄弱点),让 AI 精准适配。
3任务分解:复杂问题分步提问
对于复杂任务,不要指望一步到位。把大问题拆解成小步骤,引导 AI 一步步完成。也就是说,复杂任务分步提问,比如先让 AI 拆解知识点,再生成练习,最后批改反馈。
注意:和人类一样,AI模型也有局限性,同样产生认知偏差——信息幻觉(information hallucination)。AI幻觉指生成看似合理但虚构的信息,例如编造不存在的事实、数据或引用。对输出内容保持验证意识,尤其是专业知识,可要求 AI 标注信息来源。
二、如何自己建造一个AI智能助手
除非你你有很强的了学术研究能力和深厚相关知识,否则不建议你从零开始编写所有算法(比如自己实现一个Transformer模型)。我这里介绍的是借用利用现有的、强大的基础模型和开源工具,在上面构建自己的应用逻辑。
建造一个像你现在正在使用的 AI 助手是一个涉及多个技术领域的复杂工程,但可以分步骤逐步实现。
下面介绍,基于开源大模型(推荐初学者),建造一个AI智能助手MVP(Minimum Viable Product:最小可行产品)版本。
前置准备
编程能力:后端Python或Node.js基础,前端网页用 HTML + JavaScript(或 Vue/React)做一个聊天界面
API密钥:准备大模型API(如OpenAI、Claude、阿里通义等)
这里,具体采用:
- 前端:纯 HTML + JavaScript(无框架)
- 后端:Python FastAPI
- AI 模型:调用阿里云 通义千问(Qwen)API(免费额度可用)
你只需要一个 DashScope API Key https://dashscope.console.aliyun.com/apiKey (获取 API Key。阿里云账号免费注册,新用户送额度)。需要用支付宝对账号账号进行实名认证。
需要用到几个第三方库(third-party libraries):fastapi uvicorn dashscope
【FastAPI 是一个现代、快速(高性能)的 Python Web 框架,用于构建 API(特别是 RESTful API 或微服务)。它基于 Starlette(异步 Web 框架)和 Pydantic(数据验证库)。
Uvicorn 是一个轻量级、超快的 ASGI(Asynchronous Server Gateway Interface)服务器,用于运行像 FastAPI、Starlette 这样的异步 Python Web 应用。
DashScope 是阿里云推出的 模型即服务(MaaS)平台,提供包括通义千问(Qwen)在内的多种大模型 API,支持文本生成、图像生成、语音识别等。
pip install fastapi uvicorn dashscope
占用空间合计:大约 20–45 MB 左右】
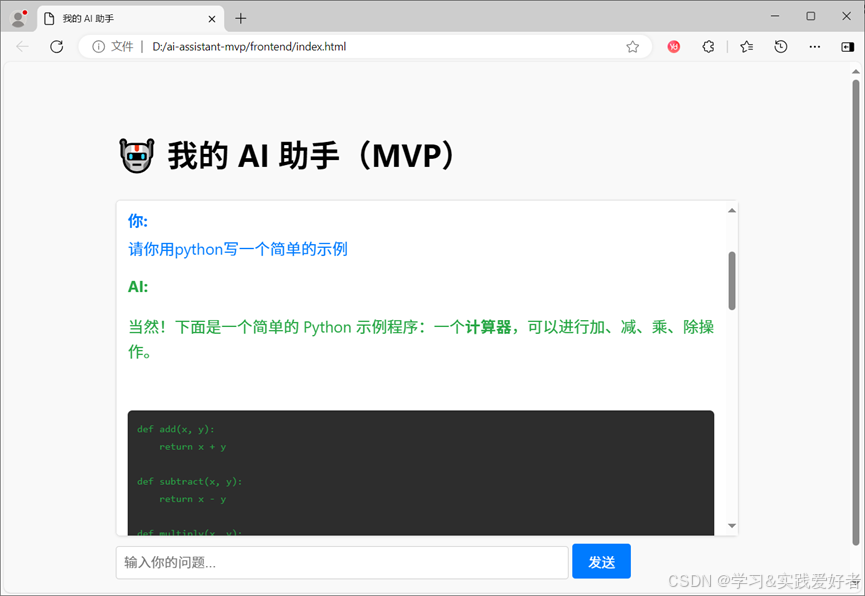
效果
- 能对话的网页 AI 助手
- 支持回车发送
- 显示“你”和“AI”的对话记录
项目结构
D:/ai-assistant-mvp/
├── backend/
│ └── main.py
└── frontend/
└── index.html
后端:backend/main.py 文件源码:
# backend/main.py
from fastapi import FastAPI, HTTPException
from fastapi.middleware.cors import CORSMiddleware
from pydantic import BaseModel
import dashscope
from dashscope import Generation

# 配置 DashScope API Key(请替换为你自己的),重要!
dashscope.api_key = "你的 DashScope API Key"

app = FastAPI()

# 允许前端跨域访问
app.add_middleware(
    CORSMiddleware,
    allow_origins=["*"],  # 生产环境应限制为具体域名
    allow_credentials=True,
    allow_methods=["*"],
    allow_headers=["*"],
)

class ChatRequest(BaseModel):
    message: str

@app.post("/chat")
async def chat(request: ChatRequest):
    try:
        response = Generation.call(
            model= "qwen-plus",  # 选择模型
            prompt=request.message
        )
        if response.status_code == 200:
            return {"reply": response.output.text}
        else:
            raise HTTPException(status_code=500, detail="模型调用失败")
    except Exception as e:
        raise HTTPException(status_code=500, detail=str(e))
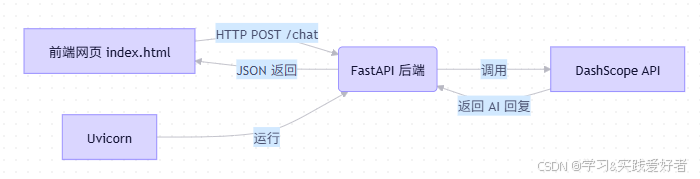
在这个AI 助手架构中,三者如何协同:
前端:frontend/index.html文件源码:
<!-- frontend/index.html -->
<!DOCTYPE html>
<html lang="zh">
<head>
<meta charset="UTF-8" />
<title>我的 AI 助手</title>
<!-- 引入 highlight.js 样式(GitHub 风格,深色代码背景) -->
<link rel="stylesheet"
href="https://cdnjs.cloudflare.com/ajax/libs/highlight.js/11.9.0/styles/github-dark.min.css">
<style>
body {
font-family: -apple-system, BlinkMacSystemFont, "Segoe UI", Roboto, sans-serif;
max-width: 800px;
margin: 40px auto;
padding: 20px;
background: #f9f9f9;
line-height: 1.6;
}
#chat-box {
height: 400px;
border: 1px solid #ddd;
padding: 15px;
overflow-y: auto;
background: white;
margin-bottom: 10px;
border-radius: 6px;
box-shadow: 0 1px 3px rgba(0,0,0,0.1);
}
#user-input {
width: 70%;
padding: 10px;
border: 1px solid #ccc;
border-radius: 4px;
}
#send-btn {
padding: 10px 20px;
background: #007bff;
color: white;
border: none;
border-radius: 4px;
cursor: pointer;
}
#send-btn:hover {
background: #0069d9;
}
.message {
margin-bottom: 16px;
word-wrap: break-word;
}
.user { color: #007bff; }
.ai { color: #28a745; }
.ai-content {
margin-top: 4px;
white-space: pre-wrap;
}
/* 代码块样式优化 */
#chat-box pre {
background: #2d2d2d !important;
border-radius: 6px;
padding: 12px !important;
margin: 8px 0;
overflow-x: auto;
font-size: 14px;
}
#chat-box code {
font-family: 'SFMono-Regular', Consolas, 'Liberation Mono', Menlo, monospace;
font-size: 13px;
}
</style>
</head>
<body>
<h1>🤖 我的 AI 助手(MVP)</h1>
<div id="chat-box"></div>
<input type="text" id="user-input" placeholder="输入你的问题..." />
<button id="send-btn">发送</button>
<!-- 引入 marked 和 highlight.js -->
<script src="https://cdn.jsdelivr.net/npm/marked/marked.min.js"></script>
<script src="https://cdnjs.cloudflare.com/ajax/libs/highlight.js/11.9.0/highlight.min.js"></script>
<script>
// 配置 marked 使用 highlight.js 进行代码高亮
marked.setOptions({
highlight: function(code, lang) {
const language = hljs.getLanguage(lang) ? lang : 'plaintext';
return hljs.highlight(code, { language }).value;
},
langPrefix: 'hljs language-'
});
const chatBox = document.getElementById('chat-box');
const input = document.getElementById('user-input');
const sendBtn = document.getElementById('send-btn');
function addMessage(text, sender) {
const div = document.createElement('div');
div.className = `message ${sender}`;
// 渲染 Markdown(AI 消息),用户消息保持纯文本
let contentHtml;
if (sender === 'ai') {
// 基础 XSS 防护:移除危险标签(简单 MVP 方案)
const cleanText = text
.replace(/<script\b[^<]*(?:(?!<\/script>)<[^<]*)*<\/script>/gi, '')
.replace(/javascript:/gi, '');
contentHtml = marked.parse(cleanText);
} else {
// 用户输入转义 HTML 特殊字符
const escaped = text
.replace(/&/g, '&')
.replace(/</g, '<')
.replace(/>/g, '>');
contentHtml = escaped;
}
div.innerHTML = `
<strong>${sender === 'user' ? '你' : 'AI'}:</strong>
<div class="ai-content">${contentHtml}</div>
`;
chatBox.appendChild(div);
chatBox.scrollTop = chatBox.scrollHeight;
}
async function sendMessage() {
const msg = input.value.trim();
if (!msg) return;
addMessage(msg, 'user');
input.value = '';
try {
const res = await fetch('http://localhost:8000/chat', {
method: 'POST',
headers: { 'Content-Type': 'application/json' },
body: JSON.stringify({ message: msg })
});
const data = await res.json();
if (res.ok) {
addMessage(data.reply, 'ai');
} else {
addMessage('❌ 出错了:' + (data.detail || '未知错误'), 'ai');
}
} catch (err) {
addMessage('⚠️ 无法连接到后端,请确保它正在运行。', 'ai');
}
}
sendBtn.addEventListener('click', sendMessage);
input.addEventListener('keypress', (e) => {
if (e.key === 'Enter') sendMessage();
});
</script>
</body>
</html>
其中,CDN (Content Delivery Network,内容分发网络)加载 marked 和 highlight.js 用于前端的交互输出格式。让 AI 返回的 代码块、Markdown 格式 能正确显示,并支持 Python 等语言的语法高亮!若缺乏格式输出python代码时就不好用了。
运行步骤:
1.启动后端服务
在cmd中(下行若在Windows PowerShell中运行,去掉 /d):
cd /d D:/ai-assistant-mvp/backend
uvicorn main:app --port 8000
注意,在使用时不要关闭后端服务
2.打开前端
直接双击 frontend/index.html 用浏览器打开
3.聊天
现在可以在前端网页中开始聊天!
当前方案的特点
| 特点 | 说明 |
|---|---|
| 1. 极简架构 | 前端一个 HTML 文件,后端一个 main.py,构建简单快捷 |
| 2. 开发体验快 | 调试便捷,修改即生效,无需编译、打包、部署 |
| 3. 成本极低 | 利用 DashScope 免费额度,本地运行无服务器费用 |
| 4. 功能完整 | 支持对话、代码高亮、Markdown 渲染,满足 MVP(最小可行产品) 核心需求 |
| 5. 易于理解 | 代码逻辑清晰,适合教学、演示或快速验证想法 |
待增强功能(未来扩展):
· 提升交互体验,让用户在等待期间知道系统在工作,不会误以为卡死
· 图片识别(Qwen-VL)
· 语音输入(Whisper API)
· 文件解析(PDF/Word → 文本)
· 保存聊天历史
· 安全增强 XSS(Cross-Site Scripting:跨站脚本攻击) 防护
· 部署到公网,7x24 小时可用,分享链接给任何人
三、下面是改进版本
1、提升体验
用户点击“发送” → 立刻看到“正在思考…”,让用户在等待期间知道系统在工作,不会误以为卡死。
2、更高级安全
引入purify.min.js,增强安全:purify.min.js 是 DOMPurify 库的压缩版,它的核心作用是: 安全地清理(Sanitize)HTML 字符串,防止 XSS(跨站脚本攻击)。
后端main.py不需改动,仅需要修改前端即可。
修改前端 —— index.html源码如下:
<!-- frontend/index.html -->
<!DOCTYPE html>
<html lang="zh">
<head>
  <meta charset="UTF-8" />
  <title>我的 AI 助手</title>
  <!-- 引入 highlight.js 样式(GitHub 风格,深色代码背景) -->
  <link rel="stylesheet"
        href="https://cdnjs.cloudflare.com/ajax/libs/highlight.js/11.9.0/styles/github-dark.min.css"
        crossorigin="anonymous">
  <style>
    body {
      font-family: -apple-system, BlinkMacSystemFont, "Segoe UI", Roboto, sans-serif;
      max-width: 800px;
      margin: 40px auto;
      padding: 20px;
      background: #f9f9f9;
      line-height: 1.6;
    }
    #chat-box {
      height: 400px;
      border: 1px solid #ddd;
      padding: 15px;
      overflow-y: auto;
      background: white;
      margin-bottom: 10px;
      border-radius: 6px;
      box-shadow: 0 1px 3px rgba(0,0,0,0.1);
    }
    #user-input {
      width: 70%;
      padding: 10px;
      border: 1px solid #ccc;
      border-radius: 4px;
    }
    #send-btn {
      padding: 10px 20px;
      background: #007bff;
      color: white;
      border: none;
      border-radius: 4px;
      cursor: pointer;
    }
    #send-btn:hover {
      background: #0069d9;
    }
    .message {
      margin-bottom: 16px;
      word-wrap: break-word;
    }
    .user { color: #007bff; }
    .ai { color: #28a745; }
    .ai-content {
      margin-top: 4px;
      white-space: pre-wrap;
    }
    /* 代码块样式优化 */
    #chat-box pre {
      background: #2d2d2d !important;
      border-radius: 6px;
      padding: 12px !important;
      margin: 8px 0;
      overflow-x: auto;
      font-size: 14px;
    }
    #chat-box code {
      font-family: 'SFMono-Regular', Consolas, 'Liberation Mono', Menlo, monospace;
      font-size: 13px;
    }
  </style>

</head>
<body>
  <!-- HTML 内容 -->
  <h1>🤖 我的 AI 助手(MVP)</h1>
  <div id="chat-box"></div>
  <input type="text" id="user-input" placeholder="输入你的问题..." />
  <button id="send-btn">发送</button>

  <!-- 所有第三方库:放 body 底部,避免阻塞页面渲染 -->
  <script src="https://cdn.jsdelivr.net/npm/marked/marked.min.js"></script>
  <script src="https://cdnjs.cloudflare.com/ajax/libs/highlight.js/11.9.0/highlight.min.js"></script>
  <script src="https://cdnjs.cloudflare.com/ajax/libs/dompurify/3.0.5/purify.min.js"></script>

  <!-- 自定义逻辑:最后执行 -->
  <script>
    // 1. 配置 marked + highlight.js
    marked.setOptions({
      highlight: function(code, lang) {
        const language = hljs.getLanguage(lang) ? lang : 'plaintext';
        return hljs.highlight(code, { language }).value;
      },
      langPrefix: 'hljs language-'
    });

    // 2. 获取 DOM 元素
    const chatBox = document.getElementById('chat-box');
    const input = document.getElementById('user-input');
    const sendBtn = document.getElementById('send-btn');

    // 3. 添加消息函数(支持替换“思考中”)
    function replaceLastAiMessage(content) {
      const lastAi = chatBox.querySelector('.message.ai:last-child');
      if (lastAi) {
        lastAi.innerHTML = `<strong>AI:</strong> ${content}`;
      }
    }

    // 4. 发送消息逻辑
    async function sendMessage() {
      const msg = input.value.trim();
      if (!msg) return;

      // 用户消息
      const userDiv = document.createElement('div');
      userDiv.className = 'message user';
      userDiv.innerHTML = `<strong>你:</strong> ${DOMPurify.sanitize(msg)}`;
      chatBox.appendChild(userDiv);
      chatBox.scrollTop = chatBox.scrollHeight;

      input.value = '';
      sendBtn.disabled = true;
      sendBtn.textContent = '发送中...';

      // 立即显示“思考中”
      const thinkingDiv = document.createElement('div');
      thinkingDiv.className = 'message ai';
      thinkingDiv.innerHTML = '<strong>AI:</strong> <i>正在思考…</i>';
      chatBox.appendChild(thinkingDiv);
      chatBox.scrollTop = chatBox.scrollHeight;

      try {
        const res = await fetch('http://localhost:8000/chat', {
          method: 'POST',
          headers: { 'Content-Type': 'application/json' },
          body: JSON.stringify({ message: msg })
        });

        const data = await res.json();
        if (res.ok) {
          // 安全渲染 Markdown + 代码高亮
          const cleanHtml = DOMPurify.sanitize(marked.parse(data.reply));
          replaceLastAiMessage(cleanHtml);
        } else {
          replaceLastAiMessage(`❌ 出错了:${data.detail || '未知错误'}`);
        }
      } catch (err) {
        replaceLastAiMessage('⚠️ 无法连接到后端,请确保它正在运行。');
      } finally {
        sendBtn.disabled = false;
        sendBtn.textContent = '发送';
      }
    }

    // 5. 绑定事件
    sendBtn.addEventListener('click', sendMessage);
    input.addEventListener('keypress', (e) => {
      if (e.key === 'Enter') sendMessage();
    });
  </script>
</body>
</html>提示,可以把 marked.min.js、highlight.min.js、purify.min.js 下载到本地 static/ 目录,改用相对路径。
运行步骤不变。

有“AI”的1024 = 2048,欢迎大家加入2048 AI社区
更多推荐

 29
29 0
0- 0


 已为社区贡献45条内容

所有评论(0)