从0到1开始搭建kubernetes集群Containerd为引擎 搭建AI集群
CPU:至少2核(推荐4核及以上)内存:至少4GB(推荐8GB及以上)硬盘:至少20GB SSD(推荐50GB及以上)操作系统:CentOS 8.5(本文以CentOS 8.5为例)网络:所有节点可互通,且能访问互联网(用于拉取镜像)kubernetes版本: 1.28版本。
从0到1开始搭建kubernetes集群Containerd为引擎 搭建AI集群
1.安装前需求
1.1 服务器配置要求
CPU:至少2核(推荐4核及以上)
内存:至少4GB(推荐8GB及以上)
硬盘:至少20GB SSD(推荐50GB及以上)
操作系统:CentOS 8.5(本文以CentOS 8.5为例)
网络:所有节点可互通,且能访问互联网(用于拉取镜像)
kubernetes版本: 1.28版本
CNI: flannel
1.2 节点规划
| 节点角色 | IP地址 | 主机名 |
|---|---|---|
| Master节点 | 192.168.192.132 | k8s-master |
| Worker节点1 | 192.168.192.133 | k8s-worker1 |
PS:本文只是做单节点演示,如果需要搭建生产需要使用高可用master
2.初始化服务器
2.1 基础环境配置
(以下所有节点执行)
修改主机名:
hostnamectl set-hostname k8s-master01
配置hosts,修改/etc/hosts如下:
[root@k8s-master01 ~]# cat /etc/hosts
127.0.0.1   localhost localhost.localdomain localhost4 localhost4.localdomain4
::1         localhost localhost.localdomain localhost6 localhost6.localdomain6
192.168.192.132 k8s-master
192.168.192.133 k8s-worker1
配置yum源:
curl -o /etc/yum.repos.d/CentOS-Base.repo https://mirrors.aliyun.com/repo/Centos-vault-8.5.2111.repo

yum-config-manager --add-repo https://mirrors.aliyun.com/docker-ce/linux/centos/docker-ce.repo

cat <<EOF | tee /etc/yum.repos.d/kubernetes.repo
[kubernetes]
name=Kubernetes
baseurl=https://mirrors.aliyun.com/kubernetes-new/core/stable/v1.28/rpm/
enabled=1
gpgcheck=1
gpgkey=https://mirrors.aliyun.com/kubernetes-new/core/stable/v1.28/rpm/repodata/repomd.xml.key
EOF
工具软件安装:
dnf install -y ipvsadm ipset sysstat conntrack libseccomp wget psmisc vim net-tools telnet yum-utils device-mapper-persistent-data lvm2 chrony dnf-plugins-core
下载nvidia驱动
去官网找到自己服务器的卡下载驱动:
NVIDIA驱动官网链接
下载完成后会有一个rpm包大概名字叫做:
nvidia-driver-local-repo-rhel8-570.124.06-1.0-1.x86_64.rpm
由于没有centos8的只能使用RHEL8的版本
安装完毕后解决依赖(由于每台服务器依赖都不一样在本文不做依赖解决问题解释)
完成后确认是否成功执行命令:
nvidia-smi
执行后会显示此信息: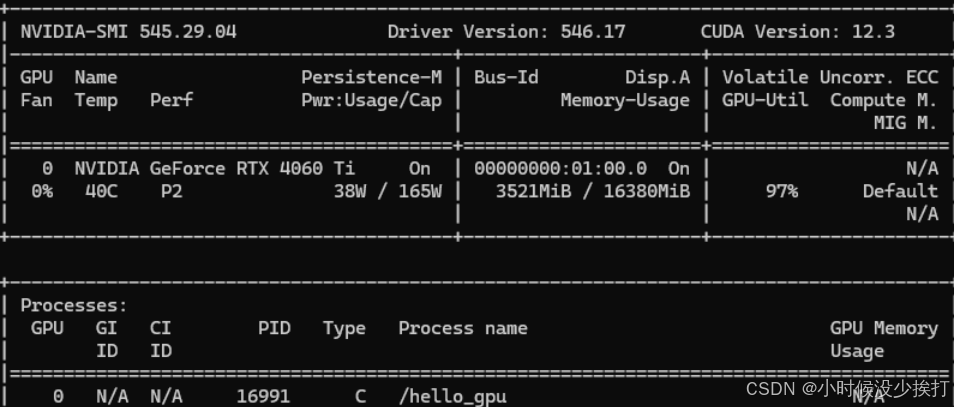
关闭防火墙、selinux、swap:
systemctl disable --now firewalld

setenforce 0

sed -i 's#SELINUX=enforcing#SELINUX=disabled#g' /etc/sysconfig/selinux

sed -i 's#SELINUX=enforcing#SELINUX=disabled#g' /etc/selinux/config

swapoff -a && sysctl -w vm.swappiness=0
sed -ri '/^[^#]*swap/s@^@#@' /etc/fstab
设置chrony(前面安装工具时已经进行了安装):
systemctl enable --now chronyd

vim /etc/chrony.conf

#在pool开头的这行后面添加

server ntp1.aliyun.com iburst
server ntp2.aliyun.com iburst

systemctl restart chronyd

#可以使用以下命令查看ntp服务器列表
chronyc sources -n

#设置时区为上海
ln -sf /usr/share/zoneinfo/Asia/Shanghai /etc/localtime
echo 'Asia/Shanghai' >/etc/timezone
配置limit:
cat <<EOF >> /etc/security/limits.conf
* soft nofile 65536
* hard nofile 131072
* soft nproc 65535
* hard nproc 655350
* soft memlock unlimited
* hard memlock unlimited
* EOF

ulimit -SHn 65535
升级系统软件:
dnf update -y --exclude=kernel*
配置ipvs模块:
modprobe -- ip_vs
modprobe -- ip_vs_rr
modprobe -- ip_vs_wrr
modprobe -- ip_vs_sh
modprobe -- nf_conntrack

cat <<EOF | tee /etc/modules-load.d/ipvs.conf
ip_vs
ip_vs_lc
ip_vs_wlc
ip_vs_rr
ip_vs_wrr
ip_vs_lblc
ip_vs_lblcr
ip_vs_dh
ip_vs_sh
ip_vs_fo
ip_vs_nq
ip_vs_sed
ip_vs_ftp
ip_vs_sh
nf_conntrack
ip_tables
ip_set
xt_set
ipt_set
ipt_rpfilter
ipt_REJECT
ipip
EOF

systemctl enable --now systemd-modules-load.service
配置内核参数(注意此处会重启服务器):
cat <<EOF | tee /etc/sysctl.d/k8s.conf
net.ipv4.ip_forward = 1
net.bridge.bridge-nf-call-iptables = 1
net.bridge.bridge-nf-call-ip6tables = 1
fs.may_detach_mounts = 1
net.ipv4.conf.all.route_localnet = 1
vm.overcommit_memory=1
vm.panic_on_oom=0
fs.inotify.max_user_watches=89100
fs.file-max=52706963
fs.nr_open=52706963
net.netfilter.nf_conntrack_max=2310720
net.ipv4.tcp_keepalive_time = 600
net.ipv4.tcp_keepalive_probes = 3
net.ipv4.tcp_keepalive_intvl =15
net.ipv4.tcp_max_tw_buckets = 36000
net.ipv4.tcp_tw_reuse = 1
net.ipv4.tcp_max_orphans = 327680
net.ipv4.tcp_orphan_retries = 3
net.ipv4.tcp_syncookies = 1
net.ipv4.tcp_max_syn_backlog = 16384
net.ipv4.ip_conntrack_max = 65536
net.ipv4.tcp_max_syn_backlog = 16384
net.ipv4.tcp_timestamps = 0
net.core.somaxconn = 16384
EOF

sysctl --system

reboot

#重启后检查是否启动
lsmod | grep --color=auto -e ip_vs -e nf_conntrack
3.安装containerd kubeadm服务
3.1 安装containerd (为了省事直接安装docker及containerd一起装了,不启动docker就行)
dnf install docker-ce docker-ce-cli containerd.io docker-buildx-plugin docker-compose-plugin
3.2 配置Containerd所需的模块
cat <<EOF | tee /etc/modules-load.d/containerd.conf
overlay
br_netfilter
EOF

modprobe -- overlay
modprobe -- br_netfilter

cat <<EOF | tee /etc/sysctl.d/99-kubernetes-cri.conf
net.bridge.bridge-nf-call-iptables = 1
net.ipv4.ip_forward = 1
net.bridge.bridge-nf-call-ip6tables = 1
EOF

sysctl --system
3.3 改写配置文件
mkdir -p /etc/containerd
containerd config default | tee /etc/containerd/config.toml
修改config.toml文件
vim /etc/containerd/config.toml
version = 2

[plugins]

  [plugins."io.containerd.grpc.v1.cri"]
    device_ownership_from_security_context = false
    disable_apparmor = false
    disable_cgroup = false
    disable_hugetlb_controller = true
    disable_proc_mount = false
    disable_tcp_service = true
    drain_exec_sync_io_timeout = "0s"
    enable_selinux = false
    enable_tls_streaming = false
    enable_unprivileged_icmp = false
    enable_unprivileged_ports = false
    ignore_deprecation_warnings = []
    ignore_image_defined_volumes = false
    max_concurrent_downloads = 3
    max_container_log_line_size = 16384
    netns_mounts_under_state_dir = false
    restrict_oom_score_adj = false
    #####这里修改下改成阿里云的源#####
    sandbox_image = "registry.cn-hangzhou.aliyuncs.com/google_containers/pause:3.9"
    selinux_category_range = 1024
    stats_collect_period = 10
    stream_idle_timeout = "4h0m0s"
    stream_server_address = "127.0.0.1"
    stream_server_port = "0"
    #####这里修改下改成使用Cgroup#####
    systemd_cgroup = true
    tolerate_missing_hugetlb_controller = true
    unset_seccomp_profile = ""

    [plugins."io.containerd.grpc.v1.cri".cni]
      bin_dir = "/opt/cni/bin"
      conf_dir = "/etc/cni/net.d"
      conf_template = ""
      ip_pref = ""
      max_conf_num = 1

    [plugins."io.containerd.grpc.v1.cri".containerd]
    #####这里修改下改成runtime为nvidia#####
      default_runtime_name = "nvidia"
      disable_snapshot_annotations = true
      discard_unpacked_layers = false
      ignore_rdt_not_enabled_errors = false
      no_pivot = false
      snapshotter = "overlayfs"

      [plugins."io.containerd.grpc.v1.cri".containerd.default_runtime]
        base_runtime_spec = ""
        cni_conf_dir = ""
        cni_max_conf_num = 0
        container_annotations = []
        pod_annotations = []
        privileged_without_host_devices = false
        runtime_engine = ""
        runtime_path = ""
        runtime_root = ""
        runtime_type = ""

        [plugins."io.containerd.grpc.v1.cri".containerd.default_runtime.options]

      [plugins."io.containerd.grpc.v1.cri".containerd.runtimes]

        [plugins."io.containerd.grpc.v1.cri".containerd.runtimes.nvidia]
          base_runtime_spec = ""
          cni_conf_dir = ""
          cni_max_conf_num = 0
          container_annotations = []
          pod_annotations = []
          privileged_without_host_devices = false
          runtime_engine = ""
          runtime_path = ""
          runtime_root = ""
          runtime_type = "io.containerd.runc.v2"

          [plugins."io.containerd.grpc.v1.cri".containerd.runtimes.nvidia.options]
            BinaryName = "/usr/bin/nvidia-container-runtime"
            CriuImagePath = ""
            CriuPath = ""
            CriuWorkPath = ""
            IoGid = 0
            IoUid = 0
            NoNewKeyring = false
            NoPivotRoot = false
            Root = ""
            ShimCgroup = ""
            SystemdCgroup = true

        [plugins."io.containerd.grpc.v1.cri".containerd.runtimes.runc]
          base_runtime_spec = ""
          cni_conf_dir = ""
          cni_max_conf_num = 0
          container_annotations = []
          pod_annotations = []
          privileged_without_host_devices = false
          runtime_engine = ""
          runtime_path = ""
          runtime_root = ""
          runtime_type = "io.containerd.runc.v2"

          [plugins."io.containerd.grpc.v1.cri".containerd.runtimes.runc.options]
            BinaryName = ""
            CriuImagePath = ""
            CriuPath = ""
            CriuWorkPath = ""
            IoGid = 0
            IoUid = 0
            NoNewKeyring = false
            NoPivotRoot = false
            Root = ""
            ShimCgroup = ""
            SystemdCgroup = true

      [plugins."io.containerd.grpc.v1.cri".containerd.untrusted_workload_runtime]
        base_runtime_spec = ""
        cni_conf_dir = ""
        cni_max_conf_num = 0
        container_annotations = []
        pod_annotations = []
        privileged_without_host_devices = false
        runtime_engine = ""
        runtime_path = ""
        runtime_root = ""
        runtime_type = ""

        [plugins."io.containerd.grpc.v1.cri".containerd.untrusted_workload_runtime.options]

    [plugins."io.containerd.grpc.v1.cri".image_decryption]
      key_model = "node"

    [plugins."io.containerd.grpc.v1.cri".registry]
      config_path = ""

      [plugins."io.containerd.grpc.v1.cri".registry.auths]

      [plugins."io.containerd.grpc.v1.cri".registry.configs]

      [plugins."io.containerd.grpc.v1.cri".registry.headers]

      [plugins."io.containerd.grpc.v1.cri".registry.mirrors]

    [plugins."io.containerd.grpc.v1.cri".x509_key_pair_streaming]
      tls_cert_file = ""
      tls_key_file = ""
3.4 设置开启启动并启动containerd
systemctl daemon-reload && systemctl enable --now containerd
3.5 安装k8s组件
安装kubeadm
dnf install -y kubeadm-1.28* kubelet-1.28* kubectl-1.28*

systemctl daemon-reload
systemctl enable --now kubelet
配置kubeadm的config文件
vim kubeadm-config.yaml
apiVersion: kubeadm.k8s.io/v1beta3
bootstrapTokens:
- groups:
  - system:bootstrappers:kubeadm:default-node-token
  token: *************
  ttl: 24h0m0s
  usages:
  - signing
  - authentication
kind: InitConfiguration
localAPIEndpoint:
  advertiseAddress: 192.168.192.132
  bindPort: 6443
nodeRegistration:
  criSocket: unix:///var/run/containerd/containerd.sock
  name: k8s-master01
  taints:
  - effect: NoSchedule
    key: node-role.kubernetes.io/control-plane
---
apiServer:
  certSANs:
  - 192.168.192.132
  timeoutForControlPlane: 4m0s
apiVersion: kubeadm.k8s.io/v1beta3
certificatesDir: /etc/kubernetes/pki
clusterName: kubernetes
controlPlaneEndpoint: 192.168.192.132:6443
controllerManager: {}
etcd:
  local:
    dataDir: /var/lib/etcd
imageRepository: registry.cn-hangzhou.aliyuncs.com/google_containers
kind: ClusterConfiguration
kubernetesVersion: v1.28.3
networking:
  dnsDomain: cluster.local
  podSubnet: 172.16.0.0/16
  serviceSubnet: 10.96.0.0/16
scheduler: {}
重新适配yaml
kubeadm config migrate --old-config kubeadm-config.yaml --new-config new.yaml
提前下载镜像
kubeadm config images pull --config /root/new.yaml
初始化kubeadm
kubeadm init --config ./new.yaml --upload-certs
初始化成功以后,会有有join语句token记得保存
配置变量
cat <<EOF >> /root/.bashrc
export KUBECONFIG=/etc/kubernetes/admin.conf
EOF
source /root/.bashrc
查看集群状态
kubectl get node
(如果成功初始化不需要执行此步骤)
如果出现异常可以尝试重置再初始化,重置命令:
kubeadm reset -f ; ipvsadm --clear ; rm -rf ~/.kube
设置自动补全kubectl命令
dnf install -y bash-completion

#在/etc/profile添加一行命令
echo "source <(kubectl completion bash)" >> /etc/profile
source /etc/profile
3.6 安装网络组建
下载flannel的yaml
wget https://github.com/flannel-io/flannel/releases/latest/download/kube-flannel.yml
需要点科学上网,如果无法下载将以下yaml保存下来即可,容器从其他容器镜像网站下载后改下tag即可,在这里不再赘述
apiVersion: v1
kind: Namespace
metadata:
  labels:
    k8s-app: flannel
    pod-security.kubernetes.io/enforce: privileged
  name: kube-flannel
---
apiVersion: v1
kind: ServiceAccount
metadata:
  labels:
    k8s-app: flannel
  name: flannel
  namespace: kube-flannel
---
apiVersion: rbac.authorization.k8s.io/v1
kind: ClusterRole
metadata:
  labels:
    k8s-app: flannel
  name: flannel
rules:
- apiGroups:
  - ""
  resources:
  - pods
  verbs:
  - get
- apiGroups:
  - ""
  resources:
  - nodes
  verbs:
  - get
  - list
  - watch
- apiGroups:
  - ""
  resources:
  - nodes/status
  verbs:
  - patch
---
apiVersion: rbac.authorization.k8s.io/v1
kind: ClusterRoleBinding
metadata:
  labels:
    k8s-app: flannel
  name: flannel
roleRef:
  apiGroup: rbac.authorization.k8s.io
  kind: ClusterRole
  name: flannel
subjects:
- kind: ServiceAccount
  name: flannel
  namespace: kube-flannel
---
apiVersion: v1
data:
  cni-conf.json: |
    {
      "name": "cbr0",
      "cniVersion": "0.3.1",
      "plugins": [
        {
          "type": "flannel",
          "delegate": {
            "hairpinMode": true,
            "isDefaultGateway": true
          }
        },
        {
          "type": "portmap",
          "capabilities": {
            "portMappings": true
          }
        }
      ]
    }
  net-conf.json: |
    {
      "Network": "10.244.0.0/16",
      "EnableNFTables": false,
      "Backend": {
        "Type": "vxlan"
      }
    }
kind: ConfigMap
metadata:
  labels:
    app: flannel
    k8s-app: flannel
    tier: node
  name: kube-flannel-cfg
  namespace: kube-flannel
---
apiVersion: apps/v1
kind: DaemonSet
metadata:
  labels:
    app: flannel
    k8s-app: flannel
    tier: node
  name: kube-flannel-ds
  namespace: kube-flannel
spec:
  selector:
    matchLabels:
      app: flannel
      k8s-app: flannel
  template:
    metadata:
      labels:
        app: flannel
        k8s-app: flannel
        tier: node
    spec:
      affinity:
        nodeAffinity:
          requiredDuringSchedulingIgnoredDuringExecution:
            nodeSelectorTerms:
            - matchExpressions:
              - key: kubernetes.io/os
                operator: In
                values:
                - linux
      containers:
      - args:
        - --ip-masq
        - --kube-subnet-mgr
        command:
        - /opt/bin/flanneld
        env:
        - name: POD_NAME
          valueFrom:
            fieldRef:
              fieldPath: metadata.name
        - name: POD_NAMESPACE
          valueFrom:
            fieldRef:
              fieldPath: metadata.namespace
        - name: EVENT_QUEUE_DEPTH
          value: "5000"
        - name: CONT_WHEN_CACHE_NOT_READY
          value: "false"
        image: ghcr.io/flannel-io/flannel:v0.27.4
        name: kube-flannel
        resources:
          requests:
            cpu: 100m
            memory: 50Mi
        securityContext:
          capabilities:
            add:
            - NET_ADMIN
            - NET_RAW
          privileged: false
        volumeMounts:
        - mountPath: /run/flannel
          name: run
        - mountPath: /etc/kube-flannel/
          name: flannel-cfg
        - mountPath: /run/xtables.lock
          name: xtables-lock
      hostNetwork: true
      initContainers:
      - args:
        - -f
        - /flannel
        - /opt/cni/bin/flannel
        command:
        - cp
        image: ghcr.io/flannel-io/flannel-cni-plugin:v1.8.0-flannel1
        name: install-cni-plugin
        volumeMounts:
        - mountPath: /opt/cni/bin
          name: cni-plugin
      - args:
        - -f
        - /etc/kube-flannel/cni-conf.json
        - /etc/cni/net.d/10-flannel.conflist
        command:
        - cp
        image: ghcr.io/flannel-io/flannel:v0.27.4
        name: install-cni
        volumeMounts:
        - mountPath: /etc/cni/net.d
          name: cni
        - mountPath: /etc/kube-flannel/
          name: flannel-cfg
      priorityClassName: system-node-critical
      serviceAccountName: flannel
      tolerations:
      - effect: NoSchedule
        operator: Exists
      volumes:
      - hostPath:
          path: /run/flannel
        name: run
      - hostPath:
          path: /opt/cni/bin
        name: cni-plugin
      - hostPath:
          path: /etc/cni/net.d
        name: cni
      - configMap:
          name: kube-flannel-cfg
        name: flannel-cfg
      - hostPath:
          path: /run/xtables.lock
          type: FileOrCreate
        name: xtables-lock
修改flannel组件的以下yaml:
  net-conf.json: |
    {
      "Network": "10.244.0.0/16",
      "EnableNFTables": false,
      "Backend": {
        "Type": "vxlan"
      }
    }
修改根据上面的init.yaml文件中以下这段决定的:
networking:
  dnsDomain: cluster.local
  podSubnet: 172.16.0.0/16
  serviceSubnet: 10.96.0.0/16
scheduler: {}
修改完成后:
kubectl apply -f kube-flannel.yml
执行完后查看容器是否正常running:
kubectl get pod -n kube-flannel
正常运行后查看node运行节点:
kubectl get nodes
所有的节点为Ready即可
4.安装nvidia服务
4.1 安装nvidia-container-toolkit(这个可能需要科学上网)
#下载toolkit的repo
curl -s -L https://nvidia.github.io/libnvidia-container/stable/rpm/nvidia-container-toolkit.repo | tee /etc/yum.repos.d/nvidia-container-toolkit.repo
#启动toolkit的repo
dnf-config-manager --enable nvidia-container-toolkit-experimental
#设置toolkit的版本为1.18.0-1
export NVIDIA_CONTAINER_TOOLKIT_VERSION=1.18.0-1
#安装对应的版本
dnf install -y       nvidia-container-toolkit-${NVIDIA_CONTAINER_TOOLKIT_VERSION}       nvidia-container-toolkit-base-${NVIDIA_CONTAINER_TOOLKIT_VERSION}       libnvidia-container-tools-${NVIDIA_CONTAINER_TOOLKIT_VERSION}       libnvidia-container1-${NVIDIA_CONTAINER_TOOLKIT_VERSION}
#将ctk的runtime设置为containerd
nvidia-ctk runtime configure --runtime=containerd
#检查是否成功
cat /etc/containerd/config.toml | grep -A 10 "nvidia"
#重启containerd
systemctl restart containerd
4.2 安装nvidia的pod
kubectl create -f https://raw.githubusercontent.com/NVIDIA/k8s-device-plugin/v0.17.1/deployments/static/nvidia-device-plugin.yml
检查状态
kubectl -n kube-system exec -it $(kubectl get pod -n kube-system -l name=nvidia-device-plugin-ds -o name) -- ls /dev/ | grep nvidia
最后确认GPU资源出现
kubectl describe node
有GPU数量安装完成

有“AI”的1024 = 2048,欢迎大家加入2048 AI社区
更多推荐


 14
14 0
0- 0


 已为社区贡献1条内容

所有评论(0)