人工智能基础知识笔记二十:构建一个简单的Agent+MCP Server
本文介绍了如何使用Ollama的Llama3.2模型构建MCP服务器(MCPServer)和Agent系统。首先通过Ollama下载所需模型,并推荐使用uv替代pip进行依赖管理。文章详细展示了如何创建天气查询功能的MCPServer,以及如何通过Agent自动识别查询内容并调用MCP服务器获取天气信息。示例代码包括服务器端(weather_server.py)和客户端(agent_client.
关于如何构建MCP Server请参考:https://blog.csdn.net/jimmyleeee/article/details/154799040
1、环境的构建:
本文使用的是ollama的llama3.2:latest模型,所以,需要首先下载并且安装ollama。
关于如何安装ollama,可以参考如下:
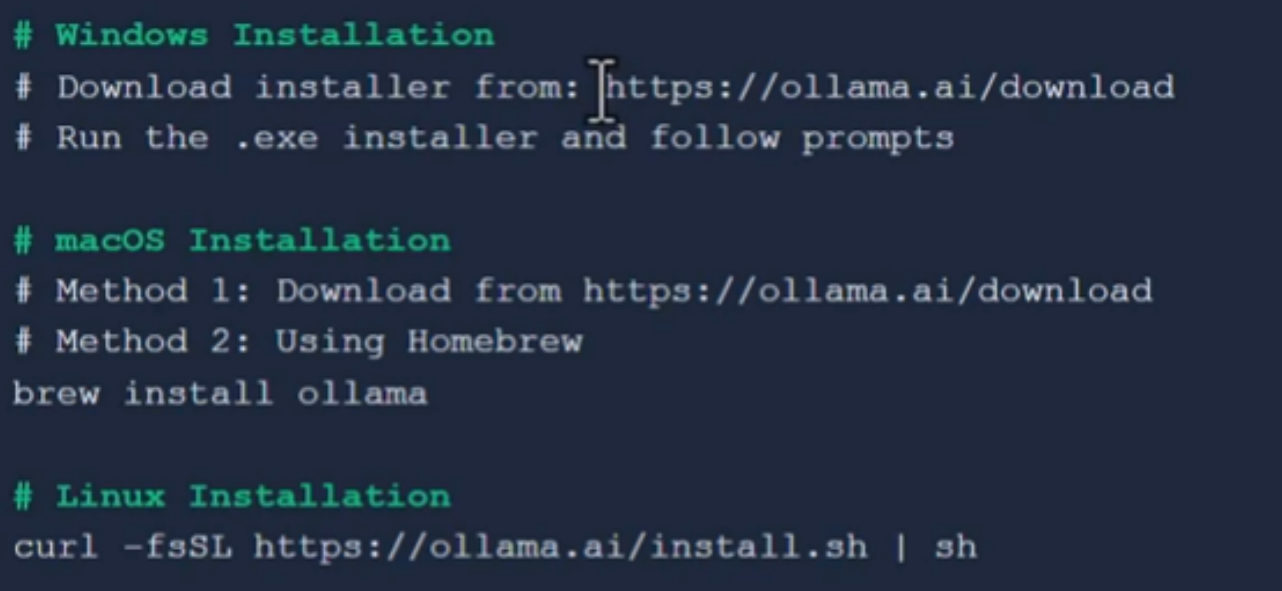
安装之后,执行命令: ollama pull llama3.2:latest ,下载需要的模型。也可以从https://ollama.com/search 查询想要使用的模型,例如:deepseek-r1,

搜索到模型之后,就可以使用 ollama pull 模型名,把模型下载到本地。
参考:https://blog.csdn.net/jimmyleeee/article/details/154799040 安装相关的依赖,这里建议使用uv而不是pip,安装uv的方法如下:

uv和pip的比较如下:
| 特性 | uv | pip |
| 开发团队 | Astral | Python 包装指导委员会 |
| 编程语言 | Rust | Python |
| 定位 | 高速、一体化的包管理器和解析器(替代 pip/pip-tools/venv/virtualenv) | 官方的 Python 包安装工具 |
| 优点 | 1. 极快的速度:依赖解析和安装速度远超 pip,尤其是在有缓存的情况下。 2. 一体化工具:集成了包管理、虚拟环境管理(创建/激活)、依赖锁定(uv.lock)等功能,无需额外安装工具。 3. 可复现的依赖解析:默认生成 uv.lock 文件,确保依赖树的完全一致。 4. 跨平台一致性:依赖解析算法在所有操作系统上保持一致。 5. 强大的 pyproject.toml 支持:对动态依赖(如 poetry)有很好的支持。 6. 项目工作流:内置了对管理多个项目相关任务的支持(类似 poetry 或 pdm)。 7. 内置虚拟环境:命令更简洁(如 uv run 可直接在虚拟环境中运行命令)。 |
1. 官方标准:Python 的官方包管理器,是所有 Python 安装的标配。 2. 极高的兼容性:与所有 Python 版本和绝大多数包 100% 兼容。 3. 生态系统成熟:拥有最庞大的用户基础和社区支持,文档和教程极其丰富。 4. 简单直接:功能专注,学习曲线平缓,核心命令(install, uninstall, freeze)简单易用。 5. 与 setuptools 深度集成:是打包和分发生态系统的基石。 |
| 缺点 | 1. 相对较新:生态系统和社区支持不如 pip 成熟,可能存在未知的边缘情况。 2. 非官方标准:需要单独安装,不是 Python 发行版的一部分。 3. 功能仍在演进:虽然核心功能已非常稳定,但一些高级或边缘功能可能仍在开发中。 4. 对旧式包的兼容性:对于非常古老或非标准的打包方式,可能不如 pip 稳定。 |
1. 速度较慢:依赖解析和安装过程,尤其是在处理复杂依赖关系时,速度较慢。 2. 功能单一:只是一个安装工具。需要配合 venv、virtualenv、pip-tools、pipenv 等工具才能完成完整的项目管理。 3. 依赖解析器较弱:默认的解析器在处理复杂依赖冲突时能力有限,有时会给出令人困惑的错误信息。 4. 无内置锁定文件:标准 pip 不生成锁定文件,依赖 requirements.txt 难以保证完全一致的依赖树。 |
2、 构建一个MCP Server
这里参考使用https://blog.csdn.net/jimmyleeee/article/details/154799040的MCP Server,文件名字weather_server.py,代码现实如下:
# file name weather_server.py
import httpx
from fastmcp import FastMCP

# Create FastMCP server
mcp = FastMCP("Weather")

@mcp.tool()
async def get_weather(location: str) -> str:
    """Get current weather for a location"""
    async with httpx.AsyncClient() as client:
        response = await client.get(f"https://wttr.in/{location}?format=j1")
        data = response.json()

        current = data["current_condition"][0]
        area = data["nearest_area"][0]["areaName"][0]["value"]

        return f"Weather in {area}: {current['temp_C']}°C, {current['weatherDesc'][0]['value']}"


@mcp.tool()
async def get_forecast(location: str) -> str:
    """Get 3-day weather forecast"""
    async with httpx.AsyncClient() as client:
        response = await client.get(f"https://wttr.in/{location}?format=j1")
        data = response.json()

        result = f"3-day forecast for {location}:\n"
        for day in data["weather"][:3]:
            result += f"{day['date']}: {day['mintempC']}-{day['maxtempC']}°C\n"
        return result


if __name__ == "__main__":
    mcp.run(transport="stdio")
    #mcp.run(transport="streamable-http", port=8001)
3、 构建一个Agent
Agent是使用之前下载的 llama3.2:latest, 通过Agent识别query的内容,然后自动去调用weather_server.py的MCP server去查询某个城市的天气。示例代码如下:
# filename  agent_client.py

import asyncio
from langchain_ollama import ChatOllama
from mcp_use import MCPAgent, MCPClient

async def main():

    # Create configuration dictionary
    config = {
      "mcpServers": {
          "weather": {
              "command": "uv",
              "args": ["run",
                       "--directory",
                       "D:\\AI_Test_Code\\FirstMcpServer\\ollama",
                       "weather_server.py"],
          }
      }
    }

    # Create MCPClient from configuration dictionary
    client = MCPClient.from_dict(config)

    # Create LLM
    llm = ChatOllama(base_url="http://localhost:11434", model="llama3.2:latest")

    # Create agent with the client
    agent = MCPAgent(llm=llm, client=client, max_steps=30)

    # Run the query
    result = await agent.run(
        "What's the weather in Shanghai and the 3-day forecast?",
    )
    print(f"\nResult: {result}")

if __name__ == "__main__":
    asyncio.run(main())
4、运行
在VS Code的terminal里,执行 uv run agent_client.py,或者直接使用VS Code的![]() 运行程序按钮也可以。
运行程序按钮也可以。
运行Agent的结果如下:
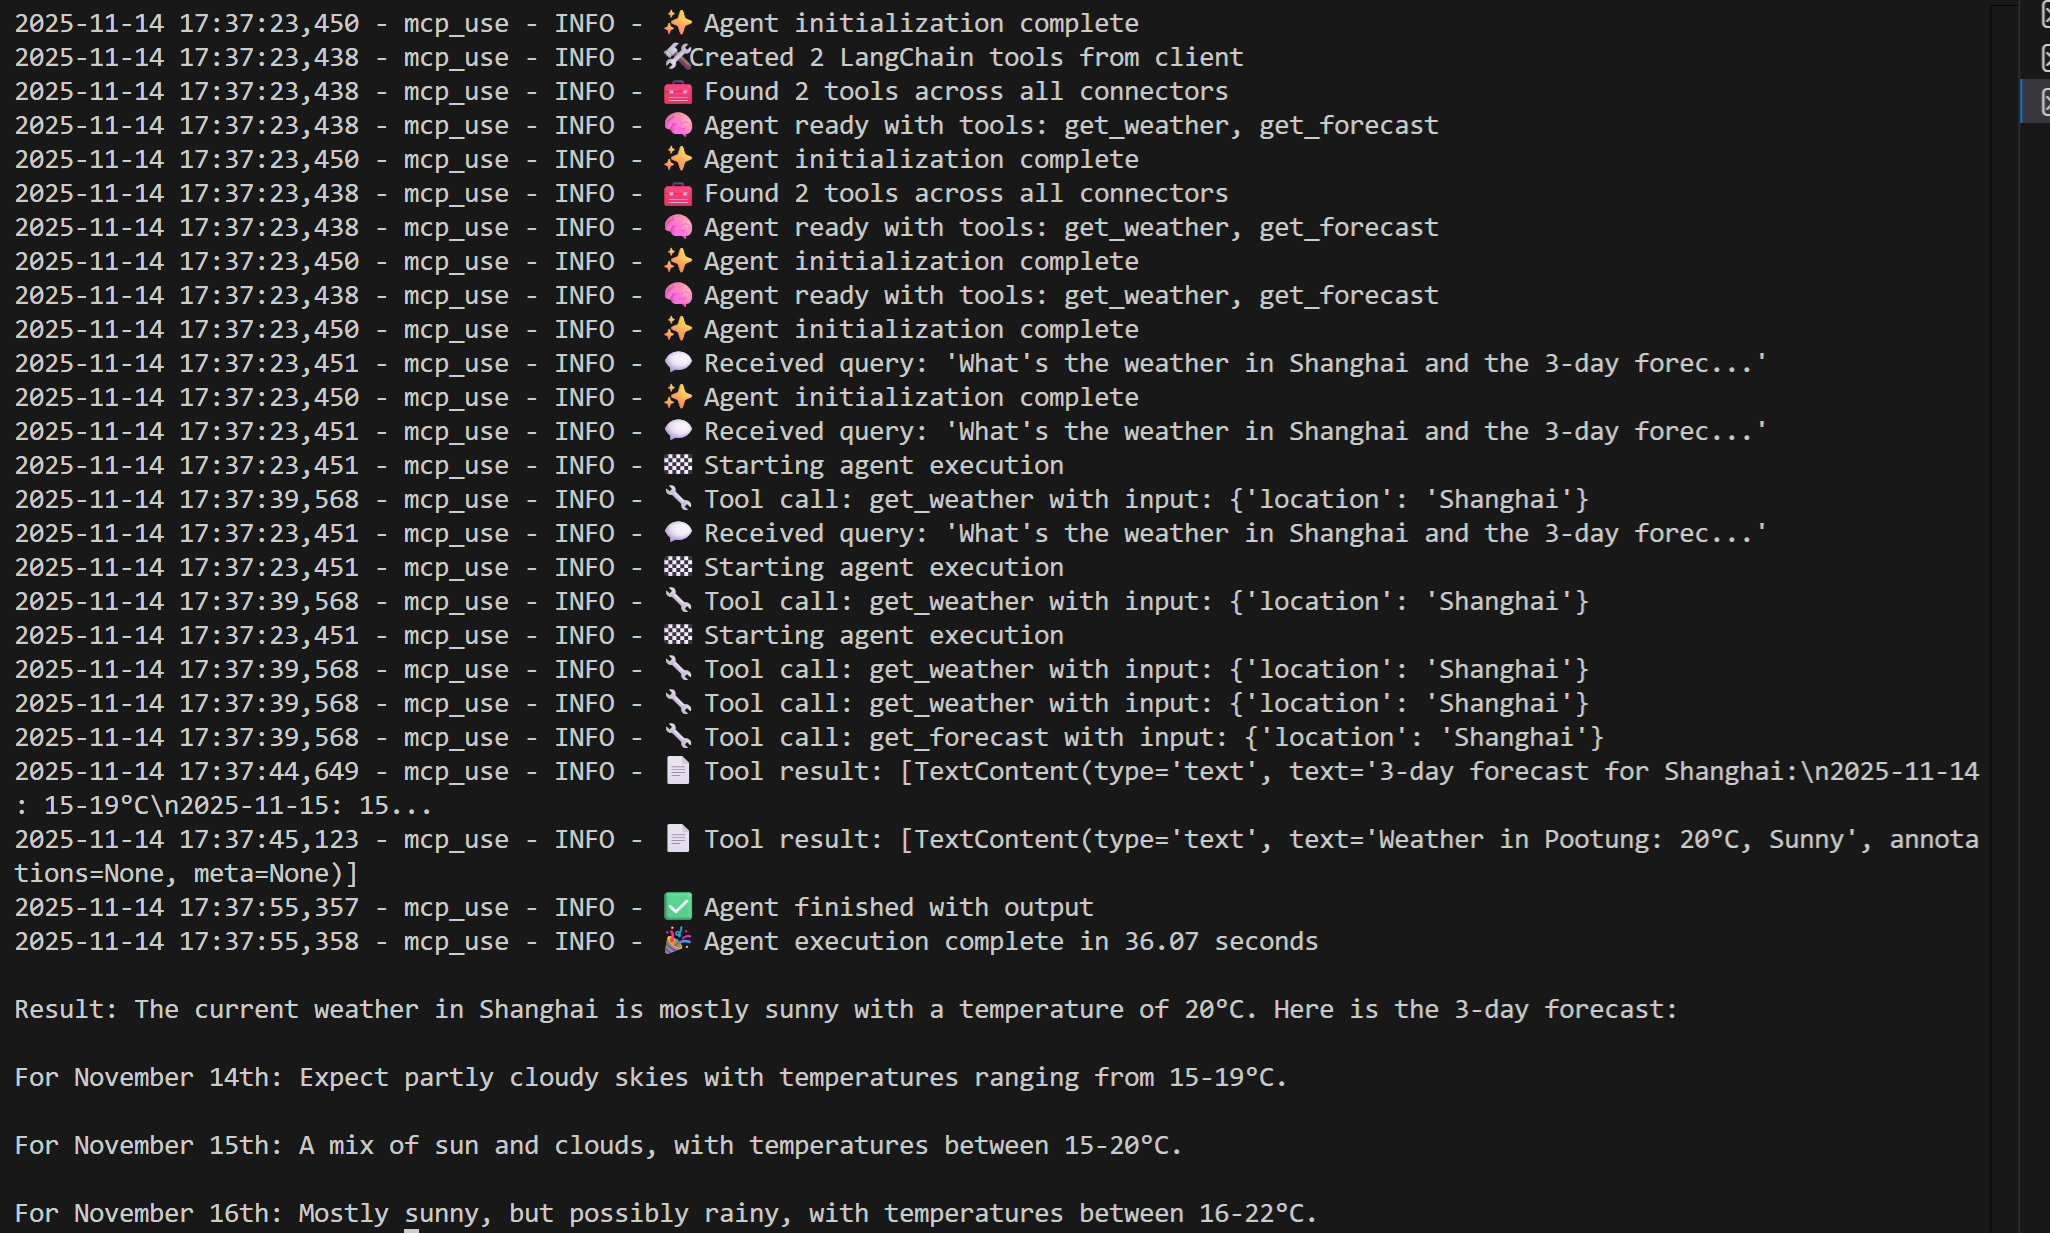
可以看到已经根据城市名称查询到未来3天的天气情况。

有“AI”的1024 = 2048,欢迎大家加入2048 AI社区
更多推荐

 17
17 0
0- 0


 已为社区贡献3条内容

所有评论(0)