高通QCS8550部署Yolov8模型与性能测试
前言:
在当今科技飞速发展的时代,边缘计算和人工智能的融合正推动着众多领域的创新变革。而在这一进程中,硬件平台的性能起着至关重要的作用。今天,我们将聚焦于一款强大的硬件 —— 高通 QCS8550,探索如何在其上部署热门的 Yolov8 模型。
高通 QCS8550 采用先进的 4 纳米制程工艺,在提升性能的同时有效降低了功耗。其核心由八核 Kryo CPU 构成,具体包括一个主频高达 3.2GHz 的超大核,能轻松应对高强度任务;四个主频为 2.8GHz 的性能内核,兼顾性能与能效;还有三个主频 2.0GHz 的效率内核,负责日常轻负载操作,这种合理的内核配置实现了任务处理的高效与节能。在图形处理方面,集成的 Adreno 740 GPU 表现卓越,支持 4K@60Hz 的显示输出,为高清多媒体应用提供有力支撑。不仅如此,该平台在视频处理能力上也十分出色,支持 8K@30fps 的视频编码以及 8K@60fps 的视频解码,并且兼容 H.264 和 H.265 编码标准,能满足各类高品质视频应用的需求。
然而,QCS8550 最为引人注目的,当属其强大的 AI 处理能力。整体 AI 算力高达 48TOPS,内部集成的高通 Hexagon 神经网络处理单元支持先进的 INT4 AI 精度格式,相比上一代产品,在持续 AI 推理方面实现了 60% 的能效提升。这意味着设备在拥有强大 AI 性能的同时,能够极大地降低能耗,尤其适用于智能监控、机器人、自动驾驶辅助等对 AI 性能和能耗有严苛要求的长时间运行智能场景。
|
模型 尺寸640*640 |
CPU | NPU QNN2.31 | ||||
| FP32 | FP16 | INT8 | ||||
| YOLOv8n | 170ms | 5.8 FPS | 4.67ms | 214 FPS | 1.66ms | 602 FPS |
| YOLOv8s | 513ms | 1.9 FPS | 6.87ms | 145 FPS | 2.38ms | 420 FPS |
| YOLOv8m | 1249ms | 0.8 FPS | 15.15ms | 66 FPS | 4.65ms | 215 FPS |
| YOLOv8l | 2341ms | 0.4 FPS | 31.12ms | 32 FPS | 8.42ms | 118 FPS |
| YOLOv8x | 3350ms | 0.3 FPS | 52.47ms | 19 FPS | 13.13ms | 76 FPS |
点击链接可以下载YOLOv8系列模型的pt格式,其他模型尺寸可以通过AIMO转换模型,并修改下面参考代码中的model_size测试即可
(一)将pt模型转换为onnx格式
Step1:升级pip版本为25.1.1
python3.10 -m pip install --upgrade pip
pip -V
aidlux@aidlux:~/aidcode$ pip -V
pip 25.1.1 from /home/aidlux/.local/lib/python3.10/site-packages/pip (python 3.10)
Step2:安装Yolov8和onnx
pip install yolov8 onnxStep3:设置yolo命令的环境变量
方法 1:临时添加环境变量(立即生效)
在终端中执行以下命令,将 ~/.local/bin 添加到当前会话的环境变量中
export PATH="$PATH:$HOME/.local/bin"- 说明:此操作仅对当前终端会话有效,关闭终端后失效。
- 验证:执行
yolo --version,若输出版本号(如0.0.2),则说明命令已生效。
方法 2:永久添加环境变量(长期有效)
echo 'export PATH="$PATH:$HOME/.local/bin"' >> ~/.bashrc
source ~/.bashrc # 使修改立即生效验证:执行 yolo --version,若输出版本号(如 0.0.2),则说明命令已生效。
测试环境中安装yolo版本为8.3.152

提示:如果遇到用户组权限问题,可以忽悠,因为yolo命令会另外构建临时文件,也可以执行下面命令更改用户组,执行后下面的警告会消失:
sudo chown -R aidlux:aidlux ~/.config/
sudo chown -R aidlux:aidlux ~/.config/Ultralytics
可能遇见的报错如下:
WARNING ⚠️ user config directory '/home/aidlux/.config/Ultralytics' is not writeable, defaulting to '/tmp' or CWD.Alternatively you can define a YOLO_CONFIG_DIR environment variable for this path.
Step4:将Yolov8系列模型的pt格式转换为onnx格式
新建一个python文件,命名自定义即可,用于模型转换以及导出:
from ultralytics import YOLO

# 加载同级目录下的.pt模型文件
model = YOLO('./yolov8x.pt')  # 替换为实际模型文件名

# 导出ONNX配置参数
export_params = {
    'format': 'onnx',
    'opset': 12,          # 推荐算子集版本
    'simplify': True,     # 启用模型简化
    'dynamic': False,     # 固定输入尺寸
    'imgsz': 640,         # 标准输入尺寸
    'half': False         # 保持FP32精度
}

# 执行转换并保存到同级目录
model.export(**export_params)
执行该程序完成将pt模型导出为onnx模型
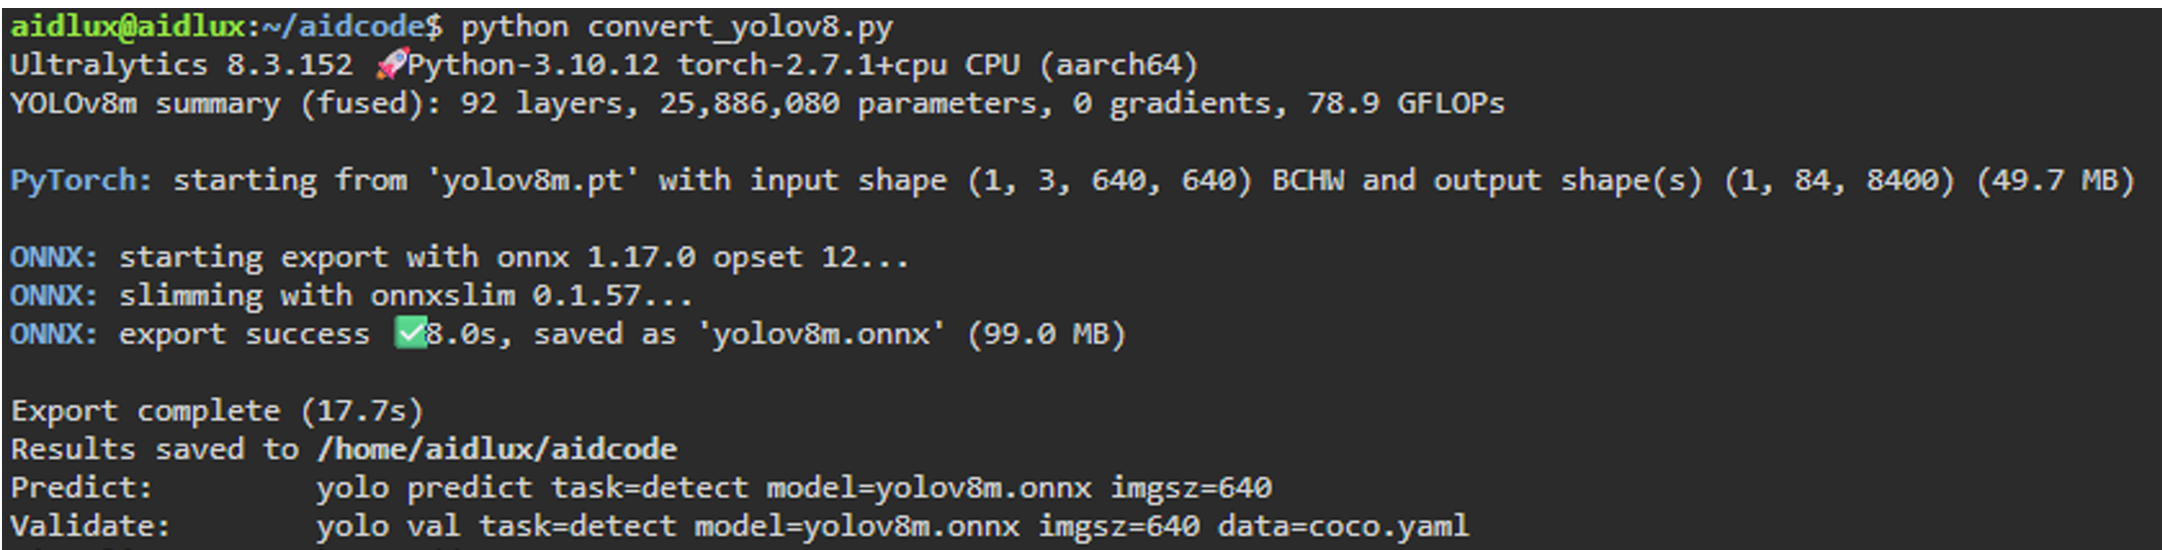
提示:Yolov8n,Yolov8s,Yolov8m,Yolov8l替换代码中Yolov8x即可;
(二)使用AIMO将onnx模型转换高通NPU可以运行的模型格式
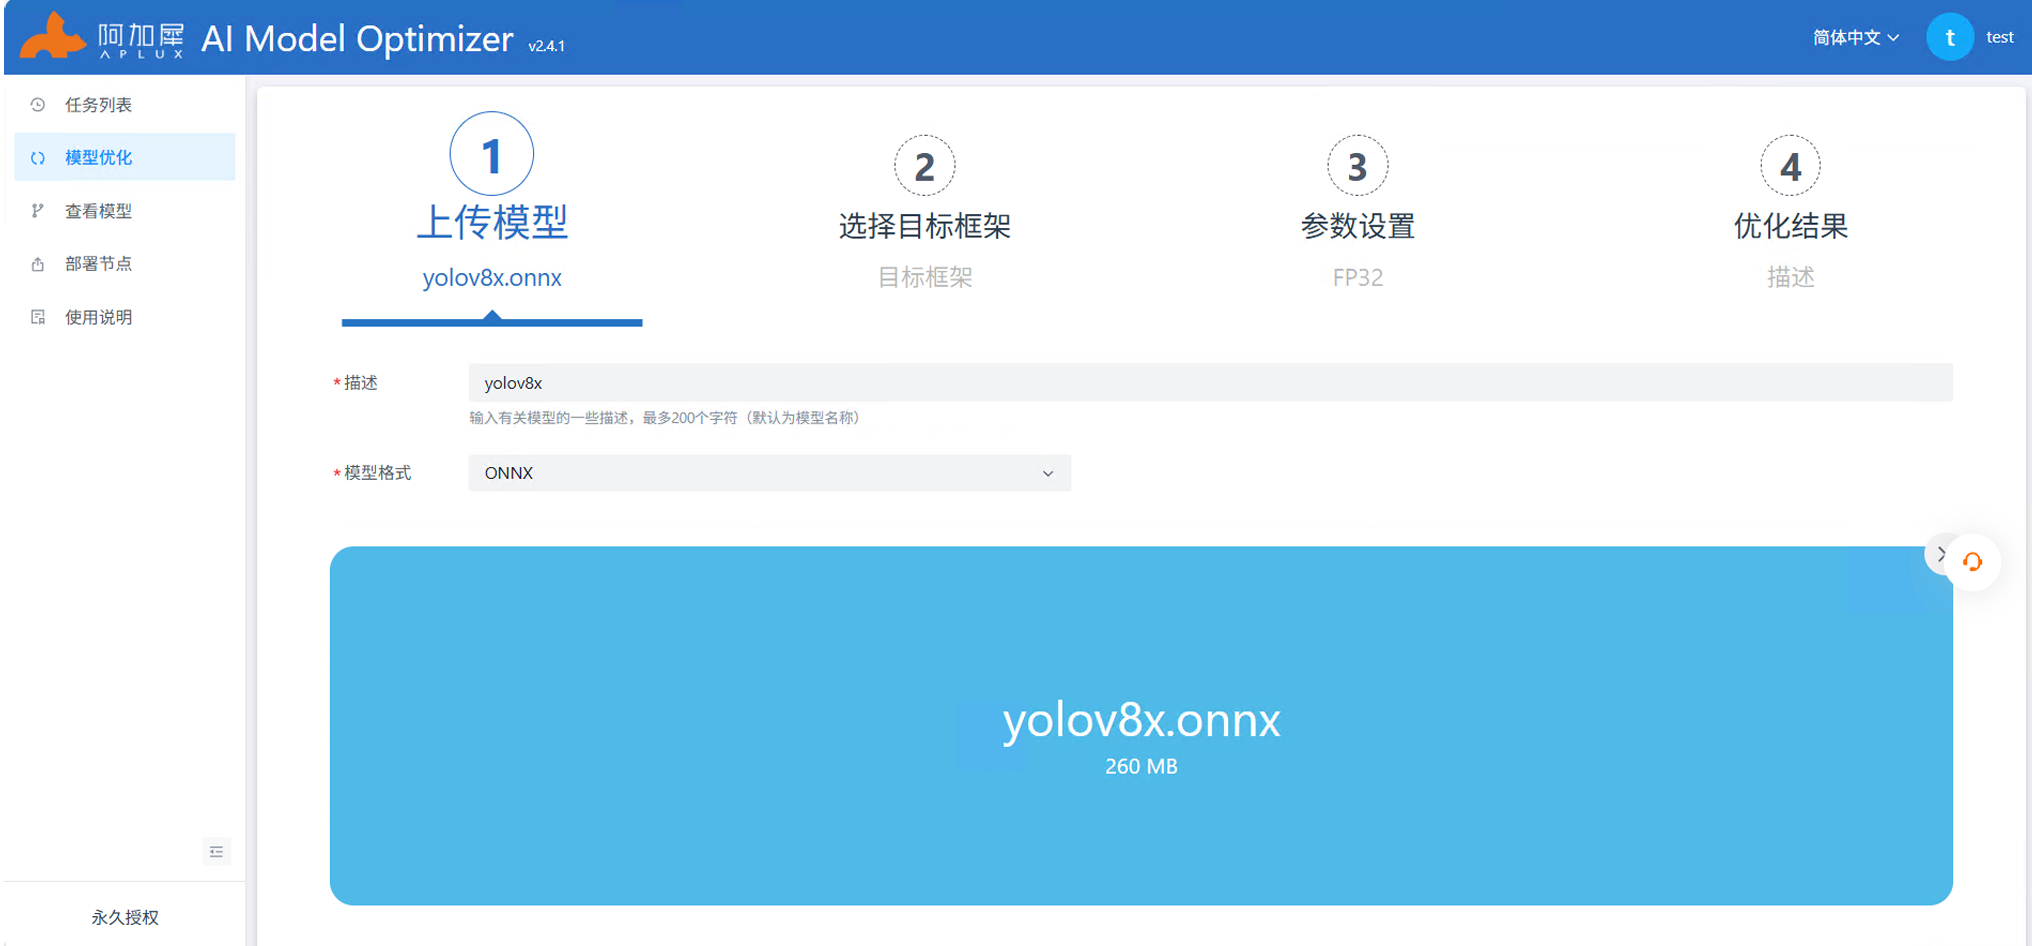
Step1:选择模型优化,模型格式选择onnx格式上传模型
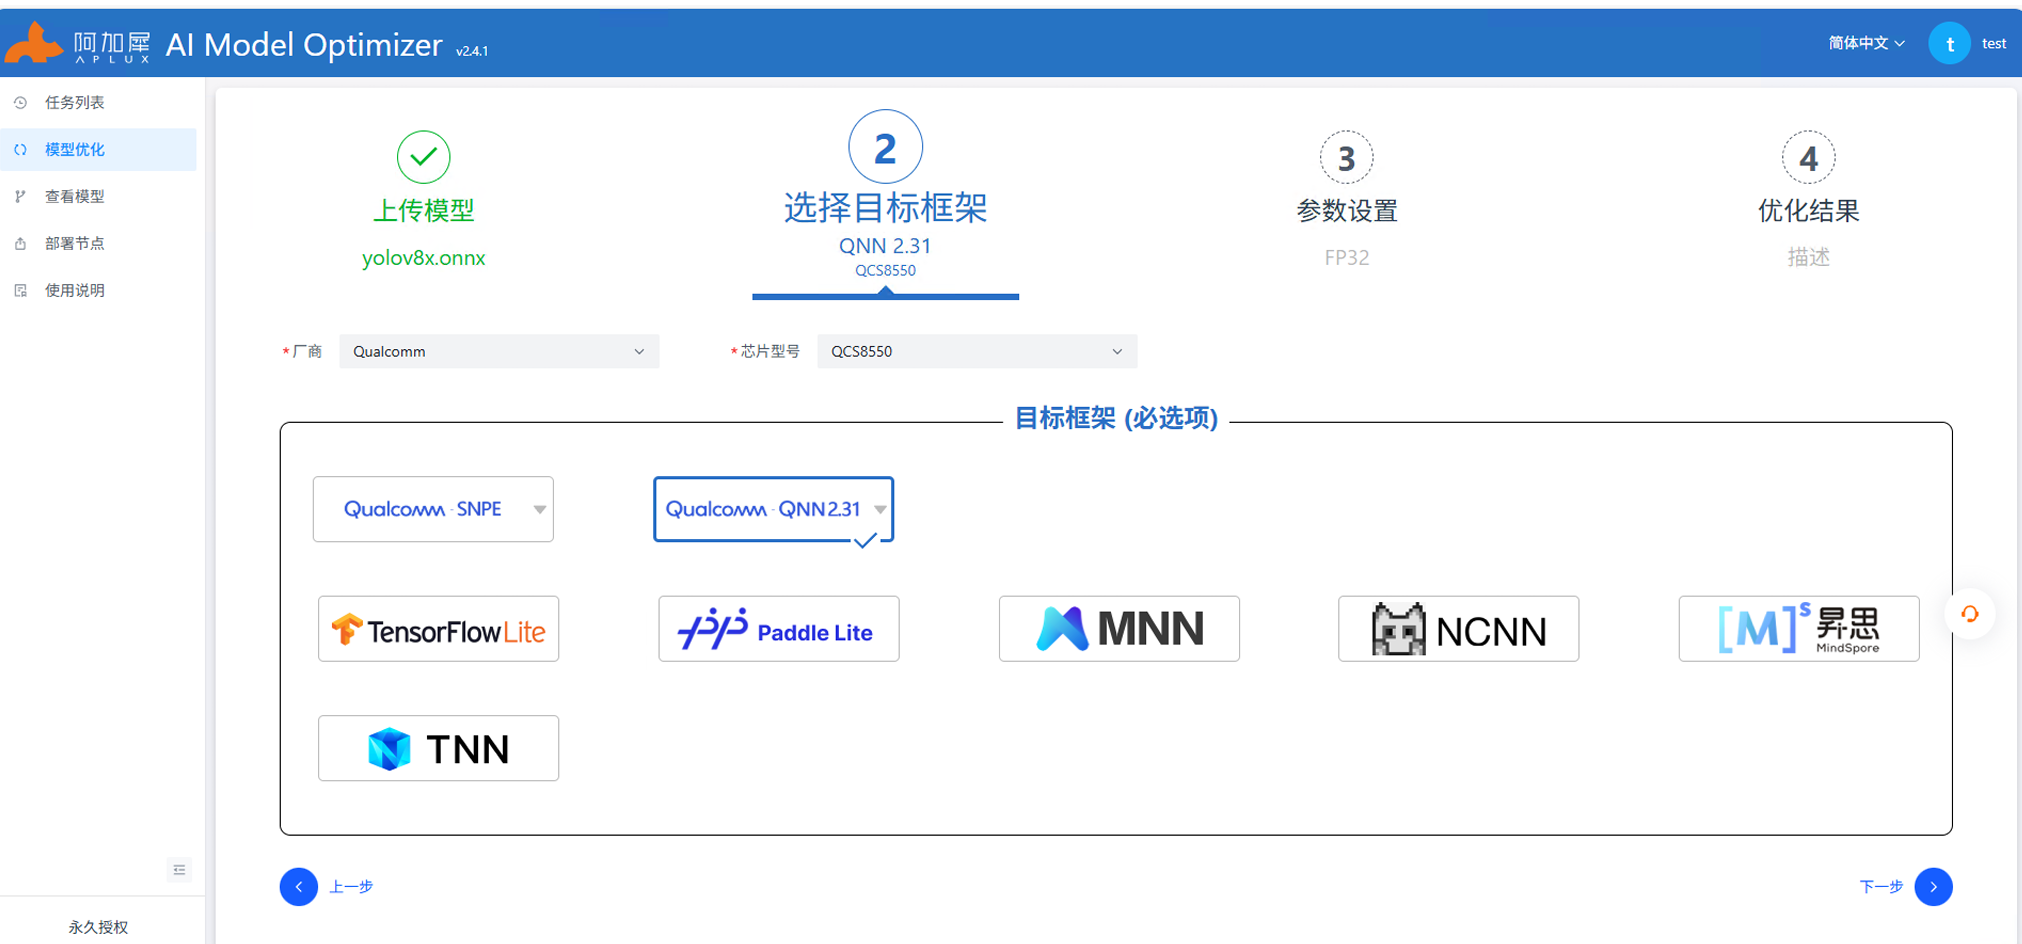
Step2:选择芯片型号以及目标框架,这里我们选择QCS8550+Qnn2.31
Step3:点击查看模型,使用Netron查看模型结构,进行输入输出的填写
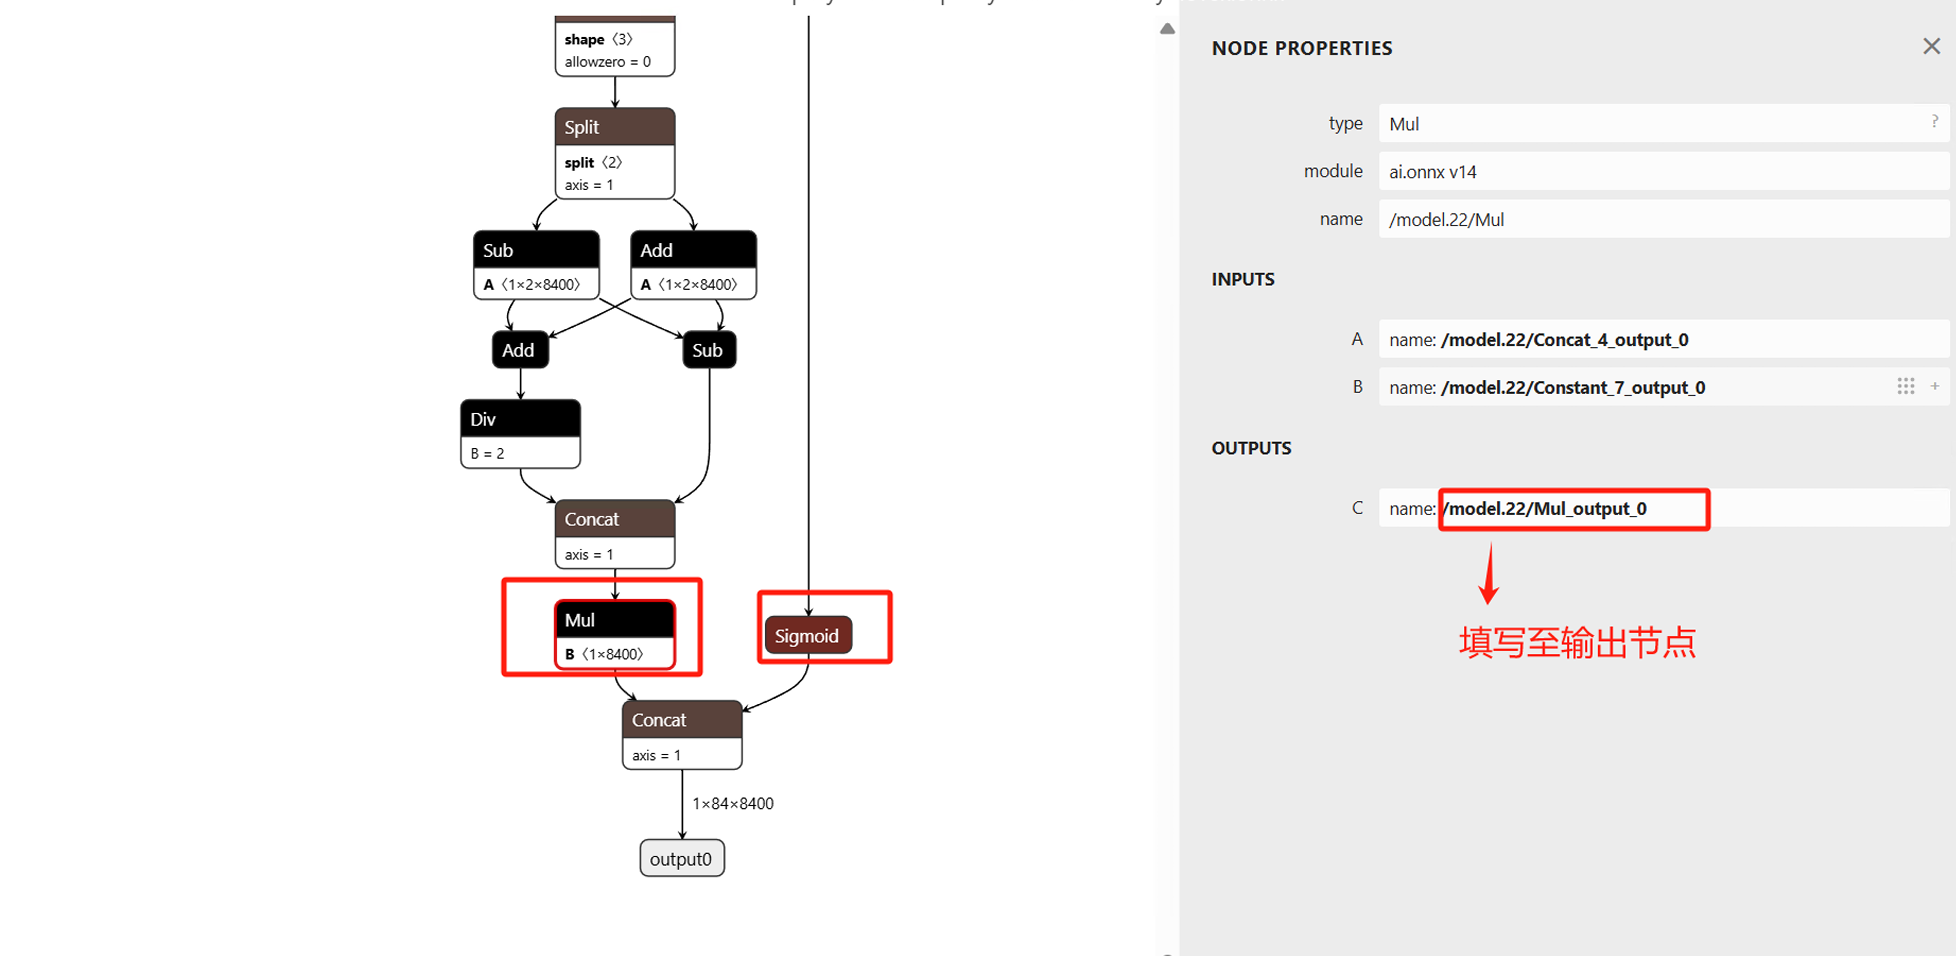
如上图output节点由Mul和Sigmod两个节点Concat而成,分别点击两个节点复制OUTPUTS的name名称到下图中:
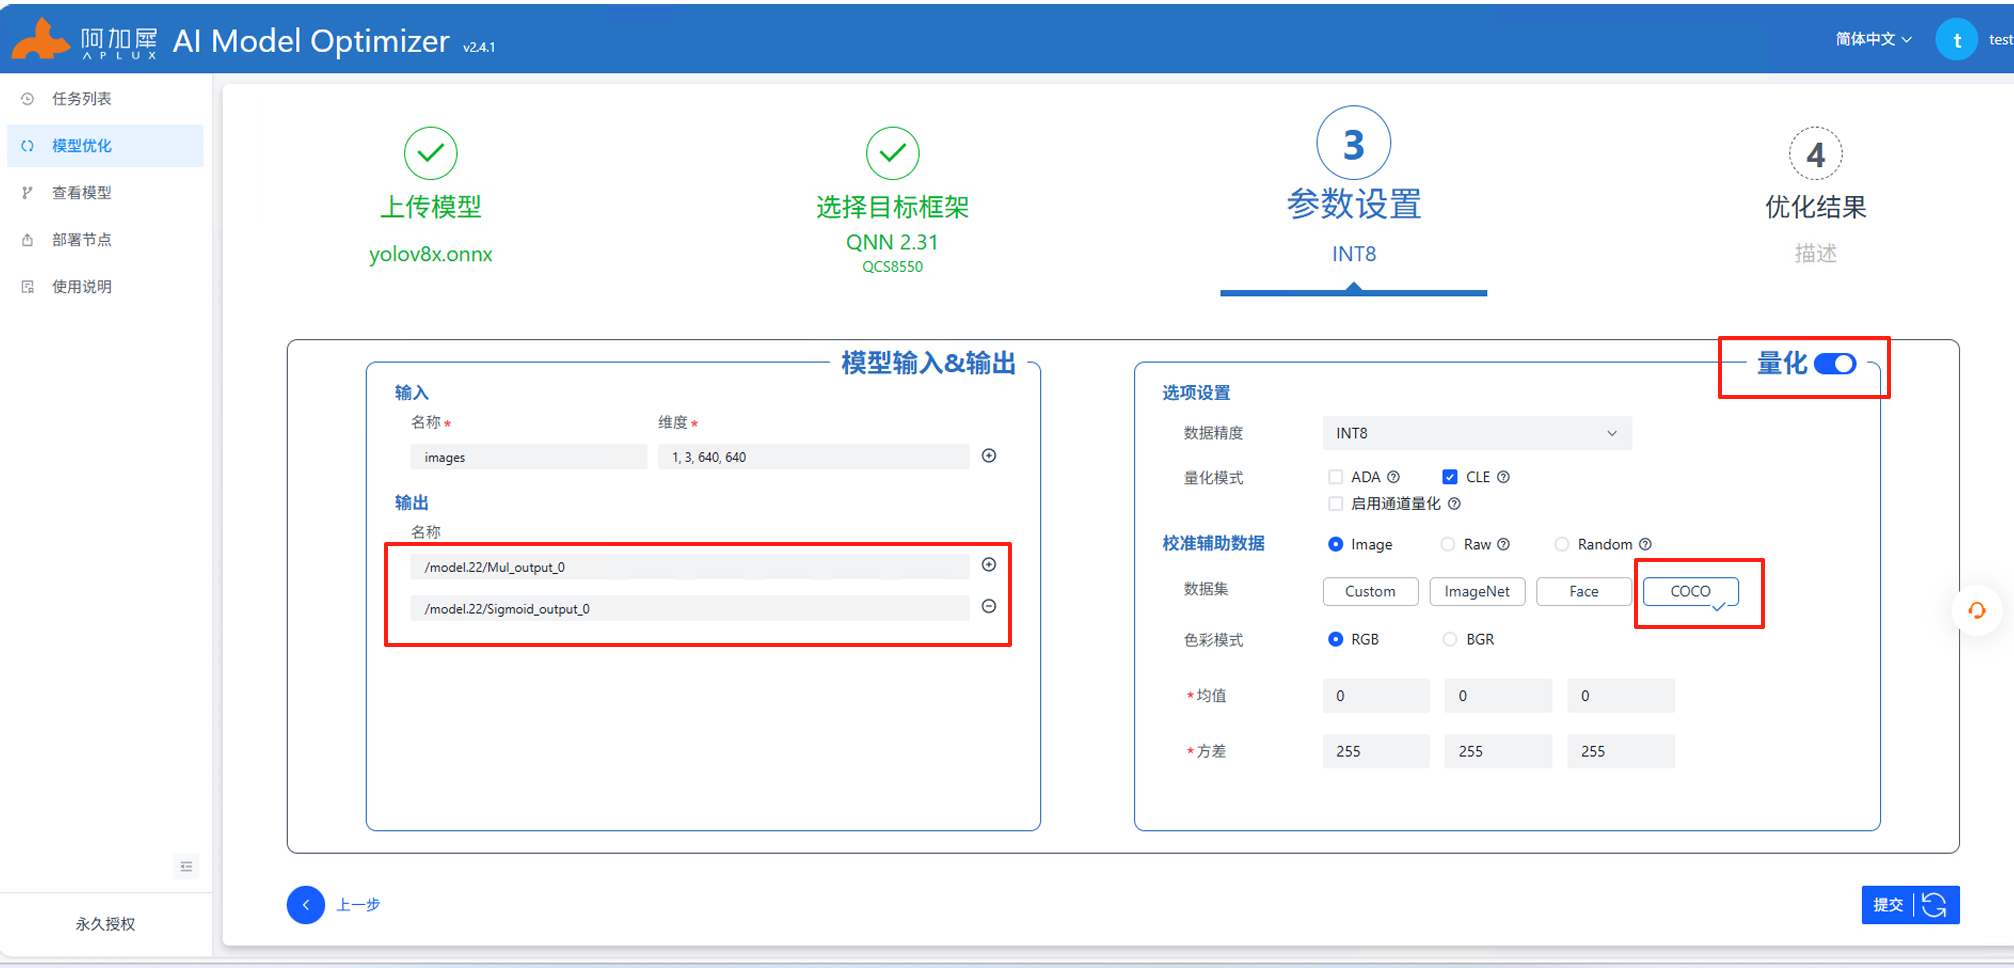
参考上图中红色框部分填写,其他不变,注意开启自动量化功能,AIMO更多操作查看使用说明或开发指南中的AIMO介绍。
Step4:接下来进行提交即可,转换完成后将目标模型文件下载,解压缩后其中的.bin.aidem文件即为模型文件

(三)在QCS8550的NPU中推理Yolov8_int8模型
检查aidlux环境中的aidlite版本是否与我们转换模型时选择的Qnn版本一致,终端执行:
sudo aid-pkg installed 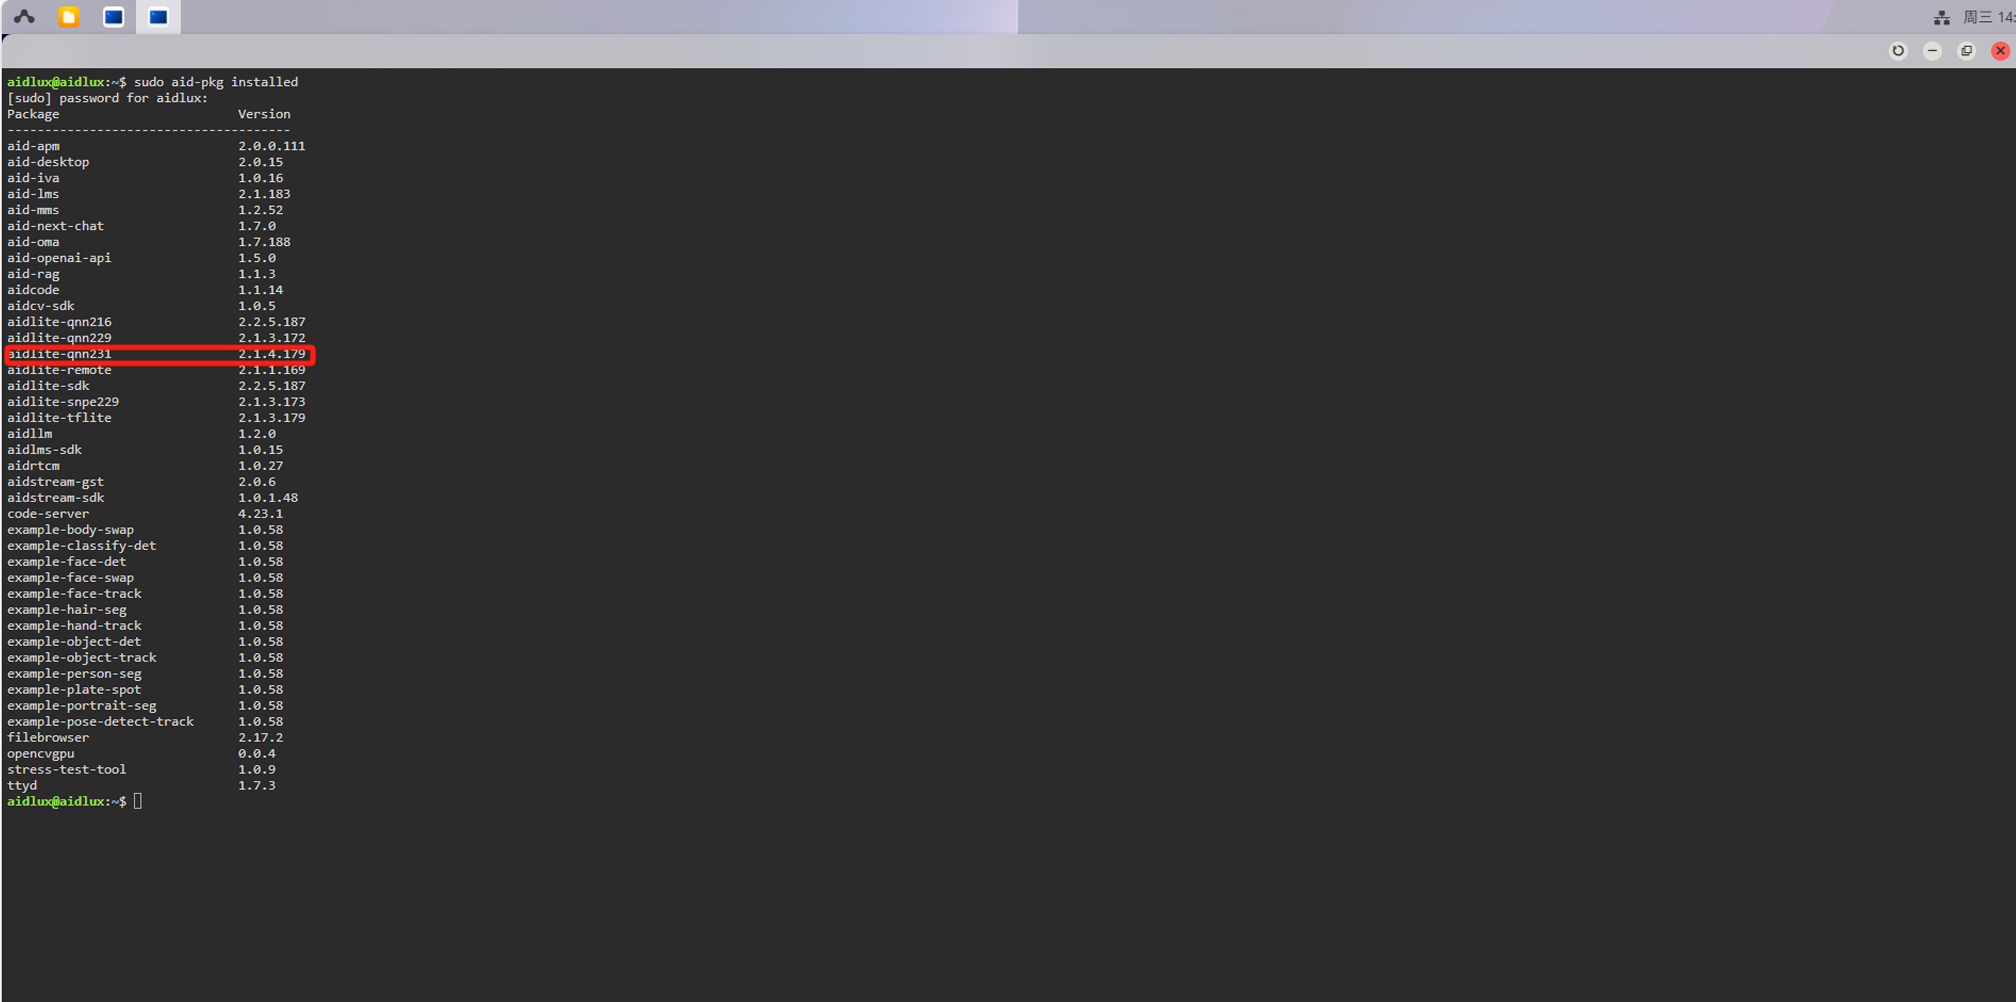
如果没有aidlite-qnn231,需要安装:
sudo aid-pkg update
sudo aid-pkg install aidlite-sdk

# Install the latest version of AidLite (latest QNN version)
sudo aid-pkg install aidlite
💡注意
Linux环境下,安装指定QNN版本的AidLite SDK:
sudo aid-pkg install aidlite-{QNN Version}例如:安装QNN2.31版本的AidLite SDK ——
sudo aid-pkg install aidlite-qnn231
模型进行AI推理:
import time
import numpy as np
import cv2
import os
import aidlite
import argparse

# COCO数据集的80个类别名称
coco_class = ['person', 'bicycle', 'car', 'motorcycle', 'airplane', 'bus', 'train', 'truck', 'boat', 'traffic light',
              'fire hydrant', 'stop sign', 'parking meter', 'bench', 'bird', 'cat', 'dog', 'horse', 'sheep', 'cow',
              'elephant', 'bear', 'zebra', 'giraffe', 'backpack', 'umbrella', 'handbag', 'tie', 'suitcase', 'frisbee',
              'skis', 'snowboard', 'sports ball', 'kite', 'baseball bat', 'baseball glove', 'skateboard', 'surfboard',
              'tennis racket', 'bottle', 'wine glass', 'cup', 'fork', 'knife', 'spoon', 'bowl', 'banana', 'apple',
              'sandwich', 'orange', 'broccoli', 'carrot', 'hot dog', 'pizza', 'donut', 'cake', 'chair', 'couch',
              'potted plant', 'bed', 'dining table', 'toilet', 'tv', 'laptop', 'mouse', 'remote', 'keyboard', 'cell phone',
              'microwave', 'oven', 'toaster', 'sink', 'refrigerator', 'book', 'clock', 'vase', 'scissors', 'teddy bear',
              'hair drier', 'toothbrush']

# 为每个类别随机分配颜色,用于绘制检测框
colors = {name: [np.random.randint(0, 255) for _ in range(3)] for i, name in enumerate(coco_class)}


def xywh2xyxy(x):
    '''
    将边界框格式从(中心x, 中心y, 宽度, 高度)转换为(左上角x, 左上角y, 右下角x, 右下角y)
    这是YOLO模型常用的边界框表示格式转换
    '''
    y = np.copy(x)
    y[:, 0] = x[:, 0] - x[:, 2] / 2  # 左上角x坐标
    y[:, 1] = x[:, 1] - x[:, 3] / 2  # 左上角y坐标
    y[:, 2] = x[:, 0] + x[:, 2] / 2  # 右下角x坐标
    y[:, 3] = x[:, 1] + x[:, 3] / 2  # 右下角y坐标
    return y


def xyxy2xywh(box):
    '''
    将边界框格式从(左上角x, 左上角y, 右下角x, 右下角y)转换为(左上角x, 左上角y, 宽度, 高度)
    适合用于OpenCV的矩形绘制函数
    '''
    box[:, 2:] = box[:, 2:] - box[:, :2]
    return box


def NMS(dets, thresh):
    '''
    单类非极大值抑制(NMS)算法
    作用是在重叠的检测框中保留置信度最高的框
    dets.shape = (N, 5), (左上角x, 左上角y, 右下角x, 右下角y, 置信度)
    '''
    dets = np.array(dets)
    x1 = dets[:, 0]
    y1 = dets[:, 1]
    x2 = dets[:, 2]
    y2 = dets[:, 3]
    areas = (y2 - y1 + 1) * (x2 - x1 + 1)  # 计算每个框的面积
    scores = dets[:, 4]  # 提取置信度
    keep = []  # 保存最终保留的框索引
    index = scores.argsort()[::-1]  # 按置信度从高到低排序

    # 循环处理每个框
    while index.size > 0:
        i = index[0]  # 当前置信度最高的框
        keep.append(i)  # 保留该框

        # 计算当前框与其他框的重叠区域
        x11 = np.maximum(x1[i], x1[index[1:]])
        y11 = np.maximum(y1[i], y1[index[1:]])
        x22 = np.minimum(x2[i], x2[index[1:]])
        y22 = np.minimum(y2[i], y2[index[1:]])

        w = np.maximum(0, x22 - x11 + 1)  # 重叠区域宽度
        h = np.maximum(0, y22 - y11 + 1)  # 重叠区域高度
        overlaps = w * h  # 重叠区域面积

        # 计算IoU (Intersection over Union)
        ious = overlaps / (areas[i] + areas[index[1:]] - overlaps)

        # 保留IoU小于阈值的框的索引
        idx = np.where(ious <= thresh)[0]
        index = index[idx + 1]  # +1是因为index[0]已经处理过
    return dets[keep]


def letterbox(img, new_shape=(640, 640), color=(114, 114, 114), auto=True, scaleFill=False, scaleup=True, stride=32):
    '''
    调整图像大小并进行填充,保持原始图像的宽高比
    常用于目标检测预处理,确保输入图像尺寸符合模型要求
    '''
    # 获取原始图像尺寸
    shape = img.shape[:2]  # 当前形状 [高度, 宽度]
    if isinstance(new_shape, int):
        new_shape = (new_shape, new_shape)

    # 计算缩放比例(保持宽高比)
    r = min(new_shape[0] / shape[0], new_shape[1] / shape[1])
    if not scaleup:  # 只缩小不放大(用于更好的测试mAP)
        r = min(r, 1.0)

    # 计算新的未填充尺寸和填充量
    ratio = r, r  # 宽度、高度比例
    new_unpad = int(round(shape[1] * r)), int(round(shape[0] * r))
    dw, dh = new_shape[1] - new_unpad[0], new_shape[0] - new_unpad[1]  # 宽度和高度的填充量

    if auto:  # 最小矩形填充
        dw, dh = np.mod(dw, stride), np.mod(dh, stride)  # 确保填充量是stride的倍数
    elif scaleFill:  # 拉伸填充
        dw, dh = 0.0, 0.0
        new_unpad = (new_shape[1], new_shape[0])
        ratio = new_shape[1] / shape[1], new_shape[0] / shape[0]  # 宽度、高度比例

    dw /= 2  # 将填充量分为左右两侧
    dh /= 2  # 将填充量分为上下两侧

    # 调整图像大小
    if shape[::-1] != new_unpad:  # 如果需要调整大小
        img = cv2.resize(img, new_unpad, interpolation=cv2.INTER_LINEAR)

    # 计算填充边界
    top, bottom = int(round(dh - 0.1)), int(round(dh + 0.1))
    left, right = int(round(dw - 0.1)), int(round(dw + 0.1))

    # 添加边界填充
    img = cv2.copyMakeBorder(img, top, bottom, left, right, cv2.BORDER_CONSTANT, value=color)
    return img, ratio, (dw, dh)


def preprocess_img(img, target_shape, means=[0, 0, 0], stds=[255, 255, 255]):
    '''
    图像预处理函数:
    1. 将图像调整为正方形
    2. 转换颜色空间
    3. 归一化处理
    target_shape: 目标尺寸
    means: 通道均值,用于z-score归一化
    stds: 通道标准差,用于z-score归一化
    '''
    img_processed = np.copy(img)
    # 获取图像尺寸
    [height, width, _] = img_processed.shape
    length = max((height, width))  # 取宽高的最大值
    scale = length / target_shape  # 计算缩放比例
    ratio = [scale, scale]  # 保存宽高比

    # 创建正方形画布并居中放置原始图像
    image = np.zeros((length, length, 3), np.uint8)
    image[0:height, 0:width] = img_processed

    # 转换颜色空间为RGB(OpenCV默认读取为BGR)
    image = cv2.cvtColor(image, cv2.COLOR_BGR2RGB)

    # 调整图像大小为目标尺寸
    img_input = cv2.resize(image, (target_shape, target_shape))
    print("image.shape==", image.shape)

    # 归一化处理(z-score)
    img_processed = (img_processed - means) / stds
    img_processed = img_processed.astype(np.float32)

    return img_processed, ratio


def scale_coords(img1_shape, coords, img0_shape, ratio_pad=None):
    '''
    将检测框坐标从处理后的图像尺寸缩放回原始图像尺寸
    img1_shape: 处理后的图像尺寸
    coords: 检测框坐标
    img0_shape: 原始图像尺寸
    ratio_pad: 缩放和填充信息
    '''
    if ratio_pad is None:  # 如果没有提供缩放和填充信息,则计算
        gain = min(img1_shape[0] / img0_shape[0], img1_shape[1] / img0_shape[1])  # 计算缩放比例
        pad = (img1_shape[1] - img0_shape[1] * gain) / 2, (img1_shape[0] - img0_shape[0] * gain) / 2  # 计算填充量
    else:
        gain = ratio_pad[0][0]
        pad = ratio_pad[1]

    # 调整坐标(减去填充量并除以缩放比例)
    coords[:, [0, 2]] -= pad[0]  # x方向填充量
    coords[:, [1, 3]] -= pad[1]  # y方向填充量
    coords[:, :4] /= gain  # 应用缩放比例

    # 裁剪坐标,确保不超出图像边界
    clip_coords(coords, img0_shape)
    return coords


def clip_coords(boxes, img_shape):
    '''
    裁剪边界框坐标,确保它们在图像范围内
    boxes: 边界框坐标
    img_shape: 图像尺寸
    '''
    boxes[:, 0].clip(0, img_shape[1], out=boxes[:, 0])  # 裁剪x1
    boxes[:, 1].clip(0, img_shape[0], out=boxes[:, 1])  # 裁剪y1
    boxes[:, 2].clip(0, img_shape[1], out=boxes[:, 2])  # 裁剪x2
    boxes[:, 3].clip(0, img_shape[0], out=boxes[:, 3])  # 裁剪y2


def postprocess(outputs, ratio, conf_threshold=0.5, nms_threshold=0.45):
    '''
    模型输出后处理函数:
    1. 过滤低置信度检测
    2. 应用非极大值抑制
    3. 缩放检测框到原始图像尺寸
    outputs: 模型输出
    ratio: 缩放比例
    conf_threshold: 置信度阈值
    nms_threshold: NMS阈值
    '''
    rows = outputs.shape[0]  # 检测框数量
    boxes = []  # 存储边界框
    scores = []  # 存储置信度
    class_ids = []  # 存储类别ID

    # 遍历所有检测框
    for i in range(rows):
        classes_scores = outputs[i][4:]  # 获取类别分数(前4个是边界框信息)
        (minScore, maxScore, minClassLoc, (x, maxClassIndex)) = cv2.minMaxLoc(classes_scores)  # 获取最大分数和对应类别

        if maxScore >= conf_threshold:  # 如果置信度高于阈值
            # 提取边界框信息(中心坐标和宽高)
            box = [
                outputs[i][0] - (0.5 * outputs[i][2]), outputs[i][1] - (0.5 * outputs[i][3]),
                outputs[i][2], outputs[i][3]]
            boxes.append(box)
            scores.append(maxScore)
            class_ids.append(maxClassIndex)

    # 使用OpenCV的NMS函数进行非极大值抑制
    result_boxes = cv2.dnn.NMSBoxes(boxes, scores, score_threshold=conf_threshold, nms_threshold=nms_threshold, eta=0.5)
    result_boxes = result_boxes.reshape(-1)

    # 处理NMS后的结果
    new_bboxes = []
    new_scores = []
    new_class_ids = []
    for i in range(len(result_boxes)):
        index = result_boxes[i]
        bbox = boxes[index]
        x, y, w, h = float(bbox[0]), float(bbox[1]), float(bbox[2]), float(bbox[3])
        # 缩放坐标到原始图像尺寸
        new_bboxes.append([round(x * ratio[0]), round(y * ratio[1]), round(w * ratio[0]), round(h * ratio[1])])
        new_scores.append(scores[index])
        new_class_ids.append(class_ids[index])

    # 整理结果格式
    new_scores = np.expand_dims(new_scores, 1)
    new_class_ids = np.expand_dims(new_class_ids, 1)

    boxes = np.concatenate((new_bboxes, new_scores), axis=1)
    boxes = np.concatenate((boxes, new_class_ids), axis=1)

    return boxes


def draw_res(img, boxes):
    '''
    在图像上绘制检测结果:
    1. 绘制边界框
    2. 添加类别标签和置信度
    img: 原始图像
    boxes: 检测框信息,包含坐标、置信度和类别ID
    '''
    img = img.astype(np.uint8)  # 确保图像类型正确
    for i, [x, y, w, h, scores, class_ids] in enumerate(boxes):
        x = int(x)
        y = int(y)
        w = int(w)
        h = int(h)
        name = coco_class[int(class_ids)]  # 获取类别名称
        print(i + 1, [x, y, w, h], round(scores, 4), name)  # 打印检测信息

        label = f'{name} ({scores:.2f})'  # 构建标签文本
        W, H = cv2.getTextSize(label, 0, fontScale=1, thickness=2)[0]  # 获取文本尺寸
        color = colors[name]  # 获取类别对应的颜色

        # 绘制边界框
        cv2.rectangle(img, (x, y), (int(x + w), int(y + h)), color, thickness=2)

        # 绘制标签背景
        cv2.rectangle(img, (x, int(y - H)), (int(x + W / 2), y), (0, 255,), -1, cv2.LINE_AA)

        # 添加标签文本
        cv2.putText(img, label, (x, int(y) - 6), cv2.FONT_HERSHEY_SIMPLEX, 0.5, (255, 0, 0), 1)
    return img


def main(args):
    '''
    主函数:
    1. 初始化模型和配置
    2. 读取和预处理图像
    3. 执行模型推理
    4. 处理和可视化结果
    '''
    print("Start image inference ... ...")

    # 初始化模型部分与原代码相同
    size = 640  # 模型输入尺寸
    config = aidlite.Config.create_instance()
    if config is None:
        print("Create config failed !")
        return False

    config.implement_type = aidlite.ImplementType.TYPE_LOCAL

    # 根据命令行参数选择模型框架
    if args.model_type.lower() == "qnn":
        config.framework_type = aidlite.FrameworkType.TYPE_QNN231 # 指定Qnn版本
    elif args.model_type.lower() == "snpe2" or args.model_type.lower() == "snpe":
        config.framework_type = aidlite.FrameworkType.TYPE_SNPE2

    config.accelerate_type = aidlite.AccelerateType.TYPE_DSP  # 使用DSP加速
    config.is_quantify_model = 1  # 使用量化模型

    # 创建并配置模型
    model = aidlite.Model.create_instance(args.target_model)
    if model is None:
        print("Create model failed !")
        return False
    input_shapes = [[1, size, size, 3]]  # 模型输入形状
    output_shapes = [[1, 4, 8400], [1, 80, 8400]]  # 模型输出形状

    # 设置模型属性
    model.set_model_properties(input_shapes, aidlite.DataType.TYPE_FLOAT32,
                               output_shapes, aidlite.DataType.TYPE_FLOAT32)

    # 构建和初始化解释器
    interpreter = aidlite.InterpreterBuilder.build_interpretper_from_model_and_config(model, config)
    if interpreter is None:
        print("build_interpretper_from_model_and_config failed !")
        return None
    result = interpreter.init()
    if result != 0:
        print(f"interpreter init failed !")
        return False
    result = interpreter.load_model()
    if result != 0:
        print("interpreter load model failed !")
        return False
    print("detect model load success!")

    # 读取图片
    img = cv2.imread(args.image_path)
    if img is None:
        print("Error: Could not open image file")
        return False

    # 图片预处理
    img_processed = np.copy(img)
    [h, w, _] = img_processed.shape
    length = max((h, w))
    scale = length / size
    ratio = [scale, scale]

    # 创建正方形画布并居中放置原始图像
    image = np.zeros((length, length, 3), np.uint8)
    image[0:h, 0:w] = img_processed

    # 转换颜色空间并调整大小
    img_input = cv2.cvtColor(image, cv2.COLOR_BGR2RGB)
    img_input = cv2.resize(img_input, (size, size))

    # 归一化处理
    mean_data = [0, 0, 0]
    std_data = [255, 255, 255]
    img_input = (img_input - mean_data) / std_data  # HWC格式
    img_input = img_input.astype(np.float32)

    # 设置输入tensor
    result = interpreter.set_input_tensor(0, img_input.data)
    if result != 0:
        print("interpreter set_input_tensor() failed")
        return False

    # 只计算模型推理的时间
    t1 = time.time()
    result = interpreter.invoke()
    t2 = time.time()

    if result != 0:
        print("interpreter invoke() failed")
        return False

    # 获取输出结果
    qnn_local = interpreter.get_output_tensor(0).reshape(*output_shapes[0])
    qnn_conf = interpreter.get_output_tensor(1).reshape(*output_shapes[1])

    # 计算处理时间
    inference_time = (t2 - t1) * 1000  # 转换为毫秒
    print(f"Model inference time: {inference_time:.2f} ms")

    # 后处理
    qnn_result = np.concatenate((qnn_local, qnn_conf), axis=1)
    qnn_result = qnn_result.transpose(0, 2, 1)
    qnn_result = qnn_result[0]

    # 应用后处理函数获取最终检测结果
    detect = postprocess(qnn_result, ratio, conf_threshold=0.5, nms_threshold=0.45)
    print(f"Detected {len(detect)} targets in the image")

    # 在原图上绘制检测结果
    res_img = draw_res(img, list(detect))

    # 添加处理时间文本
    cv2.putText(res_img, f"Inference Time: {inference_time:.2f} ms", (10, 30),
                cv2.FONT_HERSHEY_SIMPLEX, 1, (0, 255, 0), 2)

    # 保存结果图片
    cv2.imwrite('output.jpg', res_img)
    print("Output image saved as 'output.jpg'")

    # 释放资源
    result = interpreter.destory()


def parser_args():
    '''
    解析命令行参数
    '''
    parser = argparse.ArgumentParser(description="Run image inference benchmarks")
    parser.add_argument('--target_model', type=str,
                        default='/home/aidlux/yolov8/8550_models/cutoff_yolov8l_qcs8550_w8a8.qnn231.ctx.bin',
                        help="inference model path")
    parser.add_argument('--image_path', type=str, default='bus.jpg', help="Input image path")
    parser.add_argument('--model_type', type=str, default='QNN', help="run backend")
    args = parser.parse_args()
    return args


if __name__ == "__main__":
    args = parser_args()
    main(args)
推理结果
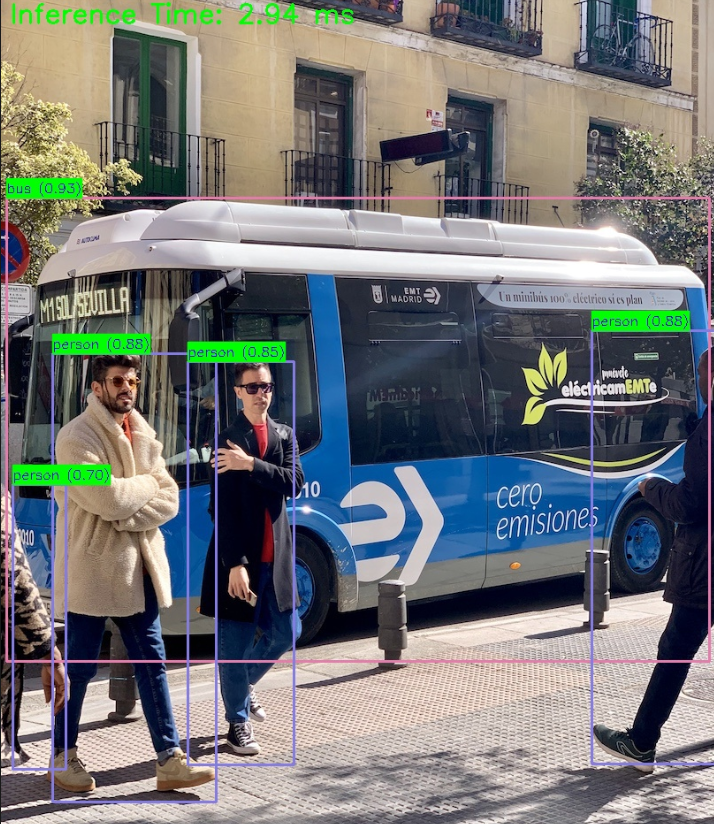
多进程推理
代码功能概述
该代码实现了基于 YOLOv8n 模型的多进程目标检测推理测试工具。主要功能包括:
- 使用 3 个并行进程对同一张图像进行目标检测推理
- 对推理性能进行评估,计算平均耗时、最大耗时、最小耗时、方差和 FPS
- 支持 QNN 和 SNPE2 两种推理框架
- 采用多进程方式充分利用系统资源,测试并发推理性能
-
初始化与配置:
- 定义 COCO 数据集类别和颜色映射
- 解析命令行参数,获取模型路径、图像路径和模型类型
-
多进程管理:
- 创建 3 个并行进程,每个进程独立执行推理任务
- 使用队列 (Queue) 收集各进程的推理结果
- 等待所有进程完成后汇总结果
-
单进程推理流程:
- 初始化 aidlite 配置和模型
- 读取并预处理输入图像(缩放、归一化等)
- 模型预热(执行 10 次推理)
- 性能测试(执行 100 次推理,记录每次耗时)
- 计算性能指标(平均耗时、最大 / 最小耗时、方差、FPS)
- 将结果放入队列
-
结果处理:
- 收集所有进程的结果并按进程 ID 排序
- 打印每个进程的性能指标
- 计算并打印总体 FPS(各进程 FPS 之和)
该代码主要用于评估 YOLOv8 模型在多进程并发情况下的推理性能,可比较不同框架(QNN/SNPE2)在相同硬件环境下的表现。
代码
#!/usr/bin/env python3
# -*- coding: utf-8 -*-
"""
YOLOv8 多进程推理测试工具

该脚本使用3个并行进程对指定图像进行目标检测推理,
评估不同框架(QNN/SNPE2)下的推理性能,包括耗时、FPS等指标。
支持COCO数据集的80个类别目标检测。
"""

import time
import numpy as np
import cv2
import os
import aidlite  # 推理加速库
import argparse
from multiprocessing import Process, Queue  # 多进程相关库

# COCO数据集的80个类别名称
# 这些是目标检测中常用的80个物体类别,与YOLOv8模型训练时使用的类别一致
coco_class = ['person', 'bicycle', 'car', 'motorcycle', 'airplane', 'bus', 'train', 'truck', 'boat', 'traffic light',
              'fire hydrant', 'stop sign', 'parking meter', 'bench', 'bird', 'cat', 'dog', 'horse', 'sheep', 'cow',
              'elephant', 'bear', 'zebra', 'giraffe', 'backpack', 'umbrella', 'handbag', 'tie', 'suitcase', 'frisbee',
              'skis', 'snowboard', 'sports ball', 'kite', 'baseball bat', 'baseball glove', 'skateboard', 'surfboard',
              'tennis racket', 'bottle', 'wine glass', 'cup', 'fork', 'knife', 'spoon', 'bowl', 'banana', 'apple',
              'sandwich', 'orange', 'broccoli', 'carrot', 'hot dog', 'pizza', 'donut', 'cake', 'chair', 'couch',
              'potted plant', 'bed', 'dining table', 'toilet', 'tv', 'laptop', 'mouse', 'remote', 'keyboard', 'cell phone',
              'microwave', 'oven', 'toaster', 'sink', 'refrigerator', 'book', 'clock', 'vase', 'scissors', 'teddy bear',
              'hair drier', 'toothbrush']

# 为每个类别随机分配颜色(用于绘制检测框)
# 字典结构,键为类别名称,值为RGB颜色值
colors = {name: [np.random.randint(0, 255) for _ in range(3)] for i, name in enumerate(coco_class)}

# 以下函数为目标检测常用工具函数,保持不变

def xywh2xyxy(x):
    """
    将边界框格式从(中心x, 中心y, 宽, 高)转换为(左上角x, 左上角y, 右下角x, 右下角y)

    参数:
        x: 输入的边界框数组,形状为[N, 4]

    返回:
        y: 转换后的边界框数组,形状为[N, 4]
    """
    y = np.copy(x)
    y[:, 0] = x[:, 0] - x[:, 2] / 2  # 左上角x
    y[:, 1] = x[:, 1] - x[:, 3] / 2  # 左上角y
    y[:, 2] = x[:, 0] + x[:, 2] / 2  # 右下角x
    y[:, 3] = x[:, 1] + x[:, 3] / 2  # 右下角y
    return y

def xyxy2xywh(box):
    """
    将边界框格式从(左上角x, 左上角y, 右下角x, 右下角y)转换为(中心x, 中心y, 宽, 高)

    参数:
        box: 输入的边界框数组,形状为[N, 4]

    返回:
        转换后的边界框数组,形状为[N, 4]
    """
    box[:, 2:] = box[:, 2:] - box[:, :2]  # 计算宽和高
    return box

def NMS(dets, thresh):
    """
    非极大值抑制算法,用于去除重叠度高的边界框

    参数:
        dets: 检测结果数组,形状为[N, 5],前4位为边界框坐标,第5位为置信度
        thresh: IOU阈值,超过该阈值的边界框会被抑制

    返回:
        经过NMS处理后的检测结果
    """
    dets = np.array(dets)
    x1 = dets[:, 0]  # 左上角x坐标
    y1 = dets[:, 1]  # 左上角y坐标
    x2 = dets[:, 2]  # 右下角x坐标
    y2 = dets[:, 3]  # 右下角y坐标
    areas = (y2 - y1 + 1) * (x2 - x1 + 1)  # 计算每个边界框的面积
    scores = dets[:, 4]  # 置信度
    keep = []  # 保存保留的边界框索引
    index = scores.argsort()[::-1]  # 按置信度降序排序的索引

    while index.size > 0:
        i = index[0]  # 取置信度最高的边界框
        keep.append(i)

        # 计算与其他边界框的交叠区域
        x11 = np.maximum(x1[i], x1[index[1:]])
        y11 = np.maximum(y1[i], y1[index[1:]])
        x22 = np.minimum(x2[i], x2[index[1:]])
        y22 = np.minimum(y2[i], y2[index[1:]])

        # 计算交叠区域的宽和高
        w = np.maximum(0, x22 - x11 + 1)
        h = np.maximum(0, y22 - y11 + 1)
        overlaps = w * h  # 交叠区域面积

        # 计算IOU(交并比)
        ious = overlaps / (areas[i] + areas[index[1:]] - overlaps)
        # 保留IOU小于等于阈值的边界框
        idx = np.where(ious <= thresh)[0]
        index = index[idx + 1]  # 调整索引,因为已经去掉了第一个元素
    return dets[keep]

def letterbox(img, new_shape=(640, 640), color=(114, 114, 114), auto=True, scaleFill=False, scaleup=True, stride=32):
    """
    对图像进行缩放和填充,保持原始比例,避免图像变形

    参数:
        img: 输入图像
        new_shape: 目标形状
        color: 填充区域的颜色
        auto: 是否自动计算填充
        scaleFill: 是否拉伸填充以适应目标形状
        scaleup: 是否允许放大图像
        stride: 步长,用于对齐填充

    返回:
        img: 处理后的图像
        ratio: 缩放比例
        (dw, dh): 填充的宽度和高度
    """
    shape = img.shape[:2]  # 原始图像形状 [height, width]
    if isinstance(new_shape, int):
        new_shape = (new_shape, new_shape)

    # 计算缩放比例
    r = min(new_shape[0] / shape[0], new_shape[1] / shape[1])
    if not scaleup:
        r = min(r, 1.0)  # 不允许放大

    ratio = r, r  # 宽高缩放比例相同
    new_unpad = int(round(shape[1] * r)), int(round(shape[0] * r))  # 缩放后的尺寸
    dw, dh = new_shape[1] - new_unpad[0], new_shape[0] - new_unpad[1]  # 计算需要填充的宽度和高度

    if auto:
        # 自动计算填充,使其能被stride整除
        dw, dh = np.mod(dw, stride), np.mod(dh, stride)
    elif scaleFill:
        # 拉伸填充,不保持比例
        dw, dh = 0.0, 0.0
        new_unpad = (new_shape[1], new_shape[0])
        ratio = new_shape[1] / shape[1], new_shape[0] / shape[0]

    # 将填充均匀分配到两边
    dw /= 2
    dh /= 2

    # 调整图像大小
    if shape[::-1] != new_unpad:
        img = cv2.resize(img, new_unpad, interpolation=cv2.INTER_LINEAR)

    # 上下左右填充
    top, bottom = int(round(dh - 0.1)), int(round(dh + 0.1))
    left, right = int(round(dw - 0.1)), int(round(dw + 0.1))

    img = cv2.copyMakeBorder(img, top, bottom, left, right, cv2.BORDER_CONSTANT, value=color)
    return img, ratio, (dw, dh)

def preprocess_img(img, target_shape, means=[0, 0, 0], stds=[255, 255, 255]):
    """
    图像预处理函数,将图像调整为模型输入要求的格式

    参数:
        img: 输入图像
        target_shape: 目标尺寸
        means: 均值,用于归一化
        stds: 标准差,用于归一化

    返回:
        img_processed: 处理后的图像
        ratio: 缩放比例
    """
    img_processed = np.copy(img)
    [height, width, _] = img_processed.shape
    length = max((height, width))  # 取宽高中的最大值
    scale = length / target_shape  # 计算缩放比例
    ratio = [scale, scale]  # 宽高缩放比例

    # 创建正方形画布并将原始图像放置在左上角
    image = np.zeros((length, length, 3), np.uint8)
    image[0:height, 0:width] = img_processed

    # 转换颜色空间并调整大小
    image = cv2.cvtColor(image, cv2.COLOR_BGR2RGB)
    img_input = cv2.resize(image, (target_shape, target_shape))

    # 归一化处理
    img_processed = (img_processed - means) / stds
    img_processed = img_processed.astype(np.float32)

    return img_processed, ratio

def scale_coords(img1_shape, coords, img0_shape, ratio_pad=None):
    """
    将模型输出的边界框坐标从缩放后的图像映射回原始图像

    参数:
        img1_shape: 模型输入图像的形状
        coords: 模型输出的边界框坐标
        img0_shape: 原始图像的形状
        ratio_pad: 缩放比例和填充信息

    返回:
        coords: 映射到原始图像的边界框坐标
    """
    if ratio_pad is None:
        # 计算缩放比例和填充
        gain = min(img1_shape[0] / img0_shape[0], img1_shape[1] / img0_shape[1])
        pad = (img1_shape[1] - img0_shape[1] * gain) / 2, (img1_shape[0] - img0_shape[0] * gain) / 2
    else:
        gain = ratio_pad[0][0]
        pad = ratio_pad[1]

    # 去除填充并缩放回原始尺寸
    coords[:, [0, 2]] -= pad[0]
    coords[:, [1, 3]] -= pad[1]
    coords[:, :4] /= gain

    # 确保边界框在图像范围内
    clip_coords(coords, img0_shape)
    return coords

def clip_coords(boxes, img_shape):
    """
    将边界框坐标限制在图像范围内

    参数:
        boxes: 边界框数组
        img_shape: 图像形状 [height, width]
    """
    boxes[:, 0].clip(0, img_shape[1], out=boxes[:, 0])  # x1
    boxes[:, 1].clip(0, img_shape[0], out=boxes[:, 1])  # y1
    boxes[:, 2].clip(0, img_shape[1], out=boxes[:, 2])  # x2
    boxes[:, 3].clip(0, img_shape[0], out=boxes[:, 3])  # y2

def postprocess(outputs, ratio, conf_threshold=0.5, nms_threshold=0.45):
    """
    对模型输出进行后处理,包括筛选置信度和非极大值抑制

    参数:
        outputs: 模型输出
        ratio: 缩放比例
        conf_threshold: 置信度阈值
        nms_threshold: NMS阈值

    返回:
        boxes: 处理后的边界框,包含坐标、置信度和类别ID
    """
    rows = outputs.shape[0]
    boxes = []
    scores = []
    class_ids = []

    for i in range(rows):
        classes_scores = outputs[i][4:]  # 类别得分
        # 找到最大得分及其对应的类别
        (minScore, maxScore, minClassLoc, (x, maxClassIndex)) = cv2.minMaxLoc(classes_scores)

        if maxScore >= conf_threshold:
            # 计算边界框
            box = [
                outputs[i][0] - (0.5 * outputs[i][2]), outputs[i][1] - (0.5 * outputs[i][3]),
                outputs[i][2], outputs[i][3]]
            boxes.append(box)
            scores.append(maxScore)
            class_ids.append(maxClassIndex)

    # 应用非极大值抑制
    result_boxes = cv2.dnn.NMSBoxes(boxes, scores, score_threshold=conf_threshold, nms_threshold=nms_threshold, eta=0.5)
    result_boxes = result_boxes.reshape(-1)

    new_bboxes = []
    new_scores = []
    new_class_ids = []
    for i in range(len(result_boxes)):
        index = result_boxes[i]
        bbox = boxes[index]
        x, y, w, h = float(bbox[0]), float(bbox[1]), float(bbox[2]), float(bbox[3])
        # 缩放边界框到原始图像尺寸
        new_bboxes.append([round(x * ratio[0]), round(y * ratio[1]), round(w * ratio[0]), round(h * ratio[1])])
        new_scores.append(scores[index])
        new_class_ids.append(class_ids[index])

    # 组合结果
    new_scores = np.expand_dims(new_scores, 1)
    new_class_ids = np.expand_dims(new_class_ids, 1)

    boxes = np.concatenate((new_bboxes, new_scores), axis=1)
    boxes = np.concatenate((boxes, new_class_ids), axis=1)

    return boxes

def draw_res(img, boxes):
    """
    在图像上绘制检测结果

    参数:
        img: 原始图像
        boxes: 检测到的边界框

    返回:
        img: 绘制了检测结果的图像
    """
    img = img.astype(np.uint8)
    for i, [x, y, w, h, scores, class_ids] in enumerate(boxes):
        x = int(x)
        y = int(y)
        w = int(w)
        h = int(h)
        name = coco_class[int(class_ids)]  # 获取类别名称
        print(i + 1, [x, y, w, h], round(scores, 4), name)  # 打印检测结果

        # 准备标签文本
        label = f'{name} ({scores:.2f})'
        # 计算文本尺寸
        W, H = cv2.getTextSize(label, 0, fontScale=1, thickness=2)[0]
        color = colors[name]  # 获取该类别的颜色

        # 绘制边界框
        cv2.rectangle(img, (x, y), (int(x + w), int(y + h)), color, thickness=2)
        # 绘制标签背景
        cv2.rectangle(img, (x, int(y - H)), (int(x + W / 2), y), (0, 255,), -1, cv2.LINE_AA)
        # 绘制标签文本
        cv2.putText(img, label, (x, int(y) - 6), cv2.FONT_HERSHEY_SIMPLEX, 0.5, (255, 0, 0), 1)
    return img

def process_inference(args, queue, process_id):
    """
    单个进程的推理函数,执行模型加载、图像预处理、推理和性能评估,并将结果放入队列

    参数:
        args: 命令行参数
        queue: 用于传递结果的队列
        process_id: 进程ID,用于标识不同进程
    """
    try:
        size = 640  # 模型输入尺寸
        # 创建配置实例
        config = aidlite.Config.create_instance()
        if config is None:
            queue.put((process_id, None))  # 放入None表示失败
            return

        # 设置本地推理模式
        config.implement_type = aidlite.ImplementType.TYPE_LOCAL

        # 根据模型类型设置框架
        if args.model_type.lower() == "qnn":
            config.framework_type = aidlite.FrameworkType.TYPE_QNN231
        elif args.model_type.lower() == "snpe2" or args.model_type.lower() == "snpe":
            config.framework_type = aidlite.FrameworkType.TYPE_SNPE2

        # 设置加速类型为DSP
        config.accelerate_type = aidlite.AccelerateType.TYPE_DSP
        config.is_quantify_model = 1  # 量化模型

        # 创建模型实例
        model = aidlite.Model.create_instance(args.target_model)
        if model is None:
            queue.put((process_id, None))
            return

        # 设置模型输入输出形状
        input_shapes = [[1, size, size, 3]]  # [batch, height, width, channels]
        output_shapes = [[1, 80, 8400], [1, 4, 8400]]  # YOLOv8输出形状

        # 设置模型属性
        model.set_model_properties(input_shapes, aidlite.DataType.TYPE_FLOAT32,
                                   output_shapes, aidlite.DataType.TYPE_FLOAT32)

        # 创建解释器
        interpreter = aidlite.InterpreterBuilder.build_interpretper_from_model_and_config(model, config)
        if interpreter is None:
            queue.put((process_id, None))
            return
        # 初始化解释器并加载模型
        if interpreter.init() != 0 or interpreter.load_model() != 0:
            queue.put((process_id, None))
            return

        # 读取并预处理图像
        img = cv2.imread(args.image_path)
        if img is None:
            queue.put((process_id, None))
            return

        [h, w, _] = img.shape
        length = max((h, w))  # 取宽高中的最大值
        scale = length / size  # 计算缩放比例
        ratio = [scale, scale]  # 宽高缩放比例

        # 创建正方形画布并放置原始图像
        image = np.zeros((length, length, 3), np.uint8)
        image[0:h, 0:w] = img
        # 转换颜色空间并调整大小
        img_input = cv2.cvtColor(image, cv2.COLOR_BGR2RGB)
        img_input = cv2.resize(img_input, (size, size))

        # 归一化处理
        mean_data = [0, 0, 0]
        std_data = [255, 255, 255]
        img_input = (img_input - mean_data) / std_data
        img_input = img_input.astype(np.float32)

        # 模型预热(执行10次推理,不计入性能统计)
        for _ in range(10):
            interpreter.set_input_tensor(0, img_input.data)
            interpreter.invoke()

        # 性能测试
        invoke_nums = 100  # 执行100次推理来评估性能
        invoke_times = []  # 存储每次推理的耗时

        for _ in range(invoke_nums):
            interpreter.set_input_tensor(0, img_input.data)
            t1 = time.time()  # 记录开始时间
            result = interpreter.invoke()  # 执行推理
            t2 = time.time()  # 记录结束时间

            if result != 0:  # 推理失败
                queue.put((process_id, None))
                return

            # 计算耗时(毫秒)并添加到列表
            invoke_time = (t2 - t1) * 1000
            invoke_times.append(invoke_time)

        # 计算性能指标
        mean = np.mean(invoke_times)  # 平均耗时
        max_t = np.max(invoke_times)  # 最大耗时
        min_t = np.min(invoke_times)  # 最小耗时
        var = np.var(invoke_times)    # 方差
        fps = 1000 / mean             # FPS(每秒帧数)

        # 保存结果到队列
        queue.put((process_id, (mean, max_t, min_t, var, fps)))
        interpreter.destory()  # 销毁解释器

    except Exception as e:
        print(f"Process {process_id} error: {e}")
        queue.put((process_id, None))

def main(args):
    """
    主函数,负责创建和管理多进程,收集并打印结果

    参数:
        args: 命令行参数
    """
    print("Starting 3 processes for inference...")

    # 创建队列用于接收进程结果
    queue = Queue()
    processes = []

    # 启动3个进程
    for i in range(3):
        p = Process(target=process_inference, args=(args, queue, i+1))
        processes.append(p)
        p.start()

    # 等待所有进程完成
    for p in processes:
        p.join()

    # 收集结果
    results = []
    while not queue.empty():
        results.append(queue.get())

    # 按进程ID排序
    results.sort(key=lambda x: x[0])

    # 打印每个进程的结果
    all_fps = []
    for pid, stats in results:
        if stats is None:
            print(f"Process {pid} failed to get results")
            continue

        mean, max_t, min_t, var, fps = stats
        all_fps.append(fps)
        print(f"\nProcess {pid} Results:")
        print(f"-- mean_invoke_time: {mean:.2f} ms")  # 平均调用时间
        print(f"-- max_invoke_time: {max_t:.2f} ms")  # 最大调用时间
        print(f"-- min_invoke_time: {min_t:.2f} ms")  # 最小调用时间
        print(f"-- var_invoke_time: {var:.2f}")       # 调用时间方差
        print(f"-- FPS: {fps:.2f}")                   # 每秒帧数

    # 计算并打印总体FPS
    if all_fps:
        overall_fps = sum(all_fps)  # 总FPS为各进程FPS之和
        print(f"\nOverall FPS (sum of all processes): {overall_fps:.2f}")
    else:
        print("\nNo valid results to calculate overall FPS")

def parser_args():
    """
    解析命令行参数

    返回:
        args: 解析后的命令行参数
    """
    parser = argparse.ArgumentParser(description="Run image inference with 3 processes")
    parser.add_argument('--target_model', type=str,
                        default='yolov8s/cutoff_yolov8s_qcs6490_w8a8.qnn231.ctx.bin',
                        help="inference model path")
    parser.add_argument('--image_path', type=str, default='bus.jpg', help="Input image path")
    parser.add_argument('--model_type', type=str, default='QNN', help="run backend")
    return parser.parse_args()

if __name__ == "__main__":
    args = parser_args()
    main(args)
推理结果
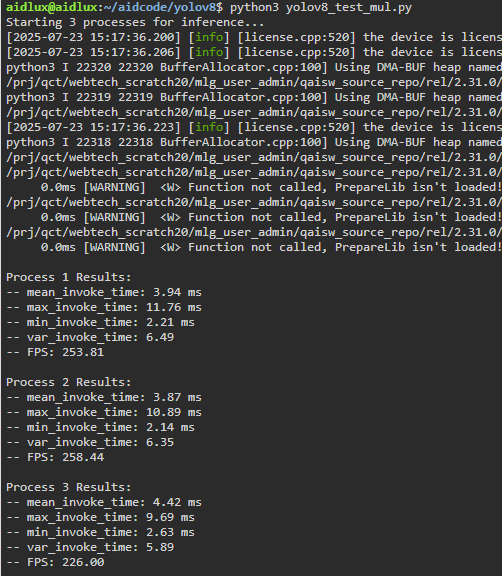
单进程yolov8n的推理的速度为602FPS(文章开头表格有测试数据),而多进程每一路的推理大约在235FPS,多进程和单进程在推理并不是一个线性的关系,这里涉及数据交换,内存分配问题,需要具体项目具体分析,以上可以作为一个参考。

有“AI”的1024 = 2048,欢迎大家加入2048 AI社区
 14
14 0
0- 0



 已为社区贡献30条内容

所有评论(0)