【datawhale学习-post training】task2-SFT
本文基于 DeepLearning.AI 出品的短课 《Post‑training of LLMs》,并在datawhale组织帮助下学习:github
定义
SFT 指的是 Supervised Fine-Tuning(监督式微调)。
按照监督学习的基本逻辑:给定 input,模型产生 output,再与 target 计算交叉熵损失,通过反向传播调整参数,使模型输出逐步逼近 target。
大模型这里也是,在已有的语言模型基础上,使用成对的 (input, target) 进行进一步训练,使得模型输出结果逼近target。
| 时间步 | 输入给模型 | 模型要预测的正确 token | 损失计算 |
|---|---|---|---|
| t=1 | prompt | “我” | 交叉熵(模型预测分布, “我”) |
| t=2 | prompt + “我” | “爱” | 交叉熵(模型预测分布, “爱”) |
| t=3 | prompt + “我 爱” | “你” | 交叉熵(模型预测分布, “你”) |
不过这里有所不同的是:语言模型的损失并不是序列级 cross-entropy,而是基于 teacher forcing 的 token-level loss。也就是说,把整段 prompt 输入模型,再拿模型生成的整段输出与 target 做sequence-level的交叉熵是错误的。正确做法是在每个时间步使用 prompt 加上目标序列的真实前缀作为输入,让模型预测下一个真实 token。例如在 t=2 时,模型的输入是 prompt + ‘我’,而不是仅用 prompt 和模型上一步生成的结果。
这样一整个 target 序列就变成了一串 token 的交叉熵,最后再做求和或平均。
关于loss
在教程中,直接给出了如下式子:
L SFT = − ∑ i = 1 N log ( p θ ( Response ( i ) ∣ Prompt ( i ) ) ) \mathcal{L}_{\text{SFT}} = -\sum_{i=1}^N \log\left(p_\theta(\text{Response}(i) \mid \text{Prompt}(i))\right) LSFT=−i=1∑Nlog(pθ(Response(i)∣Prompt(i)))
但我觉得从交叉熵怎么走到这个真实 token 的负对数概率,中间还是需要一些解释。
我们定义:对每个样本 (i),Response 本身是一串 token, 即 Response ( i ) = ( y 1 , y 2 , … , y T ) \text{Response}(i)= (y_1, y_2, \dots, y_T) Response(i)=(y1,y2,…,yT)
两个概率分布 p(x) (真实分布)和 q(x)(模型预测分布),交叉熵损失为:
L CE = − ∑ x p ( x ) log q ( x ) \mathcal{L}_{\text{CE}} = -\sum_x p(x) \log q(x) LCE=−x∑p(x)logq(x)
在序列生成任务中,真实分布 p(x) 是one-hot 分布(即只有真实 token y t y_t yt 的位置概率为 1,其余为 0)。将其代入交叉熵公式,只有真实 token 对应的项会保留,因此单步 token 预测的交叉熵损失为:
− log P θ ( y t ∣ Prompt ( i ) , y < t ) -\log P_\theta\left(y_t \mid \text{Prompt}(i),\ y_{<t}\right) −logPθ(yt∣Prompt(i), y<t)
把整个 Response 的 token 的损失都加起来,就得到:
− ∑ t = 1 T log P θ ( y t ∣ Prompt ( i ) , y < t ) = − log ∏ t = 1 T P θ ( y t ∣ Prompt ( i ) , y < t ) = − log P θ ( Response ( i ) ∣ Prompt ( i ) ) -\sum_{t=1}^T \log P_\theta\left(y_t \mid \text{Prompt}(i),\ y_{<t}\right) = -\log \prod_{t=1}^T P_\theta\left(y_t \mid \text{Prompt}(i),\ y_{<t}\right) = -\log P_\theta(\text{Response}(i)\mid \text{Prompt}(i)) −t=1∑TlogPθ(yt∣Prompt(i), y<t)=−logt=1∏TPθ(yt∣Prompt(i), y<t)=−logPθ(Response(i)∣Prompt(i))
所以此处的推导逻辑是“分类交叉熵 → 单步 token 损失 → 序列总损失(负对数似然)”。随后再多个样本求和作为loss。
所以本质上,就是让模型去拟合目标数据的分布。这就要求我的数据质量高。
关于数据
既然已经要求高质量数据了,那么我们就要来考究数据来源:
- 蒸馏:用高级模型的输入输出作为target,然后给小模型训,这样小模型就能快速习得大模型的输出的数据分布。
- 用一些筛选法,比如Best‑of‑K / 拒绝采样,过滤得到优质数据。
关于微调
微调方式,大致分两种(1)全量微调 (2)部分参数微调(也称PEFT-参数高效微调)
(1)全量微调顾名思义全体参数都调整了,所以肯定效果更好,但是这也意味着几十亿参数全部要参与训练,显存耗不起。
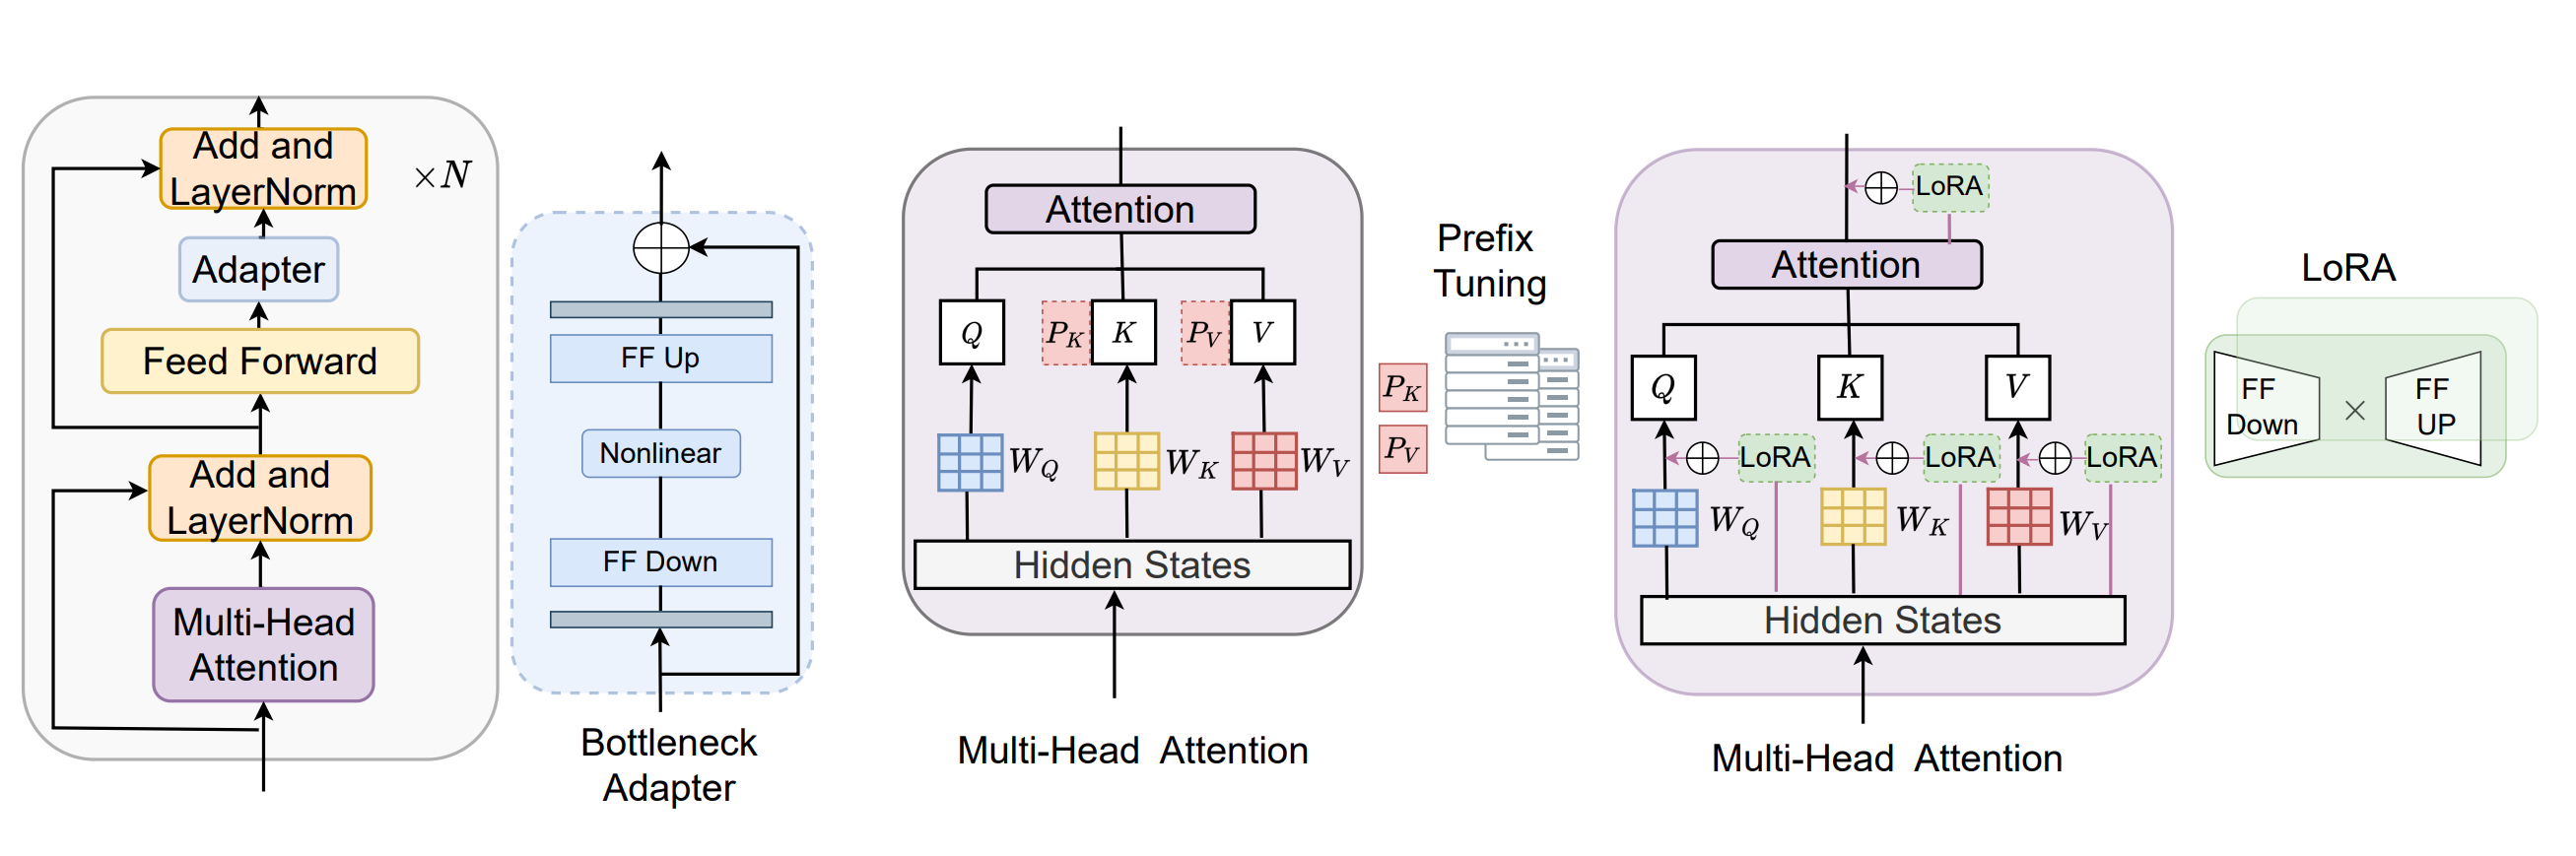
(2)PEFT只调整部分参数,常用的方法有:
- LoRA(最常用):在注意力层权重旁插入低秩矩阵,只训练这些小矩阵。
- Adapter :在 Transformer 层里插 Adapter 模块,训练这些小模块。
- Prefix Tuning:在模型输入前面加一段可训练的虚拟前缀。
所以其实大家一般都用lora进行微调。
实践环节
模型推理过程:数据流向
# 模型推理函数,用于生成通用回复。它的参数包括模型本身、分词器、用户消息,以及可选的 system prompt等。
def generate_responses(model, tokenizer, user_message, system_message=None,
                       max_new_tokens=100):
    # 将输入的 prompt 使用 chat message
    messages = []
    if system_message:
        messages.append({"role": "system", "content": system_message})

    # 假设所有的数据都是单轮对话(Q-A)
    messages.append({"role": "user", "content": user_message})

    prompt = tokenizer.apply_chat_template(
        messages,
        tokenize=False,
        add_generation_prompt=True,
        enable_thinking=False,
    )

    inputs = tokenizer(prompt, return_tensors="pt").to(model.device)

    with torch.no_grad():
        outputs = model.generate(
            **inputs,
            max_new_tokens=max_new_tokens,
            do_sample=False,
            pad_token_id=tokenizer.eos_token_id,
            eos_token_id=tokenizer.eos_token_id,
        )
    input_len = inputs["input_ids"].shape[1]
    generated_ids = outputs[0][input_len:]
    response = tokenizer.decode(generated_ids, skip_special_tokens=True).strip()

    return response
- 角色区分
    messages = []
    if system_message:
        messages.append({"role": "system", "content": system_message})

    # 假设所有的数据都是单轮对话(Q-A)
    messages.append({"role": "user", "content": user_message})
比如根据 system_message 和 user_message,构建包含不同角色(system 和 user)消息的列表。system_message代表系统的指示或背景信息会先添加进来。
- 应用模板
把message封装成一种模板形式:prompt = tokenizer.apply_chat_template
具体的template格式如下:
        tokenizer.chat_template = """{% for message in messages %}
                {% if message['role'] == 'system' %}System: {{ message['content'] }}\n
                {% elif message['role'] == 'user' %}User: {{ message['content'] }}\n
                {% elif message['role'] == 'assistant' %}Assistant: {{ message['content'] }} <|endoftext|>
                {% endif %}
                {% endfor %}"""
-
数据分词
input=tokenizer(prompt, return_tensors="pt")将文本数据encoder到向量空间 -
input塞入大模型
outputs = model.generate一旦文本变成了向量,接下来就可以将数据输入到大模型中进行推理。模型会根据输入生成新的 token,构成回复的一部分。 -
输出转化回文本空间
response = tokenizer.decode解码
所以一共流程是:role → template → tokenizer→ model → decoder
sft 方式
这里还是要依靠专业的包 from trl import SFTTrainer, DataCollatorForCompletionOnlyLM, SFTConfig
trl 是一个用于大规模语言模型训练的工具包,特别用于 强化学习(Reinforcement Learning)和 微调(Fine-tuning)。这个包专注于帮助用户方便地训练和微调预训练的大型语言模型(如 GPT、T5 等),使其能够更好地处理对话和生成任务。
- Dataset
用来微调的Dataset是pair格式:
| User Prompt | Assistant Response |
|---|---|
| The left child should have a value less than the parent node’s value, and the right child should have a value greater than the parent node’s value. | This statement is correct. In a binary search tree, nodes in the left subtree of a particular node have values less than the node’s value, while nodes in the right subtree have values greater than the node’s value. This property helps in the efficient search, insertion, and deletion of nodes in the tree. |
- 设置config
sft_config = SFTConfig(
    learning_rate=8e-5, # Learning rate for training.
    num_train_epochs=1, #  Set the number of epochs to train the model.
    per_device_train_batch_size=1, # Batch size for each device (e.g., GPU) during training.
    gradient_accumulation_steps=8, # Number of steps before performing a backward/update pass to accumulate gradients.
    gradient_checkpointing=False, # Enable gradient checkpointing to reduce memory usage during training at the cost of slower training speed.
    logging_steps=2,  # Frequency of logging training progress (log every 2 steps).

)
- 设置trainer, then train
sft_trainer = SFTTrainer(
    model=model,
    args=sft_config,
    train_dataset=train_dataset,
    processing_class=tokenizer,
)
sft_trainer.train()
base model 和fine-tuning model的对比
这里有一个有趣的对比,比较的是 base model “Qwen/Qwen3-0.6B-Base” 和 fine-tuning model “Qwen/Qwen3-0.6B”。以往很多人误以为,base model 就是可以直接拿来用的,输入什么问题就能得到直接的答案,结果其实并非如此,这种实际上是经过fine-tuning的。我们可以通过以下的案例来分析一下:
#base model: Qwen3-0.6B-Base
model, tokenizer = load_model_and_tokenizer("Qwen/Qwen3-0.6B-Base", USE_GPU)

test_model_with_questions(model, tokenizer, questions,
                          title="Base Model (Before SFT) Output")

# OUTPUT:
#Model Input 1:
#Give me an 1-sentence introduction of LLM.
#Model Output 1:
#⚙ ⚙ ⚙ ⚙ ⚙ ⚙ ⚙ ⚙ ⚙ ⚙ ⚙ ⚙ ⚙ ⚙ ⚙ ⚙ ⚙ ⚙ ⚙ ⚙ ⚙ ⚙ ⚙ ⚙ ⚙ ⚙ ⚙ ⚙ ⚙ ⚙ ⚙ ⚙ ⚙ �


#fine-tuning model:
model, tokenizer = load_model_and_tokenizer("Qwen/Qwen3-0.6B", USE_GPU)

test_model_with_questions(model, tokenizer, questions,
                          title="Base Model (After SFT) Output")

# OUTPUT:
#Model Input 1:
#Give me an 1-sentence introduction of LLM.
#Model Output 1:
#A large language model is a system designed to understand and generate human language.
首先来看 base model 的输出。我们输入的问题是:“Give me a 1-sentence introduction of LLM.”,但它的输出却是一串奇怪的符号,⚇ ⚇ ⚇…,这是因为基础模型的主要训练目标是预测文本序列中的下一个词(例如,“天空是蓝色的” -> “天空是蓝” 后面很可能接 “色的”)。但上文说过,这里的输入是一个已经被包装成模板的格式,这对 base model 来说是陌生的,它没有见过经过格式化的 chat 形式:
<|im_start|>user
Give me an 1-sentence introduction of LLM.<|im_end|>
<|im_start|>assistant
<think>

</think>
所以base model输出的很奇怪。但是后面的fine-tuning model "Qwen/Qwen3-0.6B"是根据这个格式微调的,所以能回答明确:“A large language model is a system designed to understand and generate human language.”
另外,关于大模型训练的细节,可以参考 Stanford cs336,内容更加深入和全面。
END.

有“AI”的1024 = 2048,欢迎大家加入2048 AI社区
更多推荐


 17
17 0
0- 0


 已为社区贡献6条内容

所有评论(0)