面向对象的仓颉——类与接口的进化设计
引言:面向对象——构建复杂系统的蓝图
嘿,各位技术探索者们!欢迎回到我们的仓颉语言深度解析系列。今天,我们将深入探讨一个在软件工程中占据核心地位的范式——面向对象编程(OOP)。
面向对象不仅仅是一种编程风格,更是一种思考问题和组织代码的方式。它通过将数据和行为封装到对象中,并通过类、接口、继承和多态等机制,帮助我们管理复杂性,提高代码的复用性和可维护性。
在仓颉语言中,我们设想其OOP设计将融合现代语言的精华,既提供强大的抽象能力,又避免传统OOP中可能出现的复杂性和陷阱。我们将重点关注class(如果存在)和interface(或trait)在仓颉中的角色,理解它们如何协同工作,以及如何通过可见性、继承、重载等机制,构建出健壮、灵活且易于扩展的软件系统。
理解仓颉语言的面向对象设计,是掌握这门语言,并用它来构建大型、复杂应用的关键一步。
让我们一起,驾驭仓颉的OOP特性,构建健壮可扩展的系统!
一、class与interface的关系与差异
仓颉语言在面向对象设计上,将倾向于“组合优于继承”的原则,并以接口(interface)/特征(trait)作为实现多态的主要手段。同时,为了满足特定需求,可能会提供结构体(struct)和类(class)两种数据聚合方式。
1.1 结构体(struct)作为主要数据聚合
在仓颉语言中,结构体(struct)将是定义自定义数据类型的主要方式。它们通常遵循值语义,意味着在赋值或传递时会进行数据复制。结构体通过**实现块(impl)**来为其添加方法和关联函数。
// 定义一个表示点的结构体
struct Point {
    x: f64,
    y: f64,
}

// 为 Point 结构体实现方法
impl Point {
    fn new(x: f64, y: f64) -> Self {
        Point { x, y }
    }

    fn distance_from_origin(&self) -> f64 {
        (self.x.powi(2) + self.y.powi(2)).sqrt()
    }

    fn translate(&mut self, dx: f64, dy: f64) {
        self.x += dx;
        self.y += dy;
    }
}

fn main() {
    let mut p1 = Point::new(3.0, 4.0); // 值语义
    let p2 = p1; // p2 是 p1 的一个副本
    p1.translate(1.0, 1.0);
    println!("p1: ({}, {})", p1.x, p1.y); // (4.0, 5.0)
    println!("p2: ({}, {})", p2.x, p2.y); // (3.0, 4.0) - 未受 p1 影响
}
1.2 类(class):引用语义与行为封装(设想)
为了支持更传统的面向对象范式,例如单继承和运行时多态,仓颉语言可能会引入类(class)。类将遵循引用语义,意味着变量存储的是对堆上对象的引用。类实例的内部状态通常是可变的,即使持有该实例的引用是不可变的,只要类的方法允许,其内部状态仍可能被修改(内部可变性)。
// 设想的 Class 定义
class Entity {
    id: u32,
    name: String,
}

impl Entity {
    fn new(id: u32, name: String) -> Self {
        Entity { id, name }
    }

    fn get_name(&self) -> &str {
        &self.name
    }

    fn set_name(&mut self, new_name: String) {
        self.name = new_name;
    }
}

fn main() {
    let mut e1 = Entity::new(1, "Player1".to_string()); // e1 是一个引用
    let e2 = e1; // e2 复制了 e1 的引用,指向同一个堆对象
    e1.set_name("NewPlayer1".to_string());
    println!("e1 name: {}", e1.get_name()); // NewPlayer1
    println!("e2 name: {}", e2.get_name()); // NewPlayer1 - e2 也被修改了
}
1.3 接口(interface)/特征(trait):行为契约与多态
**接口(interface)或特征(trait)**是仓颉语言实现多态的核心机制。它们定义了一组行为契约(函数签名),任何类型(无论是struct还是class)只要实现了某个接口,就可以被当作该接口类型来处理。
// 定义一个可移动的接口
interface Movable {
    fn move_by(&mut self, dx: f64, dy: f64);
    fn get_position(&self) -> (f64, f64);
}

// Point 结构体实现 Movable 接口
impl Movable for Point {
    fn move_by(&mut self, dx: f64, dy: f64) {
        self.x += dx;
        self.y += dy;
    }
    fn get_position(&self) -> (f64, f64) {
        (self.x, self.y)
    }
}

// 设想的 Entity 类也实现 Movable 接口
impl Movable for Entity {
    fn move_by(&mut self, dx: f64, dy: f64) {
        // 假设 Entity 内部有一个 Point 字段
        // self.position.x += dx;
        // self.position.y += dy;
        println!("Entity {} moved by ({}, {})", self.name, dx, dy);
    }
    fn get_position(&self) -> (f64, f64) {
        // (self.position.x, self.position.y)
        (0.0, 0.0) // 简化示例
    }
}

fn process_movable(item: &mut dyn Movable) { // 接受一个 Movable 接口对象
    item.move_by(10.0, 10.0);
    println!("New position: {:?}", item.get_position());
}

fn main() {
    let mut p = Point::new(0.0, 0.0);
    process_movable(&mut p); // Point 实例作为 Movable 处理

    let mut e = Entity::new(2, "Enemy".to_string());
    process_movable(&mut e); // Entity 实例作为 Movable 处理
}
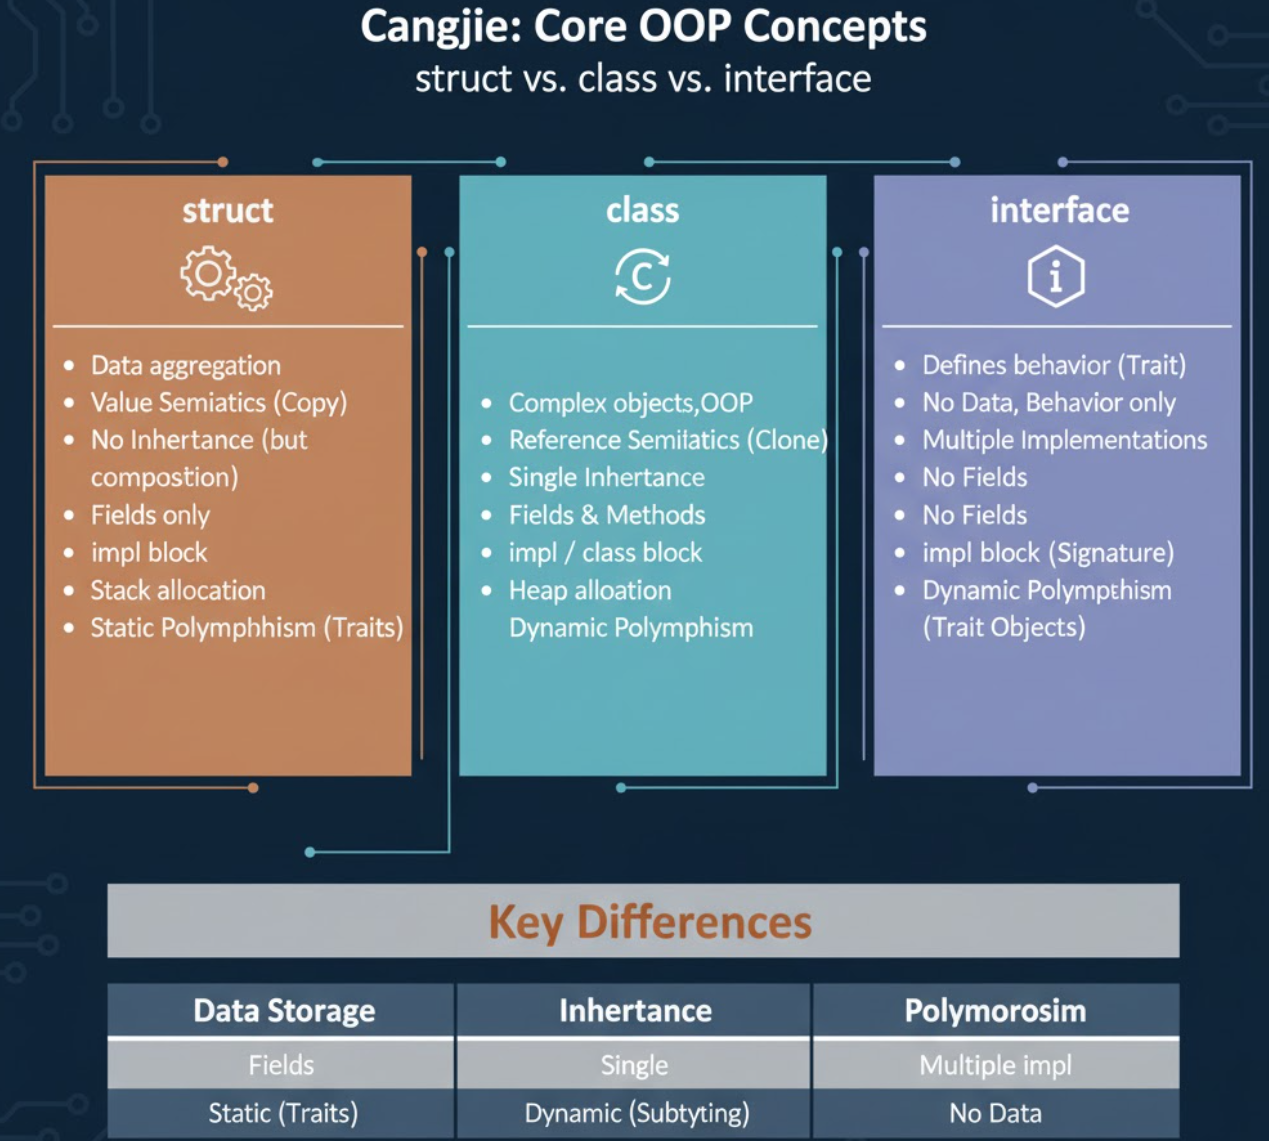
1.4 核心差异:数据与行为、单继承与多实现、值与引用语义
| 特性 | struct (结构体) | class (类,设想) | interface (接口/特征) |
|---|---|---|---|
| 主要用途 | 数据聚合,轻量级数据结构 | 复杂对象,传统OOP继承,运行时多态 | 定义行为契约,实现多态 |
| 语义 | 值语义(默认),赋值/传递时复制数据 | 引用语义,赋值/传递时复制引用 | 无数据,只定义行为 |
| 继承 | 不支持继承(但可组合) | 支持单继承(继承实现) | 支持多实现(一个类型可实现多个接口) |
| 数据 | 包含数据字段 | 包含数据字段 | 不包含数据字段 |
| 方法 | 通过 impl 块实现 | 通过 impl 块或直接在 class 定义中实现 | 只定义方法签名(可有默认实现) |
| 内存分配 | 通常在栈上(如果大小已知),或嵌入其他结构体 | 通常在堆上分配 | 无直接内存分配 |
| 多态 | 静态多态(泛型),通过实现接口实现动态多态 | 静态多态(泛型),通过继承和接口实现动态多态 | 实现动态多态(通过接口对象) |
二、成员可见性与访问修饰符详解
仓颉语言通过访问修饰符来严格控制代码的可见性,确保模块化和封装性。这适用于模块、结构体、类、枚举的字段和方法。
2.1 pub:公开可见性
pub 关键字用于将项(如函数、结构体、枚举、字段、方法)声明为公开的,可以在任何地方访问。
mod geometry {
    pub struct Point { // Point 结构体是公开的
        pub x: f64, // x 字段是公开的
        y: f64, // y 字段默认是私有的
    }

    impl Point {
        pub fn new(x: f64, y: f64) -> Self { // new 方法是公开的
            Point { x, y }
        }

        pub fn get_y(&self) -> f64 { // get_y 方法是公开的
            self.y
        }

        fn set_y(&mut self, new_y: f64) { // set_y 方法默认是私有的
            self.y = new_y;
        }
    }

    pub enum ShapeType { // ShapeType 枚举是公开的
        Circle,
        Rectangle,
    }
}

fn main() {
    let mut p = geometry::Point::new(1.0, 2.0);
    println!("Point x: {}", p.x); // 允许访问公开字段 x
    // println!("Point y: {}", p.y); // 编译错误:y 是私有的

    println!("Point y (via getter): {}", p.get_y()); // 允许通过公开方法访问 y
    // p.set_y(3.0); // 编译错误:set_y 是私有的

    let shape = geometry::ShapeType::Circle; // 允许访问公开枚举及其变体
}
2.2 priv:私有可见性(默认)
在仓颉语言中,如果一个项没有显式指定访问修饰符,它将默认为私有(priv)。私有项只能在其定义的模块或作用域内部访问。
mod data_store {
    struct InternalData { // 默认私有
        value: i32,
    }

    impl InternalData {
        fn new(value: i32) -> Self { // 默认私有
            InternalData { value }
        }

        fn get_value(&self) -> i32 { // 默认私有
            self.value
        }
    }

    pub struct PublicStore {
        data: InternalData, // data 字段是私有的,但其类型 InternalData 也是私有的
    }

    impl PublicStore {
        pub fn new(initial_value: i32) -> Self {
            PublicStore { data: InternalData::new(initial_value) }
        }

        pub fn get_stored_value(&self) -> i32 {
            self.data.get_value() // 允许在 PublicStore 内部访问 InternalData 的私有方法
        }
    }
}

fn main() {
    let store = data_store::PublicStore::new(100);
    println!("Stored value: {}", store.get_stored_value()); // 允许访问 PublicStore 的公开方法
    // let internal = data_store::InternalData::new(10); // 编译错误:InternalData 是私有的
}
2.3 模块(mod)与可见性边界
模块是仓颉语言中组织代码的基本单元,它们也定义了可见性的边界。pub 关键字可以与 (crate) 或 (super) 等结合,实现更细粒度的可见性控制。
pub(crate):在当前 crate(编译单元)内公开。pub(super):在父模块内公开。pub(in path::to::module):在指定路径的模块内公开。mod outer_module { pub(crate) fn crate_visible_fn() { println!("Visible within the current crate."); } pub mod inner_module { pub(super) fn super_visible_fn() { println!("Visible within outer_module."); } pub fn public_in_inner() { println!("Public in inner_module."); } } } fn main() { outer_module::crate_visible_fn(); // 允许访问 outer_module::inner_module::super_visible_fn(); // 允许访问 (因为 main 在 crate 根,可以访问 outer_module) outer_module::inner_module::public_in_inner(); // 允许访问 }2.4 字段与方法的可见性控制
字段和方法的可见性遵循与模块和类型相同的规则。通过合理设置,可以实现数据封装,只暴露必要的公共API。
struct BankAccount {
    account_number: String, // 默认私有
    balance: f64,           // 默认私有
    pub owner_name: String, // 公开字段
}

impl BankAccount {
    pub fn new(account_number: String, owner_name: String, initial_balance: f64) -> Self {
        BankAccount {
            account_number,
            owner_name,
            balance: initial_balance,
        }
    }

    pub fn deposit(&mut self, amount: f64) {
        if amount > 0.0 {
            self.balance += amount;
        }
    }

    pub fn withdraw(&mut self, amount: f64) -> bool {
        if amount > 0.0 && self.balance >= amount {
            self.balance -= amount;
            true
        } else {
            false
        }
    }

    pub fn get_balance(&self) -> f64 {
        self.balance
    }

    fn get_account_number(&self) -> &str { // 私有方法
        &self.account_number
    }
}

fn main() {
    let mut account = BankAccount::new("12345".to_string(), "Alice".to_string(), 1000.0);
    println!("Owner: {}", account.owner_name); // 访问公开字段
    // println!("Balance: {}", account.balance); // 编译错误:balance 是私有的

    account.deposit(500.0);
    println!("New balance: {}", account.get_balance()); // 通过公开方法访问
    // account.get_account_number(); // 编译错误:get_account_number 是私有方法
}
三、继承、重载与遮盖机制
在面向对象编程中,继承、重载和遮盖是处理代码复用和多态的关键概念。仓颉语言将提供这些机制,但会以现代、安全的方式进行设计。
3.1 继承(inheritance):代码复用与层次结构(针对class设想)
如果仓颉语言支持class,它将可能支持单继承,允许一个类从另一个类继承字段和方法。这有助于建立类型层次结构和实现代码复用。
// 设想的基类
class Animal {
    pub name: String,
    pub age: u32,
}

impl Animal {
    pub fn new(name: String, age: u32) -> Self {
        Animal { name, age }
    }

    pub fn speak(&self) {
        println!("{} makes a sound.", self.name);
    }
}

// 设想的派生类,继承自 Animal
class Dog: Animal { // Dog 继承 Animal
    pub breed: String,
}

impl Dog {
    pub fn new_dog(name: String, age: u32, breed: String) -> Self {
        Dog {
            // 调用父类的构造函数(或直接初始化父类字段)
            // super::new(name, age), // 设想的父类构造调用
            name, age, // 直接初始化继承的字段
            breed,
        }
    }

    // 覆盖父类的 speak 方法
    pub fn speak(&self) {
        println!("{} barks! I am a {} dog.", self.name, self.breed);
    }

    pub fn fetch(&self) {
        println!("{} fetches the ball.", self.name);
    }
}

fn main() {
    let animal = Animal::new("Generic Animal".to_string(), 5);
    animal.speak(); // Generic Animal makes a sound.

    let dog = Dog::new_dog("Buddy".to_string(), 3, "Golden Retriever".to_string());
    dog.speak(); // Buddy barks! I am a Golden Retriever dog. (调用了子类覆盖的方法)
    dog.fetch(); // Buddy fetches the ball.

    // 多态:父类引用指向子类对象
    let animal_ref: &dyn Animal = &dog; // 设想的接口对象转换
    // animal_ref.speak(); // 编译错误:&dyn Animal 无法直接调用 Dog 的 speak 方法,除非 Animal 接口定义了 speak
    // 如果 Animal 是一个 trait,并且 Dog 实现了它,那么可以通过 trait object 调用
    // 如果 Animal 是一个 class,那么会调用 Dog 的 speak 方法(虚函数)
}
在仓颉中,如果class支持继承,那么方法覆盖(override)将是其核心特性,通常通过虚函数机制实现运行时多态。
3.2 方法重载(overloading):同名方法的不同签名
方法重载允许在同一个类或结构体中定义多个同名方法,只要它们的参数列表(参数数量、类型或顺序)不同即可。这在之前的函数机制中已经提及,同样适用于方法。
struct Calculator { }

impl Calculator {
    pub fn add(&self, a: i32, b: i32) -> i32 {
        a + b
    }

    pub fn add(&self, a: f64, b: f64) -> f64 { // 重载 add 方法
        a + b
    }

    pub fn add(&self, a: i32, b: i32, c: i32) -> i32 { // 重载 add 方法
        a + b + c
    }
}

fn main() {
    let calc = Calculator {};
    println!("Sum i32: {}", calc.add(10, 20)); // 调用 add(i32, i32)
    println!("Sum f64: {}", calc.add(10.5, 20.3)); // 调用 add(f64, f64)
    println!("Sum three i32: {}", calc.add(1, 2, 3)); // 调用 add(i32, i32, i32)
}
3.3 字段遮盖(shadowing):局部变量的优先级
字段遮盖指的是在内部作用域声明一个与外部作用域同名的变量,内部变量会“遮盖”外部变量。这在仓颉语言中是允许的,但通常不推荐在类/结构体字段和局部变量之间使用,以避免混淆。
struct Example {
    value: i32,
}

fn main() {
    let value = 10; // 外部作用域的 value
    println!("Outer value: {}", value); // 输出 10

    {
        let value = 20; // 内部作用域的 value,遮盖了外部的 value
        println!("Inner value: {}", value); // 输出 20
    }

    println!("Outer value again: {}", value); // 输出 10 (内部作用域结束后,外部 value 恢复)

    let ex = Example { value: 30 };
    let value = 40; // 遮盖了 ex.value,但不是 ex.value 本身
    println!("Local value: {}", value); // 输出 40
    println!("Struct value: {}", ex.value); // 输出 30
}
3.4 方法覆盖(override)与隐藏(hide)(针对class设想)
- 方法覆盖(
override): 在派生类中提供一个与基类方法具有相同签名的方法。如果基类方法是虚函数,则通过基类引用调用时会执行派生类的版本,实现运行时多态。仓颉的class继承将支持此机制。 - 方法隐藏(
hide): 在派生类中定义一个与基类方法同名但签名不同的方法,或者基类方法不是虚函数。这不会实现多态,而是简单地在派生类中引入一个新方法,基类方法仍然可以通过显式转换或super关键字访问。// 设想的基类 class Base { pub fn greet(&self) { println!("Hello from Base!"); } pub fn do_something(&self) { // 假设这是虚函数 println!("Base doing something."); } } // 设想的派生类 class Derived: Base { pub fn greet(&self) { // 隐藏了 Base 的 greet 方法 println!("Hello from Derived!"); } pub fn do_something(&self) { // 覆盖了 Base 的 do_something 方法 println!("Derived doing something."); } pub fn derived_only(&self) { println!("Derived specific action."); } } fn main() { let b = Base {}; let d = Derived {}; b.greet(); // Hello from Base! d.greet(); // Hello from Derived! (隐藏) let base_ref: &dyn Base = &d; // 设想的向上转型 // base_ref.greet(); // 编译错误:如果 greet 不是虚函数,则无法通过基类引用调用派生类版本 // base_ref.do_something(); // 如果 do_something 是虚函数,则会调用 Derived 的版本 }
仓颉语言会明确区分方法覆盖和隐藏,并可能要求显式使用override关键字来标记覆盖方法,以提高代码清晰度。
四、Self类型与实例引用解析
在仓颉语言中,Self(大写)和self(小写)是两个非常重要的关键字,它们分别用于指代当前类型和当前实例,对于编写泛型代码和方法至关重要。
4.1 Self类型:指代当前类型
Self(大写)是一个类型占位符,它在impl块或接口(interface/trait)定义中,指代当前正在实现或定义的具体类型。这在返回当前类型的新实例或在接口中定义返回自身类型的方法时非常有用。
struct Point {
    x: f64,
    y: f64,
}

impl Point {
    // 关联函数,返回当前类型 (Point) 的新实例
    fn new(x: f64, y: f64) -> Self { // Self 在这里就是 Point
        Point { x, y }
    }

    // 关联函数,返回一个零点
    fn origin() -> Self { // Self 在这里就是 Point
        Self::new(0.0, 0.0)
    }
}

interface Cloneable {
    fn clone(&self) -> Self; // 返回一个与当前类型相同的实例
}

impl Cloneable for Point {
    fn clone(&self) -> Self { // Self 在这里就是 Point
        Point { x: self.x, y: self.y }
    }
}

fn main() {
    let p1 = Point::new(1.0, 2.0);
    let p_origin = Point::origin();
    let p_cloned = p1.clone();
    println!("Cloned point: ({}, {})", p_cloned.x, p_cloned.y);
}
4.2 self实例引用:方法中的当前对象
self(小写)是方法中用于指代当前实例的参数。它的形式决定了方法对实例的访问权限和所有权。
&self: 不可变引用,方法可以读取实例,但不能修改。&mut self: 可变引用,方法可以读取和修改实例。self: 拥有所有权,方法会消费实例,实例在方法调用后将不再可用。struct Counter { count: i32, } impl Counter { fn new(initial: i32) -> Self { Counter { count: initial } } fn get_count(&self) -> i32 { // &self: 读取 count self.count } fn increment(&mut self) { // &mut self: 修改 count self.count += 1; } fn consume_and_reset(self) -> i32 { // self: 消费实例 let old_count = self.count; // self 在这里被消费 old_count } } fn main() { let mut c = Counter::new(0); c.increment(); println!("Current count: {}", c.get_count()); // 输出 1 let old_val = c.consume_and_reset(); println!("Consumed value: {}", old_val); // 输出 1 // c.get_count(); // 编译错误:c 的所有权已转移 }4.3 关联函数与
Self
关联函数(或静态方法)不接收self参数,因为它们不操作特定实例。然而,它们仍然可以使用Self类型来指代它们所属的类型,例如在构造函数中返回Self类型的新实例。
struct Logger {
    prefix: String,
}

impl Logger {
    // 关联函数,返回 Logger 类型的新实例
    fn new(prefix: String) -> Self { // Self 指代 Logger
        Logger { prefix }
    }

    // 实例方法
    fn log(&self, message: &str) {
        println!("[{}] {}", self.prefix, message);
    }
}

fn main() {
    let my_logger = Logger::new("APP".to_string()); // 调用关联函数
    my_logger.log("Application started.");
}
五、泛型类与接口的限制与实现
泛型是仓颉语言实现代码复用和类型安全的关键。它允许我们编写能够处理多种类型而无需重复代码的结构体、类和接口。
5.1 泛型结构体与类:参数化类型
泛型结构体和类通过在名称后添加类型参数(通常用大写字母表示,如T)来定义。这些类型参数在实例化时会被具体类型替换。
// 泛型结构体:Pair
struct Pair<T, U> {
    first: T,
    second: U,
}

impl<T, U> Pair<T, U> {
    fn new(first: T, second: U) -> Self {
        Pair { first, second }
    }

    fn swap(&mut self) {
        std::mem::swap(&mut self.first, &mut self.second); // 假设 std::mem::swap 存在
    }
}

// 设想的泛型类:Box
class Box<T> {
    value: T,
}

impl<T> Box<T> {
    fn new(value: T) -> Self {
        Box { value }
    }

    fn get_value(&self) -> &T {
        &self.value
    }
}

fn main() {
    let p1 = Pair::new(10, "hello".to_string()); // Pair<i32, String>
    let p2 = Pair::new(true, 3.14); // Pair<bool, f64>
    println!("p1: ({}, {})", p1.first, p1.second);

    let b = Box::new(42); // Box<i32>
    println!("Box value: {}", b.get_value());
}
5.2 泛型接口:定义通用行为契约
接口本身也可以是泛型的,允许它们定义依赖于类型参数的行为。
// 泛型接口:Collection
interface Collection<T> {
    fn add(&mut self, item: T);
    fn contains(&self, item: &T) -> bool;
    fn size(&self) -> usize;
}

// 设想的 VArray 实现了 Collection 接口
impl<T: PartialEq> Collection<T> for VArray<T> { // T 必须可比较
    fn add(&mut self, item: T) {
        self.push(item);
    }

    fn contains(&self, item: &T) -> bool {
        self.iter().any(|e| e == item)
    }

    fn size(&self) -> usize {
        self.len()
    }
}

fn main() {
    let mut numbers: VArray<i32> = VArray::new();
    numbers.add(1);
    numbers.add(2);
    println!("Contains 2: {}", numbers.contains(&2)); // true
    println!("Size: {}", numbers.size()); // 2
}
5.3 类型参数约束:where子句与接口绑定
为了确保泛型代码能够安全地操作类型参数,仓颉语言使用类型参数约束。这通常通过在类型参数后添加冒号和接口名称(T: MyInterface)或使用where子句来实现。
// 泛型函数,要求 T 必须实现 Display 和 Debug 接口
interface Display { fn to_string(&self) -> String; }
interface Debug { fn debug_format(&self) -> String; }

fn print_and_debug<T>(item: &T)
where
    T: Display + Debug, // T 必须同时实现 Display 和 Debug
{
    println!("Display: {}", item.to_string());
    println!("Debug: {}", item.debug_format());
}

// 假设 i32 实现了 Display 和 Debug
impl Display for i32 { fn to_string(&self) -> String { format!("{}", self) } }
impl Debug for i32 { fn debug_format(&self) -> String { format!("i32({})", self) } }

fn main() {
    let num = 123;
    print_and_debug(&num);
}
5.4 关联类型(Associated Types):接口中的类型占位符
关联类型允许在接口定义中声明一个类型占位符,其具体类型由实现该接口的类型来指定。这使得接口更加灵活,可以定义与实现类型相关的复杂行为。
// 设想的 Iterator 接口,带有关联类型 Item
interface Iterator {
    type Item; // 关联类型
    fn next(&mut self) -> Option<Self::Item>;
}

struct MyRange {
    current: i32,
    end: i32,
}

impl Iterator for MyRange {
    type Item = i32; // MyRange 实现 Iterator 时,Item 具体为 i32

    fn next(&mut self) -> Option<Self::Item> {
        if self.current < self.end {
            let value = self.current;
            self.current += 1;
            Option::Some(value)
        } else {
            Option::None
        }
    }
}

fn main() {
    let mut range = MyRange { current: 0, end: 3 };
    while let Option::Some(num) = range.next() {
        println!("Next: {}", num); // 输出 0, 1, 2
    }
}
六、综合实例:接口驱动的模块化设计
现在,让我们通过一个综合实例,展示如何利用仓颉语言的接口(interface)特性,实现一个高度模块化和可扩展的设计。我们将构建一个简单的日志系统,支持不同的日志输出目标和不同的日志格式化器。
6.1 定义核心接口:Logger与Formatter
首先,我们定义两个核心接口:Logger用于定义日志记录的行为,Formatter用于定义日志消息的格式化行为。
// 定义日志级别枚举
enum LogLevel {
    Debug,
    Info,
    Warn,
    Error,
}

// 定义日志消息结构体
struct LogMessage {
    level: LogLevel,
    timestamp: String, // 简化为字符串
    message: String,
}

// 定义日志格式化器接口
interface Formatter {
    fn format(&self, msg: &LogMessage) -> String;
}

// 定义日志记录器接口
interface Logger {
    fn log(&self, level: LogLevel, message: &str);
}
6.2 实现具体数据源与处理器
接下来,我们实现几个具体的格式化器和日志记录器。
// 实现一个简单的文本格式化器
struct SimpleFormatter;
impl Formatter for SimpleFormatter {
    fn format(&self, msg: &LogMessage) -> String {
        format!("[{}] {} - {}", msg.level.to_string(), msg.timestamp, msg.message)
    }
}

// 实现一个 JSON 格式化器
struct JsonFormatter;
impl Formatter for JsonFormatter {
    fn format(&self, msg: &LogMessage) -> String {
        format!(r#"{{"level":"{}", "timestamp":"{}", "message":"{}"}}"#,
                msg.level.to_string(), msg.timestamp, msg.message)
    }
}

// 实现一个控制台日志记录器
struct ConsoleLogger {
    formatter: Box<dyn Formatter>, // 组合一个 Formatter 接口对象
}

impl ConsoleLogger {
    fn new(formatter: Box<dyn Formatter>) -> Self {
        ConsoleLogger { formatter }
    }
}

impl Logger for ConsoleLogger {
    fn log(&self, level: LogLevel, message: &str) {
        let now = "2025-11-10T10:00:00".to_string(); // 简化时间戳
        let log_msg = LogMessage { level, timestamp: now, message: message.to_string() };
        let formatted_msg = self.formatter.format(&log_msg);
        println!("{}", formatted_msg);
    }
}

// 实现一个文件日志记录器
import std::io::File;
import std::io::Write;

struct FileLogger {
    file_path: String,
    formatter: Box<dyn Formatter>,
}

impl FileLogger {
    fn new(file_path: String, formatter: Box<dyn Formatter>) -> Self {
        FileLogger { file_path, formatter }
    }
}

impl Logger for FileLogger {
    fn log(&self, level: LogLevel, message: &str) {
        let now = "2025-11-10T10:00:00".to_string();
        let log_msg = LogMessage { level, timestamp: now, message: message.to_string() };
        let formatted_msg = self.formatter.format(&log_msg);

        let mut file = File::open_append(&self.file_path)
            .expect("Failed to open log file");
        file.write_all(formatted_msg.as_bytes())
            .expect("Failed to write to log file");
        file.write_all(b"\n").expect("Failed to write newline");
    }
}

// 为 LogLevel 实现 Display 接口,用于格式化输出
impl Display for LogLevel {
    fn to_string(&self) -> String {
        match self {
            LogLevel::Debug => "DEBUG".to_string(),
            LogLevel::Info => "INFO".to_string(),
            LogLevel::Warn => "WARN".to_string(),
            LogLevel::Error => "ERROR".to_string(),
        }
    }
}
6.3 构建模块化应用:依赖接口而非具体实现
现在,我们可以构建一个应用,它依赖于Logger接口,而不是特定的ConsoleLogger或FileLogger。
// 应用程序核心逻辑,只依赖 Logger 接口
struct Application {
    logger: Box<dyn Logger>, // 依赖 Logger 接口
}

impl Application {
    fn new(logger: Box<dyn Logger>) -> Self {
        Application { logger }
    }

    fn run(&self) {
        self.logger.log(LogLevel::Info, "Application started successfully.");
        self.logger.log(LogLevel::Debug, "Processing user input...");
        // ... 更多业务逻辑
        self.logger.log(LogLevel::Error, "An unexpected error occurred!");
        self.logger.log(LogLevel::Info, "Application shutting down.");
    }
}

fn main() {
    // 使用 SimpleFormatter 和 ConsoleLogger
    let console_logger = ConsoleLogger::new(Box::new(SimpleFormatter {}));
    let app1 = Application::new(Box::new(console_logger));
    println!("--- Running App with ConsoleLogger (SimpleFormatter) ---");
    app1.run();

    // 使用 JsonFormatter 和 FileLogger
    let file_logger = FileLogger::new("app.log".to_string(), Box::new(JsonFormatter {}));
    let app2 = Application::new(Box::new(file_logger));
    println!("\n--- Running App with FileLogger (JsonFormatter) ---");
    app2.run();
    println!("Check app.log for output.");
}
6.4 扩展性与可测试性分析
这个接口驱动的设计带来了显著的优势:
- 高扩展性: 我们可以轻松添加新的日志记录器(如网络日志、数据库日志)或新的格式化器(如XML格式),而无需修改
Application的核心逻辑,只需实现相应的接口。 - 松耦合:
Application与具体的日志实现解耦,它只关心Logger接口定义的行为。 - 易于测试: 在单元测试中,我们可以创建
Logger接口的模拟(Mock)实现,轻松测试Application的日志行为,而无需实际写入文件或打印到控制台。
结语:驾驭仓颉OOP,构建健壮可扩展系统
各位技术探索者们,今天我们对仓颉语言的面向对象设计进行了全面而深入的剖析。我们探讨了结构体、类和接口在仓颉中的角色与差异,理解了成员可见性如何保障封装,以及继承、重载和遮盖机制如何实现代码复用和多态。
我们还深入解析了Self类型和self实例引用在方法和泛型中的重要作用,并探索了泛型类与接口、类型参数约束和关联类型如何构建灵活而类型安全的抽象。
最后,通过一个接口驱动的日志系统综合实例,我们亲身体验了仓颉语言如何通过接口实现高度模块化、可扩展和易于测试的软件设计。
掌握仓颉语言的面向对象设计,意味着你拥有了构建复杂、健壮、可扩展软件的强大工具。它将让你能够以更清晰、更具表达力的方式组织和实现程序逻辑。
那么,你对仓颉语言的面向对象设计有什么新的见解或疑问吗?你认为它在哪些方面做得特别出色?欢迎在评论区留言,与我一起交流!

有“AI”的1024 = 2048,欢迎大家加入2048 AI社区
更多推荐


 29
29 0
0- 0


 已为社区贡献2条内容

所有评论(0)