OpenShift AI - 在 OpenShift 和 OpenShift AI 上运行 LLM 推理服务
《OpenShift / RHEL / DevSecOps 汇总目录》
说明:本文已经在 OpenShift 4.18 + OpenShift AI 2.19 的环境中验证
文章目录
安装 Python 本地环境
- 为了后面能从本地通过 Python 访问 LLM,在本地安装 Python 依赖包。
$ pip install text-generation
$ pip install openai
在 OpenShift 上运行 LLM
先将部署资源下载到本地。
$ git clone https://github.com/rh-aiservices-bu/llm-on-openshift
vLLM
本部分将部署包含 vLLM 运行环境的 quay.io/rh-aiservices-bu/vllm-openai-ubi9 镜像,然后在其中运行 huggingface 的 mistralai/Mistral-7B-Instruct-v0.2 模型。注意:该模型需要 GPU 才能运行。
- 先设置 deployment.yaml 中的 HF_TOKEN。
$ cd llm-on-openshift/llm-servers/vllm/gpu/gitops
$ grep "value:" deployment.yaml
              value: ''
$ HF_TOKEN="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"
$ sed -i s/"value: ''"/"value: '${HF_TOKEN}'"/g deployment.yaml
- 再在 vllm 项目中创建相关资源。
oc new-project vllm
oc apply -f pvc.yaml
oc apply -f deployment.yaml
oc apply -f service.yaml
oc apply -f route.yaml
- 获的访问 LLM 的地址。
$ VLLM_ROUTE=$(oc get route vllm -n vllm -ojsonpath={.spec.host})
- 用浏览器访问
https://$VLLM_ROUTE/docs,查看可以使用的 Restful API。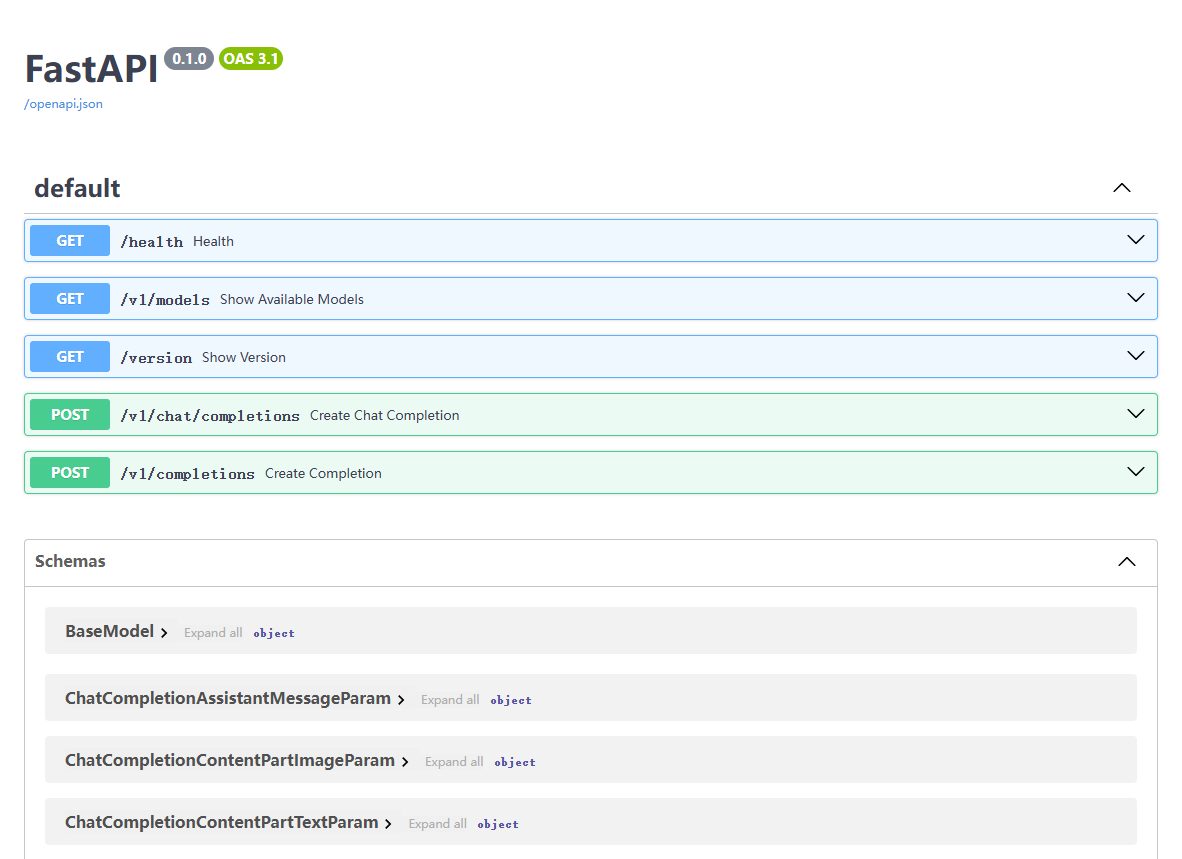
- 访问以上第二个 API,获得可用的模型。
$ curl -s https://$VLLM_ROUTE/v1/models | jq
{
  "object": "list",
  "data": [
    {
      "id": "mistralai/Mistral-7B-Instruct-v0.2",
      "object": "model",
      "created": 1746240773,
      "owned_by": "vllm",
      "root": "mistralai/Mistral-7B-Instruct-v0.2",
      "parent": null,
      "permission": [
        {
          "id": "modelperm-14986668a1f448868f42be92f54fb958",
          "object": "model_permission",
          "created": 1746240773,
          "allow_create_engine": false,
          "allow_sampling": true,
          "allow_logprobs": true,
          "allow_search_indices": false,
          "allow_view": true,
          "allow_fine_tuning": false,
          "organization": "*",
          "group": null,
          "is_blocking": false
        }
      ]
    }
  ]
}
- 访问 mistralai/Mistral-7B-Instruct-v0.2 模型的 v1/completions,提示为
"San Francisco is a",返回只有 7 个token,即" city that is known for its beautiful"。
$ curl -s https://${VLLM_ROUTE}/v1/completions \
      -H "Content-Type: application/json" \
      -d '{
          "model": "mistralai/Mistral-7B-Instruct-v0.2",
          "prompt": "San Francisco is a",
          "max_tokens": 7,
          "temperature": 0
      }' | jq
{
  "id": "cmpl-4c9449ad2d984f33bc6416022dd3fc71",
  "object": "text_completion",
  "created": 1746236352,
  "model": "mistralai/Mistral-7B-Instruct-v0.2",
  "choices": [
    {
      "index": 0,
      "text": " city that is known for its beautiful",
      "logprobs": null,
      "finish_reason": "length",
      "stop_reason": null
    }
  ],
  "usage": {
    "prompt_tokens": 5,
    "total_tokens": 12,
    "completion_tokens": 7
  }
}
- 访问 mistralai/Mistral-7B-Instruct-v0.2 模型的 v1/chat/completions,确认根据问题
"Who won the world series in 2020?"返回的结果。
$ curl -s https://${VLLM_ROUTE}/v1/chat/completions \
      -H "Content-Type: application/json" \
      -d '{
            "model": "mistralai/Mistral-7B-Instruct-v0.2",
            "messages": [
              {"role": "user", "content": "Who won the world series in 2020?"},
              {"role": "assistant", "content": "You are a helpful assistant."}
            ]
          }' | jq
{
  "id": "cmpl-2849fbaac0f54ebea22d3354c6e0e7f2",
  "object": "chat.completion",
  "created": 1746238820,
  "model": "mistralai/Mistral-7B-Instruct-v0.2",
  "choices": [
    {
      "index": 0,
      "message": {
        "role": "assistant",
        "content": " I'd be happy to help answer your question! However, I see that you are asking about the winner of the World Series in the year 2020. I'd be happy to provide you with that information.\n\nThe 2020 World Series was won by the Tampa Bay Rays. They defeated the Los Angeles Dodgers in six games to claim their second World Series championship in franchise history. The series was played in a neutral site, with all games being held at Globe Life Field in Arlington, Texas, due to the COVID-19 pandemic.\n\nI hope that helps answer your question! Let me know if you have any other questions."
      },
      "logprobs": null,
      "finish_reason": "stop",
      "stop_reason": null
    }
  ],
  "usage": {
    "prompt_tokens": 28,
    "total_tokens": 171,
    "completion_tokens": 143
  }
}
- 根据以下内容创建 vllm-client.py 文件,它用过 python 调用模型的 API。
$ cat > vllm-client.py << EOF
from openai import OpenAI
# Set OpenAI's API key and API base to use vLLM's API server.
openai_api_key = "EMPTY"
openai_api_base = "https://${VLLM_ROUTE}/v1"

client = OpenAI(
    api_key=openai_api_key,
    base_url=openai_api_base,
)

chat_response = client.chat.completions.create(
    model="mistralai/Mistral-7B-Instruct-v0.2",
    messages=[
        {"role": "system", "content": "You are a helpful assistant."},
        {"role": "user", "content": "Tell me a joke."},
    ]
)
print("Chat response:", chat_response)
EOF
- 运行 python 访问模型。
$ python3 vllm-client.py
Chat response: ChatCompletion(id='cmpl-a42f709ad14842a1b3d3e6da4098a997', choices=[Choice(finish_reason='stop', index=0, logprobs=None, message=ChatCompletionMessage(content=" Why don't scientists trust atoms?\n\nBecause they make up everything!", refusal=None, role='assistant', annotations=None, audio=None, function_call=None, tool_calls=None), stop_reason=None)], created=1746239854, model='mistralai/Mistral-7B-Instruct-v0.2', object='chat.completion', service_tier=None, system_fingerprint=None, usage=CompletionUsage(completion_tokens=17, prompt_tokens=22, total_tokens=39, completion_tokens_details=None, prompt_tokens_details=None))
Ollama
本部分将部署包含 Ollama 运行环境的 quay.io/rh-aiservices-bu/ollama-ubi9 镜像,然后在其中运行 https://ollama.com/library/mistral 模型。注意:该模型不需要 GPU 即可运行。
- 在 ollama 项目中创建相关资源。
cd llm-on-openshift/llm-servers/ollama/gitops
oc new-project ollama
oc apply -f pvc.yaml
oc apply -f deployment.yaml
oc apply -f service.yaml
oc apply -f route.yaml
- 获的访问 LLM 的地址,然后通过 Restful API 访问模型。
$ OLLAMA_ROUTE=$(oc get route ollama -n ollama -ojsonpath={.spec.host})
$ curl -s https://$OLLAMA_ROUTE/api/generate -d '{
        "model": "mistral",
        "prompt":"Why is the sky blue?",
        "stream": false
      }'
- 模型会获得以下返回结果。注意:由于模型未使用 GPU,因此返回速度较慢。
{"model":"mistral","created_at":"2025-05-06T08:20:20.53940876Z","response":" The sky appears blue during a clear day because of a process called Rayleigh scattering. As sunlight reaches Earth, it is made up of different colors, each with varying wavelengths. When this light enters Earth's atmosphere, it interacts with molecules (mostly nitrogen and oxygen) in the air. Smaller blue wavelengths are scattered more than other colors because they have shorter wavelengths and interact more frequently with the gas molecules. This scattered blue light from all directions reaches our eyes, making the sky appear blue.","done":true,"done_reason":"stop","context":[3,29473,5083,1117,1040,7980,5813,29572,4,1027,1183,7980,8813,5813,2706,1032,3849,2138,1864,1070,1032,2527,2755,9720,1059,1724,22403,29491,1904,23718,19478,9367,29493,1146,1117,2037,1350,1070,2349,10072,29493,2198,1163,23080,1043,27563,29481,29491,2452,1224,2829,27801,9367,29510,29481,14557,29493,1146,1559,10432,1163,12928,22417,1093,3052,1114,23060,26270,1072,21826,29499,1065,1040,3191,29491,4307,8358,5813,1043,27563,29481,1228,21763,1448,1589,1567,10072,1864,1358,1274,20135,1043,27563,29481,1072,14881,1448,11988,1163,1040,5903,12928,22417,29491,1619,21763,5813,2829,1245,1312,15046,19478,1581,3050,29493,3260,1040,7980,5073,5813,29491],"total_duration":26601465636,"load_duration":5093630,"prompt_eval_count":11,"prompt_eval_duration":563482000,"eval_count":112,"eval_duration":25991022000}
DeepSparse
DeepSparse 是由 Neural Magic 开发的一个高性能推理引擎,专门针对稀疏化(Sparsity)和量化(Quantization)的深度学习模型进行优化。它的核心目标是在 CPU 上实现接近甚至超过 GPU 的推理性能,从而降低硬件成本并提高资源利用率。
- 先设置 deployment.yaml 中的 HF_TOKEN。
$ cd  llm-on-openshift/llm-servers/deepsparse/gitops/
$ grep "value:" deployment.yaml
              value: ''
$ HF_TOKEN=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
$ sed -i s/"value: ''"/"value: '${HF_TOKEN}'"/g deployment.yaml
- 部署运行模型。
oc new-project deepsparse
oc apply -f pvc.yaml
oc apply -f deployment.yaml
oc apply -f service.yaml
oc apply -f route.yaml
- 获得模型的访问地址,然后可用浏览器访问 https://$DEEPSPARSE_ROUTE/docs 查看 API。
$ DEEPSPARSE_ROUTE=$(oc get route deepsparse-text-generation -n deepsparse -ojsonpath={.spec.host})
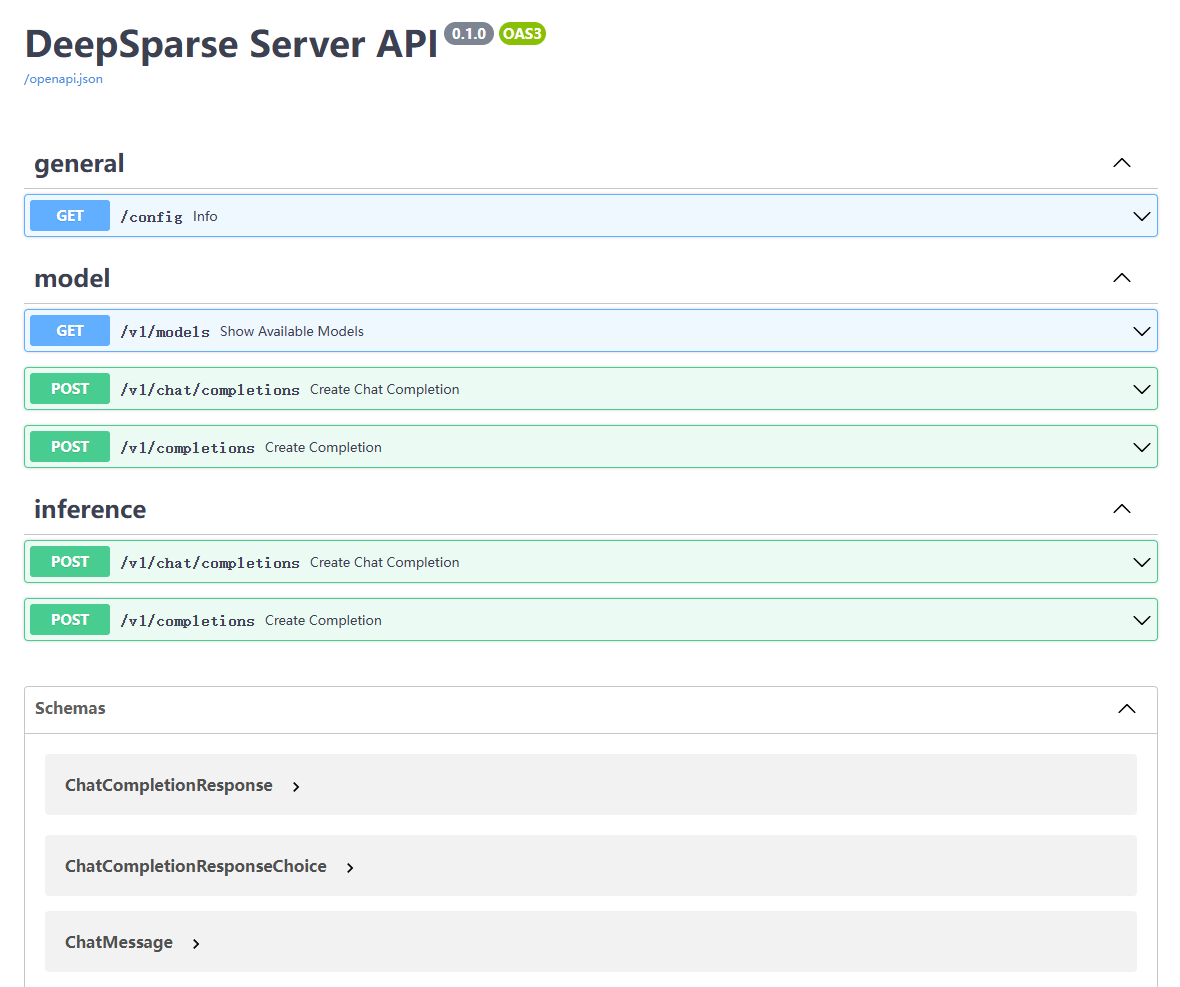
- 获取模型列表。
$ curl -s https://$DEEPSPARSE_ROUTE/v1/models | jq
{
  "object": "list",
  "data": [
    [
      "id",
      "hf:nm-testing/granite-7b-lab-pruned50-quant-ds"
    ],
    [
      "object",
      "model"
    ],
    [
      "created",
      1746258470
    ],
    [
      "owned_by",
      "neuralmagic"
    ],
    [
      "root",
      "hf:nm-testing/granite-7b-lab-pruned50-quant-ds"
    ],
    [
      "parent",
      null
    ],
    [
      "permission",
      [
        {
          "id": "modelperm-229ea00fd9c6400fa50b5cfc27dfa57a",
          "object": "model_permission",
          "created": 1746258470,
          "allow_create_engine": false,
          "allow_sampling": true,
          "allow_logprobs": true,
          "allow_search_indices": false,
          "allow_view": true,
          "allow_fine_tuning": false,
          "organization": "*",
          "group": null,
          "is_blocking": false
        }
      ]
    ]
  ]
}
- 从客户端访问模型。
$ curl -s https://${DEEPSPARSE_ROUTE}/v1/completions -d '{
          "model": "hf:nm-testing/granite-7b-lab-pruned50-quant-ds",
          "prompt": "San Francisco is a",
          "temperature": 0
      }'
在 OpenShift AI 上运行 LLM
先根据《OpenShift AI - 部署 OpenShift AI 环境,运行 AI/ML 应用(视频)》一文完成 OpenShift AI 环境的安装。
安装 MinIO
- 运行以下命令,在 minio 项目中部署 MinIO。
oc new-project minio
oc -n minio apply -f https://raw.githubusercontent.com/rh-demos/llm-serving/refs/heads/main/minio.yaml
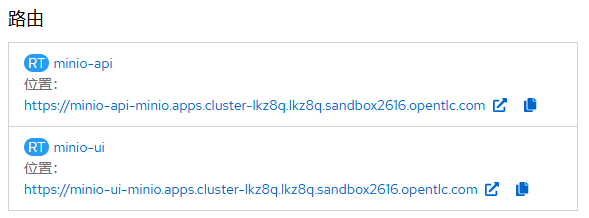
- 用浏览器打开名为 minio-ui 的 Route 对应地址,然后用 minio/your-password 登录 MinIO 控制台。
- 在 Buckets 页面中创建一个名为 models 的 Bucket。

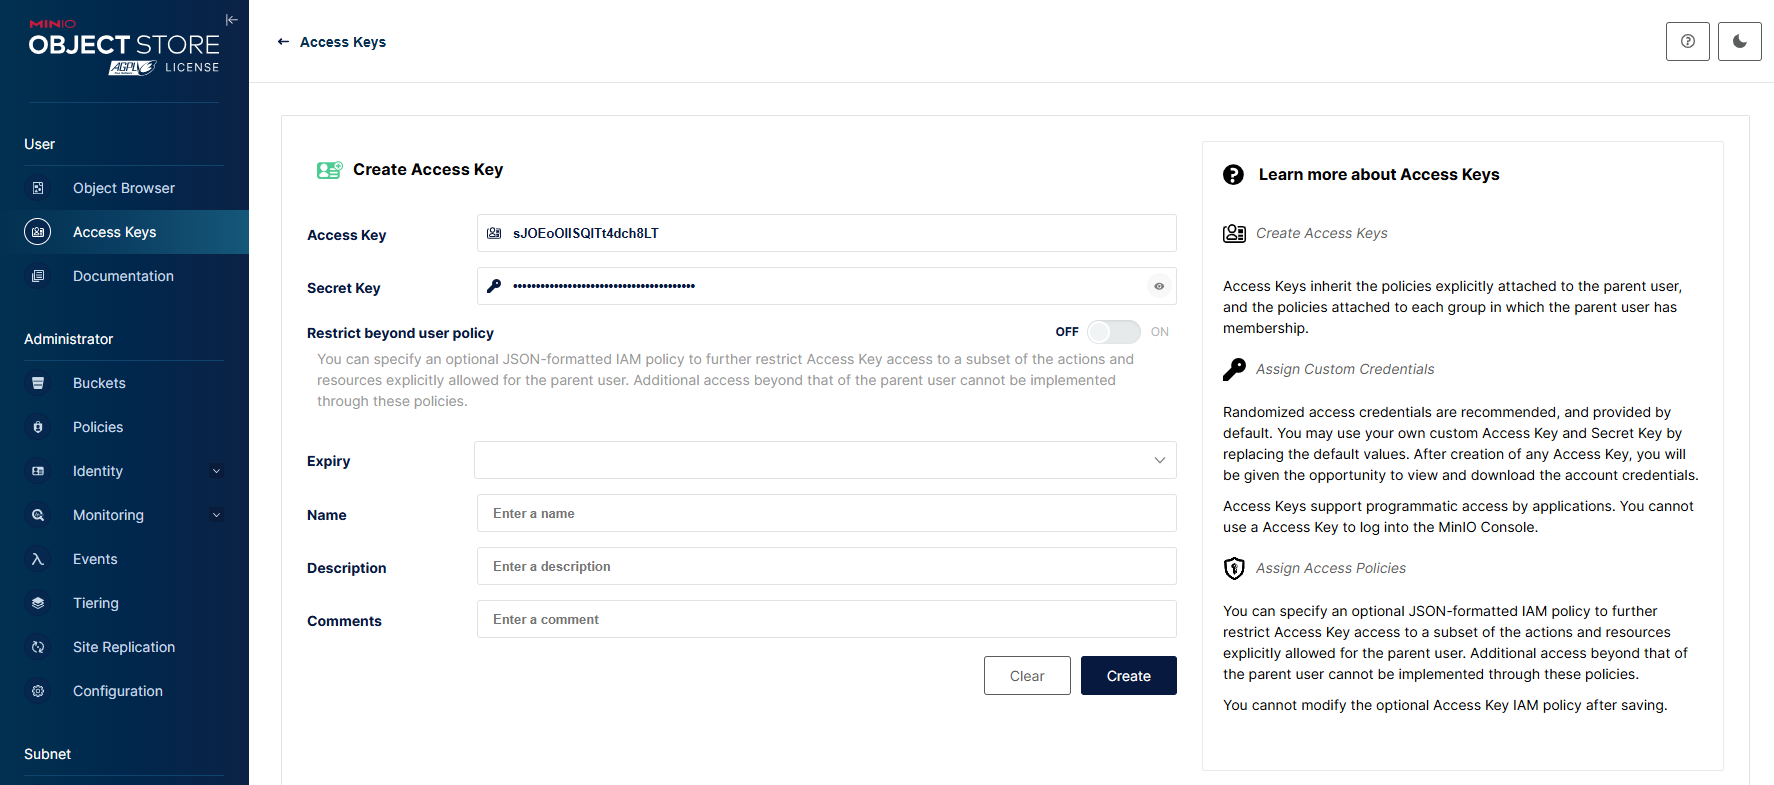
- 在 Access Keys 页面中先点击 Create Access Key,复制生成的 Access Key 和 Secret Key 后再点击 Create。
添加 Model serving runtime
- 在 OpenShift AI 的控制台中进入 Settings -> Serving runtimes 菜单,可以看到当前包含的 Serving runtime。
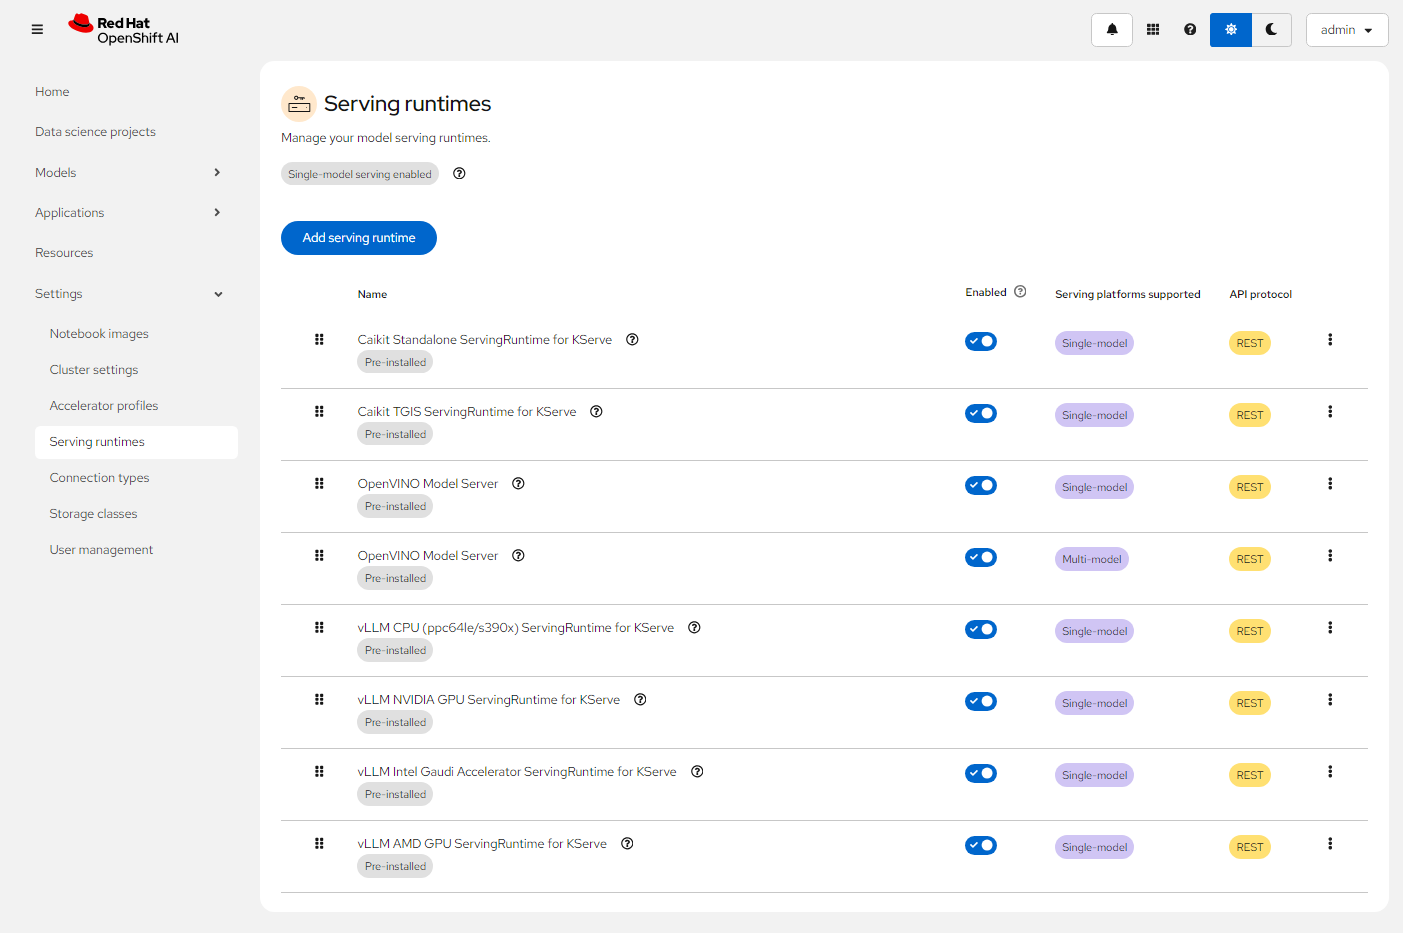
以上 Serving runtime 也可通过执行命令查看对应的 Template 对象。
$ oc get template -n redhat-ods-applications
NAME                                 DESCRIPTION                                                                        PARAMETERS    OBJECTS
caikit-standalone-serving-template   Caikit is an AI toolkit that enables users to manage models through a set of...    0 (all set)   1
caikit-tgis-serving-template         Caikit is an AI toolkit that enables users to manage models through a set of...    0 (all set)   1
kserve-ovms                          OpenVino Model Serving Definition                                                  0 (all set)   1
ovms                                 OpenVino Model Serving Definition                                                  0 (all set)   1
vllm-cpu-runtime-template            vLLM is a high-throughput and memory-efficient inference and serving engine f...   0 (all set)   1
vllm-cuda-runtime-template           vLLM ServingRuntime with CUDA support (for NVIDIA GPUs)                            0 (all set)   1
vllm-gaudi-runtime-template          vLLM ServingRuntime to support Gaudi(for Habana AI processors)                     0 (all set)   1
vllm-multinode-runtime-template      vLLM is a high-throughput and memory-efficient inference and serving engine f...   0 (all set)   1
vllm-rocm-runtime-template           vLLM ServingRuntime to support ROCm (for AMD GPUs)                                 0 (all set)   1
- 点击上图的 Add serving runtime 按钮,然后在下图的下拉框中选择 “Single-model serving platform” 和 “REST”。
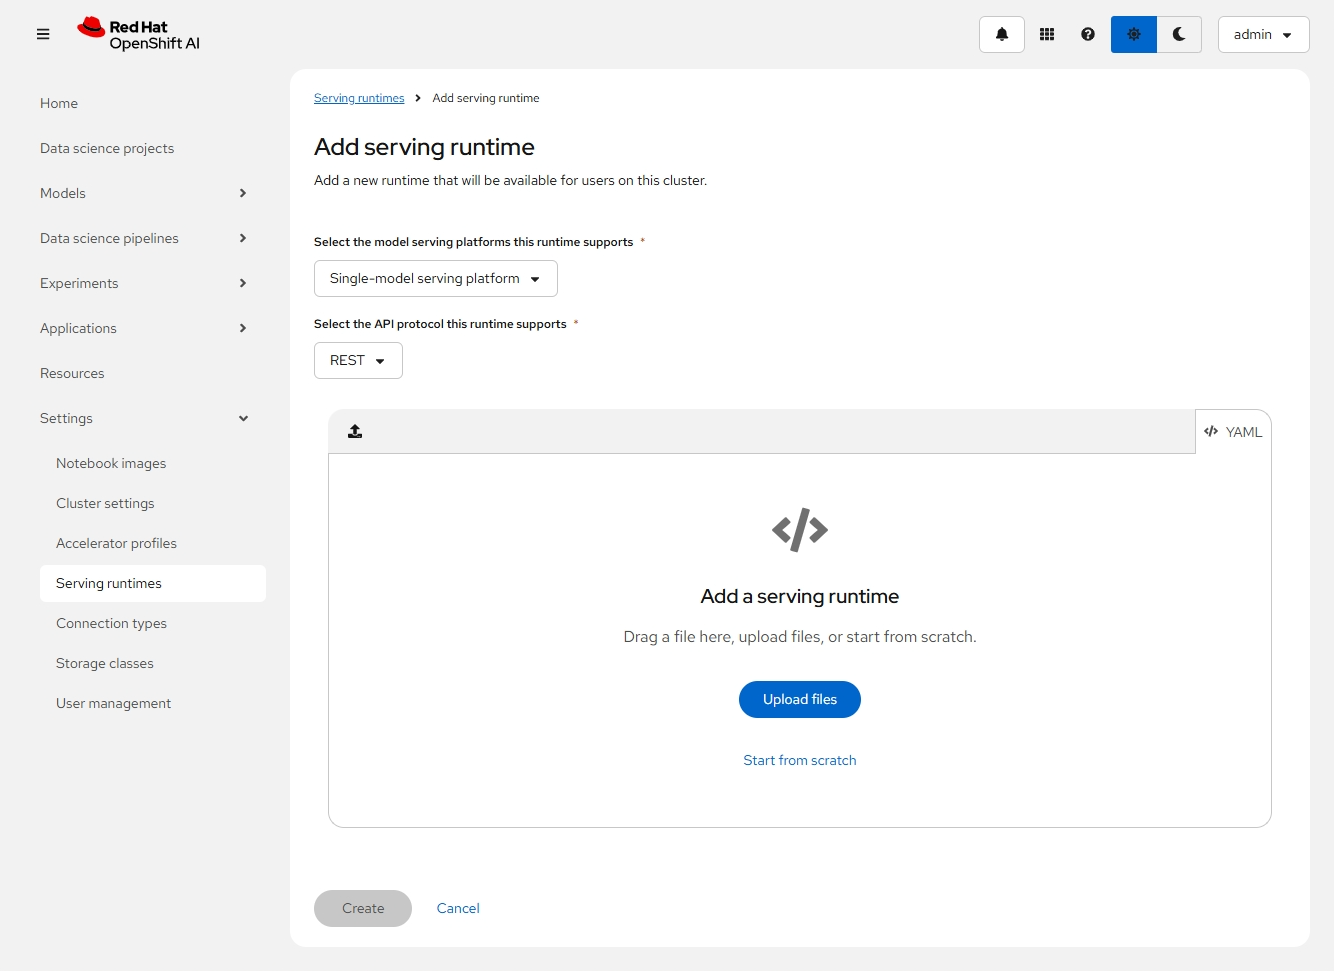
- 点击 Start from scratch 链接,然后在 YAML 中填入以下内容。注意:该 ServingRuntime 使用了支持 vllm 运行环境的镜像。
apiVersion: serving.kserve.io/v1alpha1
kind: ServingRuntime
metadata:
  annotations:
    opendatahub.io/recommended-accelerators: '["nvidia.com/gpu"]'
    openshift.io/display-name: My vLLM ServingRuntime for KServe
  labels:
    opendatahub.io/dashboard: "true"
  name: my-vllm-runtime
spec:
  annotations:
    prometheus.io/path: /metrics
    prometheus.io/port: "8080"
  containers:
    - args:
        - --port=8080
        - --model=/mnt/models
        - --served-model-name={{.Name}}
        - --distributed-executor-backend=mp
        - --max-model-len
        - "8000"
      command:
        - python
        - -m
        - vllm.entrypoints.openai.api_server
      env:
        - name: HF_HOME
          value: /tmp/hf_home
      image: quay.io/modh/vllm:rhoai-2.16-cuda
      name: kserve-container
      ports:
        - containerPort: 8080
          protocol: TCP
  multiModel: false
  supportedModelFormats:
    - autoSelect: true
      name: vLLM
下载模型
以下是通过在 OpenShift AI 的 Workbench 运行 Jupyter Notebook 实现下载模型,并将其上传到由 MinIO 提供的对象存储中。
导入 notebook image
- 在 OpenShift AI 的控制台中进入 Settings -> Notebook images 菜单。
- 根据以下配置导入一个 notebook image。
Image location: quay.io/jonkey/rhods/odh-pytorch-notebook-aria2:2023.2-2
Notebook name: odh-pytorch-notebook-aria2
创建 Workbench
- 在 Data science projects 中创建名为 llm 的项目。
- 进入 llm 项目的 Workbenchs,点击 Create Workbench 按钮。
- 先设置以下基本配置:
Name: my-wb
Notebook Image: odh-pytorch-notebook-aria2
Container size: small - 在 Environment variables 中添加以下基于 Secret 的 Key/Value:
HF_USERNAME: <huggingface username>
HF_TOKEN: <huggingface token>
- 在 Cluster storage 中有以下配置的存储:
Storage name: my-wb-storage
Storage size: 20G
- 在 Connections 中按以下配置创建一个 S3 compatible object storage - v1 类型的 Connection。
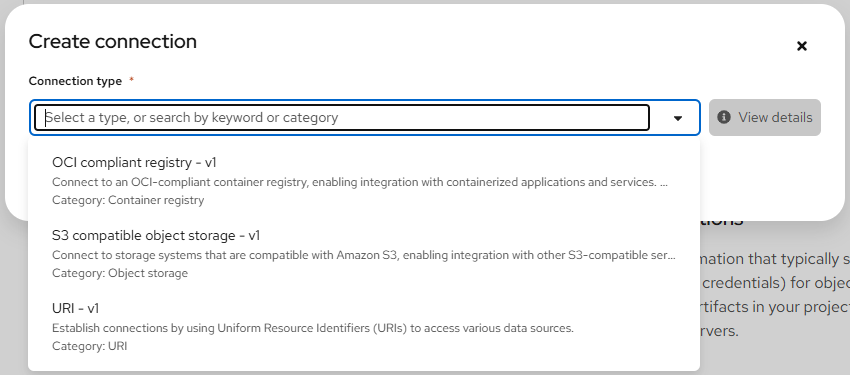
Connection name: models
Access key: <MinIO Access key>
Secret key: <MinIO Secret key>
Endpoint: http://minio-service.minio.svc.cluster.local:9000
Region: none
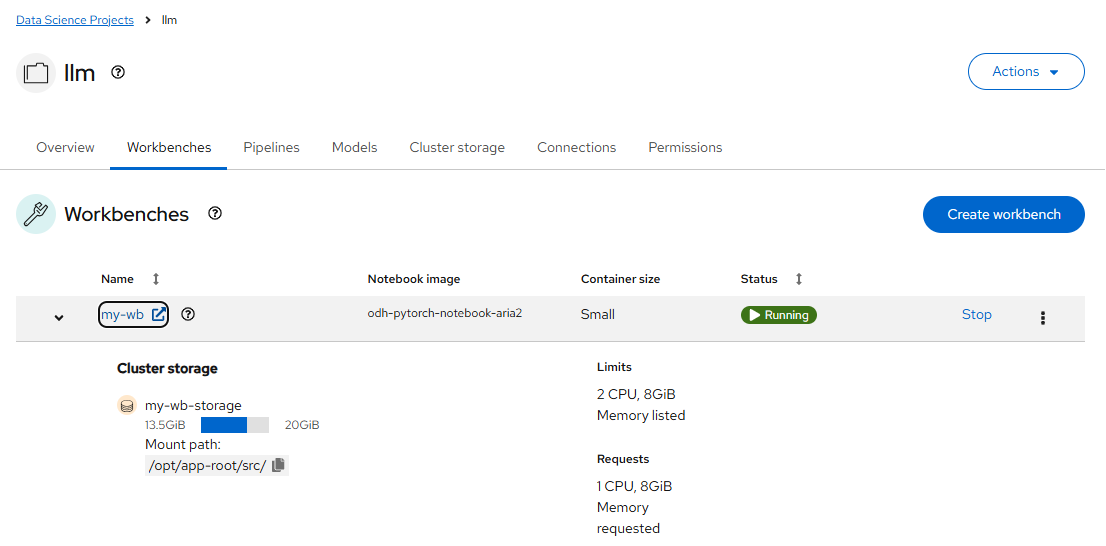
Bucket: models - 最后 Create Workbench。在创建好后可以看到它变为 Running 状态。此时点击 my-wb 链接即可进入 Jupyter Notebook 环境。
下载 Model 文件
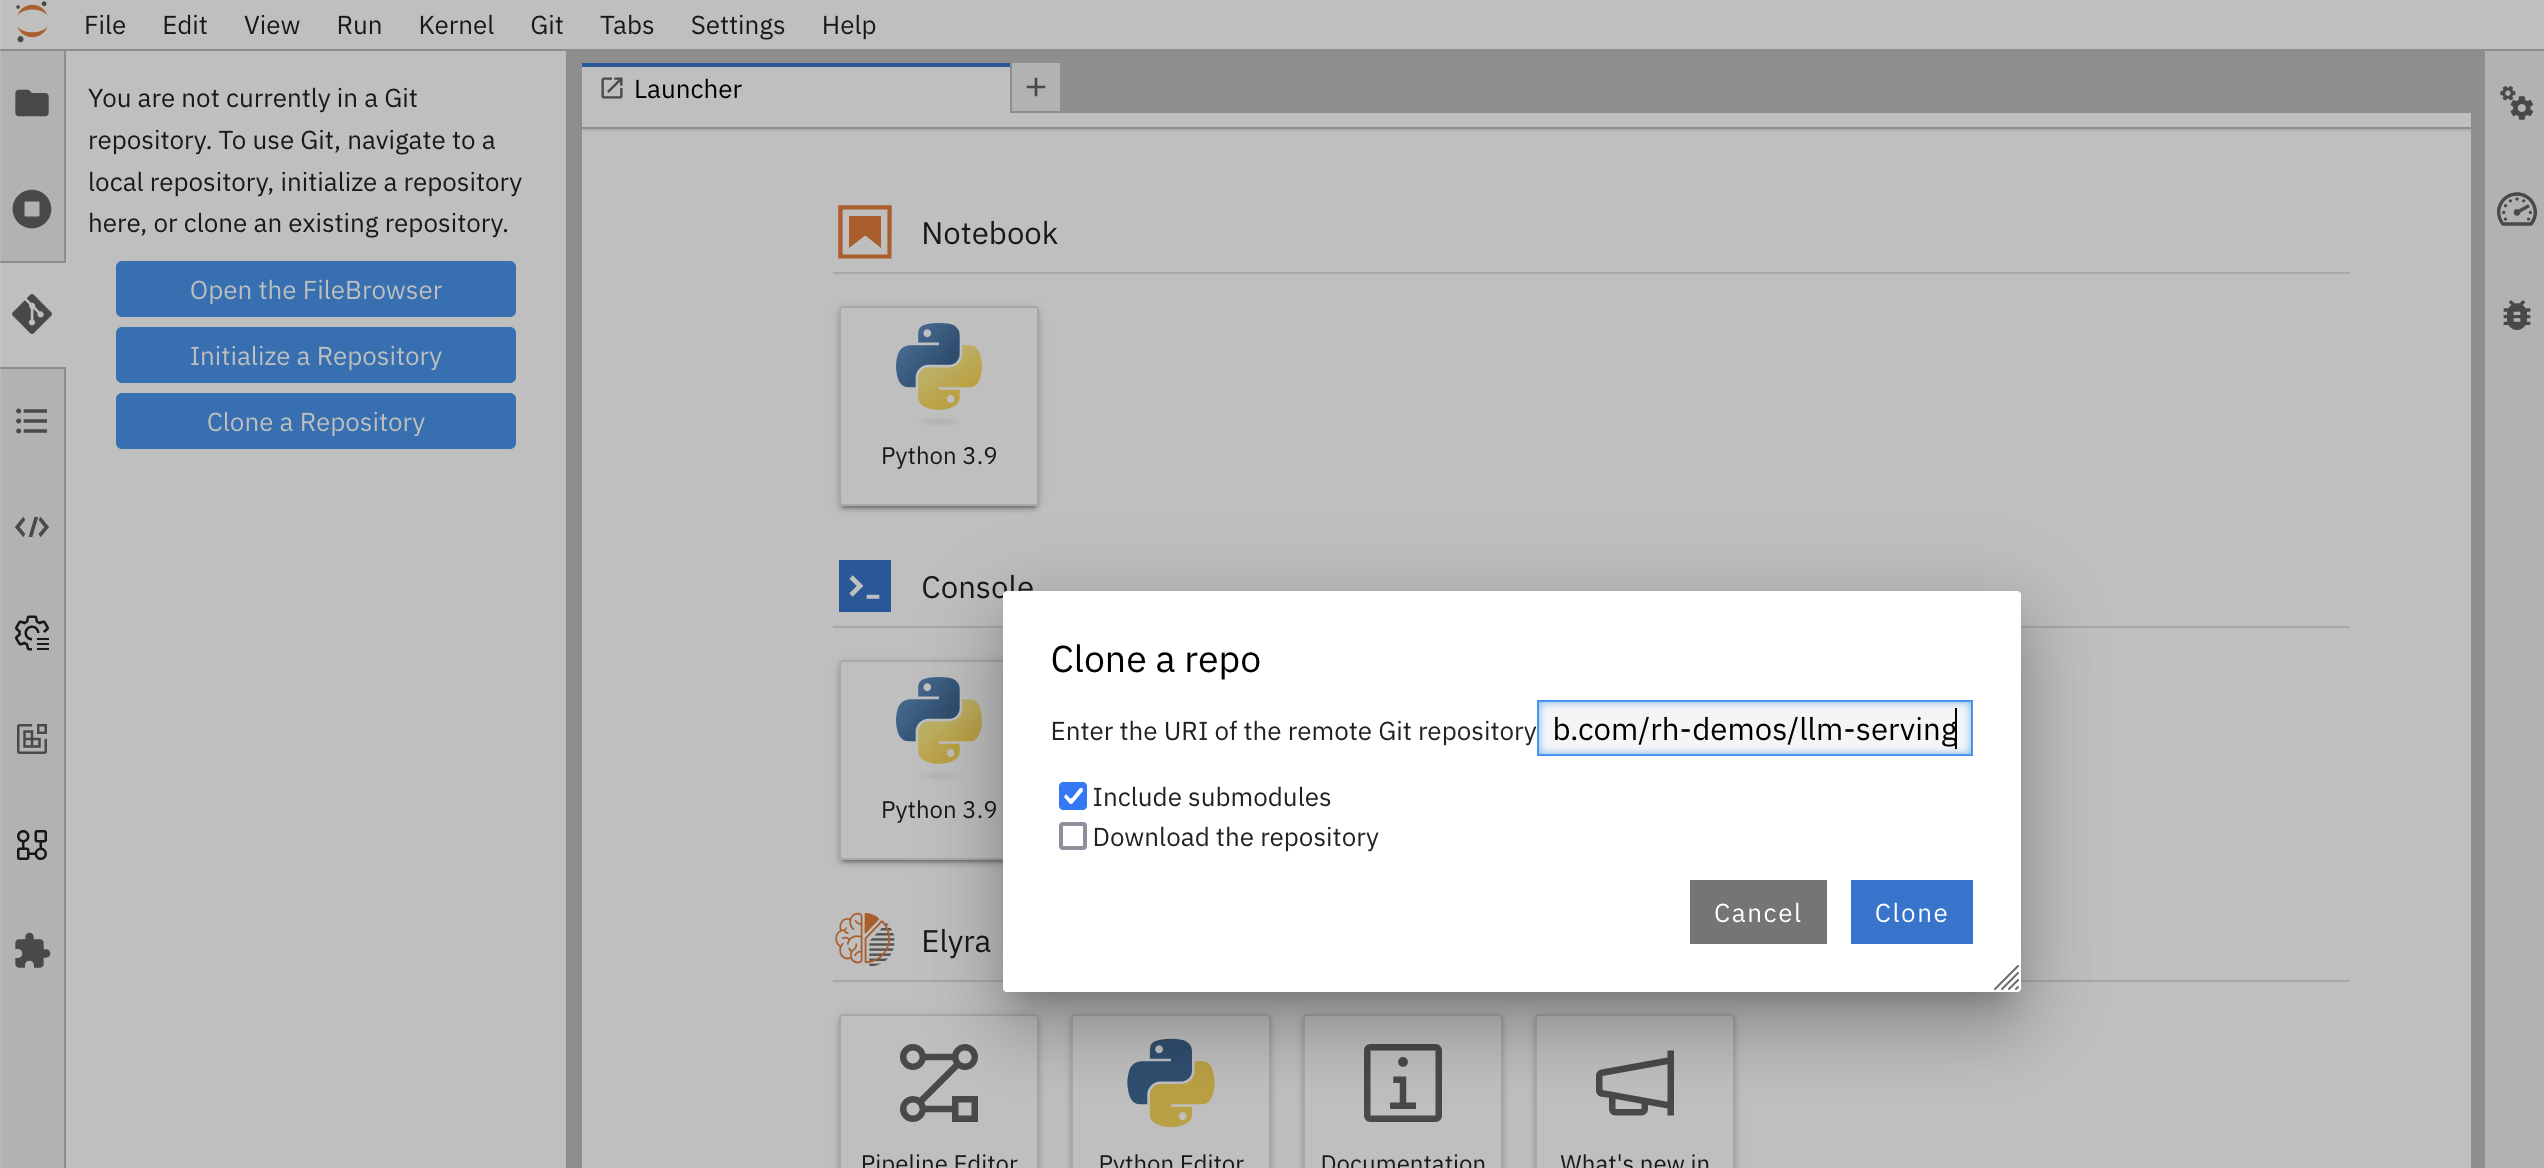
- 在 Jupyter Notebook 界面中先点击 git 图标,然后点击 Clone a Repository 按钮,再在 Clone a repo 框中填入 https://github.com/rh-demos/llm-serving,最后点击 Clone 按钮。
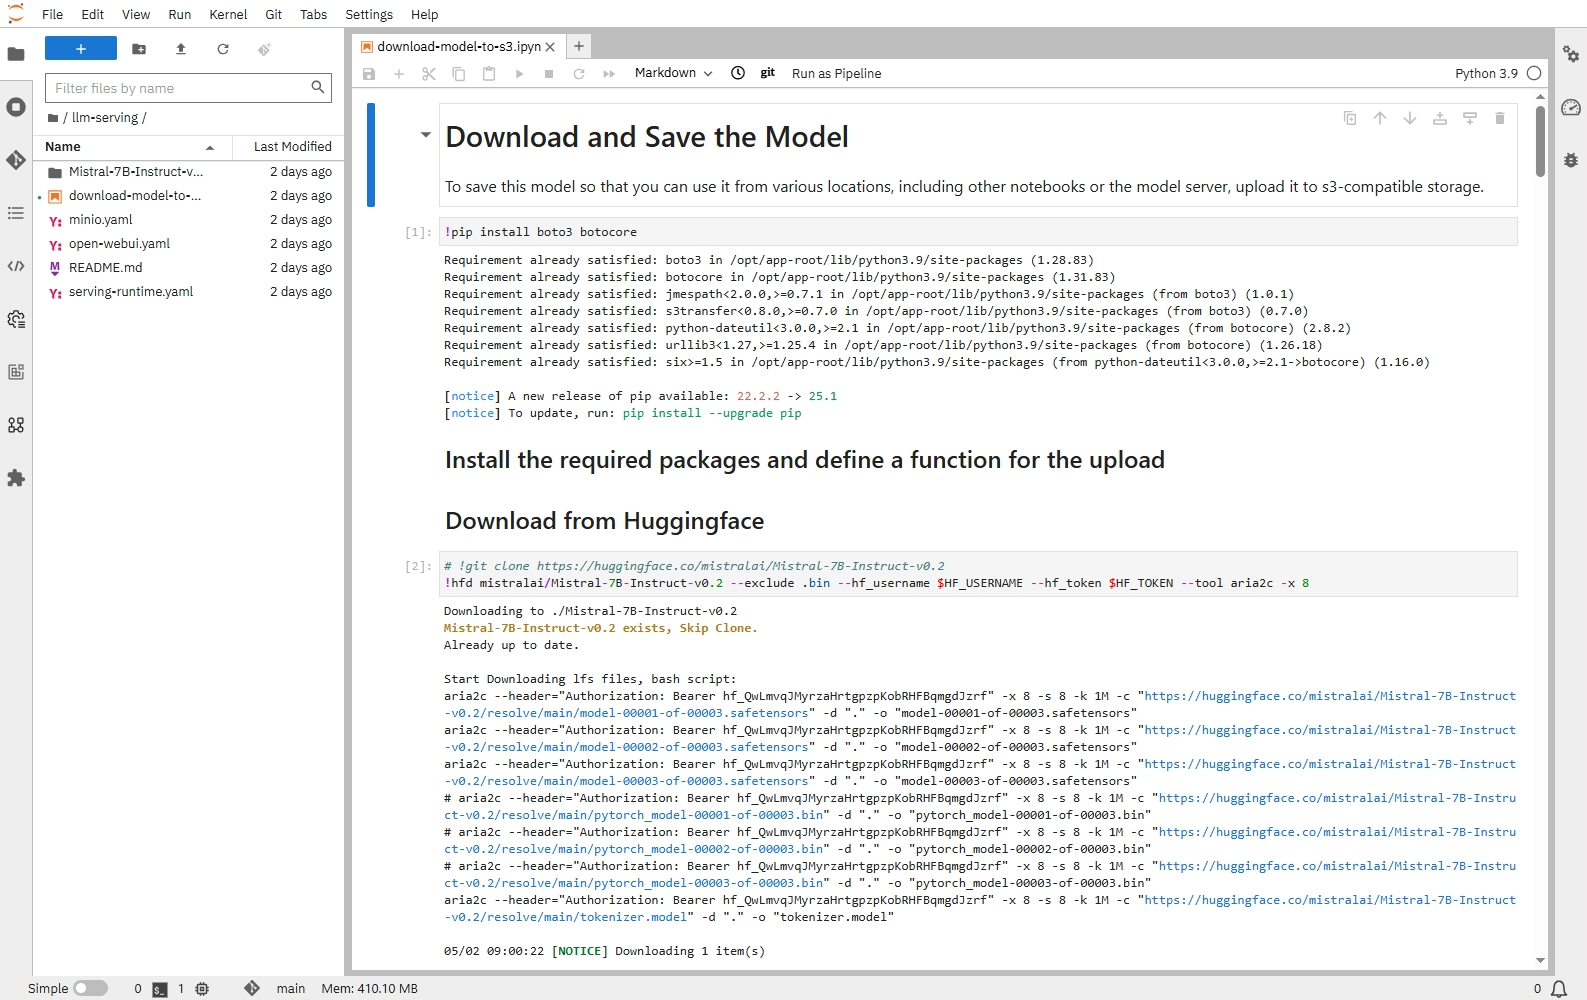
- 打开 llm-serving 中的 download-model-to-s3.ipyn 文件,然后点击运行图标。它先下载 mistralai/Mistral-7B-Instruct-v0.2 模型所包含的文件,然后将模型文件传到 MinIO 对象存储中。注意:也可下载其他模型,例如 deepseek-ai/DeepSeek-R1-Distill-Qwen-1.5B。
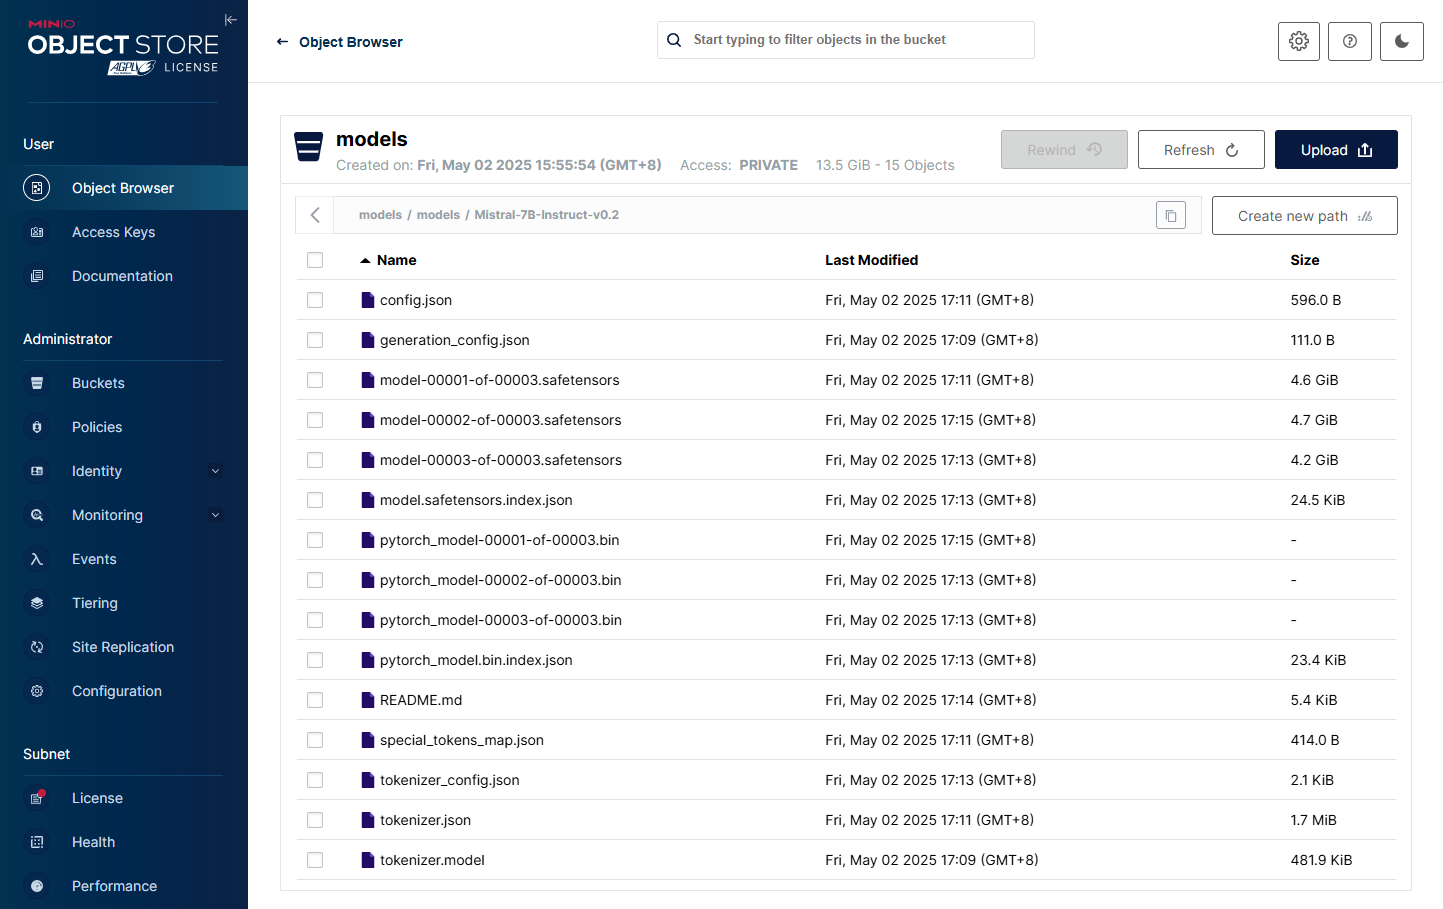
- 在执行成功后确认在 MinIO 的 models/models/Mistral-7B-Instruct-v0.2 中已包含模型文件。
部署运行模型
- 在 OpenShift AI 控制台进入 llm 项目的 Models。
- 先选择 Single-mode serving,然后根据以下配置部署模型。
Model deployment name: mistral
Serving runtime: My vLLM ServingRuntime for KServe
Model framework: vLLM
Deployment mode: Standard
Number of model server replicas to deploy: 1
Model server size: Custom
CPUs requested: 2
CPU limit: 4
Memory requested: 8Gi
Memory limit: 16Gi
Accelerator: NV GPU
Number of accelerators: 1
Make deployed models available through an external route: checked
Require token authentication: checked
Existing connection: checked
Connection: models
Path: models/Mistral-7B-Instruct-v0.2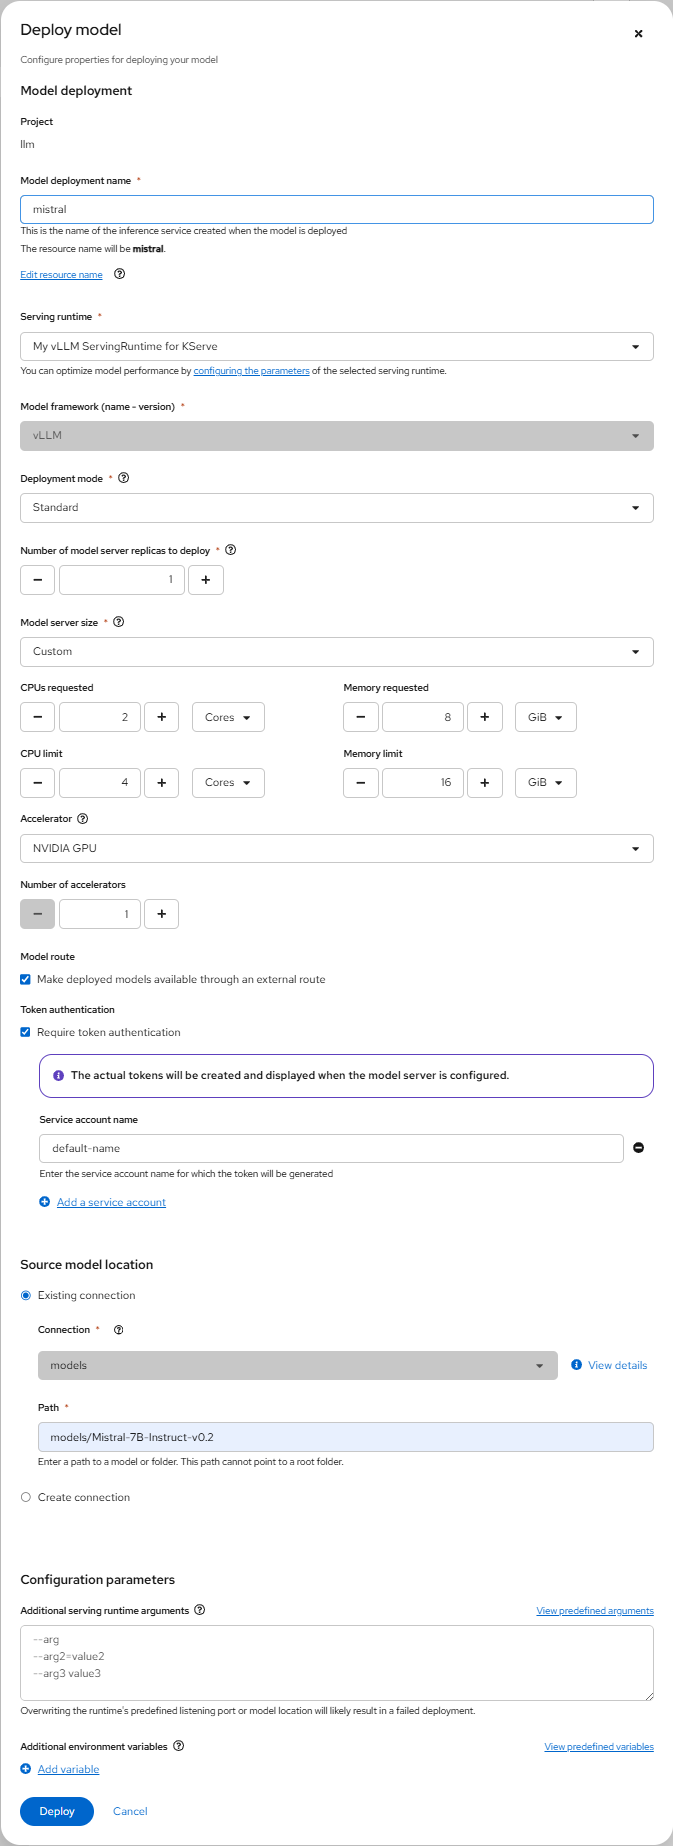
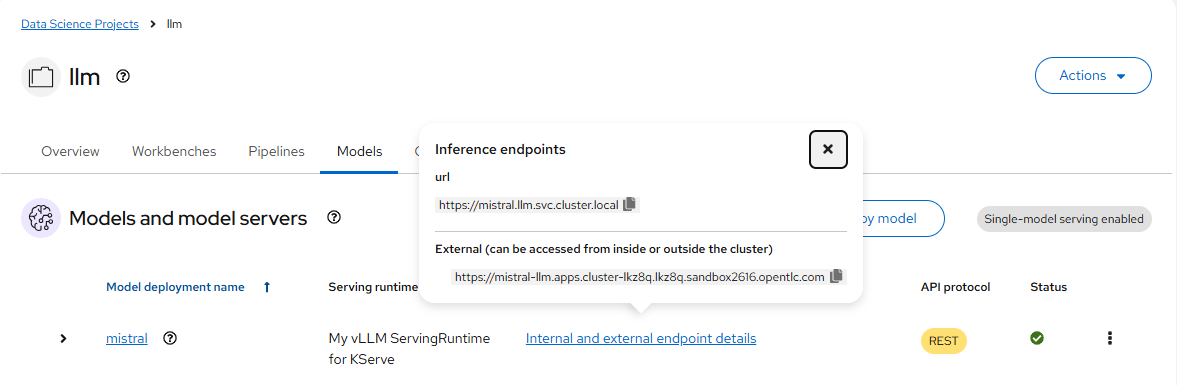
- 在 mistral 模型部署好后,它的 Status 为绿色。此时点击 Internal and external endpoint details 链接后会弹窗中显示 Inference endpoints。
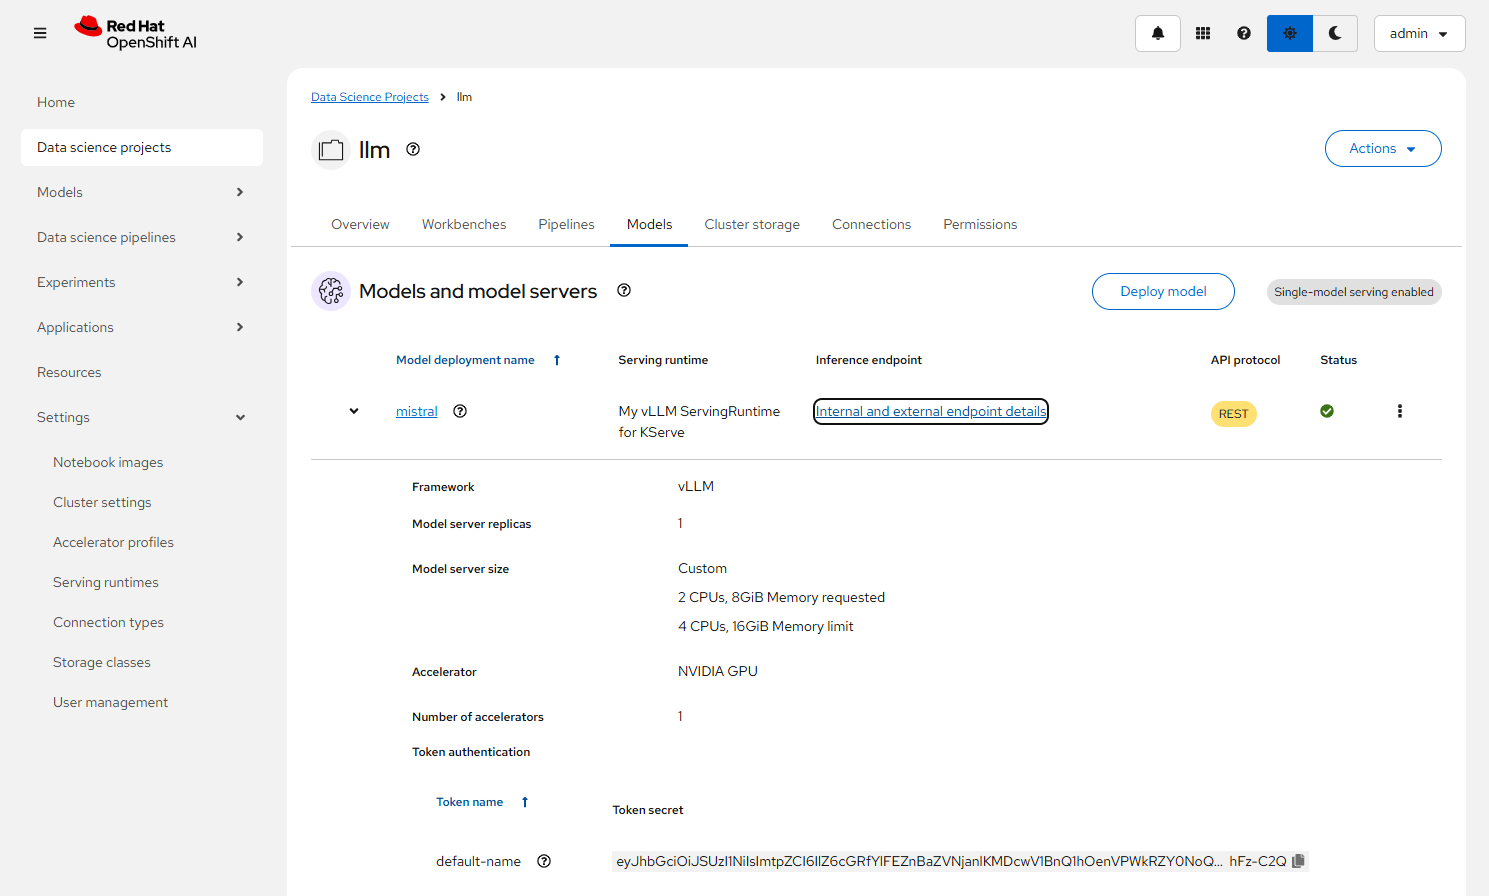
- 展开 mistral 模型,可以在 Token autoentication 的 default-name 中看到访问模型所需的 Token。该 Token 也可通过以下命令获得。
oc get secret default-name-mistral-sa -n llm -ojsonpath={.data.token} | base64 -d
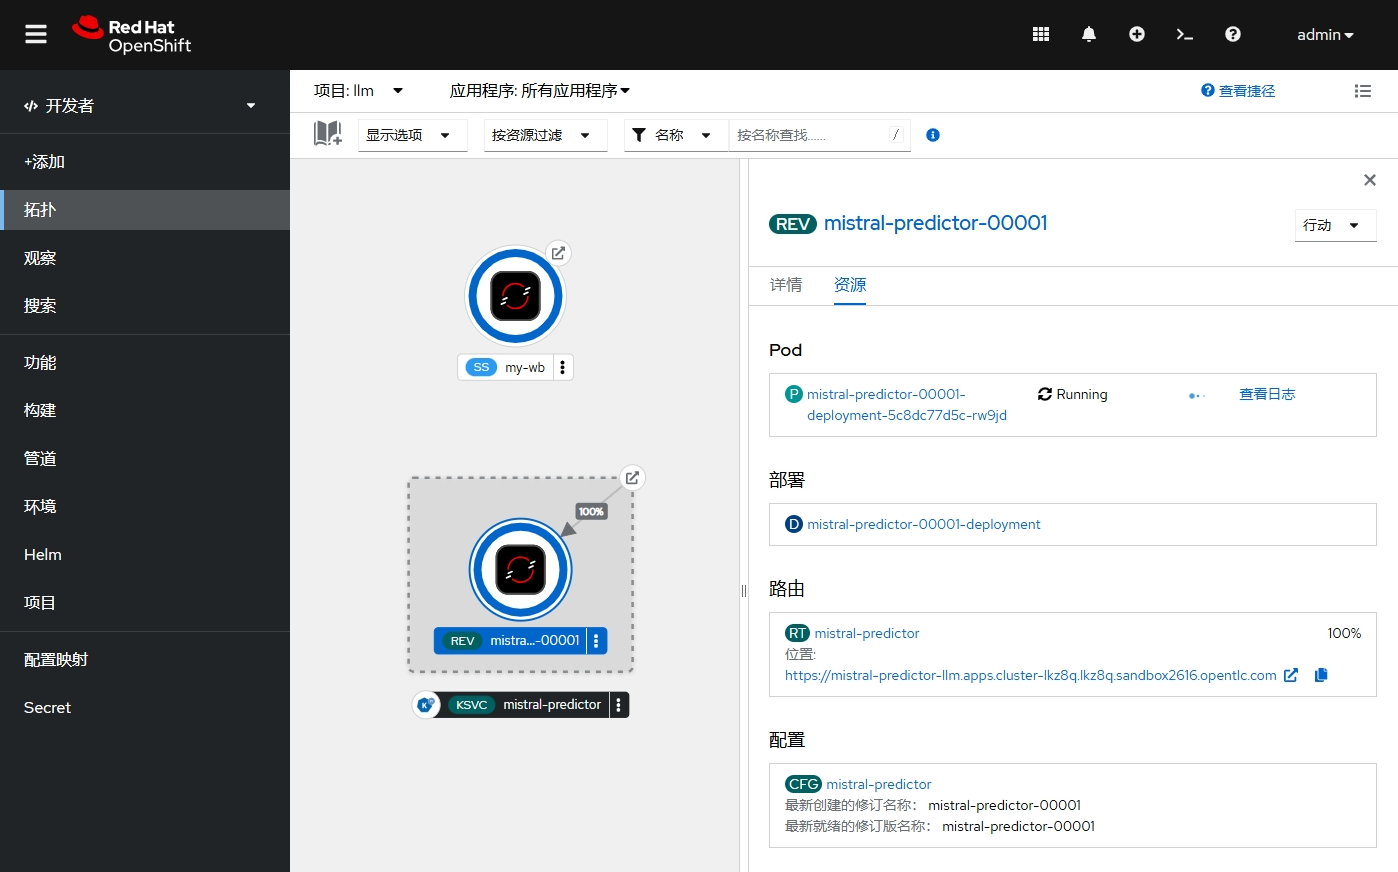
- 还可在 OpenShift 控制台中查看 llm 项目的拓扑视图。
- 查看 inferenceservice 对象。缺省在使用 Serverless 运行模型的时候,maxReplicas 和 minReplicas 都为 1,但可以手动修改。
$ oc get inferenceservice mistral -ojsonpath={.spec.predictor} | jq
{
  "maxReplicas": 1,
  "minReplicas": 1,
  "model": {
    "modelFormat": {
      "name": "vLLM"
    },
    "name": "",
    "resources": {
      "limits": {
        "cpu": "4",
        "memory": "16Gi",
        "nvidia.com/gpu": "1"
      },
      "requests": {
        "cpu": "2",
        "memory": "8Gi",
        "nvidia.com/gpu": "1"
      }
    },
    "runtime": "deepseek-r1-distill-qwen-15b",
    "storage": {
      "key": "models",
      "path": "models/DeepSeek-R1-Distill-Qwen-1.5B"
    }
  },
  "tolerations": [
    {
      "effect": "NoSchedule",
      "key": "nvidia.com/gpu",
      "operator": "Exists"
    }
  ]
}
访问模型
- 使用访问模型的 Token,创建 llm-client.py 文件。
$ cat > llm-client.py << EOF
from openai import OpenAI
openai_api_base = "$(oc get inferenceservice mistral -n llm -ojsonpath={.status.url})/v1"
openai_api_key = "YOUR TOEKN"

client = OpenAI(
    api_key=openai_api_key,
    base_url=openai_api_base,
)

chat_response = client.chat.completions.create(
    model="mistral",
    messages=[
        {"role": "system", "content": "You are a helpful assistant."},
        {"role": "user", "content": "Tell me a joke."},
    ]
)
print("Chat response:", chat_response)
EOF
- 运行 vllm-client.py 文件,确认模型返回的结果。
$ python3 llm-client.py
Chat response: ChatCompletion(id='chat-0e408cfee52441cdb9096d102b8496a1', choices=[Choice(finish_reason='stop', index=0, logprobs=None, message=ChatCompletionMessage(content=" Of course, I'd be happy to share a joke with you! Here's one that's been making the rounds:\n\nWhy don't scientists trust atoms?\n\nBecause they make up everything! \n\nI hope you found that amusing. Do you have any other requests or questions?", refusal=None, role='assistant', annotations=None, audio=None, function_call=None, tool_calls=[]), stop_reason=None)], created=1746327886, model='mistral', object='chat.completion', service_tier=None, system_fingerprint=None, usage=CompletionUsage(completion_tokens=66, prompt_tokens=21, total_tokens=87, completion_tokens_details=None, prompt_tokens_details=None), prompt_logprobs=None)
- 另外,如为 deepseek-ai/DeepSeek-R1-Distill-Qwen-1.5B 模型,可用以下方式调用。
$ LLM_ROUTE=$(oc get inferenceservice deepseek-r1-distill-qwen-15b -n llm -ojsonpath={.status.url})
$ TOKEN=$(oc get secret default-name-deepseek-r1-distill-qwen-15b-sa -n llm -ojsonpath={.data.token} | base64 -d)
$ curl -s $LLM_ROUTE/v1/models -H "Authorization: Bearer $TOKEN" | jq .data[].id	# 找到模型 id,这里是 deepseek-r1-distill-qwen-15b
$ curl -X POST "$LLM_ROUTE/v1/chat/completions" \
  -H "Authorization: Bearer $TOKEN" \
  -H "Content-Type: application/json" \
  -d '{
    "model": "deepseek-r1-distill-qwen-15b",
    "messages": [{"role": "user", "content": "What are some fun things to do in New York?"}],
    "max_tokens": 200
  }'
注意:在以上 API 中使用的 model 为下图的 Resource name:deepseek-r1-distill-qwen-15b,而非显示名 DeepSeek-R1-Distill-Qwen-1.5B。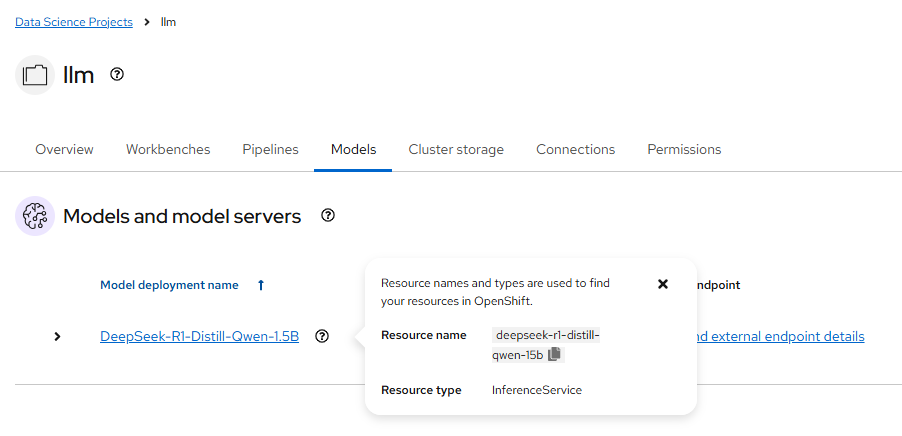
参考
https://github.com/rh-aiservices-bu/llm-on-openshift/blob/main/llm-servers/vllm/gpu/README.md
https://docs.vllm.ai/en/latest/getting_started/quickstart.html#openai-compatible-server
https://github.com/rh-demos/ai-assisted-development/blob/main/1-deploy-llm.md
https://github.com/ollama/ollama/blob/main/docs/api.md#generate-a-chat-completion

有“AI”的1024 = 2048,欢迎大家加入2048 AI社区
更多推荐

 30
30 0
0- 0


 已为社区贡献7条内容

所有评论(0)