仓颉并发编程实战:协程与异步编程模型
·
目录
摘要
在现代应用开发中,高效的并发处理能力至关重要。仓颉语言提供了先进的协程(Coroutine)机制和异步编程模型,使开发者能够以同步代码的简洁性编写异步逻辑,同时获得出色的性能表现。本文深入探讨仓颉的协程实现原理、async/await编程模式、Channel通信机制以及并发安全最佳实践,通过丰富的代码示例和架构设计,帮助开发者构建高性能、高并发的HarmonyOS应用。
一、协程机制深度解析
1.1 协程 vs 线程:概念对比
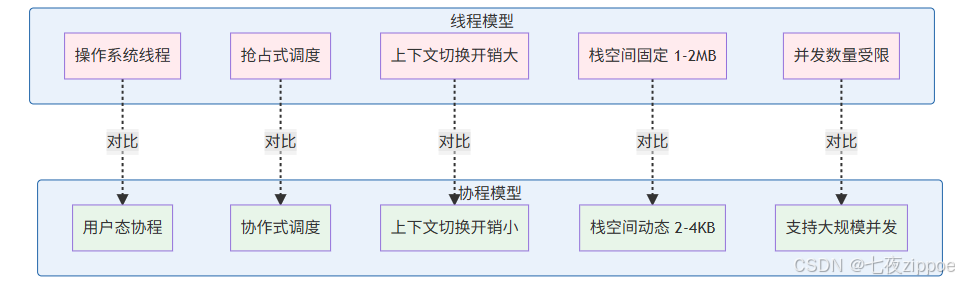
核心差异对比表:
| 维度 | 线程(Thread) | 协程(Coroutine) | 说明 |
|---|---|---|---|
| 调度方式 | 操作系统抢占式 | 用户态协作式 | 协程由程序控制 |
| 切换开销 | 1-2μs | 0.1-0.2μs | 协程快10倍+ |
| 内存占用 | 1-2MB栈 | 2-4KB栈 | 协程轻量500倍+ |
| 并发数量 | 数百~数千 | 数万~数百万 | 协程支持大规模 |
| 通信方式 | 共享内存+锁 | Channel消息传递 | 协程更安全 |
| 适用场景 | CPU密集型 | I/O密集型 | 各有所长 |
1.2 仓颉协程的实现原理
import std.concurrent.coroutine.*

// ========== 协程生命周期 ==========
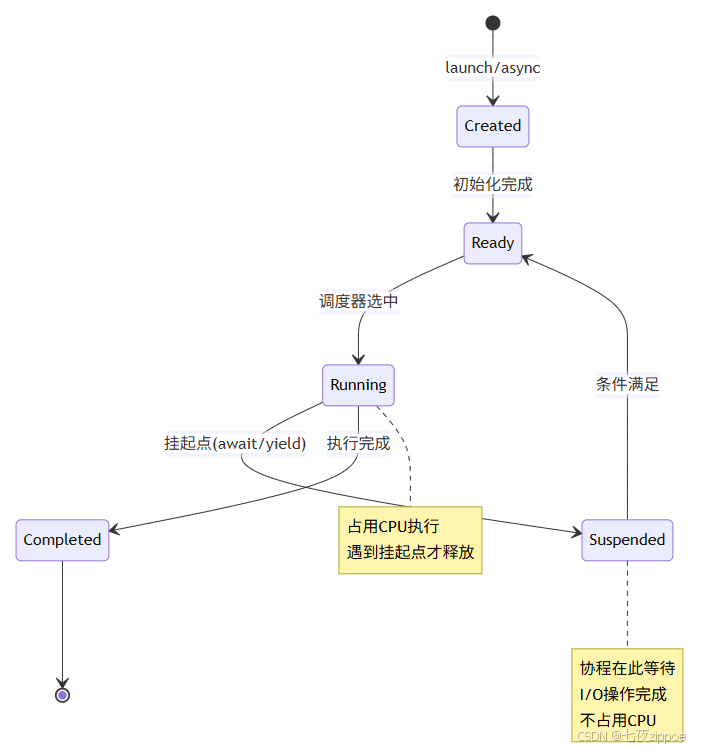
// ========== 协程基础示例 ==========
import std.concurrent.coroutine.*

func demonstrateCoroutineBasics() {
    println("Main: Start")

    // 启动协程
    let job = launch {
        println("Coroutine: Start")
        delay(Duration.seconds(1))  // 挂起1秒
        println("Coroutine: After delay")
    }

    println("Main: Launched coroutine")

    // 等待协程完成
    job.join()
    println("Main: End")
}

// 输出顺序:
// Main: Start
// Main: Launched coroutine
// Coroutine: Start
// (等待1秒)
// Coroutine: After delay
// Main: End
1.3 协程作用域(CoroutineScope)
// ========== 结构化并发 ==========
import std.concurrent.coroutine.*

// 自定义协程作用域
class ViewModelScope: CoroutineScope {
    private job: Job

    public init() {
        this.job = Job()
    }

    // 清理所有协程
    public func cancel() {
        this.job.cancel()
    }
}

func structuredConcurrency() {
    let scope = ViewModelScope()

    // 在作用域内启动协程
    scope.launch {
        println("Task 1 started")
        delay(Duration.seconds(1))
        println("Task 1 completed")
    }

    scope.launch {
        println("Task 2 started")
        delay(Duration.seconds(2))
        println("Task 2 completed")
    }

    // 取消所有协程
    Thread.sleep(Duration.milliseconds(1500))
    scope.cancel()  // Task 2 将被取消
}

// ========== 父子协程关系 ==========
func parentChildCoroutines() {
    launch {
        println("Parent: Start")

        // 子协程1
        launch {
            delay(Duration.seconds(1))
            println("Child 1: Completed")
        }

        // 子协程2
        launch {
            delay(Duration.seconds(2))
            println("Child 2: Completed")
        }

        println("Parent: Waiting for children")
        // 父协程会等待所有子协程完成
    }.join()

    println("All coroutines completed")
}
结构化并发优势:
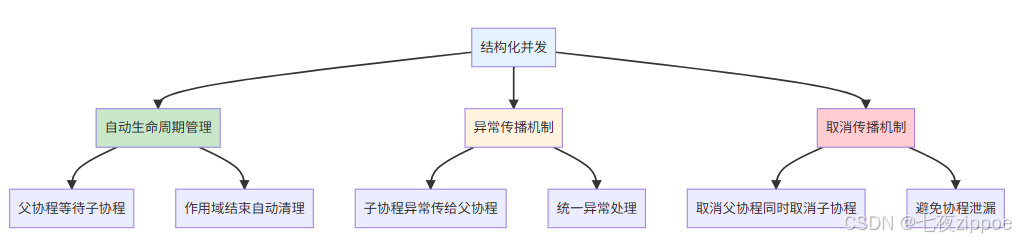
二、async/await异步编程模式
2.1 async/await基础语法
import std.concurrent.coroutine.*

// ========== async 返回 Deferred ==========
func asyncBasics(): Deferred<Int32> {
    return async {
        println("Computing...")
        delay(Duration.seconds(1))
        return 42
    }
}

func testAsync() {
    launch {
        println("Start")

        // 启动异步任务
        let deferred = asyncBasics()

        println("Doing other work...")

        // 等待结果
        let result = deferred.await()
        println("Result: ${result}")
    }.join()
}

// ========== 多个异步任务并行 ==========
func parallelAsync() {
    launch {
        // 并行启动多个任务
        let task1 = async { computeTask1() }
        let task2 = async { computeTask2() }
        let task3 = async { computeTask3() }

        // 等待所有结果
        let result1 = task1.await()
        let result2 = task2.await()
        let result3 = task3.await()

        println("Results: ${result1}, ${result2}, ${result3}")
    }.join()
}

func computeTask1(): Int32 {
    delay(Duration.seconds(1))
    return 100
}

func computeTask2(): Int32 {
    delay(Duration.seconds(2))
    return 200
}

func computeTask3(): Int32 {
    delay(Duration.seconds(1))
    return 300
}
2.2 异步函数定义
// ========== 使用 async 关键字定义异步函数 ==========
async func fetchUserData(userId: Int32): Result<User, Error> {
    try {
        // 模拟网络请求
        delay(Duration.seconds(1))

        if userId <= 0 {
            return Err(Error("Invalid user ID"))
        }

        let user = User(
            id: userId,
            name: "User${userId}",
            email: "user${userId}@example.com"
        )

        return Ok(user)
    } catch (e: Exception) {
        return Err(Error(e.message))
    }
}

async func fetchUserPosts(userId: Int32): Result<ArrayList<Post>, Error> {
    delay(Duration.seconds(2))

    let posts = ArrayList<Post>([
        Post(id: 1, title: "Post 1", content: "Content 1"),
        Post(id: 2, title: "Post 2", content: "Content 2")
    ])

    return Ok(posts)
}

// ========== 组合异步函数 ==========
async func getUserProfile(userId: Int32): Result<UserProfile, Error> {
    // 串行执行
    let userResult = await fetchUserData(userId)
    let user = match userResult {
        case Ok(u) => u
        case Err(e) => return Err(e)
    }

    let postsResult = await fetchUserPosts(userId)
    let posts = match postsResult {
        case Ok(p) => p
        case Err(e) => return Err(e)
    }

    return Ok(UserProfile(user: user, posts: posts))
}

// ========== 并行优化版本 ==========
async func getUserProfileParallel(userId: Int32): Result<UserProfile, Error> {
    // 并行执行
    let userDeferred = async { fetchUserData(userId) }
    let postsDeferred = async { fetchUserPosts(userId) }

    let userResult = await userDeferred
    let postsResult = await postsDeferred

    let user = match userResult {
        case Ok(u) => u
        case Err(e) => return Err(e)
    }

    let posts = match postsResult {
        case Ok(p) => p
        case Err(e) => return Err(e)
    }

    return Ok(UserProfile(user: user, posts: posts))
}

// ========== 数据结构定义 ==========
struct User {
    id: Int32
    name: String
    email: String
}

struct Post {
    id: Int32
    title: String
    content: String
}

struct UserProfile {
    user: User
    posts: ArrayList<Post>
}

struct Error {
    message: String
}
串行 vs 并行性能对比:
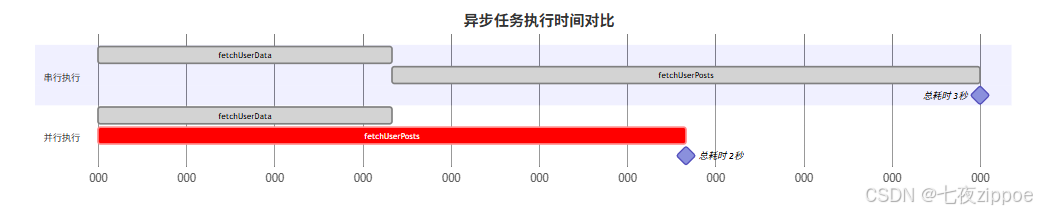
2.3 异常处理与超时控制
import std.concurrent.coroutine.*

// ========== 异步异常处理 ==========
async func fetchDataWithErrorHandling(): Result<String, Error> {
    try {
        let data = await riskyOperation()
        return Ok(data)
    } catch (e: NetworkError) {
        println("Network error: ${e.message}")
        return Err(Error("Network failed"))
    } catch (e: TimeoutError) {
        println("Timeout error: ${e.message}")
        return Err(Error("Request timeout"))
    } catch (e: Exception) {
        println("Unknown error: ${e.message}")
        return Err(Error("Unknown error"))
    }
}

async func riskyOperation(): String {
    delay(Duration.seconds(1))
    // 模拟随机错误
    if Random.nextInt(2) == 0 {
        throw NetworkError("Connection failed")
    }
    return "Success data"
}

// ========== 超时控制 ==========
async func fetchWithTimeout(timeoutMs: Int64): Result<String, Error> {
    return withTimeout(Duration.milliseconds(timeoutMs)) {
        await slowOperation()
    }
}

async func slowOperation(): String {
    delay(Duration.seconds(5))
    return "Slow data"
}

func testTimeout() {
    launch {
        // 2秒超时
        let result = await fetchWithTimeout(2000)

        match result {
            case Ok(data) => println("Got data: ${data}")
            case Err(e) => println("Timeout: ${e.message}")
        }
    }.join()
}

// ========== 重试机制 ==========
async func fetchWithRetry(
    maxRetries: Int32,
    delayMs: Int64
): Result<String, Error> {
    var attempts = 0

    while attempts < maxRetries {
        try {
            let data = await riskyOperation()
            return Ok(data)
        } catch (e: Exception) {
            attempts += 1
            if attempts >= maxRetries {
                return Err(Error("Max retries exceeded"))
            }

            println("Retry ${attempts}/${maxRetries} after error: ${e.message}")
            delay(Duration.milliseconds(delayMs))
        }
    }

    return Err(Error("Failed after retries"))
}

func testRetry() {
    launch {
        let result = await fetchWithRetry(maxRetries: 3, delayMs: 1000)

        match result {
            case Ok(data) => println("Success: ${data}")
            case Err(e) => println("Failed: ${e.message}")
        }
    }.join()
}
三、Channel通信机制
3.1 Channel基础概念
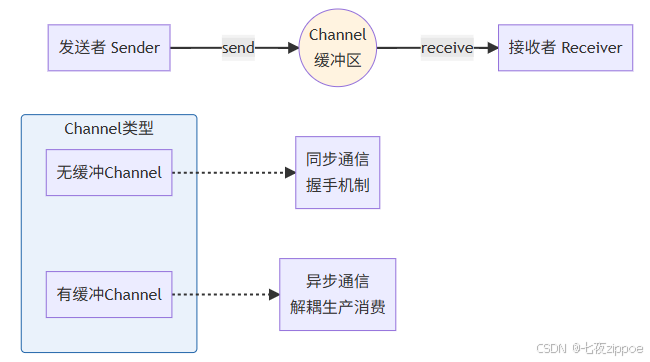
import std.concurrent.channel.*

// ========== 创建Channel ==========
func channelBasics() {
    // 无缓冲Channel (容量=0)
    let channel1 = Channel<Int32>()

    // 有缓冲Channel (容量=10)
    let channel2 = Channel<String>(capacity: 10)

    // 无限容量Channel
    let channel3 = Channel<Bool>(capacity: Channel.UNLIMITED)
}

// ========== 基本发送接收 ==========
func sendReceiveBasics() {
    let channel = Channel<Int32>(capacity: 5)

    // 发送者协程
    launch {
        for i in 0..<10 {
            channel.send(i)
            println("Sent: ${i}")
        }
        channel.close()  // 关闭通道
    }

    // 接收者协程
    launch {
        for value in channel {
            println("Received: ${value}")
            delay(Duration.milliseconds(100))
        }
        println("Channel closed")
    }

    Thread.sleep(Duration.seconds(2))
}

// ========== 非阻塞操作 ==========
func nonBlockingOperations() {
    let channel = Channel<String>(capacity: 2)

    launch {
        // trySend: 非阻塞发送
        let result1 = channel.trySend("msg1")
        println("Send result 1: ${result1}")  // Success

        channel.trySend("msg2")
        channel.trySend("msg3")

        // 缓冲区满,发送失败
        let result2 = channel.trySend("msg4")
        println("Send result 2: ${result2}")  // Failure

        channel.close()
    }

    launch {
        delay(Duration.milliseconds(500))

        // tryReceive: 非阻塞接收
        while true {
            match channel.tryReceive() {
                case Some(value) => println("Received: ${value}")
                case None => {
                    if channel.isClosed() {
                        break
                    }
                    delay(Duration.milliseconds(100))
                }
            }
        }
    }

    Thread.sleep(Duration.seconds(2))
}
3.2 生产者-消费者模式
// ========== 单生产者单消费者 ==========
func singleProducerConsumer() {
    let channel = Channel<Task>(capacity: 10)

    // 生产者
    launch {
        for i in 0..<20 {
            let task = Task(id: i, data: "Task ${i}")
            channel.send(task)
            println("Produced: ${task.id}")
            delay(Duration.milliseconds(50))
        }
        channel.close()
    }

    // 消费者
    launch {
        for task in channel {
            println("Processing: ${task.id}")
            delay(Duration.milliseconds(100))
            println("Completed: ${task.id}")
        }
    }

    Thread.sleep(Duration.seconds(3))
}

// ========== 多生产者多消费者 ==========
func multipleProducersConsumers() {
    let channel = Channel<Task>(capacity: 20)
    let producerCount = 3
    let consumerCount = 2

    // 启动多个生产者
    for producerId in 0..<producerCount {
        launch {
            for i in 0..<10 {
                let taskId = producerId * 10 + i
                let task = Task(id: taskId, data: "Task ${taskId}")
                channel.send(task)
                println("Producer ${producerId} sent: ${taskId}")
                delay(Duration.milliseconds(Random.nextInt(100)))
            }
        }
    }

    // 启动多个消费者
    for consumerId in 0..<consumerCount {
        launch {
            while true {
                match channel.tryReceive() {
                    case Some(task) => {
                        println("Consumer ${consumerId} processing: ${task.id}")
                        delay(Duration.milliseconds(150))
                    }
                    case None => {
                        if channel.isClosed() {
                            break
                        }
                        delay(Duration.milliseconds(50))
                    }
                }
            }
        }
    }

    // 等待所有生产者完成
    Thread.sleep(Duration.seconds(2))
    channel.close()

    Thread.sleep(Duration.seconds(1))
}

struct Task {
    id: Int32
    data: String
}
3.3 Channel高级模式
// ========== select 多路复用 ==========
func channelSelect() {
    let channel1 = Channel<Int32>(capacity: 5)
    let channel2 = Channel<String>(capacity: 5)

    launch {
        var count = 0
        while count < 10 {
            select {
                case value = channel1.receive() => {
                    println("Received int: ${value}")
                    count += 1
                }
                case value = channel2.receive() => {
                    println("Received string: ${value}")
                    count += 1
                }
                timeout Duration.seconds(1) => {
                    println("Timeout!")
                    break
                }
            }
        }
    }

    // 随机发送到不同channel
    launch {
        for i in 0..<5 {
            if Random.nextBool() {
                channel1.send(i)
            } else {
                channel2.send("msg${i}")
            }
            delay(Duration.milliseconds(200))
        }
    }

    Thread.sleep(Duration.seconds(3))
}

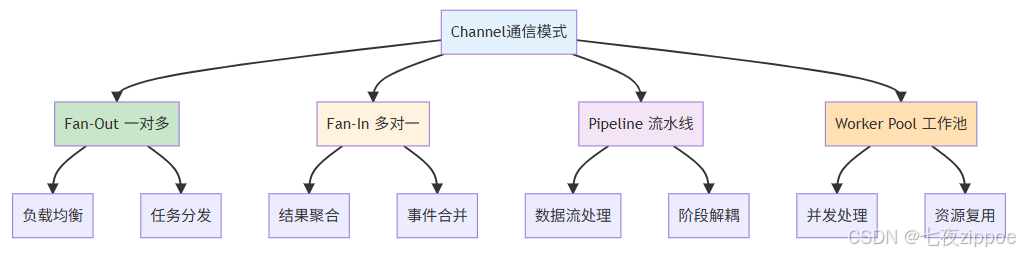
// ========== Fan-Out模式(一对多)==========
func fanOutPattern() {
    let input = Channel<Int32>(capacity: 10)
    let outputs = ArrayList<Channel<Int32>>()

    // 创建多个输出通道
    for _ in 0..<3 {
        outputs.add(Channel<Int32>(capacity: 5))
    }

    // 分发器
    launch {
        var index = 0
        for value in input {
            let targetChannel = outputs.get(index % outputs.size())
            targetChannel.send(value)
            index += 1
        }

        // 关闭所有输出通道
        for ch in outputs {
            ch.close()
        }
    }

    // 生产者
    launch {
        for i in 0..<20 {
            input.send(i)
            delay(Duration.milliseconds(50))
        }
        input.close()
    }

    // 多个消费者
    for i in 0..<outputs.size() {
        let channel = outputs.get(i)
        launch {
            for value in channel {
                println("Worker ${i} processed: ${value}")
                delay(Duration.milliseconds(100))
            }
        }
    }

    Thread.sleep(Duration.seconds(3))
}

// ========== Fan-In模式(多对一)==========
func fanInPattern() {
    let output = Channel<Int32>(capacity: 20)
    let inputCount = 3

    // 多个生产者
    for producerId in 0..<inputCount {
        launch {
            for i in 0..<10 {
                let value = producerId * 100 + i
                output.send(value)
                delay(Duration.milliseconds(Random.nextInt(100)))
            }
        }
    }

    // 单个消费者
    launch {
        var received = 0
        while received < inputCount * 10 {
            let value = output.receive()
            println("Received: ${value}")
            received += 1
        }
        output.close()
    }

    Thread.sleep(Duration.seconds(2))
}
Channel模式对比:
四、并发安全实践
4.1 数据竞争检测与避免
// ========== 数据竞争示例 ==========
var sharedCounter = 0  // ❌ 不安全的共享状态

func dataRaceBad() {
    let jobs = ArrayList<Job>()

    for _ in 0..<100 {
        let job = launch {
            for _ in 0..<1000 {
                sharedCounter += 1  // ❌ 数据竞争!
            }
        }
        jobs.add(job)
    }

    for job in jobs {
        job.join()
    }

    println("Counter: ${sharedCounter}")  // 结果不确定 < 100000
}

// ========== 使用Mutex保护 ==========
import std.concurrent.Mutex

var safeCounter = 0
let counterMutex = Mutex()

func dataRaceSafe() {
    let jobs = ArrayList<Job>()

    for _ in 0..<100 {
        let job = launch {
            for _ in 0..<1000 {
                let guard = counterMutex.lock()
                safeCounter += 1  // ✅ 安全
                // guard自动解锁
            }
        }
        jobs.add(job)
    }

    for job in jobs {
        job.join()
    }

    println("Counter: ${safeCounter}")  // 确定为 100000
}

// ========== 使用Atomic原子操作 ==========
import std.concurrent.Atomic

let atomicCounter = AtomicInt32(0)

func dataRaceAtomic() {
    let jobs = ArrayList<Job>()

    for _ in 0..<100 {
        let job = launch {
            for _ in 0..<1000 {
                atomicCounter.fetchAdd(1)  // ✅ 原子操作
            }
        }
        jobs.add(job)
    }

    for job in jobs {
        job.join()
    }

    println("Counter: ${atomicCounter.load()}")  // 确定为 100000
}

// ========== 使用Channel避免共享状态 ==========
func dataRaceChannel() {
    let channel = Channel<Int32>(capacity: 1000)

    // 计数器协程
    let counterJob = launch {
        var count = 0
        for _ in channel {
            count += 1
        }
        println("Counter: ${count}")  // 确定为 100000
    }

    // 多个发送者
    let senders = ArrayList<Job>()
    for _ in 0..<100 {
        let job = launch {
            for _ in 0..<1000 {
                channel.send(1)  // ✅ 无共享状态
            }
        }
        senders.add(job)
        job.start()
    }

    for sender in senders {
        sender.join()
    }

    channel.close()
    counterJob.join()
}
4.2 线程安全的数据结构
// ========== 线程安全的队列 ==========
class ConcurrentQueue<T> {
    private data: ArrayList<T>
    private mutex: Mutex

    public init() {
        this.data = ArrayList<T>()
        this.mutex = Mutex()
    }

    public func push(item: T) {
        let guard = this.mutex.lock()
        this.data.add(item)
    }

    public func pop(): Option<T> {
        let guard = this.mutex.lock()
        if this.data.isEmpty() {
            return None
        }
        return Some(this.data.removeAt(0))
    }

    public func size(): Int64 {
        let guard = this.mutex.lock()
        return this.data.size()
    }
}

// ========== 线程安全的缓存 ==========
class ConcurrentCache<K, V> where K: Hash + Eq {
    private data: HashMap<K, V>
    private rwLock: RwLock
    private maxSize: Int64

    public init(maxSize: Int64) {
        this.data = HashMap<K, V>()
        this.rwLock = RwLock()
        this.maxSize = maxSize
    }

    public func get(key: K): Option<V> {
        let guard = this.rwLock.readLock()
        return this.data.get(key)
    }

    public func put(key: K, value: V) {
        let guard = this.rwLock.writeLock()

        // LRU淘汰策略(简化版)
        if this.data.size() >= this.maxSize {
            // 删除第一个元素
            if let firstKey = this.data.keys().first() {
                this.data.remove(firstKey)
            }
        }

        this.data.put(key, value)
    }

    public func remove(key: K): Option<V> {
        let guard = this.rwLock.writeLock()
        return this.data.remove(key)
    }
}
4.3 Actor模型
// ========== Actor抽象基类 ==========
abstract class Actor<M> {
    private mailbox: Channel<M>
    private job: Job

    public init(capacity: Int64) {
        this.mailbox = Channel<M>(capacity: capacity)
        this.job = launch {
            this.run()
        }
    }

    // 发送消息
    public func send(message: M) {
        this.mailbox.send(message)
    }

    // 消息处理循环
    private func run() {
        for message in this.mailbox {
            this.onReceive(message)
        }
    }

    // 子类实现消息处理逻辑
    protected abstract func onReceive(message: M)

    // 停止Actor
    public func stop() {
        this.mailbox.close()
        this.job.cancel()
    }
}

// ========== 具体Actor实现:计数器Actor ==========
enum CounterMessage {
    | Increment
    | Decrement
    | GetValue(Channel<Int32>)  // 回复通道
}

class CounterActor: Actor<CounterMessage> {
    private count: Int32

    public init() {
        super.init(capacity: 100)
        this.count = 0
    }

    protected override func onReceive(message: CounterMessage) {
        match message {
            case Increment => {
                this.count += 1
                println("Count incremented to ${this.count}")
            }
            case Decrement => {
                this.count -= 1
                println("Count decremented to ${this.count}")
            }
            case GetValue(replyChannel) => {
                replyChannel.send(this.count)
            }
        }
    }
}

func testCounterActor() {
    let counter = CounterActor()

    // 多个协程同时发送消息
    let jobs = ArrayList<Job>()
    for _ in 0..<10 {
        let job = launch {
            for _ in 0..<100 {
                counter.send(Increment)
            }
        }
        jobs.add(job)
    }

    for job in jobs {
        job.join()
    }

    // 查询最终值
    let replyChannel = Channel<Int32>()
    counter.send(GetValue(replyChannel))
    let finalCount = replyChannel.receive()
    println("Final count: ${finalCount}")  // 1000

    counter.stop()
}

// ========== 银行账户Actor示例 ==========
enum AccountMessage {
    | Deposit(amount: Int32)
    | Withdraw(amount: Int32, replyChannel: Channel<Bool>)
    | GetBalance(replyChannel: Channel<Int32>)
}

class BankAccountActor: Actor<AccountMessage> {
    private balance: Int32

    public init(initialBalance: Int32) {
        super.init(capacity: 100)
        this.balance = initialBalance
    }

    protected override func onReceive(message: AccountMessage) {
        match message {
            case Deposit(amount) => {
                this.balance += amount
                println("Deposited ${amount}, new balance: ${this.balance}")
            }
            case Withdraw(amount, replyChannel) => {
                if this.balance >= amount {
                    this.balance -= amount
                    println("Withdrew ${amount}, new balance: ${this.balance}")
                    replyChannel.send(true)
                } else {
                    println("Insufficient funds for withdrawal of ${amount}")
                    replyChannel.send(false)
                }
            }
            case GetBalance(replyChannel) => {
                replyChannel.send(this.balance)
            }
        }
    }
}

func testBankAccountActor() {
    let account = BankAccountActor(initialBalance: 1000)

    // 存款
    account.send(Deposit(500))

    // 取款
    let withdrawChannel = Channel<Bool>()
    account.send(Withdraw(300, withdrawChannel))
    let success = withdrawChannel.receive()
    println("Withdrawal success: ${success}")

    // 查询余额
    let balanceChannel = Channel<Int32>()
    account.send(GetBalance(balanceChannel))
    let balance = balanceChannel.receive()
    println("Current balance: ${balance}")  // 1200

    account.stop()
}
Actor模型优势: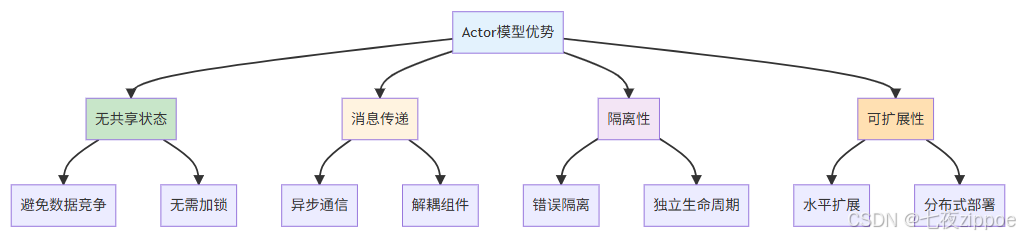
五、实战案例:高性能Web爬虫
5.1 爬虫架构设计
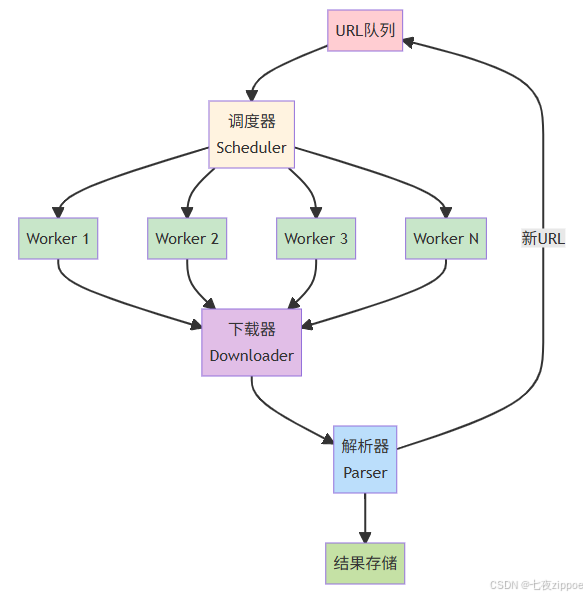
5.2 爬虫实现代码
import std.concurrent.coroutine.*
import std.concurrent.channel.*
import std.collections.*
import std.net.http.*

// ========== 爬虫配置 ==========
struct CrawlerConfig {
    maxWorkers: Int32
    maxDepth: Int32
    timeout: Duration
    userAgent: String
}

// ========== URL任务 ==========
struct UrlTask {
    url: String
    depth: Int32
}

// ========== 爬取结果 ==========
struct CrawlResult {
    url: String
    title: String
    links: ArrayList<String>
    content: String
    success: Bool
    error: Option<String>
}

// ========== 并发爬虫实现 ==========
class ConcurrentCrawler {
    private config: CrawlerConfig
    private urlQueue: Channel<UrlTask>
    private resultChannel: Channel<CrawlResult>
    private visited: ConcurrentSet<String>
    private running: AtomicBool

    public init(config: CrawlerConfig) {
        this.config = config
        this.urlQueue = Channel<UrlTask>(capacity: 1000)
        this.resultChannel = Channel<CrawlResult>(capacity: 100)
        this.visited = ConcurrentSet<String>()
        this.running = AtomicBool(false)
    }

    // 启动爬虫
    public func start(seedUrls: ArrayList<String>) {
        this.running.store(true)

        // 添加种子URL
        for url in seedUrls {
            this.urlQueue.send(UrlTask(url: url, depth: 0))
        }

        // 启动工作协程
        let workers = ArrayList<Job>()
        for workerId in 0..<this.config.maxWorkers {
            let job = launch {
                this.workerLoop(workerId)
            }
            workers.add(job)
        }

        // 启动结果处理协程
        let resultProcessor = launch {
            this.processResults()
        }

        // 等待所有工作完成
        for worker in workers {
            worker.join()
        }

        this.urlQueue.close()
        this.resultChannel.close()
        resultProcessor.join()
    }

    // 工作协程循环
    private async func workerLoop(workerId: Int32) {
        println("Worker ${workerId} started")

        while this.running.load() {
            match this.urlQueue.tryReceive() {
                case Some(task) => {
                    if !this.visited.contains(task.url) {
                        this.visited.add(task.url)
                        await this.crawlUrl(task)
                    }
                }
                case None => {
                    if this.urlQueue.isClosed() {
                        break
                    }
                    delay(Duration.milliseconds(100))
                }
            }
        }

        println("Worker ${workerId} stopped")
    }

    // 爬取单个URL
    private async func crawlUrl(task: UrlTask) {
        println("Crawling: ${task.url} (depth: ${task.depth})")

        try {
            // 下载页面
            let response = await this.downloadPage(task.url)

            // 解析页面
            let result = this.parsePage(task.url, response)

            // 发送结果
            this.resultChannel.send(result)

            // 如果未达到最大深度,添加新URL
            if task.depth < this.config.maxDepth {
                for link in result.links {
                    if !this.visited.contains(link) {
                        this.urlQueue.send(UrlTask(
                            url: link,
                            depth: task.depth + 1
                        ))
                    }
                }
            }
        } catch (e: Exception) {
            this.resultChannel.send(CrawlResult(
                url: task.url,
                title: "",
                links: ArrayList<String>(),
                content: "",
                success: false,
                error: Some(e.message)
            ))
        }
    }

    // 下载页面
    private async func downloadPage(url: String): HttpResponse {
        let client = HttpClient()
        client.setTimeout(this.config.timeout)
        client.setHeader("User-Agent", this.config.userAgent)

        return await client.get(url)
    }

    // 解析页面
    private func parsePage(url: String, response: HttpResponse): CrawlResult {
        let html = response.body()

        // 提取标题
        let title = this.extractTitle(html)

        // 提取链接
        let links = this.extractLinks(html, url)

        // 提取内容
        let content = this.extractContent(html)

        return CrawlResult(
            url: url,
            title: title,
            links: links,
            content: content,
            success: true,
            error: None
        )
    }

    // 处理结果
    private func processResults() {
        var totalProcessed = 0
        var successCount = 0

        for result in this.resultChannel {
            totalProcessed += 1

            if result.success {
                successCount += 1
                println("✓ ${result.url} - ${result.title}")
                this.saveResult(result)
            } else {
                println("✗ ${result.url} - ${result.error.unwrapOr("Unknown error")}")
            }

            if totalProcessed % 10 == 0 {
                println("Progress: ${totalProcessed} pages processed")
            }
        }

        println("Crawl completed: ${successCount}/${totalProcessed} successful")
    }

    // 保存结果到数据库或文件
    private func saveResult(result: CrawlResult) {
        // 实现数据持久化
        // 可以保存到数据库、文件或其他存储
    }

    // 辅助方法:提取标题
    private func extractTitle(html: String): String {
        // 简化实现,实际应使用HTML解析器
        let startTag = "<title>"
        let endTag = "</title>"

        if let startIndex = html.indexOf(startTag) {
            if let endIndex = html.indexOf(endTag, startIndex) {
                return html.substring(startIndex + startTag.length(), endIndex)
            }
        }

        return "No title"
    }

    // 辅助方法:提取链接
    private func extractLinks(html: String, baseUrl: String): ArrayList<String> {
        let links = ArrayList<String>()
        // 简化实现,实际应使用HTML解析器
        // 提取所有 <a href="..."> 标签
        return links
    }

    // 辅助方法:提取内容
    private func extractContent(html: String): String {
        // 简化实现,移除HTML标签
        return html
    }

    // 停止爬虫
    public func stop() {
        this.running.store(false)
    }
}

// ========== 线程安全Set实现 ==========
class ConcurrentSet<T> where T: Hash + Eq {
    private data: HashSet<T>
    private mutex: Mutex

    public init() {
        this.data = HashSet<T>()
        this.mutex = Mutex()
    }

    public func add(item: T): Bool {
        let guard = this.mutex.lock()
        if this.data.contains(item) {
            return false
        }
        this.data.add(item)
        return true
    }

    public func contains(item: T): Bool {
        let guard = this.mutex.lock()
        return this.data.contains(item)
    }

    public func size(): Int64 {
        let guard = this.mutex.lock()
        return this.data.size()
    }
}

// ========== 使用示例 ==========
func testConcurrentCrawler() {
    let config = CrawlerConfig(
        maxWorkers: 10,
        maxDepth: 2,
        timeout: Duration.seconds(30),
        userAgent: "CangjieBot/1.0"
    )

    let crawler = ConcurrentCrawler(config)

    let seedUrls = ArrayList<String>([
        "https://example.com",
        "https://example.org",
        "https://example.net"
    ])

    crawler.start(seedUrls)
}
5.3 性能优化策略
// ========== 连接池优化 ==========
class HttpConnectionPool {
    private connections: Channel<HttpConnection>
    private maxConnections: Int32

    public init(maxConnections: Int32) {
        this.maxConnections = maxConnections
        this.connections = Channel<HttpConnection>(capacity: maxConnections)

        // 预创建连接
        for _ in 0..<maxConnections {
            this.connections.send(HttpConnection())
        }
    }

    public async func execute<T>(
        request: HttpRequest,
        handler: (HttpResponse) -> T
    ): T {
        // 获取连接
        let conn = await this.connections.receive()

        try {
            // 执行请求
            let response = await conn.send(request)
            let result = handler(response)

            // 归还连接
            this.connections.send(conn)

            return result
        } catch (e: Exception) {
            // 连接出错,创建新连接
            this.connections.send(HttpConnection())
            throw e
        }
    }
}

// ========== 请求限流器 ==========
class RateLimiter {
    private tokens: AtomicInt32
    private maxTokens: Int32
    private refillRate: Duration

    public init(maxTokens: Int32, refillRate: Duration) {
        this.tokens = AtomicInt32(maxTokens)
        this.maxTokens = maxTokens
        this.refillRate = refillRate

        // 启动令牌补充协程
        launch {
            while true {
                delay(this.refillRate)
                let current = this.tokens.load()
                if current < this.maxTokens {
                    this.tokens.store(this.maxTokens)
                }
            }
        }
    }

    public async func acquire() {
        while true {
            let current = this.tokens.load()
            if current > 0 {
                if this.tokens.compareAndSwap(current, current - 1) {
                    return
                }
            } else {
                delay(Duration.milliseconds(10))
            }
        }
    }
}

// ========== 使用连接池和限流器 ==========
func optimizedCrawler() {
    let connectionPool = HttpConnectionPool(maxConnections: 20)
    let rateLimiter = RateLimiter(maxTokens: 100, refillRate: Duration.seconds(1))

    launch {
        let urls = ArrayList<String>([/* ... */])

        for url in urls {
            // 限流
            await rateLimiter.acquire()

            // 使用连接池
            await connectionPool.execute(HttpRequest(url)) { response =>
                println("Downloaded: ${url}")
            }
        }
    }
}
六、并发调试与监控
6.1 协程调试技巧
// ========== 协程命名 ==========
func namedCoroutines() {
    launch(name: "DataLoader") {
        println("Loading data...")
        delay(Duration.seconds(1))
        println("Data loaded")
    }

    launch(name: "DataProcessor") {
        println("Processing data...")
        delay(Duration.seconds(2))
        println("Data processed")
    }
}

// ========== 协程日志记录 ==========
class CoroutineLogger {
    private logChannel: Channel<LogEntry>

    public init() {
        this.logChannel = Channel<LogEntry>(capacity: 1000)

        // 启动日志写入协程
        launch(name: "LogWriter") {
            for entry in this.logChannel {
                this.writeLog(entry)
            }
        }
    }

    public func log(level: LogLevel, message: String) {
        let coroutineName = getCurrentCoroutineName()
        let timestamp = DateTime.now()

        this.logChannel.send(LogEntry(
            timestamp: timestamp,
            level: level,
            coroutine: coroutineName,
            message: message
        ))
    }

    private func writeLog(entry: LogEntry) {
        println("[${entry.timestamp}] [${entry.level}] [${entry.coroutine}] ${entry.message}")
    }
}

enum LogLevel {
    | Debug
    | Info
    | Warning
    | Error
}

struct LogEntry {
    timestamp: DateTime
    level: LogLevel
    coroutine: String
    message: String
}

// ========== 使用示例 ==========
let logger = CoroutineLogger()

func loggedTask() {
    launch(name: "Task1") {
        logger.log(Info, "Task started")
        delay(Duration.seconds(1))
        logger.log(Info, "Task completed")
    }
}
6.2 性能监控
// ========== 协程性能监控器 ==========
class CoroutineMonitor {
    private activeCoroutines: AtomicInt32
    private totalLaunched: AtomicInt64
    private totalCompleted: AtomicInt64

    public init() {
        this.activeCoroutines = AtomicInt32(0)
        this.totalLaunched = AtomicInt64(0)
        this.totalCompleted = AtomicInt64(0)

        // 启动监控协程
        launch(name: "Monitor") {
            while true {
                this.printStats()
                delay(Duration.seconds(5))
            }
        }
    }

    public func onCoroutineStart() {
        this.activeCoroutines.fetchAdd(1)
        this.totalLaunched.fetchAdd(1)
    }

    public func onCoroutineComplete() {
        this.activeCoroutines.fetchSub(1)
        this.totalCompleted.fetchAdd(1)
    }

    private func printStats() {
        let active = this.activeCoroutines.load()
        let launched = this.totalLaunched.load()
        let completed = this.totalCompleted.load()

        println("""
        ========== Coroutine Stats ==========
        Active: ${active}
        Total Launched: ${launched}
        Total Completed: ${completed}
        =====================================
        """)
    }
}

// ========== 包装协程启动 ==========
let monitor = CoroutineMonitor()

func monitoredLaunch(block: () -> Unit): Job {
    monitor.onCoroutineStart()

    return launch {
        try {
            block()
        } finally {
            monitor.onCoroutineComplete()
        }
    }
}
七、最佳实践总结
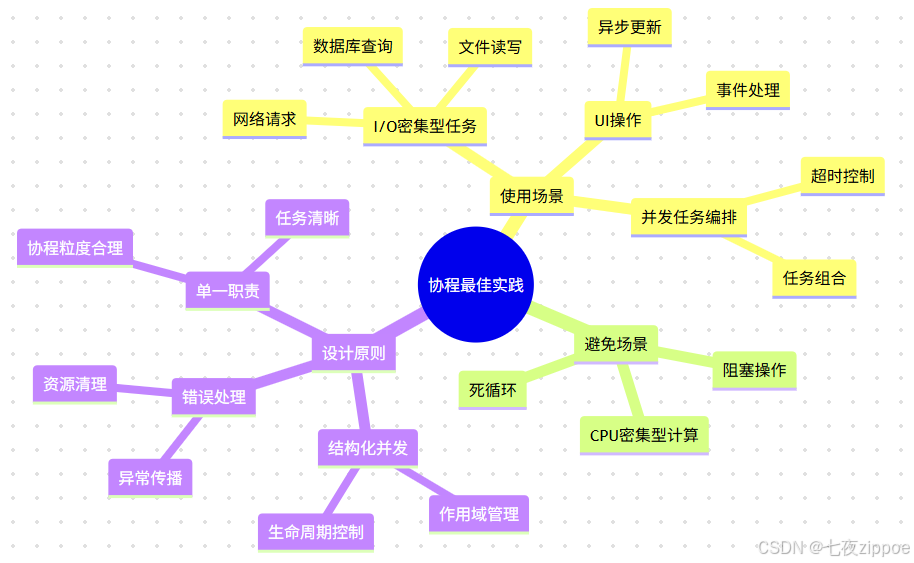
7.1 协程使用原则
7.2 性能优化清单
✅ 协程优化
- 避免创建过多协程(使用工作池)
- 合理设置Channel缓冲区大小
- 使用
async而非launch获取返回值 - 避免在协程中执行阻塞操作
✅ Channel优化
- 选择合适的容量(无缓冲 vs 有缓冲)
- 使用
select实现超时控制 - 及时关闭不再使用的Channel
- 批量发送/接收减少通信次数
✅ 并发安全
- 优先使用消息传递而非共享状态
- 必要时使用
Mutex或RwLock保护 - 简单计数使用
Atomic操作 - 考虑使用Actor模型封装状态
✅ 资源管理
- 使用结构化并发管理生命周期
- 实现超时机制防止协程泄漏
- 正确处理取消操作
- 监控协程数量和资源占用
八、与其他语言对比
8.1 仓颉 vs Kotlin协程
| 特性 | 仓颉 | Kotlin | 说明 |
|---|---|---|---|
| 语法 | async/await |
suspend |
仓颉更接近JavaScript |
| 调度器 | 内置运行时 | Dispatchers | Kotlin更灵活 |
| Channel | 内置支持 | kotlinx.coroutines | 功能类似 |
| 结构化并发 | ✅ 原生支持 | ✅ 原生支持 | 概念一致 |
| 与平台集成 | HarmonyOS深度集成 | Android深度集成 | 各有侧重 |
8.2 仓颉 vs Go协程
| 特性 | 仓颉 | Go | 说明 |
|---|---|---|---|
| 协程关键字 | launch/async |
go |
Go更简洁 |
| 通信机制 | Channel | Channel | 都支持CSP模型 |
| 调度器 | M:N混合 | M:N调度 | 原理相似 |
| 类型安全 | ✅ 强类型 | ✅ 强类型 | 都有编译时检查 |
| 性能 | 接近原生 | 接近原生 | 都很高效 |
九、总结与展望
核心知识点回顾
- 协程机制:轻量级并发,用户态调度,低开销
- async/await:同步风格写异步代码,提升可读性
- Channel通信:消息传递模型,避免共享状态
- 并发安全:Mutex、Atomic、Actor多种保障机制
- 实战应用:Web爬虫等高并发场景
讨论问题
- 架构选择:在您的项目中,什么时候使用协程?什么时候使用线程?
- 通信模式:Channel vs 共享内存,如何权衡?
- 性能调优:如何诊断和解决协程性能问题?
- 最佳实践:您在使用协程时有哪些经验教训?
学习建议
- 🔹 深入理解原理:学习协程调度器实现
- 🔹 实战演练:构建真实并发应用
- 🔹 性能测试:对比不同并发模型
- 🔹 阅读源码:研究标准库实现
参考资源

有“AI”的1024 = 2048,欢迎大家加入2048 AI社区
更多推荐

 32
32 0
0- 0



 已为社区贡献40条内容

所有评论(0)