一篇搞定 UITableView [含cell复用]
UITableView
外观属性:有三种主要样式
enum UITableViewStyle : Int {
    case plain       // 默认样式
    case grouped     // 分组样式
    case insetGrouped // 插入分组样式 (iOS 13+)
}
效果如下:
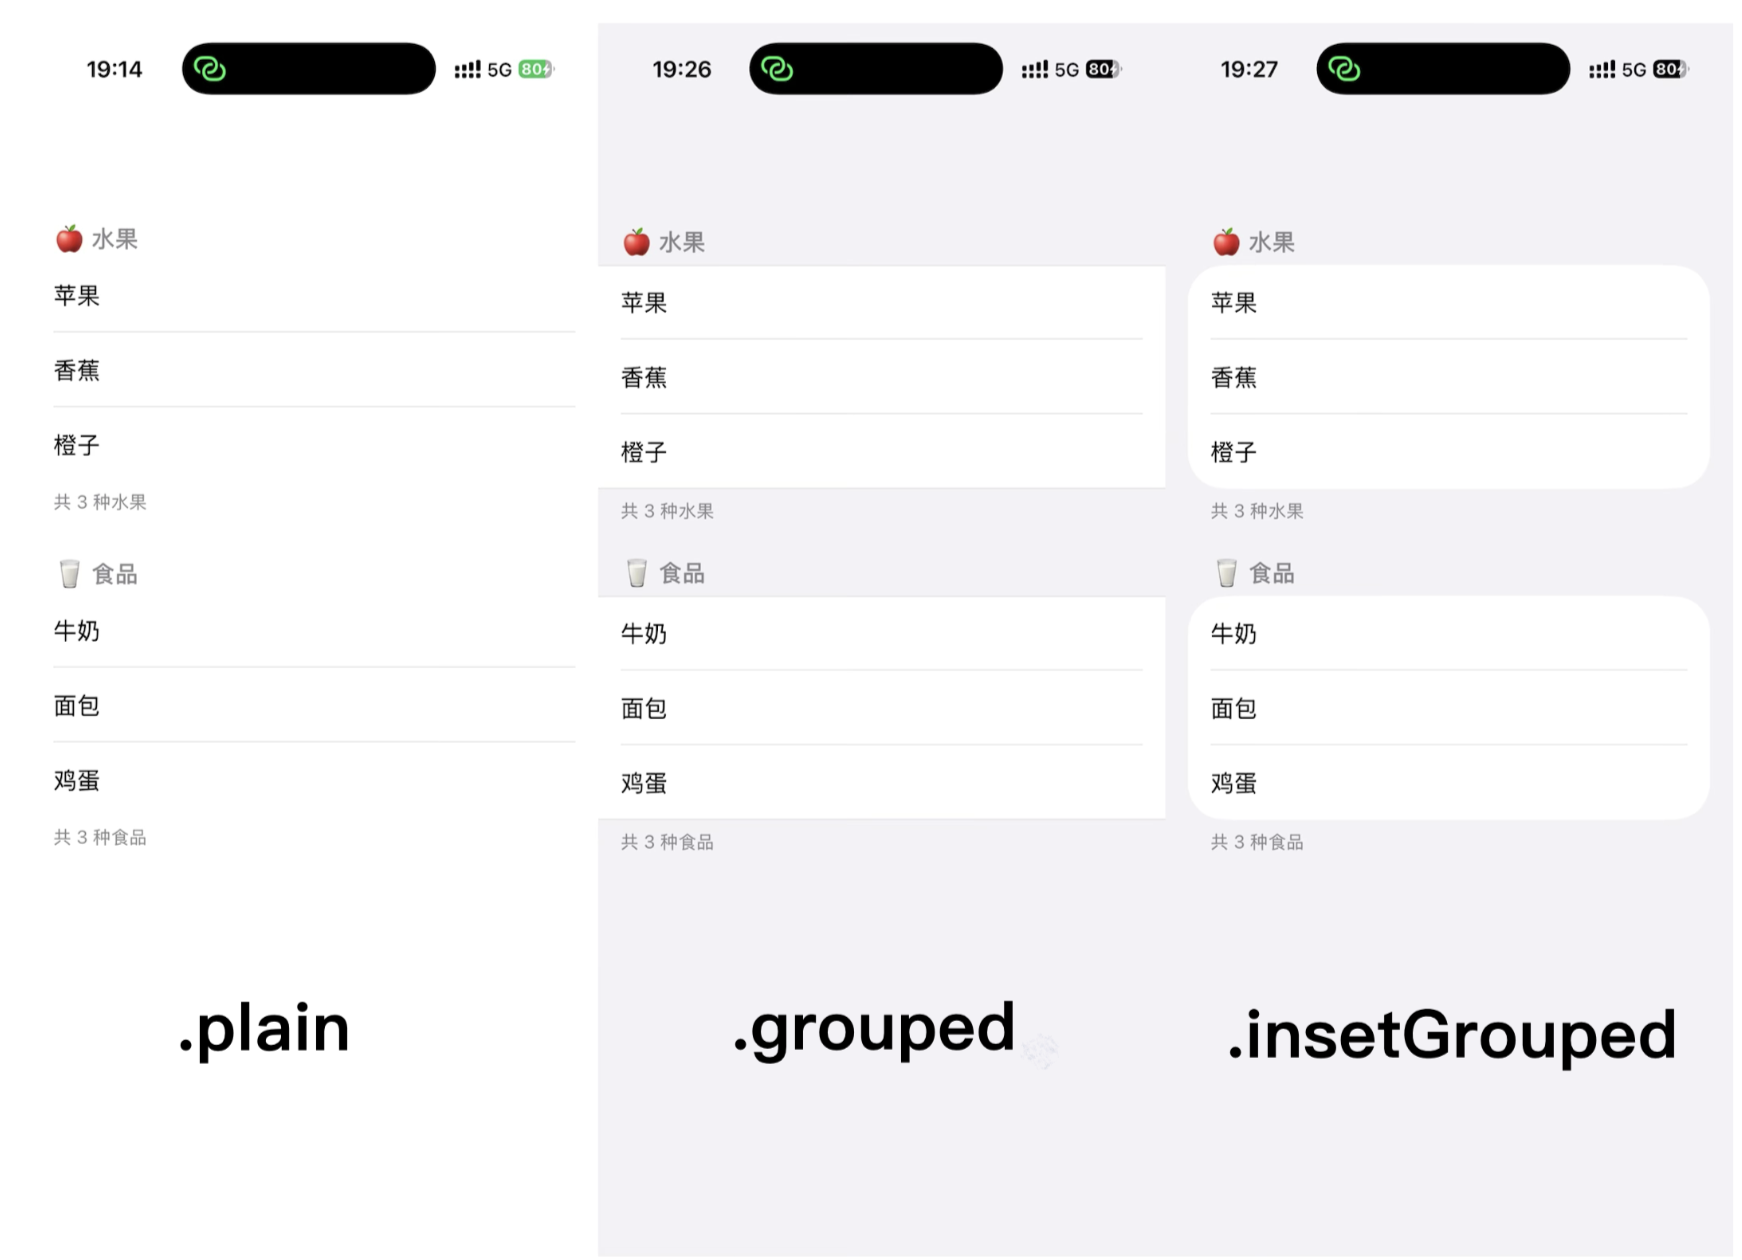
主要区别就是plain带了个粘性头部(如下图),titleForHeaderInSection会停留在最上方。insetGrouped就是grouped的美观改进版。
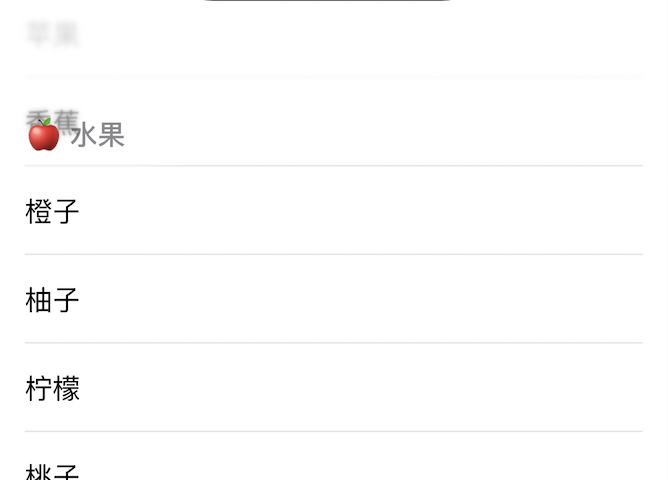
plain是默认样式,用于单分区列表(如联系人、消息列表),或需要突出内容连续性的场景。
grouped和insetGrouped,用于多组数据分类(如设置页面、表单填写),强调分组的独立性。
UITableViewDataSource
UITableViewCell
UITableView里面默认有一个contentView,像UIViewController里面默认带一个UIView一样。将子视图添加到contentView内会避免很多麻烦。例如当单元格进入编辑状态,contentView会自动左移,适应accessoryView中的删除按钮。如果直接添加到cell上就会产生遮挡问题。
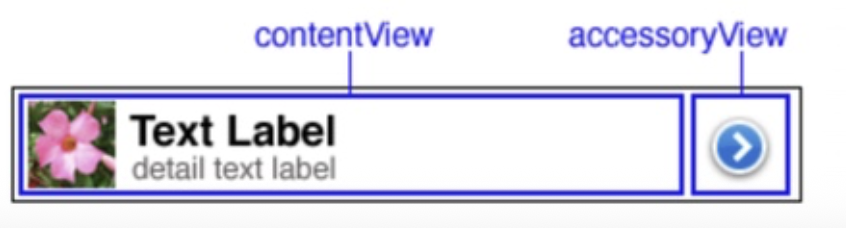
下方是accessoryType的类型:

contentView下默认有三个子视图,两个UILabel和一个UIImageView,结构与访问如下图。
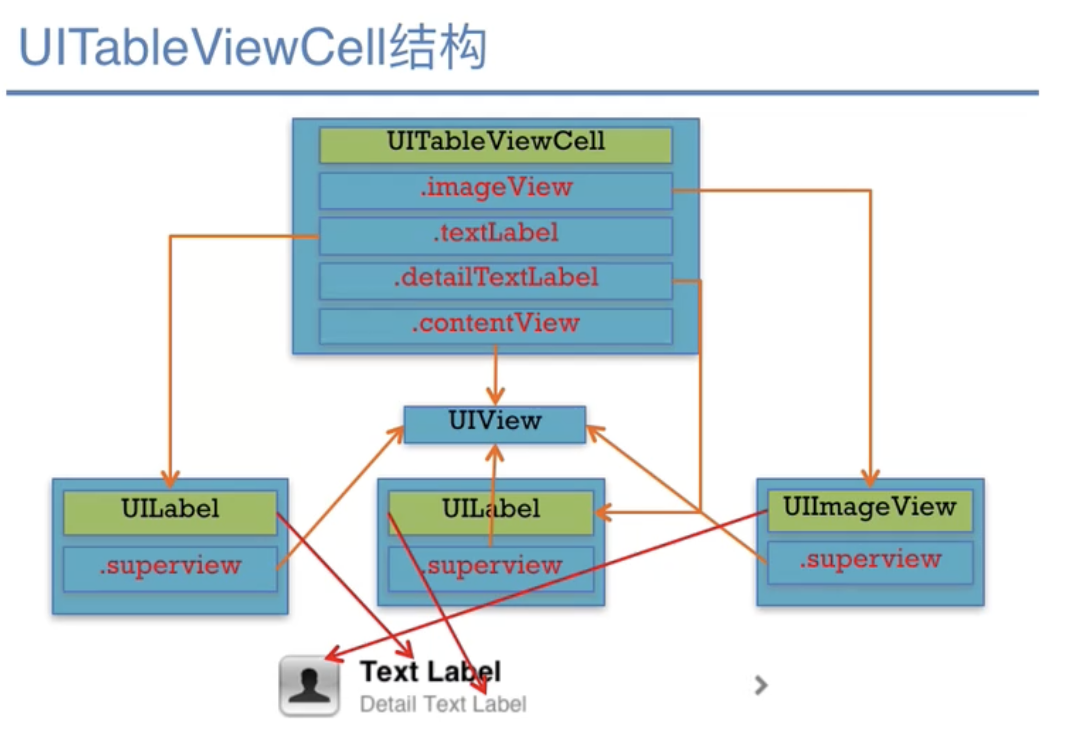
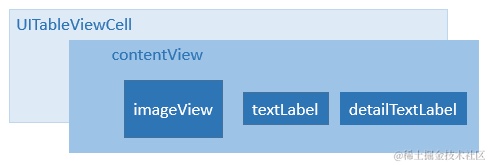
UITableViewCell里还有一个style属性,有四种类型,区别如下图所示。就是对上方所讲,两个UILabel和一个UIImageView的排版与应用的区别。default只显示Textlabel和Imageview,subtitle value1三个都显示,value1中DetailLabel靠右。value2只显示Label不显示图片。
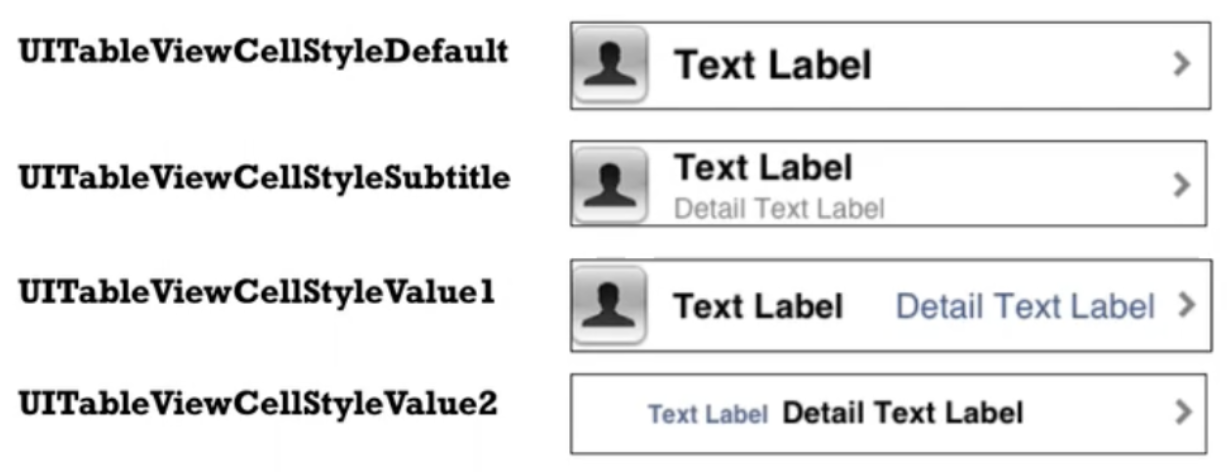
eg.如果在注册创建后想更改style,需要自定义一个cell继承自UITableViewCell,在里面进行定义。然后注册时将UITableViewCell.self中的UITableViewCell改为自定义的类名,并在tableView.dequeueReusableCell方法后加as!类名。
接下来,我们讲怎么进行设置。需要用到UITableViewDataSource数据源。里面有默认实现和扩展方法。
默认三个方法要实现:
numberOfSections- 几个分组(系统不默认)
numberOfRowsInSection- 每个分组有几行
cellForRowAt- 每一行长什么样(设置cell)
使用系统内置样式创建,cell = UITableViewCell(style:四种,reuseIdentifier:复用标识符)。这里创建单元格的style属性就是上方讲的四种属性。自定义需要继承 UITableViewCell 创建自定义类。
常用的扩展方法:
canEditRowAt、commit editingStyle- 行编辑的执行
titleForHeaderInSection、titleForFooterInSection- 设置分组的头部,底部标题
canMoveRowAt、moveRowAt- 行移动的执行索引栏相关
Cell的复用机制
Cell复用原理:屏幕上能加载的是有限度的,移出屏幕的cell就拿来复用。不用的cell放重用池内,执行时先去重用池内拿,没有的话再创建。(当滚动列表时,部分UITableViewCell会移出窗口,UITableView会将窗口外的cell放入一个对象池中,等待重用。当UITableView要求dataSource返回cell时,dataSource会先查看这个对象池,如果池中有未使用的cell,dataSource会用新的数据配置这个cell,然后返回给UITableView,重新显示到窗口中,从而避免创建新对象。)
-
滚动时:
1. Cell 移出屏幕 → 进入复用队列(reuse queue)
2. 需要显示新 Cell → dequeueReusableCell() 从队列获取
3. 队列有 Cell → 直接复用 + 重新配置数据
4. 队列为空 → 自动创建新 Cell(如果已注册)
cell = UITableViewCell(style:四种,reuseIdentifier:复用标识符)就是重用的标志。原本的创建代码类似下方,直接创建一个cell。但是引入复用后,代码就会不一样。
func tableView(_ tableView: UITableView, cellForRowAt indexPath: IndexPath) -> UITableViewCell {

        let cell = UITableViewCell(style: .default, reuseIdentifier: "Reuse")
        return cell
    }
通常先注册 Cell 类型。告诉 UITableView:"当需要创建新的 Cell 时,请使用 UITableViewCell 这个类,创建一个标识符为 self.identify 的 UITableViewCell"。如果不提前注册cell类型,需要在下方dequeueReusableCell做额外的nil情况处理。注册后可以简化代码,不需要手动处理 nil 情况。
cell=tableview.dequeueReusableCell(),用该方法从重用池获取可重用的cell。首先会判断重用池内是否有闲置的对象,有的时候就对已经创建过的进行复用,没有再创建新对象。
    lazy var tableview:UITableView = {
        let tableView = UITableView(frame: CGRect(x: 0, y: 0, width: ScreenWidth, height: 500))
        //把当前控制器指定为控制源和代理
        tableView.dataSource = self
        tableView.delegate = self
        //提前注册tableview
        tableView.register(UITableViewCell.self, forCellReuseIdentifier: self.identify)
        return tableView
    }()

    func tableView(_ tableView: UITableView, cellForRowAt indexPath: IndexPath) -> UITableViewCell {
        let cell = tableView.dequeueReusableCell(withIdentifier: self.identify, for: indexPath)
       //cell.textLabel?.text = self.content?[indexPath.row]
       //cell.detailTextLabel?.text = self.detailContent?[indexPath.row]
       //cell.imageView?.image = UIImage(named: "picture")
        return cell

    }
数据
cellForRowAt从第0行开始执行,所以通常用数组来构造tableView的数据。这样indexPath.row下标就可以和数组数据匹配。如果要设置分组的话,就可以用section来查找。[indexPath.section][indexPath.row]可以对应到二位数组内的数据,直接[section]就是设置分组的标题数据。
UITableViewDelegate
代理有很多种方法。
选择
didSelectRowAt-选择某一行时
在cellForRowAt方法中调用tableView.deselectRow(at: indexPath, animated: true)可以变成抬手恢复该行颜色。
样式
heightForRowAt- 行高
heightForHeaderInSection、heightForFooterInSection-分组的头部/尾部高度
编辑
canEditRowAt-能否编辑
editingStyleForRowAt- 编辑风格
commit editingStyle- 提交编辑titleForDeleteConfirmationButtonForRowAt - 删除按钮的文字
编辑风格默认是删除,可以改成insert。可以创建两个UIBarButtonItem进行编辑和保存。在点击事件内填写self.tableview.setEditing(true, animated: true)就可以进入编辑状态。
删除时,需要在commit editingStyle里调用remove方法删除数组内数据,并用tableView.deleteRows(at: [indexPath], with: )进行删除。
添加时,需要在commit editingStyle里调用insert方法向数组内增加数据,并用tableView.insertRows(at: [indexPath], with: )进行添加。
移动
canMoveRowAt-能否移动
moveRowAt to- 移动表格
moveto这个方法如果不写内容,上下滑动后移动的内容会复原。因为滑动后会重新调用cellForRowAt,根据原数据进行排列。所以需要在moveto中对原数据进行处理,在原位置删除后在新位置添加即可。
func tableView(_ tableView: UITableView, moveRowAt sourceIndexPath: IndexPath, to destinationIndexPath: IndexPath) {
        var text = self.content?[sourceIndexPath.row]
        self.content?.remove(at: sourceIndexPath.row)
        self.content?.insert(text!, at: destinationIndexPath.row)
//省略detailtext处理...
    }
索引
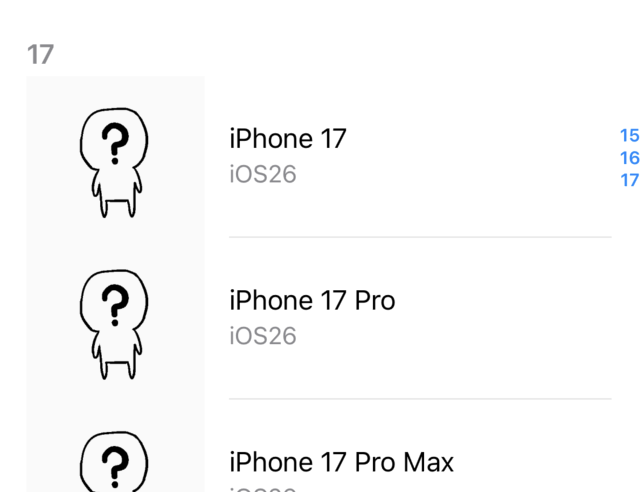
sectionIndexTitles- 屏幕右侧分组的索引标题
sectionForSectionIndexTitle- 点击索引
sectionIndexTitles直接应用数据源中titleForHeaderInSection的数据,在右侧生成可跳转的索引,点击直接跳转到对应的section。颜色可以在tableviewd的sectionIndexBackgroundColor中设置。
sectionForSectionIndexTitle中不return index的时候不会自动进行跳转滚动。title属性就是点击的title。
整理代码
将class里的方法抽离,将都放在类扩展extension ViewController里面。分别实现UITableViewDataSource和UITableViewDelegate。整理后很清爽。

有“AI”的1024 = 2048,欢迎大家加入2048 AI社区
更多推荐

 32
32 0
0- 0


 已为社区贡献2条内容

所有评论(0)