基于javaweb和mysql的springboot雪具商城系统(java+springboot+mybaits+vue+elementui+mysql)
前台地址:http://localhost:8080/springbootx9zss/front/dist/index.html。后台地址:http://localhost:8080/springbootx9zss/admin/dist/index.html。管理员角色:销售员管理、用户管理、雪具分类管理、雪具商品管理、进货记录管理、退货记录管理、系统管理。3.硬件环境:windows 7/8/1
基于javaweb和mysql的springboot雪具商城系统(java+springboot+mybaits+vue+elementui+mysql)
私信源码获取及调试交流
私信源码获取及调试交流
运行环境
Java≥8、MySQL≥5.7、Node.js≥14
开发工具
后端:eclipse/idea/myeclipse/sts等均可配置运行
前端:WebStorm/VSCode/HBuilderX等均可
适用
课程设计,大作业,毕业设计,项目练习,学习演示等
功能说明
基于javaweb的SpringBoot雪具商城系统(java+springboot+mybaits+vue+elementui+mysql)
项目介绍
基于Springboot + vue实现的雪具销售系统
角色:管理员、用户两种角色,分为前后台;
管理员角色:销售员管理、用户管理、雪具分类管理、雪具商品管理、进货记录管理、退货记录管理、系统管理。
普通用户角色:前台门户浏览、个人信息修改、雪具商品购买、订单查询、退货申请等功能。
环境需要
1.运行环境:最好是java jdk 1.8,我们在这个平台上运行的。其他版本理论上也可以。
2.IDE环境:IDEA,Eclipse,Myeclipse都可以。推荐IDEA;
3.硬件环境:windows 7/8/10 1G内存以上;或者 Mac OS;
4.数据库:MySql 5.7/8.0版本均可;
5.是否Maven项目:是;
技术栈
后端:SpringBoot+Mybaits
前端:Vue+elementui
使用说明
项目运行:
-
使用Navicat或者其它工具,在mysql中创建对应sql文件名称的数据库,并导入项目的sql文件;
-
使用IDEA/Eclipse/MyEclipse导入项目,导入成功后请执行maven clean;maven install命令;
-
将项目中application.yml配置文件中的数据库配置改为自己的配置;
4.运行项目,在浏览器中输入地址:
前台地址:http://localhost:8080/springbootx9zss/front/dist/index.html
用户:用户账号1/123456
后台地址:http://localhost:8080/springbootx9zss/admin/dist/index.html
管理员:admin/admin
文档介绍:
登录展示页:
首页展示:
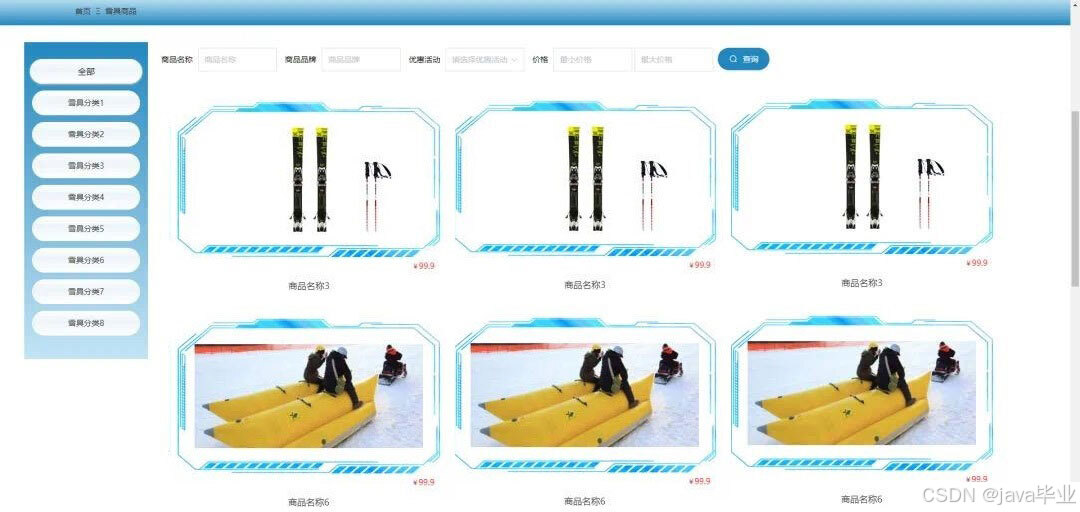
商品展示页面:
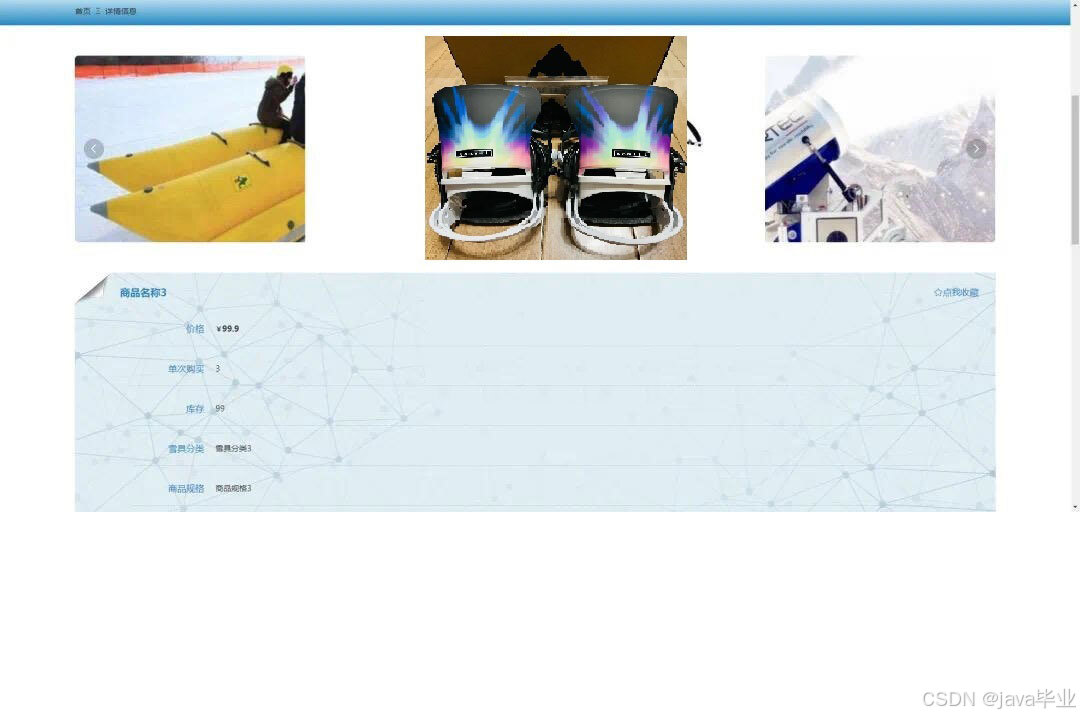
商品详情介绍:
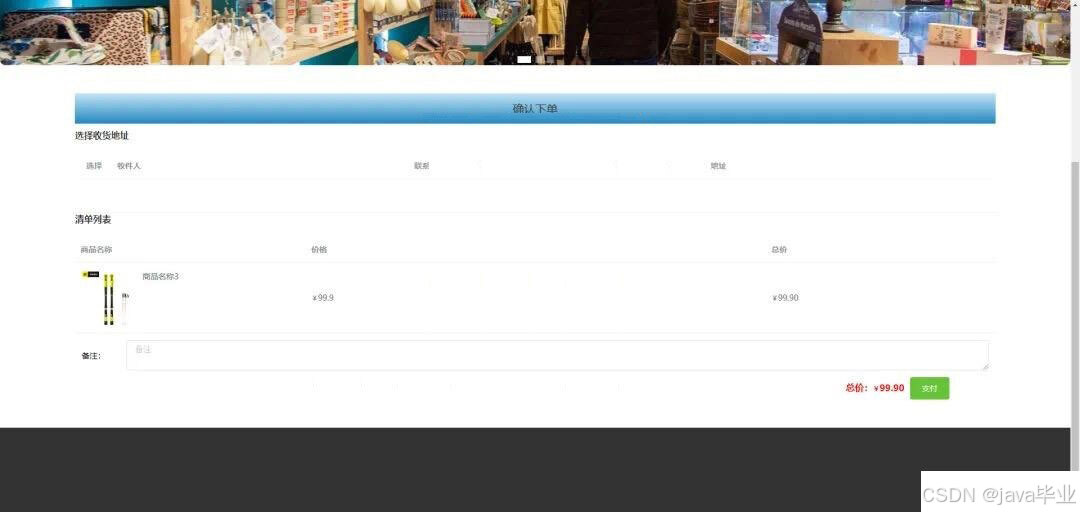
收货地址详情:
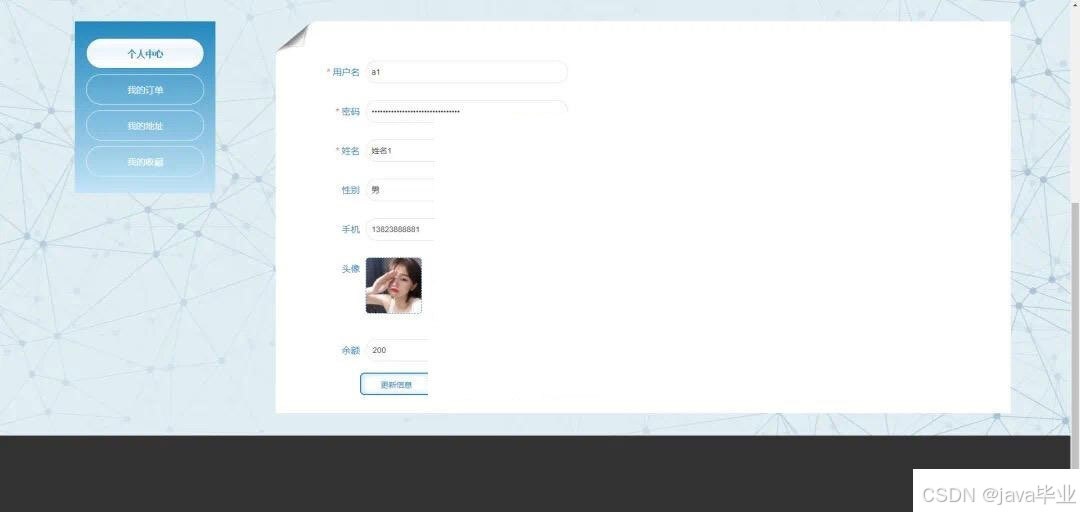
个人中心详情介绍:
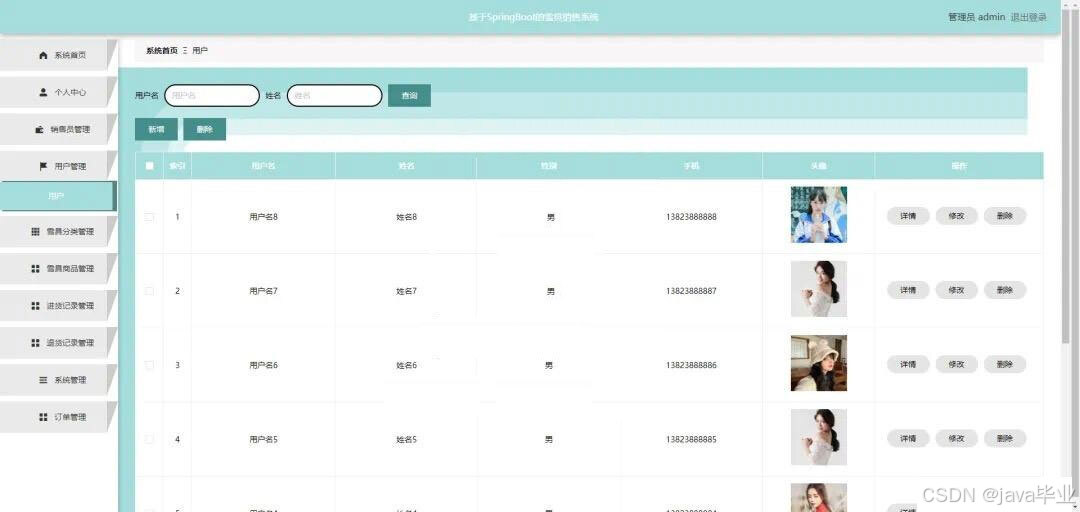
用户管理展示:
雪具分类展示页面:
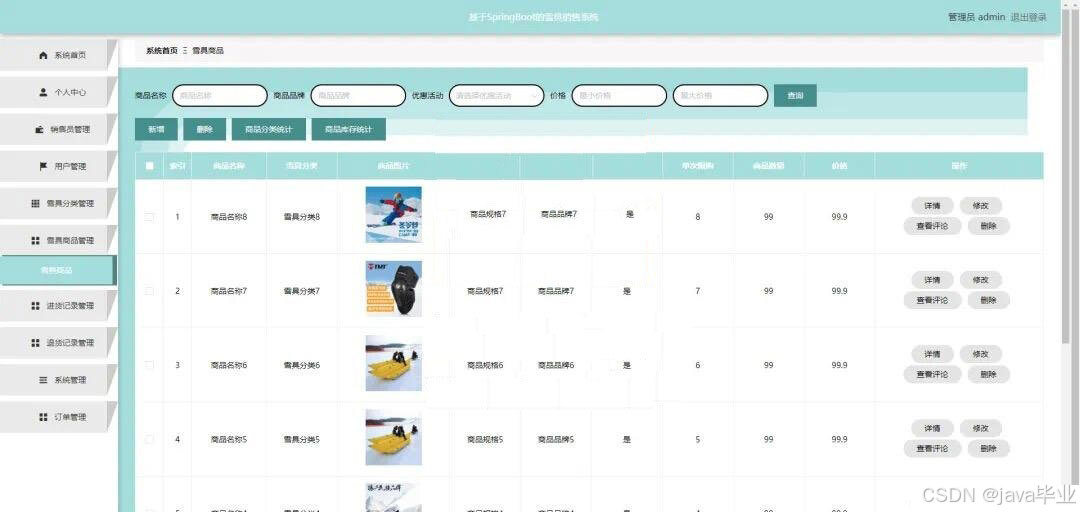
雪具商品管理展示页面:
* @return

*/

@RequestMapping(value = "/update")

public String update(Integer id,Model model) {

Car obj = carService.load(id);

model.addAttribute("obj",obj);

return "car/update";

@RequestMapping(value = "/js")

@ResponseBody

public String js(@RequestBody List<CarDto> list,Model model,HttpServletRequest request) {

Object attribute = request.getSession().getAttribute("userId");

JSONObject js = new JSONObject();
* @return

*/

@RequestMapping(value = "/delete.json", method = RequestMethod.POST)

@ResponseBody

public String exDeleteJson(Integer id, Model model, HttpServletRequest request, HttpServletResponse response) {

///1.通过主键删除

userService.deleteById(id);

/*以下是多种删除方式*/

//		//2.通过实体条件删除

//		userService.deleteByEntity(user);

//		//3.通过参数删除

//        //通过map查询
* @param files

* @param id

* @return

*/

@RequestMapping(value = "/saveFiles")

public String saveFiles(@RequestParam("file") CommonsMultipartFile[] files,Integer id,HttpServletRequest request){

for(int i = 0;i<files.length;i++){

System.out.println("fileName---------->" + files[i].getOriginalFilename());

if(!files[i].isEmpty()){

int pre = (int) System.currentTimeMillis();

try {

//拿到输出流,同时重命名上传的文件
j.put("res", 1);

return j.toString();

//	@RequestMapping("/toLogin2")

//	public String toLogin(Student student, HttpServletRequest request, HttpServletResponse response){

//		student.setIsdel(0);

//		Student byEntity = studentService.getByEntity(student);

//		if(byEntity == null){

//			return "redirect:/login/login.action";

//		}else{

//			request.getSession().setAttribute("role",2);

//			request.getSession().setAttribute("type",3);

//			request.getSession().setAttribute("username", byEntity.getXh());

//			request.getSession().setAttribute("userId", byEntity.getId());
* @return String 返回类型

* @throws

*/

@RequestMapping(value = "/listByMap")

public String listByMap(User user, Model model, HttpServletRequest request, HttpServletResponse response){

//通过map查询

Map<String,Object> params = new HashMap<String,Object>();

if(!isEmpty(user.getUserName())){

params.put("userName", user.getUserName());

if(!isEmpty(user.getPassWord())){
OrderDetail obj = orderDetailService.load(id);

model.addAttribute("obj",obj);

return "orderDetail/update";

/**

* 添加修改

* @return

*/

@RequestMapping(value = "/exUpdate")

public String exUpdate(OrderDetail orderDetail, Model model, HttpServletRequest request, HttpServletResponse response) {

//1.通过实体类修改,可以多传修改条件
params.put("userName", user.getUserName());

if(!isEmpty(user.getPassWord())){

params.put("passWord", user.getPassWord());

if(!isEmpty(user.getPhone())){

params.put("phone", user.getPhone());

if(!isEmpty(user.getRealName())){

params.put("realName", user.getRealName());

if(!isEmpty(user.getSex())){

params.put("sex", user.getSex());

if(!isEmpty(user.getAddress())){

params.put("address", user.getAddress());

if(!isEmpty(user.getEmail())){
Map<String,Object> params = new HashMap<String,Object>();

if(!isEmpty(car.getItemId())){

params.put("itemId", car.getItemId());

if(!isEmpty(car.getUserId())){

params.put("userId", car.getUserId());

if(!isEmpty(car.getNum())){

params.put("num", car.getNum());

if(!isEmpty(car.getTotal())){

params.put("total", car.getTotal());

//分页查询

Pager<Car> pagers = carService.findByMap(params);

JSONObject jsonObject = new JSONObject();

jsonObject.put("pagers", pagers);

jsonObject.put("obj", car);
*/

@RequestMapping(value = "/saveFiles")

public String saveFiles(@RequestParam("file") CommonsMultipartFile[] files,Integer id,HttpServletRequest request){

for(int i = 0;i<files.length;i++){

System.out.println("fileName---------->" + files[i].getOriginalFilename());

if(!files[i].isEmpty()){

int pre = (int) System.currentTimeMillis();

try {

//拿到输出流,同时重命名上传的文件

String filePath = request.getRealPath("/upload");

File f=new File(filePath);

if(!f.exists()){
if(!f.exists()){

f.mkdirs();

String fileNmae=new Date().getTime() + files[i].getOriginalFilename();

File file=new File(filePath+"/"+pre + files[i].getOriginalFilename());

if(!file.exists()){

file.createNewFile();

files[i].transferTo(file);

} catch (Exception e) {

e.printStackTrace();

System.out.println("上传出错");

return "";

// --------------------------------------- 华丽分割线 ------------------------------
* @return

*/

@RequestMapping(value = "/findByMap")

public String findByMap(User user, Model model, HttpServletRequest request, HttpServletResponse response) {

//通过map查询

Map<String,Object> params = new HashMap<String,Object>();

if(!isEmpty(user.getUserName())){

params.put("userName", user.getUserName());

if(!isEmpty(user.getPassWord())){

params.put("passWord", user.getPassWord());

if(!isEmpty(user.getPhone())){

params.put("phone", user.getPhone());

if(!isEmpty(user.getRealName())){
//		userService.update(load);

//5.状态删除

//User load = userService.load(id);

//load.setIsDelete(1);

//userService.update(load);

return "redirect:/user/findBySql.action";

// --------------------------------------- 华丽分割线 ------------------------------

// --------------------------------------- 【下面是ajax操作的方法。】 ------------------------------

/*********************************查询列表【不分页】***********************************************/

/**

* 【不分页 => 查询列表 => 无条件】

* @Title: listAll
model.addAttribute("obj", user);

return "user/user";

/**********************************【增删改】******************************************************/

/**

* 跳至添加页面

* @return

*/

@RequestMapping(value = "/add")

public String add() {

return "user/add";

/**

* 跳至详情页面
return jsonObject.toString();

/**

* ajax 删除

* @return

*/

@RequestMapping(value = "/delete.json", method = RequestMethod.POST)

@ResponseBody

public String exDeleteJson(Integer id, Model model, HttpServletRequest request, HttpServletResponse response) {

///1.通过主键删除

carService.deleteById(id);

/*以下是多种删除方式*/
return "login/info";

购物车管理控制层:

@Controller

@RequestMapping("/car")

public class CarController extends BaseController {

@Autowired

private ItemService itemService;

@Autowired

private AddressService addressService;

/**
@RequestMapping(value = "/saveFile")

public String saveFile(@RequestParam(value = "file", required = false) MultipartFile file, HttpServletRequest request, Model model) {

System.out.println("开始");

String path = request.getSession().getServletContext().getRealPath("/upload");

String fileName = file.getOriginalFilename();

System.out.println(path);

File targetFile = new File(path, fileName);

if(!targetFile.exists()){

targetFile.mkdirs();

//保存
} catch (Exception e) {

e.printStackTrace();

System.out.println("上传出错");

return "";

// --------------------------------------- 华丽分割线 ------------------------------

登录管理控制层:

@Controller

@RequestMapping("/login")

public class LoginController  extends BaseController{

@Autowired

private ManageService manageService;

@Autowired

private UserService userService;


有“AI”的1024 = 2048,欢迎大家加入2048 AI社区
更多推荐

 4
4 0
0- 0


 已为社区贡献24条内容

所有评论(0)