Sigmstar Comake D1 SSD2355 AI开发 IPU ToolChain 模型转换介绍
本文详细介绍了IPU工具链中模型转换的完整流程,主要包括:1. 模型转换配置文件input_config.ini的编写指南,涵盖输入输出配置、量化参数设置等核心内容;2. 前处理脚本的编写规范,针对不同数据格式(RGB/BGR/GRAY/RAWDATA等)提供了具体示例;3. 使用SGS_converter工具将原始模型转换为端侧离线模型的完整方法。其中重点说明了ONNX框架作为主力支持平台的优势
IPU
2. 模型转换
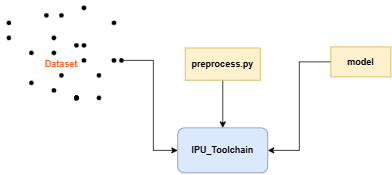
本章主要介绍如何将不同平台的网络模型转换到可供开发板运行的IPU离线网络模型, 模型转换示意图:
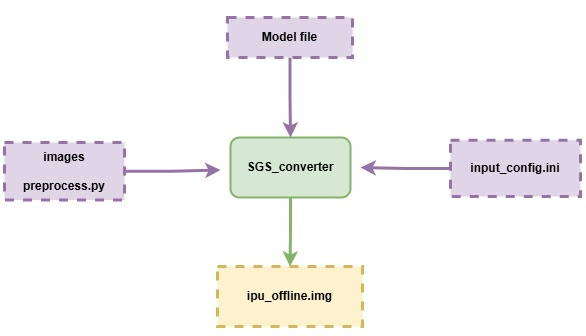
模型转换流程说明:
① 模型文件Model file
② 配置文件 input_config.ini
③ 模型转换所需要的数据images 、前处理脚本preprocess.py
送入模型转换工具SGS_converter,
即可获得可供开发板运行的IPU离线网络模型 img 文件。
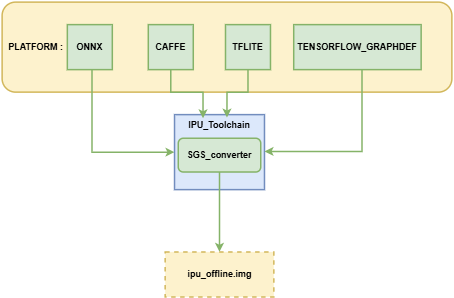
IPU工具链现支持将以下platform的模型转换到离线网络:
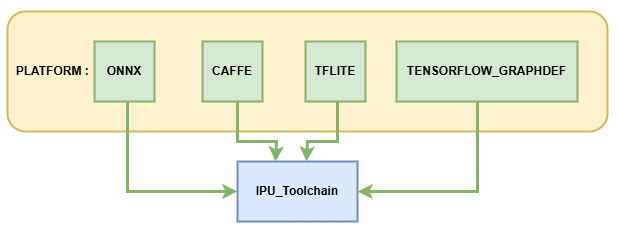
其中ONNX为IPU工具链主力支持的模型框架,可以提供较完整的功能迭代与技术服务支持,其余框架的模型处于维护支持状态,建议优先转换ONNX框架下的模型以获得最佳体验。
下面将详细介绍如何使用IPU Toolchain生成离线模型。
1. 模型转换配置文件——input_config.ini使用指南
各平台模型在转换为IPU离线网络模型的指令中都需使用必选参数 --input_config 用于指定input tensor的配置信息文件input_config.ini路径, 本节主要介绍转换模型过程中所需的input_config.ini文件如何进行配置。
1.1 input config.ini内容概述
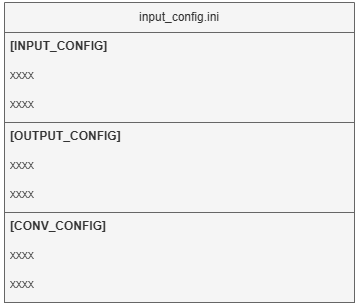
该文件主要分为三部分进行信息的配置:
[INPUT_CONFIG]   # 配置网络模型图片前处理的归一化信息

[OUTPUT_CONFIG]  # 配置网络模型输入输出的量化处理信息

[CONV_CONFIG]    # optional, 配置网络模型中卷积的量化信息
下文分别介绍基础版和进阶版的配置方法。
1.2 input config.ini基础使用
配置示例及说明:
[INPUT_CONFIG]

inputs= data;                   # 输入节点名称,多个输入需以“,”隔开

training_input_formats=RGB;     # 模型训练时的输入格式,数量和顺序与`inputs`的配置一致

input_formats=BGR;              # 板端输入格式,数量和顺序与`inputs`的配置一致

quantizations=TRUE;             # 是否打开输入量化, 可选格式为TRUE或者FALSE,数量和顺序与`inputs`的配置一致

mean=127.5:127.5:127.5;         # 均值, 顺序为RGB,多个输入需以“,”隔开

std_value = 255;                # 方差, 多个输入需以“,”隔开,如果每个通道都有对应的`std_value`值,以英文冒号( : )分隔,顺序为RGB

[OUTPUT_CONFIG]

outputs= prob;                  # 输出节点名称,多个输入需以“,”隔开

dequantizations=TRUE;           # 是否开启反量化, 根据实际需求填写, 建议为TRUE,数量和顺序与`outputs`的配置一致

[CONV_CONFIG]                   #  optional

tensor_arrays=conv1-1,conv2-1;  # 指定网络中某些层的卷积量化方式,需要更高的精度时配置。
1.3 input config.ini使用进阶
下面将针对 [INPUT_CONFIG]、[OUTPUT_CONFIG] 和 [CONV_CONFIG] 三部分信息可设置的参数分别进行讲解:
1.3.1 [INPUT_CONFIG]可配置信息详解
1、可配置参数说明
现阶段支持的参数有:inputs、training_input_formats、input_formats、quantizations、mean、std_value、input_width_alignment (optional)、input_height_alignment (optional)、input_layouts (optional)。
(1) inputs: 网络输入Tensor的name。
使用须知
-
多个输入Tensor请用逗号( , )分隔。模型输入Tensor数量和顺序与
inputs的配置一致。 -
所有输入name的长度不能超过2048个字符。
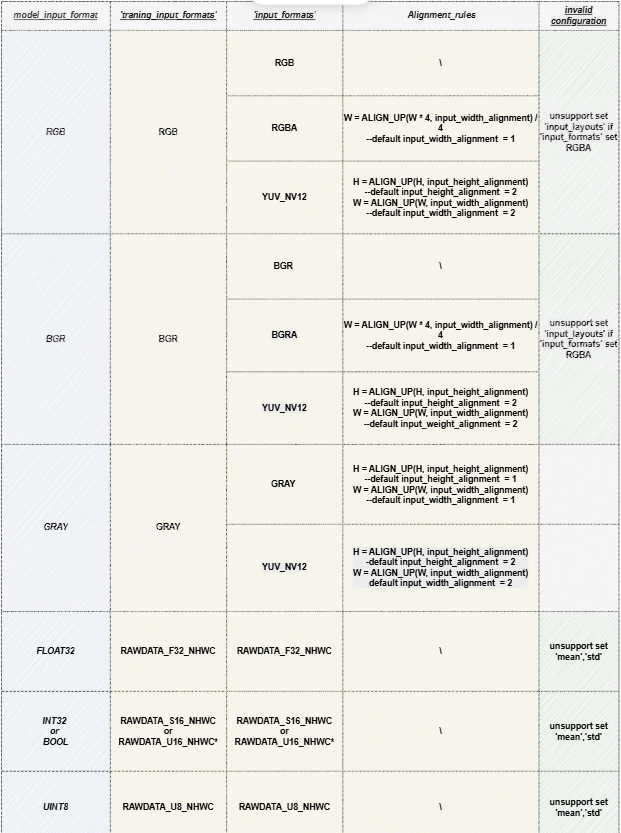
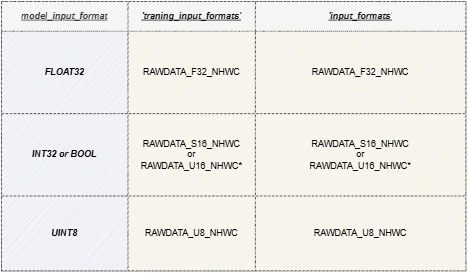
(2) training_input_formats: 网络训练时的图片格式。
使用须知
-
多个输入Tensor请用逗号( , )分隔。模型输入Tensor数量和顺序与
inputs的配置一致。 -
可选格式包括:
- RGB
- BGR
- GRAY
- RAWDATA_U8_NHWC
- RAWDATA_S16_NHWC
- RAWDATA_F32_NHWC
- 各模型推荐配置值详见下节表格
(3) input_formats: 网络模型在IPU芯片上运行的图片输入格式。
使用须知
-
多个输入Tensor请用逗号( , )分隔。模型输入Tensor数量和顺序与
inputs的配置一致。 -
可选格式包括:
- RGB
- BGR
- RGBA
- BGRA
- YUV_NV12
- GRAY
- RAWDATA_U8_NHWC
- RAWDATA_S16_NHWC
- RAWDATA_F32_NHWC
- 各模型推荐配置值详见下节表格
(4) quantizations: 用来标识所有输入Tensor的数据是否需要做量化,TRUE或者FALSE。
使用须知
- 多个输入Tensor请用逗号( , )分隔。模型输入Tensor数量和顺序与
inputs的配置一致。
(5) mean: 网络训练阶段用来对图片进行前处理。
图片做归一化的公式如下:
使用须知
-
顺序为RGB ,分别代表相应通道上的mean值。
-
数量等于inputs 个数,多个输入Tensor以英文逗号( , )分隔且中间不可有空格。
-
RAWDATA格式的数据请不要配置mean,其余格式如果没有做归一化处理,这个值设为0。
(6) std_value: 网络训练阶段用来对图片进行前处理。
使用须知
-
数量等于inputs 个数, 多个输入Tensor以英文逗号( , )分隔且中间不可有空格。
-
如果每个通道都有对应的
std_value值,以英文冒号( : )分隔,顺序为RGB。 -
RAWDATA格式的数据请不要配置mean,其余格式如果没有做归一化处理,这个值设为0。
(7) input_width_alignment (optional):用来标识数据作为网络输入时Width方向对齐的数量。
使用须知
- 如果有多个输入Tensor,以英文逗号( , )分隔且中间不可有空格。
- 各模型推荐配置值请参考下节表格'Alignment_rules'列
(8) input_height_alignment (optional):用来标识数据作为网络输入时Height方向对齐的数量。
使用须知
- 如果有多个输入Tensor,以英文逗号( , )分隔且中间不可有空格。
- 各模型推荐配置值请参考下节表格'Alignment_rules'列
(9) input_layouts (optional): 用来标识模型输入Tensor的数据排布格式。
使用须知
-
default is NHWC.
-
可选数据排布格式包括:
-
NCHW: 仅对4维输入Tensor生效
-- 4维Tensor处理:当指定NCHW时,强制按NCHW排布。
-- 非4维Tensor处理:维度输入保持原状,但需在input_layouts中用NHWC占位
-
NHWC: 仅对4维输入Tensor生效
-- 4维Tensor处理:当指定NHWC时,强制按NHWC排布。
-- 非4维Tensor处理:维度输入保持原状,但需在input_layouts中用NHWC占位
-
-
数量等于inputs个数,模型输入Tensor顺序与
input_layouts的配置顺序一致, 多个输入Tensor以英文逗号(,)分隔且中间不可有空格。 -
注意:当4维输入的
input_layouts设为NCHW时,需要确保该输入对应的前处理脚本(下节给出介绍)返回数据也按照NCHW排布,且板端运行离线模型时的输入数据排布也按照NCHW排布。 -
注意:当input_formats设定为YUV_NV12的输入的
input_layouts被设为NCHW时,需要确保该输入对应的前处理脚本(下节给出介绍)返回数据也按照NCHW排布,而在板端运行离线模型时的输入数据为正常排布的YUV_NV12。 -
注意:当input_formats设定为RGBA、BGRA时,不支持指定对应输入的
input_layouts。
2、模型参数配置约束条件与选择组合
使用须知
-
RAWDATA_U16_NHWC :仅限于输入直接接embedding层的情况,
例如:CLIP Text模型的embedding层
其embeeeding 层的index 满足 32727 < index < 65535 的条件时,可以配置成 RAWDATA_U16_NHWC。
使用须知
-
灰度模型转换须知:
-
input_formats为GRAY时:
实际给Fixed或Offline模型的数据为灰度图片,此时对应的[INPUT_CONFIG] ...... training_input_formats=GRAY; input_formats=GRAY; ......input_width_alignment和input_height_alignment默认为1,如不设定input_width_alignment和input_height_alignment,实际输入与模型输入形状相同。 -
input_formats为YUV_NV12时:
实际给Fixed或Offline模型的数据为YUV_NV12数据,此时对应的[INPUT_CONFIG] ...... training_input_formats=GRAY; input_formats=YUV_NV12; ......input_width_alignment和input_height_alignment默认为2。 -
input_config.ini文件中仅需设置单通道的mean值
[INPUT_CONFIG]
......
mean=33.318;
std_value=1.0;
-
3、多输入模型配置注意事项:
(1) 当模型存在多输入且数据格式混合时,若包含rawdata格式输入,需注意:
使用须知
-
1)禁止为rawdata格式输入配置mean/std归一化参数;
-
2)在ini配置文件中必须将rawdata输入排列在最后一位。
如: input_list = [input0,input1,input2] , 其中input0和input2为RGB格式,input1为RAWDATA格式,请在ini中按照 [inpit0,input2,input1]的顺序进行输入配置:[INPUT_CONFIG] inputs=input0,input2,input1; # 调整输入顺序,RAWDATA格式tensor置后。 input_formats=RGB,RGB,RAWDATA_F32_NHWC; quantizations=TRUE,TRUE,TRUE; mean=127.5:127.5:127.5,0:0:0; #只配置两组,input1禁止配置归一化参数 std_value = 255,255; # 只配置两组,input1禁止配置归一化参数
(2) 当模型存在多输入且数据维度混合时,若需配置 input_layouts ,需注意:
使用须知
- 1) 非4维Tensor需在input_layouts中用NHWC占位。
如: input_list = [input0,input1,input2] , 其中input0为3维tensor,input1和input2为4维tensor,指定input1按照NCHW进行排布:[INPUT_CONFIG] inputs=input0,input1,input2; … input_layouts=NHWC,NCHW,NHWC; # input0为非4维tensor,需要配置占位
1.3.2 [OUTPUT_CONFIG]可配置信息详解
现阶段支持的参数有:outputs、dequantizations、output_layouts (optional)、output_formats (optional)。
(1) outputs: 网络输出节点名称。
使用须知
-
多个输出Tensor以英文逗号( , )分隔,顺序与模型保持一致。
-
所有输出name的长度不能超过2048个字符。
-
转换带后处理网络时,Backbone网络的outputs与完整网络outputs的名称不同,其余设置应完全一致。
(2) dequantizations: 用来标识所有输出Tensor的数据是否需要做反量化,TRUE或者FALSE。
使用须知
-
仅在板上运行时生效,数量等于outputs,输出Tensor以英文逗号( , )分隔且中间不可有空格。
-
如果配置
dequantizations为TRUE,模型输出会增加Fix2Float算子,输出数据类型为float32。 -
如果配置
dequantizations为FALSE,在板端运行时输出数据类型为int16。
(3) output_layouts (optional): 用来标识输出Tensor的数据排布格式。
使用须知
-
如果不设置该项,将默认数据排布格式为
NHWC。 -
可选数据排布格式包括:
- NCHW:
NCHW表示对应的4维outputTensor按照NCHW的数据格式排布。 - NHWC:
NHWC表示对应的4维outputTensor按照NHWC的格式排布。
- NCHW:
-
数量等于outputs个数,模型输出Tensor顺序与
output_layouts的配置顺序一致,多个输入Tensor以英文逗号(,)分隔且中间不可有空格。
(4) output_formats (optional): 标识输出Tensor的数据格式。
使用须知
-
如果不设置该项,将默认数据格式以
dequantizations的配置为准:当dequantizations为TRUE时,输出RAWDATA_F32_NHWC;当dequantizations为FALSE时,输出RAWDATA_S16_NHWC,且不会反量化。 -
可选数据格式包括:
- RAWDATA_F32_NHWC: 模型输出float32类型数据。
dequantizations只能配置TRUE。 - RAWDATA_S16_NHWC: 模型输出int16类型数据。当
dequantizations为TRUE时,输出int16会反量化回真实数值;当dequantizations为FALSE时,输出int16不会反量化。 - RAWDATA_U8_NHWC: 模型输入uint8类型数据。当
dequantizations为TRUE时,输出uint8会反量化回真实数值;当dequantizations为FALSE时,输出uint8不会反量化。
- RAWDATA_F32_NHWC: 模型输出float32类型数据。
-
如果有多个输出Tensor,以英文逗号(,)分隔且中间不可有空格。数量等于outputs个数,模型输出Tensor顺序与
output_formats的配置顺序一致。
1.3.3 [CONV_CONFIG] (optional)可配置信息详解
此部分均为非必须配置的参数,现阶段支持的参数有:input_format (optional)、input_format (optional)。
(1) input_format (optional): 指定网络中所有卷积的量化方式。
使用须知
-
转换工具默认使用IPU Toolchain推荐的量化方式,还可以通过配置input_format指定量化。可选方案有:
ALL_UINT8: 指定所有卷积按照UINT8量化。ALL_INT16: 指定所有卷积按照INT16量化。CONV2D_INT16: 只指定所有普通卷积按照INT16量化。DEPTHWISE_INT16: 只指定所有Depthwise 卷积按照INT16量化。
-
在
ALL_UINT8 模式下,卷积运行所占带宽小,运行速度快;在ALL_INT16 模式下,可以极大的提高卷积的精度,但是运行的速度会有影响。 -
配置了
input_format后,使用calibrator/torch_calibrator推荐的量化策略将失效。如果要使用calibrator/torch_calibrator推荐的量化策略,需要删除input_format后重新转换模型。
(2) tensor_arrays (optional): 指定网络中某些层的卷积量化方式。
使用须知
-
转换工具默认使用IPU Toolchain推荐的量化方式,某些卷积层需要更高的精度时可以配置'tensor_arrays'实现指定部分卷积层量化方式。
-
填写卷积层的第一个输入的 input tensor name。需要配置多个卷积层更高精度时,input tensor name以逗号( , )分隔。
-
指定量化时,网络中的第一层卷积不生效。
2. 模型转换配置文件——前处理脚本书写指南
各平台模型在转换为IPU离线网络模型的指令中都需使用必选参数 -n 指定前处理脚本路径,本节主要介绍转换模型过程中所需的前处理文件如何进行配置。
2.1 前处理文件编写示例
以onnx_yolov8s网络为例,对编写图片前处理文件进行说明,demo展示:
import cv2
import numpy as np

def letterbox(im, new_shape=(640, 640), color=(114, 114, 114), auto=False, scaleFill=False, scaleup=True, stride=32):
    # Resize and pad image while meeting stride-multiple constraints
    shape = im.shape[:2]  # current shape [height, width]
    if isinstance(new_shape, int):
        new_shape = (new_shape, new_shape)

    # Scale ratio (new / old)
    r = min(new_shape[0] / shape[0], new_shape[1] / shape[1])
    if not scaleup:  # only scale down, do not scale up (for better val mAP)
        r = min(r, 1.0)

    # Compute padding
    ratio = r, r  # width, height ratios
    new_unpad = int(round(shape[1] * r)), int(round(shape[0] * r))
    dw, dh = new_shape[1] - new_unpad[0], new_shape[0] - new_unpad[1]  # wh padding
    if auto:  # minimum rectangle
        dw, dh = np.mod(dw, stride), np.mod(dh, stride)  # wh padding
    elif scaleFill:  # stretch
        dw, dh = 0.0, 0.0
        new_unpad = (new_shape[1], new_shape[0])
        ratio = new_shape[1] / shape[1], new_shape[0] / shape[0]  # width, height ratios

    dw /= 2  # divide padding into 2 sides
    dh /= 2

    if shape[::-1] != new_unpad:  # resize
        im = cv2.resize(im, new_unpad, interpolation=cv2.INTER_LINEAR)
    top, bottom = int(round(dh - 0.1)), int(round(dh + 0.1))
    left, right = int(round(dw - 0.1)), int(round(dw + 0.1))
    im = cv2.copyMakeBorder(im, top, bottom, left, right, cv2.BORDER_CONSTANT, value=color)  # add border
    return im, ratio, (dw, dh)


def image_preprocess(image_file, norm=True, new_shape=(640, 640)):
    im = cv2.imread(image_file)

    im, ratio, (dw, dh) = letterbox(im, new_shape)

    im = im[:, :, ::-1]  # BGR to RGB
    im = np.expand_dims(im, 0)
    im = np.ascontiguousarray(im)
    if norm:
        return im.astype(np.float32) / 255
    else:
        return im
使用须知
-
需要声明
image_preprocess(img_path, norm=True)的函数原型来调用,函数返回numpy.ndarray的数据类型。 -
当模型的training_input_formats为RGB / BGR / GRAY时,
image_preprocess(img_path, norm=True)函数必须包含的2个参数:-
图片路径
-
归一化标记(norm=True)
归一化标记是为了区分网络模型是否是浮点模型。因为在浮点网络模型阶段,图片的归一化需要在送进网络前处理好。但是定点网络模型和离线网络模型已经包含了input_config.ini文件的设置信息,能够将图片数据自行做归一化处理,因此送进网络模型的数据不需要做归一化,这与在IPU硬件上处理方式相同。
-
-
前处理文件对输入数据的处理要与模型训练时保持一致,前处理脚本是将数据文件处理成为模型的
training_input_formats的格式。
2.2 前处理文件编写说明
不同数据格式的前处理略有不同,下面将分别给出示例:
① 图片输入模型前处理说明
适用于training_input_formats为RGB / BGR / GRAY的模型。
图片输入模型的前处理脚本用户主要关心将数据文件处理成为模型的training_input_formats的格式。
以torchvision的resnet18前处理脚本示例:
from PIL import Image
import numpy as np
from torchvision.transforms import transforms

def sim_standard_preprocess(image_file, input_size=224, norm=True):
    ori_image = Image.open(image_file).convert('RGB')
    if input_size == 299:
        scaled_size = input_size
    else:
        scaled_size = 256
    image = transforms.Resize(scaled_size)(ori_image)
    image = transforms.CenterCrop(input_size)(image)
    if norm:
        image = transforms.Compose(
            [
                transforms.ToTensor(),
                transforms.Normalize(mean=[0.485, 0.456, 0.406], std=[0.229, 0.224, 0.225])
            ]
        )(image)
        image = image.numpy()
        image = np.expand_dims(image, 0).astype(np.float32)
        image = np.transpose(image, axes=(0, 2, 3, 1)).copy()
    else:
        image = image.numpy()
        image = np.expand_dims(image, 0).astype(np.uint8)
    return image


def image_preprocess(image_file, input_size=224, norm=True):
    sim_processed = sim_standard_preprocess(image_file, input_size, norm=norm)
    return sim_processed
使用须知
-
针对图片做归一化的公式,上述mean/std信息转换到input_config.ini时是:
[INPUT_CONFIG] mean=123.675:116.28:103.53; std_value=58.395:57.12:57.375; -
使用时务必检查前处理脚本中的mean和std参数与input_config.ini中配置的信息保持一致。
以caffe的caffe_lenet前处理脚本示例GRAY输入的模型:
import cv2
import numpy as np

def get_image(img_path, resizeH=28, resizeW=28, norm=True, mean=33.318, std=1.0):
    img = cv2.imread(img_path)
    if img is None:
        raise FileNotFoundError('No such image: {}'.format(img_path))

    img = cv2.cvtColor(img, cv2.COLOR_BGR2GRAY)
    img_norm = cv2.resize(img, (resizeW, resizeH), interpolation=cv2.INTER_LINEAR)

    if norm:
        img_norm = (img_norm - mean) / std
        img_norm = np.expand_dims(img_norm, axis=2)
        img_norm = img_norm.astype('float32')
    else:
        img_norm = np.expand_dims(img_norm, axis=2)

    return np.expand_dims(img_norm, 0)

def image_preprocess(img_path, norm=True):
    return get_image(img_path, norm=norm)
② 非图片输入模型前处理示例
示例输入数据是保存的npy文件。实际使用请替换真实处理逻辑。
非图片输入模型用户对float / fixed / offline模型的输入数据格式都要考虑。当norm为True时返回float模型需要的格式,当norm为False时,返回fixed / offline模型需要的格式。
float模型一般与原始模型输入的数据格式一致。
1) 适用于training_input_formats和input_formats均为RAWDATA_F32_NHWC的模型。
前处理脚本示例:
import numpy as np

def image_preprocess(img_path, norm=True):
    data = np.load(img_path)    # img_path is npy file, contains float32 dtype ndarray
    data = data.astype(np.float32)
    return data

def image_preprocess(img_path, norm=True):
    return get_image(img_path, norm=norm)
2) 适用于training_input_formats和input_formats均为RAWDATA_S16_NHWC的模型。
前处理脚本示例:
import numpy as np

def image_preprocess(img_path, norm=True):
    data = np.load(img_path)    # img_path is npy file, contains int32 or bool dtype ndarray
    if norm:
        data = data.astype(np.int32)    # or astype(np.bool_) / astype(np.float32) ……
    else:
        data = data.astype(np.int16)
    return data


def image_preprocess(img_path, norm=True):
    return get_image(img_path, norm=norm)
3) 适用于training_input_formats和input_formats均为RAWDATA_U16_NHWC的模型。
使用须知
-
RAWDATA_U16_NHWC :仅限于输入直接接embedding层的情况,
例如:CLIP Text模型的embedding层
其embeeeding 层的index 满足 32727 < index < 65535 的条件时,可以配置成 RAWDATA_U16_NHWC。
前处理脚本示例:
import numpy as np

def image_preprocess(img_path, norm=True):
    data = np.load(img_path)    # img_path is npy file, contains int32 dtype ndarray
    if norm:
        data = data.astype(np.int32)
    else:
        data = data.astype(np.uint16)
    return data


def image_preprocess(img_path, norm=True):
    return get_image(img_path, norm=norm)
4) 适用于training_input_formats和input_formats均为RAWDATA_U8_NHWC的模型。
前处理脚本示例:
import numpy as np

def image_preprocess(img_path, norm=True):
    data = np.load(img_path)    # img_path is npy file, contains uint8 dtype ndarray
    if norm:
        data = data.astype(np.uint8)
    else:
        data = data.astype(np.uint8)
    return data

def image_preprocess(img_path, norm=True):
    return get_image(img_path, norm=norm)
3. 原始模型到端侧模型转换指南
IPU Toolchain的SGS_converter工具支持一键生成可供开发板运行的IPU离线网络模型。
3.1. SGS_converter工具简介
4. 立即开始
加入Comake开发者社区
主页地址: CoMake开发者社区
SDK下载: CoMake开发者社区
文档中心: CoMake开发者社区
马上购买 : 首页-Comake开发者社区商店

有“AI”的1024 = 2048,欢迎大家加入2048 AI社区
更多推荐


 18
18 0
0- 0


 已为社区贡献18条内容

所有评论(0)