GR00T N1.5 Enabling on Intel Architecture through OpenVINO
该代码留了一个接口,可以灵活选择执行设备。我自己在先前的科研经历中,主要是做集感知、规划、执行、验证、持续学习为一体的具身智能体架构的一些工作,在这个过程中使用到了大量视觉或是基于transformer架构的网络,我其实都会使用OpenVINO做加速,所以这次参与完成GR00T部署的一些工作也让我有了更深入的理解和学习。现在,我们拿到了所有网络结构的xml格式文件,我们需要定义向前传播过程,把这些
本篇工程实践将详细描述人形机器人大小脑混合控制Vision–Language–Action(VLA)架构 Isaac-GR00T N1.5 如何通过OpenVINO在Intel生态软硬件平台上成功启用并完成推理。OpenVINO 极大程度拓宽了模型部署的可选择性,同时带来更优的推理性能。
1. GR00T 概要介绍
1.1 GR00T 背景与主要资料
GR00T N1 是首款开源、可定制且预训练的人形机器人基础模型,拥有“System 1”(快速反应动作)与“System 2”(推理规划)的双系统架构。
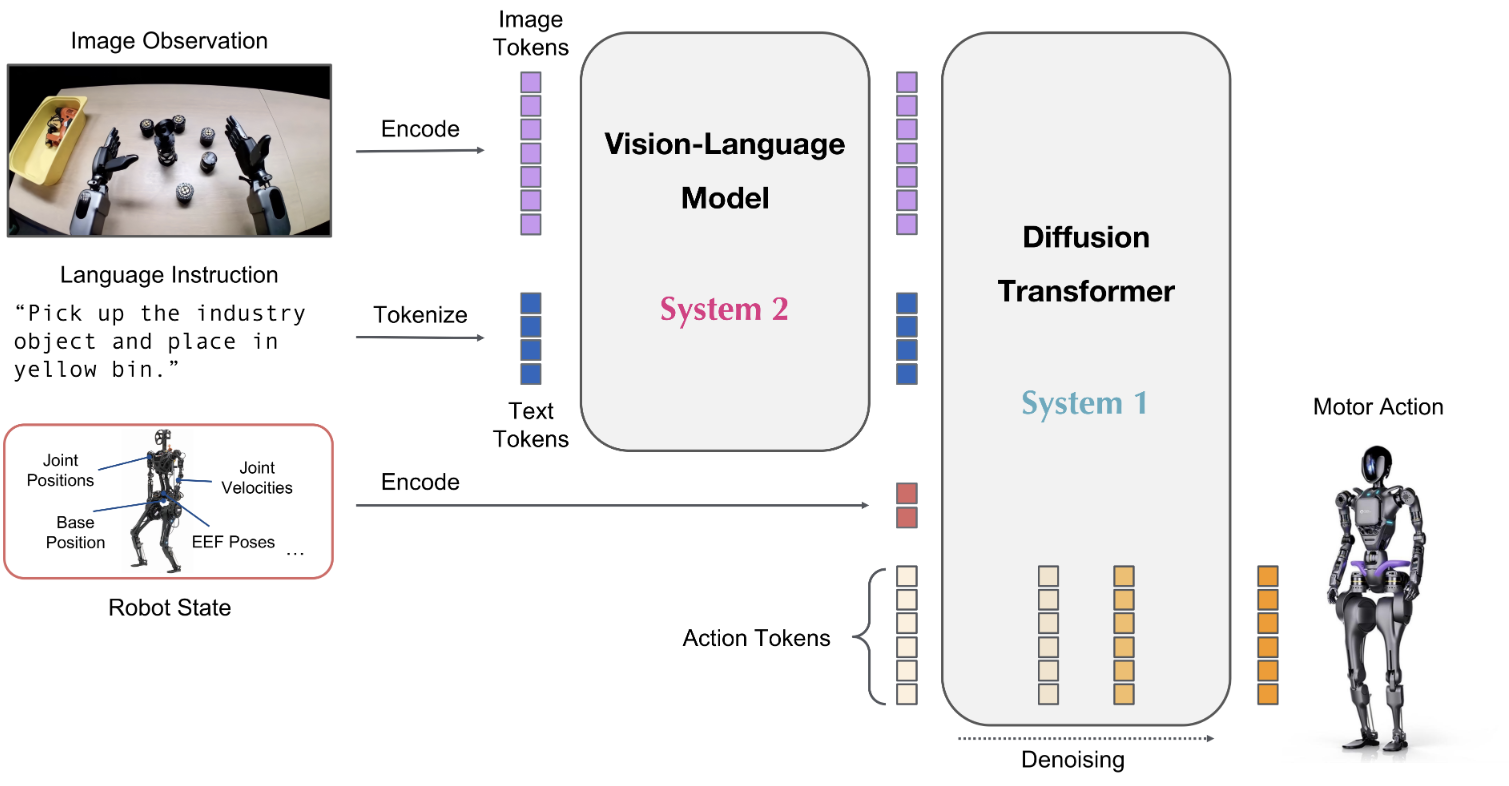
图 GR00T结构示意图
GR00T N1.5于2025年6月11日正式发布,相比GR00T N1,N1.5在架构与数据方面引入了多个关键优化:彻底冻结视觉语言模型(VLM)、简化视觉编码器到语言模型间的 Adapter、在训练目标中新增了 FLARE、结合DreamGen合成轨迹生成的训练数据,增强zero-/few-shot 泛化能力等。
主要资料:
Hugging Face:
(模型)nvidia/GR00T-N1.5-3B · Hugging Face![]() https://huggingface.co/nvidia/GR00T-N1.5-3B (数据集)
https://huggingface.co/nvidia/GR00T-N1.5-3B (数据集)
nvidia/PhysicalAI-Robotics-GR00T-X-Embodiment-Sim · Datasets at Hugging Face![]() https://huggingface.co/datasets/nvidia/PhysicalAI-Robotics-GR00T-X-Embodiment-Sim
https://huggingface.co/datasets/nvidia/PhysicalAI-Robotics-GR00T-X-Embodiment-Sim
1.2 与端到端VLA的区别
许多VLA模型采用端到端结构,将图像与语言输入直接映射为动作输出——从视觉编码、语言理解到动作生成一体化处理。早期的VLA大多直接使用视觉语言模型,微调后用于机器人动作预测。这类架构往往泛化表现不佳,容易出现“幻觉”(hallucination)问题,并且依赖大量真实机器人数据进行微调。根据我之前的经验来看,一旦面对新场景(如不同照明、物体、布局),性能通常急剧下降。此外,获取真实机器人示范数据极其昂贵,不利于通用化训练。GR00T双系统架构带来明显优势:System 2(VLM 感知模块)负责理解视觉语言环境,冻结预训练能力,System 1(动作生成模块)快速生成连续控制指令,应对实时控制需求。
另外咱们还能观察到的一个问题是,端到端VLA在微调过程中会因为灾难性遗忘(catastrophic forgetting)而显著削弱 VLM 泛化与理解能力,表现为视觉-语言泛化与理解能力下降、零样本性能差、甚至更强的幻觉倾向,这对于机器人领域是致命的。关于这个观点,这里我给出一些文章,感兴趣的朋友可以瞅一眼:
VLM持续学习时,直接微调导致零样本迁移性能明显下降,被明确归因为灾难性遗忘:https://openaccess.thecvf.com/content/ICCV2023/papers/Zheng_Preventing_Zero-Shot_Transfer_Degradation_in_Continual_Learning_of_Vision-Language_Models_ICCV_2023_paper.pdf![]() https://openaccess.thecvf.com/content/ICCV2023/papers/Zheng_Preventing_Zero-Shot_Transfer_Degradation_in_Continual_Learning_of_Vision-Language_Models_ICCV_2023_paper.pdf
https://openaccess.thecvf.com/content/ICCV2023/papers/Zheng_Preventing_Zero-Shot_Transfer_Degradation_in_Continual_Learning_of_Vision-Language_Models_ICCV_2023_paper.pdf
多模态模型在微调后往往丧失在标准视觉识别或语言任务上的性能:[2309.10313] Investigating the Catastrophic Forgetting in Multimodal Large Language ModelsAbstract page for arXiv paper 2309.10313: Investigating the Catastrophic Forgetting in Multimodal Large Language Models![]() https://arxiv.org/abs/2309.10313
https://arxiv.org/abs/2309.10313
监督信号偏向文本,模型会弱化视觉表征,出现“visual forgetting”: Mitigating Visual Knowledge Forgetting in MLLM Instruction-tuning via Modality-decoupled Gradient Descent![]() https://arxiv.org/html/2502.11740v1
https://arxiv.org/html/2502.11740v1
GR00T 通过冻结 VLM,将微调集中在动作头上,该设计显著避免了 VLM 的能力退化问题,保持了模型在新任务和已知能力之间的平衡。
2. 为什么选Intel-OpenVINO部署?
2.1 OpenVINO 的优势
OpenVINO 是 Intel 提供的跨硬件推理优化工具链,其核心机制是将模型转换为中间表示(IR,Intermediate Representation),并在编译过程中进行一系列优化,其实这也是我们下面在部署过程中,需要完成的核心逻辑:将 PyTorch(或TensorFlow)等框架训练好的模型统一转换为IR格式,屏蔽框架差异,提升可移植性。
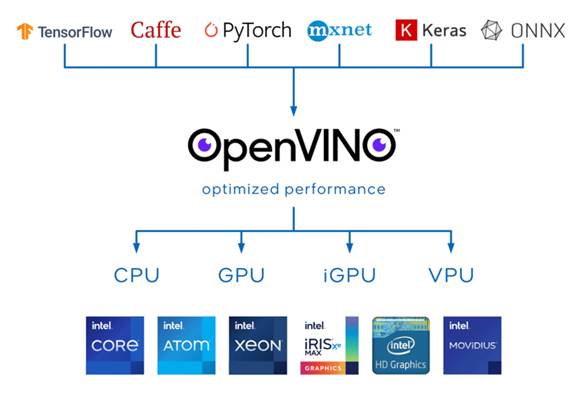
图 OpenVINO介绍
依托 Intel 完整的软硬件生态,OpenVINO 在不同硬件上几乎“开箱即用”,同时保证精度近乎无损,为机器人任务提供一致、可靠的推理性能。我之前其实做过很多小的端到端网络的OpenVINO加速,之前需要先转ONNX再转IR,感兴趣的朋友可以瞅瞅我之前的工作踩坑记录。神经网络使用openvino加速_tesseract openvino加速-CSDN博客![]() https://blog.csdn.net/weixin_52582300/article/details/140098031?spm=1001.2014.3001.5501
https://blog.csdn.net/weixin_52582300/article/details/140098031?spm=1001.2014.3001.5501
2.2 多网络结构(如 GR00T)的加速优势
GR00T本质上是由多个网络模块组合而成(VLM backbone、动作 decoder等)。传统框架在这种模块化结构下往往存在调度与内存拷贝的开销,而OpenVINO对多子网络推理具有天然优势:支持 pipeline 级别的异步并行执行,减少不同模块之间的等待时间,提高跨模块的推理效率;保持原始网络的前向传播逻辑不变,部署的时候我们无需修改模型架构。因此,OpenVINO 尤其适合像 GR00T 这样多模块协同的系统,使其能够在机器人本地设备上高效运行,保证实时性和低功耗。
3. 实施细节(含代码示例)
3.1 Deployment Scripts 概览
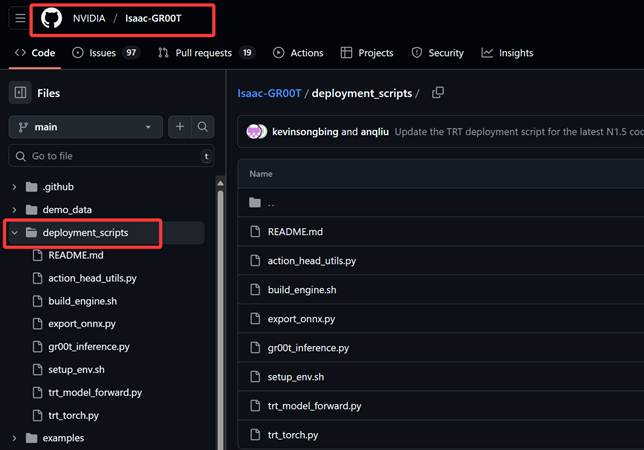
我们阅读代码就能发现,原先的Isaac-GR00T 仓库中,deployment_scripts/ 文件夹是整个推理部署流程的核心入口。这个目录下的脚本为 GR00T N1.5 提供了从模型导出、引擎构建,到推理执行的三个完整工具链(这其实也是我们扩展其intel生态的主要逻辑),源代码分为以下三个层次:
ONNX 导出层
export_onnx.py 负责将训练好的 PyTorch 模型转换为 ONNX 格式。
引擎构建层(TensorRT 优化及前向传播)
build_engine.sh、tr_model_forward.py 利用 TensorRT 的编译工具将 ONNX 模型转化为高性能的 TRT 引擎文件。本层涵盖算子融合、量化和 GPU调度。
源码中Set TensorRT forward functions如下:
policy.model.backbone.forward = partial(eagle_tensorrt_forward, policy.model.backbone)
    policy.model.action_head.get_action = partial(
        action_head_tensorrt_forward, policy.model.action_head
    )
推理接口层
gr00t_inference.py 定义了标准的推理调用接口:加载引擎 → 输入预处理 → 向前传播(forward)→ 输出解析。
源码中调用不同推理引擎的条件判断分支如下(我节选部分):
if args.inference_mode == "pytorch":
        predicted_action = policy.get_action(step_data)
        print("\n=== PyTorch Inference Results ===")
        for key, value in predicted_action.items():
            print(key, value.shape)
elif args.inference_mode == "tensorrt":
        # Setup TensorRT engines
        setup_tensorrt_engines(policy, args.trt_engine_path)

        predicted_action = policy.get_action(step_data)
        print("\n=== TensorRT Inference Results ===")
        for key, value in predicted_action.items():
            print(key, value.shape)
可以看到,这套 Deployment Scripts 本质上围绕 “导出 → 编译 → 推理” 三个步骤展开。因此,接下来我将展示如何基于原有设计思想,针对 OpenVINO 重构出对应的导出(3.2小节)、forward(3.3小节)、推理(3.4小节)三大模块,让 GR00T 在 Intel 平台上顺畅运行。
3.2 IR文件的导出 (export_ov.py)
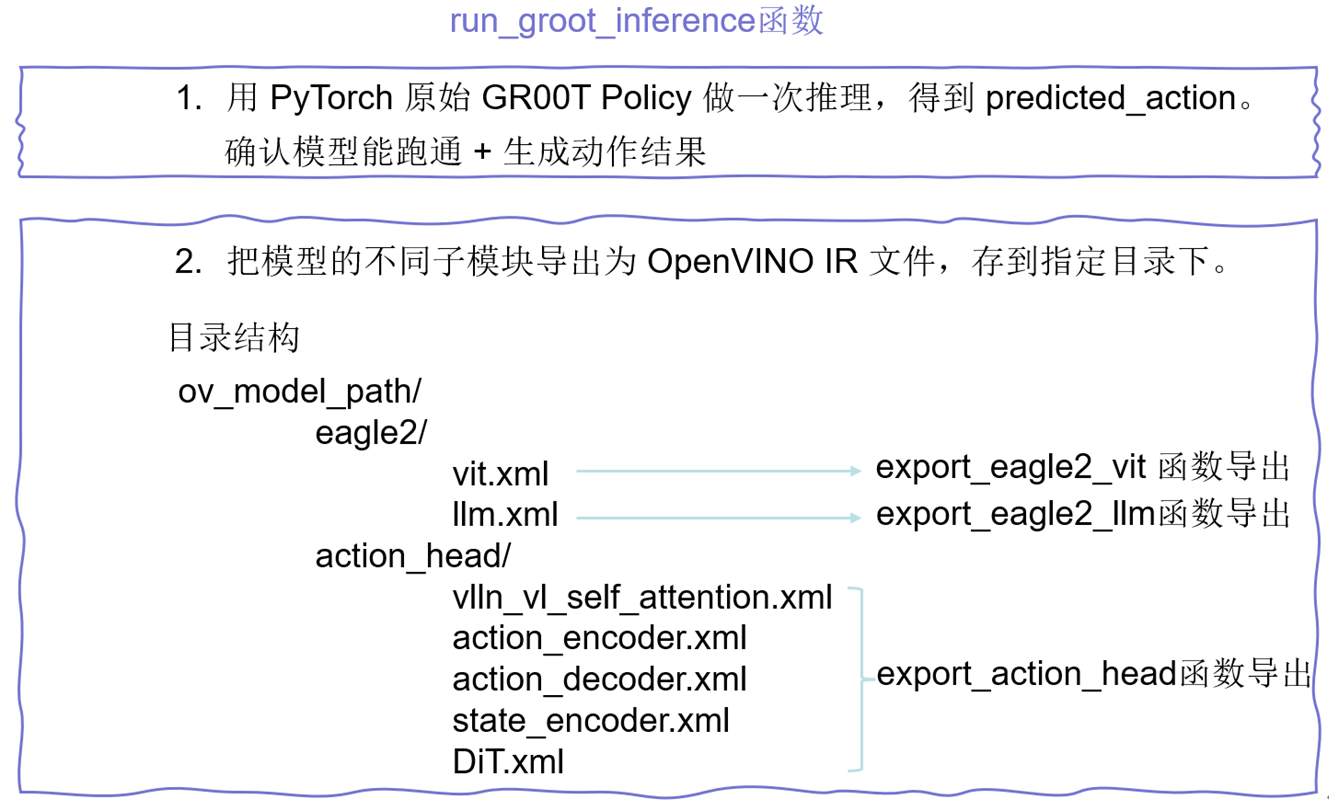
图 GR00T网络结构导出为Openvino IR的逻辑
首先我们需要先类似于export_onnx.py写一个能把网络各个模块导出为IR格式的脚本,上图展示的就是GR00T网络结构导出为Openvino IR的逻辑,我定义了run_groot_inference主函数来完成整个网络的转换过程:
def run_groot_inference(
    dataset_path: str,
    model_path: str,
    ov_model_path: str,
    device: str = "cpu",
) -> Dict[str, float]:

    # load the policy
    data_config = DATA_CONFIG_MAP["fourier_gr1_arms_only"]
    modality_config = data_config.modality_config()
    modality_transform = data_config.transform()
    EMBODIMENT_TAG = "gr1"
    policy = Gr00tPolicy(
        model_path=model_path,
        embodiment_tag=EMBODIMENT_TAG,
        modality_config=modality_config,
        modality_transform=modality_transform,
        device=device,
    )
    modality_config = policy.modality_config
    # load the dataset
    dataset = LeRobotSingleDataset(
        dataset_path=dataset_path,
        modality_configs=modality_config,
        video_backend="decord",
        video_backend_kwargs=None,
        transforms=None,  # We will handle transforms separately through the policy
        embodiment_tag=EMBODIMENT_TAG,
    )

    step_data = dataset[0]
    # get the action
    predicted_action = policy.get_action(step_data)

    attention_mask, state = get_input_info(policy, step_data)
    # export ov
    os.makedirs(ov_model_path, exist_ok=True)
    os.makedirs(os.path.join(ov_model_path, "eagle2"), exist_ok=True)
    os.makedirs(os.path.join(ov_model_path, "action_head"), exist_ok=True)

    export_eagle2_vit(policy.model.backbone.eagle_model.vision_model.vision_model, ov_model_path)
    export_eagle2_llm(
        policy.model.backbone, policy.model.config.backbone_cfg, ov_model_path, attention_mask
    )
    export_action_head(policy, ov_model_path, state, attention_mask)

    return predicted_action
值得一提的是,我们上文讲到模块化导出网络结构,所以大家能看到导出的目录结构中,会分为eagle2部分(VLM部分)和action_head部分,而且文件夹下的每个xml文件都是一个导出完成的单独的IR工程文件。
这里给出一个将 GR00T 的视觉前端 ViT 模块导出为 OpenVINO IR 格式的示例:
def export_eagle2_vit(vision_model, output_dir):
    class SiglipVisionEmbeddingsOpt(SiglipVisionEmbeddings):
        def __init__(self, config):
            super().__init__(config)

        def forward(
            self,
            pixel_values: torch.FloatTensor,
            position_ids: torch.LongTensor,  # position_ids is now an input
            interpolate_pos_encoding=False,
        ) -> torch.Tensor:
            _, _, height, width = pixel_values.shape
            target_dtype = self.patch_embedding.weight.dtype
            patch_embeds = self.patch_embedding(
                pixel_values.to(dtype=target_dtype)
            )  # shape = [*, width, grid, grid]
            embeddings = patch_embeds.flatten(2).transpose(1, 2)

            if interpolate_pos_encoding:
                embeddings = embeddings + self.interpolate_pos_encoding(embeddings, height, width)
            else:
                embeddings = embeddings + self.position_embedding(position_ids)
            return embeddings

    class SiglipVisionTransformerOpt(SiglipVisionTransformer):
        def __init__(self, config: SiglipVisionConfig):
            config._attn_implementation = "sdpa"
            super().__init__(config)
            self.embeddings = SiglipVisionEmbeddingsOpt(config)

        def forward(
            self,
            pixel_values,
            position_ids,  # Pass position_ids as input
            output_attentions: Optional[bool] = None,
            output_hidden_states: Optional[bool] = None,
            interpolate_pos_encoding: Optional[bool] = False,
        ):
            output_attentions = (
                output_attentions
                if output_attentions is not None
                else self.config.output_attentions
            )
            output_hidden_states = (
                output_hidden_states
                if output_hidden_states is not None
                else self.config.output_hidden_states
            )

            hidden_states = self.embeddings(
                pixel_values,
                position_ids=position_ids,
                interpolate_pos_encoding=interpolate_pos_encoding,
            )

            encoder_outputs = self.encoder(
                inputs_embeds=hidden_states,
                output_attentions=output_attentions,
                output_hidden_states=output_hidden_states,
            )

            last_hidden_state = encoder_outputs.last_hidden_state
            last_hidden_state = self.post_layernorm(last_hidden_state)

            return last_hidden_state

    model = SiglipVisionTransformerOpt(vision_model.config).to(torch.float32)
    model.load_state_dict(vision_model.state_dict())
    model.eval()

    pixel_values = torch.randn(
        (1, model.config.num_channels, model.config.image_size, model.config.image_size),
        dtype=torch.float32,
        device="cpu",
    )
    position_ids = torch.arange(model.embeddings.num_patches, device="cpu").expand((1, -1))

    os.makedirs(output_dir, exist_ok=True)
    with torch.inference_mode():
        ov_vit = ov.convert_model(
            model,
            example_input=[pixel_values, position_ids]
        )
        ov.save_model(ov_vit, f"{output_dir}/eagle2/vit.xml")
在 export_eagle2_vit 函数中,需要对原始的 SigLIP Vision Transformer 进行改写:将位置编码 (Position IDs) 显式作为输入,保证导出的 IR 模型在不同输入分辨率下依然可用;固定注意力实现为 SDPA(这个我在3.5小节会讲)。
随后,通过加载权重并构造一个模拟图像输入,调用 OpenVINO 的 convert_model 完成 IR 转换,最终得到 vit.xml 文件。这个文件就是 GR00T 视觉前端在 Intel 平台的推理基石。
注:由于篇幅原因,导出IR的脚本并没有全部贴上来,但是逻辑和原理与源码中export_onnx.py相似,大家可以根据上边我的示例export_eagle2_vit 函数,类比完成即可。
3.3 实现基于OpenVINO的向前传播(ov_model_forward.py)
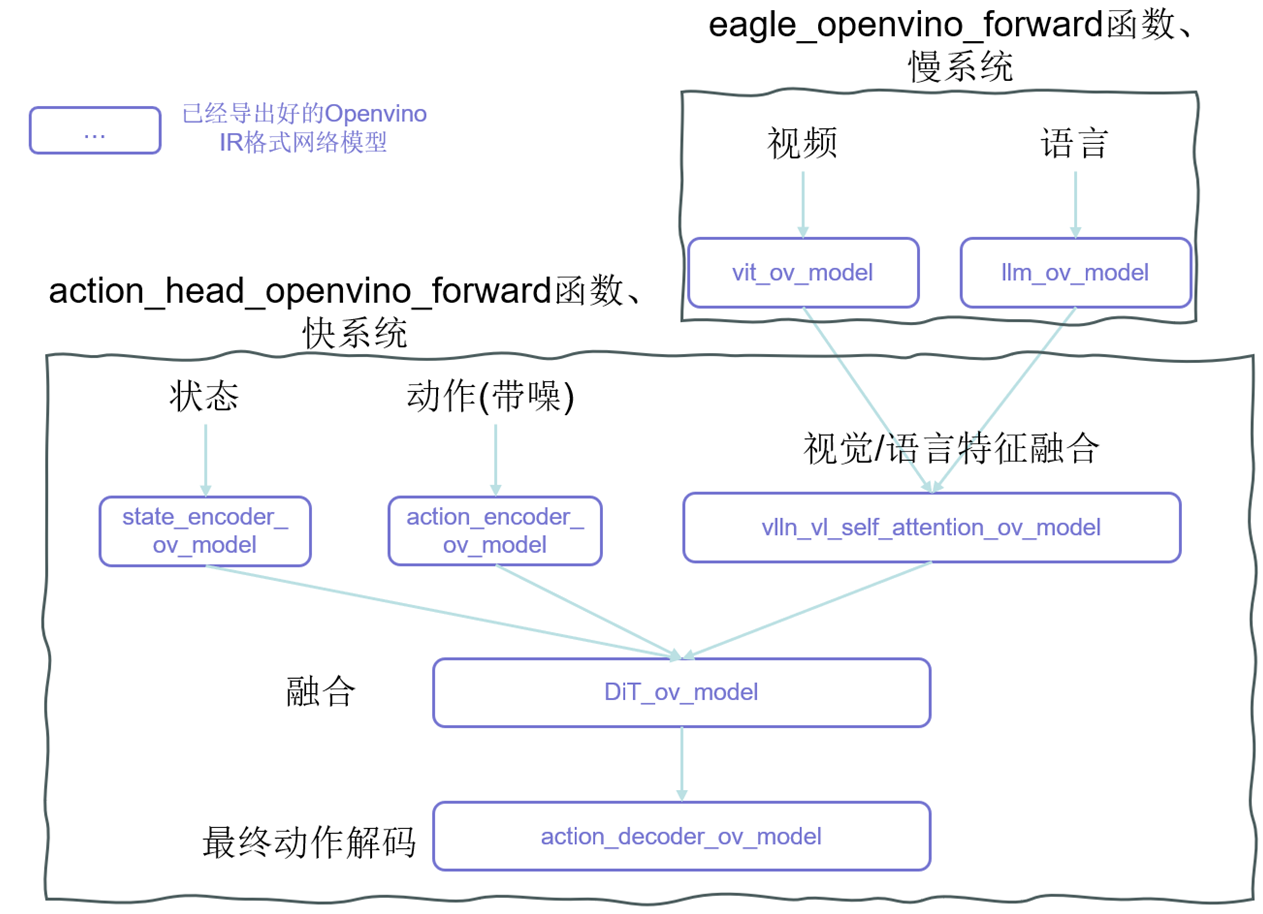
图 Openvino实现GR00T前向传播逻辑
现在,我们拿到了所有网络结构的xml格式文件,我们需要定义向前传播过程,把这些零散的积木堆起来,因此需要定义ov_model_forward.py,这和源代码中的向前传播是并行的。上面的图中详细阐述了各个导出的模块是如何“堆起来”形成整个GR00T的双系统的,大家可以详细看看。因此,我们定义双系统的两个系统传播函数eagle_openvino_forward和action_head_openvino_forward,并使用它们完成OpenVINO forward:
# Set OpenVINO forward functions
    policy.model.backbone.forward = partial(eagle_openvino_forward, policy.model.backbone)
    policy.model.action_head.get_action = partial(action_head_openvino_forward, policy.model.action_head)
同时,我们需要完成整个ov_model_forward.py的逻辑,删除 PyTorch 对应网络模块,加载IR 模型,绑定到 policy 对应位置上(policy.model.backbone或policy.model.action_head),最后使用forward流程(该流程的实现逻辑我画在3.4小节的图中了):
def setup_openvino_models(policy, ov_model_path, device="CPU"):
    """
    Setup OpenVINO models for GR00T model inference.
    Args:
        policy: GR00T policy model instance
        ov_model_path: Path to OpenVINO XML files
    """
    policy.model.backbone.num_patches = (
        policy.model.backbone.eagle_model.vision_model.vision_model.embeddings.num_patches
    )
    if hasattr(policy.model.backbone.eagle_model, "vision_model"):
        del policy.model.backbone.eagle_model.vision_model
    if hasattr(policy.model.backbone.eagle_model, "language_model"):
        del policy.model.backbone.eagle_model.language_model
    if hasattr(policy.model.action_head, "vlln"):
        del policy.model.action_head.vlln
    if hasattr(policy.model.action_head, "vl_self_attention"):
        del policy.model.action_head.vl_self_attention
    if hasattr(policy.model.action_head, "model"):
        del policy.model.action_head.model
    if hasattr(policy.model.action_head, "state_encoder"):
        del policy.model.action_head.state_encoder
    if hasattr(policy.model.action_head, "action_encoder"):
        del policy.model.action_head.action_encoder
    if hasattr(policy.model.action_head, "action_decoder"):
        del policy.model.action_head.action_decoder

    core = ov.Core()
    # Setup backbone models
    policy.model.backbone.vit_ov_model = core.compile_model(os.path.join(ov_model_path, "eagle2/vit.xml"), device_name=device)
    policy.model.backbone.llm_ov_model = core.compile_model(os.path.join(ov_model_path, "eagle2/llm.xml"), device_name=device)
    # Setup action head models
    policy.model.action_head.vlln_vl_self_attention_ov_model = core.compile_model(os.path.join(ov_model_path, "action_head/vlln_vl_self_attention.xml"), device_name=device)
    policy.model.action_head.action_encoder_ov_model = core.compile_model(os.path.join(ov_model_path, "action_head/action_encoder.xml"), device_name=device)
    policy.model.action_head.action_decoder_ov_model = core.compile_model(os.path.join(ov_model_path, "action_head/action_decoder.xml"), device_name=device)
    policy.model.action_head.DiT_ov_model = core.compile_model(os.path.join(ov_model_path, "action_head/DiT.xml"), device_name=device)
    policy.model.action_head.state_encoder_ov_model = core.compile_model(os.path.join(ov_model_path, "action_head/state_encoder.xml"), device_name=device)

    # Set OpenVINO forward functions
    policy.model.backbone.forward = partial(eagle_openvino_forward, policy.model.backbone)
    policy.model.action_head.get_action = partial(action_head_openvino_forward, policy.model.action_head)
同样,双系统的两个系统传播函数eagle_openvino_forward和action_head_openvino_forward我选取一个进行示例:
def eagle_openvino_forward(self, vl_input):
    eagle_prefix = "eagle_"
    eagle_input = {
        k.removeprefix(eagle_prefix): v for k, v in vl_input.items() if k.startswith(eagle_prefix)
    }
    del eagle_input["image_sizes"]
    vl_input = eagle_input

    self.set_frozen_modules_to_eval_mode()
    batch_size = vl_input["pixel_values"].shape[0]
    position_ids = torch.arange(self.num_patches, device="cpu").expand((batch_size, -1))
    pixel_values = vl_input["pixel_values"]
    if pixel_values.dtype != torch.float32:
        pixel_values = pixel_values.to(torch.float32)
    position_ids = position_ids.to(torch.int64)

    vit_features = self.vit_ov_model([pixel_values, position_ids])[0]

    input_ids = vl_input["input_ids"]
    attention_mask = vl_input["attention_mask"]
    vit_features_tensor = vit_features if isinstance(vit_features, torch.Tensor) else torch.from_numpy(vit_features)

    llm_features = self.llm_ov_model([input_ids, vit_features_tensor, attention_mask])[0]

    return BatchFeature(
        data={
            "backbone_features": torch.from_numpy(llm_features),
            "backbone_attention_mask": vl_input["attention_mask"],
        }
    )
该函数前向传播的逻辑如下:
总体流程:
1)输入处理:提取并规范化输入(图像和文本)。
2)视觉编码 (ViT):把图像切 patch 并生成视觉特征。
3)语言建模 (LLM):融合文本 tokens 和视觉特征。
4)输出:返回 backbone 特征和 attention mask,供后续下游任务使用。
3.4 统一推理接口(gr00t_inference.py)
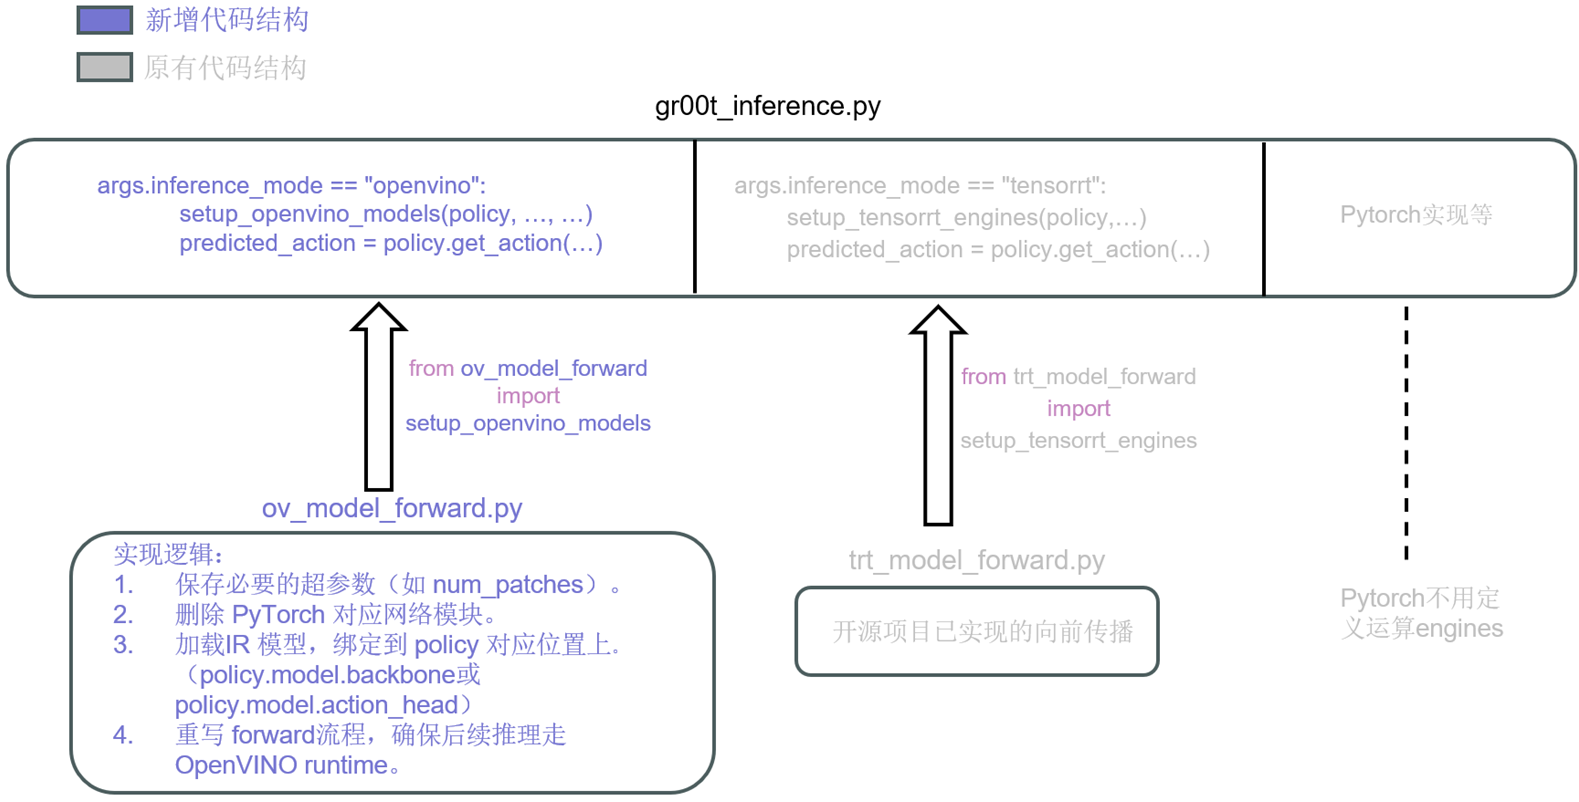
图 推理逻辑
现在,我们已经有了一个“引擎” ov_model_forward.py,我们需要把他整合进gr00t_inference.py,因为这个就是源代码中的推理入口。所以我们需要在原来脚本中新增 --inference_mode=openvino 参数,支持切换运行模式。整个的逻辑比较好理解,上图已经展现。
主函数里面传参定义的部分,我现在也加上了openvino的选项:
 parser.add_argument(
        "--inference_mode",
        type=str,
        choices=["pytorch", "tensorrt", "openvino", "compare"],
        default="pytorch",
        help="Inference mode: 'pytorch' for PyTorch inference, 'tensorrt' for TensorRT inference, 'openvino' for Openvino inference, 'compare' for compare PyTorch and TensorRT outputs similarity",
    )
同时在条件判断时,也新增了分支,调用咱们的openvino“引擎” ov_model_forward.py:
elif args.inference_mode == "openvino":
        setup_openvino_models(policy, args.ov_model_path, "GPU.0")
        predicted_action = policy.get_action(step_data)
        print("\n=== Openvino Inference Results ===")
        for key, value in predicted_action.items():
            print(key, value.shape)
该代码留了一个接口,可以灵活选择执行设备。当前是"GPU.0",这是因为setup_openvino_models默认就是使用核显。一旦我们想切换到独立 GPU,只需修改为 "GPU.1"。根据官方文档,OpenVINO 的设备命名规则如下(节选):设备会被枚举为 GPU.X,其中 X = {0, 1, 2...}。GPU.0 固定表示integrated GPU集成显卡(iGPU),而 GPU.1 则通常对应第一块独立显卡(dGPU)。
官方操作手册链接如下:
3.5 Config 文件的调整
在整体部署迁移过程中,有一个比较细节的技术问题,我认为有必要单独强调一下,就是遇到的跨生态问题:FlashAttention →SDPA(ScaledDotProductAttention)
我们可以在源码的readme注意到,官方强调了”Note that, please make sure your CUDA version is 12.4. Otherwise, you may have a hard time with properly configuring flash-attn module.” 这就是因为FlashAttention本质是用 CUDA kernel 做 attention 的 IO-aware 算子优化。强依赖cuda。我们迁移到Intel Architecture时,可以使用SDPA(ScaledDotProductAttention)完成替换。OpenVINO官方文档如下:https://docs.openvino.ai/2024/documentation/openvino-ir-format/operation-sets/operation-specs/sequence/scaled-dot-product-attention.html![]() https://docs.openvino.ai/2024/documentation/openvino-ir-format/operation-sets/operation-specs/sequence/scaled-dot-product-attention.html
https://docs.openvino.ai/2024/documentation/openvino-ir-format/operation-sets/operation-specs/sequence/scaled-dot-product-attention.html
所以改动就在于:
gr00t/model/backbone/eagle2_hg_model/config.json中,需要修改实现方式:
{
    "_attn_implementation": "sdpa",
    "_commit_hash": null,
    "architectures": [
        "Eagle2_5_VLForConditionalGeneration"
],
略…
然后我们在export_ov.py中,注意定义类似于:
 class SiglipVisionTransformerOpt(SiglipVisionTransformer):
        def __init__(self, config: SiglipVisionConfig):
            config._attn_implementation = "sdpa"
            super().__init__(config)
4. 小结
4.1 部署心得总结
我自己在先前的科研经历中,主要是做集感知、规划、执行、验证、持续学习为一体的具身智能体架构的一些工作,在这个过程中使用到了大量视觉或是基于transformer架构的网络,我其实都会使用OpenVINO做加速,所以这次参与完成GR00T部署的一些工作也让我有了更深入的理解和学习。我认为相比于传统 GPU-only 部署方案,Intel 架构在通用性、可扩展性上具备显著优势:既能覆盖从云端到边缘端的广泛场景,又能充分利用 npu多种算力单元的异构调度能力。
一直使用OpenVINO的过程中我也发现整个生态在飞速完善,版本迭代带来更加丰富全面的功能,很多时候不再需要重复造轮子了。OpenVINO不仅极大程度拓宽了模型部署的可选择性,还通过硬件加速带来更优的推理性能,为机器人任务的实时响应和大规模落地提供了坚实支撑。

有“AI”的1024 = 2048,欢迎大家加入2048 AI社区
更多推荐

 24
24 0
0- 0


 已为社区贡献1条内容

所有评论(0)