Create a Simple Survey for a Service (Survey Designer, Trigger Condition, Email Notification)
【代码】Create a Simple Survey for a Service (Survey Designer, Trigger Condition, Email Notification)
- Creating a Survey
1. Application navigator --> Survey --> Survey Designer
2. ServiceNow makes it really easy with the survey designer. we can select the type of question we would want to ask the user. I have created one with 2 questions.
 a. Feedback - type - String
 b. Rate - type - Numeric Scale
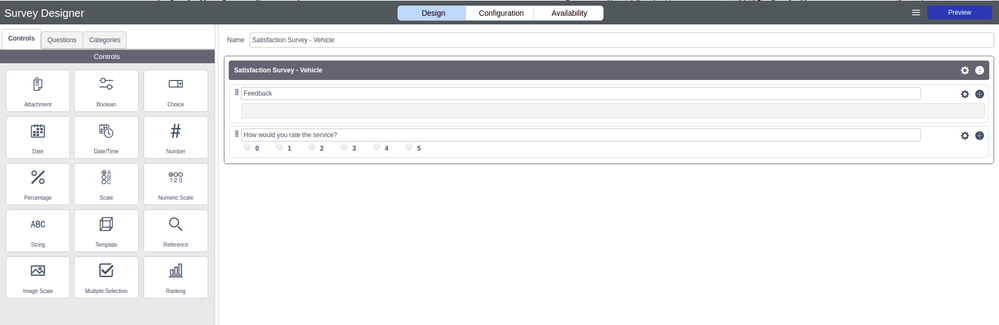
3. Once the survey is saved, we have to publish it. It can be done from a survey designer or from the survey definition form view. The survey must be published for users to access it or complete it.
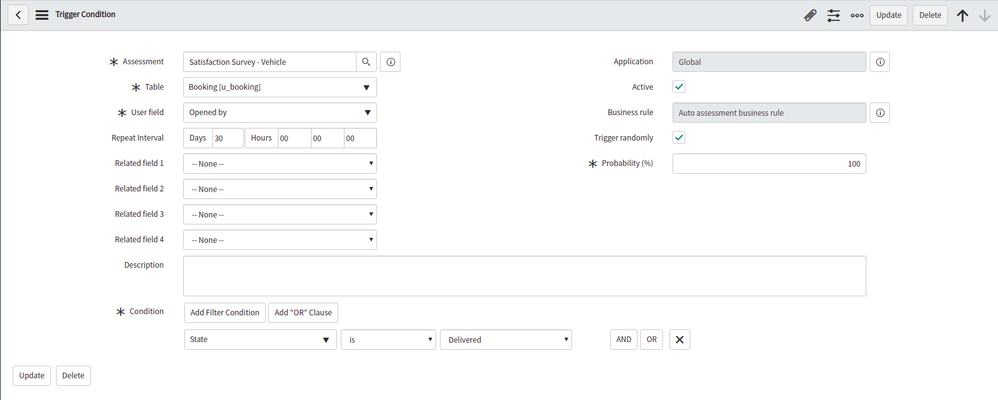
- Adding conditions
1. user(s) receive the notification when a condition is satisfied.
2. navigate to Survey --> Administration --> Trigger Conditions.
The assessment would be the survey that we have created in the earlier step
User field represents the user who would receive the notification
The condition can be set accordingly. For ex: when a service is delivered or a request is completed etc.
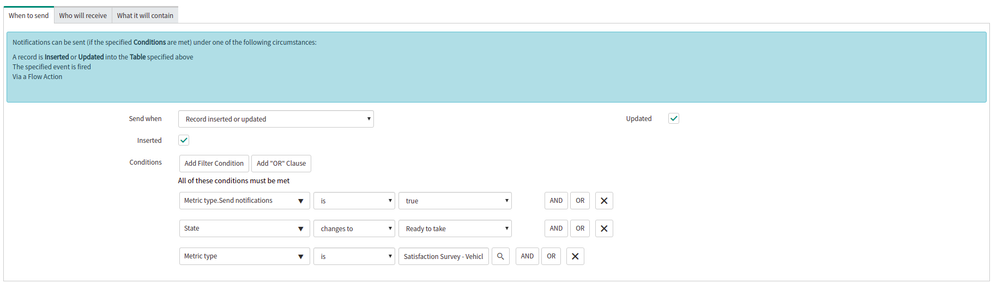
- Email Notification
ServiceNow provides a default Survey Email Notification that would be triggered when a survey condition(trigger condition) is satisfied.
  Name: Survey User Invite
  Table: Assessment Instance [asmt_assessment_instance]
Email template/ Email layouts can be changed to add details as required.
To create a custom Survey Email specific for the survey created, we can simply copy the existing notification and add our conditions in the When to Send tab. For example as below
- Redirecting the User to Service Portal.
Default Survey Notification URL has the link that would redirect to the survey page on ServiceNow instance. In order to change the URL to the service portal, we can change the script include AssessmentUtils and add the below function
getInstanceLinkHTMLBooking : function(instanceGr) {
  var instanceURL = gs.getProperty("glide.servlet.uri");
  url = instanceURL + 'sp?id=take_survey&instance_id=' + instanceGr.sys_id;
  return url;
},
Call this script include method in the mail script of the email notification that we have created earlier. for ex:
Hello ${user},

Thank you!
<mail_script>
var html = new AssessmentUtils().getInstanceLinkHTMLBooking(current);

template.print('<p><font face="helvetica">');
template.print('<a style="font-size: 16px; font-family: Helvetica, Arial, sans-serif; color: #ffffff; text-decoration: none; border-radius: 3px; -webkit-border-radius: 3px; -moz-border-radius: 3px; background-color: #f13632; border: 1px solid #0368d4; display: inline-block; padding: 5px" href="' + html + '">' + 'Click here to give us your feedback' + '</a>');
template.print('</font></p>');
</mail_script>

Thank you!
- Survey Response
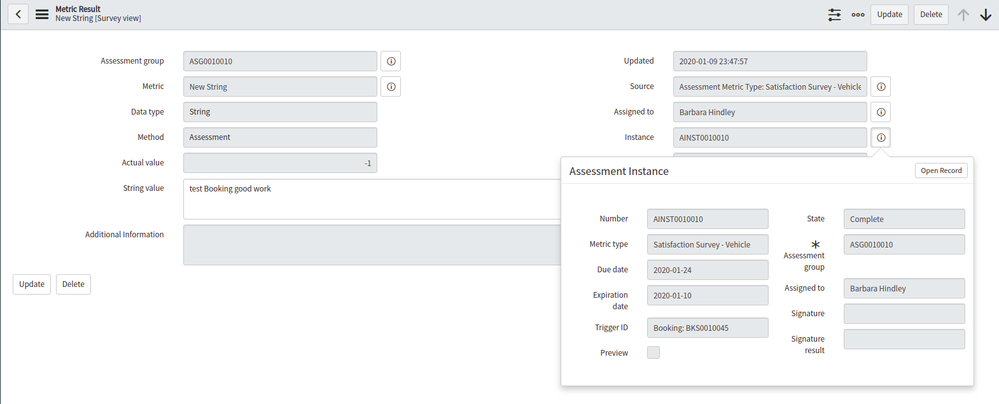
- the survey result can be viewed in survey responses. navigator Survey --> Survey Responses
- The record assigned to the instance can be fetched from the assessment instance as shown in the screenshot

有“AI”的1024 = 2048,欢迎大家加入2048 AI社区
更多推荐


 5
5 0
0- 0


 已为社区贡献14条内容

所有评论(0)