AI、人工智能基础: 模型剪枝的概念与实践(PyTorch版)
文章摘要 本文介绍了基于PyTorch的模型剪枝技术,通过仿照生物神经网络的稀疏连接特性来压缩和加速深度神经网络。文章详细讲解了模型剪枝的核心概念,包括使用掩码机制实现参数筛选,以及剪枝后的参数变化。通过LeNet示例展示了单模块剪枝、多参数模块剪枝、全局剪枝和自定义剪枝等不同方法的具体实现,并对比了各种剪枝策略的特点和适用场景。PyTorch的torch.nn.utils.prune模块提供了灵
胡说八道:
各位观众老爷,大家好,我是诗人啊_,今天和各位分享模型剪枝的相关知识和操作,一文速通~
(屏幕前的你,帅气低调有内涵,美丽大方很优雅… 所以,求个点赞、收藏、关注呗~)
正经标题:模型剪枝理论入门及 PyTorch API 实战
此文讲解 torch.nn.utils.prune 模块的使用,模型剪枝的执行步骤请看 ↓↓↓↓↓
模型剪枝的概念与实践(PyTorch版)
前言
深度神经网络的大型预训练模型往往依赖庞大的参数量实现SOTA效果,但生物神经网络却通过稀疏连接完成复杂任务。模型剪枝正是受此启发,通过将稠密连接转化为稀疏连接,在保持性能的前提下压缩模型,本文基于PyTorch详细介绍模型剪枝的概念与实操。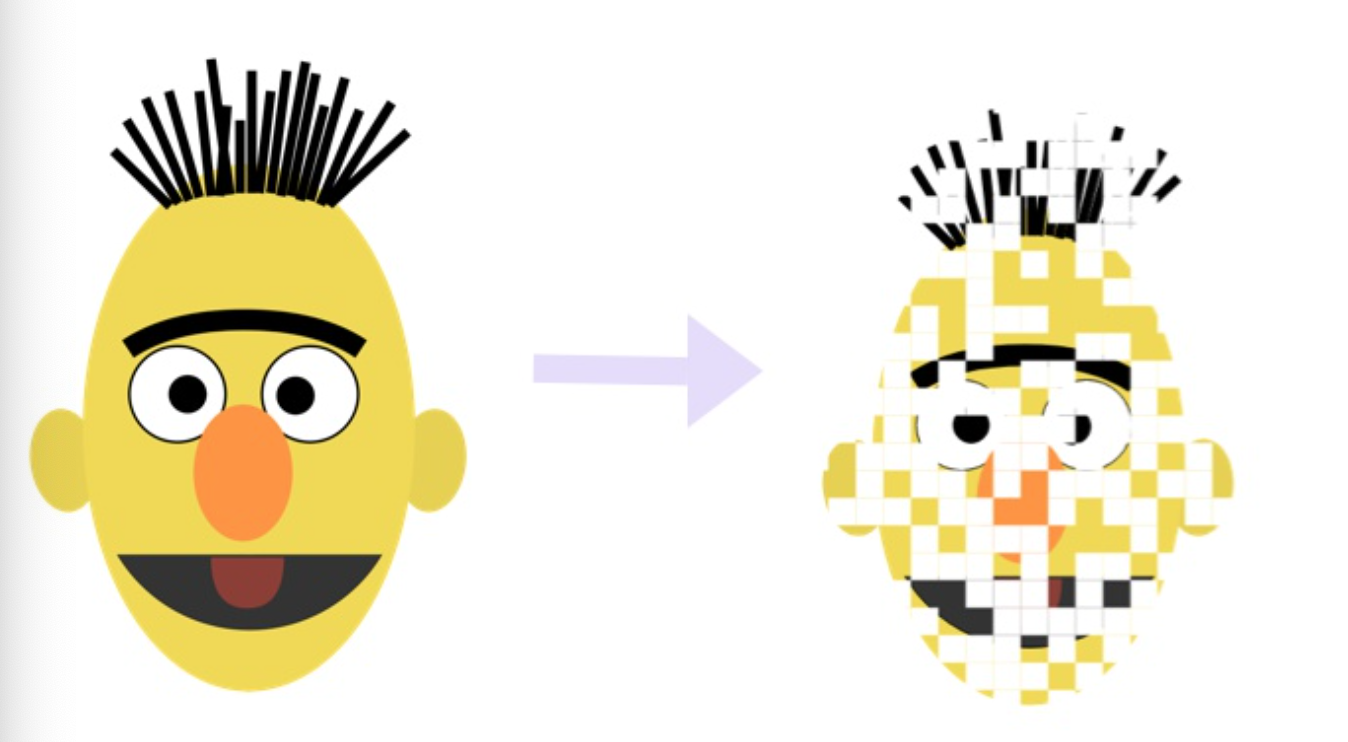
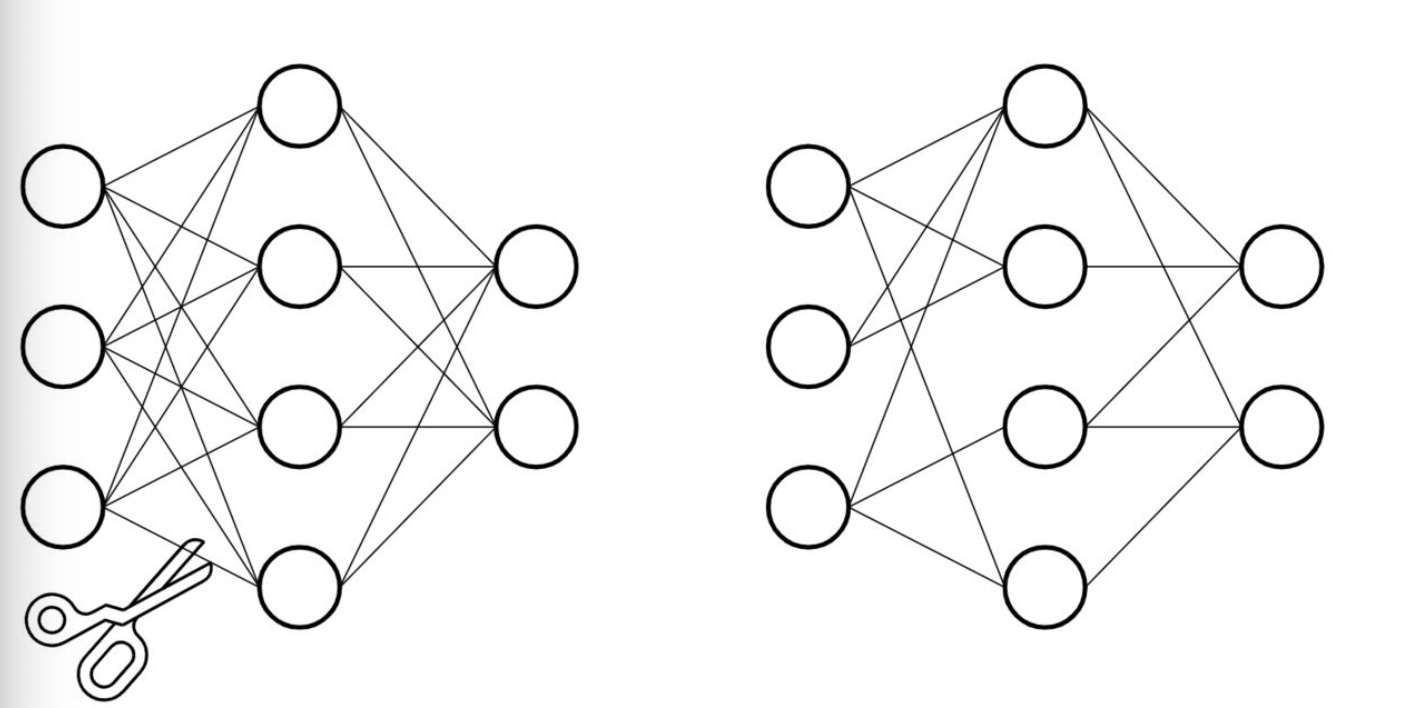
一、什么是模型剪枝?
- 核心思想:仿照生物神经网络的稀疏连接特性,移除冗余参数或结构,实现模型压缩与加速。
- 本质:将稠密网络转化为稀疏网络,在精度损失可接受的范围内减少参数量和计算量。
- PyTorch支持:需使用
torch.nn.utils.prune模块,要求PyTorch版本≥1.4.0,支持多种剪枝方式:- 特定网络模块的剪枝
- 多参数模块的剪枝
- 全局剪枝
- 用户自定义剪枝
二、剪枝的基本原理(以LeNet为例)
2.1 准备工作
先定义经典LeNet网络作为示例:
import torch
from torch import nn
import torch.nn.utils.prune as prune
import torch.nn.functional as F

device = torch.device("cuda" if torch.cuda.is_available() else "cpu")

class LeNet(nn.Module):
    def __init__(self):
        super(LeNet, self).__init__()
        self.conv1 = nn.Conv2d(1, 6, 3)  # 输入1通道,输出6通道,3x3卷积核
        self.conv2 = nn.Conv2d(6, 16, 3)
        self.fc1 = nn.Linear(16 * 5 * 5, 120)
        self.fc2 = nn.Linear(120, 84)
        self.fc3 = nn.Linear(84, 10)

    def forward(self, x):
        x = F.max_pool2d(F.relu(self.conv1(x)), (2, 2))
        x = F.max_pool2d(F.relu(self.conv2(x)), 2)
        x = x.view(-1, int(x.nelement() / x.shape[0]))
        x = F.relu(self.fc1(x))
        x = F.relu(self.fc2(x))
        x = self.fc3(x)
        return x

model = LeNet().to(device=device)
2.2 剪枝核心机制:掩码(Mask)
剪枝通过掩码张量实现参数筛选,核心逻辑如下:
- 原始参数(如
weight)被拆分为:weight_orig:保留原始参数值(可训练)weight_mask:掩码张量(0表示剪枝移除,1表示保留)
- 实际使用的参数
weight=weight_orig * weight_mask(被掩码为0的参数失效) - 剪枝后,
weight从可训练参数(Parameter)变为普通属性(Attribute)
2.3 单模块剪枝示例
以conv1层的weight参数为例,执行随机非结构化剪枝:
module = model.conv1
# 对conv1的weight参数剪枝30%
prune.random_unstructured(module, name="weight", amount=0.3)
剪枝后参数变化:
named_parameters()中weight变为weight_orig(保留原始值)named_buffers()中新增weight_mask(掩码张量)module.weight为weight_orig * weight_mask的结果(含0值的剪枝后参数)
# 剪枝后参数查看
print("参数列表:", list(module.named_parameters()))  # 含weight_orig、bias
print("掩码列表:", list(module.named_buffers()))      # 含weight_mask
print("剪枝后weight:\n", module.weight)               # 含0值的有效参数
2.4 剪枝永久化(remove操作)
剪枝默认是临时的,执行prune.remove()可将掩码效果永久应用到参数:
# 永久化剪枝(无法撤销)
prune.remove(module, 'weight')
永久化后变化:
weight_orig消失,weight恢复为可训练参数(值 = 剪枝后的有效参数)weight_mask被移除(无需保留)
三、常见剪枝方式实战
3.1 特定模块剪枝
针对单个模块的特定参数(如weight或bias)剪枝,支持多种策略:
| 剪枝函数 | 作用 | 适用场景 |
|---|---|---|
random_unstructured |
随机移除单个参数 | 非结构化剪枝(单权重) |
l1_unstructured |
移除L1范数最小的单个参数 | 非结构化剪枝(优先移除小值) |
ln_structured |
移除Lₙ范数最小的结构化单元 | 结构化剪枝(通道/神经元) |
示例:对bias参数执行L1剪枝
# 对conv1的bias参数剪枝3个(绝对值最小的3个)
prune.l1_unstructured(module, name="bias", amount=3)
print("剪枝后bias:", module.bias)  # 含0值的剪枝后偏置
3.2 多参数模块剪枝
对模型中多个模块批量剪枝(如所有卷积层/全连接层):
# 对所有卷积层和全连接层分别剪枝
for name, module in model.named_modules():
    if isinstance(module, nn.Conv2d):
        # 卷积层:L1非结构化剪枝20%
        prune.l1_unstructured(module, name="weight", amount=0.2)
    elif isinstance(module, nn.Linear):
        # 全连接层:L2结构化剪枝40%
        prune.ln_structured(module, name="weight", amount=0.4, n=2, dim=0)
效果:
- 所有卷积层的
weight均被剪枝20% - 所有全连接层的
weight均被剪枝40% - 每个模块独立生成
weight_orig和weight_mask
3.3 全局剪枝(Global Pruning)
局部剪枝(单模块/多模块)要求每层剪枝比例固定,而全局剪枝以整个网络为单位分配剪枝比例(总剪枝量固定,每层比例自适应)。
示例:全局剪枝20%参数
# 定义参与剪枝的模块和参数
parameters_to_prune = (
    (model.conv1, 'weight'),
    (model.conv2, 'weight'),
    (model.fc1, 'weight'),
    (model.fc2, 'weight'),
    (model.fc3, 'weight')
)

# 全局剪枝20%(总参数量的20%)
prune.global_unstructured(
    parameters_to_prune,
    pruning_method=prune.L1Unstructured,
    amount=0.2
)
特点:
- 总剪枝比例固定(如20%),但每层剪枝比例不同
- 重要性低的层(参数值小)会被剪枝更多
# 查看各层剪枝比例
print("conv1稀疏度:{:.2f}%".format(
    100 * torch.sum(model.conv1.weight == 0) / model.conv1.weight.nelement()
))
print("全局总稀疏度:{:.2f}%".format(
    100 * (torch.sum(model.conv1.weight == 0) + torch.sum(model.conv2.weight == 0) + ...)
    / (model.conv1.weight.nelement() + model.conv2.weight.nelement() + ...)
))
3.4 用户自定义剪枝
通过继承BasePruningMethod实现自定义剪枝规则,只需重写__init__和compute_mask方法。
示例:每隔一个参数剪枝一个(50%比例)
class MyPruningMethod(prune.BasePruningMethod):
    PRUNING_TYPE = "unstructured"  # 非结构化剪枝(单参数)

    def compute_mask(self, t, default_mask):
        mask = default_mask.clone()
        # 自定义规则:每隔一个参数剪枝一个(索引为偶数的置0)
        mask.view(-1)[::2] = 0
        return mask

# 封装为剪枝函数
def my_unstructured_pruning(module, name):
    MyPruningMethod.apply(module, name)
    return module

# 对fc3的bias参数应用自定义剪枝
my_unstructured_pruning(model.fc3, name="bias")
print("自定义剪枝掩码:", model.fc3.bias_mask)  # 0和1交替出现
四、剪枝模型的序列化
剪枝后的模型状态字典(state_dict)会保留:
- 原始参数:
weight_orig、bias_orig - 掩码张量:
weight_mask、bias_mask
# 剪枝前后状态字典对比
print("剪枝前:", model.state_dict().keys())
# 执行剪枝...
print("剪枝后:", model.state_dict().keys())  # 含orig和mask
总结
- 核心逻辑:通过掩码张量筛选参数,实现模型稀疏化
- 关键操作:单模块剪枝→多模块批量剪枝→全局剪枝→自定义剪枝
- 实用技巧:
- 非结构化剪枝(单权重)适合压缩模型,结构化剪枝(通道/神经元)适合加速推理
- 剪枝后建议微调模型,恢复精度损失
- 永久化剪枝(
remove)可减小模型存储体积
通过合理的剪枝策略,可在保持模型性能的同时显著降低参数量和计算成本,是模型部署的重要优化手段。
我是诗人啊_程序员,致力于分享人工智能方面的知识,近期 NLP 自然语言处理系列文章发布中,如果感兴趣,来个关注呗~

有“AI”的1024 = 2048,欢迎大家加入2048 AI社区
更多推荐

 30
30 0
0- 0


 已为社区贡献7条内容

所有评论(0)