阿里lowcode低码引擎源码(一)页面ui结构和插件系统
整体上ui界面渲染可以概括为三部部分
插件(负责页面功能和UI的创建)、skeleton(这个页面的核心骨架负责ui结构管理)、ui渲染(负责最终的UI渲染)
流程上
注册插件->初始化插件为skeleton添加配置->根据配置信息对应用的Area添加配置->Area调用自己的container进行配置添加->WidgetContainer添加配置的不同为自己创建不同的item->Area对象以属性的形式传入UI组件->UI组件遍历Area中WidgetContainer的items进行渲染
下面是一个简化的主流程核心代码
// 注册一批内置插件
async function registryInnerPlugin(designer: any, editor: any, plugins: Plugins) {
await plugins.register(OutlinePlugin, {}, { autoInit: true });
await plugins.register(defaultPanelRegistry(editor));
}
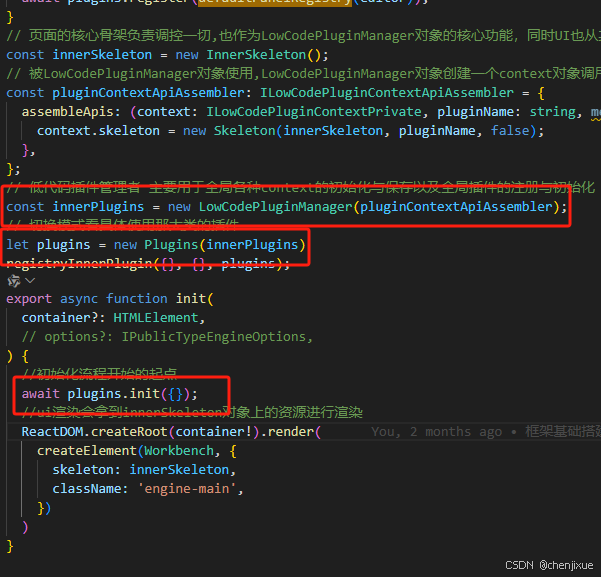
// 页面的核心骨架负责调控一切,也作为LowCodePluginManager对象的核心功能,同时UI也从其身上拿资源去渲染
const innerSkeleton = new InnerSkeleton();
// 被LowCodePluginManager对象使用,LowCodePluginManager对象创建一个context对象调用该方法并创建新的属性添加,他的大多数能力也是通过创建的context进行操作
const pluginContextApiAssembler: ILowCodePluginContextApiAssembler = {
assembleApis: (context: ILowCodePluginContextPrivate, pluginName: string, meta: IPublicTypePluginMeta) => {
context.skeleton = new Skeleton(innerSkeleton, pluginName, false);
},
};
// 低代码插件管理者 主要用于全局各种context的初始化与保存以及全局插件的注册与初始化
const innerPlugins = new LowCodePluginManager(pluginContextApiAssembler);
// 切换模式看具体使用那大类的插件
let plugins = new Plugins(innerPlugins)
registryInnerPlugin({}, {}, plugins);
export async function init(
container?: HTMLElement,
// options?: IPublicTypeEngineOptions,
) {
//初始化流程开始的起点
await plugins.init({});
//ui渲染会拿到innerSkeleton对象上的资源进行渲染
ReactDOM.createRoot(container!).render(
createElement(Workbench, {
skeleton: innerSkeleton,
className: 'engine-main',
})
)
}//Area内容添加流程
从registryInnerPlugin开始,Plugins调用LowCodePluginManager,LowCodePluginManager生成带skeleton属性的context, 将context传入插件中,插件返回一个带初始化方法的对象作为一个配置,LowCodePluginManager调用返回的配置对象的初始化方法,该方法通过之前传入context解析出skeleton调用add传入一个渲染配置对象
我们具体看下LowCodePluginManager的注册方法
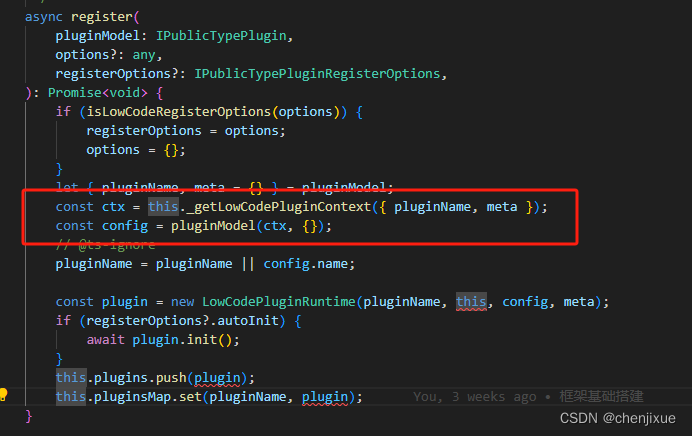
这一步其实就是生成了一个context,然后将context传入plugin插件,下面是些极简化的插件代码(pluginModel),其余的插件都大差不差。
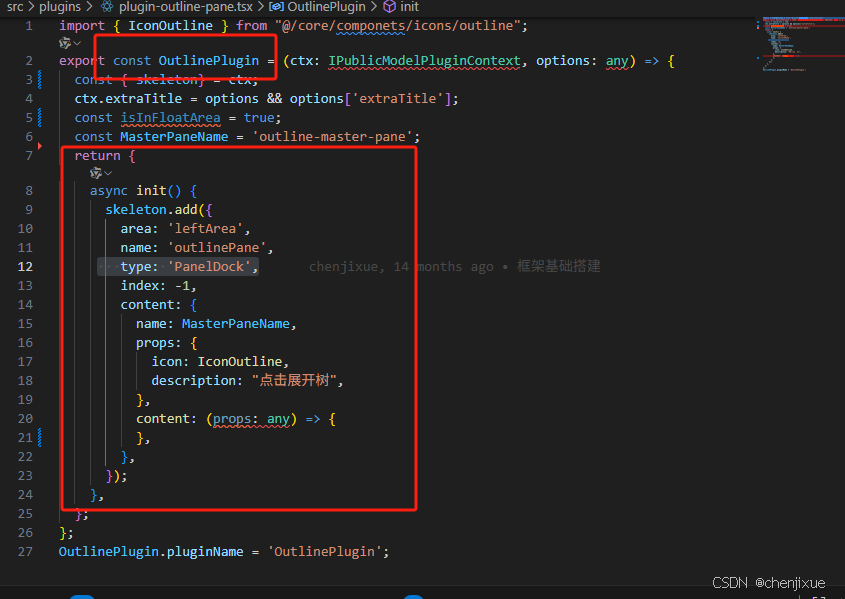
有通过skeleton添加视图的
往左侧区域添加视图
export const OutlinePlugin = (ctx: IPublicModelPluginContext, options: any) => {
  const { skeleton, config, common, event, canvas, project } = ctx;
  ctx.extraTitle = options && options['extraTitle'];
  let isInFloatArea = true;
  const hasPreferenceForOutline = config.getPreference().contains('outline-pane-pinned-status-isFloat', 'skeleton');
  if (hasPreferenceForOutline) {
    isInFloatArea = config.getPreference().get('outline-pane-pinned-status-isFloat', 'skeleton');
  }
  const BackupPaneName = 'outline-backup-pane';
  const MasterPaneName = 'outline-master-pane';
  let masterPaneController: PaneController | null = null;
  return {
    async init() {
      skeleton.add({
        area: 'leftArea',
        name: 'outlinePane',
        type: 'PanelDock',
        index: -1,
        content: {
          name: MasterPaneName,
          props: {
            icon: IconOutline,
            description: "点击展开树",
          },
          content: (props: any) => {
          },
        },
      });
    },
  };
};
OutlinePlugin.pluginName = 'OutlinePlugin';
往中间区域添加视图
import { SettingsPrimaryPane } from "@/componets/settings-primary-pane";
import DesignerPlugin from "@/core/designer/designer";
// 注册默认的面板
export const defaultPanelRegistry = (editor: any) => {
  const fun = (ctx: any) => {
    return {
      init() {
        const { skeleton } = ctx;
        skeleton.add({
          area: 'mainArea',
          name: 'designer',
          type: 'Widget',
          content: <DesignerPlugin
            engineEditor={editor}
          />,
        });
      },
    };
  };

  fun.pluginName = '___default_panel___';

  return fun;
};


export default defaultPanelRegistry;
有通过material管理和获取设计器资产包的
export const componentMetaParser = (designer: any) => {
  const fun = (ctx:any) => {
    return {
      init() {
        const { material } = ctx;
        material.onChangeAssets(() => {
          const assets = material.getAssets();
          const { components = [] } = assets;
          designer.buildComponentMetasMap(components);
        });
      },
    };
  };

  fun.pluginName = '___component_meta_parser___';

  return fun;
};
import { IPublicModelPluginContext } from '@alilc/lowcode-types';
// import { injectAssets } from '@alilc/lowcode-plugin-inject';
import assets from '../services/assets.json';
import { getProjectSchema } from "../services/mockService"
const EditorInitPlugin = (ctx: IPublicModelPluginContext, options: any) => {
  return {
    async init() {
      const { material, project, config } = ctx;
      // // 设置物料描述

      await material.setAssets(assets);

      const schema = await getProjectSchema("");
      // // 加载 schema
      project.importSchema(schema as any);
    },
  };
}
EditorInitPlugin.pluginName = 'EditorInitPlugin';
export default EditorInitPlugin;
总之插件可以拿到context里面东西从而获得对全局的管控,包括skeleton注册视图,material管理资产包,project项目管理等等
以上就是算是插件注册完成了,注意只是注册添加完了。接下来开始插件的初始化,
初始化其实最终使用的是LowCodePluginManager的初始化方法对之前注册的插件遍历初始化
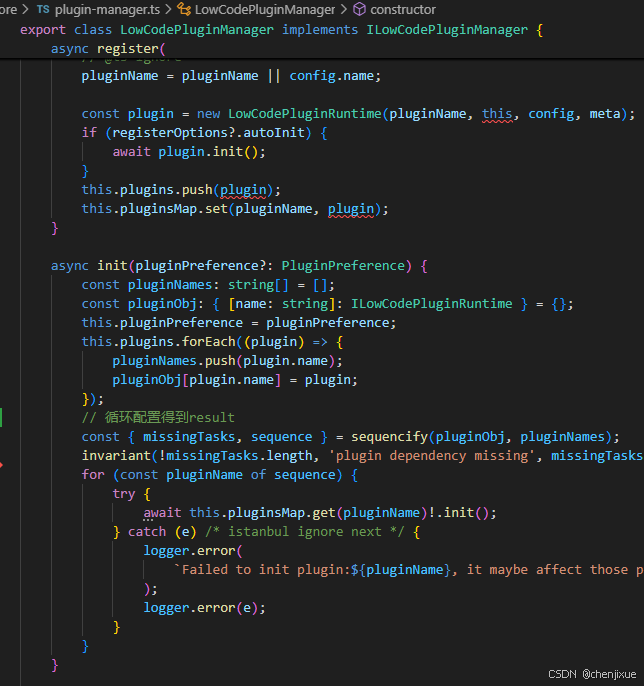
接下来就是调用插件的init方法进行初始化了 ,举例其中一个通过skeleton注册视图的OutlinePlugin来说
skeleton.add ->this.leftArea.add->WidgetContainer.add解析配置->调用来自Area的handle方法
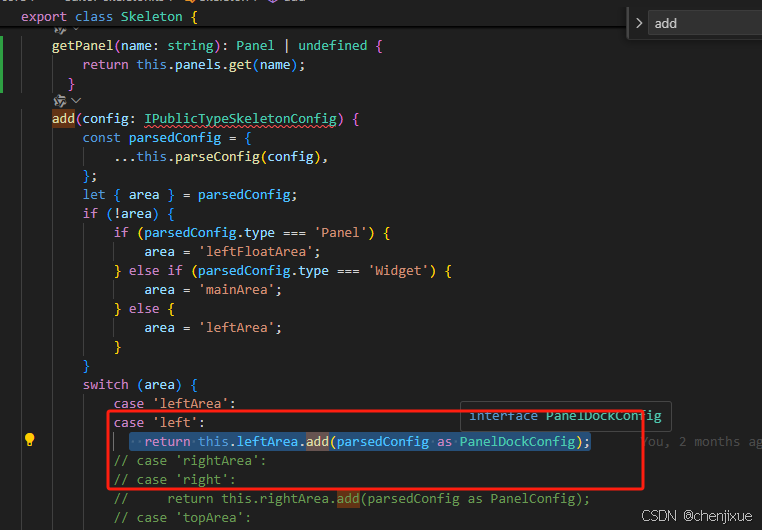
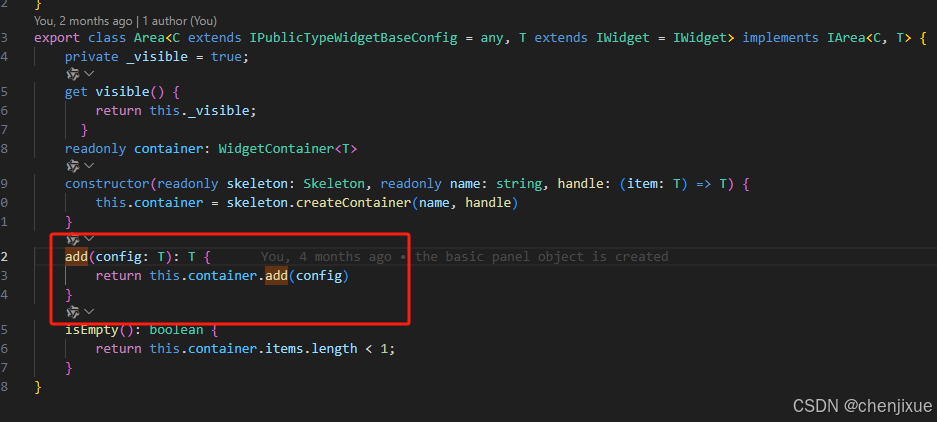
这个 container其实就是widgetContainer

这个this.handle实际上指的是Area构造函数第三参
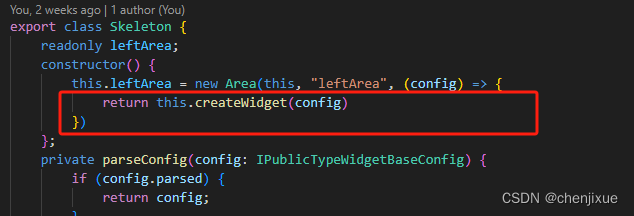
this.createWidget
  createWidget(config: IPublicTypeWidgetBaseConfig) {
        config = this.parseConfig(config);
        let widget: IWidget;
        if (isDockConfig(config)) {
            if (isPanelDockConfig(config)) {
                widget = new PanelDock(this, config);
            } else if (false) {
                // DialogDock
                // others...
            } else {
                widget = new Dock(this, config);
            }
        } else if (isDividerConfig(config)) {
            widget = new Widget(this, {
                ...config,
                type: 'Widget',
                // content: Divider,
            });
        } else if (isPanelConfig(config)) {
            widget = this.createPanel(config);
        } else {
            widget = new Widget(this, config as WidgetConfig);
        }
        return widget;
    }
会根据配置的不同生成不同的widget,拿我们当前的leftArea配置来说返回的是PanelDock对象,
PanelDock对象
export class PanelDock implements IWidget {
    readonly name: string;
    private _body: ReactNode;
    private inited = false;
    private _shell: ReactInstance | null = null;
    constructor(readonly skeleton: Skeleton, readonly config: PanelDockConfig) {
        const { name } = config
        this.name = name
    }
    get body() {
        if (this.inited) {
            return this._body;
        }
        this.inited = true;
        const { props } = this.config;

        this._body = createElement(PanelDockView, {
            ...props,
            dock: this,
        });
        return this._body;
    }
    get content(): ReactNode {
        return createElement(WidgetView, {
            widget: this,
            ref: (ref) => {
                this._shell = ref;
            },
            key: this.id,
        });
    }
}
PanelDock.content ->WidgetView( PanelDock.body)->PanelDockView->DockView组件
export function DockView({ title, icon, description, size, className, onClick }) {
    return (
        <Title title={composeTitle(title, icon, description)} className={classNames('lc-dock', className, {
            [`lc-dock-${size}`]: size,
        })}
        />
    );
}
到此则为一个组件添加到对应的leftArea对象下的container的items中,来到最后一步试图渲染
首先我们看看整个大框架的视图组件是如何渲染的
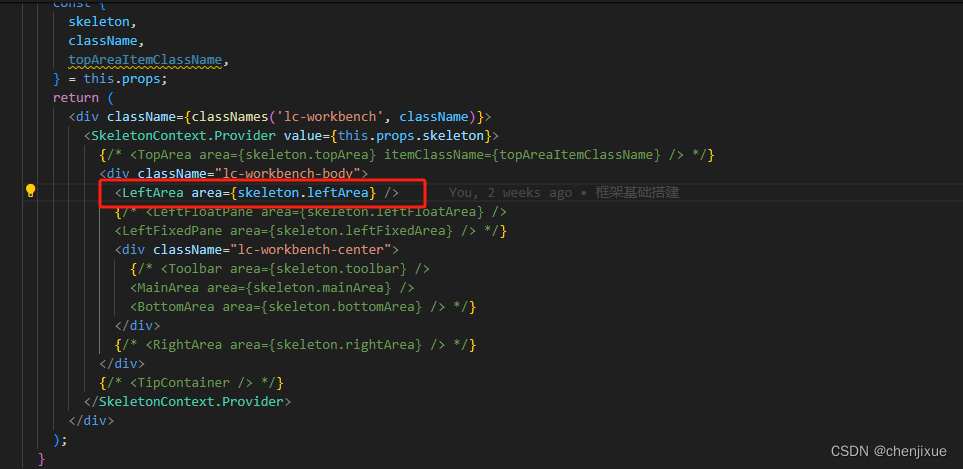
我们就拿本次leftArea,其具体渲染代码主要就是拿到我们area.container.items进行渲染
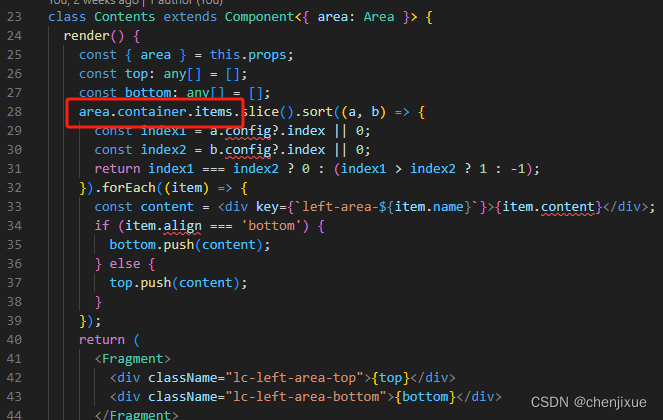
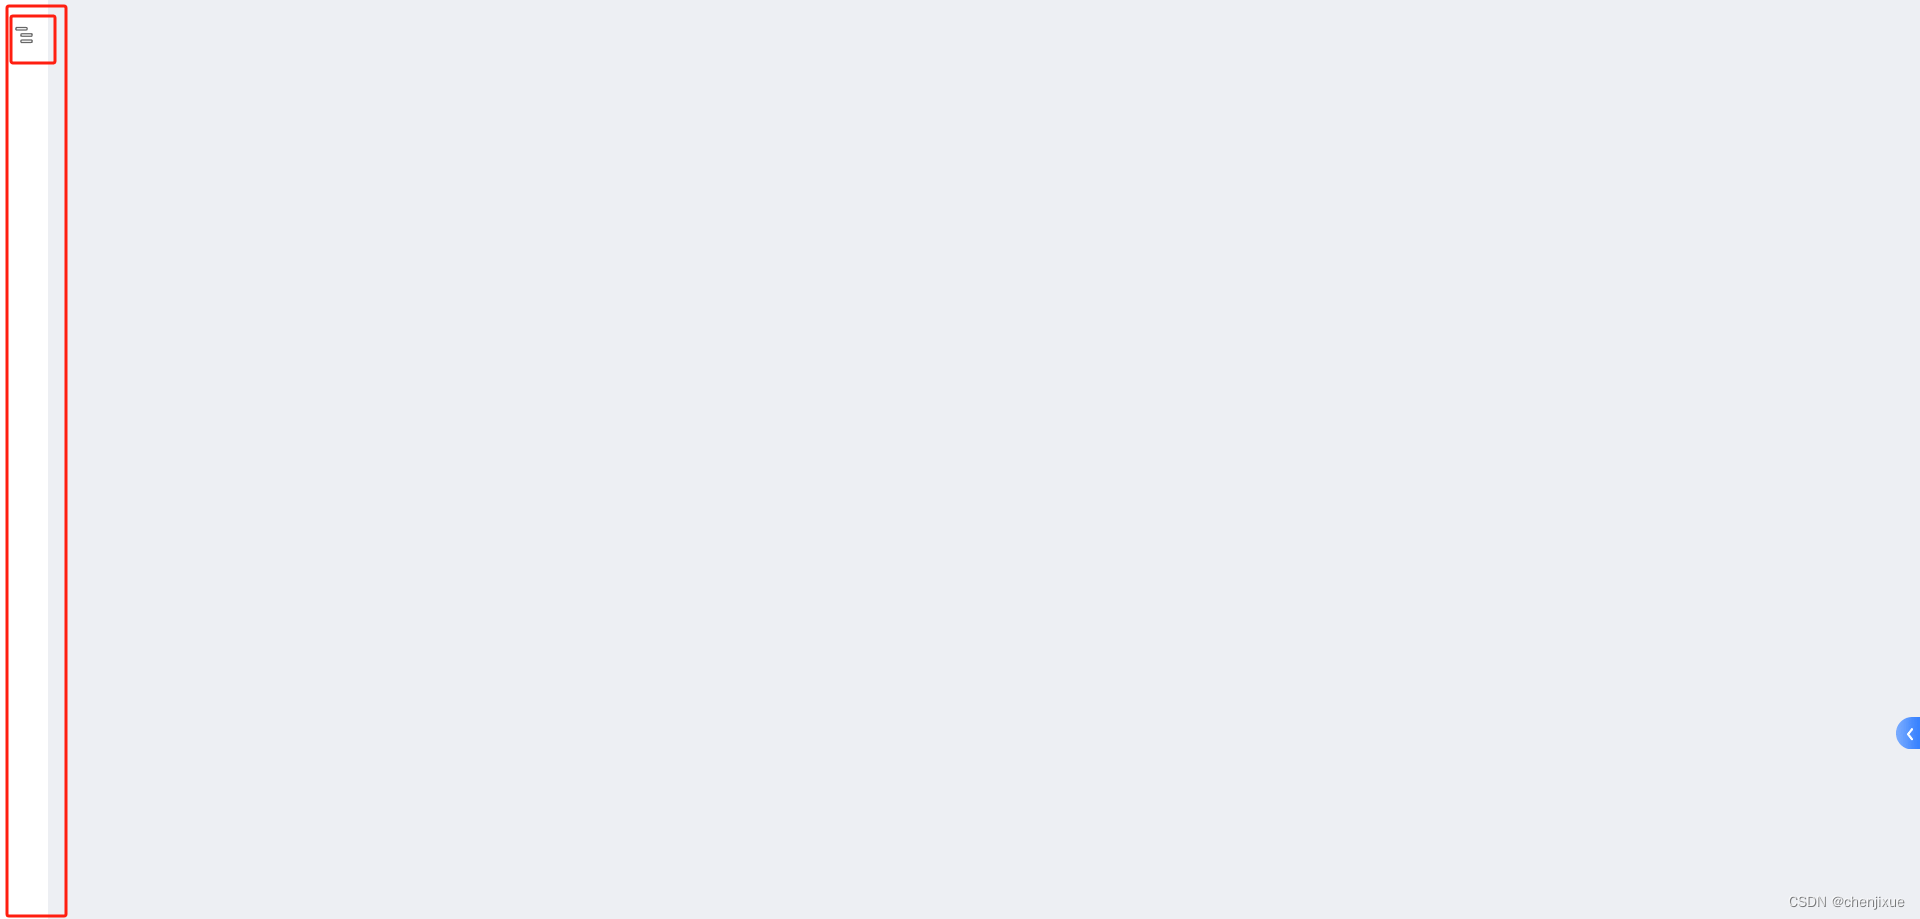
最终效果视图
github地址

有“AI”的1024 = 2048,欢迎大家加入2048 AI社区
更多推荐

 6
6 0
0- 0


 已为社区贡献1条内容

所有评论(0)