前端基础之《Vue(29)—Vue3 路由V4》
本文介绍了Vue3项目中集成Vue Router(v4)的全过程。首先通过npm安装依赖,配置@路径别名指向src目录,包括vite.config.ts和tsconfig.app.json的修改。然后详细说明了在main.ts中如何初始化路由,创建路由实例并定义路由规则。接着指导建立router/index.ts文件,配置hash模式路由和全局守卫。最后演示了在App.vue中使用<rout
一、安装
1、命令
cnpm install vue-router@42、配置@映射为src路径
(1)安装对应配置
cnpm install @types/node(2)配置vite.config.ts
import { defineConfig } from 'vite'
import vue from '@vitejs/plugin-vue'
import * as path from "node:path"

// vite官方配置文件
export default defineConfig({
  plugins: [vue()],
  // 配置别名@指向src目录
  resolve: {
    alias: {
      '@': path.resolve(__dirname, 'src')
    }
  }
})
(3)配置tsconfig.app.json
compilerOptions添加一段:
    "baseUrl": ".",
    "paths": {
      "@/*": ["src/*"]
    }
二、集成
1、main.ts导入路由模块
// import Vue from 'vue' 在vue3中已经没有这个构造函数了
// 导入createApp工厂方法,用于创建vue实例
import { createApp } from 'vue'
// 导入全局样式
//import './style.css'
// 导入根组件
import App from './App.vue'
import router from './router'

//createApp(App).mount('#app')
const app = createApp(App)

// 注册路由
app.use(router)

// 在vue3中,只能使用$mount挂载,已经淘汰了el选项
app.mount('#app')
2、建立src/router/index.ts
import { createRouter, createWebHashHistory } from 'vue-router'

const router = createRouter({
    history: createWebHashHistory(), // 带#的hash模式
    routes: [
        { path: '/', component: () => import('@/pages/PageA.vue') },
        { path: '/xxx', component: () => import('@/pages/PageB.vue')}
    ]

})

router.beforeEach((to, from, next)=>{
    next()
})

export default router
3、App.vue修改视图结构
<script setup>

</script>

<template>
    <router-view></router-view>
</template>

<style scoped>

</style>
三、显示路由
1、访问
http://localhost:5173/#/
http://localhost:5173/#/xxx
能显示对应页面。
2、小结
第1步:安装vue-router(v4)并创建路由实例,在main.js注册
第2步:编写路由规则{ path, component, children, meta, props, name, alias, redirect }
第3步:使用<router-view>显示匹配成功的页面组件,使用<router-link>做设计菜单导航
四、element-plus
1、安装
cnpm install element-plus2、导入组件库
import ElementPlus from 'element-plus'
import 'element-plus/dist/index.css'
3、use一下
app.use(ElementPlus)4、安装icon图标
cnpm install @element-plus/icons-vue5、注册图标(总的main.ts)
// import Vue from 'vue' 在vue3中已经没有这个构造函数了
// 导入createApp工厂方法,用于创建vue实例
import { createApp } from 'vue'
// 导入全局样式
//import './style.css'
// 导入根组件
import App from './App.vue'
import router from './router'
import ElementPlus from 'element-plus'
import 'element-plus/dist/index.css'
// 如果您正在使用CDN引入,请删除下面一行。
import * as ElementPlusIconsVue from '@element-plus/icons-vue'

//createApp(App).mount('#app')
const app = createApp(App)
// 注册element-plus-icon
for (const [key, component] of Object.entries(ElementPlusIconsVue)) {
  app.component(key, component)
}

// 注册路由
app.use(router)
app.use(ElementPlus)

// 在vue3中,只能使用$mount挂载,已经淘汰了el选项
app.mount('#app')
五、element-plus简单使用
搭建一个管理系统界面。
1、src/layout/index.vue
<template>
    <el-container>
      <el-aside width="200px">
        <el-menu
            active-text-color="#ffd04b"
            background-color="#545c64"
            class="el-menu-vertical-demo"
            default-active="2"
            text-color="#fff"
            >
            <el-sub-menu :index='sub.id' v-for='sub in asyncRoutes' :key='sub.id'>
            <template #title>
                <el-icon><location /></el-icon>
                <span>{{ sub.text }}</span>
            </template>
            <el-menu-item :index='item.id' v-for='item in sub.children' :key='item.id'>
                <router-link :to='item.path' custom>
                    <!--用插槽解决渲染成a标签-->
                    <!--在路由v4中,router-link已经没有tag属性了,建议使用插槽来改变渲染节点-->
                    <template v-slot='{navigate}'>
                        <span @click='navigate'>{{ item.text }}</span>
                    </template>
                </router-link>
            </el-menu-item>
            </el-sub-menu>

            <el-menu-item index="2">
            <el-icon><icon-menu /></el-icon>
            <span>Navigator Two</span>
            </el-menu-item>

            <el-menu-item index="3" disabled>
            <el-icon><document /></el-icon>
            <span>Navigator Three</span>
            </el-menu-item>

            <el-menu-item index="4">
            <el-icon><setting /></el-icon>
            <span>Navigator Four</span>
            </el-menu-item>
        </el-menu>
      </el-aside>
      <el-container>
        <el-header>Header</el-header>
        <el-main>
            <!--这里是二级路由-->
            <router-view></router-view>
        </el-main>
      </el-container>
    </el-container>
</template>

<script setup>
    import { asyncRoutes } from '@/router/index'
</script>

<style lang="css" scoped>

</style>
2、src/router/index.ts
import { createRouter, createWebHashHistory } from 'vue-router'
import Layout from '@/layout/index.vue'
// 构造一个假列表
export const asyncRoutes = [
{
id: "10",
text: '学习模块',
icon: '',
children: [
{ id: "1", text: 'A页面', path: '/a', component: () => import('@/pages/PageA.vue') },
{ id: "2", text: 'R页面', path: '/r', component: () => import('@/pages/PageR.vue')}
]
},
{
id: "11",
text: '全家桶',
icon: '',
path: '/stack',
component: Layout,
redirect: '',
children: [
{ id: "111", text: '学习路由', path: '/stack/r', component: () => import('@/pages/stack/PageR.vue')},
{ id: "112", text: '状态管理', path: '/stack/s', component: () => import('@/pages/stack/PageS.vue')}
]
}
]
const router = createRouter({
history: createWebHashHistory(), // 带#的hash模式
routes: [
{
path: '/',
component: Layout,
redirect: '/a', // 相当于dashboard
children: [
{ path: 'a', component: () => import('@/pages/PageA.vue') },
{ path: 'xxx', component: () => import('@/pages/PageB.vue')},
{ path: 'r', component: () => import('@/pages/PageR.vue')}
]
},
...asyncRoutes
]
})
router.beforeEach((to, from, next)=>{
next()
})
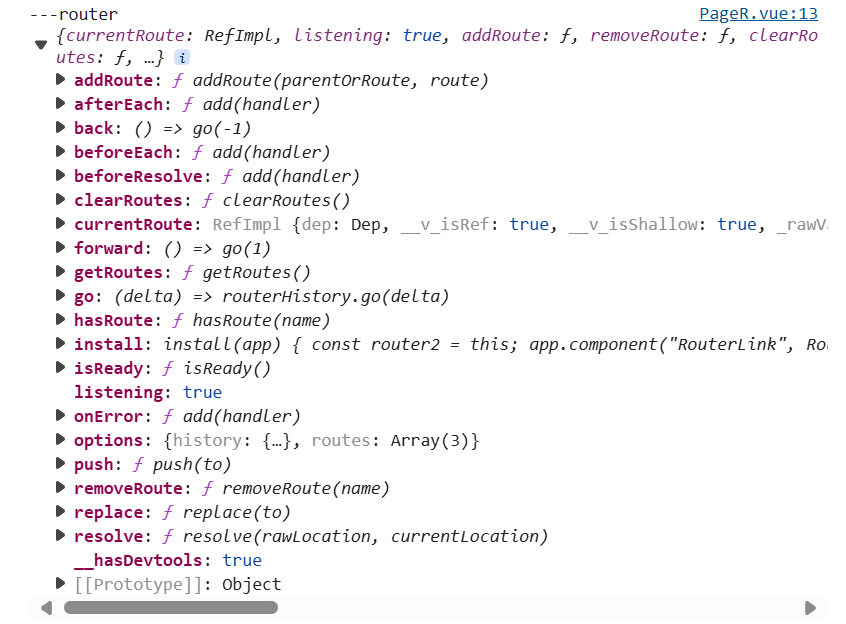
export default router3、页面例子src/pages/stack/PageR.vue
<template>
    <div>
        <h1>页面R</h1>
    </div>
</template>

<script setup>
    import { useRoute, useRouter } from 'vue-router'
    const route = useRoute() // 相当于选项中的this.$route
    const router = useRouter() // 相当于选项中的this.$router

    console.log('---route', route)
    console.log('---router', router)
</script>
4、route和router
六、路由知识点
1、在vue3环境中,必须要使用vue-router(v4)
2、创建router,使用createRouter()
3、指定路由模式,使用history属性
4、路由注册,在main.js中:app.use(router)
5、如果是选项式组件开发,this.$router/this.$route可以正常使用。如果当前项目严格使用组合式API进行开发,必须使用useRoute、useRouter等Hooks API进行开发
6、<router-link>已经没有tag属性,可以用custom和插槽实现自定义
7、<router-view>新增了“插槽”功能,及其强大,参见路由中的伪代码,它在实现<keep-alive>和<transition>动画将变得更简单,还可以Suspense实现Loading
8、新增了几个组合API:useRoute/useRouter/useLink

有“AI”的1024 = 2048,欢迎大家加入2048 AI社区
更多推荐

 3
3 0
0- 0


 已为社区贡献6条内容

所有评论(0)