程序调用接入ai大模型的方式
[ai大模型的调用 (1)](assets/ai大模型的调用 (1).png)
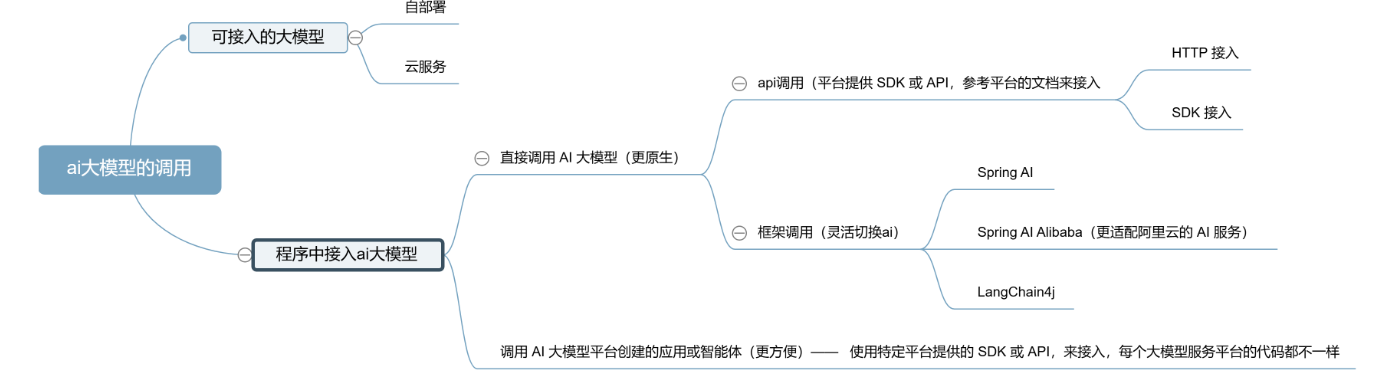
调用 AI 大模型平台创建的应用或智能体(更方便)
使用特定平台提供的 SDK 或 API,来接入,每个大模型服务平台的代码都不一样
直接调用 AI 大模型(更原生)
1.SDK 接入:使用官方提供的软件开发工具包,最直接的集成方式
2.HTTP 接入:通过 REST API 直接发送 HTTP 请求调用模型(如果有官方 SDK 支持,优先使用 SDK;只有在不支持 SDK 的情况下,再考虑直接 HTTP)
3.Spring AI:基于 Spring 生态系统的 AI 框架,更方便地接入大模型
4.LangChain4j:专注于构建 LLM 应用的 Java 框架,提供丰富的 AI 调用组件
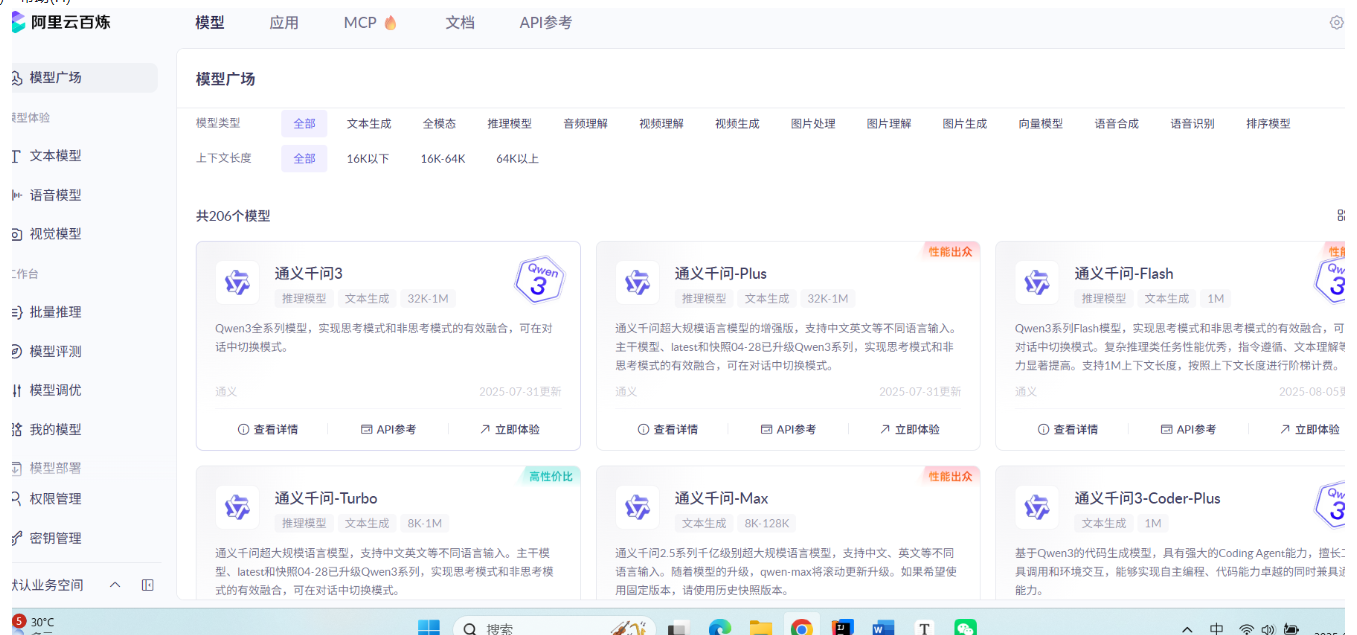
以下的例子都以——阿里云的 灵积平台(DashScope) 服务为例
灵积平台(DashScope)提供的模型
-
qwen-turbo 轻量高效版模型,响应速度快、成本低,适合对实时性要求高的场景(如智能客服、简单问答),平衡了性能和效率。
-
qwen-plus 增强版模型,具备更强的文本生成、逻辑推理和多轮对话能力
-
qwen-max 旗舰版模型,拥有最强的综合能力,支持复杂任务处理,适合对精度要求极高的场景。
-
qwen-long
长文本专用模型,支持超长上下文理解(可达百万字级别),适用于处理文档分析、合同审查等长文本场景。
SDK 接入:
1,按照官方文档安装对应的 SDK:安装 SDK 官方指南
在 pom.xml 中引入灵积平台(DashScope) 服务依赖:
 <!-- https://mvnrepository.com/artifact/com.alibaba/dashscope-sdk-java -->
 <dependency>
     <groupId>com.alibaba</groupId>
     <artifactId>dashscope-sdk-java</artifactId>
     <version>2.19.1</version>
 </dependency>
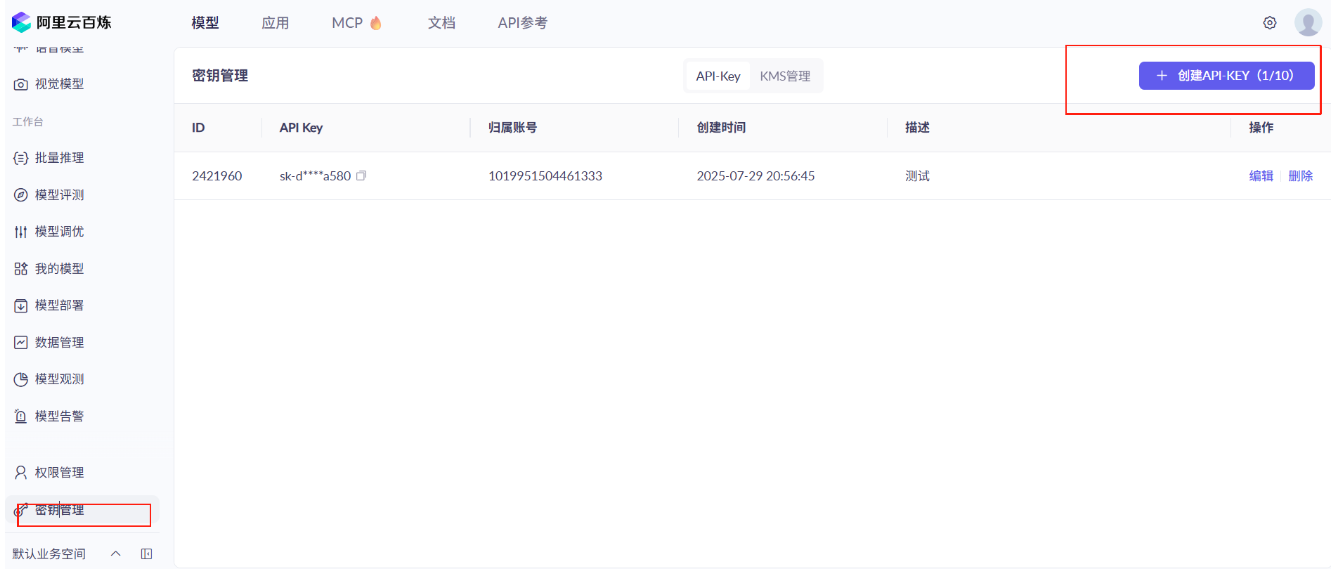
2,在百炼平台申请一个 API Key
3.具体的代码示例可参考官方文档去实现
创建一个接口类来存储密钥信息(在实际生产环境中,应使用配置文件或环境变量):
public interface TestApiKey {
String API_KEY = "你的 API Key";
}
使用 SDK 调用模型的完整示例代码:
package com.yupi.aiagent.demo.invoke;
import com.alibaba.dashscope.aigc.generation.Generation;
import com.alibaba.dashscope.aigc.generation.GenerationParam;
import com.alibaba.dashscope.aigc.generation.GenerationResult;
import com.alibaba.dashscope.common.Message;
import com.alibaba.dashscope.common.Role;
import com.alibaba.dashscope.exception.ApiException;
import com.alibaba.dashscope.exception.InputRequiredException;
import com.alibaba.dashscope.exception.NoApiKeyException;
import com.alibaba.dashscope.utils.JsonUtils;
import java.util.Arrays;
/**
* 阿里云灵机——SDK的调用
*/
public class SdkAiInvoke {
// 建议dashscope SDK的版本 >= 2.12.0
public static GenerationResult callWithMessage() throws ApiException, NoApiKeyException, InputRequiredException {
Generation gen = new Generation();
Message systemMsg = Message.builder()
.role(Role.SYSTEM.getValue())
.content("You are a helpful assistant.")
.build();
Message userMsg = Message.builder()
.role(Role.USER.getValue())
.content("你是谁?")
.build();
GenerationParam param = GenerationParam.builder()
// 若没有配置环境变量,请用百炼API Key将下行替换为:.apiKey("sk-xxx")
.apiKey(TestApiKey.API_KEY) //把api替换为我们自己放api的地方
// 此处以qwen-plus为例,可按需更换模型名称。模型列表:https://help.aliyun.com/zh/model-studio/getting-started/models
.model("qwen-plus")
.messages(Arrays.asList(systemMsg, userMsg))
.resultFormat(GenerationParam.ResultFormat.MESSAGE)
.build();
return gen.call(param);
}
public static void main(String[] args) {
try {
GenerationResult result = callWithMessage();
System.out.println(JsonUtils.toJson(result));
} catch (ApiException | NoApiKeyException | InputRequiredException e) {
// 使用日志框架记录异常信息
System.err.println("An error occurred while calling the generation service: " + e.getMessage());
}
System.exit(0);
}
}
HTTP 接入:
package com.yupi.aiagent.demo.invoke;
import cn.hutool.http.HttpRequest;
import cn.hutool.http.HttpResponse;
import cn.hutool.json.JSONObject;
import java.util.HashMap;
import java.util.Map;
/**
* http方式调用ai
*/
public class HttpAiInvoke {
public static void main(String[] args) {
// 替换为你的实际 API 密钥
String apiKey = TestApiKey.API_KEY;
//构建请求url
String url = "https://dashscope.aliyuncs.com/api/v1/services/aigc/text-generation/generation";
// 设置请求头
Map<String, String> headers = new HashMap<>();
headers.put("Authorization", "Bearer " + TestApiKey.API_KEY);
headers.put("Content-Type", "application/json");
// 设置请求体
JSONObject requestBody = new JSONObject();
requestBody.put("model", "qwen-plus");
JSONObject input = new JSONObject();
JSONObject[] messages = new JSONObject[2];
JSONObject systemMessage = new JSONObject();
systemMessage.put("role", "system");
systemMessage.put("content", "You are a helpful assistant.");
messages[0] = systemMessage;
JSONObject userMessage = new JSONObject();
userMessage.put("role", "user");
userMessage.put("content", "你是谁?");
messages[1] = userMessage;
input.put("messages", messages);
requestBody.put("input", input);
JSONObject parameters = new JSONObject();
parameters.put("result_format", "message");
requestBody.put("parameters", parameters);
// 发送请求
HttpResponse response = HttpRequest.post(url)
.addHeaders(headers)
.body(requestBody.toString())
.execute();
// 处理响应
if (response.isOk()) {
System.out.println("请求成功,响应内容:");
System.out.println(response.body());
} else {
System.out.println("请求失败,状态码:" + response.getStatus());
System.out.println("响应内容:" + response.body());
}
}
}
Spring AI:
想要调用阿里系大模型(比如通义千问),推荐直接使用阿里自主封装的 Spring AI Alibaba 框架更好
相关模型的官方文档如下
1)引入依赖:
<dependency> <groupId>com.alibaba.cloud.ai</groupId> <artifactId>spring-ai-alibaba-starter</artifactId> <version>1.0.0-M6.1</version> </dependency>
由于 spring-ai 相关依赖包还没有发布到中央仓库,如出现 spring-ai-core 等相关依赖解析问题,请在项目的 pom.xml 依赖中加入如下仓库配置。
 <repositories>
   <repository>
     <id>spring-milestones</id>
     <name>Spring Milestones</name>
     <url>https://repo.spring.io/milestone</url>
     <snapshots>
       <enabled>false</enabled>
     </snapshots>
   </repository>
 </repositories>
2)编写配置
spring: application: name: spring-ai-alibaba-qwq-chat-client-example ai: dashscope: api-key: 你的api-key chat: options: model: 要选择的模型
3)编写示例代码,注意要注入 dashscopeChatModel:
package com.yupi.aiagent.demo.invoke;
import jakarta.annotation.Resource;
import org.springframework.ai.chat.messages.AssistantMessage;
import org.springframework.ai.chat.model.ChatModel;
import org.springframework.ai.chat.prompt.Prompt;
import org.springframework.boot.CommandLineRunner;
import org.springframework.stereotype.Component;
/**
* SpringAi框架调用ai大模型
*/
@Component
public class SpringAiAiInvoke implements CommandLineRunner {
@Resource
private ChatModel dashscopeChatModel;
@Override
public void run(String... args) throws Exception {
AssistantMessage assistantMessage = dashscopeChatModel.call(new Prompt("我是鼠鼠"))
.getResult()
.getOutput();
System.out.println(assistantMessage.getText());
}
}
LangChain4j:
可以在官方文档中查询支持的模型列表:LangChain4j模型集成
接入阿里云灵积模型,可以参考官方文档:DashScope模型集成,提供了依赖和示例代码
1)引入langchain4j的依赖
<!-- https://mvnrepository.com/artifact/dev.langchain4j/langchain4j-community-dashscope -->
<dependency>
    <groupId>dev.langchain4j</groupId>
    <artifactId>langchain4j-community-dashscope</artifactId>
    <version>1.0.0-beta2</version>
</dependency>
LangChain4j 也提供了 Spring Boot Starter,方便在 Spring 项目中使用,如果没有引入了 Spring AI 的 Starter,要引入 LangChain 的 Starter
2)示例代码
package com.yupi.aiagent.demo.invoke;

import com.yupi.aiagent.demo.invoke.TestApiKey;
import dev.langchain4j.community.model.dashscope.QwenChatModel;
import dev.langchain4j.model.chat.ChatLanguageModel;

public class LangChainAiInvoke {

    public static void main(String[] args) {
        ChatLanguageModel qwenModel = QwenChatModel.builder()
                .apiKey(TestApiKey.API_KEY)
                .modelName("qwen-max")
                .build();
        String answer = qwenModel.chat("我是程序员鱼皮,这是编程导航 codefather.cn 的原创项目教程");
        System.out.println(answer);
    }
}
两种调用方法的区别
直接调用大模型(比如 DeepSeek)= 自己买菜做饭
-
你得自己去菜市场(申请 API 密钥),知道买什么菜(了解模型参数),还得会自己调味(调 temperature 这些参数)、掌握火候(处理请求格式)。
-
好处是:想吃啥味就做啥味(完全自定义),比如想多加辣(调大随机性)、少放盐(固定输出格式),都能自己说了算。
-
缺点是:麻烦,得懂点 “厨艺”(有开发经验),不然容易搞砸(调用失败)。
调用平台的应用 / 智能体 = 点外卖
-
别人已经做好了半成品(平台提前配置好了模型参数、prompt 模板),你只需要告诉商家 “我要一份宫保鸡丁”(调用简单的 API)就行,不用管菜怎么切、怎么炒。
-
好处是:快,不用自己动手(低代码甚至无代码),平台可能还帮你配好了餐具(自带对话记忆、日志统计这些功能)。
-
缺点是:菜单是固定的(功能受平台限制),比如商家没做微辣版(不能调某些参数),你就点不到。
直接调用大模型
import java.net.URI;
import java.net.http.HttpClient;
import java.net.http.HttpRequest;
import java.net.http.HttpResponse;
import java.time.Duration;
import com.google.gson.Gson;

public class DirectModelCall {
    // 直接调用模型需要的配置
    private static final String API_KEY = "你的模型API密钥";
    private static final String MODEL_ENDPOINT = "https://api.deepseek.com/v1/chat/completions";
    private static final HttpClient client = HttpClient.newBuilder()
            .version(HttpClient.Version.HTTP_2)
            .connectTimeout(Duration.ofSeconds(10))
            .build();
    private static final Gson gson = new Gson();

    public static void main(String[] args) throws Exception {
        // 1. 构建详细的请求参数,完全控制所有选项
        ModelRequest requestBody = new ModelRequest();
        requestBody.model = "deepseek-chat";  // 指定具体模型
        requestBody.messages.add(new Message("user", "什么是人工智能"));
        requestBody.temperature = 0.7;  // 控制回答随机性
        requestBody.max_tokens = 500;   // 控制回答长度
        requestBody.top_p = 0.9;        // 控制采样多样性

        // 2. 构建HTTP请求
        HttpRequest request = HttpRequest.newBuilder()
                .uri(URI.create(MODEL_ENDPOINT))
                .header("Content-Type", "application/json")
                .header("Authorization", "Bearer " + API_KEY)
                .POST(HttpRequest.BodyPublishers.ofString(gson.toJson(requestBody)))
                .build();

        // 3. 发送请求并处理响应
        HttpResponse<String> response = client.send(request, HttpResponse.BodyHandlers.ofString());

        // 4. 解析原始响应
        ModelResponse modelResponse = gson.fromJson(response.body(), ModelResponse.class);
        if (modelResponse.choices != null && !modelResponse.choices.isEmpty()) {
            System.out.println("AI回答: " + modelResponse.choices.get(0).message.content);
        }
    }

    // 模型请求的详细数据结构
    static class ModelRequest {
        String model;
        List<Message> messages = new ArrayList<>();
        double temperature;
        int max_tokens;
        double top_p;
    }

    static class Message {
        String role;
        String content;

        Message(String role, String content) {
            this.role = role;
            this.content = content;
        }
    }

    // 模型响应的详细数据结构
    static class ModelResponse {
        List<Choice> choices;

        static class Choice {
            Message message;
        }
    }
}
调用平台的应用 / 智能体
import java.net.URI;
import java.net.http.HttpClient;
import java.net.http.HttpRequest;
import java.net.http.HttpResponse;
import java.time.Duration;
import com.google.gson.Gson;

public class PlatformAppCall {
    // 调用平台应用只需要简单配置
    private static final String APP_KEY = "你的应用密钥";
    private static final String APP_ENDPOINT = "https://platform.example.com/api/my-ai-app";
    private static final HttpClient client = HttpClient.newBuilder()
            .version(HttpClient.Version.HTTP_2)
            .connectTimeout(Duration.ofSeconds(10))
            .build();
    private static final Gson gson = new Gson();

    public static void main(String[] args) throws Exception {
        // 1. 构建简单的请求参数,只需传入问题
        AppRequest requestBody = new AppRequest();
        requestBody.question = "什么是人工智能";
        // 注意:这里没有参数可以调整,所有参数都在平台上预先配置好了

        // 2. 构建HTTP请求
        HttpRequest request = HttpRequest.newBuilder()
                .uri(URI.create(APP_ENDPOINT))
                .header("Content-Type", "application/json")
                .header("X-App-Key", APP_KEY)  // 认证方式也更简单
                .POST(HttpRequest.BodyPublishers.ofString(gson.toJson(requestBody)))
                .build();

        // 3. 发送请求并处理响应
        HttpResponse<String> response = client.send(request, HttpResponse.BodyHandlers.ofString());

        // 4. 解析简化的响应
        AppResponse appResponse = gson.fromJson(response.body(), AppResponse.class);
        System.out.println("AI回答: " + appResponse.answer);
    }

    // 应用请求的简单数据结构
    static class AppRequest {
        String question;  // 只需要传入问题
    }

    // 应用响应的简单数据结构
    static class AppResponse {
        String answer;    // 直接返回答案
        String requestId; // 平台提供的额外信息
    }
}

有“AI”的1024 = 2048,欢迎大家加入2048 AI社区
更多推荐
 31
31 0
0- 0


 已为社区贡献8条内容

所有评论(0)