Spring AI 进阶之路02:集成SSE实现AI对话的流式响应
你只需要在App里点击一次“允许通知”(这就是建立连接),之后只要有新的大新闻发生,App服务器就会主动把消息推送到你的手机上,你不用一遍遍地去刷新App。你的浏览器(客户端)和我们的服务器(服务端)建立一个连接后,服务器就能随时把新数据(AI生成的新词语)主动“推送”给浏览器,而浏览器只管接收就行。,你会看到一个简洁的聊天界面。试着问一些问题,你会发现AI的回复不再是漫长等待后的一次性呈现,而是
认识SSE
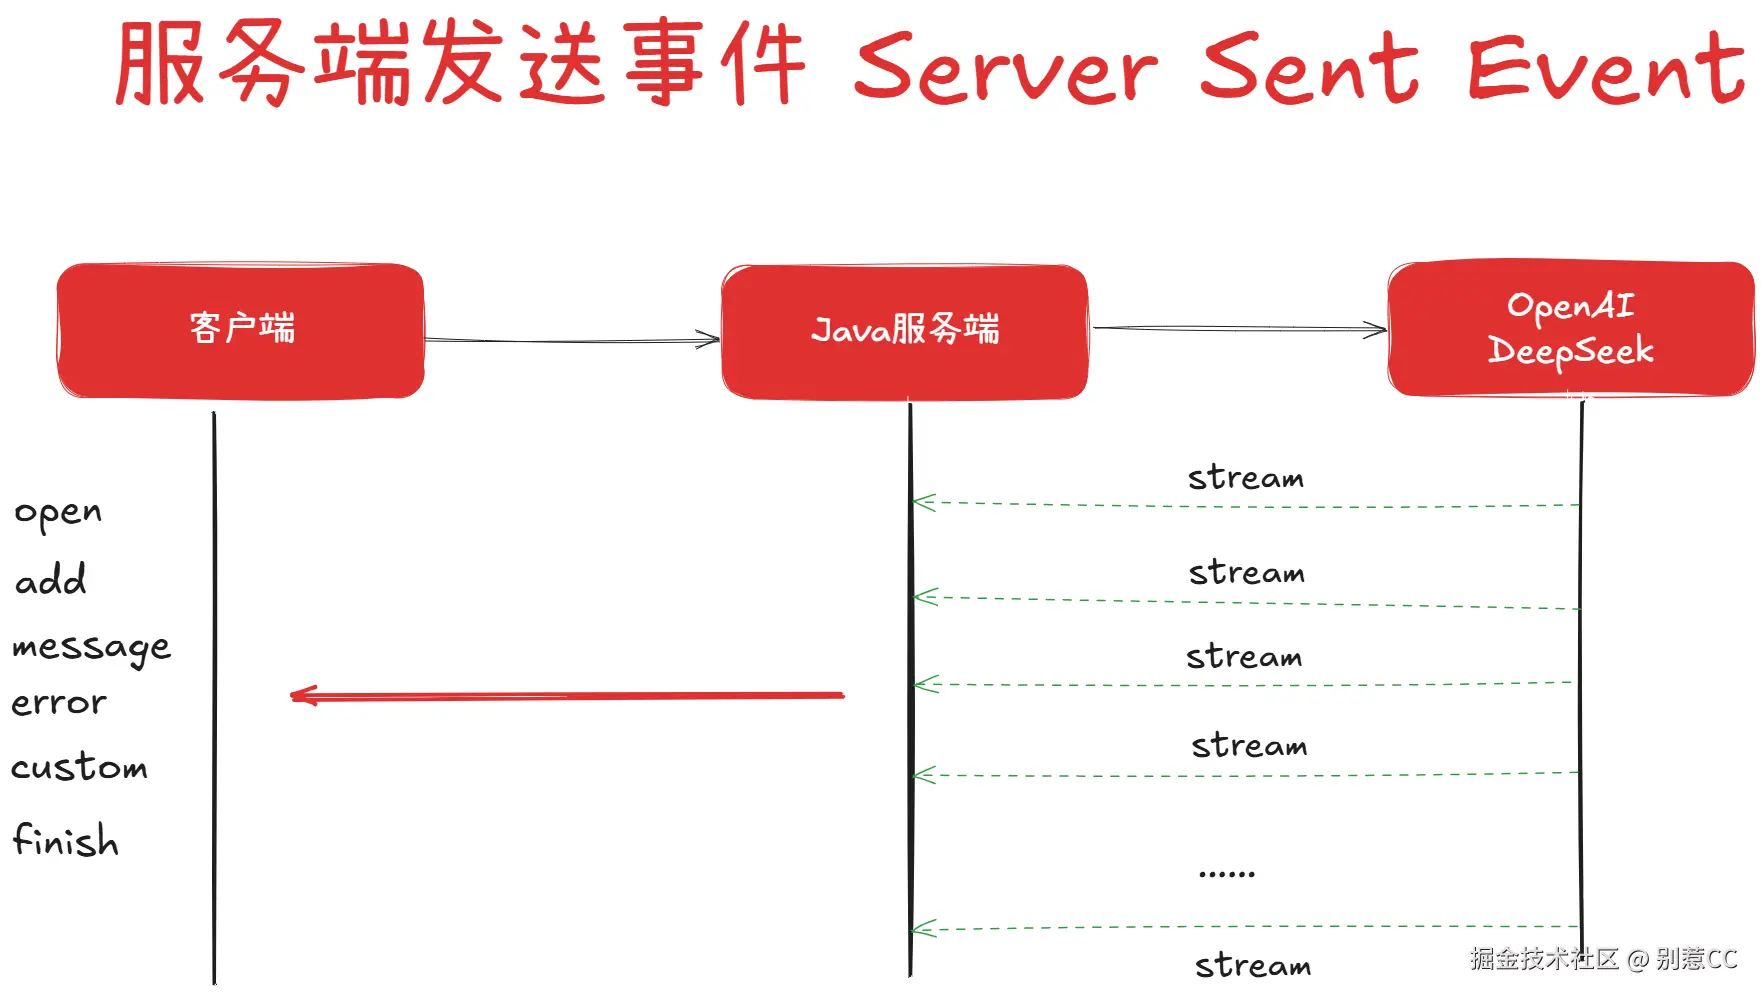
在动手编码之前,我们有必要先花点时间了解一下本次实现的关键技术——SSE,全称 Server-Sent Events,即“服务器发送事件”。你可以把它想象成你关注了一个新闻App的“突发新闻”推送。你只需要在App里点击一次“允许通知”(这就是建立连接),之后只要有新的大新闻发生,App服务器就会主动把消息推送到你的手机上,你不用一遍遍地去刷新App。
你的浏览器(客户端)和我们的服务器(服务端)建立一个连接后,服务器就能随时把新数据(AI生成的新词语)主动“推送”给浏览器,而浏览器只管接收就行。这是一个从服务器到客户端的单行道。

这里我们引申一下,可能有的读者会问为啥不用 WebSocket?这里我们对比下:
- WebSocket:像一个微信电话。你和服务器都能随时说话,是双向的。它功能强大,但对于我们这个场景来说,有点“杀鸡用牛刀”。
- SSE:就是我们上面说的新闻推送。只有服务器能“说话”,你只管听。是单向的。
在AI对话的场景里,我们问完问题后,只需要静静地听AI把答案一个字一个字“说”出来就行了。AI并不需要中途再听我们说什么。所以,更轻量、更简单的SSE,就是我们这个场景下的完美选择。
项目迭代
理论知识已经储备完毕,现在让我们开始动手改造项目。
1.搭建SSE通信管道
首先,我们需要创建一个SSE服务管理器,它负责管理所有客户端的连接。可以把它想象成一个"调度中心",负责记录哪些用户连接了进来,并向指定用户推送消息。
package com.cc.utils; import com.cc.enums.SSEMsgType; import lombok.extern.slf4j.Slf4j; import org.springframework.util.CollectionUtils; import org.springframework.web.servlet.mvc.method.annotation.SseEmitter; import java.io.IOException; import java.util.Map; import java.util.concurrent.ConcurrentHashMap; import java.util.function.Consumer; @Slf4j public class SSEServer { // 存放所有用户的SseEmitter连接 private static final Map<String, SseEmitter> sseClients = new ConcurrentHashMap<>(); // 建立连接 public static SseEmitter connect(String userId) { // 设置超时时间为0,即不超时,默认是30秒,超时未完成任务则会抛出异常 SseEmitter sseEmitter = new SseEmitter(0L); // 注册连接完成、超时、异常时的回调函数 sseEmitter.onTimeout(timeoutCallback(userId)); sseEmitter.onCompletion(completionCallback(userId)); sseEmitter.onError(errorCallback(userId)); sseClients.put(userId, sseEmitter); log.info("SSE connect, userId: {}", userId); return sseEmitter; } // 发送消息 public static void sendMsg(String userId, String message, SSEMsgType msgType) { if (CollectionUtils.isEmpty(sseClients)) { return; } if (sseClients.containsKey(userId)) { SseEmitter sseEmitter = sseClients.get(userId); sendEmitterMessage(sseEmitter, userId, message, msgType); } } public static void sendMsgToAllUsers(String message) { if (CollectionUtils.isEmpty(sseClients)) { return; } sseClients.forEach((userId, sseEmitter) -> { sendEmitterMessage(sseEmitter, userId, message, SSEMsgType.MESSAGE); }); } private static void sendEmitterMessage(SseEmitter sseEmitter, String userId, String message, SSEMsgType msgType) { // 指定事件名称(name),前端根据这个名称监听 SseEmitter.SseEventBuilder msgEvent = SseEmitter.event() .id(userId) .data(message) .name(msgType.type); try { sseEmitter.send(msgEvent); } catch (IOException e) { log.error("SSE send message error, userId: {}, error: {}", userId, e.getMessage()); close(userId); // 发送异常时,移除该连接 } } // 关闭连接 public static void close(String userId) { SseEmitter emitter = sseClients.get(userId); if (emitter != null) { emitter.complete(); // 这会触发 onCompletion 回调,回调中已经包含了 remove 操作 } } }
这个管理器的核心功能包括:
- connect:为新用户建立SSE连接,并注册各种回调函数
- sendMsg:向指定用户发送消息,支持不同的消息类型
- close:优雅地关闭连接
接下来,我们需要创建一个消息类型枚举,用于区分不同类型的SSE消息:
package com.cc.enums; public enum SSEMsgType { MESSAGE("message", "单次发送的普通信息"), ADD("add", "消息追加,适用于流式stream推送"), FINISH("finish", "消息发送完成"), CUSTOM_EVENT("custom_event", "自定义消息类型"), DONE("done", "消息发送完成"); public final String type; public final String value; SSEMsgType(String type, String value) { this.type = type; this.value = value; } }
有了管理工具,我们还需要提供一个让前端连接的入口。创建一个专门的SSE控制器:
package com.cc.controller; import com.cc.enums.SSEMsgType; import com.cc.utils.SSEServer; import org.springframework.http.MediaType; import org.springframework.web.bind.annotation.GetMapping; import org.springframework.web.bind.annotation.RequestMapping; import org.springframework.web.bind.annotation.RequestParam; import org.springframework.web.bind.annotation.RestController; import org.springframework.web.servlet.mvc.method.annotation.SseEmitter; @RestController @RequestMapping("/sse") public class SSEController { @GetMapping(path = "/connect", produces = { MediaType.TEXT_EVENT_STREAM_VALUE }) public SseEmitter connect(@RequestParam String userId) { return SSEServer.connect(userId); } }
这个控制器很简洁,它的唯一职责就是调用 SSEServer.connect(),并把返回的 SseEmitter 对象交给 Spring MVC。当返回类型是 SseEmitter 时,Spring Boot 就知道要维持一个长连接。
2.改造核心聊天服务
这是本次迭代的核心部分。我们要将原来的同步聊天方法改造成流式处理,让AI的回复能够实时推送给用户。
package com.cc.service.impl; import com.cc.bean.ChatEntity; import com.cc.enums.SSEMsgType; import com.cc.service.ChatService; import com.cc.utils.SSEServer; import lombok.extern.slf4j.Slf4j; import org.springframework.ai.chat.client.ChatClient; import org.springframework.stereotype.Service; import reactor.core.publisher.Flux; @Service @Slf4j public class ChatServiceImpl implements ChatService { private final ChatClient chatClient; public ChatServiceImpl(ChatClient.Builder chatClientBuilder) { this.chatClient = chatClientBuilder.build(); } @Override public void doChat(ChatEntity chatEntity) { String userId = chatEntity.getCurrentUserName(); String prompt = chatEntity.getMessage(); Flux<String> stringFlux = chatClient .prompt(prompt) .stream() .content(); stringFlux .doOnError(throwable -> { log.error("AI Stream error:" + throwable.getMessage()); SSEServer.sendMsg(userId, "AI service error", SSEMsgType.FINISH); SSEServer.close(userId); }) .subscribe( content -> SSEServer.sendMsg(userId, content, SSEMsgType.ADD), error -> log.error("Error processing stream: " + error.getMessage()), () -> { SSEServer.sendMsg(userId, "done", SSEMsgType.FINISH); SSEServer.close(userId); } ); } }
这里的关键变化:
- 使用
stream().content()获取流式响应,而不是之前的call()同步调用 - 通过
subscribe()订阅流,实现非阻塞处理 - 每收到一块内容就立即通过SSE推送给前端,实现实时效果
3. 创建聊天接口
我们还需要一个普通的HTTP接口,用于接收用户的聊天请求:
package com.cc.controller; import com.cc.bean.ChatEntity; import com.cc.service.ChatService; import jakarta.annotation.Resource; import org.springframework.web.bind.annotation.*; @RestController @RequestMapping("/chat") public class ChatController { @Resource private ChatService chatService; @PostMapping("/ai") public void chat(@RequestBody ChatEntity chatEntity) { chatService.doChat(chatEntity); } }
注意这个接口的返回类型是 void,因为真正的响应是通过SSE推送的,而不是通过这个HTTP请求返回的。
4.编写前端页面
为了直观地展示流式效果,我们编写一个简洁美观的聊天界面。将以下代码保存为 index.html,放在项目的 src/main/resources/static 目录下:
<!DOCTYPE html> <html lang="zh-CN"> <head> <meta charset="UTF-8"> <meta name="viewport" content="width=device-width, initial-scale=1.0"> <title>SSE 流式对话</title> <style> body { font-family: -apple-system, BlinkMacSystemFont, "Segoe UI", Roboto, "Helvetica Neue", Arial, sans-serif; background-color: #f4f7f9; margin: 0; display: flex; justify-content: center; align-items: center; height: 100vh; } .chat-container { width: 90%; max-width: 800px; height: 90vh; background-color: #fff; border-radius: 12px; box-shadow: 0 4px 20px rgba(0, 0, 0, 0.1); display: flex; flex-direction: column; overflow: hidden; } .chat-header { background-color: #4a90e2; color: white; padding: 16px; font-size: 1.2em; text-align: center; font-weight: bold; } .chat-messages { flex-grow: 1; padding: 20px; overflow-y: auto; display: flex; flex-direction: column; gap: 15px; } .message { padding: 12px 18px; border-radius: 18px; max-width: 75%; line-height: 1.5; } .user-message { background-color: #dcf8c6; align-self: flex-end; border-bottom-right-radius: 4px; } .bot-message { background-color: #e9e9eb; align-self: flex-start; border-bottom-left-radius: 4px; } .chat-input-area { display: flex; padding: 15px; border-top: 1px solid #e0e0e0; background-color: #f9f9f9; } #message-input { flex-grow: 1; padding: 12px; border: 1px solid #ccc; border-radius: 20px; resize: none; font-size: 1em; margin-right: 10px; } #send-button { padding: 12px 25px; border: none; background-color: #4a90e2; color: white; border-radius: 20px; cursor: pointer; font-size: 1em; transition: background-color 0.3s; } #send-button:disabled { background-color: #a0c7ff; cursor: not-allowed; } </style> </head> <body> <div class="chat-container"> <div class="chat-header">AI 实时对话机器人</div> <div class="chat-messages" id="chat-messages"> <!-- 聊天消息会在这里动态添加 --> </div> <div class="chat-input-area"> <textarea id="message-input" placeholder="输入你的问题..." rows="1"></textarea> <button id="send-button">发送</button> </div> </div> <script> // DOM 元素获取 const chatMessages = document.getElementById('chat-messages'); const messageInput = document.getElementById('message-input'); const sendButton = document.getElementById('send-button'); // 生成一个简单的唯一用户ID const userId = 'user-' + Date.now() + '-' + Math.random().toString(36).substr(2, 9); let eventSource = null; let currentBotMessageElement = null; // 1. 页面加载后,立即连接SSE function connectSSE() { if (eventSource) { eventSource.close(); } // 注意这里的URL要和你后端的SSEController路径一致 eventSource = new EventSource(`/sse/connect?userId=${userId}`); // 监听 'add' 事件 (对应后端的 SSEMsgType.ADD) eventSource.addEventListener('add', (event) => { if (!currentBotMessageElement) { // 如果是第一块数据,创建新的机器人消息框 currentBotMessageElement = createMessageElement('bot-message'); chatMessages.appendChild(currentBotMessageElement); } // 将收到的数据追加到机器人消息框中 // 注意:OpenAI的流式响应可能会返回 "null" 字符串,需要过滤掉 if (event.data && event.data.toLowerCase() !== 'null') { currentBotMessageElement.textContent += event.data; } scrollToBottom(); }); // 监听 'finish' 事件 (对应后端的 SSEMsgType.FINISH) eventSource.addEventListener('finish', (event) => { console.log('Stream finished:', event.data); // 流结束后,重置机器人消息元素,并重新启用发送按钮 currentBotMessageElement = null; sendButton.disabled = false; messageInput.disabled = false; // 连接已完成使命,可以安全关闭 eventSource.close(); }); eventSource.onerror = (error) => { console.error('SSE Error:', error); sendButton.disabled = false; messageInput.disabled = false; eventSource.close(); // 出错时也关闭连接 }; } // 2. 发送消息的逻辑 async function sendMessage() { const message = messageInput.value.trim(); if (!message) return; // 在UI上显示用户自己的消息 const userMessageElement = createMessageElement('user-message', message); chatMessages.appendChild(userMessageElement); messageInput.value = ''; scrollToBottom(); // 禁用输入框和按钮,防止重复发送 sendButton.disabled = true; messageInput.disabled = true; // 重新建立SSE连接,为接收新消息做准备 connectSSE(); // 通过HTTP POST请求触发后端的AI聊天 try { // 注意这里的URL要和你后端的ChatController路径一致 await fetch('/chat/ai', { method: 'POST', headers: { 'Content-Type': 'application/json', }, body: JSON.stringify({ currentUserName: userId, message: message, }), }); } catch (error) { console.error('Failed to send message:', error); const errorMessage = createMessageElement('bot-message', '抱歉,发送消息失败。'); chatMessages.appendChild(errorMessage); sendButton.disabled = false; messageInput.disabled = false; } } // 辅助函数:创建消息DOM元素 function createMessageElement(className, text = '') { const div = document.createElement('div'); div.className = `message ${className}`; div.textContent = text; return div; } // 辅助函数:滚动到底部 function scrollToBottom() { chatMessages.scrollTop = chatMessages.scrollHeight; } // 事件绑定 sendButton.addEventListener('click', sendMessage); messageInput.addEventListener('keydown', (event) => { if (event.key === 'Enter' && !event.shiftKey) { event.preventDefault(); sendMessage(); } }); </script> </body> </html>
这个前端页面的工作流程:
-
建立SSE连接:通过
EventSourceAPI 与后端建立长连接 -
监听事件流:监听
add事件接收AI的实时响应,监听finish事件知道响应结束 -
发送聊天请求:通过普通的HTTP POST请求触发后端的AI聊天
-
实时渲染响应:收到数据块时立即追加到页面上,实现"打字机"效果
效果测试
现在,让我们启动项目来体验流式响应的魅力。访问 http://localhost:8080/index.html,你会看到一个简洁的聊天界面。试着问一些问题,你会发现AI的回复不再是漫长等待后的一次性呈现,而是像真人打字一样,一个字一个字地流畅展现。
小结
通过本文的学习,我们成功地将一个普通的AI聊天应用升级为支持流式响应的版本。这个过程中,我们:
- 深入理解了SSE技术:它简单、轻量,特别适合服务器向客户端的单向数据推送场景
- 掌握了Spring AI的流式API:通过
stream()方法获取响应流,配合响应式编程实现非阻塞处理 - 实现了完整的流式对话系统:从后端的SSE管理、流式处理,到前端的实时渲染,构建了一个完整的解决方案
流式响应不仅仅是一个技术特性,更是提升用户体验的关键要素。在AI应用日益普及的今天,掌握这项技术将让你的应用在用户体验上领先一步。
更多推荐
 已为社区贡献11条内容


所有评论(0)