rk3588 npu 使用python推理 retinaface 人脸检测
根据瑞星微官方提供的,官方提供了模型转换,Python 的模拟器代码,但是没有提供能直接在rk3588 板端运行的python代码,本文完成rk3588的板端python推理实现。
·
1. 前言
根据瑞星微官方提供的rknn_model_zoo RetinaFace
,官方提供了模型转换,Python 的模拟器代码,但是没有提供能直接在rk3588 板端运行的python代码,本文完成rk3588的板端python推理实现。
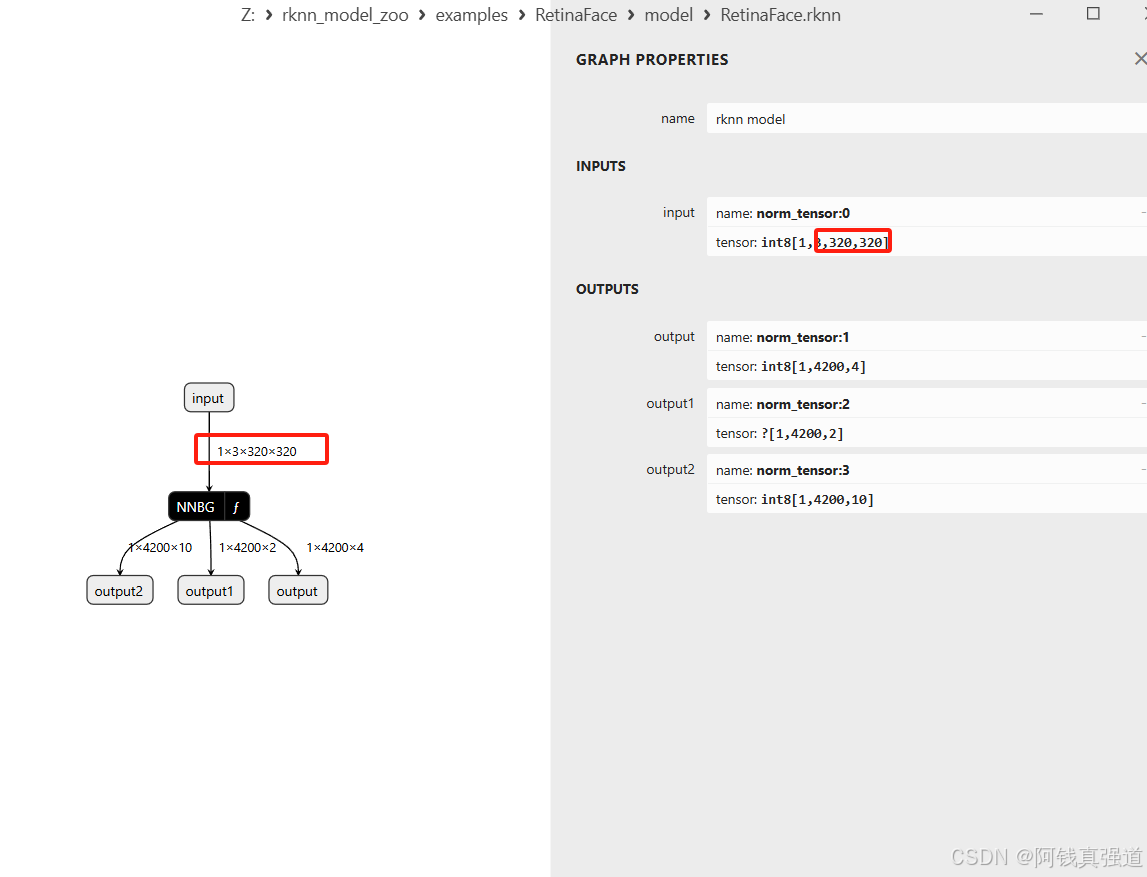
2. 模型转换
模型使用官方提供的模型,这里提供已经转换好的rknn模型和onnx模型
通过网盘分享的文件:retinaface
链接: https://pan.baidu.com/s/1oT5XiBm_6Lr8VcZmrY8plg?pwd=uigw 提取码: uigw
3. 测试
3.1 代码
import cv2
import numpy as np
from rknnlite.api import RKNNLite
import platform
import os
import time
from itertools import product as product
from math import ceil
path=os.getcwd()
model_path='./RetinaFace.rknn'
img_path='./test.jpg'
IMG_SIZE = 320
cfg_mnet={
'min_sizes': [[16, 32], [64, 128], [256, 512]],
'steps': [8, 16, 32],
'variance': [0.1, 0.2],
}
# 得到anchor
class Anchors(object):
def __init__(self, cfg, image_size=None):
super(Anchors, self).__init__()
self.min_sizes = cfg['min_sizes']
self.steps = cfg['steps']
#---------------------------#
# 图片的尺寸
#---------------------------#
self.image_size = image_size
#---------------------------#
# 三个有效特征层高和宽
#---------------------------#
self.feature_maps = [[ceil(self.image_size[0]/step), ceil(self.image_size[1]/step)] for step in self.steps]
def get_anchors(self):
anchors = []
for k, f in enumerate(self.feature_maps):
min_sizes = self.min_sizes[k]
#-----------------------------------------#
# 对特征层的高和宽进行循环迭代
#-----------------------------------------#
for i, j in product(range(f[0]), range(f[1])):
for min_size in min_sizes:
s_kx = min_size / self.image_size[1]
s_ky = min_size / self.image_size[0]
dense_cx = [x * self.steps[k] / self.image_size[1] for x in [j + 0.5]]
dense_cy = [y * self.steps[k] / self.image_size[0] for y in [i + 0.5]]
for cy, cx in product(dense_cy, dense_cx):
anchors += [cx, cy, s_kx, s_ky]
output_np=np.array(anchors).reshape(-1,4)
return output_np
# 填充灰条,实现resize
def letterbox_image(image, size):
ih, iw, _ = np.shape(image)
w, h = size
scale = min(w/iw, h/ih)
nw = int(iw*scale)
nh = int(ih*scale)
image = cv2.resize(image, (nw, nh))
new_image = np.ones([size[1], size[0], 3]) * 128
new_image[(h-nh)//2:nh+(h-nh)//2, (w-nw)//2:nw+(w-nw)//2] = image
return new_image
# 人脸框坐标解码
def decode(loc, priors, variances):
boxes = np.concatenate((priors[:, :2] + loc[:, :2] * variances[0] * priors[:, 2:],
priors[:, 2:] * np.exp(loc[:, 2:] * variances[1])), 1)
boxes[:, :2] -= boxes[:, 2:] / 2
boxes[:, 2:] += boxes[:, :2]
return boxes
# 人脸关键点解码
def decode_landm(pre, priors, variances):
landms = np.concatenate((priors[:, :2] + pre[:, :2] * variances[0] * priors[:, 2:],
priors[:, :2] + pre[:, 2:4] * variances[0] * priors[:, 2:],
priors[:, :2] + pre[:, 4:6] * variances[0] * priors[:, 2:],
priors[:, :2] + pre[:, 6:8] * variances[0] * priors[:, 2:],
priors[:, :2] + pre[:, 8:10] * variances[0] * priors[:, 2:],
), 1)
return landms
def pynms(dets, thresh): #非极大抑制
x1 = dets[:, 0]
y1 = dets[:, 1]
x2 = dets[:, 2]
y2 = dets[:, 3]
areas = (y2 - y1) * (x2 - x1)
scores = dets[:, 4]
keep = []
index = scores.argsort()[::-1] #置信度从大到小排序(下标)
while index.size > 0:
i = index[0]
keep.append(i)
x11 = np.maximum(x1[i], x1[index[1:]]) # 计算相交面积
y11 = np.maximum(y1[i], y1[index[1:]])
x22 = np.minimum(x2[i], x2[index[1:]])
y22 = np.minimum(y2[i], y2[index[1:]])
w = np.maximum(0, x22 - x11 ) # 当两个框不想交时x22 - x11或y22 - y11 为负数,
# 两框不相交时把相交面积置0
h = np.maximum(0, y22 - y11 ) #
overlaps = w * h
ious = overlaps / (areas[i] + areas[index[1:]] - overlaps)#计算IOU
idx = np.where(ious <= thresh)[0] #IOU小于thresh的框保留下来
index = index[idx + 1]
return keep
def filter_box(org_box,conf_thres,iou_thres): #过滤掉无用的框
conf = org_box[..., 4] > conf_thres #删除置信度小于conf_thres的BOX
# print(conf)
box = org_box[conf == True]
output = []
curr_cls_box = np.array(box)
curr_cls_box[:,:4]=curr_cls_box[:,:4]*320
curr_cls_box[:,5:]=curr_cls_box[:,5:]*320
curr_out_box = pynms(curr_cls_box,iou_thres) #经过非极大抑制后输出的BOX下标
for k in curr_out_box:
output.append(curr_cls_box[k]) #利用下标取出非极大抑制后的BOX
output = np.array(output)
return output
# 输入图片处理
def procss_img(img_path):
img=cv2.imread(img_path)
img=cv2.cvtColor(img,cv2.COLOR_BGR2RGB)
img=letterbox_image(img,(IMG_SIZE,IMG_SIZE))
or_img=np.array(img,np.uint8)
or_img=cv2.cvtColor(or_img,cv2.COLOR_RGB2BGR)
img=img.astype(dtype=np.float32)
img-=np.array((104,117,123),np.float32)
# img = img.transpose(2, 0, 1)
img=np.expand_dims(img,axis=0)
return img,or_img #img为模型输入,or_img用于画人脸框
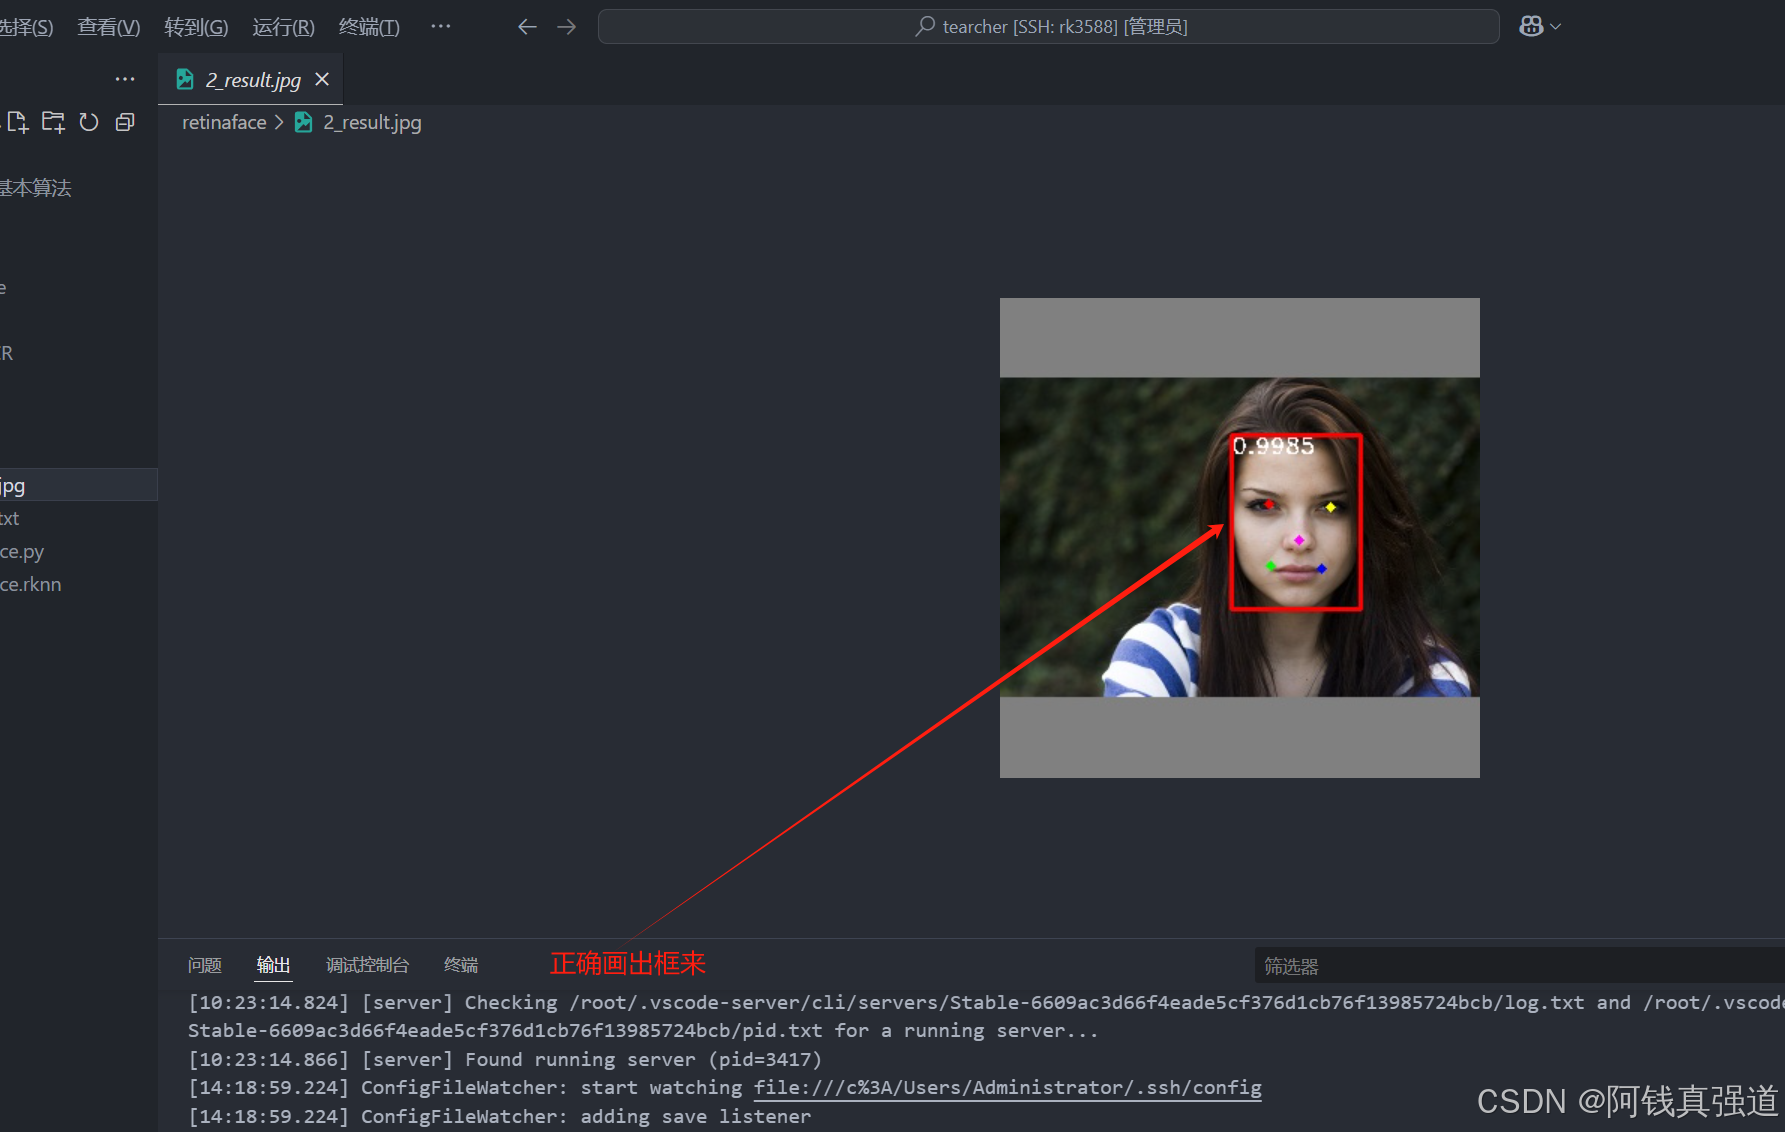
# 画人脸框和5个关键点
def draw_img(boxes_conf_landms,old_image):
for b in boxes_conf_landms:
text = "{:.4f}".format(b[4])
b = list(map(int, b))
# b[0]-b[3]为人脸框的坐标,b[4]为得分
cv2.rectangle(old_image, (b[0], b[1]), (b[2], b[3]), (0, 0, 255), 2)
cx = b[0]
cy = b[1] + 12
cv2.putText(old_image, text, (cx, cy),cv2.FONT_HERSHEY_DUPLEX, 0.5, (255, 255, 255))
# b[5]-b[14]为人脸关键点的坐标
cv2.circle(old_image, (b[5], b[6]), 1, (0, 0, 255), 4)
cv2.circle(old_image, (b[7], b[8]), 1, (0, 255, 255), 4)
cv2.circle(old_image, (b[9], b[10]), 1, (255, 0, 255), 4)
cv2.circle(old_image, (b[11], b[12]), 1, (0, 255, 0), 4)
cv2.circle(old_image, (b[13], b[14]), 1, (255, 0, 0), 4)
return old_image
if __name__ == '__main__':
# # Create RKNN object
rknn = RKNNLite()
# Load rknn model
print('--> Loading model')
ret = rknn.load_rknn(model_path)
if ret != 0:
exit(ret)
print('done')
target = 'rk3588'
print("target ",target)
ret = rknn.init_runtime()
if ret != 0:
print("error ")
exit(ret)
img,or_img=procss_img(img_path)
# Inference
print('--> Running model')
start=time.time()
outputs = rknn.inference(inputs=[img])
end=time.time()
print('时间:{}'.format(end-start))
#输出数据转为numpy数据格式
output_1 = np.array(outputs[0]).squeeze()
output_2 = np.array(outputs[1]).squeeze()
output_3 = np.array(outputs[2]).squeeze()
#生成anchor , 人脸框和热恋关键点解码
anchors = Anchors(cfg_mnet, image_size=(320, 320)).get_anchors()
boxes = decode(output_1, anchors, cfg_mnet['variance'])
landms = decode_landm(output_3, anchors, cfg_mnet['variance'])
conf = output_2[:, 1:2]
#非极大抑制,得到最终输出
boxs_conf = np.concatenate((boxes, conf, landms), -1)
boxs_conf = filter_box(boxs_conf, 0.5, 0.45)
#画出人类框和5个人脸关键并保存图片
if boxs_conf is not None:
draw_img(boxs_conf, or_img)
cv2.imwrite('./2_result.jpg',or_img)
# # cv2.imshow('re', or_img)
# # cv2.waitKey(0)
# cv2.destroyAllWindows()
3.2 测试结果
运行指令
python3 RetinaFace.py

3.3 代码文件结构
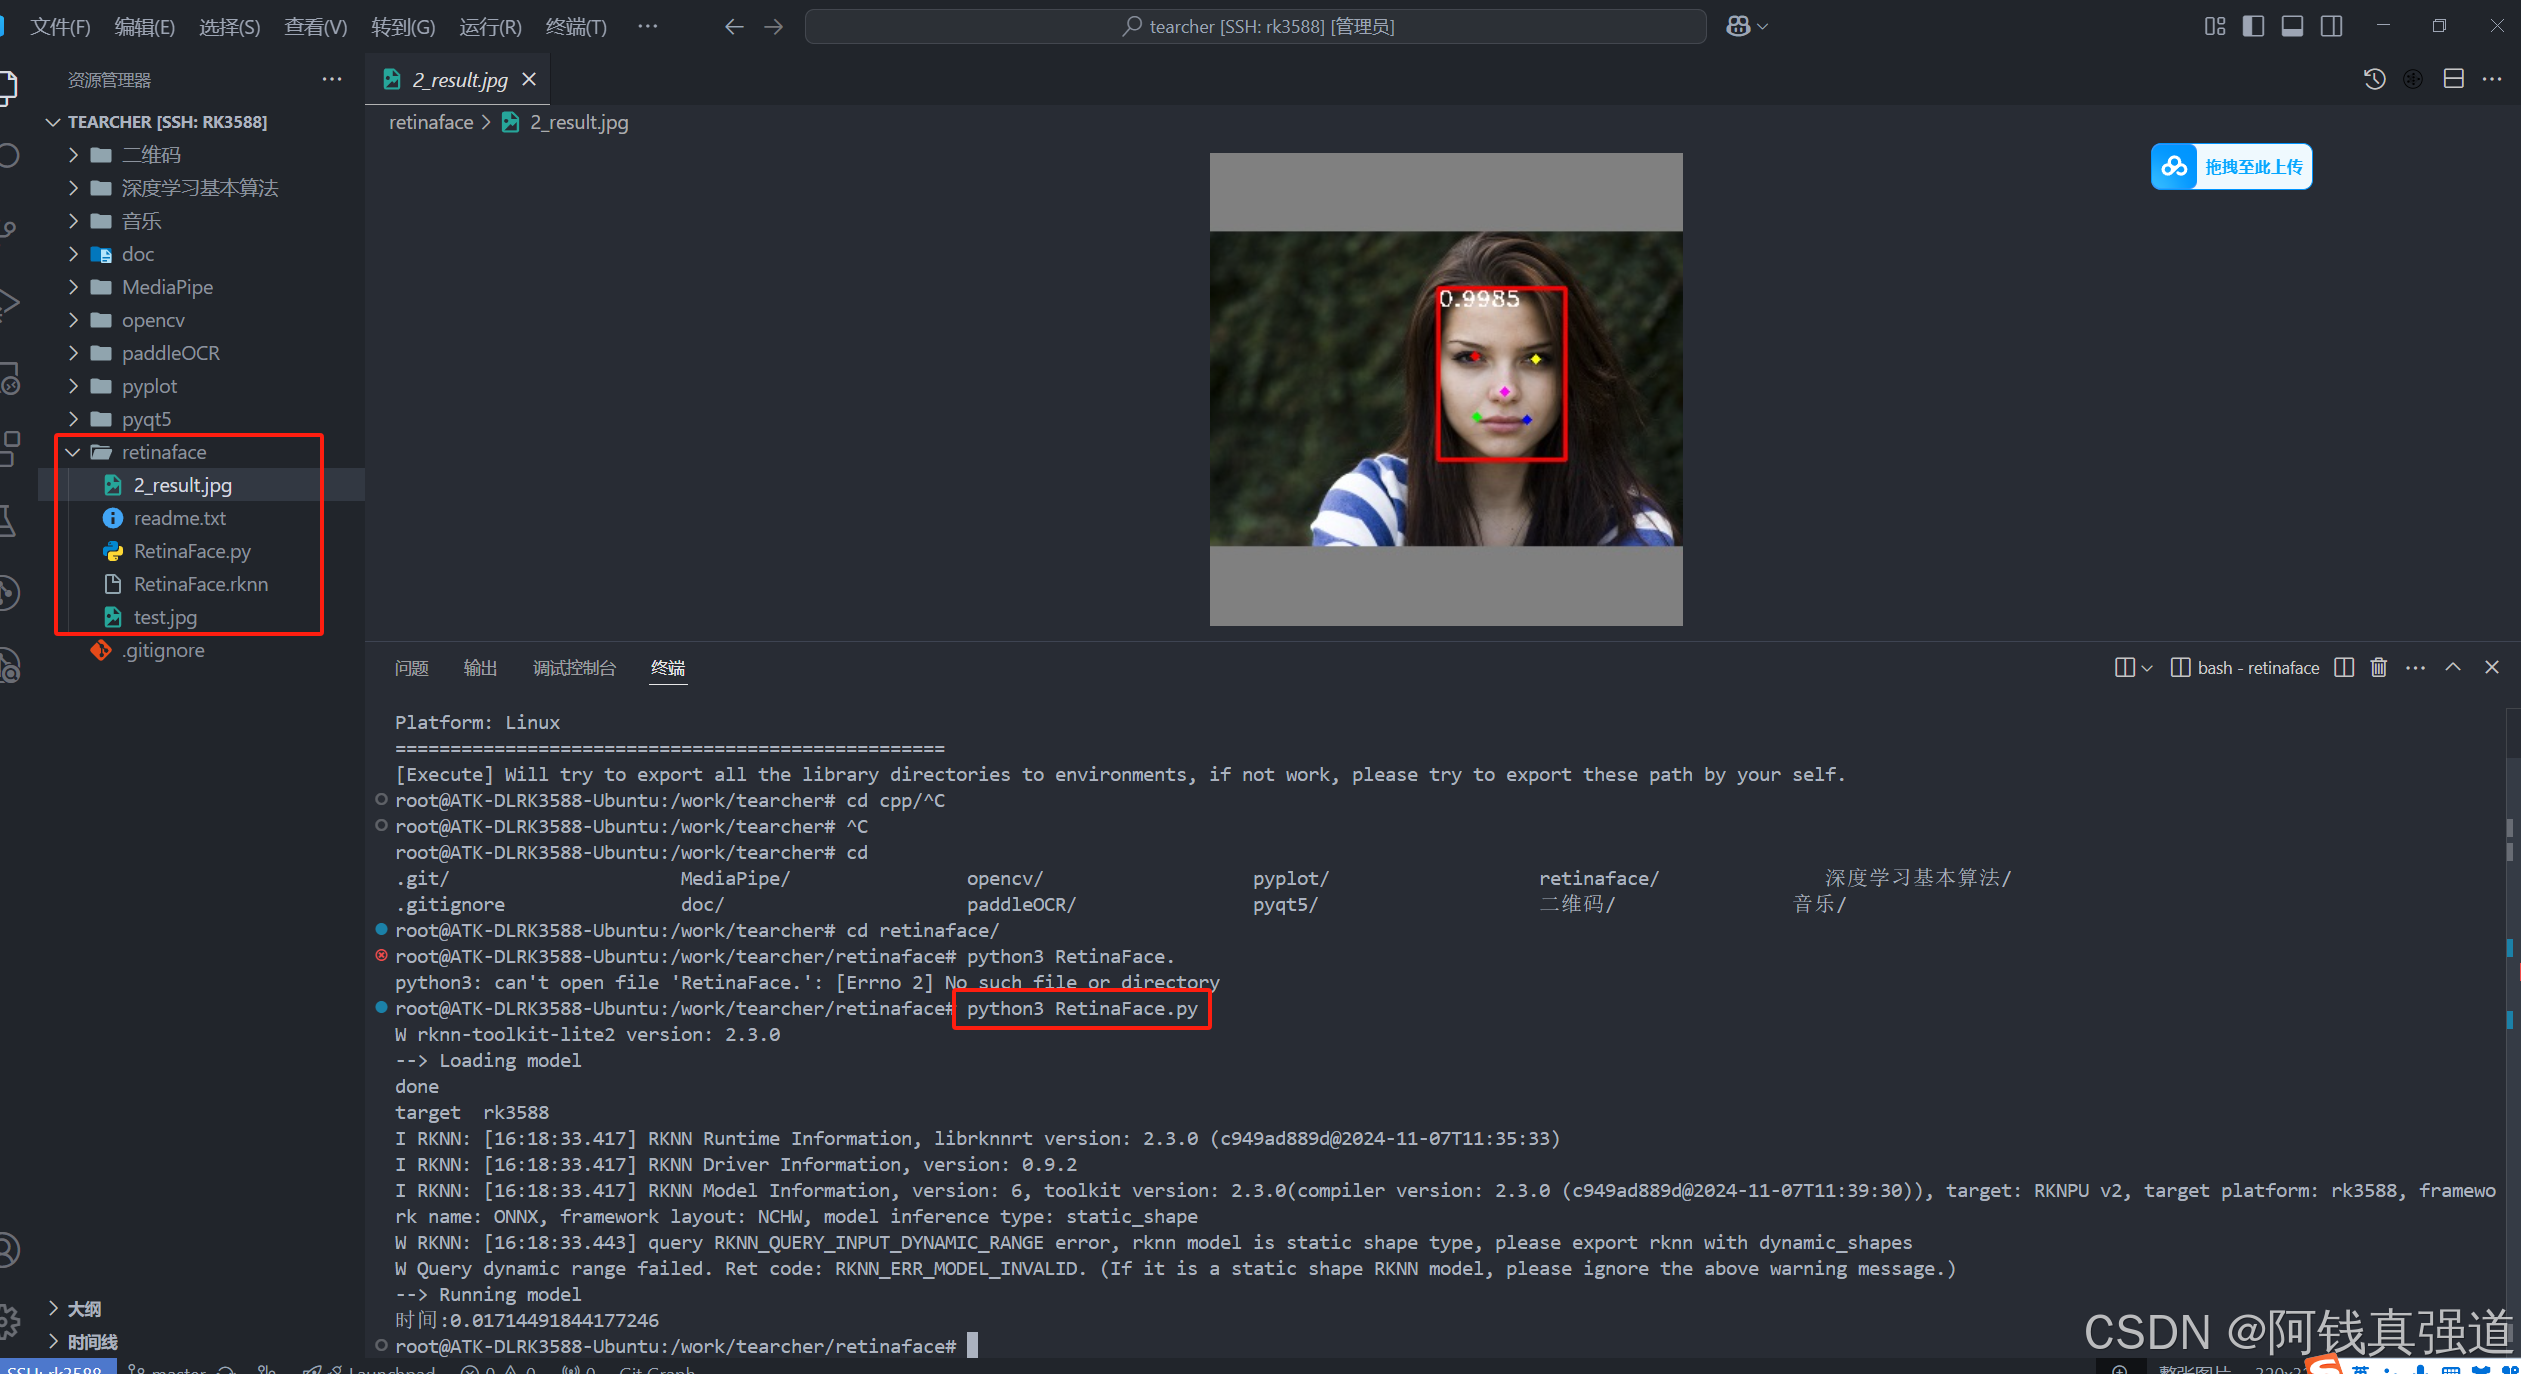
将网盘提供的模型和测试图片放到同一个目录,执行上述的指令即可

有“AI”的1024 = 2048,欢迎大家加入2048 AI社区
更多推荐

 6
6 0
0- 0


 已为社区贡献2条内容

所有评论(0)