安装mxnet(GPU)
本文记录了mxnet的GPU版本安装过程
·
1. 虚拟环境
1.1 创建环境
conda create --prefix=安装路径\环境名 python=3.9
或者
conda create –n 环境名 python=版本 –c 镜像地址
镜像源:
https://mirrors.tuna.tsinghua.edu.cn/anaconda/pkgs/main
https://mirrors.bfsu.edu.cn/anaconda/pkgs/main
http://mirrors.aliyun.com/anaconda/pkgs/main
激活环境
activate 环境名
1.2 如果已有CPU版本的,可先卸载
pip uninstall mxnet
2. 用命令行下载
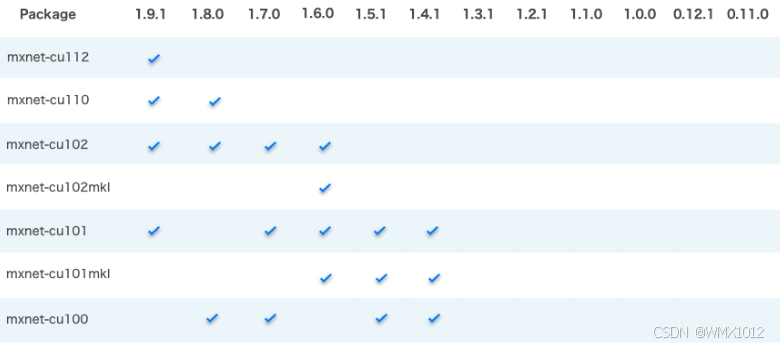
2.1 mxnet版本与cuda版本的关系
mxnet与cuda
2.2 用命令行下载
pip install --pre mxnet-cu101 -i https://pypi.douban.com/simple
–pre会安装包的预发布版本
或者
pip install mxnet-cu102==1.7.0 -f https://dist.mxnet.io/python/cu102
mxnet-cu102==1.7.0表示CUDA版本为10.2,mxnetGPU版1.7.0
3. 安装测试
3.1 CPU版
import mxnet as mx

a = mx.nd.ones((2,3))

b = a * 2 + 1

b.asnumpy()
3.2 GPU版
import mxnet as mx

a = mx.nd.ones((2,3), mx.gpu())

b = a * 2 + 1

b.asnumpy()
运行结果
array([[ 3.,  3.,  3.],
       [ 3.,  3.,  3.]], dtype=float32)

有“AI”的1024 = 2048,欢迎大家加入2048 AI社区
更多推荐

 4
4 0
0- 0


 已为社区贡献1条内容

所有评论(0)