【机械视觉】C#+visionPro联合编程———【二、位深图(CogImage8Grey),使用Bitmap和CogImageFileTool操作图像方式,以及图片读取和存储的2个实例】
在 C# 与 VisionPro 联合编程中,
【机械视觉】C#+visionPro联合编程———【二、位深图(CogImage8Grey),使用Bitmap和CogImageFileTool处理图像方式,以及图片读取和存储的2个实例】
目录
【机械视觉】C#+visionPro联合编程———【二、位深图(CogImage8Grey),使用Bitmap和CogImageFileTool处理图像方式,以及图片读取和存储的2个实例】
C# 与 VisionPro联合编程中的位深图(Bit-Depth Images)详解
使用Bitmap和CogImageFileTool处理图像方式
实例一图片读取和存储的(使用CogImageFileTool处理图像方式)
C# 与 VisionPro联合编程中的位深图(Bit-Depth Images)详解
在机器视觉中,位深图指图像中每个像素的亮度值所占用的位数,直接影响图像的灰度精度和数据范围。VisionPro 支持多种位深的图像处理(如 8 位、16 位、24 位等),结合 C# 编程可实现高精度图像分析与工业检测。
一、位深图的核心概念
1. 常见位深类型
| 位深类型 | 数据范围 | 典型应用场景 | VisionPro 类名 |
|---|---|---|---|
| 8 位灰度 | 0-255(256级灰度) | 普通工业检测(表面缺陷、OCR) | CogImage8Grey |
| 16 位灰度 | 0-65535(高动态范围) | 医疗影像、高精度测量(半导体) | CogImage16Grey |
| 24 位彩色 | RGB各8位(共24位) | 颜色识别、复杂场景分类 | CogImage24PlanarColor |
| 12 位/10 位 | 0-4095 或 0-1023 | 工业相机原生数据(需转换为高位深) | 需通过 CogImageConvert 转换 |
2. 位深图的关键特性
-
动态范围:位深越高,可区分的灰度级越多(如 16 位图像能捕捉微弱对比度差异)。
-
数据精度:高位深图像在数学运算(如亚像素测量)中误差更小。
-
内存占用:16 位图像的内存是 8 位图像的两倍,需注意性能优化。
二、C# 中操作位深图的流程与代码
1. 创建位深图
(1) 创建 8 位灰度图
// 创建一个 640x480 的 8 位灰度图(初始值为0)
CogImage8Grey image8 = new CogImage8Grey(640, 480);
(2) 创建 16 位灰度图
// 创建一个 1024x1024 的 16 位灰度图(初始值为0)
CogImage16Grey image16 = new CogImage16Grey(1024, 1024);
2. 位深转换
(1) 16 位转 8 位(动态范围压缩)
// 定义转换参数:线性缩放(16位范围0-65535 → 8位范围0-255)
CogImageConvertParams convertParams = new CogImageConvertParams();
convertParams.ScalingMethod = CogImageScalingMethodConstants.Linear;
convertParams.LinearScaling = new CogLinearScaling(0, 65535, 0, 255); // 输入范围 → 输出范围

// 执行转换
CogImage8Grey image8 = CogImageConvert.GetInt8Image(image16, convertParams);
(2) 8 位转 16 位(扩展位深)
// 直接复制数据(8位值0-255 → 16位值0-255,高位填充0)
CogImage16Grey image16 = CogImageConvert.GetInt16Image(image8);
3. 访问像素数据
(1) 读取/修改 16 位图像像素值
// 获取像素访问器
CogImage16GreyPixelAccess accessor = image16.GetPixelAccess(CogImageDataModeConstants.ReadWrite);

// 读取像素 (x=100, y=200)
ushort pixelValue = accessor.GetPixel(100, 200);

// 修改像素 (x=100, y=200)
accessor.SetPixel(100, 200, 32768); // 设置为 32768(16位中间值)
(2) 遍历图像区域(ROI)
// 定义 ROI(矩形区域)
CogRectangle roi = new CogRectangle(0, 0, 100, 100);
CogImage16GreyPixelAccess accessor = image16.GetPixelAccess(roi, CogImageDataModeConstants.Read);

for (int y = 0; y < roi.Height; y++)
{
    for (int x = 0; x < roi.Width; x++)
    {
        ushort value = accessor.GetPixel(x, y);
        // 处理像素值(如阈值过滤)
    }
}
三、VisionPro 工具与位深图的兼容性
1. 工具支持情况
| VisionPro 工具 | 支持的位深 | 注意事项 |
|---|---|---|
| CogPMAlignTool | 8位、16位灰度 | 训练图像与运行时图像的位深需一致,否则自动转换可能降低匹配精度。 |
| CogCaliperTool | 8位、16位灰度 | 高位深图像在亚像素边缘检测中精度更高。 |
| CogBlobTool | 8位灰度 | 16位图像需先转换为8位(通过 CogImageConvert)。 |
| CogOCRTool | 8位灰度 | 直接输入16位图像会抛出异常,需提前转换。 |
2. 示例:在 16 位图像上运行 PMAlign 工具
CogPMAlignTool pmTool = new CogPMAlignTool();
pmTool.Pattern.TrainImage = image16; // 直接使用16位图像训练
pmTool.InputImage = image16;         // 输入16位图像
pmTool.Run();

if (pmTool.Results.Count > 0)
{
    double score = pmTool.Results[0].Score;
    Console.WriteLine($"匹配分数: {score}");
}
五、注意事项
-
内存管理
-
16 位图像占用内存较大,处理大尺寸图像时需避免内存溢出(使用
GC.Collect()或分块处理)。 -
及时释放 VisionPro 对象:
image16.Dispose(); // 显式释放资源
-
-
相机配置
-
确保相机输出位深与 VisionPro 工具兼容(如 GigE Vision 相机需设置
PixelFormat为Mono16)。
-
-
异常处理
try
{
    pmTool.Run();
}
catch (CogException ex)
{
    // 处理位深不匹配错误(如输入了24位彩色图到灰度工具)
    MessageBox.Show($"VisionPro 错误: {ex.Message}");
}
六、总结
在 C# 与 VisionPro 联合编程中,位深图是处理高精度视觉任务的核心。通过合理选择位深、正确转换格式,并匹配 VisionPro 工具的特性,可显著提升检测系统的性能与可靠性。关键点包括:
-
灵活使用
CogImageConvert处理位深转换。 -
优先在高精度场景(如医疗、半导体)使用 16 位图像。
-
注意工具链的位深兼容性(如
CogBlobTool仅支持 8 位)
使用Bitmap和CogImageFileTool处理图像方式
在 C# 与 VisionPro 联合编程中,System.Drawing.Bitmap 是 .NET 标准库中的图像处理类,而 CogImageFileTool 是 VisionPro 提供的专门用于加载和保存图像文件的工具。两者在图像处理中有不同的适用场景和操作方式。
CogImageFileTool
使用CogImageFileTool 直接处理图像
CogImageFileTool 是 VisionPro 提供的专用工具,支持多种格式(BMP、TIFF、JPEG等),并自动处理位深、颜色空间等细节。
1. 加载图像
-
/// 加载方式一 CogImageFileTool imageFileTool = new CogImageFileTool(); // 设置文件路径 imageFileTool.Filename = "image.tif"; // 运行工具加载图像 imageFileTool.Run(); // 获取图像(自动识别为 CogImage8Grey 或 CogImage24PlanarColor) ICogImage cogImage = imageFileTool.OutputImage; // 显示图像(使用 VisionPro 控件) cogRecordDisplay1.Image = cogImage; -
/// 加载方式二
CogImageFileTool fileTool = new CogImageFileTool();
fileTool.Operator.Open("./1.png", CogImageFileModeConstants.Read);
// 2 运行工具
fileTool.Run();
// 3 获取CogImageFileTool工具的输出图
cogRecordDisplay1.Image = fileTool.OutputImage;
cogRecordDisplay1.Fit(); // 自适应大小
// 4 图片自适应
cogRecordDisplay1.Fit(); // 自适应大小
2. 保存图像
-
///保存方式一 CogImageFileTool imageFileTool = new CogImageFileTool(); // 设置输出路径和格式 imageFileTool.Filename = "output.bmp"; imageFileTool.FileFormat = CogImageFileFormatConstants.BMP; // 输入图像(假设是 VisionPro 处理后的结果) imageFileTool.InputImage = processedImage; // 运行工具保存图像 imageFileTool.Run(); -
/// 保存方式二
CogImageFileTool fileTool = new CogImageFileTool();
fileTool.InputImage = cogRecordDisplay1.Image; // 把控件显示的图片作为CogImageFileTool输入图
fileTool.Operator.Open("./1.png", CogImageFileModeConstants.Write); // 写入CogImageFileTool工具里面
// 运行工具
fileTool.Run();
Bitmap
System.Drawing.Bitmap 是 .NET 标准库中的图像处理类。VisionPro 的核心图像类型是 CogImage8Grey(8位灰度)和 CogImage24PlanarColor(24位彩色),而 Bitmap 是通用图像格式。二者转换需注意 像素格式 和 内存管理。
加载
- 方式一
-
Bitmap map = Image.FromFile("./1.png") as Bitmap;
//c# 位图转成vp的8位的灰图
CogImage8Grey imageGrey = new CogImage8Grey(map);
cogRecordDisplay1.Image = imageGrey; //显示8位灰图进行展示 - 方式二
-
Bitmap map = new Bitmap("./1.png");
//c# 位图转成vp的8位的灰图
CogImage8Grey imageGrey = new CogImage8Grey(map);
cogRecordDisplay1.Image = imageGrey; //显示8位灰图进行展示
存储
-
string fileName = path + @"\1.png";
//CreateContentBitmap() 把cogRecordDisplay1工具里面图片取出创建成位图 创建
Bitmap map = cogRecordDisplay1.CreateContentBitmap(Cognex.VisionPro.Display.CogDisplayContentBitmapConstants.Image) as Bitmap;
//save() 保存位图,参数1路径,参数2转成图片的格式
 map.Save(fileName, ImageFormat.Png);
图像间的转换
1. Bitmap → CogImage
-
(1) 灰度图像转换
-
// 加载 Bitmap(假设为8位灰度格式) Bitmap bitmap = new Bitmap("image_gray.bmp"); // 转换为 CogImage8Grey CogImage8Grey cogImage8Grey = new CogImage8Grey(bitmap); // 释放 Bitmap 资源(重要!避免内存泄漏) bitmap.Dispose(); -
(2) 彩色图像转换
-
Bitmap bitmap = new Bitmap("image_color.bmp");

// 转换为 CogImage24PlanarColor(注意颜色通道顺序:RGB)
CogImage24PlanarColor cogColorImage = new CogImage24PlanarColor(bitmap);

// 若需要 BGR 顺序(某些相机格式)
CogImage24PlanarColor cogColorBGR = CogImageConvert.GetPlanarColorImage(
    bitmap,
    CogImageFormatConstants.BGR
);

bitmap.Dispose();
2. CogImage → Bitmap
(1) 灰度图像转换
CogImage8Grey cogImage8Grey = CogImageFileTool.Load("image_gray.bmp") as CogImage8Grey;

// 转换为 Bitmap
Bitmap bitmap = cogImage8Grey.ToBitmap();
(2) 彩色图像转换
CogImage24PlanarColor cogColorImage = CogImageFileTool.Load("image_color.bmp") as CogImage24PlanarColor;

// 转换为 Bitmap(默认 RGB 顺序)
Bitmap bitmap = cogColorImage.ToBitmap();
图片读取和存储的二个实例
实例要求:
- 一、UI界面
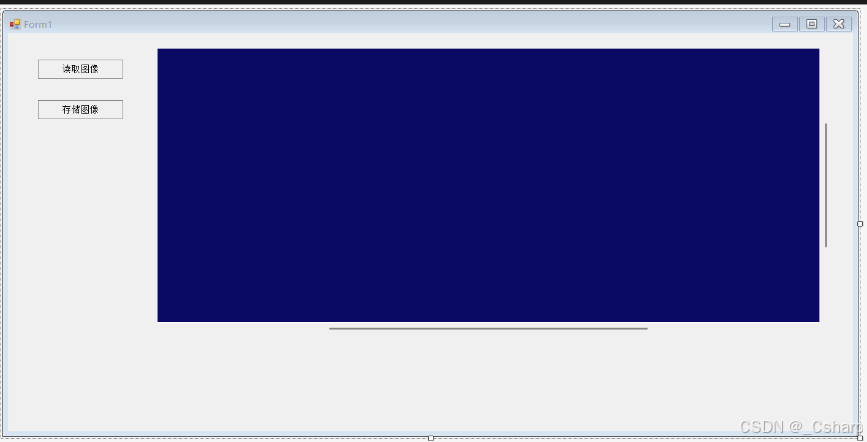
- 二、操作效果
- 当点击读取图像按钮时,弹出文件选择框,选择好图片文件时,将图片显示在CogRecordDisplay控件中。 当点击存储图像时将CogRecordDisplay中的图像存储在本地。
提示: 两个实例的效果是一样的只是实现方法不一样,一个使用的是CogImageFileTool操作图像方式,一个使用的是Bitmap操作图像方式。
实例一图片读取和存储的(使用CogImageFileTool处理图像方式)
项目源码
public partial class Form1 : Form
{
    public Form1()
    {
        InitializeComponent();
    }
    CogImageFileTool fileTool = new CogImageFileTool();
    // 读取
    // 采用CogImageFileTool 工具读取
    private void button1_Click(object sender, EventArgs e)
    {
        OpenFileDialog ofd = new OpenFileDialog(); // 打开文件对话框
        ofd.Filter = "All Image Files|*.bmp;*.ico;*.gif;*.jpeg;*.jpg;*.png;*.tif;*.tiff;*.idb|Windows Bitmap(*.bmp)|*.bmp|Windows Icon(*.ico)|*.ico|Graphics Interchange Format (*.gif)|(*.gif)|JPEG File Interchange Format (*.jpg)|*.jpg;*.jpeg|Portable Network Graphics (*.png)|*.png|Tag Image File Format (*.tif)|*.tif;*.tiff|Image DataBase (*.idb)|*.idb;";
        ofd.Title = "选择图像";
        if (ofd.ShowDialog()==DialogResult.OK)
        {
            // Open() 打开一个路径上的资源
            // 参数1 文件路径
            // 参数2 资源是以读取的形式来进行操作
            // 1 添加输入图
            fileTool.Operator.Open(ofd.FileName, CogImageFileModeConstants.Read);

            // 2 运行工具
            fileTool.Run();

            // 3 获取CogImageFileTool工具的输出图
            cogRecordDisplay1.Image = fileTool.OutputImage;
            cogRecordDisplay1.Fit(); // 自适应大小

            // 4 图片自适应
            cogRecordDisplay1.Fit(); // 自适应大小
        }

    }


    // 存储
    private void button2_Click(object sender, EventArgs e)
    {
        string fileName = Directory.GetCurrentDirectory() + @"./image"; // 文件路径
        if (!File.Exists(fileName))
        {
            Directory.CreateDirectory(fileName);
        }
        fileName =$"{fileName}/{DateTime.Now.ToString("HH-mm-ss")}.Png";

        // 创建CogImageFileTool
        CogImageFileTool fileTool = new CogImageFileTool();
        fileTool.InputImage = cogRecordDisplay1.Image; // 把控件显示的图片作为CogImageFileTool输入图
        fileTool.Operator.Open(fileName, CogImageFileModeConstants.Write); // 写入CogImageFileTool工具里面
        // 运行工具
        fileTool.Run();
    }
}
实例二图片读取和存储的(使用Bitmap处理图像方式)
项目源码
public partial class Form1 : Form
{
    public Form1()
    {
        InitializeComponent();
    }

    //读取 采用的是BitMap读取
    private void button1_Click(object sender, EventArgs e)
    {
        OpenFileDialog ofd  = new OpenFileDialog();
        ofd.Filter = "All Image Files|*.bmp;*.ico;*.gif;*.jpeg;*.jpg;*.png;*.tif;*.tiff;*.idb|Windows Bitmap(*.bmp)|*.bmp|Windows Icon(*.ico)|*.ico|Graphics Interchange Format (*.gif)|(*.gif)|JPEG File Interchange Format (*.jpg)|*.jpg;*.jpeg|Portable Network Graphics (*.png)|*.png|Tag Image File Format (*.tif)|*.tif;*.tiff;";
        ofd.Title = "选择图像";
        ofd.InitialDirectory = @"C:\"; //InitialDirectory 初始化对话框的路径
        if(ofd.ShowDialog()== DialogResult.OK)
        {
            //Image.FromFile 加载路径上资源
            //as Bitmap 转成位图
          Bitmap map =  Image.FromFile(ofd.FileName) as Bitmap;
            //c# 位图转成vp的8位的灰图
          CogImage8Grey imageGrey = new CogImage8Grey(map);
          cogRecordDisplay1.Image = imageGrey; //显示8位灰图进行展示
          cogRecordDisplay1.Fit();

        }
    }

    //写入
    private void button2_Click(object sender, EventArgs e)
    {
     string path  = Directory.GetCurrentDirectory()+@"\data";
     if(!Directory.Exists(path))
     {
        Directory.CreateDirectory(path);
     }
     string fileName = path + @"\1.png";
        //CreateContentBitmap() 把cogRecordDisplay1工具里面图片取出创建成位图 创建
     Bitmap map = cogRecordDisplay1.CreateContentBitmap(Cognex.VisionPro.Display.CogDisplayContentBitmapConstants.Image) as Bitmap;
        //save() 保存位图,参数1路径,参数2转成图片的格式
      map.Save(fileName, ImageFormat.Png);
    }
}
温馨提示: 此文章未经作者允许,不可转载!!!

有“AI”的1024 = 2048,欢迎大家加入2048 AI社区
更多推荐

 25
25 0
0- 0


 已为社区贡献4条内容

所有评论(0)